1
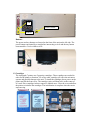
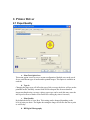
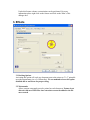
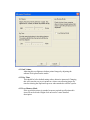
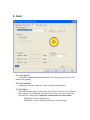
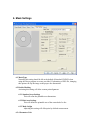
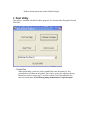
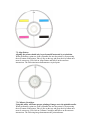
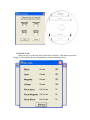
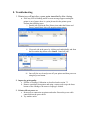
Autograph 7
Table of contents
1. Introduction
1.1 Printer connections and Buttons
1.2 Cartridges
1.3 u
2. Paper/Quality
2.1 Print Task Quick Sets
2.2 Type is
2.3 Print Quality
2.4 HP Digital Photography
3. Effects
3.1 Resizing Options
3.2 Watermarks
4. Basic
4.1 Copies
4.2 Print Preview
4.3 Advanced Features
4.3.1 Ink Volume
4.3.2 Dry Time
4.3.3 Low Memory Mode
5. Color
5.1 Color Options
5.2 Color Attributes
5.3 Color Space
6. Mask Settings
6.1 Mask Type
6.2 Enable Masking
6.2.1 Standard Area Settings
6.2.2 Hub Area Settings
6.2.3 Mask Origin
6.2.4 Parameter Unit
7. Disc Printer Utilities
7.1 Print Test
7.2 Align Printer
7.3 Calibrate Cartridges
7.4 Get Ink Levels
8. Troubleshooting
1. Introduction and Setup
The following document will provide an overview of the Disc Makers Autograph 7
printer driver. These settings can be found under the Printer and Faxes control panel. In
order to access the following menu options right click on the Autograph 7 printer icon
and left click on Printing Preferences. Right clicking on most topics under Printing
Preferences will show a What’s This? dialogue box, which once clicked, will give a
description of the option. As shown in the example below:
To begin right click on the Disc Printer icon located under the Printer and Faxes control
panel. Left click on Printing Preferences. This will open the dialogue boxes in the
following sections.
1.1 Printer connections and Buttons
The 3 main connections on the Autograph 7 Disc Printer are as follows.
Printer Control:
Used by the robotics to control the opening and closing of the printer tray. It is a Mini
din type connection with 6 pins.
Power:
Only use the supplied power supply. The power supply consists of a power brick and
power cable. Connect the brick and cable securely together before use before
connecting to Printer and power outlet.
USB:
The USB cable will be the conduit for data that the printer will use in order to print
the desired image onto the disc.
USB
Printer Control
POWER
Buttons:
The power and tray buttons are located on the front of the unit on the left side. The
power button represented by a straight line intersecting a circle and the tray button
represented by a circle within a circle.
1.2 Cartridges
The Autograph 7 printer uses 2 propriety cartridges. These cartridges are needed in
order for the printer to function. Use of any other cartridge will cause the unit not to
operate and possible damage to the unit. To install the cartridges please power on the
printer and left the front cover. The cartridge carrier will then move to the center of
its’ track. Place cartridges in there respective labeled areas. Close the cover and allow
the printer to initialize the cartridges. The initialization is complete when the carrier
stops moving.
2. Printer Driver
2.1 Paper/Quality
a. Print Task Quick Sets
This menu option is used to save a custom configuration. Multiple sets can be saved
for use on different types if media and/or printed images. This option is available on
each tab.
b. Type is:
Changing the paper type will affect the type of ink coverage the driver will use on the
printable media. Normally a matte finish will be adequate but for more detailed
images needing heavier coverage a glossy paper type can be used (this may cause the
ink to pool on areas of darker color on the disc causing dry time to increase)
c. Print Quality
By default the driver is set to Best. This setting can be changed depending on the
level of print you desire. The higher the setting the longer it will take the disc to print
as well as dry.
d. HP Digital Photography
Under this feature advance customization can be performed. For more
information please right click on the feature and click on the What’s This
dialogue box.
3. Effects
3.1 Resizing Options
Activating this option will scale any document sent to the printer to 5”x 5” printable
area (the approximate size of a 120mm disc). We recommend to leave this option
disabled and to use Discus for proper sizing.
3.2 Watermarks
Allows custom watermark text to be printed on each document. Feature is not
allowed with use of PRN files since extra data can not be added to the file
once created.
4. Basic
4.1 Copies
This setting should not be changed. Changing this option will cause multiple print
jobs to load into the print queue causing errors when used with the Elite systems.
4.2 Print Preview
This setting should not be changed. Changing this option will cause a dialogue
box showing the submitted print job before printing can take place. When used
with the Elite systems automation will be halted.
4.3 Advanced Features
4.3.1 Ink Volume
Adjusting this can lighten or darken printed images by adjusting the
amount of ink placed on the media.
4.3.2 Dry Time
This should be left at default setting unless otherwise instructed. Changing
this will cause the tray to exit printer at a slower rate allowing longer dry
time but slowing the duplication process when attached to an Elite system.
4.3.3 Low Memory Mode
If the system the printer is attached to meets required specifications this
item will not be needed. Right click on Item for a more detailed
description.
5. Color
5.1 Color Options
Activating the Print In Grayscale option by left clicking on the check box will
disable color printing.
5.2 Color Attributes
Adjusting the slide bar either left or right will adjust print qualities
5.3 Color Space
This will define the range of colors that can be printed. Once the job is submitted
these settings will translate the colors from their current color space to the one
selected here as listed below. Right click on this feature for more details.
SRGB/SYCC: most commonly used.
AdobeRGB: A newer standard, which only works on images.
6. Mask Settings
6.1 Mask Type
Normally this setting should be left at the default of Standard CD/DVD when
using the Discus program to create your label. If submitting a JPEG file, changing
this option will clip the image to the proper disc dimensions.
6.2 Enable Masking
Activating this setting will allow custom print alignment.
6.2.1 Standard Area Settings
This will refine the printable area dimensions.
6.2.2 Hub Area Settings
This will define the printable area of the center hub of a disc.
6.2.3 Mask Origin
Adjusting this setting will offset print by defined measurement.
6.2.4 Parameter Unit
Defines measurement unit used in Masked Origin.
7. Print Utility
This utility is installed with the FlexWare program. It is located under Program Files and
FlexWare.
7.1 Print Test
When performing a print test, load a printable disc into the printer by first
pressing the tray button on the printer. Place a disc on the tray and press the tray
button once more to retract tray. Left click on Print Test Page and follow the
onscreen instructions. The following image demonstrates a typical output.
7.2 Align Printer
Aligning the printer should only be performed if instructed by a technician.
When performing a print test, load a printable disc into the printer by first pressing
the tray button on the printer. Place a disc on the tray and press the tray button once
more to retract tray. Left click on Align Printer and follow on the onscreen
instructions. The following image demonstrates a typical print.
7.3 Calibrate Cartridges
Using this utility will assure proper printing of images on to the printable media.
When performing a print test, load a printable disc into the printer by first pressing
the tray button on the printer. Place a disc on the tray and press the tray button once
more to retract tray. Left click on Calibrate Cartridges and follow on the onscreen
instructions. The following image demonstrates the print and menu.
7.4 Get Ink Levels
Shows an easy to read usage chart of ink in the cartridges. This number represents
average as calculated by the driver dependant on images and settings used.
8. Troubleshooting
1. Printer tray will not close, opens again immediately after closing.
a. If the tray LED is blinking and/or an error message appears stating the
printer is out of paper, there is a print job stuck in the printer queue.
Perform the following steps:
i. Double left click on the Disc Printer icon under the Printer and
Faxes Control Panel, this will open the printer queue.
ii. Clear each job in the queue by clicking each individually and from
the Document drop down select Cancel. Cancel all jobs.
iii. Once all jobs are cleared power off your printer and then power on
using the power button.
2. Improving print quality.
a. Perform a Cartridge Calibration as described under section 7.3.
b. Remove cartridges from printer and using a cotton swab swipe the brass
bottom of the cartridge with water or Isopropyl Alcohol.
3. Printer will not power on.
a. Reseat power connection on printer and outlet. Reseat the power cable
connected into the power brick.
b. Try another outlet.