1
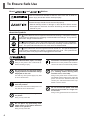
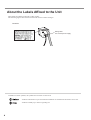
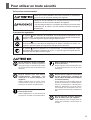
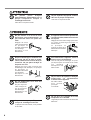
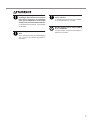
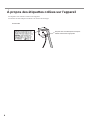
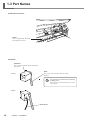
Heater Unit
HU-600
HU-500
HU-501
User's Manual
Thank you very much for purchasing this product.
• To ensure correct and safe usage with a full understanding of this product’s performance, please be
sure to read through this manual completely and store it in a safe location.
• Unauthorized copying or transferral of this manual, in whole or in part, is prohibited.
• The contents of this operation manual and the specifications of this product are subject to change
without notice.
• The operation manual and the product have been prepared and tested as much as possible. If you
find any misprint or error, please inform us.
• Roland DG Corp. assumes no responsibility for any direct or indirect loss or damage which may
occur through use of this product, regardless of any failure to perform on the part of this product.
• Roland DG Corp. assumes no responsibility for any direct or indirect loss or damage which may
occur with respect to any article made using this product.
For the USA
FEDERAL COMMUNICATIONS COMMISSION
RADIO FREQUENCY INTERFERENCE
STATEMENT
This equipment has been tested and found to comply with the
limits for a Class A digital device, pursuant to Part 15 of the
FCC Rules.
These limits are designed to provide reasonable protection
against harmful interference when the equipment is operated
in a commercial environment.
This equipment generates, uses, and can radiate radio
frequency energy and, if not installed and used in accordance
with the instruction manual, may cause harmful interference
to radio communications.
Operation of this equipment in a residential area is likely to
cause harmful interference in which case the user will be
required to correct the interference at his own expense.
NOTICE
Grounding Instructions
Do not modify the plug provided - if it will not fit the outlet,
have the proper outlet installed by a qualified electrician.
Check with qualified electrician or service personnel if the
grounding instructions are not completely understood, or if in
doubt as to whether the tool is properly grounded.
Use only 3-wire extension cords that have 3-prong
grounding plugs and 3-pole receptacles that accept the tool’s
plug.
Repair or replace damaged or worn out cord immediately.
Unauthorized changes or modification to this system can void
the users authority to operate this equipment.
For Canada
CLASS A
NOTICE
This Class A digital apparatus meets all requirements of the
Canadian Interference-Causing Equipment Regulations.
CLASSE A
AVIS
Cet appareil numérique de la classe A respecte toutes les
exigences du Règlement sur le matériel brouilleur du
Canada.
ROLAND DG CORPORATION
1-6-4 Shinmiyakoda, Hamamatsu-shi, Shizuoka-ken, JAPAN 431-2103
MODEL NAME
: See the MODEL given on the rating plate.
RELEVANT DIRECTIVE : EC LOW VOLTAGE DIRECTIVE (73/23/EEC)
EC ELECTROMAGNETIC COMPATIBILITY DIRECTIVE (89/336/EEC)
WARNING
This is a Class A product. In a domestic environment this product may cause radio interference in which
case the user may be required to take adequate measures.
Contents
ENGLISH
Contents ........................................................................................................................... 1
To Ensure Safe Use ......................................................................................................... 2
About the Labels Affixed to the Unit ...................................................................................................... 4
Pour utiliser en toute sécurité ........................................................................................ 5
À propos des étiquettes collées sur l'appareil ....................................................................................... 8
1. Getting Started ............................................................................................................. 9
1-1 What's the HU-600/500/501? ........................................................................................................ 10
Features .................................................................................................................................................................................................. 10
Installable Combinations ....................................................................................................................................................................... 10
Recommended Ink ................................................................................................................................................................................. 10
1-2 Installation and Transport .............................................................................................................. 11
Installing the Heater Unit on the Printer ............................................................................................................................................... 11
About the Power Supply ........................................................................................................................................................................ 11
When Moving the Printer ...................................................................................................................................................................... 11
1-3 Part Names ................................................................................................................................... 12
2. Using the Heater Unit ................................................................................................ 15
2-1 Switching the Power On and Off ................................................................................................... 16
Switching On the Controller .................................................................................................................................................................. 16
Switching Off the Controller ................................................................................................................................................................. 16
2-2 Loading Media ............................................................................................................................... 17
About the Ambient Temperature During Heater Use ........................................................................................................................... 17
Points to Observe When Loading Media .............................................................................................................................................. 17
2-3 Printing and Cutting ....................................................................................................................... 18
Printing ................................................................................................................................................................................................... 18
Cutting/Printing and Cutting ................................................................................................................................................................. 19
2-4 What to Do If ... ............................................................................................................................. 20
3. Other Information ....................................................................................................... 21
3-1 Daily Maintenance ......................................................................................................................... 23
3-2 Additional Menus on the Printer .................................................................................................... 23
3-3 Specifications ................................................................................................................................ 24
Heater Unit Specifications ..................................................................................................................................................................... 24
Printer Specifications When the Heater Unit Is Installed .................................................................................................................... 24
SOLJET™ and ECO-SOL INK™ are trademarks of Roland DG Corporation.
Other company names and product names are trademarks or registered trademarks of their respective holders.
Copyright© 2003 Roland DG Corporation
http://www.rolanddg.com/
1
To Ensure Safe Use
About
and
Notices
Used for instructions intended to alert the user to the risk of death or
severe injury should the unit be used improperly.
Used for instructions intended to alert the user to the risk of injury or
material damage should the unit be used improperly.
* Material damage refers to damage or other adverse effects caused
with respect to the home and all its furnishings, as well to domestic
animals or pets.
About the Symbols
The symbol alerts the user to important instructions or warnings. The specific meaning
of the symbol is determined by the design contained within the triangle. The symbol at
left means "danger of electrocution."
The
symbol alerts the user to items that must never be carried out (are forbidden).
The specific thing that must not be done is indicated by the design contained within the
circle. The symbol at left means the unit must never be disassembled.
The
symbol alerts the user to things that must be carried out. The specific thing that
must be done is indicated by the design contained within the circle. The symbol at left
means the power-cord plug must be unplugged from the outlet.
Do not disassemble, repair, or modify.
Ground the unit with the ground wire.
Doing so may lead to fire or abnormal operation resulting in injury.
Failure to do so may result in risk of electrocution in the event of a mechanical problem.
Do not use with any electrical power
supply that does not meet the ratings
displayed on the unit.
Do not use while in an abnormal state
(i.e., emitting smoke, burning odor,
unusual noise, or the like).
Use with any other power supply may lead
to fire or electrocution.
Doing so may result in fire or electrocution.
Immediately switch off the power, unplug the
power cord from the electrical outlet, and
contact your authorized Roland DG Corp.
dealer or service center.
Use only with the power cord included
with this product.
Use with other than the included power cord
may lead to fire or electrocution.
Do not spill combustible liquid over
the platen.
Doing so may cause fire.
Do not place any potentially flammable object on the platen while the
heater is in operation.
Doing so may cause fire.
2
Do not connect the power cord with
other electrical loads on a single electrical outlet.
Doing so may generate heat and cause fire.
Do not use with a damaged power
cord or plug, or with a loose electrical outlet.
When not in use for extended periods,
unplug the power-cord plug from the
electrical outlet.
Doing so may lead to
fire, electrical shock,
or electrocution.
Failure to do so may result in danger of electrical shock, electrocution,
or fire due to deterioration
of electrical insulation.
Do not damage or modify the electrical power cord, subject it to excessive bending, twisting, pulling, binding, or pinching, or place any object
or weight on it.
Doing so may damage the electrical
power cord, leading
to fire, electrical
shock, or electrocution.
Do not attempt to unplug the powercord plug with wet hands.
Doing so may result
in electrical shock
or electrocution.
Do not touch the platen when the
heater is operating.
Doing so may cause burns because the
platen is hot.
When cleaning the heater unit, be sure
to wait approximately 30 minutes or
more after switching off the power of
the heater until the temperature of the
platen falls sufficiently.
Doing so may cause burns because the
platen is hot.
Ensure adequate ventilation for the
work area.
When unplugging the electrical power
cord from the power outlet, grasp the
plug, not the cord.
Unplugging by pulling
the cord may damage it, leading to fire,
electrical shock, or
electrocution.
Do not allow liquids, metal objects or
flammables inside the machine.
Such materials
can cause fire.
Do not hang on to the hose. Do not
hang anything on it.
Doing so may cause the unit to tip over, leading to injury.
Be sure to use the media with a width
of 500 mm (19-11/16 in.) or more.
Failure to do so may cause overheating of
the heater, leading to fire.
Do not press the [SEL] key of the controller.
Doing so may cause malfunction of the
heater, leading to fire.
Failure to do so may result in odor, physical
distress, or fire.
3
About the Labels Affixed to the Unit
These labels are affixed to the body of this product.
The following figures describe the location and content of these messages.
Controller
Rating label
Use a rated power supply.
In addition to these symbols, the symbols shown below are also used.
: Indicates information to prevent machine breakdown or malfunction and ensure correct use.
: Indicates a handy tip or advice regarding use.
4
Pour utiliser en toute sécurité
Avis sur les avertissements
Utilisé pour avertir l'utilisateur d'un risque de décès ou de blessure
grave en cas de mauvaise utilisation de l'appareil.
Utilisé pour avertir l'utilisateur d'un risque de blessure ou de dommage
matériel en cas de mauvaise utilisation de l'appareil.
* Par dommage matériel, il est entendu dommage ou tout autre effet
indésirable sur la maison, tous les meubles et même les animaux
domestiques.
À propos des symboles
Le symbole
attire l'attention de l'utilisateur sur les instructions importantes ou les
avertissements. Le sens précis du symbole est déterminé par le dessin à l'intérieur du
triangle. Le symbole à gauche signifie "danger d'électrocution".
Le symbole
avertit l'utilisateur de ce qu'il ne doit pas faire, ce qui est interdit. La
chose spécifique à ne pas faire est indiquée par le dessin à l'intérieur du cercle. Le
symbole à gauche signifie que l'appareil ne doit jamais être démonté.
Le symbole
prévient l'utilisateur sur ce qu'il doit faire. La chose spécifique à faire
est indiquée par le dessin à l'intérieur du cercle. Le symbole à gauche signifie que le fil
électrique doit être débranché de la prise.
Ne pas démonter, réparer ni modifier.
Démonter, réparer ou modifier l'appareil risque de provoquer un incendie ou de causer
un fonctionnement anormal entraînant des
blessures.
Mettre l'appareil à la terre avec le fil
de mise à la terre.
Ne pas respecter cette consigne peut créer
un risque d'électrocution en cas de panne
mécanique.
Ne pas utiliser avec une source
d'alimentation électrique non
conforme à la norme indiquée sur
l'appareil.
Ne pas utiliser l'appareil s'il est dans
un état anormal (p.ex., émission de
fumée, odeur de brûlé, bruit inhabituel
ou autre anomalie).
Utiliser l'appareil avec une autre source
d'alimentation risque de provoquer un
incendie ou de causer une électrocution.
Ne pas respecter cette consigne risque de
provoquer un incendie ou une électrocution.
Couper immédiatement l'alimentation
électrique, débrancher le fil de la prise et
communiquer avec le revendeur ou le centre de service autorisés de la société Roland
DG.
Utiliser l'appareil uniquement avec le
fil électrique fourni.
Utiliser l'appareil avec un autre fil risque de
provoquer un incendie ou une électrocution.
Ne pas brancher d'autres appareils
dans la même prise que l'appareil.
Ne pas respecter cette consigne risque de
causer une surchauffe et de provoquer un
incendie.
5
Ne
jamais
poser
d’objets
potentiellement inflammables sur la
plaque d’exposition lorsque le
chauffage fonctionne.
Ne pas répandre de liquide combustible sur la plaque d’exposition.
Cela crée un risque d'incendie.
Cela crée un risque d'incendie.
Ne pas utiliser si le fil ou la fiche
électriques sont endommagés; ne
pas brancher dans une prise mal
fixée.
Négliger de suivre
cette consigne risque
de provoquer un
incendie ou decauser
une décharge
électrique ou une
électrocution.
Ne pas endommager ni modifier le fil
électrique. Ne pas le plier, le tordre,
l'étirer, l'attacher ou le serrer de façon
excessive. Ne pas placer d'objet ou
de poids sur le fil.
Négliger de suivre cette consigne peut
endommager le fil électrique, ce qui risque
de provoquer un
incendie ou de causer
une décharge
électrique ou une
électrocution.
Ne pas débrancher le fil avec des
mains mouillées.
Ne pas respecter
cette consigne risque de provoquer
des décharges
électriques ou une
électrocution.
Si l'appareil reste inutilisé pendant de
longues périodes, débrancher la fiche
de la prise.
Négliger de suivre cette consigne peut créer
un risque de décharge électrique ou
d'électrocution
ou
provoquer
un
incendie à cause de la
détérioration de l'isolant
électrique.
Pour débrancher l'appareil, saisir la
fiche et non le fil électrique.
Tirer sur le fil peut l'endommager, ce qui risque de provoquer un incendie ou de causer
une
décharge
électrique ou une
électrocution.
Ne pas laisser de liquides ni d'objets
métalliques ou inflammables
s'infiltrer dans l'appareil.
De telles infiltrations
peuvent
provoquer
un incendie.
Ne pas tirer sur le flexible et ne rien
suspendre sur le flexible.
Ne pas toucher la plaque d’exposition
lorsque le chauffage fonctionne.
La plaque étant très chaude, il est possible
de se brûler.
6
L'appareil pourrait se renverser et causer des
blessures.
Avant de nettoyer le bloc de
chauffage, attendre au moins 30 minutes après l’extinction du chauffage
pour que la température de la plaque
d’exposition soit suffisamment basse.
La plaque étant très chaude, il est possible
de se brûler.
S'assurer que le lieu de travail est bien
aéré.
Toujours utiliser un support d’au
moins 500 mm.
Le chauffage risque sinon de trop chauffer,
ce qui peut entraîner un incendie.
Ne pas appuyer sur la touche [SEL]
de la commande.
Ceci peut causer une panne de chauffage et
entraîner un incendie.
Sinon, des odeurs fortes peuvent se dégager
et il y a risque de malaises physiques ou
d'incendie.
7
À propos des étiquettes collées sur l'appareil
Ces étiquettes sont collées à l'extérieur de l'appareil.
Les dessins suivants indiquent l'endroit et le contenu des messages.
Commande
Étiquette des caractéristiques électriques
Utiliser l'alimentation appropriée
8
1. Getting Started
This section describes the features, part names, and the like of the HU600/500/501.
9
1-1 What's the HU-600/500/501?
Features
The HU-600/500/501 is a heater unit for Roland DG SOLJET series large-format printers. It enhances the fixation of the
ink on the media and dries ink faster by preheating the media before printing. The controller for the HU-600/500/501
allows you to adjust the heater temperature to match the media.
Installable Combinations
The HU-600/500/501 can be installed on the following printers.
HU-600 ... SJ-600
HU-500 ... SJ-500
HU-501 ... SC-500
In this manual, the HU-600/500/501 is referred to as the "heater unit," and each model of the printer is referred to as the
"printer."
Recommended Ink
Use ECO-SOL INK to ensure acceptable printing results when performing printing while using the heater unit.
Using inks other than ECO-SOL INK may cause unexpected printing results.
10
Chapter 1: Installation
1-2 Installation and Transport
Installing the Heater Unit on the Printer
The heater unit is to be installed on the printer by an authorized service engineer.
Never attempt to install the heater unit on the printer by yourself.
About the Power Supply
Be sure to use an electrical outlet for the power supply. Also, do not connect multiple electrical loads on a single
electrical outlet.
Low or unstable voltage may result in inadequate heater performance. If the temperature of the heater fails to rise
adequately even when used correctly, check the voltage of the power supply.
When Moving the Printer
The printer that the heater unit has been installed on cannot be repacked. When repacking the printer, please contact
your authorized Roland DG Corp. dealer or service center.
Chapter 1: Installation
11
1-3 Part Names
Inside the Front Cover
Platen
This is equipped with the heater
and temperature sensor.
Controller
Controller
This is equipped with the heater and temperature sensor.
(Front)
Hose
The power cord and other cables are inside
the hose.
Do not hang on to the hose. Do not hang
anything on it.
Doing so may cause the unit to tip over, leading to injury.
(Rear)
Power Cord
12
Chapter 1: Installation
Control Panel
Display
[POWER] Switch
This switches the heater on and off.
When switching off the power for the
printer, be sure to switch off the heater as
well.
Switching off the printer doe not switch off
the power for the heater. Never leave only
the heater switched on and powered.
Indicators other than [C1]
do not light.
[C1] Indicator
This indicator lights
when the heater is operating. It goes dark
when heater temperature reaches the preset
temperature and the
heater stops operating.
PV
(Heater temperature)
This shows the current
temperature of the heater.
It displays error messages
in the event of a problem
in the heater unit.
SV
(Preset temperature)
This shows the preset
temperature of the heater.
This indicator lights when
the heater is switched on.
[SEL] Key
Do not press the [SEL] key.
Doing so may cause malfunction
of the heater, leading to fire or
electrical shock.
[
] Key
[
] Key
[ ] Key
Pressing this key one time increases the preset
temperature by 1 ºC.
[ ] Key
Pressing this key one time lowers the preset temperature by 1 ºC.
Chapter 1: Installation
13
MEMO
14
Chapter 1: Installation
2. Using the Heater
Unit
This section describes how to print and cut while using the heater unit
and the like.
15
2-1 Switching the Power On and Off
When not in use for extended periods, unplug the power-cord plug from the electrical outlet.
Switching On the Power
1
Switch on the sub power for the printer.
2
Switch on the [POWER] switch for the heater.
3
The [C1] indicator on the display lights up.
After the display flashes for a short time, both [SV] and
[PV] light up and indicate their values.
The heater starts operating.
When the display shows characters other than numerical figures, such as UUUU or LLLL, immediately switch off the heater
and contact your authorized Roland DG Corp. dealer or service center.
Switching Off the Power
1
Switch off the [POWER] switch for the heater.
2
Switch off the sub power for the printer.
When switching off the power for the printer, be sure to switch off the heater as well.
Switching off the printer doe not switch off the power for the heater. Never leave only the heater switched on and powered.
The preset temperature of the heater is saved in memory when the controller is switched off.
16
2. Using the Heater Unit
2-2 Loading Media
About the Ambient Temperature During Heater Use
To ensure stable printing quality, we recommend use in an environment where the ambient temperature is 20˚C (68˚F)
or higher.
At low temperatures, warm-up may take a long time, or the temperature may fail to reach the preset value, or large
differences in temperature may occur. Inadequate temperature may result in coarse printing.
If the media fails to warm up sufficiently, try setting the heater to a higher temperature. If this fails to resolve the
problem, raise the temperature of the room.
Points to Observe When Loading Media
Check and observe the following points when loading media. For detailed information on how to load media, refer to
the user's manual for the printer.
Use Media With a Width of about 1 m (40 in.) or More
We recommend using media having a width of about 1 m (40 in.) or more. Media of narrower width may take a long
time to heat, or may fail to reach the preset temperature.
Also, in no event should media having a width of 50 cm (19-11/16 in.) or less be used. Doing so may lead to danger of
overheating.
Before Loading Media, Allow the Heater to Cool Down to 30˚C (86˚F) or Lower
Before loading media, switch off the heater or set the preset temperature to 30˚C and allow the heater to cool down.
Loading media when the heater is 30˚C (86˚F) or more may cause the media to wrinkle or warp due to the sudden rise
in temperature.
When Printing, Use the Media Clamps
If your printer comes with media clamps, use them to hold the two edges of the media in place.
Set the height of the printing heads to "High," then engage the media clamps. Depending on the media, the edges of the
media may warp due to heat or the media may strike the printing heads, causing jams or malfunction.
2. Using the Heater Unit
17
2-3 Printing and Cutting
Printing
Before performing printing, set the preset temperature to 45 to 50˚C (113 to 122˚F) and wait until media becomes
sufficiently warm.
For information on how to perform printing, refer to the user's manual for the printer.
The recommended ambient temperature for ensuring acceptable quality when performing printing is 20 to 32˚C (68 to 89.6˚F).
When the ambient temperature is less than 20˚C, the media doesn't heat up enough to ensure acceptable quality. In such cases,
set the preset temperature to higher value.
1
After loading media, set [SV] on the controller to 45 to 50˚C.
2
After the controller's [PV] setting (heater temperature) reaches
the preset temperature, wait for an additional ten to 30 minutes or so to allow the media to warm up sufficiently, then
begin printing.
SV
PV
The setting range of preset temperature by the controller is 30 to 50˚C ( 86 to 122˚F).
The media is not yet warm enough at the time immediately after the heater temperature reaches the preset temperature. Performing printing before the media has warmed up sufficiently may result in coarse printing.
The actual temperature of the media is 5 to 10˚C lower than the controller's displayed [PV] setting (heater temperature). For this
reason, we recommend making the controller's [SV] setting (temperature setting) at a value higher than the actual target temperature for the media.
When the heater reaches the preset temperature, the [C1] indicator goes dark and the heater stops operating. The heater is
switched on and off automatically to maintain the preset temperature. Meanwhile the [C1] indicator lights up and goes dark to
indicate the status of the heater.
18
2. Using the Heater Unit
Cutting/Printing and Cutting
This section explains printers equipped with a cutting function.
Assurance of Accuracy When Performing Printing and Cutting
When the heater is used, the media may experience subtle deformation due to thermal expansion or contraction. For this
reason, no assurance is made with respect to the following points when the heater is used.
• Distance accuracy (when cutting)
• Repetition accuracy (when cutting)
• Repetition between printing and cutting
• Alignment accuracy for printing and cutting when reloading media
Using crop marks when performing printing and cutting, even when these are performed simultaneously, may help reduce
misalignment. After printing, it is a good idea to allow the heater to cool before performing cutting.
1. Carry out only printing, with crop marks.
2. Switch off the heater and allow the media and the platen to cool sufficiently.
3. Use the crop marks to align.
4. Carry out only cutting.
For detailed information about aligning using crop marks, refer to the user's manual for the printer.
To Perform Cutting Only
Before performing cutting, switch off the controller to turn off the heater, and allow the platen to cool sufficiently.
2. Using the Heater Unit
19
2-4 What to Do If ...
The results of printing are coarse.
The results of printing may be coarse when the media is not warm enough. In particular, the edges of the media tend not
to become as warm as the center, which may result in ink drips or unevenness, depending on the printing data. If this
happens, increase the preset temperature and perform printing again. If the printing results don't improve even when you
increase the preset temperature, the ambient temperature may be too low. Be sure to perform printing in the recommended operating environment.
Setting the [SCAN INTERVAL] menu item for the printer may improve printing quality. Please refer to "3-2 Additional
Menus on the Printer."
Media wrinkles when performing printing.
Never continue to heat media for 30 minutes or longer without performing printing. Depending on the type of media,
wrinkling may occur when printing is resumed. When you are not printing continuously, remove the media or reduce the
preset temperature to 30˚C.
Media warps before performing printing.
Depending on the type of media, it may tend to warp when there is a large difference between the ambient temperature
and the heater temperature.
If your printer comes with media clamps, use them to hold the two edges of the media in place. Also, reduce the
difference in temperature by raising the temperature of the room or lowering the preset temperature.
It may be possible to prevent media from warping by setting the [VACUUM POWER] menu item of the printer. Please
refer to "3-2 Additional Menus on the Printer."
20
2. Using the Heater Unit
3. Other Information
This section describes daily maintenance, additional menus on the printer,
and specifications.
21
3-1 Daily Maintenance
When cleaning the platen, first switch off the controller and the sub power for the printer.
Failure to do so may cause burns when the platen is hot.
Never clean with solvents (such as benzine or thinners).
Doing so may cause fire when the platen is hot.
Periodically clean the platen. Buildup of grime may soil printed media and make correct detection of media width impossible.
Cleaning the Platen
Moisten a cloth with neutral detergent diluted with water, wring dry, and wipe gently.
For buildup of cutting dust on the platen, use a commercially available brush to brush it away toward the front. When
doing this, never use a metal brush.
Cleaning the Controller
Use a cloth moistened with water then wrung well, and wipe gently to clean. Wipe the control panel and display gently
with a clean, soft cloth.
22
3. Other Information
3-2 Additional Menus on the Printer
Installing the heater unit adds the following menus to the printer.
FULL WIDTH S (Some versions of printers come with these already installed by default.)
SCAN INTERVAL
VACUUM POWER (SC-500 only)
INK AMOUNT
To make the settings for these menus, follow the instructions below. Depending on the menu, replace the display of
screens 1 and 2 with the respective figures in the following table. For detailed information about each menu, refer to the
following table.
1
Press the [MENU] key, then press the [ ] key
to make screen 1 appear on the display.
2
Press the [
3
Use the [ ] and [
sired value.
4
Press the [ENTER] key.
] key to display screen 2.
MENU
FULL WIDTH S
Screen 1
FULL WIDTH S
DISABLE DISABLE
Screen 2
] keys to select the deFULL WIDTH S
DISABLE ENABLE
Menu Description
Screen 1
Screen 2
Function
Setting range Default value
This sets the movement width of the printing carriage ENABLE/
when printing.
DISABLE
Using this function may improve printing quality by
maintaining a uniform speed for media feed. However,
printing may take more time.
MENU
FULL WIDTH S
MENU
SCAN INTERVAL
MENU
VACUUM POWER
FULL WIDTH S
DISABLE ENABLE
SCAN INTERVAL
1.0 sec
2.0 sec
VACUUM POWER
AUTO
90%
*SC-500 only
DISABLE
[ENABLE]: Movement always takes place within a fixed
range (the width of the media), regardless of any settings
in the printing data.
[DISABLE]: The width changes according to the printing data.
This sets the ink-drying time. This function is available
only when performing bidirectional printing.
If problems with ink stains occur, setting this value to a
longer time may improve printing quality.
OFF/
1.0 sec
0.1 to 10.0 sec
(in steps of 0.1
sec)
This adjusts the suction force of the fan installed under AUTO/
AUTO
the platen to make the media contact the platen.
10 to 100%
Adjust this value when the media warps due to heat or (in steps of 10%)
sticks to the platen. Increasing the value makes the suction force stronger, but because it lowers the temperature of the platen, the media may become difficult to
warm.
[AUTO]: The suction force is adjusted automatically.
[10 to 100%]: The suction force remains constant at the
set value.
MENU
INK AMOUNT
INK AMOUNT
NORMAL
LIGHT
This adjusts the amount of ink applied to the media.
NORMAL/
Depending on the media, the printed results may be coarse LIGHT
or smudged. If this occurs, set the value to [LIGHT].
NORMAL
3. Other Information
23
3-3 Specifications
Heater Unit Specifications
Installable printer
HU-600
HU-500
HU-501
SJ-600
SJ-500
SC-500
Setting range for the preset
temperature
30 to 50˚C (86 to 122˚F) (*1)
Power supply
AC 117 V, 220 to 240 V ± 10% 50/60 Hz
Power consumption
Maximum 5.0 A (117 V), 3.1 A Maximum 5.0 A (117 V), 3.0 A Maximum 5.0 A (117 V), 3.1 A
(220 to 240 V)
(220 to 240 V)
(220 to 240 V)
Weight
6.6 kg (14.6 lb.)
6.1 kg (13.5 lb.)
5.4 kg (12.0 lb.)
Packed dimensions
2120 [W] x 370 [D] x 360 [H]
mm
(83-1/2 [W] x 14-3/4 [D] x 141/4 [H] in.)
1870 [W] x 370 [D] x 360 [H]
mm
(73-3/4 [W] x 14-3/4 [D] x 141/4 [H] in.)
1870 [W] x 370 [D] x 360 [H]
mm
(73-3/4 [W] x 14-3/4 [D] x 141/4 [H] in.)
Packed weight
19.3 kg (42.6 lb.)
17.2 kg (38.0 lb.)
16.5 kg (36.4 lb.)
Included items
power cord: 1, user's manual: 1
*1 The heater temperature may not reach the preset temperature depending on ambient conditions or the width of the media. Also, the actual media
temperature may be lower than the displayed heater temperature. Unevenness in temperature may be larger depending on ambient conditions or
the width of the media.
Printer Specifications When the Heater Unit Is Installed
The specifications of the printer change when the heater unit is installed. In the "Main Unit Specifications" for your
printer, replace or add the following items.
SJ-600
Distance accuracy
(For printing while the heater is running)
Acceptable media width
(For printing with the heater)
SJ-500
SC-500
Error of less than ± 0.3% of distance traveled, or 0.3 mm, whichever is greater (at SV-G-1270G,
print travel: 1 m, temperature: 20˚C (68˚F) , humidity: 50%, heater temperature setting: 45˚C)
500 to 1625 mm
(19-11/16 to 64 in.)
Ink cartridge
500 to 1371 mm
(19-11/16 to 54 in.)
500 to 1371 mm
(19-11/16 to 54 in.)
Exclusive ECO-SOL INK cartridge
Dimensions (with stand)
2500 [W] x 758 [D] x 1302 [H]
mm
(98-7/16 [W] x 29-7/8 [D] x
51-5/16 [H] in.)
2246 [W] x 758 [D] x 1302 [H]
mm
(88-7/16 [W] x 29-7/8 [D] x
51-5/16 [H] in.)
2325 [W] x 736 [D] x 1352 [H]
mm
(91-9/16 [W] x 29 [D] x 53-1/
4 [H] in.)
Weight (with stand)
134.6 kg (297 lb.)
121.1 kg (267 lb.)
110.4 kg (244 lb.)
Recommended operating environment
Temperature: 20 to 32˚C (68 to 89.6˚F), humidity: 35 to 80% (non-condensing)
* For the SC-500, the following items are not guaranteed when cutting while using the heater. Please refer to the SC-500 User's Manual.
• Distance accuracy (when cutting)
• Repetition accuracy (when cutting)
• Repetition between printing and cutting
• Alignment accuracy for printing and cutting when reloading media
24
3. Other Information