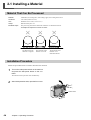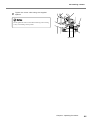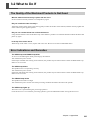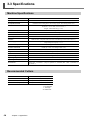
1
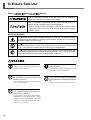
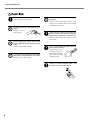
User's Manual
This manual describes operation of the processing machine. It also contains a list of accessories and explanations for installation of material and cutter.
R
X-
50
Thank you very much for purchasing this product.
• To ensure correct and safe usage with a full understanding of this product's performance, please be sure to read through this
manual completely and store it in a safe location.
• Unauthorized copying or transferral, in whole or in part, of this manual is prohibited.
• The contents of this operation manual and the specifications of this product are subject to change without notice.
• The operation manual and the product have been prepared and tested as much as possible. If you find any misprint or error,
please inform us.
• Roland DG Corp. assumes no responsibility for any direct or indirect loss or damage which may occur through use of this
product, regardless of any failure to perform on the part of this product.
• Roland DG Corp. assumes no responsibility for any direct or indirect loss or damage which may occur with respect to any
article made using this product.
For the USA
FEDERAL COMMUNICATIONS COMMISSION
RADIO FREQUENCY INTERFERENCE
STATEMENT
This equipment has been tested and found to comply with the
limits for a Class A digital device, pursuant to Part 15 of the
FCC Rules.
These limits are designed to provide reasonable protection
against harmful interference when the equipment is operated
in a commercial environment.
This equipment generates, uses, and can radiate radio
frequency energy and, if not installed and used in accordance
with the instruction manual, may cause harmful interference
to radio communications.
Operation of this equipment in a residential area is likely to
cause harmful interference in which case the user will be
required to correct the interference at his own expense.
Unauthorized changes or modification to this system can void
the users authority to operate this equipment.
The I/O cables between this equipment and the computing
device must be shielded.
For Canada
CLASS A
NOTICE
This Class A digital apparatus meets all requirements of the
Canadian Interference-Causing Equipment Regulations.
CLASSE A
AVIS
Cet appareil numérique de la classe A respecte toutes les
exigences du Règlement sur le matériel brouilleur du
Canada.
ROLAND DG CORPORATION
1-6-4 Shinmiyakoda, Hamamatsu-shi, Shizuoka-ken, JAPAN 431-2103
MODEL NAME
: See the MODEL given on the rating plate.
RELEVANT DIRECTIVE : EC MACHINERY DIRECTIVE (98/37/EC)
EC LOW VOLTAGE DIRECTIVE (73/23/EEC)
EC ELECTROMAGNETIC COMPATIBILITY DIRECTIVE (89/336/EEC)
WARNING
This is a Class A product. In a domestic environment this product may cause radio interference in which
case the user may be required to take adequate measures.
Table of Contents
Table of Contents ............................................................................................................. 1
To Ensure Safe Use ......................................................................................................... 2
About the Labels Affixed to the Unit ...................................................................................................... 5
Pour utiliser en toute sécurité ........................................................................................ 6
À propos des étiquettes collées sur l'appareil ....................................................................................... 9
Chapter 1 Getting Started ............................................................................................. 11
1-1 What Is RX-50? ............................................................................................................................. 12
1-2 Part Names and Functions ............................................................................................................ 13
Main Unit ............................................................................................................................................................................................... 13
Controller ............................................................................................................................................................................................... 14
1-3 Supplied Accessories .................................................................................................................... 15
1-4 Location and Connecting Cables .................................................................................................. 16
Location ................................................................................................................................................................................................. 16
Removing Protections ............................................................................................................................................................................ 17
Attaching Caps ....................................................................................................................................................................................... 17
Connecting Cables ................................................................................................................................................................................. 18
Chapter 2 Operating Procedure .................................................................................... 19
2-1 Installing a Material ....................................................................................................................... 20
Material That Can Be Processed ........................................................................................................................................................... 20
Installation Procedure ............................................................................................................................................................................ 20
2-2 Installing a Cutter .......................................................................................................................... 22
2-3 Processing ..................................................................................................................................... 24
Starting Processing ................................................................................................................................................................................ 24
After Processing ..................................................................................................................................................................................... 24
Canceling or Temporarily Stopping the Processing Operation ............................................................................................................ 25
Chapter 3 Appendixes .................................................................................................. 27
3-1 Maintenance .................................................................................................................................. 28
3-2 What to Do If ................................................................................................................................. 29
The Quality of the Machined Products Is Not Good ............................................................................................................................ 29
Error Indications and Remedies ............................................................................................................................................................ 29
3-3 Specifications ................................................................................................................................ 30
Machine Specifications ......................................................................................................................................................................... 30
Recommended Cutters ........................................................................................................................................................................... 30
Company names and product names are trademarks or registered trademarks of their respective holders.
Copyright© 2002 Roland DG Corporation
http://www.rolanddg.com/
1
To Ensure Safe Use
About
and
Notices
Used for instructions intended to alert the user to the risk of death or
severe injury should the unit be used improperly.
Used for instructions intended to alert the user to the risk of injury or
material damage should the unit be used improperly.
* Material damage refers to damage or other adverse effects caused
with respect to the home and all its furnishings, as well to domestic
animals or pets.
About the Symbols
The symbol alerts the user to important instructions or warnings. The specific meaning
of the symbol is determined by the design contained within the triangle. The symbol at
left means "danger of electrocution."
The
symbol alerts the user to items that must never be carried out (are forbidden).
The specific thing that must not be done is indicated by the design contained within the
circle. The symbol at left means the unit must never be disassembled.
The
symbol alerts the user to things that must be carried out. The specific thing that
must be done is indicated by the design contained within the circle. The symbol at left
means the power-cord plug must be unplugged from the outlet.
Do not disassemble, repair, or modify.
Doing so may lead to fire or abnormal operation resulting in injury.
Do not use with any electrical power supply that does not meet the ratings displayed on the unit.
Use with any other power supply may lead
to fire or electrocution.
Do not use while in an abnormal state
(i.e., emitting smoke, burning odor, unusual noise, or the like).
Doing so may result in fire or electrocution.
Immediately switch off the power, unplug
the power cord from the electrical outlet, and
contact your authorized Roland DG Corp.
dealer or service center.
2
Use only with the power cord included
with this product.
Use with other than the included power cord
may lead to fire or electrocution.
Do not connect the power cord with other
electrical loads on a single electrical outlet.
Doing so may generate heat and cause fire.
To Ensure Safe Use
Do not use with a damaged power cord
or plug, or with a loose electrical outlet.
Doing so may lead to
fire, electrical shock,
or electrocution.
Do not attempt to unplug the power-cord
plug with wet hands.
Doing so may result
in electrical shock
or electrocution.
Do not damage or modify the electrical
power cord, subject it to excessive bending, twisting, pulling, binding, or pinching, or place any object or weight on it.
Doing so may damage the electrical
power cord, leading to fire, electrical shock, or electrocution.
Do not allow liquids, metal objects or
flammables inside the machine.
Such materials can
cause fire.
When not in use for extended periods,
unplug the power-cord plug from the
electrical outlet.
Failure to do so may result in danger of electrical shock, electrocution,
or fire due to deterioration of electrical insulation.
Unpacking, installation, and moving are
operations that must be carried out by
two or more persons.
Failure to do so may result in falling of the
unit, leading to injury.
Install on a stable surface.
Failure to do so may
result in the unit tipping over, leading to
injury.
When unplugging the electrical power
cord from the power outlet, grasp the
plug, not the cord.
Unplugging by pulling the cord may
damage it, leading to
fire, electrical shock,
or electrocution.
3
To Ensure Safe Use
Perform dry cutting with no cutting oil.
Such materials can cause fire.
Do not touch the tip of the blade with your
fingers.
Doing so may result in injury.
Do not bring your hands close to the
moving parts when the machine is operating.
Doing so may result in injury.
Do not touch the spindle motor immediately after a cutting operation has ended.
Doing so may result in burns.
Do not operate if a front cover is cracked
or broken.
Failure to do so may result in injury. If the
front cover is cracked, contact a service agent
immediately for repairs.
Switch off the machine and unplug the
power cord from the electrical outlet before performing cleaning or maintenance.
Failure to do so may result in injury or electrical shock.
Use a commercially available brush to
remove metal cuttings.
Attempting to use a
vacuum cleaner to
take up metal cuttings
may cause fire in the
vacuum cleaner.
When you have finished, wash your
hands to rinse away all cuttings.
4
To Ensure Safe Use
About the Labels Affixed to the Unit
These labels are affixed to the body of this product.
The following figure describes the location and content of these messages.
It is high temperature.
Do not touch immediately after a
cutting operation has ended.
Use caution when handling or
working with the blade. Careless
handling may result in injury.
Rating label
Use a rated power supply.
In addition to the symbol, the symbol shown below is also used.
: Indicates information to prevent machine breakdown or malfunction and ensure correct use.
5
Pour utiliser en toute sécurité
Avis sur les avertissements
Utilisé pour avertir l'utilisateur d'un risque de décès ou de blessure
grave en cas de mauvaise utilisation de l'appareil.
Utilisé pour avertir l'utilisateur d'un risque de blessure ou de dommage
matériel en cas de mauvaise utilisation de l'appareil.
* Par dommage matériel, il est entendu dommage ou tout autre effet
indésirable sur la maison, tous les meubles et même les animaux
domestiques.
À propos des symboles
Le symbole
attire l'attention de l'utilisateur sur les instructions importantes ou les
avertissements. Le sens précis du symbole est déterminé par le dessin à l'intérieur du
triangle. Le symbole à gauche signifie "danger d'électrocution".
Le symbole
avertit l'utilisateur de ce qu'il ne doit pas faire, ce qui est interdit. La
chose spécifique à ne pas faire est indiquée par le dessin à l'intérieur du cercle. Le
symbole à gauche signifie que l'appareil ne doit jamais être démonté.
Le symbole
prévient l'utilisateur sur ce qu'il doit faire. La chose spécifique à faire
est indiquée par le dessin à l'intérieur du cercle. Le symbole à gauche signifie que le fil
électrique doit être débranché de la prise.
Ne pas démonter, réparer ni modifier.
Démonter, réparer ou modifier l'appareil risque de provoquer un incendie ou de causer
un fonctionnement anormal entraînant des
blessures.
Ne pas utiliser avec une source
d'alimentation électrique non conforme
à la norme indiquée sur l'appareil.
Utiliser l'appareil avec une autre source
d'alimentation risque de provoquer un
incendie ou de causer une électrocution.
Ne pas utiliser l'appareil s'il est dans un
état anormal (p.ex., émission de fumée,
odeur de brûlé, bruit inhabituel ou autre
anomalie).
Ne pas respecter cette consigne risque de
provoquer un incendie ou une électrocution.
Couper immédiatement l'alimentation
électrique, débrancher le fil de la prise et
communiquer avec le revendeur ou le centre de service autorisés de la société Roland
DG.
6
Utiliser l'appareil uniquement avec le fil
électrique fourni.
Utiliser l'appareil avec un autre fil risque de
provoquer un incendie ou une électrocution.
Ne pas brancher d'autres appareils dans
la même prise que l'appareil.
Ne pas respecter cette consigne risque de
causer une surchauffe et de provoquer un
incendie.
Pour utiliser en toute sécurité
Ne pas utiliser si le fil ou la fiche
électriques sont endommagés; ne pas
brancher dans une prise mal fixée.
Négliger de suivre cette consigne risque de
provoquer
un
incendie ou decauser
une
décharge
électrique ou une
électrocution.
Ne pas endommager ni modifier le fil
électrique. Ne pas le plier, le tordre,
l'étirer, l'attacher ou le serrer de façon
excessive. Ne pas placer d'objet ou de
poids sur le fil.
Négliger de suivre cette consigne peut
endommager le fil électrique, ce qui risque
de provoquer un
incendie ou de causer
une
décharge
électrique ou une
électrocution.
Si l'appareil reste inutilisé pendant de
longues périodes, débrancher la fiche de
la prise.
Négliger de suivre cette consigne peut créer
un risque de décharge électrique ou
d'électrocution
ou
provoquer un incendie à
cause de la détérioration
de l'isolant électrique.
Ne pas débrancher le fil avec des mains
mouillées.
Ne pas respecter
cette consigne risque de provoquer
des
décharges
électriques ou une
électrocution.
Ne pas laisser de liquides ni d'objets
métalliques ou inflammables s'infiltrer
dans l'appareil.
De telles infiltrations peuvent
provoquer
un
incendie.
Lorsque vous déplacez l'appareil, le
saisir par sa base en aluminium et le
transporter à 2 personnes ou plus.
Tirer sur le fil peut l'endommager, ce qui risque de provoquer un incendie ou de causer
une décharge électrique ou une électrocution.
Installer sur une surface stable.
Sinon, l'appareil risque
de se renverser et de
causer des blessures.
Pour débrancher l'appareil, saisir la fiche
et non le fil électrique.
Tirer sur le fil peut l'endommager, ce qui risque de provoquer un incendie ou de causer
une
décharge
électrique ou une
électrocution.
7
Pour utiliser en toute sécurité
Faire des coupes à sec, sans huile de
coupe.
L'huile de coupe peut provoquer un incendie.
Ne pas toucher à l’extrémité de la lame
avec vos doigts.
Vous risqueriez
de vous blesser
en y touchant.
Ne pas approcher les mains des pièces
en mouvement lorsque la machine
fonctionne.
Vous risqueriez de vous blesser.
Ne touchez pas le moteur de l'axe
immédiatement après avoir terminé une
coupe.
Vous risqueriez alors de vous brûler.
Ne pas utiliser si un couvercle transparent est fissuré ou brisé.
Si le couvercle transparent à l'avant ou sur le
côté de l'appareil est fissuré, communiquer
immédiatement avec un agent de service pour
le faire réparer.
Couper le contact et débrancher le câble
d’alimentation du réceptacle avant de
procéder au nettoyage ou à l’entretien
de l’appareil.
Une négligence à ce niveau pourrait
provoquer des blessures ou une électrocution.
Utiliser une brosse du commerce pour
retirer les rognures de métal.
Tenter de retirer les
rognures de métal à
l’aide d’un aspirateur
peut faire naître un
incendie
dans
l’aspirateur.
Quand vous avez terminé d'utiliser
l'appareil, laver vos
mains pour bien
enlever tous les
copeaux.
8
Pour utiliser en toute sécurité
À propos des étiquettes collées sur l'appareil
Ces étiquettes sont collées à l'extérieur de l'appareil.
Les dessins suivants indiquent l'endroit et le contenu des messages.
Attention : températures
élevées. Ne touchez pas
immédiatement après avoir
effectué une coupe.
Soyez prudent lorsque vous
manipulez ou utilisez la lame,
sinon vous risquez de vous
blesser.
Étiquette des caractéristiques électriques
Utiliser l'alimentation appropriée
9
MEMO
10
Chapter 1
Getting Started
This chapter describes basic information such as accessories and part
names.
11
1-1 What Is RX-50?
The machine is a processing machine for engraving 3D images on materials such as brass or aluminum.
12
Chapter 1 Getting Started
1-2 Part Names and Functions
Main Unit
Front cover
If you open the front cover, processing automatically stops
for your safety.
Spindle
Collet
Cutter
Vise
Rotate the knob and holds a material in
place on the table.
Table
Rotates to process a material.
USB connector
Connect a USB cable (sold separately)
to this connector.
Controller connector
Connect the supplied controller to this
connector.
Main Power switch
Power connector
Connect the supplied power cord to
this connector.
Chapter 1 Getting Started
13
1-2 Part Names and Functions
Controller
Power lamp
Lights up when the machine is operating.
VIEW lamp
Lights up when the machine is temporarily stopped. While the lamp is
on, the machine does not receive
processing data.
ORIGIN lamp
Lights up when the cutter is moving to the original position.
14
Chapter 1 Getting Started
Sub power button
Press this button to start the machine when the main power switch
is on.
VIEW button
Press this button to temporarily stop
the machine and move the cutter to
the top position. To restart the machine, press the button once again.
ORIGIN button
Press this button to move the cutter
to the original position (center of a
material).
Press and hold this button while the
machine is temporarily stopped to
delete the processing data and cancel the processing operation.
1-3 Supplied Accessories
The following items are packed together with the unit. Make sure all the included items are present.
Power cord : 1
Controller : 1
Caps : 4
Spanners : 2
Wrenches (M6:1, M4:1)
Manuals : 2
CD-ROM : 1
Chapter 1 Getting Started
15
1-4 Location and Connecting Cables
Unpacking, installation, and moving are operations that must be carried out by two or more persons.
Failure to do so may result in falling of the unit, leading to injury.
Install on a stable surface.
Failure to do so may result in the unit tipping over, leading to injury.
Location
To operate the machine safely, be sure to locate it in the following environment.
• Temperature: 5 to 40 ˚C (41 to 104 ˚F), Humidity: 35 to 80% (no condensation)
• Stable and level location
• Dust-free
• Vibration-free
• Well-ventilated area (heat can dissipate easily)
• Low electrical noise (e.g. avoid installing near an electric motor)
The machine requires the following space to be located.
Location space
450 mm (W) x 400 mm (D) x 710 mm (H) (17-3/4 in. (W) x 15-3/4 in. (D) x 28 in. (H) )
16
Chapter 1 Getting Started
1-4 Location and Connecting Cables
Removing Protections
In order to prevent damage to the product during transportation, we apply protections to the machine. After locating the
machine, remove all protections from it. The protections are necessary when transporting the machine so keep them for
later use.
Remove all screws and protective media.
Wrench (M4)
Protective media
Wrench (M6)
Protective media
Protective media
Screw
Wrench (M4)
Wrench (M4)
Wrench (M6)
Screw
Wrench (M6)
Screw
Attaching Caps
Attach the caps in the figure.
Cap
Cap
Cap
Chapter 1 Getting Started
17
1-4 Location and Connecting Cables
Connecting Cables
Ground the unit with the ground wire.
Failure to do so may harm your health due to spread cutting dust in the air.
Use only with the power cord included with this product.
Use with other than the included power cord may lead to fire or electrocution.
Do not use with any electrical power supply that does not meet the ratings displayed on the unit.
Use with any other power supply may lead to fire or electrocution.
Computer
Do not connect the USB cable at this point.
You should connect the USB cable when installing the
software. If you do not follow the procedure correctly,
the USB driver may not be installed properly.
USB cable
Machine
Controller
Power outlet
Power cord
Connecting/disconnecting the cable
Be sure to turn off the machine before connecting/disconnecting the power cord or controller. Also, be sure to
connect the cables securely so that they will not accidentally disconnect while the machine is operating.
18
Chapter 1 Getting Started
Chapter 2
Operating Procedure
This chapter describes the basic operating procedures such as installation of material and cutter.
19
2-1 Installing a Material
Material That Can Be Processed
Material
Aluminum, free-cutting brass, free-cutting copper, free-cutting nickel silver
Thickness
2 to 10 mm (0.08 to 0.39 in.)
Size
Diameter 20 to 51 mm (13/16 to 2 in.)
Shape
Must be held by the vise.
Backside shape
The processing side must be horizontal when the vise holds the material.
<Examples of shapes that cannot be used>
The backside of the
material is irregular.
The backside of the
material is curved.
The backside of the
material is not
uniform thickness.
Installation Procedure
Follow the procedure below to install a material to the machine.
1
Turn on the main power switch on the machine
and press the Sub-power button on the controller.
The machine initial operation starts automatically.
2
After initial operation ends, open the front cover.
Front cover
20
Chapter 2 Operating Procedure
2-1 Installing a Material
3
Place the material in the vise.
Place the material securely on the vise surface so that it
does not wobble.
Material
Vise
Material
Side view
Knob
Vise surface
4
Rotate the knob until the vise holds the material securely.
Knob
Continue with installing a cutter.
Chapter 2 Operating Procedure
21
2-2 Installing a Cutter
When installing a cutter, adjust the cutting edge length depending on the thickness of a material. Be sure to use the
recommended cutters. You should adjust the cutting edge length each time you change a material.
1
Close the front cover.
2
Press the ORIGIN button.
3
When the ORIGIN lamp goes out, open the front
cover.
4
Loosen the cutter collet using the supplied spanner.
The ORIGIN lamp lights up, and the spindle moves to
the original position.
Use the spanner here
Spanners
5
22
Install the cutter from the top and adjust the
location of the cutter so that the tip gently
touches the surface of the material.
Chapter 2 Operating Procedure
2-2 Installing a Cutter
6
Tighten the cutter collet using the supplied
spanner.
Do not tighten the cutter collet without installing a cutter. Doing
so may cause damage to the product.
Spanners
Chapter 2 Operating Procedure
23
2-3 Processing
Perform dry cutting with no cutting oil.
Such material can cause fire.
Do not operate if a front cover is cracked or broken.
Failure to do so may result in injury. If the front cover is cracked, contact a service agent immediately for repairs.
Do not touch the tip of the blade with your fingers.
Doing so may result in injury.
Starting Processing
Check the following before starting the processing operation:
• The front cover is closed.
• The machine is not temporarily stopped (The VIEW lamp is off).
After Processing
24
1
Press the VIEW button.
2
Check that the processing operation has completely stopped and then open the front cover.
3
Remove the material.
4
Remove the cutter.
The cutter moves to the VIEW position.
When removing the material, do not touch the tip of the blade.
Carry out the procedure in “2-2 Installing a cutter” in the reverse order.
When the cutter doesn't detach, rap the cutter from top down with supporting.
Chapter 2 Operating Procedure
2-3 Processing
Canceling or Temporarily Stopping the Processing Operation
Canceling the processing operation
1
Press the VIEW button.
2
Stop sending data from the computer.
3
Delete the processing data from the machine.
Press and hold the ORIGIN button.
The machine operation stops temporarily.
The VIEW lamp blinks. If the processing data is completely deleted, the VIEW lamp goes out.
Stopping the processing operation temporarily
You can stop the processing operation temporarily. However, this may cause burrs on parts of the material when restarting the processing operation.
To stop the processing operation temporarily
Press the VIEW button.
The cutter moves to the top position.
You can open the front cover when the processing operation stops. Make sure that the processing operation completely
stops before opening the front cover.
To restart the processing operation
Check that the front cover is closed and press the VIEW button once again.
Chapter 2 Operating Procedure
25
MEMO
26
Chapter 2 Operating Procedure
Chapter 3 Appendixes
27
3-1 Maintenance
Switch off the machine and unplug the power cord from the electrical outlet before performing cleaning or
maintenance.
Failure to do so may result in injury or electrical shock.
Use a commercially available brush to remove metal cuttings.
Attempting to use a vacuum cleaner to take up metal cuttings may cause fire in the vacuum cleaner.
Do not use solvents such as paint thinner, benzene, or alcohol.
Continuing to use the machine without removing dust may result in built-up dust getting inside the mechanism, leading to
breakdown.
Cleaning the machine
Use a soft cloth to wipe the machine.
Cleaning the table
Turn off the machine after operations are completed. Brush the dust off around the table.
28
Chapter 3 Appendixes
3-2 What to Do If
The Quality of the Machined Products Is Not Good
Was the material held securely in place with the vice?
Secure a material securely with the vice and please try again.
Did you install the cutter correctly?
Adjust the position of the cutter so that the tip gently touches the surface of the material, and then securely tighten the
cutter collet using the supplied spanner.
Did you use a material that has uniform thickness?
Using material that have uneven thickness may cause defective products. Use material that have uniform thickness and
please try again.
Is the tip of the cutter worn?
When the tip of the cutter is worn, replace with a new one. Be sure to use the recommended cutters.
Error Indications and Remedies
The VIEW lamp and ORIGIN lamp blink
An error occurred during the initial processing by the machine.
Turn off the main power switch.
If the lamps still blink after turning on the machine, the product may be broken. Please contact the Roland DG Corp.
dealer or service center.
The VIEW lamp blinks
The spindle motor is not operating correctly.
Turn off the main power switch.
If the lamp still blinks after turning on the machine, the product may be broken. Please contact the Roland DG Corp.
dealer or service center.
The ORIGIN lamp blinks
The spindle motor load is too high.
Turn off the main power switch. Check the processing condition and reduce the load on the spindle.
The VIEW lamp lights up
The front cover is opened during the processing operation.
Close the front cover. To restart the processing operation, press the VIEW button after closing the front cover.
Chapter 3 Appendixes
29
3-3 Specifications
Machine Specifications
RX-50
Cutting area
Acceptable material
Maximum : Diameter 51 mm (2 in.), Depth 5 mm (0.19 in.)
Aluminum, free-cutting brass, free-cutting copper, free-cutting nickel silver
Loadable material
Size : Diameter 20 to 51 mm (13/16 to 2 in.)
Thickness : 2 to 10 mm (0.08 to 0.39 in.)
Weight : Maximum 500 g (1.1 lb)
Table rotation speed
Max 65 rpm
Mechanical resolution
table radius : 0.004mm, table rotation : 0.16 degrees, Z-axis : 0.0025mm
Spindle motor
DC brushless motor, Maximum 72W
Spindle speed
10000 to 50000 rpm
Interface
USB interface (compliant with Universal Serial Bus Specification Revision 1.1)
Voltage and frequency : AC 100 - 240 V ± 10 %, 50/60 Hz
Required power capacity : 1.5 A
Power supply
Power consumption
Approx. 150 W
Acoustic noise level
70 dB (A) or less (According to ISO 7779)
Dimensions
391 (W) x 374 (D) x 359 (H) mm (15-7/16 (W) x 14-3/4 (D) x 14-3/16 (H) in.)
Weight
45 Kg (99 lb.)
Packed dimensions
590 (W) x 550 (D) x 645 (H) mm (23-1/4 (W) x 21-3/4 (D) x 25-1/2 (H) in.)
Packed weight
60 Kg (132 lb.)
Operating temperature
5 to 40˚C (41 to 104˚F)
Operating humidity
Accessories
35 to 80 % (no condensation)
Power cord : 1, controller : 1, caps : 4, spanners : 2, wrenches (M6 : 1, M4 : 1), manuals : 2,
CD-ROM :1,
Recommended Cutters
Part number
Description
ZEC-AP (for coated metals)
φ 3.175 x 90 (L) x 0.25 (W)
ZEC-AM (for metals)
φ 3.175 x 90 (L) x 0.25 (W)
ZEC-AR (for plastics)
φ 3.175 x 90 (L) x 0.25 (W)
Unit : mm
φ : Tool diameter
L : Tool length
W : Blade width
30
Chapter 3 Appendixes
MEMO
Chapter 3 Appendixes
31
MEMO
32
Chapter 3 Appendixes
R1-040409