Download Red Hat NETSCAPE ENTERPRISE SERVER 6.0 - NSAPI PROGRAMMER GUIDE User guide

Transcript
Interstage Application Server
V7.0
Single Sign-on Operator's Guide
Single Sign-on Operator's Guide - Preface
Trademarks
Trademarks of other companies are used in this user guide only to identify particular products or
systems:
Product
Trademark/Registered Trademark
Microsoft, Visual Basic, Visual C++,
Windows, Windows NT, Internet Information
Server, and Internet Explorer
Registered trademarks of Microsoft Corporation in
the U.S.A. and other countries
Sun, Solaris, Java, and other trademarks
containing Java
Trademarks of Sun Microsystems, Inc., in the
U.S.A. and other countries
Linux
Registered trademark of Linus Torvalds in the
U.S.A. and other countries
Red Hat, RPM and all Red Hat-based
trademarks and logos
Trademarks or registered trademarks of Red Hat,
Inc. in the U.S.A and other countries
UNIX
Registered trademark of The Open Group in the
United States and other countries
Netscape, Netscape FastTrack Server,
Netscape Enterprise Server, and Netscape
Navigator
Registered trademarks of Netscape
Communications Corporation in the U.S.A. and
other countries
CORBA, Object Management Group, OMG,
OMG IDL, IIOP, Object Request Broker, and
ORB
Trademarks or registered trademarks of Object
Management Group Inc. in the U.S.A. and other
countries
Interstage and ObjectDirector
Registered trademarks of Fujitsu Limited
This document contains technology relating to strategic products controlled by export
control laws of the producing and/ or exporting countries. This document or a portion
thereof should not be exported (or re-exported) without authorization from the
appropriate government authorities in accordance with such laws.
Fujitsu Limited
First Edition (March 2005)
The contents of this manual may be revised without prior notice.
All Rights Reserved, Copyright © FUJITSU LIMITED 2005
ii
Single Sign-on Operator's Guide - Preface
Preface
Purpose of this Document
This manual describes the environment setup and operation procedures required for Interstage Single
Sign-on operation.
Note
Throughout this manual Interstage Application Server is referred to as Interstage.
Who Should Read this Document?
It is assumed that readers of this manual have a basic knowledge of the following:
•
The Internet
•
SSL
•
Apache
•
Web Server
•
LDAP and X.500
•
Basic knowledge of Java application development using JAAS for Java application development
•
Basic knowledge of the OS used
iii
Single Sign-on Operator's Guide - Preface
Organization of this Document
This document is organized as follows:
•
Chapter 1 Overview
This chapter provides an outline and explanation of the concepts (e.g., system configuration) and
functions of Interstage Single Sign-on.
•
Chapter 2 Environment Setup (SSO Administrators)
This chapter explains how to set up the authentication infrastructure environment for Interstage
Single Sign-on.
•
Chapter 3 Environment Setup (Business Server Administrators)
This chapter explains how to set up the business system environment that is needed for Interstage
Single Sign-on.
•
Chapter 4 Operation and Maintenance
This chapter provides details on the operation and maintenance of Interstage Single Sign-on.
•
Chapter 5 Single Sign-on Customization
This chapter explains how to customize Interstage Single Sign-on.
•
Chapter 6 Troubleshooting
This chapter explains how to troubleshoot problems in Interstage Single Sign-on.
•
Chapter 7 Developing Applications
This chapter provides an explanation of the application interface provided by Interstage Single
Sign-on. In addition, it also provides information on how to develop applications for Interstage
Single Sign-on.
•
Appendix A Samples of User Program Descriptions
This appendix provides samples of the user programs that are required to operate the SSO
repository for Interstage Single Sign-on.
•
Appendix B Entry Attributes To Be Registered in SSO Repository
This appendix provides user information, role configurations, and protection resources that are
registered in the SSO repository, which are required for authentication and authorization for
Interstage Single Sign-on.
iv
Table of Contents
Chapter 1 Overview
What Is Single Sign-on ...................................................................................................................1-2
Problems in Conventional Systems...........................................................................................1-2
Effects of Single Sign-on............................................................................................................1-4
Implementation Method .............................................................................................................1-5
Basic System Configuration............................................................................................................1-6
Authentication Infrastructure......................................................................................................1-7
Business System ..................................................................................................................... 1-11
Client........................................................................................................................................1-13
Administrators ...............................................................................................................................1-14
Authentication ...............................................................................................................................1-15
Password and Certificate Authentication .................................................................................1-15
Combinations of Authentication Methods ................................................................................1-23
User Information ......................................................................................................................1-24
Authentication Information .......................................................................................................1-25
Authentication in a Multi-domain Environment ........................................................................1-25
Certificate Selection Windows .................................................................................................1-26
Restrictions on Authentication .................................................................................................1-28
Authorization .................................................................................................................................1-35
Relationships between Roles, Users, and Resources ............................................................1-35
Information Required for Authorization Using Roles ...............................................................1-36
Centralized Management of User and Access Control Information ........................................1-39
Updating Access Control Information ......................................................................................1-40
High-Performance and High-Reliability System ...........................................................................1-42
Load Balancing ........................................................................................................................1-42
Increase of System Availability ................................................................................................1-44
Linkage with SSL Accelerator ..................................................................................................1-47
Linkage with Application Gateway ...........................................................................................1-49
Linkage with Web Applications ................................................................................................1-56
Choosing URLs.............................................................................................................................1-57
Authentication infrastructure URL............................................................................................1-57
v
Single Sign-on Operator's Guide: Table of Contents
Business system public URL ...................................................................................................1-61
Host Name of the Repository Server .......................................................................................1-65
Chapter 2 Environment Setup (SSO Administrators)
Environment Setup Flow .................................................................................................................2-2
Flow of Environment Setup by Systems ....................................................................................2-3
Using the Authentication Infrastructure Configuration Spreadsheet..........................................2-6
Preparation for Environment Setup.................................................................................................2-8
Designing an SSO Repository ...................................................................................................2-8
Preparation for a User Program...............................................................................................2-11
Repository Server Setup...............................................................................................................2-12
Creating an SSO Repository ...................................................................................................2-13
Registering User Information and Role Configuration in the SSO Repository ........................2-16
Importing User Information From the Database to the SSO Repository ............................2-16
Using a CSV Data File ........................................................................................................2-19
Using an LDIF File ..............................................................................................................2-28
Role Configuration Entry.....................................................................................................2-37
User Information Entry........................................................................................................2-41
Constructing a Repository Server (One Server or Update System)........................................2-51
Downloading the Authentication Infrastructure Setup File..................................................2-52
Constructing an SSL Communication Environment for a Repository Server (Update System)2-52
Adding a Repository Server (Reference System)....................................................................2-54
Backing up the SSO Repository of the Repository Server (Update System).....................2-54
Setting up the SSL Communication Environment for the Repository Server (Reference
System)...............................................................................................................................2-55
Creating an SSO Slave Repository of the Repository Server (Reference System)...........2-56
Restoring the SSO Repository in the Repository Server (Reference System) ..................2-58
Changing the Settings of the SSO Repository of the Restored Repository Server
(Reference System)............................................................................................................2-61
Setting up for Adding the Repository Server (Reference System) .....................................2-61
Changing the Settings of the SSO Repository of the Repository Server (Update System)2-62
Setup of Authentication Server .....................................................................................................2-63
SSL Communication Environment Setup ................................................................................2-63
Preparations for SSL Communication ................................................................................2-64
Settings for SSL Communication........................................................................................2-69
Preparations for Confirming Validity of Certificate Authentication ......................................2-70
Settings for SSL Communication Using SSL Accelerator...................................................2-74
Settings for Operation using Application Gateway .............................................................2-74
Setting up One Authentication Server......................................................................................2-74
Adding an Authentication Server for Load Distribution ............................................................2-76
vi
Single Sign-on Operator's Guide - Table of Contents
Setting the Reference System Repository Server Information in the Authentication Server ..2-78
Setting up a Repository Server and Authentication Server on a Single Machine ........................2-79
Registering a Business System ....................................................................................................2-80
Registration Flow of Business System ....................................................................................2-80
Information to be Acquired from Business Server Administrator.............................................2-81
Registering Protection Resources ...........................................................................................2-81
Registering Site Configuration of Business System ...........................................................2-81
Registering Protection Path................................................................................................2-82
Settings for Protection Resource........................................................................................2-82
Preparations for Setting up a Business System ......................................................................2-87
More Secure Use ..........................................................................................................................2-89
Using IPsec..............................................................................................................................2-89
Using a Firewall .......................................................................................................................2-91
Chapter 3 Environment Setup (Business Server Administrators)
Environment Setup Flow.................................................................................................................3-2
Environment Setup Flow by Case .............................................................................................3-3
Using the Configuration Spreadsheet for Business Systems....................................................3-4
Designing a Business System ........................................................................................................3-6
Setting up Business Servers...........................................................................................................3-7
Setting up the First Business Server .........................................................................................3-7
Setting up the Second and Subsequent Business Servers for Load Balancing .....................3-10
Integrating into the Web Server ...............................................................................................3-12
Integrating into Interstage HTTP Server ..................................................................................3-12
Integrating into InfoProvider Pro ..............................................................................................3-12
Integrating into Sun ONE Web Server Enterprise Edition 4.1 .................................................3-13
Integrating into Sun ONE Web Server Enterprise Edition 6.0 .................................................3-15
Microsoft(R) Internet Information Services 5.0 and 6.0...........................................................3-18
Setting the Access Permission for Operation Resources of a Web Server Used by a Business
Server ......................................................................................................................................3-23
Chapter 4 Operation and Maintenance
Starting Single Sign-on ...................................................................................................................4-2
Starting a Repository Server......................................................................................................4-2
Starting an SSO Repository..................................................................................................4-2
Starting a Repository Server.................................................................................................4-2
Starting an Authentication Server ..............................................................................................4-3
Starting a Business Server ........................................................................................................4-3
Stopping Single Sign-on..................................................................................................................4-5
Stopping a Business Server.......................................................................................................4-5
vii
Single Sign-on Operator's Guide: Table of Contents
Stopping an Authentication Server.............................................................................................4-6
Stopping a Repository Server ....................................................................................................4-6
Stopping a Repository Server ...............................................................................................4-6
Stopping an SSO Repository ................................................................................................4-6
Changing Environment Settings .....................................................................................................4-7
Changing the Environment Settings of Repository Server, Authentication Server and Business
Server.........................................................................................................................................4-7
Changing Effective User for Web Server...................................................................................4-8
User Related Operation ................................................................................................................4-10
Adding a User ..........................................................................................................................4-10
Deleting a User ........................................................................................................................4-10
Amending the Role of a User...................................................................................................4-11
Changing User Passwords ......................................................................................................4-11
Taking Corrective Action if the User Password is Forgotten....................................................4-11
Canceling Lockout ...................................................................................................................4-11
Checking User Lock Status......................................................................................................4-12
Checking and Changing User Validity Period..........................................................................4-12
Authorization-related Operation ....................................................................................................4-13
Amending Role Configurations ................................................................................................4-13
Amending Protection Resource ...............................................................................................4-14
Maintenance Using Access Logs..................................................................................................4-16
Access Log of Repository server .............................................................................................4-16
Access Log of Authentication Server .......................................................................................4-18
Access Log of Business Server ...............................................................................................4-20
Operating Notes for Large Systems .............................................................................................4-22
Chapter 5 Single Sign-on Customization
Customizing Messages Displayed on a Web Browser ...................................................................5-2
Messages that Can be Customized...........................................................................................5-2
Messages Displayed for Form Authentication ......................................................................5-2
Authentication Error Messages ............................................................................................5-5
Authorization Error Messages ..............................................................................................5-7
Customizing a Message ............................................................................................................5-8
Setting Access Authority for a Message File ...........................................................................5-11
Access Authorization for the Message File Output at Form Authentication .......................5-12
Access Authority for the Authentication Error Message File...............................................5-12
Access Authority for the Authorization Error Message File ................................................5-12
Authentication Form Tag Specifications...................................................................................5-14
Service Linkage with SSO Repository ..........................................................................................5-16
viii
Single Sign-on Operator's Guide - Table of Contents
Setting the Service Dependency .............................................................................................5-16
Canceling the Service Dependency ........................................................................................5-17
Chapter 6 Troubleshooting
Error Handling.................................................................................................................................6-2
Error Investigation and Corrective Action ..................................................................................6-2
Log output destination ...............................................................................................................6-3
Examples of Errors .........................................................................................................................6-5
Errors that can be encountered while using the Smart Repository Replication Function .........6-5
Errors in Authentication..............................................................................................................6-5
Errors in Business Server Authentication ..................................................................................6-7
Errors in the Interstage Management Console..........................................................................6-7
Chapter 7 Developing Applications
Developing Java Applications .........................................................................................................7-2
Program Development Flow ......................................................................................................7-3
Servlet Application that Receives Authentication Information from a Client.........................7-3
Java Application that Receives User ID/Password from a Client for Authentication............7-5
Developing Programs ................................................................................................................7-7
Converting CallbackHandler to an Instance .......................................................................7-10
Converting LoginContext to an Instance ............................................................................ 7-11
Calling LoginContext Login Method.................................................................................... 7-11
Obtaining User Information.................................................................................................7-12
Executing Authorization ......................................................................................................7-14
Setting the Application Execution Environment .......................................................................7-16
Setting Environment Variables ...........................................................................................7-16
Obtaining Service ID File ....................................................................................................7-19
Creating Login Configuration File .......................................................................................7-19
Creating a Security Policy File............................................................................................7-22
Creating a Trust Store File..................................................................................................7-27
Setting Access Permission for Operation Resources.........................................................7-29
Registering Protection Resources......................................................................................7-31
Exceptions and Exception Handling ...................................................................................7-31
Executing Applications.............................................................................................................7-34
Sample Code ...........................................................................................................................7-38
Servlet Application ..............................................................................................................7-38
Application that Uses a User ID/Password for Authentication and Authorization ..............7-46
Setting User Information Report with Environment Variables.......................................................7-56
ix
Single Sign-on Operator's Guide: Table of Contents
Appendix A Samples of User Program Descriptions
Registering a Role Configuration in the SSO Repository .............................................................. A-3
Registering User Information in the SSO Repository .................................................................... A-4
Deleting User Information from the SSO Repository ..................................................................... A-7
Adding a User Role ........................................................................................................................ A-8
Deleting a User Role .................................................................................................................... A-10
Displaying the User Lock Status .................................................................................................. A-12
Displaying the User Validity Period .............................................................................................. A-14
Changing the User Validity Period ............................................................................................... A-16
Changing the User Password ...................................................................................................... A-17
Appendix B Entry Attributes To Be Registered in SSO Repository
User Information............................................................................................................................. B-2
Role Configuration ......................................................................................................................... B-6
Protection Resources..................................................................................................................... B-8
Site Configuration ..................................................................................................................... B-8
Path Configuration .................................................................................................................... B-9
Index
x
Chapter 1
Overview
This chapter provides an outline and description of the functions in the Interstage Single Sign-on
application.
1-1
Chapter 1: Overview
What Is Single Sign-on
A business information system uses multiple Web Servers and Web Services together. Users usually
need to enter the each their ID and password for Web server and Web service.
The Single Sign-on function enables the user to obtain authorization to access multiple Web Servers
and Web Services by a single sign-on (Authentication) operation.
The Single Sign-on function provides an authentication and authorization infrastructure for multiple Web
servers and Web services comprising an enterprise system.
Authentication
Authentication is the process used to verify the validity and identification of the person who uses the
system.
Authorization
Authorization is the process used to make sure that the user who requests access to a resource is
allowed to access that resource. It is to confirm that a user who requests access to a resource, for
example, a HTML document, image data, voice data on a Web server, and a CGI application operating
on a Web server is allowed to access the resource.
Problems in Conventional Systems
It is often stated that a company cannot fully adapt to changes in the market and grow unless their
business information system is constructed on application servers based on Internet technology. This
means that not all-in-one information systems are used, but the system that can be flexibility to adapt to
changes is used by the construction on the Web servers and services adapted to needs and purposes
of individual, and operation it integrally.
However, business information systems that use multiple Web servers and Web services often occurs
troubles.
User authentication is essential to business information systems, so conventional systems must supply
Web servers and Web services with authentication functionality.
Common problems such as listed on the following page faced to system administrators and users.
1-2
What Is Single Sign-on
Figure 1-1 Problems in Conventional Systems
Reduced User Convenience
Since each system has an authentication function, a user must be authenticated every time they use the
system. User information (user ID and password) is also managed for each system and therefore user
must enter the user ID and password for authentication of each system. The user must also memorize
and manage the user ID and password for each system. These restrictions make users to be
inconvenience to use and access system.
Increase of Operation Cost
Every time a user is added, changed, or deleted because of a personnel change (or for other reasons),
the administrator for each individual system must perform maintenance on the associated user and
access control details. This means that the cost and time required for management of this activity is
quite significant.
Increase of Development Cost
Since a security function must be developed for each system, the time and costs required for this
development increases.
1-3
Chapter 1: Overview
Low Level of Security
The total security level of an information system that contains multiple subsystems is equivalent to the
lowest security level of its subsystems. This means that even if a subsystem is equipped with an
advanced security function based on the latest security architecture, the advanced security function only
has an effect on the total system security when all other subsystems have been used within the
advanced system.
Effects of Single Sign-on
Interstage Single Sign-on can solve the problems associated with conventional information systems.
Improving User Convenience
Each user can access various Web systems and services securely by using a single pair user ID and
password.
Reduction of Operation Cost
The system management and maintenance that is required when users are added, changed, or deleted
because of personnel changes can be integrated. This means that the associated costs for system
management and maintenance can be reduced.
Reduction of Development Cost
The need for security function development for each system is also eliminated and this means that the
associated development costs can be reduced.
Realization of High Security Level
The level of security can be increased using an integrated method and as a result the total system can
utilize the latest security architecture that is available.
1-4
What Is Single Sign-on
Figure 1-2 Comparison of a Conventional System and an Interstage Single Sign-on system
Implementation Method
Interstage Single Sign-on uses an implementation method called the "agent style" to implement the
Single Sign-on.
The agent style locates an agent on each business server, where the necessity for user authentication is
determined. When authentication is necessary, the authentication server is requested to perform
authentication. The agent style also allows the original network configuration to be used after Interstage
Single Sign-on is installed.
Figure 1-3 Implementation Method
1-5
Chapter 1: Overview
Basic System Configuration
The Interstage Single Sign-on system basically consists of an authentication infrastructure, a business
system, and clients. The authentication infrastructure has an authentication server, a repository server,
and an SSO repository. The business system has a business server.
Figure 1-4 Basic System Configuration
Users access the system from a Web browser on a client.
The user can use the system in the following two ways:
•
Specifying the Authentication infrastructure URL through a Web browser
Before accessing a business system, the user is authenticated by accessing the Authentication
infrastructure URL through the Web browser. When authentication is successful, subsequent
accesses to the business system are enabled.
•
Specifying the Business system public URL through the Web browser
The user accesses the business system through the Web browser without being aware of the
authentication infrastructure.
1-6
Basic System Configuration
If the user accesses the business system without being authenticated, the Web browser is
automatically directed to the Authentication infrastructure URL and requested to perform user
authentication. When authentication is successful, the Web browser is automatically directed back
to the URL specified first.
Note
•
The authentication and business servers cannot be constructed on the same machine.
Authentication Infrastructure
The authentication infrastructure retains the user information required for authentication, and requests
each user to present a pair of user ID and password to certificate and authenticate.
The authentication infrastructure consists of an authentication server, repository server, and SSO
repository.
Note
All access to the Authentication infrastructure uses SSL communication. For details, refer to
“Authentication infrastructure URL”.
Authentication Server
The authentication server requests each user to present a pair of user ID and password or a certificate,
and authenticate the user.
The authentication server compares the user ID and Password (or certificate presented by the user)
with the user information previously set in the repository server to determine whether the user can use
the Single Sign-on system.
Note
The authentication server is provided by the following products:
•
Interstage Application Server Enterprise Edition
•
Interstage Application Server Standard Edition
•
Interstage Application Server Plus
Repository Server
The repository server manages the information necessary for user authentication, such as user IDs and
passwords, and the information to authorize users to access the public URL path to the business system.
According to the request from the authentication server, the repository server fetches the user
information necessary for authentication from the SSO repository. The fetched information is then
transferred to the authentication server.
Two types of repository server are available: Repository server (update system) and repository server
(reference system).
The repository server (reference system) is installed when system availability needs to be increased. If
the repository server (reference system) to which the authentication server requests authentication has
failed, repository server (reference system) to the authentication request destination is switched
automatically to respond to the authentication request from the relevant client.
1-7
Chapter 1: Overview
Note
The repository server is provided by the following products:
•
Interstage Application Server Enterprise Edition
•
Interstage Application Server Standard Edition
•
Interstage Application Server Plus
SSO Repository
The SSO repository is a single directory used to control the information about all users of the operating
system, and the resources associated with each business server.
For the SSO repository, Interstage Smart Repository is used.
Basic Configurations of Authentication Infrastructure
The following describes the basic configurations of the authentication infrastructure.
Four configuration patterns are supported to meet different system-scale requirements, e.g., load
balancing and increase of system availability.
1. When Setting Up the Authentication Server on One Machine and the Repository Server on
Another Machine (Middle-scale System)
This system configuration is suitable when the number of users in the business system and the number
of simultaneous accesses to the business system are low in volume.
If the number of users within a business system increase and simultaneous access also increases,
authentication servers can be added to change the system configuration in order to match the setup
described in item 2 below.
Figure 1-5 Setting Up the Authentication on One Machine and the Repository Server on Another
Machine (Middle Scale System)
1-8
Basic System Configuration
2. When Setting Up the Authentication Server on Multiple Machines and the Repository Server
on a Machine (Middle-scale System: Balancing the Authentication Server Load)
This configuration is suitable when the number of users of the business system and the volume of
simultaneous access to that business system is large.
This system configuration places a load balancer before multiple authentication servers to balance the
load of the authentication servers. Three or more authentication servers can be implemented.
Figure 1-6 Setting Up the Authentication Server on Multiple Machines and the Repository Server
on a Machine (Middle Scale System- Balancing the Authentication Server Load)
3. When Setting Up the Authentication Server and the Repository Server on Multiple Machines
Individually (Large-scale System)
This system configuration has multiple repository servers that are used separately as update and
reference systems. Multiple repository servers have been used in this setup in order to share and
balance the processing load as needed.
This system configuration positions a load balancer between the client and multiple authentication
servers, to balance the load of the authentication servers. This configuration also uses multiple
repository servers to balance the load on repository servers during authentication processing.
Multiple repository servers (reference systems) can be allocated for an authentication server. With
multiple repository servers, even if a repository server (reference system) stops (fails), the system can
continue operation by switching the repository server to another (reference system). A repository server
(update system) can be also operated as a repository server (reference system). If a repository server
(update system) stops (fails), the system is automatically stopped.
The information stored in the SSO repositories of update and reference systems must always be
maintained to be the same status by the repository replication function.
Two or more repository servers (reference systems) can be installed.
1-9
Chapter 1: Overview
Figure 1-7 Setting Up the Repository Server and Authentication Server on Multiple Machines
Individually (Large Scale System)
4. When Setting Up the Repository Server and the Authentication Server on a Single Machine
(Small-scale System)
This system configuration sets up the authentication infrastructure (repository and authentication
servers) on one machine. This configuration is suitable for a small-scale system in which the number of
business system users and the number of simultaneous accesses to the business system are small.
Figure 1-8 Setting Up the Repository Server and Authentication Server on a Single Machine
(Small Scale System)
1-10
Basic System Configuration
Business System
The business system provides users with Web-based services.
The business system basically consists of a business server and Web Systems and services operated
on the business server.
Business Server
In request for business system access from a user, the business server requests the authentication
infrastructure in order to authenticate the user. At this point, the business server also authorizes the
authenticated user to use the access-target services.
The business server that is available to add to the business system of Interstage Single Sign-on must
be operated on the following Web servers.
•
Interstage HTTP Server
•
InfoProvider Pro
•
Microsoft(R) Internet Information Services
•
Interstage HTTP Server
•
InfoProvider Pro
•
Sun ONE Web Server Enterprise Edition
•
Interstage HTTP Server
Basic Configurations of Business System
The following two configuration patterns are available for the business system.
1. When Setting Up a Business Server on a Machine
A business server is set up on a machine.
1-11
Chapter 1: Overview
Figure 1-9 Setting Up a Business Server on a Machine
2. When Setting Up Business Servers on Multiple Machines
This system configuration positions a load balancer between the client and multiple business servers, to
balance the load of the business servers. Three or more business servers can be implemented.
Figure 1-10 Setting Up Business Servers on Multiple Machines
1-12
Basic System Configuration
Client
With Interstage Single Sign-on, a user uses the business system from a Web browser on a client.
Supported Web Browsers
The following table lists the Web browsers that can be used on the client.
Table 1-1 Supported Web Browsers
Web browser
Version and level
Netscape Communicator
4.6, 4.7, 4.72, 4.73, 4.75, 4.78
Microsoft(R) Internet Explorer
5.01, 5.5, 6.0
Web Browser Setup
•
Set up the browser to accept cookies.
•
Validate Java scripts.
•
When using proxy servers, set up the browser so that both authentication and business servers are
connected through proxy servers.
•
Set up the browser to use SSL2.0 and SSL3.0.
Application of Security Patch
The client system may be attacked and cookies may be stolen when a problem occurs in the Web
browser being used. If such a trouble is detected, the developer of the Web browser releases a security
patch. The system administrator must instruct all users of the operating system to always apply the
latest security patches to their browsers.
About Proxy Servers
When a load balancer, such as Interstage Traffic Director, is used for load balancing, the proxy server
through which a client is connected may be varied per access according to load balancer settings.
Since the authentication and business servers recognize the proxy server address as the client address,
if the proxy server is varied, the client address will be different between the access to the authentication
server and the access to the business server.
If it occurs, the Single Sign-on operation cannot be validated. To avoid this problem, ensure the load
balancer is set up so that access to the same client always uses the same proxy server.
For example, when "Balancing for each node" is specified for Interstage Traffic Director, every request
from the same client is connected to the same server.
1-13
Chapter 1: Overview
Administrators
To operate Interstage Single Sign-on, the SSO (Single Sign-on) administrator must not only manage the
authentication infrastructure but also coordinate with the administrator of the business server linked to
Single Sign-on.
SSO Administrator
The SSO administrator manages the authentication infrastructure.
Based on the information obtained from the business server administrator, the SSO administrator
registers users in the SSO repository, deletes users from the SSO repository or changes registered user
information.
Business Server Administrator
The business server administrator manages the business system.
The business server administrator decides the resources to be protected by the business server and
protection policies, including the criteria for the users who can access protected resources and delivers
the information to register the business system in the authentication infrastructure to the SSO
administrator. For details, refer to "Designing a Business System".
1-14
Authentication
Authentication
Authentication is the operation used to check the validity of any person who attempts to use the system.
This section explains the authentication function provided with Interstage Single Sign-on.
Interstage Single Sign-on supports the following authentication methods for user authentication:
Figure 1-11 Authentication
For details about Password authentication, Form authentication, Basic authentication, and Certificate
authentication, refer to “Password and Certificate Authentication“.
For details about “Password authentication or Certificate authentication” and “Password authentication
and Certificate authentication“, refer to “Combinations of Authentication Methods”.
Password and Certificate Authentication
Interstage Single Sign-on supports the following two authentication methods for user authentication.
Both methods can be used in combination.
•
Password authentication
•
Certificate authentication
With Interstage Single Sign-on, the two authentication methods can be specified separately or in
combination for the resources as access control targets for each user.
The authentication method for a user is set according to ssoAuthType, a user information entry
managed by the SSO repository of the repository server.
1-15
Chapter 1: Overview
Also, a re-authentication interval can be specified for authentication. When a re-authentication interval
is specified, an authenticated user is requested to be authenticated again after a specified time elapses
from the first authentication. This function prevents unauthorized use of the Web system by a third
person even if a user leaves the client computer for long after authentication.
Figure 1-12 Password and Certificate Authentication
Password Authentication
Password authentication is the process used to authenticate a user via a paired user ID and password.
This means that if a computer used by the user is undefined, the user can be easily authenticated.
With Interstage Single Sign-on, it is possible to select either of the following user ID/password input
screen for password authentication:
Table 1-2 Password Authentication
User ID/password
input screen
Explanation
Written name in subsequent explanations
Form authentication
page
Web page in which the
authentication form is
embedded
Form authentication
Basic authentication
dialog
Standard authentication
window of the Web
browser
Basic authentication
When the user accesses the business system, the form authentication page appears for form
authentication, and the basic authentication dialog appears for basic authentication. The user is
prompted to enter the user ID and password.
Valid user ID and password pairs must be registered in the SSO repository beforehand. Only users who
present a user ID and password pair that matches a valid registered pair are authenticated successfully.
1-16
Authentication
If the form authentication is used, users can access the Authentication infrastructure URL directly
through a Web browser for authentication, and users can also access the business system.
If users access to Authentication infrastructure directly, use the same method to access the following
URL:
Authentication infrastructure URL/ssoatcag (*1)(*2)
In the following explanation, the URL above is replaced with “URL of Form authentication“
*1 Specify the port number even if 443 is specified.
*2 If the Authentication infrastructure URL is confirmed after setting the business server, on the
Interstage Management Console, select [System] > [Security] > [Single Sign-on] > [Business system] >
[Business system Name] > [Settings] > [Detailed Settings [Show]], and then check the setting for
[Repository Server URL] under [Authentication Infrastructure Information Settings].
Example
If Authentication infrastructure URL is used as "https://authserver.fujitsu.com", the URL of Form
authentication page is the following:
https://authserver.fujitsu.com:443/ssoatcag
Note
If the incorrect URL is specified, the following error occurs and the authentication may fail.
•
The following message outputs on the Web browser, even if authentication is performed. Or reauthentication is required.
−
“403 Forbidden/Authentication is processing”
•
If client authentication is processed through SSL communication, the request window of the client
certificate is displayed several times.
•
The following message is displayed on the Web browser, and output message: sso02012 to the
system log.
−
“403 Not Found”
−
“The page cannot be displayed”
The form authentication page can be customized. For customization method details, see “Customizing
a Message"
Authentication by Password authentication is simple, but there is a risk that a user's password could be
stolen or spoofed.
The following examples show the form authentication page and dialogs that are displayed by each Web
browser for basic authentication.
Example
An example of the form authentication page is shown below.
1-17
Chapter 1: Overview
Figure 1-13 Form Authentication Page in Microsoft(R) Internet Explorer 6.0
Example
Basic authentication dialog for Microsoft(R) Internet Explorer 6.0
1-18
Authentication
Figure 1-14 Authentication Window for Microsoft ® Internet Explorer 6.0
Example
Basic authentication dialog for Netscape Communicator 4.75
Figure 1-15 Basic Authentication Window for Netscape Communicator 4.75
Certificate Authentication
This authentication method is used to authenticate a user with a certificate. This method is convenient
when the computer to be used is specified.
When the user accesses a business system or the Authentication infrastructure URL, the Web browser
prompts the user to present the certificate. Authentication is performed by registering the certificate in
advance in the Web browser used by the user. In this authentication method, the user is assumed to be
authenticated when he or she can be identified from the presented certificate.
1-19
Chapter 1: Overview
Certificate Information
For certificate authentication by Interstage Single Sign-on, the owner name (Subject), owner alias
(Subject Alternative Name) and extension information contained in the presented certificate is
referenced. Therefore, one of the following items of information must be stored in the certificate.
Certificate information referenced by Interstage Single Sign-on
•
Mail address (mail)
•
Employee number (employeeNumber)
•
User ID (uid)
•
Serial number (serialNumber)
•
DN qualifier (dnQualifier)
•
Name (cn)
If same attribute is specified for the owner name (Subject), owner alias (Subject Alternative Name) and
extension information contained in the presented certificate, the following is referenced.
•
For Mail address, the value that is set in the owner alias (Subject Alternative Name) and extension
information is valid.
•
For except mail address, the value that set in the owner name (Subject) is valid.
To set the certificate information, such as owner name and owner alias, on the Interstage Management
Console, select, [System] > [Security] > [Single Sign-on] > [Authentication infrastructure] >
[Authentication server] > [Settings] > [Detailed Settings [Show]]. Then, make settings for [Attributes
used for Authentication] under [Certificate Authentication Settings].
The following examples show the certificate selection windows that are displayed for certificate
authentication in Web browsers. If multiple certificates have been registered in a Web browser, select
the certificate on this window to be presented to the Web server.
If only one certificate has been registered in a Web browser, the certificate can be used automatically
without the certificate selection window displayed. For further details about how to display the certificate
selection window, refer to "Certificate selection windows".
For details about how to register certificates in a Web browser, refer to the Security System Guide.
Example
Certificate selection window of Microsoft(R) Internet Explorer 6.0
1-20
Authentication
Figure 1-16 Certificate Selection Window for Microsoft ® Internet Explorer 6.0
Example
Certificate selection window for Netscape Communicator 4.75.
1-21
Chapter 1: Overview
Figure 1-17 Certificate Selection Window for Netscape Communicator 4.75
On Netscape Communicator, the following window is opened after the certificate selection window is
displayed.
Figure 1-18 Password Entry Dialog Window
The "password" or "PIN" is the information to confirm the user who uses the selected certificate. When
a valid password or PIN is entered, the selected certificate is presented to the Web server.
Certificates Supported by Interstage Single Sign-on
Interstage Single Sign-on supports certificates issued by the VeriSign Inc.and Japan Certification
Services, Inc .
1-22
Authentication
Checking the Effectiveness of Certificate
The certificate used for certificate authentication can be checked effectiveness by the authentication
server. The effectiveness is checked based on the certificate revocation list (CRL) registered in the
authentication server. The CRL lists revoked certificates. If a certificate listed in the CRL is presented,
then authentication fails.
Note
If password authentication is being executed with basic authentication, a user cannot directly access the
Authentication infrastructure URL using, for example, a Web browser.
Combinations of Authentication Methods
Interstage Single Sign-on supports the following four authentication methods as combinations of
password authentication and certificate authentication. Authentication methods can be selected for
each user.
Authentication Method
Description
password authentication
This authentication method uses a user ID and password pair. Either
form authentication or basic authentication can be used.
certificate authentication
This authentication method uses the certificate obtained at SSL client
authentication. Either the file-format certificate registered in the Web
browser can be used.
password authentication
or certificate
authentication
Success of authentication is assumed only when either password
authentication or certificate authentication is successful.
password authentication
and certificate
authentication
Success of authentication is assumed only when both password
authentication and certificate authentication are successful.
Password Authentication or Certificate Authentication
Success of authentication is assumed when either password authentication or certificate authentication
is successful.
This authentication method is appropriate for a user who frequently performs access from the
computers other than the one in which the user's certificate has been registered. For example, when a
user who always receives certificate authentication needs to access a resource from a different
computer during a business trip or cannot use the certificate for some reason, the user can obtain
access by using password authentication. The authentication operation is flexible.
This authentication method first requests the user to receive certificate authentication. When certificate
authentication is successful, success of authentication is assumed. If the user fails in certificate
authentication or presents no certificate, the user is requested to receive password authentication.
When password authentication is successful, success of authentication is assumed. If the user fails
password authentication, failure in authentication is assumed.
When the user has registered only one certificate or has not registered any certificate, the user can also
use the registered certificate without displaying the certificate selection window or display the password
authentication window without displaying the certificate selection window. For further details about how
to display the certificate selection window, refer to "Certificate Selection Windows".
1-23
Chapter 1: Overview
Password Authentication and Certificate Authentication
This authentication method only assumes authentication has been successful when both password
authentication and certificate authentication have been successfully completed.
This method of authentication firstly requests the user to receive certificate authentication. When
certificate authentication is successful, the user is then requested to complete password authentication.
When password authentication has been completed, the authentication process has been successful. If
password authentication fails, the authentication process may fail.
When the user has registered only one certificate, the user can also use the registered certificate
without displaying the certificate selection window. For details about how to display the certificate
selection window, refer to "Certificate Selection Windows".
Remark
When the Web browser is Netscape Communicator, the certificate selection window may be displayed
twice. If it occurs, operate same action for both windows.
User Information
User information is managed in the SSO repository, and includes the user ID, password and
authentication method for each user managed by Interstage Single Sign-on. The following user
information can be set for each user according to system operation requirements.
The following table lists the main setting items for user information.
Table 1-3 User Information
Item
Description
Authentication method
One of the following authentication method:
Password authentication
Certificate authentication
Password authentication or certificate authentication
Password authentication and certificate authentication
User ID
User ID of the user.
Only one user ID must be set for a user.
Password
Password of the user.
Only one password must be set for a user.
Information to identify the user
at certificate authentication
Certificate information that can identify the user with the certificate
used by the user during certification authentication.
This information does not need to be set when certificate
authentication is not applied.
1-24
Authentication
Item
Description
Role name/role set name
Name of the role or role set assigned to the user.
Multiple roles or role sets can be set.
The role and role set names set in user information must be those
defined by role configuration.
Re-authentication interval
Interval of the time from authentication to subsequent reauthentication required.
Validity period start time
Date and time when the user starts using Single Sign-on.
Validity period end time
Date and time when the user ends the use of Single Sign-on.
For details of roles and role sets, refer to "Relationships between Roles, Users, and Resources".
Authentication Information
After a user is authenticated, the user's mail address, employee number, and other information that is
registered in the SSO repository are transferred as authentication information in a cookie format to the
business, authentication and repository servers.
Authentication in a Multi-domain Environment
Authentication and authorization Interstage Single Sign-on are also available for an environment where
the business system and authentication infrastructure belong to different domains.
Figure 1-19 Authentication in a Multi-domain Environment
1-25
Chapter 1: Overview
Certificate Selection Windows
If no certificate (or only one certificate) has been registered in the client computer, the displaying of the
certificate selection window can be suppressed during the certificate authentication operation.
The following explains how to suppress display of the certificate selection window on Microsoft® Internet
Explorer and Netscape Communicator. As the display procedure for the certificate selection window
varies depending on the version of Web browser, refer to the manual for the corresponding Web
browser.
Example
Microsoft® Internet Explorer 6.0
Select [Tools] > [Internet Options] > [Security], and from the tab, select [Custom level].
Figure 1-20 Internet Options
Select "Enable" for [Don't prompt for client certificate selection when no certificates or only one
certificate exists].
1-26
Authentication
Figure 1-21 Security Settings
Example
Netscape Communicator 4.78
Select [Communicator] > [Tools] > [Security Info], and from the window displayed, select [Navigator].
Then select "Select Automatically" for [Certificate to identify you to a web site].
1-27
Chapter 1: Overview
Figure 1-22 Netscape Navigator Screen
Restrictions on Authentication
Interstage Single Sign-on provides some functions to prevent illegal access. The functions include the
function for requesting re-authentication after a specified time elapses, the function setting a user
validity period and the lockout function for disabling password input after several times consecutive
invalid password input.
Re-authentication and Re-authentication Interval
A re-authentication interval can be set, so that an authenticated user is requested to be authenticated
again after a specified time elapses from the first authentication. This function reduces the risk of
unauthorized use of the user's client computer by a third person even when the user leaves the client
computer without closing the browser after the user has been authenticated.
1-28
Authentication
When the authenticated user connects to the business system from a client computer that has a
different IP address, the user is requested to be authenticated regardless of the setting of the reauthentication interval.
Figure 1-23 Interstage Single Sign-on Authentication
Re-authentication intervals can be set using the following methods.
•
To set a re-authentication interval for each user, set the time of re-authentication interval for
"ssoCredentialTTL" in the user information stored in the SSO repository.
•
To set a standard re-authentication interval, from the Interstage Management Console, select
[System] > [Security] > [Single Sign-on] > [Authentication infrastructure] > [Authentication server] >
[Settings] > [Detailed Settings [Show]]. Then, set the time of standard re-authentication interval for
[Re-authentication Interval] under [Operation after Authentication].
If all 2 items above have been set, the priority (for the re-authentication) is described in the table below.
Table 1-4 The priority for the re-authentication settings
High
^
|
Low
Re-authentication interval set for each user
Standard re-authentication interval
1-29
Chapter 1: Overview
For details of the user information stored in the SSO repository, refer to "User Information Entry".
For details of the configurations on the Interstage Management Console, refer to Operator’s Guide.
Figure 1-24 Using Re-authentication Intervals
Remarks
•
When "certificate authentication" is used as the authentication method for the user, or when the
user has been authenticated by certificate authentication with "password authentication or
certificate authentication" used as the authentication method, the client (Web browser)
automatically presents the certificate to the Web server at re-authentication.
Therefore, the window requesting re-authentication is not shown to the user. Note that, when users
are setting up the Authentication Server on multiple machines and the Repository Server on a
machine, or setting up the Authentication Server and the Repository Server on multiple machines
individually, the window requesting re-authentication may display even when the authentication
method is "certificate authentication" or "password authentication or certificate authentication."
1-30
•
When the remaining time for the validity period registered as user information in the SSO repository
is shorter than the set re-authentication interval, the validity period registered as user information in
the SSO repository has priority over the re-authentication interval. For details about the validity
period when set as user information, refer to "User Validity Period" of “Restrictions on
Authentication“.
•
To reduce the risk of unauthorized use by third persons, it is strongly recommended that "0" should
not be set as the re-authentication interval for each user or the standard re-authentication interval.
Authentication
User Validity Period
Validity periods can be set for users in Interstage Single Sign-on.
For example, if the information on new employees is stored in the SSO repository in advance, settings
can be made to validate authentication on the beginning date of employment and specify the projected
end date of employment as the validity period end date.
Thus, authentication can be invalidated temporarily, and user validity periods can be set without deletion
of user information from the SSO repository.
Set the user validity period by specifying values in "ssoNotBefore" and "ssoNotAfter" for the user
information in the SSO repository.
For details about the user information in the SSO repository, refer to "User Information Entry".
Lockout
In order to protect users against unauthorized access, the lockout function restricts authentication and
disables access to the resources managed by Interstage Single Sign-on.
If a user inputs invalid passwords (user ID and password) for a specified number of consecutive times,
the user is locked and the use of the Single Sign-on system is restricted to disable the user from
attempting the input of any more passwords.
The locked user fails authentication until the userID is unlocked.
To unlock user is performed using the Interstage Management Console by the SSO administrator. The
locked user can also be unlocked automatically after a specified time. Automatic unlocking after a
specified time is performed at the user's first authentication operation after the specified time elapses.
The count for successive authentication failures is reset when the user succeeds in password
authentication.
Remark
If a user fails in authentication using a certificate, the user is requested to input the user ID and
password. If the authentication method specified for that user is "certificate authentication" or
"Password authentication and certificate authentication," the user will fail in authentication even when
the user inputs valid user ID and password. If it occurs, select [Cancel] on the User ID/Password
Request window.
When the user inputs a user ID and a password to the user ID/password request window, the user is
regarded as a lockout target and the count for successive authentication failures is increased by one,
even if the input user ID and password are valid.
1-31
Chapter 1: Overview
Figure 1-25 Lockout in Single Sign-on Authentication
If a user has failed password authentication for a specified consecutive number of times and is locked
by the lockout function, a message is sent to the user's client computer.
The message shown in Figure 1-26 notifies the user when authentication has failed. The display of this
message is configured in the environment setup on the authentication server. To activate this setting,
on the Interstage Management Console select [System] > [Security] > [Single Sign-on] > [Authentication
infrastructure] > [Authentication server] > [Authentication server: Settings]. Then select [Yes] for [Notify
Cause of Authentication Failure to user?].
If [No] is selected, the message "User name or password is invalid." is displayed on the browser. For
further details, refer to "Messages that can be Customized".
1-32
Authentication
Figure 1-26 Screen Displayed when User is Locked Out
1-33
Chapter 1: Overview
When a locked user performs authentication, the following window is displayed on the Web browser.
Figure 1-27 Screen Displayed when User has been Locked
Note
Locked users cannot use Interstage Single Sign-on (even for certificate authentication) until they are
unlocked.
1-34
Authorization
Authorization
Authorization is the process that is used to make sure that the user who requests access to a resource
is allowed to access the resource. A user who requests access to a resource, for example, a HTML
document, image data, or voice data disclosed on a Web server or a CGI application operating on a
Web server; is checked to allow access to the resource.
Interstage Single Sign-on authorizes users' access based on the concept of "role," which is an attribute
indicating a department or business. Whether a user is allowed to access a resource is determined
according to the relationship between the role of the user and the role set for the access target resource.
The relationships between resources and roles are managed as access control information.
Relationships between Roles, Users, and Resources
Roles are defined based on actual departments and businesses, e.g., "general employee" and
"domestic sales," and assigned to user information. On the other hand, the roles required to access
resources, including the HTML and CGI resources disclosed by the Web services on business servers,
are set for the respective resources. When a user accesses a resource, the user must succeed in
authentication and have the role that is set for the target resource.
Figure 1-28 Relationships Between, Roles, Users and Resources
In the above example:
•
The roles "general employee" and "accounting department" are assigned to the accountant.
•
The role "general employee" is permitted to access only the resource "employment regulations."
•
The role "accounting department" is permitted to access only the resource "settlement information."
1-35
Chapter 1: Overview
•
Therefore, the accountant can access only the resources "employment regulations" and "settlement
information."
Multiple roles can be grouped as a role set. In the above example:
•
The role set "sales department" contains two roles, such as "overseas sales" and "domestic sales."
•
Because the resource "sales information" permits both "overseas sales" and "domestic sales" to
access the resource, the role set "sales department" can be set for the resource.
•
Because the resource "application for domestic sales" is intended to permit only the role "domestic
sales" to access the resource, only the role "domestic sales" should be assigned to the resource.
As described above, the concept of role can be used to implement authorization in a flexible manner.
Information Required for Authorization Using Roles
The following information required for the authorization using roles must be registered in the SSO
repository.
1.
Role configuration
2.
User information
3.
Protection resource
The following shows examples of configurations in the SSO repository. Access control information is a
set of role configuration and protection resource information.
1-36
Authorization
Figure 1-29 Information Required for Authorization Using Roles
Role Configuration
The role or role set name to be used is registered as a role configuration.
Roles are used to authorize the users who access the business system. Roles must be designed on
the basis of the departments and businesses of the users who use the business system. To define a
post, e.g., "general employee" or "manager," or a department, e.g., "accounting department" or
"administration department," as a role, use the role name that corresponds to the post or department as
shown in the table below to define it in the SSO repository.
When multiple roles are grouped and defined as a role set according to the hierarchy of organization
and assigned to resource information, the system has the flexibility to accommodate the future changes
in organization.
Note
Interstage Single Sign-on provides authorization with a role. Please be sure to perform a role
configuration to the SSO repository. Unless role configuration is performed, a repository server does
not start.
1-37
Chapter 1: Overview
Examples of Roles
Table 1-5 Role
Post/department
Role name
General employee
employee
Executive officer
executives
Accounting department
finance department
Administration department
administration department
Example of Role Set
Table 1-6 Role Set
Post/department
Role set name
Contained role
All employees
all
employee、executives
User Information
For details of user information, refer to "User information".
Protection Resource
If authentication and authorization are required for users to access resources such as HTML documents
and CGI applications disclosed in the business system, define those resources as protection resources.
Protection resource information consists of site and path configurations.
Site Configuration
The site configuration defines the site name of the business system. The format of site name is "fully
qualified domain name (FQDN) + port number." FQDN is the host name that includes domain name.
When the Business system public URL is "https://www.fujitsu.com:443/index.html", the site name is
"www.fujitsu.com:443".
Path Configuration
The path configuration specifies the name of the directory or file that is disclosed on the site defined by
the site configuration and requires authentication and authorization for access. When a directory name
is specified (when the path name ends with "/"), all resources under the specified directory are the
targets of authentication and authorization.
In addition, the names of the roles and role sets that are permitted to access the specified directories or
files are specified. Multiple roles and role sets can be specified.
The specification of path configurations used for authentication and authorization is described below:
1-38
•
When a directory or folder that is not defined by path configuration is accessed, the relevant
resource is disclosed unconditionally.
•
When only a directory or folder is specified and roles or role sets are not defined for the resource,
the resource is disclosed to only authenticated users.
•
When a directory or folder is specified and roles or role sets are defined for the resource, the
resource is disclosed to only the users who are authenticated and permitted to access the resource.
Authorization
Note
If a role or role set name set in the path configuration is not defined by role configuration, access control
information cannot be updated on the business server. The role and role set names set in the path
configuration must be the same as that defined by the role configuration.
Centralized Management of User and Access Control Information
The user and access control information concerning the users of multiple systems can be centrally
managed using the SSO repository to reduce the system administrators' load.
Example
The following diagram illustrates the centralized management using one SSO repository of the user and
access control information concerning business servers A, B, and C.
Figure 1-30 Centralized Management of User and Access Control Information
1-39
Chapter 1: Overview
Updating Access Control Information
The business server retains the access control information fetched from the SSO repository to reduce
the load on the repository server and increase the processing speed of the business server itself.
If the access control information (role configurations, protection resources) registered in the SSO
repository has been changed, access control information retained in the business server must be
updated.
The following describes the methods of updating the access control information in the business server.
•
Updating Access Control Information from the Interstage Management Console
On the Interstage Management Console, select [System] > [Security] > [Single Sign-on] >
[Business system] > [Business system Name] > [Update access control iInformation], and click
[Update] to update the access control information. This operation can be performed even while the
business server is active.
•
Updating Access Control Information Automatically at Business Server Startup
Access control information can be updated automatically at the startup of business server
according to an environment setting. On the Interstage Management Console, select [System] >
[Security] > [Single Sign-on] > [Business system] > [Business system Name] > [Settings] >
[Detailed Settings [Show]] to check or change the environment setting.
Then, check or change the setting for [When updating Access Control Information?] under [Access
Control Information]. When "Execute when Business server is started" is selected, the access
control information is updated at the startup of business server.
When the access control is updated information, the business server accesses the repository server
that was specified by [Repository server URL] at the creation of the business system setup file. For
details about the business system setup file, refer to “Downloading Business System Setup File”
of ”Preparations for Setting up a Business System”.
To check or change the URL of the repository server after setting up the business server, select, on the
Interstage Management Console, [System] > [Security] > [Single Sign-on] > [Business system] >
[Business system Name] > [Settings] > [Detailed Settings [Show]]. Then, check the setting for
[Repository Server URL] under [Authentication Infrastructure Information Settings].
Notes
•
1-40
Changes to access control information (role configurations, protection resources) of the SSO
repository are not reflected in business server authentication. To enable reflection of such changes,
access control information must be updated in the business server.
Note that, if "access control information is not updated at the start of the business server," is set,
changing of the SSO repository is not reflected even if the business server is restarted.
Authorization
•
If the access control information is updated while the business server is active, make sure that you
access a protection resource after the update. This is important to ensure that authentication and
authorization can be performed normally. If authentication or authorization is not performed
normally, updating may have failed.
If updating of access control information has failed, the business server responds to every access
from user with message "500 Internal Server Error".
Check those messages output to the system log which begin with "sso", take corrective action, and
stop and restart the business server. For details of message contents, refer to "Messages with
Message Numbers Beginning sso" in the Messages.
•
If an error message is output after the access control information has been updated on the
Interstage Management Console, the business server remains in the status to perform
authorization according to the old access control information. In that case, stop the business
server or take another measure as required until the business server has recovered from the error
and the information is updated normally.
1-41
Chapter 1: Overview
High-Performance and High-Reliability System
Interstage Single Sign-on supports high-performance and high-reliability systems such as client
certificate verification, high-speed SSL communication, load balancing, and increased availability.
Load Balancing
When the authentication requests from users converge on the authentication server, the load on the
server is also increased. The load can be balanced by adding an authentication server.
Also, the authentication processing on the repository server can be distributed to two repository servers,
repository server (update system) and repository server (reference system) in order to balance the load
of authentication processing on the repository server.
To distribute authentication processing to the repository server (update system) and repository server
(reference system), select, on the Interstage Management Console, [System] > [Security] > [Single
Sign-on] > [Authentication infrastructure] > [Authentication server] > [Settings] > [Detailed Settings
[Show]].
Then, specify the repository server (update system) and repository server (reference system) for
[Communication Settings with Repository server] and [Communication Settings with repository Server
(reference system)].
For details about the configurations on the Interstage Management Console, refer to the Operator’s
Guide.
It is recommended to install one repository server (update system) and multiple repository servers
(reference systems) to balance the load of authentication processing on the repository servers.
1-42
High-Performance and High-Reliability System
Figure 1-31 Load Balancing among Authentication and Repository Servers
The figure above shows the load balancing among authentication and repository servers.
The authentication requests from clients are distributed to each authentication server by a load balancer,
e.g., Interstage Traffic Director, to each authentication server.
When one repository server (update system) and multiple repository servers (reference systems) are
allocated to each authentication server, the authentication server connects to a repository server
(reference system) for the processing of ordinary authentication request. It connects automatically to the
repository server (update system) only when the information in the SSO repository is required to
change(e.g., when the user is locked by the lockout function). When different repository servers
(reference systems) are allocated separately to the authentication servers, the load on repository
servers can be balanced.
When the information in the SSO repository of the repository server (update system) is updated, the
updated content can be reflected in the SSO repository of the repository servers (reference systems)
automatically by using the Smart Repository replication function.
When a different repository server (reference system) is assigned to each authentication server as the
one to be connected preferentially, the load on repository servers can be balanced.
1-43
Chapter 1: Overview
For an example of setting a system configuration in which multiple authentication servers are arranged
to distribute the authentication server load, see “When Setting Up the Authentication Server on Multiple
Machines and the Repository Server on a Machine" of “Basic Configurations of Authentication
Infrastructure” of "Authentication Infrastructure”.
For an example of setting a system configuration in which the repository server (update system) and
repository server (reference system) are arranged to distribute the repository server load, see “When
Setting Up the Authentication Server and the Repository Server on Multiple Machines Individually" of
“Basic Configurations of Authentication Infrastructure” of "Authentication Infrastructure”.
Remark
When repository servers are used separately for update and reference systems, the contents of SSO
repositories (master and slave) must be synchronized with each other to prevent illegal authentication
due to data inconsistency. A synchronizing method is to copy the content of the SSO repository
(master) into the SSO repository (slave) by using the Smart Repository replication function.
Notes
•
The repository server (update system) and repository server (reference system) both need to be
the same edition/version.
•
The load balancer, e.g., Interstage Traffic Director, must be set up so that all authentication servers
logically have the same host name.
•
To perform SSL communication on the authentication servers, the owner name of each certificate
to be used for SSL communication must be the same on every authentication server. In details, the
host name of Interstage Traffic Director must be specified as the owner name of the certificate for
SSL communication when the certificate is obtained and registered. For further information about
the application for the certificate and its registration, refer to "Preparations for SSL Communication".
•
The load balancer must be set up so that the requests from the same client transfer to the same
authentication servers.
•
Use the following settings when the load balancer is Interstage Traffic Director:.
−
Operation Mode : bridge
−
Measure of load Balancing and uniqueness of connection : Balancing for each node
Increase of System Availability
When multiple repository servers (reference systems) are allocated to the authentication server, the
system configuration can include active and standby repository servers (reference systems). This
system configuration allows the system to continue operation even if a repository server (reference
system) fails or an error is posted from an SSO repository.
For example, if the repository server (reference system) that is requested to perform authentication
processing by the authentication server has failed, a destination of the authentication request is
automatically switched to another repository server (reference system) and the system can respond to
the authentication request from the client.
1-44
High-Performance and High-Reliability System
Figure 1-32 Increasing System Availability
When the re-connection interval specified as an environment setting on the authentication server has
elapsed after the automatic switching of authentication request destination, repository server (reference
system), an attempt is made automatically to connect to the repository server (reference system) that
was the destination for the old authentication request.
1-45
Chapter 1: Overview
Figure 1-33 Standby Repository takes over in the Event of a Failure
This means that the Interstage Single Sign-on service can operate without a halt when multiple
repository servers (reference systems) are installed.
To check the sequence of connections to the repository servers (reference systems) from the
authentication server, select, on the Interstage Management Console, [System] > [Security] > [Single
Sign-on] > [Authentication infrastructure] > [Authentication server] > [Settings] > [Detailed Settings
[Show]]. The sequence of connections is indicated by [Host name and Port numberNo.] under
[Communication Settings with Repository server (reference system)].
The authentication server attempts to connect to all the specified repository servers (reference systems)
sequentially. If the authentication server cannot connect to any other repository servers, it attempts to
connect to the first repository server (reference system) again. If the first repository server also cannot
be connected, the authentication server notifies the user of the failure in authentication.
Note that the repository server (update system) can be operated as a repository server (reference
system). When the repository server (update system) is specified as the last repository server
(reference system) to be connected in the setting for [Communication Settings with Repository server
(reference system)], the authentication server attempts to connect to the repository server (update
system) after it has failed in attempts to connect to every repository server (reference system).
Notes
1-46
•
Use repository servers with the same edition/version as the repository servers (update and
reference systems).
•
System availability cannot increase by using multiple repository servers (update systems). Note
that Interstage Application Server Enterprise Edition supports the increase of system availability by
using a cluster configuration of repository servers (update systems).
High-Performance and High-Reliability System
•
If the repository server (update system) stops operation as the result of some problem, user
authentication fails even when the repository server (reference system) can operate normally.
•
The authentication server may attempt to re-connect to the first repository server that failed before
the re-connection interval (as specified as an environment setting on the authentication server)
elapses.
Linkage with SSL Accelerator
Interstage Single Sign-on allows SSL Accelerator to be installed between the client and authentication
server to speed up client certificate authentication and SSL communication when the authentication
method is "password authentication," "certificate authentication," or "password authentication and
certificate authentication".
Figure 1-34 SSL Accelerator links the Client and Authentication Server
The linkage with SSL Accelerator must be defined in the authentication server.
Figure 1-35 Link to SSL Accelerator defined in the Authentication Server
1-47
Chapter 1: Overview
To use SSL Accelerator during Interstage Single Sign-on operations, SSL Accelerator must be set up as
follows:
Client Authentication
When the authentication method is "certificate authentication" or "password authentication and
certificate authentication," select “client authentication”. For the configuration method, see the
relevant SSL accelerator instruction manual.
Notification of Certificate
When the authentication method is "certificate authentication" or "password authentication and
certificate authentication," define the HTTP header to notify the authentication server of the
certificate sent from the client. For details about the configuration method, refer to the relevant SSL
accelerator instruction manual.
The defined HTTP header must be set on the authentication server. On the Interstage
Management Console, select [System] > [Security] > [Single Sign-on] > [Authentication
infrastructure] > [Authentication server] > [Settings] > [Detailed Settings [Show]]. Then, set the
defined HTTP header name as [HTTP header name for user certificate acquisition] under
[Certificate Authentication Settings].
This setting is not required when SSL Accelerator is used for the business system.
For details about the configurations on the Interstage Management Console, refer to the Operator’s
Guide.
Notes
1-48
•
When client authentication is enabled, the certificate to be used must always be selected at
authentication request. If certificate transmission is cancelled, SSL Accelerator discontinues
communication processing. Set up the authentication server so that the validity of certificate is
checked.
•
When the authentication method is "password authentication and certificate authentication," the
authentication operation in linkage with SSL Accelerator cannot be performed. If certificate
authentication fails or no certificate is presented, SSL Accelerator discontinues communication
processing, and the access to the target resource, which is requested by displaying the following
window (Figure 1-34) is cancelled.
•
If an expired certificate is used in the high-performance system in which SSL Accelerator is
installed between the client and authentication server, message "500 Internal Server Error" may be
sent to the Web browser. If it occurs, acquire a new certificate and register it in the Web browser.
High-Performance and High-Reliability System
Figure 1-36 Example of Screen Shown when Page Cannot be Displayed
Linkage with Application Gateway
The reverse function offered in Application Gateway can be used to access a safer intranet from a client
on the Internet.
The reverse function can be used to set up the following systems:
•
A Single Sign-on system in which access from a client on the Internet and a client in an intranet is
possible
•
A Single Sign-on system in which only access from a client on the Internet is possible
In the above systems, the following operation can also be executed, depending on the communication
method between Application Gateway and the authentication server:
•
Non-SSL communication between Application Gateway and the authentication server
•
SSL communication between Application Gateway and the authentication server
1-49
Chapter 1: Overview
The settings for a system that can be set up using the Application Gateway reverse function are
explained below.
Remark
•
In a system that has linkage with Application Gateway, the following can be used as the
authentication method for a user accessing from the Internet.
−
•
Password authentication
When SSL communication is used between the Application Gateway and authentication server,
security can be further enhanced.
1. Single Sign-on System that can be Accessed from the Clients on the Internet and in the Intranet
The following describes the Single Sign-on system that can be accessed from both the clients on the
Internet and also those in the intranet.
Note the following points for the operations of this system.
•
The URL information on the business system in the intranet may also be transmitted as a URL
parameter to the client who accesses the system via the Internet.
[Using non-SSL communication between Application Gateway and authentication server]
Figure 1-37 Using non-SSL Communication between Application Gateway and Authentication
Server
For operation using this system configuration, SSL Accelerator must be installed between the
authentication server and client in the intranet. The port number of SSL Accelerator must be the same
as that used by Application Gateway.
Remark
This system cannot be configured if the mechanism that is used for communication with the virtual IP
address is used in the SSL accelerator.
Setup of Application Gateway
•
1-50
Reverse Settings
High-Performance and High-Reliability System
Examples of the reverse settings in the figure above are shown in the table below.
In the URL for the directory from which the request originated that is entered in the business server
reverse settings, specify a directory layer for each business server. Example: /www1/, /www2/.
Table 1-7 Reverse Settings
Request-source URL
Conversion
control
Relay-destination URL
Remarks
https://sd.fujitsu.com:44
3/www1/
<---------->
http://www.fujitsu.com:80/
Reverse settings of
Business server
https://sd.fujitsu.com:44
3/auth/
<---------->
http://auth.fujitsu.com:80/
Reverse settings of
Authentication server
https://sd.fujitsu.com:44
3/auth/
<----------
https://auth.fujitsu.com:443/
When “Set-Cookies Header” is specified in the HTTP response header, and path and domain that
are specified to “Set-Cookies Header” are same as directory and server name of Relay-destination
URL that is defined in the table (1-7) above, set path and domain as to replace the compatible
Request-source URL.
Setup of authentication server
•
For a small-scale system
When using a small-scale system, select, on the Interstage Management Console of the
authentication server, [System] > [Security] > [Single Sign-on] > [Authentication infrastructure] >
[Authentication infrastructureSettings] tab > [Setup Repository server and Authentication server to a
single server.]. Then, specify "On the others" for [Where does SSL operate?] under [General
Settings].
•
For a middle-scale or large-scale system
When using a medium-scale or large-scale system, select, on the Interstage Management Console
of the authentication server, [System] > [Security] > [Single Sign-on] > [Authentication
infrastructure] > [Authentication infrastructureSettings] tab > [Setup Repository server and
Authentication server to the separate servers.]. Then, select [Create a new Authentication server],
and specify "On the others" for [Where does SSL operate?] under [General Settings].
[Using SSL communication between Application Gateway and authentication server]
1-51
Chapter 1: Overview
Figure 1-38 Using SSL Communication between Application Gateway and Authentication Server
To operate using this system configuration, use the following settings.
Setup of Application Gateway
•
Reverse Settings
Examples of the reverse settings in the figure above are shown in the table below.
In the URL for the directory from which the request originated that is entered in the business server
reverse settings, specify a directory layer for each business server. Example: /www1/, /www2/.
Table 1-8 Reverse for Application Gateway
Request-source URL
Conversion
control
Relay-destination URL
Remarks
https://sd.fujitsu.com:44
3/www1/
<---------->
https://www.fujitsu.com:443/
Reverse settings of
Business server
https://sd.fujitsu.com:44
3/auth/
<---------->
https://auth.fujitsu.com:443/
Reverse settings of
Authentication server
When “Set-Cookies Header” is specified in the HTTP response header, and path and domain that
are specified to “Set-Cookies Header” are same as directory and server name of Relay-destination
URL that is defined in the table (1-8) above, set path and domain as to replace the compatible
Request-source URL.
Setup of authentication server
•
To create SSL configurations on the authentication server, select [System] > [Security] > [SSL] >
[Create a new SSL Configuration] tab. Then, specify "No" for [Verify Client Certificate?] under
[General Settings].
2. Single Sign-on System that can be Accessed Only from the Clients on the Internet
The following describes the Single Sign-on system that can be accessed only from the clients on the
Internet.
Note the following points for the operations of this system.
1-52
High-Performance and High-Reliability System
•
The clients in the intranet cannot access the protection resources in the business system.
•
Note the following points for the design of business systems.
−
The first layer of the URL path of each business system must be unique.
−
The root path ("/") of the business system cannot be accessed by clients.
[Using non-SSL communication between Application Gateway and authentication server]
Figure 1-39 Using non-SSL Communication between Application Gateway and Authentication
Server
To operate using this system configuration, make the following settings.
Setup of Application Gateway
•
Reverse Settings
Examples of the reverse settings in the figure above are shown in the table below.
In the business system reverse settings, make sure that the path part for the URL for the directory
from which the request originated and the URL for the directory from which the relay originated are
the same. Specify everything in the first directory layer of the business system URL.
Table 1-9 Examples of Reverse Settings
Request-source URL
Conversion
control
Relay-destination URL
Remarks
https://sd.fujitsu.com:44
3/dir1/
<---------->
http://www.fujitsu.com:80/dir1/
Reverse settings of
Business server 1
https://sd.fujitsu.com:44
3/dir1/
<----------
https://sd.fujitsu.com:443/dir1/
https://sd.fujitsu.com:44
3/dir2/
<---------->
http://www.fujitsu.com:80/dir2/
1-53
Chapter 1: Overview
https://sd.fujitsu.com:44
3/dir2/
<----------
https://sd.fujitsu.com:443/dir2/
https://sd.fujitsu.com:44
3/dir3/
<---------->
http://www2.fujitsu.com:80/dir3/
https://sd.fujitsu.com:44
3/dir3/
<----------
https://sd.fujitsu.com:443/dir3/
https://sd.fujitsu.com:44
3/auth/
<---------->
http://auth.fujitsu.com:80/
Reverse settings of
Authentication server
https://sd.fujitsu.com:44
3/auth/
<----------
https://sd.fujitsu.com:443/
Reverse settings
required for adding the
business servers
Reverse settings of
Business server 2
When “Set-Cookies Header” is specified in the HTTP response header, and path and domain that
are specified to “Set-Cookies Header” are same as directory and server name of Relay-destination
URL that is defined in the table (1-9) above, set path and domain as to replace the compatible
Request-source URL.
Setup of authentication server
•
For a small-scale system
When using a small-scale system, select, on the Interstage Management Console of the
authentication server, [System] > [Security] > [Single Sign-on] > [Authentication infrastructure] >
[Authentication infrastructureSettings] tab > [Setup Repository server and Authentication server to a
single server.]. Then, specify "On the others" for [Where does SSL operate?] under [General
Settings].
•
For a middle-scale or large-scale system
When using a medium-scale or large-scale system, select, on the Interstage Management Console
of the authentication server, [System] > [Security] > [Single Sign-on] > [Authentication
infrastructure] > [Authentication infrastructure Settings] tab > [Setup Repository server and
Authentication server to the separate servers.]. Then, select [Create a new Authentication server],
and specify "On the others" for [Where does SSL operate?] under [General Settings].
1-54
High-Performance and High-Reliability System
[Using SSL communication between Application Gateway and authentication server]
Figure 1-40 Using Using SSL Communication between Application Gateway and Authentication
Server
Setup of Application Gateway
•
Reverse Settings
Examples of the reverse settings in the figure above are shown in the table below.
In the business system reverse settings, make sure that the path part for the URL for the directory
from which the request originated and the URL for the directory from which the relay originated are
the same. Specify everything in the first directory layer of the business system URL.
Table 1-10 Reverse Settings for Application Gateway Setup
Request-source URL
Conversion
control
Relay-destination URL
Remarks
https://sd.fujitsu.com:44
3/dir1/
<---------->
https://www.fujitsu.com:443/dir1
/
Reverse settings of
Business server 1
https://sd.fujitsu.com:44
3/dir2/
<---------->
https://www.fujitsu.com:443/dir2
/
https://sd.fujitsu.com:44
3/dir3/
<---------->
https://www2.fujitsu.com:443/dir
3/
Reverse settings of
Business server 2
https://sd.fujitsu.com:44
3/auth/
<---------->
https://auth.fujitsu.com:443/
Reverse settings of
Authentication server
https://sd.fujitsu.com:44
3/
<----------
https://sd.fujitsu.com:443/
Reverse settings
required for adding the
business servers
1-55
Chapter 1: Overview
When “Set-Cookies Header” is specified in the HTTP response header, and the path and domain
that are specified to “Set-Cookies Header” are the same as the directory and server name of the
Relay-destination URL defined in table 1-10, set the path and domain so as to replace the
compatible Request-source URL..
Setup of authentication server
•
To create SSL configurations on the authentication server, select [System] > [Security] > [SSL] >
[Create a new SSL Configuration] tab. Then, specify "No" for [Verify Client Certificate?] under
[General Settings].
Linkage with Web Applications
A Web application can acquire the user information stored in the SSO repository with authenticating
user to the authentication server.
The two methods that can be used to acquire user information are as follows:
•
Java application interface
The Java application interface provided by Interstage Single Sign-on can be used to develop a
Servlet application to receive authentication information from the client and a Java application to
request the authentication server to perform authentication with user ID and password. For details,
refer to "Developing Java Applications".
•
HTTP request header
User information can be set in the HTTP request header and posted to an application. The
application can acquire the user information via a Web application interface, for example CGI. For
further details, refer to "Setting User Information Report with Environment Variables".
1-56
Choosing URLs
Choosing URLs
This section describes how to choose the Authentication infrastructure URL, the Business system public
URL, and the host name of repository server.
Authentication infrastructure URL
The Authentication infrastructure URL is selected depending on the combination of the load balancer,
Application Gateway, and SSL Accelerator. The following describes examples of combinations with
Interstage Traffic Director, Application Gateway, and SSL Accelerator.
Combining No Other Equipment or Product
The FQDN and port number for the Authentication infrastructure URL are the same as those used by
the authentication server.
Figure 1-41 Combination of No Other Equipment or Product
Using Interstage Traffic Director for Balancing the Load on the Authentication Server
The FQDN and port number of the Authentication infrastructure URL are identical to the virtual IP
address that is set for Interstage Traffic Director.
For the virtual IP address, refer to "Load Distribution Using Traffic Director" in the section "For a Highperformance, High-reliability System" of the High Availability System Guide for the Interstage Application
Server Enterprise Edition.
1-57
Chapter 1: Overview
Figure 1-42 Using Interstage Director to Balance the Load on the Authentication Server
Using SSL Accelerator
The FQDN and port number of the Authentication infrastructure URL are identical to the FQDN of the
authentication server and the port number of SSL Accelerator, respectively.
Figure 1-43 Using SSL Accelerator
Using Both SSL Accelerator and Interstage Traffic Director
The FQDN and port number of the Authentication infrastructure URL are identical to the FQDN of the
virtual IP address set for Interstage Traffic Director and the port number of SSL Accelerator, respectively.
For the virtual IP address, refer to "Load Distribution Using Traffic Director" in the section "For a Highperformance, High-reliability System" of the High Availability System Guide for the Interstage Application
Server Enterprise Edition.
1-58
Choosing URLs
Figure 1-44 Using Both SSL Accelerator and Interstage Traffic Director
Linking with Application Gateway and using SSL Communication between Application Gateway and
Authentication Server
The FQDN and port number of the Authentication infrastructure URL are identical to the authentication
server (*1).
The Authentication infrastructure URL is different from the URL viewed from the client.
Figure 1-45 Linking with Application Gateway and Using SSL Communication between
Application Gateway and Authentication Server
*1 When Interstage Traffic Director or SSL Accelerator is installed between Application Gateway and
authentication server, assume that Application Gateway as the client and obtain the Authentication
infrastructure URL based on the previous explanation. Use the FQDN and port number of the obtained
URL as substitutes for those used in the authentication server.
1-59
Chapter 1: Overview
Linking with Application Gateway and Using Non-SSL Communication between Application Gateway and
Authentication Server
[To enable the clients only on the Internet to access]
The FQDN and port number of the Authentication infrastructure URL are the FQDN and the port number
of Application Gateway, respectively. The scheme name of the Authentication infrastructure URL is
"https".
Figure 1-46 Linking with Application Gatewayand Using Non-SSL Communication between
Application Gateway and Authentication Server
[To enable access for the clients both on the Internet and in the intranet]
The FQDN and port number of the Authentication infrastructure URL are the FQDN of the authentication
server (*2) and the port number of Application Gateway, respectively. The scheme name of the
Authentication infrastructure URL is "https".
The Authentication infrastructure URL is different from the URL viewed from the client.
1-60
Choosing URLs
Figure 1-47 Non-SSL Communication between Application Gateway and Authentication Server
viewed from the Client
*2 When Interstage Traffic Director is installed between Application Gateway and authentication server,
assume Application Gateway as the client and obtain the Authentication infrastructure URL based on the
information from the explanation described in figure 1-45. Use the FQDN of the obtained URL as a
substitute for the FQDN of the authentication server.
Note
When using SSL Accelerator with the mechanism that uses the virtual IP address as transfer measure,
the FQDN of the Authentication infrastructure URL is the FQDN of the IP address set for SSL
Accelerator.
Business system public URL
The Business system public URL is selected depending on the combination of the business server with
the load balancer, Application Gateway, and/or SSL Accelerator. The following describes examples of
combinations with Interstage Traffic Director, Application Gateway, and SSL Accelerator.
Combining No Other Equipment or Product
The FQDN and port number of the Business system public URL are identical to those of the business
server.
1-61
Chapter 1: Overview
Figure 1-48 Combining No Other Equipment or Product
Using Interstage Traffic Director for Balancing the Load on the Authentication Server
The FQDN and port number of the Business system public URL are identical to those of the virtual IP
address set for Interstage Traffic Director.
For details about the virtual IP address, refer to "Load Distribution Using Traffic Director" in the section
"For a High-performance, High-reliability System" of the High Availability System Guide for the
Interstage Application Server Enterprise Edition.
Figure 1-49 Using Interstage Traffic Director for Balancing Load on the Authentication Server
Using SSL Accelerator
The FQDN and port number of the Business system public URL are identical to the FQDN of the
business server and the port number of SSL Accelerator respectively.
1-62
Choosing URLs
Figure 1-50 Using SSL Accelerator
Using both SSL Accelerator and Interstage Traffic Director
The FQDN and port number of the Business system public URL are identical to the FQDN of the virtual
IP address set for Interstage Traffic Director and the port number of SSL Accelerator respectively.
For details about the virtual IP address, refer to "Load Distribution Using Traffic Director" in the section
"For a High-performance, High-reliability System" of the High Availability System Guide for the
Interstage Application Server Enterprise Edition.
Figure 1-51 Using Both SSL Accelerator and Interstage Traffic Director
Linking with Application Gateway and Enabling the Clients both on the Internet and in the Intranet to
Access (*1)
The FQDN and port number of the Business system public URL are identical to those of the business
server (*2).
The Business system public URL is different from the URL viewed from the client.
1-63
Chapter 1: Overview
Figure 1-52 Linking with Application Gateway and Enabling Clients on the Internet and Intranet
to Access
*1
For further details, refer to "Linkage with Application Gateway".
*2
When Interstage Traffic Director or SSL Accelerator is installed between Application Gateway and
business server, assume Application Gateway as the client and obtain the Business system public
URL according to the above explanation. Use the FQDN and port number of the obtained URL as
substitutes for those of the business server.
Linking with Application Gateway and Enabling Only the Clients on the Internet to Access (*1)
The FQDN and port number of the Business system public URL are identical to those of Application
Gateway.
1-64
Choosing URLs
Figure 1-53 Linking with Application Gateway and Enabling only Internet Clients to Access
*1 For further details, refer to "Linkage with Application Gateway".
Note
When using SSL Accelerator with the mechanism that uses the virtual IP address as transfer measure,
the FQDN of the Business system public URL are the FQDN of the IP address set for SSL Accelerator.
Host Name of the Repository Server
The host name of the repository server (update system) is selected depending on the repository server
configuration. The following describes examples of combinations with a cluster system.
The cluster system is supported only by Interstage Application Server Enterprise Edition. For further
details about the cluster system, refer to the High Availability System Guide for Interstage Application
Server Enterprise Edition.
1-65
Chapter 1: Overview
Not Using a Cluster System
The host name of the repository server (update system) is the same as the machine on which the
repository server (update system) is set up.
Figure 1-54 Not Using a Cluster System
Using a Cluster System
The host name of the repository server (update system) is the one that is common to the operational
node and the standby node of the cluster system.
Figure 1-55 Using a Cluster System
1-66
Chapter 2
Environment Setup (SSO Administrators)
This chapter explains the setup for the authentication infrastructure environment.
Use the Interstage Management Console to set up the Interstage Single Sign-on environment. Refer to
the Operator’s Guide for details of starting the Interstage Management Console and for details of the
items to be defined in the Interstage Management Console.
Refer to the Smart Repository Operator's Guide for details of creating an SSO repository that configures
the authentication infrastructure.
Notes
•
Refer to the Security System Guide in advance to securely set up and operate the system.
•
The Administrator's authority is required to set up the authentication infrastructure environment.
2-1
Chapter 2: Environment Setup (SSO Administrators)
Environment Setup Flow
Authentication infrastructure environment setup includes the following four operations:
•
Preparation for Environment Setup (SSO repository design, preparation for a user program)
•
Repository Server Setup
•
Setup of Authentication Server
•
Registering a Business System
Set up the environment as to operation, as the steps required for setup will depend on the system
configuration.
The authentication infrastructure configuration spreadsheet (an Excel file) is provided to assist the setup
of the authentication infrastructure environment. This file helps users to calculate connection
information between servers to be configured in the Interstage Management Console.
Refer to Using the Authentication Infrastructure Configuration Spreadsheet for details of how to use the
configuration spreadsheet.
2-2
Environment Setup Flow
Flow of Environment Setup by Systems
Figure 2-1 Flow of Environment Setup
2-3
Chapter 2: Environment Setup (SSO Administrators)
Table 2-1 shows the steps required for the environment setup of various types of systems:
Table 2-1 Environment Setup
Preparation for
Environment
Setup
Setting up the
authentication
server on a
machine and
the repository
server on
another
machine
Setting up the
authentication
server on
multiple
machines and
the repository
server on one
machine
Setting up the
authentication
server and the
repository
server on
multiple
machines
individually
Preparation
for
Environment
Setup
Preparation
for
Environment
Setup
Preparation
for
Environment
Setup
Repository
server setup
2-4
Setup of SSL
communicatio
n environment
for the
repository
server (update
system) for
use of multiple
repository
servers or
addition of a
repository
server
Adding an
authentication
server to the
authentication
infrastructure
already set up
Adding a
repository
server
(reference
system) to the
authentication
infrastructure
already set up
(multiserver
system)
Setting up the
repository
server and the
authentication
server on a
single machine
Preparation
for
Environment
Setup
Setup of SSL
communicatio
n environment
for the
repository
server (update
system) for
use of multiple
repository
servers or
addition of a
repository
server (*1)
Creation of
SSO
repository
Creation of
SSO
repository
Creation of
SSO
repository
Creation of
SSO
repository
Registering
user
information
and role
configuration
in SSO
repository
Registering
user
information
and role
configuration
in SSO
repository
Registering
user
information
and role
configuration
in SSO
repository
Registering
user
information
and role
configuration
in SSO
repository
Setting up
repository
server (server
in single
configuration
or update
system server
in multiple
configuration)
Setting up
repository
server (server
in single
configuration
or update
system server
in multiple
configuration)
Setting up
repository
server (server
in single
configuration
or update
system server
in multiple
configuration)
Environment Setup Flow
Setting up the
authentication
server on a
machine and
the repository
server on
another
machine
Setting up the
authentication
server on
multiple
machines and
the repository
server on one
machine
Setting up the
authentication
server and the
repository
server on
multiple
machines
individually
Adding an
authentication
server to the
authentication
infrastructure
already set up
Work for
setting up
repository
server
(reference
system)
Setup of
authentication
server
Setting up of
SSL
communicatio
n environment
Setting up of
SSL
communicatio
n environment
Setting up of
SSL
communicatio
n environment
Setting up one
authentication
server
Setting up one
authentication
server
Setting up one
authentication
server
Adding
authentication
server for load
distribution
Adding
authentication
server for load
distribution
Setting the
repository
server
(reference
system)
information in
authentication
server
Adding a
repository
server
(reference
system) to the
authentication
infrastructure
already set up
(multiserver
system)
Setting up the
repository
server and the
authentication
server on a
single machine
Work for
setting up
repository
server
(reference
system)
Setting up of
SSL
communicatio
n environment
Adding
authentication
server for load
distribution
Setting the
repository
server
(reference
system)
information in
authentication
server
Setting up
Repository
Server and
Authentication
Server on a
Single
Machine
Registering
Business
System
Registering
Business
System
Registering
Business
System
Registering
Business
System
Registering
Business
System
2-5
Chapter 2: Environment Setup (SSO Administrators)
Remark
Use of
authentication
infrastructure
configuration
spreadsheet
Setting up the
authentication
server on a
machine and
the repository
server on
another
machine
Setting up the
authentication
server on
multiple
machines and
the repository
server on one
machine
Setting up the
authentication
server and the
repository
server on
multiple
machines
individually
The
authentication
infrastructure
configuration
spreadsheet
(middle-scale
system) is
available.
The
authentication
infrastructure
configuration
spreadsheet
(middle-scale
system) is
available.
The
authentication
infrastructure
configuration
spreadsheet
(large-scale
system) is
available.(*2)
Adding an
authentication
server to the
authentication
infrastructure
already set up
Adding a
repository
server
(reference
system) to the
authentication
infrastructure
already set up
(multiserver
system)
Setting up the
repository
server and the
authentication
server on a
single machine
The
authentication
infrastructure
configuration
spreadsheet
(small-scale)
is available.
Notes
*1
This work is not required if the SSL communication environment has been set up in the active
repository server (update system).
*2
The configuration spreadsheet for the Smart Repository environment setup (an Excel file) is
provided by Smart Repository. Using this spreadsheet when creating the SSO master and slave
repositories, you can accurately set up the Interstage Management Console. Refer to 'Choosing
the Operating Mode' of 'Designing a Repository' of 'Environment Setup' in the Smart Repository
Operator's Guide for details of the configuration spreadsheet for Smart Repository environment
setup.
Using the Authentication Infrastructure Configuration
Spreadsheet
The authentication infrastructure configuration spreadsheet (an Excel file) is provided to assist the setup
of the authentication infrastructure environment. This file helps users to calculate connection
information between servers to be set in the Interstage Management Console. Fetch the sheet from the
following storage directory as necessary. Refer to [Procedure for Use] in the sheet for details of how to
use it.
2-6
Environment Setup Flow
Filenames and Location of the Authentication Infrastructure Configuration Spreadsheet
File name of the Authentication Infrastructure Configuration Spreadsheet:
•
SSO_Auth_L.xls
Use this sheet to set up authentication servers and repository servers on multiple machines.
•
SSO_Auth_M.xls
Use this sheet to set up an authentication server and a repository server on a single machine, or
authentication servers and repository servers on multiple machines and a single machine,
respectively.
•
SSO_Auth_S.xls
Use this sheet to set up a repository server and authentication server on a single machine.
Location of the Authentication Infrastructure Configuration Spreadsheet:
Folder 'ApplicationServer\tuning' of Manual CD
Conditions for Using the Authentication Infrastructure Configuration Spreadsheet
The authentication infrastructure configuration spreadsheet supports Microsoft® Excel 2000 and
Microsoft® Excel 2002. Ensure that either Microsoft® Excel 2000 or Microsoft® Excel 2002 is installed
on your computer.
This sheet uses macros. Configure the Microsoft® Excel security level to enable macros. Refer to
Microsoft® Excel Help for details of how to set the security level.
Contact your system administrator before changing the Microsoft® Excel security level.
The following procedure describes how to set the security level to use the authentication infrastructure
configuration spreadsheet in Microsoft® Excel 2002:
1.
Start Microsoft® Excel 2002 and from the menu bar, select [Tool (T)] > [Macro (M)] > [Security (S)].
2.
The macro security setting window appears. Select [Medium (M)] in the [Security level] tab.
3.
Click OK.
4.
Quit Microsoft® Excel and restart.
5.
From the menu bar, select [File (F)] > [Open (O)] to open the authentication infrastructure
configuration spreadsheet.
6.
The dialog asks whether to enable the macro. Click [Enable macro (E)].
After using this sheet, restore the security level as necessary.
2-7
Chapter 2: Environment Setup (SSO Administrators)
Preparation for Environment Setup
Prepare a user program and design an SSO repository before environment setup.
Designing an SSO Repository
In Interstage Single Sign-on, the SSO repository collectively manages information required for
authentication and authorization. This section explains the items to be designed before creation of an
SSO repository.
Designing Information to be Registered in the SSO Repository
Three information items are registered in the SSO repository: Role configuration, user information, and
protection resources. To set up a new authentication infrastructure, role configuration and user
information must be designed.
•
Role configuration
Role configuration is mandatory for authorization in Interstage Single Sign-on. Design this
information according to the organizational structure and user position. Refer to 'Role
Configuration' of 'Information Required for Authorization Using Roles' for details.
•
User information
User information indicates information on the user who uses Interstage Single Sign-on. Design the
user ID/password, and role configuration for association for each user. Refer to 'User Information'
for details.
Take care not to create invalid SSO repository data when designing role configuration and user
information.
The SSO repository data check sheet (an Excel file) is provided. This check sheet contains the notes
on SSO repository design. Fetch the check sheet from the following storage directory when designing
role configuration and user information.
File Name and Location of the SSO Repository Data Check Sheet
File Name of the SSO Repository Data Check Sheet:
SSO_Data_Chk.xls
Location of the SSO Repository Data Check Sheet:
Folder 'ApplicationServer\tuning' of Manual CD
Register role configuration and user information in the created SSO repository. Design and register
protection resources when adding a business system.
2-8
Preparation for Environment Setup
Designing a Registration Destination Entry
Design an entry in which role configuration, user information, and protection resources are to be
registered in the SSO repository.
Define the registration destination entry when creating an SSO repository.
The following table shows examples of registration destination entries:
Example
Management information
Registration destination entry
Role configuration
ou=Role,ou=SSO ACI,ou=interstage,o=fujitsu,dc=com
User information
ou=User,ou=interstage,o=fujitsu,dc=com
Protection resource
ou=Resource,ou=SSO ACI,ou=interstage,o=fujitsu,dc=com
Figure 2-2 Registration Destination Entries
In the Interstage Management Console, when the default value is specified in [Public directory] and
'Create' is selected for [Create default tree?] in creating an SSO Repository, the registration destination
entries shown in the above table are created. Samples provided by Interstage Single Sign-on for
registering role configuration and user information have been created with the registration destination
entries shown in Figure 2-2.
Examples of SSO Repository Design
Role Configuration
Example
This example shows a design of registering three roles classified by roles/organization and one role set
having two among the three roles in the following registration destination entry:
Role configuration registration destination entry: ou=Role,ou=SSO ACI,ou=interstage,o=fujitsu,dc=com
Table 2-2 Register Roles
Role/organization
Role/role set name
Name of role contained in the role set
All employees
All
employee, executives
Executive
Executives
-
Employee
Employee
-
Administration department
Administration
-
2-9
Chapter 2: Environment Setup (SSO Administrators)
User Information
Example
This example shows a design of registering information about two users in the following registration
destination entry:
User information registration destination entry: ou=User,ou=interstage,o=fujitsu,dc=com
Table 2-3 Register User Information
Item
User information
user001
user002
cn=user001
cn=user002
Authentication method
Certificate authentication
User ID
user001
user002
Password
00123401
00123402
Information identifying a user at
certificate authentication
user001@ interstage.fujitsu.com
user002@ interstage.fujitsu.com
Role name/role set name
Executives
employee, administration
Re-authentication interval
60 minutes
60 minutes
Validation start date
00:00:00, January 1, 2004
Expiration date
00:00:00, December 31, 2004
Registration Destination Entry
Example
The following example shows the registration of role configuration and user information as registration
destination entries:
Role configuration registration destination entry: ou=Role,ou=SSO ACI,ou=interstage,o=fujitsu,dc=com
User information registration destination entry: ou=User,ou=interstage,o=fujitsu,dc=com
2-10
Preparation for Environment Setup
Figure 2-3 Role Configuration and User Information Registration Destinations
Preparation for a User Program
To install Interstage Single Sign-on, prepare a user program for operating the SSO repository in the
following ways:
•
Registering role configuration in the SSO repository
•
Registering user information in the SSO repository
•
Deleting user information from the SSO repository
•
Adding a user role
•
Deleting a user role
•
Displaying user lock status
•
Displaying and changing the user validity period
•
Changing the user password
This manual describes an example of coding a user program in Java. Create a user program that fits in
with your operation based on the example. Refer to 'Samples of User Program Descriptions' for details.
Create a user program for operating an SSO repository based on the correct design of an SSO
repository. Take care not to create invalid SSO repository data.
Allocate the user program to a place that fits in with your operation, giving due consideration to security.
Refer to 'Role Configuration Entry', and 'User Information Entry' for details of the entry attributes of role
configuration and user information in Interstage Single Sign-on.
2-11
Chapter 2: Environment Setup (SSO Administrators)
Repository Server Setup
This section describes the procedure for setting up a repository server that configures the authentication
infrastructure.
Use the Interstage Management Console of the machine in which a repository server is set up. Refer to
the Operator’s Guide for details of starting the Interstage Management Console. Refer to the Operator’s
Guide for details of the items to be defined in the Interstage Management Console.
Setting up a Repository Server in the System with a Single Repository Server
Perform the following procedure to set up a repository server in a single-repository server configuration:
Repository server setup
1.
Create an SSO repository.
2.
Register user information and role configuration in the SSO repository.
3.
Set up the repository server.
Setting up a Repository Server in the Multiple Repository Server Configuration
Perform the following procedure to set up a repository server in the multiple-repository server
configuration:
Set up an SSL communication environment of the repository server (update system)
Set up a repository server (update system)
Perform the same procedure as that for setting up a repository server in the single repository server
configuration.
1.
Create an SSO repository (master) of the repository server (update system).
2.
Register user information and role configuration in the SSO repository (master).
3.
Set up the repository server (update system).
Set up a repository server (reference system)
2-12
1.
Back up the SSO repository data for the repository server (update system).
2.
Set up an SSL communication environment of the repository server (reference system).
3.
Create an SSO repository (slave) for the repository server (reference system).
4.
Restore the SSO repository in the repository server (reference system).
5.
Change the setting of the SSO repository for the restored repository server (reference system).
6.
Set up the repository server (reference system).
7.
Change the setting of the SSO repository for the repository server (update system).
Repository Server Setup
Setting up a Repository Server for Addition of a Repository Server (Reference System)
Perform the following procedure to add a repository server (reference system) during operation:
Set up an SSL communication environment of the repository server (update system)
This step is not required when an SSL communication environment has been set up in the repository
server (update system).
Set up a Repository Server (Reference System)
Perform the same procedure as that for setting up a repository server (reference system) in the system
with multiple repository servers.
1.
Back up the SSO repository data for the repository server (update system).
2.
Set up an SSL communication environment of the repository server (reference system).
3.
Create an SSO repository (slave) for the repository server (reference system).
4.
Restore the SSO repository in the repository server (reference system).
5.
Change the setting of the SSO repository for the restored repository server (reference system).
6.
Set up the repository server (reference system).
7
Change the setting of the SSO repository for the repository server (update system).
Creating an SSO Repository
Create an SSO repository to set up a new authentication infrastructure.
Use the Interstage Management Console of the machine in which a repository server is set up and
perform the procedure below. Refer to the Operator’s Guide for details of the items to be defined in the
Interstage Management Console.
The SSO administrator must undertake the role of the repository administrator as described in the
Interstage Management Console.
1.
Select [Services] and then [Repository] from the System menu. Click on the [Create a New
Repository] tab.
2.
Specify items as described below.
Items with (*1) can be specified only when creating an SSO repository; they cannot be changed
after the SSO repository has been created. Take special care when setting these values.
General Settings
−
Repository Name (*1)
Specify the name of an SSO repository to be created.
−
Administrator DN (*1)
Specify a DN (distinguished name) of the administrator that manages the SSO repository to be
created in the DN (distinguished name) format. (Example: cn=manager)
−
Administrator DN password
Specify a password for the SSO administrator.
2-13
Chapter 2: Environment Setup (SSO Administrators)
−
Administrator DN password (re-enter)
Re-enter the password for the SSO administrator.
−
Public Directory (*1)
'ou=interstage,o=fujitsu,dc=com' has been specified. Change this directory as necessary.
−
Create Default Tree? (*1)
Click 'Yes.'
When 'Create' is clicked and 'ou=interstage,o=fujitsu,dc=com' is specified in the public
directory, the following directory trees are created:
−
Tree to be created
Use
ou=User,ou=interstage,o=fujitsu,dc=com
For registration user
information
ou=SSO ACI,ou=interstage,o=fujitsu,dc=com
For registering access
control information
ou=Resource,ou=SSO ACI,ou=interstage,o=fujitsu,dc=com
For registering protection
resources
ou=Role,ou=SSO ACI,ou=interstage,o=fujitsu,dc=com
For registering role
configuration
Port number (*1)
Specify a port number to be used in non-SSL communication.
−
Enable SSL encryption? (*1)
Select 'No'.
If it is necessary for a user application to access the SSO repository using SSL communication,
select 'Yes'. In this case, specify [SSL Port number] and [SSL configuration].
−
SSL Port number(*1)
Specify the port number used in SSL communication.
Specify this to select 'Yes' in [Enable SSL encryption?].
−
SSL configuration
Select the SSL configuration used in SSL communication.
Specify this to select 'Yes' in [Enable SSL encryption?].
−
Connection idle Timeout
The default is '900 seconds'. Change the value as necessary.
2-14
Repository Server Setup
Detailed settings
Database Configuration
−
Maximum number of searchable entries
Maximum number of entries that can be searched The default is '500 entries'. Change the
value as necessary.
−
Cache Size
The default is '1,000 pages'. One page consists of 4 kilobytes. Change the value as necessary.
−
Search Timeout
The default is '3,600 seconds'. Change the value as necessary.
−
User password encryption method (*1)
Select 'SHA.'
−
Database Storage Directory (*1)
The following directory has been specified. Change the directory as necessary.
'C:\Interstage\Enabler\EnablerDStores\IREP'
'/var/opt/FJSVena/EnablerDStores/FJSVirep'
'/var/opt/FJSVena/DStores/FJSVirep'
Access log Configuration
−
Output Access Log?
Output access log Always select 'Yes'.
−
Output level
Select 'Client requests' and 'Server errors'. Select other items as necessary.
−
Access log storage directory
Change the value as necessary.
−
Rotation Type
Change the value as necessary.
−
Size
Change the value as necessary.
−
Number of access log files
Change the value as necessary.
3.
The status of the SSO repository (master) appears. Check the details.
2-15
Chapter 2: Environment Setup (SSO Administrators)
4.
Check the checkbox of the created SSO repository and click the Start button to start the SSO
repository.
Registering User Information and Role Configuration in the SSO
Repository
Register user information and role configuration in the SSO repository with the user program. Refer to
Preparation for a User Program, for details about the user program.
User information can be imported from the database (source data) to the SSO repository using a
command. For details on importing user information using a command, see 'Importing User Information
From the Database to the SSO Repository'.
Refer to Role Configuration Entry and User Information Entry for details of the entry attributes of role
configuration and user information in Interstage Single Sign-on.
A CSV data file or LDIF file can also be used to register user information and role configuration in the
SSO repository.
Refer to Using a CSV Data File and Using an LDIF File for details.
Importing User Information From the Database to the SSO Repository
Use the ssoimportum command to import user information from the database (source data) to the SSO
repository. For details of the database that can be used, see 'Supported Software' - 'Software Products
Required for Application Execution' in the Product Notes.
Before user information is imported from the source data to the SSO repository, the SSO repository
must be created. For details on SSO repository creation methods, see 'Creating an SSO Repository'.
In this section, the table temporarily created in the database or the table is called a 'virtual table'.
To make the source data information public, create a virtual table. Enter the table name and column
name of the connected source data in the operation information file. Using this method, registered user
information can be extracted from this source data and registered in the SSO repository. Specify the
operation information file using the parameters of the ssoimportum command.
If information that you do not want to make public is included for security purposes you should use the
public user information to create a virtual table and make a connection to that table. In this way, user
information can be extracted without having to make an actual table public.
2-16
Repository Server Setup
Figure 2-4 Importing User Information from the Database to the SSO Repository
The procedure for importing user information from the database (source data) to the SSO repository is
described below:
1.
Set the CLASSPATH environment variable
2.
Create the operation information file
3.
Execute the ssoimportum command
(1) Set the CLASSPATH environment variable
Use JDBC to connect to the database. The JDBC driver for connection to the database must be
prepared.
Before using the ssoimportum command, add the JDBC driver to be used to the CLASSPATH
environment variable.
The Interstage JDBC driver can only be used to connect to SQL Server.
Example
Conditions for connection and an example of the settings that should be made are shown below.
Database to be connected to: Symfoware V6.0L10
JDBC driver storage directory C:\temp\fjsymjdbc2.jar
C:\>set CLASSPATH=%CLASSPATH%;C:\temp\fjsymjdbc2.jar
2-17
Chapter 2: Environment Setup (SSO Administrators)
Conditions for connection and an example of the settings that should be made are shown below.
Database to be connected to: Oracle8i
JDBC driver storage directory C:\temp\classes12.zip and C:\temp\nls_charset12.zip
C:\>set
CLASSPATH=%CLASSPATH%;C:\temp\classes12.zip;C:\temp\nls_charset12.zip
An example of the settings that should be made if the Interstage JDBC driver is used are shown below.
Database to be connected to: SQL Server
JDBC driver storage directory C:\Interstage\EJB\jdbc\lib\fjisjdbc2.jar
C:\>set CLASSPATH=%CLASSPATH%;C:\Interstage\EJB\jdbc\lib\fjisjdbc2.jar
Conditions for connection and an example of the settings that should be made are shown below.
Database to be connected to: Symfoware 6.0
JDBC driver storage directory /tmp/fjsymjdbc2.jar
# CLASSPATH=/tmp/fjsymjdbc2.jar:$CLASSPATH
# export CLASSPATH
Conditions for connection and an example of the settings that should be made are shown below.
Database to be connected to: Oracle8i
JDBC driver storage directory /tmp/classes12.zip and /tmp/nls_charset12.zip
# CLASSPATH=/tmp/classes12.zip:/tmp/nls_charset12.zip:$CLASSPATH
# export CLASSPATH
Conditions for connection and an example of the settings that should be made are shown below.
Database to be connected to: Symfoware 6.0
JDBC driver storage directory /tmp/fjsymjdbc2.jar
# CLASSPATH=/tmp/fjsymjdbc2.jar:$CLASSPATH
# export CLASSPATH
2-18
Repository Server Setup
Conditions for connection and an example of the settings that should be made are shown below.
Database to be connected to: Oracle9i
JDK/JRE to be used to:
1.4
JDBC driver storage directory /tmp/ojdbc14.jar and /tmp/nls_charset12.zip
# CLASSPATH=/tmp/ojdbc14.jar:/tmp/nls_charset12.zip:$CLASSPATH
# export CLASSPATH
(2) Create the operation information file
Create an operation information file in which the settings that are required for extracting the user
information are described.
Refer to 'ssoimportum' in 'Single Sign-on Operation Commands' of the Reference Manual (Command
Edition) for details of creating the operation information file.
(3) Execute the ssoimportum command
Specify the operation information file created in (2). Execute the ssoimportum command to extract the
user information and import it to the SSO repository.
Refer to 'Single Sign-on Operation Commands' in the Reference Manual (Command Edition) for details
of the ssoimportum command.
Using a CSV Data File
A large quantity of user information managed by the personnel database, may be added to the SSO
repository at system installation, or at another time. To facilitate this, a CSV data file extracted from the
personnel database can be used to add entries to the SSO repository in batch. Periodic updates of user
information may be required when personnel transfer or new employees join. In this case, a CSV data
file containing only updated information can be used to add user information to the SSO repository.
This section explains how to register user information and role configuration using a CSV data file based
on the sample CSV data file provided by Interstage Single Sign-on.
The following paragraphs explain the procedure for registering entries using the CSV data file. Refer to
the Smart Repository Operator's Guide for details of the CSV format.
Execute the irepaddrole command to register a role and irepmodifyent command to register user
information from the CSV data file. Refer to 'Smart Repository Operation Commands' in the Reference
Manual (Command Edition) for details of the command.
The CSV data file can also be used to delete or update information. Refer to the Smart Repository
Operator's Guide for details of how to delete or update information.
Note
The CSV file contains a password. Ensure that you take sufficient action to protect the CSV file.
For details about securing your data, Refer to 'Security Measures' of 'Interstage Single Sign-on' of
'Security Risks' in the Security System Guide.
Perform the following procedure to add entries using the CSV data file:
1.
Extract data in CSV format from the personnel database.
2.
Create a rule file.
3.
Execute the role configuration import command.
2-19
Chapter 2: Environment Setup (SSO Administrators)
4.
Execute the user information import command.
Figure 2-5 Add Entries using the CSV Data File
The sample files provided by Interstage Single Sign-on are as follows:
Sample File Names and Storage Directory
Sample CSV file for entry addition:
sample_add.csv
Sample rule file:
sample_rule.xml
Sample storage directory:
C:\Interstage\F3FMsso\ssoatcsv\sample\csv
/opt/FJSVssosv/sample/csv
1. Extracting Data in CSV Format from the Personnel Database
Use the database function to extract user information in CSV format from the personnel database.
Extract the following user information items from the database:
2-20
Row
Item
Row 1
First and last name
Row 2
Last name
Row 3
First name
Row 4
User ID
Row 5
Password
Row 6
Employee number
Row 7
Mail address
Row 8
Role name
Repository Server Setup
The data in CSV format that corresponds to the above data is as follows:
user001,user001,user001,user001,user001,100001,[email protected]
m,Admin
user002,user002,user002,user001,user001,100002,[email protected]
m,Admin
user003,user003,user003,user003,user003,100003,[email protected]
m,Leader
user004,user004,user004,user004,user004,100004,[email protected]
m,Leader
user005,user005,user005,user005,user005,100005,[email protected]
m,General
user006,user006,user006,user006,user006,100006,[email protected]
m,General
2. Creating a Rule File
To register CSV data in the SSO repository, the data must be associated with SSO repository
information. For the association, create a rule file and set a mapping rule. Refer to the Smart
Repository Operator's Guide for details of the mapping rule.
Refer to Role Configuration Entry and User Information Entry for details of the entry attributes that can
be changed depending on the operating environment of Interstage Single Sign-on.
Associating CSV Data with User Information Entry Attributes
Associate the data in CSV format with the user entry attributes as shown in Table 2-4, and register the
associated data in the SSO repository.
Table 2-4 Associate CSV Data with User Information Entry Attributes
Row
Item
User information entry attribute
Row 1
First and last name
cn
Row 2
Last name
sn
Row 3
First name
givenName
Row 4
User ID
uid
Row 5
Password
userPassword
Row 6
Employee number
employeeNumber
Row 7
Mail address
mail
Row 8
Role name
ssoRoleName
CSV Data
In the CSV data, specify operation for the SSO repository in row 0.
ADD,user001,user001,user001,user001,user001,100001,[email protected]
.com,Admin
ADD,user002,user002,user002,user002,user002,100002,[email protected]
.com,Admin
ADD,user003,user003,user003,user003,user003,100003,[email protected]
2-21
Chapter 2: Environment Setup (SSO Administrators)
.com,Leader
ADD,user004,user004,user004,user004,user004,100004,[email protected]
.com,Leader
ADD,user005,user005,user005,user005,user005,100005,[email protected]
.com,General
ADD,user006,user006,user006,user006,user006,100006,[email protected]
.com,General
Rule File
The rule file associates the above CSV data with the user information entry attributes as shown below.
In the example of the role file, the following items are set:
Rule Name
sso rule
Public Directory
ou=User,ou=interstage,o=fujitsu,dc=com
Entry Attribute that Uniquely Identifies the User
uid
Operation
ADD (addition)
Attributes to be set According to CSV Data
cn, sn, givenName, uid, userPassword, employeeNumber, mail, ssoRoleName
Attributes to be set as a Fixed Value
ssoAuthType, ssoCredentialTTL, ssoNotBefore (*1)
*1 In the following example, the date is specified in the format YYYYMMDDHHMMSS+XXXX.
'+XXXX' refers to the time difference from UTC (Universal Time Coordinate). In cases where 'XXXX' is used, it means the same as above.
<?xml version="1.0" encoding="EUC-JP" ?>
<!-- Cannot be modified -->
<!DOCTYPE Csv2Directory [
<!ELEMENT Rule (name, baseDn, midDn?, Rdn+, DnChange?, objectClass+,
attributeSeparator?, unique*, CSV, fixed?)>
<!ELEMENT CSV (ldapop?, Attribute)>
<!ELEMENT ldapop (op?, ldapadd?, ldapdelete?, ldapmodify?)>
<!ELEMENT name (#PCDATA)>
<!ELEMENT baseDn (#PCDATA)>
<!ELEMENT Rdn (#PCDATA)>
<!ELEMENT objectClass (#PCDATA)>
<!ELEMENT attributeSeparator (#PCDATA)>
<!ELEMENT op (#PCDATA)>
<!ELEMENT ldapadd (#PCDATA)>
2-22
Repository Server Setup
<!ELEMENT ldapdelete (#PCDATA)>
<!ELEMENT ldapmodify (#PCDATA)>
]>
<!-- Cannot be modified -->
<Csv2Directory>
<Rule>
<name>sso rule</name>
<!-- Define baseDn (mandatory). -->
<baseDn>ou=User,ou=interstage,o=fujitsu,dc=com</baseDn>
<!-- Define attributes to be added before baseDn (arbitrary). -->
<!-- Not required for SSO
<midDn>ou=8,ou=9,ou=10</midDn>
-->
<!-- Define RDN (Mandatory:
allowed). -->
Multiple values allowed:
Same value not
<!-- Enter a unique number or attribute name. -->
<Rdn>cn</Rdn>
<!-- Specify whether the changed DN is assumed to be moved (arbitrary). -->
<!-- If assumed, specify 1. -->
<DnChange>1</DnChange>
<!-- Define objectClass. -->
<objectClass>top</objectClass>
<objectClass>person</objectClass>
<objectClass>organizationalPerson</objectClass>
<objectClass>inetOrgPerson</objectClass>
<objectClass>ssoUser</objectClass>
<!-- Delimiter when creating an attribute value from multiple CSV items
(arbitrary) -->
<!-- When specifying nothing, a null character is assumed. -->
<!-- A null character cannot be specified. -->
<attributeSeparator>-</attributeSeparator>
<!-- Specify the attribute that does not allow any same value under baseDn.
-->
<!-- Specify a unique number or attribute name. -->
2-23
Chapter 2: Environment Setup (SSO Administrators)
<!-- (Arbitrary:
Multiple values allowed:
Same value not allowed) -->
<unique>uid</unique>
<CSV>
<!-- An item number of CSV indicating a processing item
(addition, deletion, or change) (arbitrary). -->
<ldapop>
<op>0</op>
<ldapadd>ADD</ldapadd>
<ldapdelete>DEL</ldapdelete>
<ldapmodify>MOD</ldapmodify>
<ldapmove>MOV</ldapmove>
</ldapop>
<!-- Mapping between each of CSV items and directory attributes (arbitrary)
-->
<Attribute>
<cn>1</cn>
<sn>2</sn>
<givenName>3</givenName>
<uid>4</uid>
<userPassword>5</userPassword>
<employeeNumber>6</employeeNumber>
<mail>7</mail>
<ssoRoleName>8</ssoRoleName>
</Attribute>
</CSV>
<!-- Define attributes to be set as fixed values (arbitrary). -->
<fixed>
<ssoAuthType>basicAuthOrCertAuth</ssoAuthType>
<ssoCredentialTTL>60</ssoCredentialTTL>
<ssoNotBefore>20010101090000+0900</ssoNotBefore>
</fixed>
</Rule>
</Csv2Directory>
3. Executing the Role Configuration Import Command
To add entry data according to the mapping rules, execute irepaddrole command provided by Smart
Repository on the machine in which a repository server is set up.
After execution of the irepaddrole command, fetch entry information and check whether entry data has
been added correctly. Refer to 'Entry Management' in the Smart Repository Operator's Guide for details
of how to operate the entry.
2-24
Repository Server Setup
Example
For the administrator DN and Bind password, specify the administrator DN and administrator DN
password that were set when the SSO repository was created in the Interstage Management Console.
In the following example, 389 is specified for the port number of the SSO repository and
'cn=manager,ou=interstage,o=fujitsu,dc=com' is specified for the administrator DN:
Administrator DN: 'cn=manager,ou=interstage,o=fujitsu,dc=com'
Rule file: C:\Interstage\F3FMsso\ssoatcsv\sample\csv\sample_rule.xml
CSV file: C:\Interstage\F3FMsso\ssoatcsv\sample\csv\sample_add.csv
Role configuration registration destination entry: ou=Role,ou=SSO ACI,ou=interstage,o=fujitsu,dc=com
Enter the administrator DN password if you are prompted to enter the Bind password. The entered
password is not displayed.
C:\>irepaddrole -h localhost -p 389 -D
"cn=manager,ou=interstage,o=fujitsu,dc=com" -r
C:\Interstage\F3FMsso\ssoatcsv\sample\csv\sample_rule.xml -i
C:\Interstage\F3FMsso\ssoatcsv\sample\csv\sample_add.csv -b "ou=Role,ou=SSO
ACI,ou=interstage,o=fujitsu,dc=com"
Enter Bind password:
IREP: INFO: irep13570: adding new entry cn=Admin,ou=Role,ou=SSO
ACI,ou=interstage,o=fujitsu,dc=com
IREP: INFO: irep13570: adding new entry cn=Leader,ou=Role,ou=SSO
ACI,ou=interstage,o=fujitsu,dc=com
IREP: INFO: irep13570: adding new entry cn=General,ou=Role,ou=SSO
ACI,ou=interstage,o=fujitsu,dc=com
C:\>
For the administrator DN and Bind password, specify the administrator DN and administrator DN
password that were set when the SSO repository was created in the Interstage Management Console.
In the following example, 389 is specified for the port number of the SSO repository and
'cn=manager,ou=interstage,o=fujitsu,dc=com' is specified for the administrator DN:
Administrator DN: 'cn=manager,ou=interstage,o=fujitsu,dc=com'
Rule file: /opt/FJSVssosv/sample/csv/sample_rule.xml
CSV file: /opt/FJSVssosv/sample/csv/sample_add.csv
Role configuration registration destination entry: ou=Role,ou=SSO ACI,ou=interstage,o=fujitsu,dc=com
Enter the administrator DN password if you are prompted to enter the Bind password. The entered
password is not displayed.
# irepaddrole -h localhost -p 389 -D
"cn=manager,ou=interstage,o=fujitsu,dc=com" -r
/opt/FJSVssosv/sample/csv/sample_rule.xml -i
/opt/FJSVssosv/sample/csv/sample_add.csv -b "ou=Role,ou=SSO
ACI,ou=interstage,o=fujitsu,dc=com"
Enter Bind password:
2-25
Chapter 2: Environment Setup (SSO Administrators)
UX:IREP: INFO: irep13570: adding new entry cn=Admin,ou=Role,ou=SSO
ACI,ou=interstage,o=fujitsu,dc=com
UX:IREP: INFO: irep13570: adding new entry cn=Leader,ou=Role,ou=SSO
ACI,ou=interstage,o=fujitsu,dc=com
UX:IREP: INFO: irep13570: adding new entry cn=General,ou=Role,ou=SSO
ACI,ou=interstage,o=fujitsu,dc=com
#
Note
Ensure that you take sufficient action to protect your administrator DN password.
For details about securing your data, refer to 'Security Measures' of 'Interstage Single Sign-on' of
'Security Risks' in the Security System Guide.
4. Executing the User Information Import Command
To add entry data according to the mapping rules, execute the irepmodifyent command provided by
Smart Repository on the machine in which a repository server is set up.
After execution of the irepmodifyent command, fetch entry information and check whether entry data has
been added correctly. Refer to 'Entry Management' in the Smart Repository Operator's Guide for details
of how to operate the entry.
Example
For the administrator DN and Bind password, specify the administrator DN and administrator DN
password that were set when the SSO repository was created in the Interstage Management Console.
In the following example, 389 is specified for the port number of the SSO repository and
'cn=manager,ou=interstage,o=fujitsu,dc=com' is specified for the administrator DN:
Administrator DN: 'cn=manager,ou=interstage,o=fujitsu,dc=com'
Rule file: C:\Interstage\F3FMsso\ssoatcsv\sample\csv\sample_rule.xml
CSV file: C:\Interstage\F3FMsso\ssoatcsv\sample\csv\sample_add.csv
Enter the administrator DN password if you are prompted to enter the Bind password. The entered
password is not displayed.
C:\>irepmodifyent -h localhost -p 389 –D
"cn=manager,ou=interstage,o=fujitsu,dc=com" –r
C:\Interstage\F3FMsso\ssoatcsv\sample\csv\sample_rule.xml -i
C:\Interstage\F3FMsso\ssoatcsv\sample\csv\sample_add.csv
Enter Bind password:
IREP: INFO: irep13570: adding new entry
cn=User001,ou=User,ou=interstage,o=fujitsu,dc=com
IREP: INFO: irep13570: adding new entry
cn=User002,ou=User,ou=interstage,o=fujitsu,dc=com
IREP: INFO: irep13570: adding new entry
cn=User003,ou=User,ou=interstage,o=fujitsu,dc=com
IREP: INFO: irep13570: adding new entry
cn=User004,ou=User,ou=interstage,o=fujitsu,dc=com
IREP: INFO: irep13570: adding new entry
2-26
Repository Server Setup
cn=User005,ou=User,ou=interstage,o=fujitsu,dc=com
IREP: INFO: irep13570: adding new entry
cn=User006,ou=User,ou=interstage,o=fujitsu,dc=com
C:\>
For the administrator DN and Bind password, specify the administrator DN and administrator DN
password that were set when the SSO repository was created in the Interstage Management Console.
In the following example, 389 is specified for the port number of the SSO repository and
'cn=manager,ou=interstage,o=fujitsu,dc=com' is specified for the administrator DN:
Administrator DN: 'cn=manager,ou=interstage,o=fujitsu,dc=com'
Rule file: /opt/FJSVssosv/sample/csv/sample_rule.xml
CSV file: /opt/FJSVssosv/sample/csv/sample_add.csv
Enter the administrator DN password if you are prompted to enter the Bind password. The entered
password is not displayed.
# irepmodifyent -h localhost -p 389 –D
"cn=manager,ou=interstage,o=fujitsu,dc=com" -r
/opt/FJSVssosv/sample/csv/sample_rule.xml -i
/opt/FJSVssosv/sample/csv/sample_add.csv
Enter Bind password:
UX:IREP: INFO: irep13570: adding new entry
cn=User001,ou=User,ou=interstage,o=fujitsu,dc=com
UX:IREP: INFO: irep13570: adding new entry
cn=User002,ou=User,ou=interstage,o=fujitsu,dc=com
UX:IREP: INFO: irep13570: adding new entry
cn=User003,ou=User,ou=interstage,o=fujitsu,dc=com
UX:IREP: INFO: irep13570: adding new entry
cn=User004,ou=User,ou=interstage,o=fujitsu,dc=com
UX:IREP: INFO: irep13570: adding new entry
cn=User005,ou=User,ou=interstage,o=fujitsu,dc=com
UX:IREP: INFO: irep13570: adding new entry
cn=User006,ou=User,ou=interstage,o=fujitsu,dc=com
#
Note
Ensure that you take sufficient action to protect your administrator DN password.
For details about securing your data, refer to 'Security Measures' of 'Interstage Single Sign-on' of
'Security Risks' in the Security System Guide.
2-27
Chapter 2: Environment Setup (SSO Administrators)
Using an LDIF File
This section explains how to register user information and role configuration based on the sample LDIF
file provided by Interstage Single Sign-on. Perform the following procedure to register entries using the
LDIF file. Execute the ldapmodify command to register entries using the LDIF file.
Refer to the Smart Repository Operator's Guide for details of the LDIF file. Refer to the Reference
Manual (Command Edition) for details of the ldapmodify command.
The LDIF file also can be used to delete or update information. Refer to the Smart Repository
Operator's Guide for details of how to delete or update information.
1.
Create an LDIF file.
2.
Execute the ldapmodify command.
1. Creating an LDIF File
Specify in the LDIF file role configuration and user information to be registered in the SSO repository.
Modify role configuration and user information set in the sample LDIF file as necessary.
Refer to Role Configuration Entry and User Information Entry for details of the entry attributes of role
configuration and user information.
Note the following points for creating an LDIF file:
•
Do not insert a blank line at the beginning of the LDIF file. If a blank line is inserted, none of the
entries in the LDIF file are registered.
•
Insert a blank line between entry information items to separate entry information. If two or more
blank lines continue, subsequent entries are not registered.
If the default value of [Public directory] has been changed during creation of an SSO repository, change
the bold characters of the sample LDIF file to the directory set in [Public directory].
If 'No' is selected in [Create default tree?], add the following specification example to the beginning of
the sample LDIF file.
Example
In this example, the following entries are registered:
Public directory: ou=interstage,o=fujitsu,dc=com
Access control information registration destination entry: ou=SSO ACI,ou=interstage,o=fujitsu,dc=com
Role configuration registration destination entry: ou=Role,ou=SSO ACI,ou=interstage,o=fujitsu,dc=com
Protection resource registration destination entry: ou=Resource,ou=SSO
ACI,ou=interstage,o=fujitsu,dc=com
User information registration destination entry: ou=User,ou=interstage,o=fujitsu,dc=com
When a registration destination entry has been changed, also change the registration destination entry
set in the sample LDIF file.
dn: ou=SSO ACI,ou=interstage,o=fujitsu,dc=com
objectClass: organizationalUnit
objectClass: top
ou: SSO ACI
dn: ou=Role,ou=SSO ACI,ou=interstage,o=fujitsu,dc=com
2-28
Repository Server Setup
objectClass: organizationalUnit
objectClass: top
ou: Role
dn: ou=Resource,ou=SSO ACI,ou=interstage,o=fujitsu,dc=com
objectClass: organizationalUnit
objectClass: top
ou: Resource
dn: ou=User,ou=interstage,o=fujitsu,dc=com
objectClass: organizationalUnit
objectClass: top
ou: User
The following section shows the name of the sample LDIF file and storage directory:
LDIF File Name
sample.ldif
LDIF file storage directory
C:\Interstage\F3FMsso\ssoatcsv\sample\ldif
/opt/FJSVssosv/sample/ldif
#
#
# Interstage Single Sign-on
#
#
Repository(Directory) Entry sample LDIF
#
#
#******************************************************
#
# Role definition
#
#******************************************************
# Entry: Role: Admin
dn: cn=Admin,ou=Role,ou=SSO ACI,ou=interstage,o=fujitsu,dc=com
<- Registration destination entry of role name "Admin"
objectClass: ssoRole
<- Mandatory object class
objectClass: top
<- Mandatory object class
cn: Admin
<- Role name
# Entry: Role: Leader
dn: cn=Leader,ou=Role,ou=SSO ACI,ou=interstage,o=fujitsu,dc=com
<- Registration destination entry of role name "Leader"
objectClass: ssoRole
<- Mandatory object class
2-29
Chapter 2: Environment Setup (SSO Administrators)
objectClass: top
<- Mandatory object class
cn: Leader
<- Role name
# Entry: Role: General
dn: cn=General,ou=Role,ou=SSO ACI,ou=interstage,o=fujitsu,dc=com
<- Registration destination entry of role name "General"
objectClass: ssoRole
<- Mandatory object class
objectClass: top
<- Mandatory object class
cn: General
<- Role name
# Entry: RoleSet: AdminSet
dn: cn=AdminSet,ou=Role,ou=SSO ACI,ou=interstage,o=fujitsu,dc=com
<- Registration destination entry of role set name "AdminSet"
ssoRoleName: Admin
<- Role to be set in role set
objectClass: ssoRoleSet
<- Mandatory object class
objectClass: top
<- Mandatory object class
cn: AdminSet
<- Role set name
# Entry: RoleSet: LeaderSet
dn: cn=LeaderSet,ou=Role,ou=SSO ACI,ou=interstage,o=fujitsu,dc=com
<- Registration destination entry of role set name "LeaderSet"
ssoRoleName: AdminSet
<- Role set to be set in role set
ssoRoleName: Leader
<- Role to be set in role set
objectClass: ssoRoleSet
<- Mandatory object class
objectClass: top
<- Mandatory object class
cn: LeaderSet
<- Role set name
# Entry: RoleSet: GeneralSet
dn: cn=GeneralSet,ou=Role,ou=SSO ACI,ou=interstage,o=fujitsu,dc=com
<- Registration destination entry of role set name "GeneralSet"
ssoRoleName: LeaderSet
<- Role set to be set in role set
ssoRoleName: General
<- Role to be set in role set
objectClass: ssoRoleSet
<- Mandatory object class
objectClass: top
<- Mandatory object class
cn: GeneralSet
<- Role set name
#******************************************************
#
2-30
Repository Server Setup
# User definition
#
#******************************************************
# Entry: User: user001
dn: cn=user001,ou=User,ou=interstage,o=fujitsu,dc=com
<- Registration destination entry of user "user001"
objectClass: top
<- Mandatory object class
objectClass: person
<- Mandatory object class
objectClass: organizationalPerson
<- Mandatory object class
objectClass: inetOrgPerson
<- Mandatory object class
objectClass: ssoUser
<- Mandatory object class
uid: user001
<- User ID at password authentication
userPassword: user001
<- Password at password authentication
mail: [email protected]
<- Mail address
employeeNumber: 100001
<- Employee number
ssoRoleName: Admin
<- Role name
ssoAuthType: basicAuthOrCertAuth
<- Authentication method
ssoCredentialTTL: 60
<- Re-authentication interval
ssoNotBefore: 20010101090000+0900
<- Use start time
sn: user001
<- Last name
cn: user001
<- First and last name
# Entry: User: user002
dn: cn=user002,ou=User,ou=interstage,o=fujitsu,dc=com
<- Registration destination entry of user "user002"
objectClass: top
<- Mandatory object class
objectClass: person
<- Mandatory object class
objectClass: organizationalPerson
<- Mandatory object class
objectClass: inetOrgPerson
<- Mandatory object class
objectClass: ssoUser
<- Mandatory object class
uid: user002
<- User ID at password authentication
userPassword: user002
<- Password at password authentication
mail: [email protected]
employeeNumber: 100002
<- Mail address
<- Employee number
2-31
Chapter 2: Environment Setup (SSO Administrators)
ssoRoleName: Admin
<- Role name
ssoAuthType: basicAuthOrCertAuth
<- Authentication method
ssoCredentialTTL: 60
<- Re-authentication interval
ssoNotBefore: 20010101090000+0900
<- Use start time
sn: user002
<- Last name
cn: user002
<- First and last name
# Entry: User: user003
dn: cn=user003,ou=User,ou=interstage,o=fujitsu,dc=com
<- Registration destination entry of user "user003"
objectClass: top
<- Mandatory object class
objectClass: person
<- Mandatory object class
objectClass: organizationalPerson
<- Mandatory object class
objectClass: inetOrgPerson
<- Mandatory object class
objectClass: ssoUser
<- Mandatory object class
uid: user003
<- User ID at password authentication
userPassword: user003
<- Password at password authentication
mail: [email protected]
<- Mail address
employeeNumber: 100003
<- Employee number
ssoRoleName: Leader
<- Role name
ssoAuthType: basicAuth
<- Authentication method
ssoCredentialTTL: 60
<- Re-authentication interval
ssoNotBefore: 20010101090000+0900
<- Use start time
sn: user003
<- Last name
cn: user003
<- First and last name
# Entry: User: user004
dn: cn=user004,ou=User,ou=interstage,o=fujitsu,dc=com
<- Registration destination entry of user "user004"
2-32
objectClass: top
<- Mandatory object class
objectClass: person
<- Mandatory object class
objectClass: organizationalPerson
<- Mandatory object class
Repository Server Setup
objectClass: inetOrgPerson
<- Mandatory object class
objectClass: ssoUser
<- Mandatory object class
uid: user004
<- User ID at password authentication
userPassword: user004
<- Password at password authentication
mail: [email protected]
<- Mail address
employeeNumber: 100004
<- Employee number
ssoRoleName: Leader
<- Role name
ssoAuthType: basicAuth
<- Authentication method
ssoCredentialTTL: 60
<- Re-authentication interval
ssoNotBefore: 20010101090000+0900
<- Use start time
sn: user004
<- Last name
cn: user004
<- First and last name
# Entry: User: user005
dn: cn=user005,ou=User,ou=interstage,o=fujitsu,dc=com
<- Registration destination entry of user "user005"
objectClass: top
<- Mandatory object class
objectClass: person
<- Mandatory object class
objectClass: organizationalPerson
<- Mandatory object class
objectClass: inetOrgPerson
<- Mandatory object class
objectClass: ssoUser
<- Mandatory object class
uid: user005
<- User ID at password authentication
userPassword: user005
<- Password at password authentication
mail: [email protected]
<- Mail address
employeeNumber: 100005
<- Employee number
ssoRoleName: General
<- Role name
ssoAuthType: basicAuthAndCertAuth
<- Authentication method
ssoCredentialTTL: 60
<- Re-authentication interval
ssoNotBefore: 20020101090000+0900
<- Use start time
sn: user005
<- Last name
2-33
Chapter 2: Environment Setup (SSO Administrators)
cn: user005
<- First and last name
# Entry: User: user006
dn: cn=user006,ou=User,ou=interstage,o=fujitsu,dc=com
<- Registration destination entry of user "user006"
objectClass: top
<- Mandatory object class
objectClass: person
<- Mandatory object class
objectClass: organizationalPerson
<- Mandatory object class
objectClass: inetOrgPerson
<- Mandatory object class
objectClass: ssoUser
<- Mandatory object class
uid: user006
<- User ID at password authentication
userPassword: user006
<- Password at password authentication
mail: [email protected]
<- Mail address
employeeNumber: 100006
<- Employee number
ssoRoleName: General
<- Role name
ssoAuthType: CertAuth
<- Authentication method
ssoCredentialTTL: 60
<- Re-authentication interval
ssoNotBefore: 20020101090000+0900
<- Use start time
ssoNotAfter: 20021201085959+0900
<- Use exit time
sn: user006
<- Last name
cn: user006
<- First and last name
2. Executing the ldapmodify Command
Specify the created LDIF file and execute the ldapmodify command to register user information and role
configuration in the SSO repository.
After executing the ldapmodify command, fetch entry information and check whether user information
and role configuration have been registered correctly. Refer to 'Entry Management' in the Smart
Repository Operator's Guide for details of how to operate the entry.
2-34
Repository Server Setup
Example
For the administrator DN and Bind password, specify the administrator DN and administrator DN
password that were set when the SSO repository was created in the Interstage Management Console.
In the following example, 389 is specified for the port number of the SSO repository and
'cn=manager,ou=interstage,o=fujitsu,dc=com' is specified for the administrator DN:
LDIF file: C:\Interstage\F3FMsso\ssoatcsv\sample\ldif\sample.ldif
Role configuration registration destination entry: ou=Role,ou=SSO ACI,ou=interstage,o=fujitsu,dc=com
User information registration destination entry: ou=User,ou=interstage,o=fujitsu,dc=com
Administrator DN: cn=manager,ou=interstage,o=fujitsu,dc=com
Enter the administrator DN password if you are prompted to enter the Bind password. The entered
password is not displayed.
C:\> C:\Interstage\ID\Dir\sdk\C\bin\ldapmodify -p 389 -D
"cn=manager,ou=interstage,o=fujitsu,dc=com" -W -a -f
C:\Interstage\F3FMsso\ssoatcsv\sample\ldif\sample.ldif
Enter Bind password:
adding new entry cn=Admin,ou=Role,ou=SSO ACI,ou=interstage,o=fujitsu,dc=com
adding new entry cn=Leader,ou=Role,ou=SSO ACI,ou=interstage,o=fujitsu,dc=com
adding new entry cn=General,ou=Role,ou=SSO
ACI,ou=interstage,o=fujitsu,dc=com
adding new entry cn=AdminSet,ou=Role,ou=SSO
ACI,ou=interstage,o=fujitsu,dc=com
adding new entry cn=LeaderSet,ou=Role,ou=SSO
ACI,ou=interstage,o=fujitsu,dc=com
adding new entry cn=GeneralSet,ou=Role,ou=SSO
ACI,ou=interstage,o=fujitsu,dc=com
adding new entry cn=user001,ou=User,ou=interstage,o=fujitsu,dc=com
adding new entry cn=user002,ou=User,ou=interstage,o=fujitsu,dc=com
adding new entry cn=user003,ou=User,ou=interstage,o=fujitsu,dc=com
adding new entry cn=user004,ou=User,ou=interstage,o=fujitsu,dc=com
adding new entry cn=user005,ou=User,ou=interstage,o=fujitsu,dc=com
adding new entry cn=user006,ou=User,ou=interstage,o=fujitsu,dc=com
C:\>
2-35
Chapter 2: Environment Setup (SSO Administrators)
For the administrator DN and Bind password, specify the administrator DN and administrator DN
password that were set when the SSO repository was created in the Interstage Management Console.
In the following example, 389 is specified for the port number of the SSO repository and
'cn=manager,ou=interstage,o=fujitsu,dc=com' is specified for the administrator DN:
LDIF file: /opt/FJSVssosv/sample/ldif/sample.ldif
Role configuration registration destination entry: ou=Role,ou=SSO ACI,ou=interstage,o=fujitsu,dc=com
User information registration destination entry: ou=User,ou=interstage,o=fujitsu,dc=com
Administrator DN: cn=manager,ou=interstage,o=fujitsu,dc=com
Enter the administrator DN password if you are prompted to enter the Bind password. The entered
password is not displayed.
# /opt/FJSVidsdk/C/bin/ldapmodify -p 389 -D
"cn=manager,ou=interstage,o=fujitsu,dc=com" -W -a -f
/opt/FJSVssosv/sample/ldif/sample.ldif
Enter Bind password:
adding new entry cn=Admin,ou=Role,ou=SSO ACI,ou=interstage,o=fujitsu,dc=com
adding new entry cn=Leader,ou=Role,ou=SSO ACI,ou=interstage,o=fujitsu,dc=com
adding new entry cn=General,ou=Role,ou=SSO
ACI,ou=interstage,o=fujitsu,dc=com
adding new entry cn=AdminSet,ou=Role,ou=SSO
ACI,ou=interstage,o=fujitsu,dc=com
adding new entry cn=LeaderSet,ou=Role,ou=SSO
ACI,ou=interstage,o=fujitsu,dc=com
adding new entry cn=GeneralSet,ou=Role,ou=SSO
ACI,ou=interstage,o=fujitsu,dc=com
adding new entry cn=user001,ou=User,ou=interstage,o=fujitsu,dc=com
adding new entry cn=user002,ou=User,ou=interstage,o=fujitsu,dc=com
adding new entry cn=user003,ou=User,ou=interstage,o=fujitsu,dc=com
adding new entry cn=user004,ou=User,ou=interstage,o=fujitsu,dc=com
adding new entry cn=user005,ou=User,ou=interstage,o=fujitsu,dc=com
adding new entry cn=user006,ou=User,ou=interstage,o=fujitsu,dc=com
#
2-36
Repository Server Setup
Note
Ensure that you take sufficient action to protect the administrator password.
For details about securing your data, refer to 'Security Measures' of 'Interstage Single Sign-on' of
'Security Risks' in the Security System Guide.
Role Configuration Entry
This section describes the entry used to register role configuration in the SSO repository. Specify the
role name and role set name in the user information and protection resources.
The role name and role set name must both be unique.
<Role>
The entry used to register a role in the SSO repository is described below.
Object Classes
The role registered in the SSO repository is managed by the following object classes. Specify the
following object classes when registering a role in the SSO repository:
Object class
Description
top
Basic LDAP object class
ssoRole
SSO role information
Attributes
Specify the name of a role as an attribute of the above object classes.
Table 2-5 ssoRole Attributes
Role object class
Attribute name
Explanation
ssoRole
cn
Name
ssoAuthType
Authentication method
Not used in this version
(1) cn
Description
Specify the name of a role.
The role name specified here is set in the ssoRoleName attribute of user information and the role set
entry.
The following characters are valid:
•
Alphanumeric characters
•
Space ( ), exclamation mark (!), question mark (?), at symbol (@), Hash (#), dollar sign ($), percent
(%), ampersand (&), left parenthesis ((), right parenthesis ()), left brace ({), right brace (}), left
bracket ([), right bracket (]), hyphen (-), equal sign (=), asterisk (*), slash (/), vertical line (|),
underscore (_), single quotation mark ('), colon (:), period (.), caret (^), back quotation mark (`), tilde
(~)
2-37
Chapter 2: Environment Setup (SSO Administrators)
Example of Specification
Admin
Notes
•
Specify this attribute only once.
•
Use only alphanumeric characters and symbols when providing user information using environment
variables.
•
Specified values are not case-sensitive.
•
The role name or role set name must be defined only once.
(2) ssoAuthType
Description
This attribute is not used in this version.
Note
Do not specify or change this attribute.
Example of Role
Figure 2-6 Example of Role
<Role set>
The entry used to register a role set in the SSO repository is described below.
Object Classes
The role set registered in the SSO repository is managed by the object classes shown in the table below.
Specify the following object classes when registering a role set in the SSO repository.
2-38
Object class
Description
top
Basic LDAP object class
ssoRoleSet
SSO role set information
Repository Server Setup
Attributes
Specify the name of a role set and role to be included in the role set as the attributes of the above object
classes.
Table 2-6 ssoRoleSet Attributes
Role set object class
Attribute name
Explanation
ssoRoleSet
cn
Name
ssoRoleName
Role name
(1) cn
Description
Specify the name of a role set.
The role set name specified here is set in the ssoRoleName attribute of user information and the role set
entry.
The following characters are valid
•
Alphanumeric characters
•
Space ( ), exclamation mark (!), question mark (?), at symbol (@), Hash(#), dollar sign ($), percent
(%), ampersand (&), left parenthesis ((), right parenthesis ()), left brace ({), right brace (}), left
bracket ([), right bracket (]), hyphen (-), equal sign (=), asterisk (*), slash (/), vertical line (|),
underscore (_), single quotation mark ('), colon (:), period (.), caret (^), back quotation mark (`), tilde
(~)
Example of Specification
AdminSet
Notes
•
Specify this attribute only once.
•
Specified values are not case-sensitive.
•
The role name or role set name must be defined only once.
(2) ssoRoleName
Description
Specify a role to be included in the role set or a role set.
When specifying multiple roles or role sets, specify the ssoRoleName attribute more than once.
Always specify this attribute.
2-39
Chapter 2: Environment Setup (SSO Administrators)
The following characters are valid:
•
Alphanumeric characters
•
Space ( ), exclamation mark (!), question mark (?), at symbol (@), backslash (\), hash (#), dollar
sign ($), percent (%), ampersand (&), left parenthesis ((), right parenthesis ()), left brace ({), right
brace (}), left bracket ([), right bracket (]), less than (<), greater than (>), plus (+), hyphen (-), equal
sign (=), asterisk (*), slash (/), vertical line (|), underscore (_), double quotation mark ("), single
quotation mark ('), colon (:), semicolon (;), period (.), caret (^), back quotation mark (`), tilde (~)
Example of Specification
Admin
Notes
•
Specified values are not case-sensitive.
•
Overlapped roles or role sets are invalid.
•
Specify only existing roles or role sets.
•
If a loop is created in the configuration of a role set, the loop portion becomes invalid.
Example of Role Set
Figure 2-7 A Role Set
2-40
Repository Server Setup
Example of Role Set Whose Configuration Includes a Loop (Looped Portion is Assumed to be
Invalid)
Figure 2-8 A Role Set with a Loop
In Figure 2-8:
•
Role set 'LeaderSet' indicates role 'Leader' and role set 'AdminSet.'
•
Role set 'AdminSet' indicates role 'Admin' and role set 'LeaderSet.'
•
Role set 'LeaderSet' set in role set 'AdminSet' causes a loop. In this case, role set 'LeaderSet'
indicated by role set 'AdminSet' becomes invalid.
•
Finally, role set 'LeaderSet' is assumed to be a role set that indicates role 'Leader' and role 'Admin.'
User Information Entry
This section explains the entry used to register user information in the SSO repository.
Specify each attribute in the user information entry depending on operation.
•
•
Attributes that must always be specified:
−
cn
−
sn
Attributes that must be set for executing password authentication
−
uid
−
userPassword
2-41
Chapter 2: Environment Setup (SSO Administrators)
•
Attributes that must be set for executing certificate authentication (Note)
•
−
mail
−
employeeNumber
−
uid
−
serialNumber
−
dnQualifier
Attributes that must be specified depending on operation:
•
−
ssoAuthType
−
ssoRoleName
−
ssoCredentialTTL
−
ssoNotBefore
−
ssoNotAfter
Attributes that need not be specified:
−
ssoUserStatus
−
ssoFailureCount
−
ssoLockTimeStamp
Note
If the attribute for identifying user information uniquely from the owner name information in the
certificate does not use cn, one of the above attributes must be set.
Object Classes
The user registered in the SSO repository is managed by the following object classes. Always specify
the following object classes when registering user information in the SSO repository:
User information object class
Description
top
Basic LDAP object class
person
User information
organizationalPerson
inetOrgPerson
ssoUser
SSO user information
Attributes
Specify the user ID, password, and authentication method as the attributes of the above object classes.
The following attributes are used in Interstage Single Sign-on:
2-42
Repository Server Setup
Table 2-7 Attributes Used by Interstage Single Sign-on
User information object class
Attribute name
Explanation
person
cn
Name
Example: user001
sn
Last name
Example: user001
userPassword
Password
Example: user001
organizationalPerson
No attribute is required in
SSO operation.
-
inetOrgPerson
uid
User ID
Example: user001
employeeNumber
Employee number
Example: 000001
mail
E-mail address
Example: [email protected]
device
serialNumber
Serial number
Example: 1234-1234-AB
ssoUser
ssoRoleName
Role name or role set name
Example: Admin
ssoAuthType
Authentication method
Example: basicAuthOrCertAuth
ssoCredentialTTL
Re-authentication interval
Example: 60
ssoUserStatus
User status
ssoNotBefore
Validity period start date
Example: 20030101000000+0900
ssoNotAfter
Expiration date
Example: 20030102000000+0900
ssoFailureCount
Number of authentication failures due to
invalid user name or password
ssoLockTimeStamp
Lockout time
dnQualifier
DN qualifier
2-43
Chapter 2: Environment Setup (SSO Administrators)
(1) cn
Description
Specify the first and last name to identify the user entry.
Always specify this attribute.
The following characters are valid:
•
Alphanumeric characters
•
Space ( ), exclamation mark (!), question mark (?), at symbol (@), hash (#), dollar sign ($), percent
(%), ampersand (&), left parenthesis ((), right parenthesis ()), left brace ({), right brace (}), left
bracket ([), right bracket (]), hyphen (-), equal sign (=), slash (/), vertical line (|), underscore (_),
single quotation mark ('), colon (:), period (.), caret (^), back quotation mark (`), tilde (~)
Example of Specification
user001
Note
Specified values are not case-sensitive.
(2) sn
Description
Specify the last name. It is a mandatory attribute of the person object class.
The following characters are valid:
•
Alphanumeric characters
•
Space ( ), exclamation mark (!), question mark (?), at symbol (@), hash (#), dollar sign ($), percent
(%), ampersand (&), left parenthesis ((), right parenthesis ()), left brace ({), right brace (}), left
bracket ([), right bracket (]), hyphen (-), equal sign (=), slash (/), vertical line (|), underscore (_),
single quotation ('), colon (:), period (.), caret (^), back quotation mark (`), tilde (~)
Example of Specification
user001
Note
Specified values are not case-sensitive.
(3) userPassword
Description
Specify the password used for user password authentication.
2-44
Repository Server Setup
The following characters are valid:
•
Alphanumeric characters
•
Space ( ), exclamation mark (!), question mark (?), at symbol (@), back slash (\), hash (#), dollar
sign ($), percent (%), ampersand (&), left parenthesis ((), right parenthesis ()), left brace ({), right
brace (}), left bracket ([), right bracket (]), less than sign (<), greater than sign (>), plus sign (+),
hyphen (-), equal sign (=), asterisk (*), slash (/), vertical line (|), underscore (_), double quotation
mark ("), single quotation mark ('), colon (:), semicolon (;), comma (,), period (.), caret (^), back
quotation mark (`), tilde (~)
Size that can be Specified
128 bytes
Example of Specification
user001
Notes
•
If a character set in this attribute does not belong to the group of valid characters, user
authentication fails.
•
Specified values are case-sensitive.
•
Do not set this attribute more than once. If it is set more than once, user authentication may not be
executed correctly.
(4) uid
Description
Specify the user ID used for user password authentication.
Specify a unique ID.
The following characters are valid:
•
Alphanumeric characters
•
Space ( ), exclamation mark (!), question mark (?), at symbol (@), back slash (\), hash (#), dollar
sign ($), percent (%), ampersand (&), left parenthesis ((), right parenthesis ()), left brace ({), right
brace (}), left bracket ([), right bracket (]), plus sign (+), hyphen (-), equal sign (=), slash (/), vertical
line (|), underscore (_), double quotation mark ("), single quotation mark ('), semicolon (;), comma
(,), period (.), caret (^), back quotation mark (`), tilde (~)
Example of Specification
user001
Notes
•
Specified values are not case-sensitive.
•
If an invalid character is used for this attribute, user authentication fails.
•
If this attribute is specified more than once, user authentication is not performed correctly.
2-45
Chapter 2: Environment Setup (SSO Administrators)
(5) employeeNumber
Description
Specify the number allocated for each user, e.g., employee number.
If the employee number is used to identify the user in the certificate authentication process, specify a
unique number.
The following characters are valid:
•
Alphanumeric characters
•
Space ( ), exclamation mark (!), question mark (?), at symbol (@), back slash (\), hash(#), dollar
mark ($), percent (%), ampersand (&), left parenthesis ((), right parenthesis ()), left brace ({), right
brace (}), left bracket ([), right bracket (]), plus sign (+), hyphen (-), equal sign (=), slash (/), vertical
line (|), underscore (_), double quotation mark ("), single quotation mark ('), colon (:), semicolon (;),
comma (,), period (.), caret (^), back quotation mark (`), tilde (~)
Example of Specification
000001
Note
Specified values are not case-sensitive.
(6) mail
Description
Specify the E-mail address.
If the E-mail address is used to identify the user in the operation using certificate authentication, specify
a unique address.
The following characters are valid:
•
Alphanumeric characters
•
Space ( ), exclamation mark (!), question mark (?), at symbol (@), back slash (\), hash (#), dollar
sign ($), percent (%), ampersand (&), left parenthesis ((), right parenthesis ()), left brace ({), right
brace (}), left bracket ([), right bracket (]), plus sign (+), hyphen (-), equal sign (=), slash (/), vertical
line (|), underscore (_), double quotation mark ("), single quotation mark ('), colon (:), semicolon (;),
comma (,), period (.), caret (^), back quotation mark (`), tilde (~)
Example of Specification
[email protected]
Note
Specified values are not case-sensitive.
(7) serialNumber
Description
Specify the serial number.
If the serial number is used to identify the user in the certificate authentication process, specify a unique
number.
2-46
Repository Server Setup
The following characters are valid:
•
Alphanumeric characters
•
Space ( ), single quotation mark ('), left parenthesis ((), right parenthesis ()), plus sign (+), comma
(,), hyphen (-), period (.), slash (/), colon (:), equal sign (=), question mark (?)
Example of Specification
1234-1234-AB
Note
Specified values are not case-sensitive.
(8) ssoRoleName
Description
Specify the name of a role or role set to which the user belongs. This attribute can be specified more
than once if the user belongs to multiple roles.
The following characters are valid:
•
Alphanumeric characters
•
Space ( ), exclamation mark (!), question mark (?), at symbol (@), back slash (\),hash (#), dollar
sign ($), percent (%), ampersand (&), left parenthesis ((), right parenthesis ()), left brace ({), right
brace (}), left bracket ([), right bracket (]), less than sign (<), greater than sign (>), plus sign (+),
hyphen (-), equal (=), asterisk (*), slash (/), vertical line (|), underscore (_), double quotation mark
("), single quotation mark ('), colon (:), semicolon (;), period (.), caret (^), back quotation mark (`),
tilde (~)
Size that can be Specified
32 bytes
Example of Specification
Admin
Note
If a role or roleset that is not registered in the role configuration is set in this attribute (including cases in
which a role or roleset no longer exists because it has been deleted), this attribute is ignored. If, as a
result of the attribute being ignored, no role belongs to the user, that user will not be able to access a
site protected by Interstage Single Sign-on.
(9) ssoAuthType
Description
Specify the user authentication method.
The default value is 'basicAuthOrCertAuth.'
−
basicAuth: Password authentication
−
certAuth: Certificate authentication
2-47
Chapter 2: Environment Setup (SSO Administrators)
−
basicAuthAndCertAuth: Password authentication and certificate authentication
−
basicAuthOrCertAuth: Password authentication or certificate authentication
The following character types are valid:
•
basicAuth
•
certAuth
•
basicAuthAndCertAuth
•
basicAuthOrCertAuth
Example of Specification
basicAuthOrCertAuth
Note
Specified values are not case-sensitive.
(10) ssoCredentialTTL
Description
Specify the re-authentication interval as a range between 30 to 1440 minutes.
If 0 is specified, re-authentication is not performed.
If this attribute is omitted, its value defaults to the configuration value in [Re-authentication interval] of
[Operation after authentication] in the environment setup of the authentication server.
Character Types that can be Specified
•
Numbers
Example of Specification
60
Note
If a value less than 30 is specified, the value defaults to 30 minutes. If a value greater than 1440 is
specified, the value defaults to 1440 minutes (24 hours).
(11) ssoUserStatus
Description
This attribute specifies the lock status of the user account as follows:
- good: Not locked
- locked: Locked
Example of Specification
good
2-48
Repository Server Setup
Note
[Release user lock] of the Interstage Management Console is used to unlock the user account.
Do not directly set or change the user account for the SSO repository. Refer to 'Release lockout' for
details of how to unlock the user account.
(12) ssoNotBefore
Description
Specify the date when user Single Sign-on is started.
If the user uses Single Sign-on before the specified date, authentication fails.
Specify the format of YYYYMMDDHHMMSS+XXXX.(*1) For Greenwich Mean Time, specify the format
of YYYYMMDDHHMMSSZ. If this attribute is omitted, the user can immediately uses Single Sign-on.
YYYY: Year (four digits of the year)
MM : Month (two digits)
DD
: Day (two digits)
HH
: Hour (two digits for 24 hours)
MM : Minute (two digits)
SS
*1
: Second (two digits)
'+XXXX' refers to the time difference from UTC (Universal Time Coordinate). In cases where 'XXXX' is used, it means the same as above.
Character Types that can be Specified
•
Numbers
Example of Specification
20030101000000+0900
Notes
•
Set a different date and time for ssoNotBefore and ssoNotAfter. If the same date and time is
specified, user authentication fails.
•
Set a date and time for ssoNotBefore that is earlier than the date and time set for ssoNotAfter. If
the date and time set for 'ssoNotBefore' is later than the date and time set for 'ssoNotAfter', user
authentication fails.
•
Specify a date between '20000101000000' and '20371231235959' in ssoNotBefore and
ssoNotAfter regardless of Japan time or Greenwich Mean Time. If a date out of range is specified,
user authentication fails.
2-49
Chapter 2: Environment Setup (SSO Administrators)
(13) ssoNotAfter
Description
Specify the date after which Single Sign-on is not available to users. If the user uses Single Sign-on
after the specified date, authentication fails.
Specify the date in the format YYYYMMDDHHMMSS+XXXX. (*1) For Greenwich Mean Time, specify
the date in the format YYYYMMDDHHMMSSZ. If this attribute is omitted, the user can use Single Signon for an indefinite period.
YYYY: Year (four digits of the year)
MM : Month (two digits)
DD
: Day (two digits)
HH
: Hour (two digits for 24 hours)
MM : Minute (two digits)
SS
*1
: Second (two digits)
'+XXXX' refers to the time difference from UTC (Universal Time Coordinate). In cases where 'XXXX' is used, it means the same as above.
Character Types that can be Specified
•
Numbers
Example of Specification
20030102000000+0900
Notes
•
Set a different date and time for ssoNotBefore and ssoNotAfter. If the same date and time is
specified, user authentication fails.
•
Set a date and time for 'ssoNotAfter' that is later than the date and time set for 'ssoNotBefore'. If
the date and time set for 'ssoNotAfter' is earlier than the date and time set for 'ssoNotBefore', user
authentication fails.
•
Specify a date between '20000101000000' and '20371231235959' in ssoNotBefore and
ssoNotAfter regardless of Japan time or Greenwich Mean Time. If a date out of range is specified,
user authentication fails.
(14) ssoFailureCount
Description
This attribute specifies the number of user authentication failures due to incorrectly entering the user
name/password.
If the correct user name/password is specified and authentication succeeds, this attribute is reset to 0.
This value is set by the repository server.
Note
Do not specify or change this attribute.
2-50
Repository Server Setup
(15) ssoLockTimeStamp
Description
This attribute specifies the date when the user was locked by the repository server in (Greenwich Mean
Time (YYYYMMDDHHMMSSZ).
Note
Do not specify or change this attribute.
(16) dnQualifier
Description
Specify the DN qualifier.
If the DN qualifier is used to identify the user in the certificate authentication process, specify a unique
number.
Character Types that can be Specified
•
Alphanumeric characters
•
Space ( ), single quotation mark ('), left parenthesis ((), right parenthesis ()), plus sign (+), comma
(,), hyphen (-), period (.), slash (/), colon (:), equal sign (=), question mark (?)
Note
Specified values are not case-sensitive.
Constructing a Repository Server (One Server or Update System)
This section explains how to set up one repository server or an update-system repository server in
multiple-repository server configuration.
The setup described below is performed using the Interstage Management Console on the machine
where the repository server is to be set up. Refer to the Operator’s Guide for details of the items to be
defined on the Interstage Management Console.
To set up a repository server, the SSO Repository must be previously created. Refer to Creating an
SSO Repository for an explanation of SSO Repository creation.
1.
Select [Security] and then [Single Sign-on] from the System menu. Click [Authentication
infrastructure] and then click the [Authentication infrastructure Settings] tab.
2.
Select [Setup Repository server and Authentication server to the separate servers.], and click
[Next]. The window for selecting a server to be created is displayed.
3.
Select [Create a new Repository server] > [ Repository server (update system)], and click [Next].
[General Settings] is displayed.
4.
Enter [Authentication infrastructure URL], and in [Repository Name], select the SSO repository to
be used. To use a cluster system, click [Detailed Settings [Show]]. In [Host name of Repository
server], enter the host name common to the cluster systems.
5.
Click [Create].
6.
The repository server is created. A list of the created servers is displayed. Confirm the port number.
2-51
Chapter 2: Environment Setup (SSO Administrators)
7.
Activate the created repository server. Refer to 'Starting a Repository Server' in 'Operation and
Maintenance', for an explanation of repository server start.
8.
Download the authentication infrastructure setup file necessary for setting up the authentication
server or repository server (update system).
Downloading the Authentication Infrastructure Setup File
Download the authentication infrastructure setup file from the Interstage Management Console of the
machine where the repository server (update system) was created.
On the Interstage Management Console, click [Single Sign-on] and then [Authentication infrastructure]
from the Security menu. Click the [Authentication infrastructure setup file] tab. Set the [Password], and
click [Download] to download the authentication infrastructure setup file to the machine on which the
Web browser is operating.
The authentication infrastructure setup file is important for security, and is encrypted using the password.
Protect the password from exposure to third parties. After the authentication server or repository server
(reference system) is set up, always delete the password.
Remarks
The repository server does not use the port number of the Web server (Interstage HTTP server). That is,
it does not use the [Port number] configured in the [Web Server Settings] tab (found by clicking on
[Services] and then [Web Server] on the System menu).
When only the Web server (Interstage HTTP server) is used from the repository server, the above port
number is not used. Setting the port number in the [Web Server Settings] tab to be the same as the port
number specified at repository server setup prevents an unnecessary port from opening.
Constructing an SSL Communication Environment for a
Repository Server (Update System)
For replication between SSO repositories, data must be transferred from the master SSO repository of
the repository server (update system) to the slave SSO repository of the repository server (reference
system). SSL communication is performed by the repository server (reference system).
To enable SSL communication for performing replication, the SSL communication environment must be
set up on the repository server (update system).
This setup is unnecessary when one repository server (reference system) is to be added to an already
set-up authentication infrastructure, and the SSL communication environment is already set up on the
active repository server.
The SSL communication environment is set up in the following steps:
2-52
Repository Server Setup
1. Setting SSL Communication
1.
Preparations for SSL communication (acquiring the SSL site certificate and registering it in the
Interstage certificate environment)
When the site certificates for the repository server (update system) and repository server
(reference system) are issued by different certificate authorities, the certificate for the repository
server (reference system) must also be registered in the repository server (update system). For
details, refer to Preparations for SSL Communication.
2.
Setup for SSL communication (creation of SSL configuration)
On the Interstage Management Console, select [Security] and then [SSL] from the [System] menu.
From the [Create a new SSL Configuration] tab, perform setup for SSL communication as follows:
−
Configuration Name
Set the name identifying the SSL configuration.
−
Site Certificate Nickname
Set the nickname that was specified when the SSL certificate was registered in the Interstage
certificate environment as described in Preparations for SSL Communication. The registered
SSL site certificate can be accessed in the Interstage Management Console by selecting
[Security] and then [Certificates] on the [System] menu. Click [Site Certificate] to access the
SSL site certificate.
−
Protocol Version
Select 'SSL 3.0' only.
−
Client certificate
Select 'Yes (Authenticate when client certificate is presented).'
−
Encryption Method
Change the encryption method when necessary.
−
Nickname of Certificate of Certificate Authority
Change the nickname when necessary.
For details of the above items, refer to the Operator’s Guide.
2. Confirming the Validity of a Certificate
In addition to the above setup, the validity of the certificate must be confirmed. This process includes
acquiring and registering the CRL in the Interstage certificate environment. When the site certificates for
the repository server (update system) and repository server (reference system) are issued by different
authorities, acquire the CRL from the certificate authority that issued the certificate of the repository
server (reference system). Then register this CRL on the repository server (update system).
For details, refer to Preparations for Confirming Validity of Certificate Authentication.
Remark
Replication using SSL communication can protect confidential information since risks such as electrical
interception, alteration, and spoofing are avoided by SSL client-server authentication, and
communication between respective SSO repositories is encrypted. SSL communication is, therefore,
highly recommended for security.
2-53
Chapter 2: Environment Setup (SSO Administrators)
Adding a Repository Server (Reference System)
This section explains how to set up a repository server (reference system) when two or more repository
servers are to be set up.
Backing up the SSO Repository of the Repository Server (Update System)
To create the SSO slave repository of the reference system repository server, back up the copy of the
SSO repository (master) data of the repository server (update system). Restore the backed-up data
onto the repository server (reference system).
Back up the SSO repository (master) data of the repository server (update system) according to the
following procedure:
1.
On the Interstage Management Console of the repository server (update system), select [Services]
and then [Repository] from the System menu.
2.
On [Repository: View Status], check the check box of the SSO repository for master operation.
Then click the [Stop] button to stop the SSO repository.
3.
On the repository server (update system), execute the irepbacksys command with the -dataonly
option specified. Back up the SSO repository data in the directory. Execute the irepbacksys
command as the administrator.
1.
On the Interstage Management Console of the repository server (update system), select [Services]
and then [Repository] from the System menu.
2.
On [Repository: View Status], check the check box of the SSO repository for master operation.
Then click the [Stop] button to stop the SSO repository.
3..
On the repository server (update system), execute the irepbacksys command with the -dataonly
option specified. Back up the SSO repository data in a file. Execute the irepbacksys command as
the administrator.
Refer to 'Backup Commands' in the Reference Manual (Command Edition) for details of the irepbacksys
command.
Example
Backup destination directory: C:\WINDOWS\temp\backup
SSO repository name
: ssorep
Specify the backup destination directory as the directory in which the SSO repository data is to be
backed up.
2-54
Repository Server Setup
After execution of the irepbacksys command, the backup folder is created under the
C:\WINDOWS\temp folder.
C:\>irepbacksys -d C:\WINDOWS\temp\backup -R ssorep –dataonly
IREP: INFO: irep11000: Backup has completed. C:\WINDOWS\temp\backup [ssorep]
Backup file name (without extension): /home/user1/backup
SSO repository name: ssorep
Specify the backup file name as the name of the file in which the SSO repository data is to be backed up.
In this case, the specified file name must not include the extension.
After execution of the irepbacksys command, the /home/user1/backup.tar.Z is created.
# irepbacksys -f /home/user1/backup -R ssorep –dataonly
UX:IREP: INFO: irep11000: Backup has completed.
/home/user1/backup.tar.Z[ssorep]
Setting up the SSL Communication Environment for the Repository Server (Reference
System)
To use SSL communication for replication between SSO repositories, the SSL communication
environment must be set up on the repository server (reference system).
Set up the SSL communication environment according to the following procedure:
1. Setting SSL Communication
1.
Preparations for SSL communication (acquiring SSL site certificate and registering it in Interstage
certificate environment)
When the site certificates for the repository server (update system) and repository server
(reference system) are issued by different authorities, the certificate of the repository server
(reference system) must also be registered in the repository server (update system. For details,
refer to Preparations for SSL Communication.
2.
SSL communication setup (creation of SSL configuration) using the Interstage Management
Console
Select [Security] and then [SSL] from the System menu. On the [Create a new SSL Configuration]
tab, set up SSL communication as follows:
−
Configuration Name
Enter the name identifying the SSL configuration.
−
Site Certificate Nickname
Enter the nickname that was specified when the SSL certificate was registered in the Interstage
certificate environment as described in Preparations for SSL Communication. The registered
SSL site certificate can be accessed on the Interstage Management Console by selecting the
[Security] and then [Certificate] from the System menu. Click [Site Certificate] to view the site
certificate.
2-55
Chapter 2: Environment Setup (SSO Administrators)
−
Protocol Version
Select 'SSL 3.0' only.
−
Client Certificate
Select 'Yes (Authenticate when client certificate is presented)'.
−
Encryption Method
Change the encryption method when necessary.
−
Nickname of Certificate Authority
Change the nickname when necessary.
For details of the above items, refer to the Operator’s Guide.
2. Confirming the Validity of the Certificate
In addition to the above setup, the validity of the certificate authentication must be confirmed. This
process includes acquiring and registering the CRL in the Interstage certificate environment. When
the site certificates for the repository server (update system) and repository server (reference
system)are issued by different authorities, acquire the CRL from the certificate authority that issued
the certificate of the repository server(update system). Then register this CRL in the machine of the
repository server (reference system).For details, refer to Preparations for Confirming Validity of
Certificate Authentication.
Remarks
•
Replication using SSL communication can protect confidential information since risks such as
electrical interception, alteration, and spoofing are avoided by SSL client-server authentication, and
communication between respective SSO repositories is encrypted. SSL communication is,
therefore, highly recommended for security.
•
To set up the SSL communication environment on the repository server (reference system), do not
use a site certificate for test.
Creating an SSO Slave Repository of the Repository Server (Reference System)
Create the SSO repository for slave operation of replication on the machine on which the repository
server (reference system) is set up. On the Interstage Management Console of the machine on which
this repository server (reference system) is to be set up, perform the following procedure:
1.
Select [Services] and then [Repository] from the System menu. Click the [Create a New
Repository] tab.
2.
Specify the items as described below, and click the Create button.
Descriptions in bold indicate settings that must be the same as those of the SSO repository
(master). Items marked with (*1) can be specified only when the SSO repository is to be created.
These items cannot be changed after the SSO repository is created. Carefully set these items. For
other items, check values and change them when necessary.
2-56
Repository Server Setup
General Settings
−
Repository Name (*1)
Enter the same name as that of the SSO repository (master) that was created for the repository
server (update system).
−
Administrator DN (*1)
Enter the DN (distinguished name) of the administrator who manages the created SSO
repository. This value must be specified in dn=distinguished-name format (example:
cn=manager).
−
Administrator DN password
Enter the password for the SSO administrator.
−
Administrator DN password (re-enter)
Enter the password for the SSO administrator again.
−
Public Directory (*1)
Set the same directory as that for the SSO repository (master) that was created for the
repository server (update system).
−
Create default tree? (*1)
Set the same tree as that of the SSO repository (master) that was created for the repository
server (update system).
−
Port number (*1)
Specify the port number for non-SSL communication.
−
Enable SSL encryption? (*1)
Select 'Yes'.
−
SSL Port number(*1)
Specify the port number for SSL communication. The default value is '636'. Change this value
when necessary.
−
SSL configuration
Select the SSL configuration that was defined as described in Setting up the SSL
Communication Environment for the Repository Server (Reference System)
Detailed Settings
Database Configuration
−
Database Definition
Maximum Number of Entries to be Retrieved The default value is '500'. Change this value when
necessary.
−
Cache Size
The default value is '1000' pages. One page consists of 4 KB. Change this value when
necessary.
2-57
Chapter 2: Environment Setup (SSO Administrators)
−
Retrieval Processing Timeout
The default value is '3600' seconds. Change this value when necessary.
−
User password encryption method (*1)
Select 'SHA'.
−
Database Storage Directory (*1)
Set the same directory as that of the SSO repository (master) that was created for the repository
server (update system).
Access Log Configuration
−
Output Access Log
Always select 'Yes'.
−
Output Level
Select 'Client requests' and 'Server errors'. For other cases, select other items.
−
Storage Directory
Change the directory when necessary.
−
Rotation Type
Change the type when necessary.
−
Size
Change the size when necessary.
−
Number of Log Files to Maintain
Change the value when necessary.
3.
Confirm the displayed status of the SSO repository (slave).
On the Interstage Management Console of the machine where the repository server (update system)
was created, confirm the setting status of the SSO repository (master). Select [Services] and then
[Repository] from the System menu. On [Repository: View Status], select the SSO repository that was
created for the master system. Confirm the settings on the [General Settings], or that displayed after
clicking [Detailed Settings [Show]].
Remark
If the [Administrator DN password] of the SSO slave repository was changed during replication
operation, the [Replication connection Settings] of the SSO master repository must be edited. Refer to
the Smart Repository Operator's Guide for details.
Restoring the SSO Repository in the Repository Server (Reference System)
To create the SSO slave repository of the repository server (reference system), back up the SSO
repository (master) data of the repository server (update system) and restore it to the repository server
(reference system).
This section explains how to restore the SSO master repository data of the repository server (update
system) in the repository server (reference system).
2-58
Repository Server Setup
The SSO master repository data of the update system repository server is restored according to the
following procedure:
1.
To restore the repository server (reference system), transfer the backup destination directory that
was created as described in Backing up the SSO Repository of the Repository Server (Update
System).
Ensure that there is adequate security in place to prevent third parties from electronically
intercepting data during the above transfer. Always delete the directory after use.
2.
On the machine of the repository server (reference system), execute the ireprestsys command with
the -dataonly option specified to restore data in the backup destination directory. The same SSO
repository name as the name of the backed-up SSO repository must be specified in this command.
1.
To restore the repository server (reference system), transfer the backup file that was created as
described in Backing up the SSO Repository of the Repository Server (Update System).
Ensure that there is adequate security in place to prevent third parties from electronically
intercepting data during the above transfer. Always delete the file after use.
2.
On the machine of the repository server (reference system), execute the ireprestsys command with
the -dataonly option specified to restore the backup file. The same SSO repository name as the
name of the backed-up SSO repository must be specified in this command.
Refer to 'Backup Commands' in the Reference Manual (Command Edition) for details of the ireprestsys
command.
Example
Backup destination directory : C:\WINDOWS\temp\backup
SSO repository name
: ssorep
Database storage directory : C:\Interstage\Enabler\EnablerDStores\IREP\ssorep\data
The same SSO repository name as the name of the backed-up SSO repository must be specified in the
command.
A message asking the user to confirm if they want to overwrite the database is displayed. To replace it
and continue restoring the data, enter ‘y’.
C:\>ireprestsys -d C:\WINDOWS\temp\backup -R ssorep –dataonly
Data already exists in database store.
(C:\Interstage\Enabler\EnablerDStores\IREP\ssorep\data)
Are you sure of deleting data in database store? (y/n):y
IREP: INFO: irep11001: Restore has completed. C:\WINDOWS\temp\backup
[ssorep]
2-59
Chapter 2: Environment Setup (SSO Administrators)
Backup file name: /home/user1/backup.tar.Z
SSO repository name: ssorep
Database storage directory : /var/opt/FJSVena/EnablerDStores/FJSVirep/ssorep/data
The same SSO repository name as the name of the backed-up SSO repository must be specified in the
command.
A message asking the user to confirm that they wish to replace the database is displayed. Then entery.
# ireprestsys -f /home/user1/backup.tar.Z -R ssorep –dataonly
Data already exists in database store.
(/var/opt/FJSVena/EnablerDStores/FJSVirep/ssorep/data)
Are you sure of deleting data in database store? (y/n):y
UX:IREP: INFO: irep11001: Restore has completed.
/home/user1/backup.tar.Z[ssorep]
Backup file name: /home/user1/backup.tar.Z
SSO repository name: ssorep
Database storage directory: /var/opt/FJSVena/DStores/FJSVirep/ssorep/data
The same SSO repository name as the name of the backed-up SSO repository must be specified in the
command.
A message asking the user to confirm that they wish to replace the database is displayed. Then enter y.
# ireprestsys -f /home/user1/backup.tar.Z -R ssorep –dataonly
Data already exists in database store.
(/var/opt/FJSVena/DStores/FJSVirep/ssorep/data)
Are you sure of deleting data in database store? (y/n):y
UX:IREP: INFO: irep11001: Restore has completed.
/home/user1/backup.tar.Z[ssorep]
2-60
Repository Server Setup
Changing the Settings of the SSO Repository of the Restored Repository Server
(Reference System)
Set replication slave operation for the restored SSO repository as described in Restoring the SSO
Repository in the Repository Server (Reference System). Perform the following procedure on the
Interstage Management Console of the repository server (reference system):
1.
Select [Services] and then [Repository] from the System menu, and select the SSO repository for
slave operation on [Repository: View Status].
2.
Click [Detailed Settings [Show]], and select 'Slave' as the [Operation mode] of [Replication Settings].
3.
In the newly displayed [Slave operation Settings], enter the host name of the machine of the
repository server (update system).
4.
Click [Update].
5.
Check the check box of the updated SSO repository, and click [Start] to start the SSO repository.
Setting up for Adding the Repository Server (Reference System)
This section explains how to set up the repository server (reference system). On the Interstage
Management Console of the machine where the repository server is to be set up, perform the following
procedure. Refer to the Operator’s Guide for details of the items to be defined on the Interstage
Management Console.
You will need an authentication infrastructure setup file to set up the repository server (reference
system). Refer to Downloading the Authentication Infrastructure Setup File under Constructing a
Repository Server (One Server or Update System) for how to create the authentication infrastructure
setup file. To create the repository server (reference system), the slave SSO repository must be created
in advance. Refer to Creating an SSO Slave Repository of the Repository Server (Reference System)
for how to create the SSO repository (slave).The following procedure describes how to set up the
repository server (reference system):
1.
Select [Security] and then [Single Sign-on] from the System menu. Click [Authentication
infrastructure] and then click the [Authentication infrastructure Settings] tab.
2.
Select [Setup Repository server and Authentication server to the separate servers.], and click
[Next]. The selection window for the server to be created is displayed.
3.
Select [Create a new Repository server] and then [Repository server (reference system)], and click
[Next].
4.
[General Settings] is displayed. Select the authentication infrastructure setup file that was
downloaded from the repository server (update system) in [Authentication infrastructure setup file].
5.
Enter the password that was set for the authentication infrastructure setup file. In [Repository
Name], select the SSO repository to be used. Click [Create].
6.
The repository server is created. A list of the created servers is displayed. Confirm the port
number.
7.
Activate the created repository server. Refer to 'Starting a Repository Server' in 'Operation and
Maintenance', for an explanation of repository server start.
8.
Delete the authentication infrastructure setup file.
2-61
Chapter 2: Environment Setup (SSO Administrators)
Notes
•
When the Microsoft® Internet Explorer is used as the browser, an authentication infrastructure
setup file with an absolute path length that exceeds 200 bytes may not be able to be specified with
the Browse button. In this case, change the location of the authentication infrastructure setup file
so that its absolute path length is shorter.
•
The authentication infrastructure setup file is important for security. Always delete this file after the
repository server (reference system) is set up.
Changing the Settings of the SSO Repository of the Repository Server (Update System)
Set the information on the SSO slave repository of the added repository server (reference system) in the
SSO master repository of the repository server (update system). Perform the following procedure on the
Interstage Management Console of the repository server (update system):
1.
Click [Services] and then [Repository] from the System menu, and from the [Repository: View
Status] window select the SSO repository for master operation.
2.
Click [Detailed Settings [Show]]. Go to Step 3 when 'Master' is selected as the [Operation mode] of
[Replication Settings].
When 'Master' is not selected, select 'Master'. [Replication destination host list] is displayed.
3.
Click [Add], and enter the machine information of the repository server (reference system) to be
added in each item field of the newly displayed [Replication connection Settings] Click [Update].
Host name
Enter the host name of the SSO slave repository.
Port number
Enter the [SSL Port number] that was set for the SSO slave repository.
Enable SSL encryption?
Select 'Yes'.
Present client certificate?
Select 'Yes' or 'No'.
SSL configuration
When 'Yes' is selected in [Present client certificate?], select the SSL configuration that was
defined as described in Setup of the SSL communication environment for repository server
(update system).
DN for the connection
Enter the same administrator DN as that specified for the SSO repository (slave).
Password for the connection
Enter the same password as the administrator DN password specified for the SSO repository
(slave).
4.
2-62
Check the check box of an SSO repository for which settings are changed, and click [Start] to start
the SSO repository.
Setup of Authentication Server
This section explains the procedure for setting up of the authentication server that provides the
authentication infrastructure. Use the Interstage Management Console to set up the authentication
server.
SSL Communication Environment Setup
The SSL environment must be set up before the authentication infrastructure.
The flow of setting up SSL communication environment is shown below.
SSL Communication using Authentication Server
If using SSL communication on the authentication server, perform the following steps according to the
operating conditions:
1.
Required settings
Refer to Preparations for SSL Communication.
Refer to Settings for SSL Communication.
2.
Confirming validity of certificate
In addition to the above settings, perform the operations explained in Preparations for Confirming
Validity of Certificate Authentication.
3.
Operation using Application Gateway
In addition to the above settings, perform the operations explained in Settings for Operation using
Application Gateway.
SSL Communication using SSL Accelerator
To execute SSL communication using the SSL accelerator, configure the settings according to the
operation shown below.
1.
Required settings
Refer to Settings for Settings for SSL Communication Using SSL Accelerator
2.
Confirming validity of certificate
In addition to the above settings, perform the operations explained in Preparations for Confirming
Validity of Certificate Authentication.
2-63
Chapter 2: Environment Setup (SSO Administrators)
SSL Communication using Application Gateway
For operation using non-SSL communication between the Application Gateway complete the following
settings according to the operating conditions:
1.
Required settings
Refer to Settings for Operation using Application Gateway.
2.
Confirming validity of certificate
In addition to the above settings, perform the operations explained in Preparations for Confirming
Validity of Certificate Authentication.
Preparations for SSL Communication
For SSL communication using each server, acquire the site certificates and register them in the
Interstage certificate environment. For explanations of site certificate acquisition and registration in the
Interstage certificate environment, refer to 'Setting and Use of the Interstage Certificate Environment' of
the Security System Guide.
When the site certificate is already acquired and registered, the registered site certificate can be used.
The following is an example of preparations for SSL communication.
Setting Access Permission of Interstage Certificate Environment
To set up the Interstage certificate environment, an owner group with permission to access the
Interstage certificate environment must be created. The created owner group must be specified in the g option of the scsmakeenv command when the Interstage certificate environment is set up.
The effective users who are to be registered in the owner group of the Interstage certificate environment
must be already set in the User directive of the environment configuration file (httpd.conf) of the
Interstage HTTP server.
For an explanation of the access permission of the Interstage certificate environment, refer to 'Setting
and Use of the Interstage Certificate Environment' of the Security System Guide.
Signing Request of a Certificate for SSL Communication
Specify distinguished names such as country code, alphanumeric first and last name, alphanumeric
organization name, alphanumeric organizational unit name, prefecture name, and municipality name to
create a certificate signing request (CSR) for signing requesting the certificate for the SSL
communication.
Use the scsmakeenv command to create the certificate signing request (CSR). Send the CSR to a
certificate authority (VeriSign Inc.) to request to issue the certificate.
Executing the scsmakeenv command prompts the operator to enter distinguished names. In response
to the message, 'What is your first and last name?' specify the Fully Qualified Domain Name (FQDN) of
the URL of the authentication infrastructure, as the Web server host name. If the load of the
authentication server is distributed using a load balancer such as the Interstage Traffic Director, specify
the FQDN of the Interstage Traffic Director. FQDN is a host name including a domain name. To request
the certificate of a Web server, FQDN must be specified as the owner name of the certificate. (For
example: authenticate_server.fujitsu.com)
In the scsmakeenv command, specify the password and private-key nickname for access to the
Interstage certificate environment. The password is required to access the Interstage certificate
environment. The nickname is required to register the site certificate that was acquired from the
certificate authority. Be sure to remember the nickname.
2-64
Setup of Authentication Server
Refer to 'SSL Commands' in Reference Manual (Command Edition) for details of the scsmakeenv
command for CSR creation.
Example
The following is an example in which the name of the CSR output destination file is
'C:\WINNT\temp\ssocert.txt'. When necessary, change the name of the CSR output destination file.
When password entry is requested, enter the password for access to the Interstage certificate
environment. The entered password is not displayed.
When you are requested to enter distinguished names, enter them in the bold as shown below.
Site Certificate Nickname: 'SERVERCERT'
CSR output destination file name : 'C:\WINNT\temp\ssocert.txt'
Country code: jp
Alphanumeric first and last name: authenticate_server.fujitsu.com
Alphanumeric organization name: FUJITSU
Alphanumeric organizational unit name: FUJITSU TOKYO
Prefecture name: Tokyo
Municipality name: Shinjuku
C:\>scsmakeenv -n SERVERCERT -f C:\WINNT\temp\ssocert.txt
New Password:
Retype:
Input X.500 distinguished names.
What is your first and last name?
[Unknown]: authenticate_server.fujitsu.com
What is the name of your organizational unit?
[Unknown]: FUJITSU TOKYO
What is the name of your organization?
[Unknown]: FUJITSU
What is the name of your City or Locality?
[Unknown]: Shinjuku
What is the name of your State or Province?
[Unknown]: Tokyo
What is the two-letter country code for this unit?
[Un]: jp
Is <CN=authenticate_server.fujitsu.com, OU=FUJITSU TOKYO, O=FUJITSU,
L=Shinjuku, ST=Tokyo,C=jp> correct?
[no]: yes
SCS: INFO: scs0101: CSR was issued <C:\WINNT\temp\ssocert.txt>
C:\>
When the scsmakeenv command is terminated normally, the CSR is output to the file specified with the f option of the scsmakeenv command. Send the file to the certificate authority and request to issue the
CSR. The requesting method depends on the certificate authority.
2-65
Chapter 2: Environment Setup (SSO Administrators)
The following is an example in which the Interstage certificate environment with the access permission
by 'nobody' is newly created and a CSR is created. When the Interstage certificate environment is
already created, set the access permission in the Interstage certificate environment when necessary.
In this example, the name of the CSR output destination file is '/tmp/ssocert.txt'. Change the CSR
output destination file when necessary.
Before requesting the CSR, set the JDK or JRE installation path in environment variable JAVA_HOME.
The following example uses the Bourne shell. When password input is requested, enter the password
for access to the Interstage certificate environment. The entered password is not displayed.
When you are requested to enter distinguished names, enter them in bold as shown below.
Site Certificate Nickname: 'SERVERCERT'
CSR output destination file name: '/tmp/ssocert.txt'
Country code: jp
Alphanumeric first and last name: authenticate_server.fujitsu.com
Alphanumeric organization name: FUJITSU
Alphanumeric organizational unit name: FUJITSU TOKYO
Prefecture name: Tokyo
Municipality name: Shinjuku
Group which is permitted to access to Interstage certificate environment: nobody
# JAVA_HOME=/opt/FJSVawjbk/jdk14;export JAVA_HOME
# scsmakeenv -n SERVERCERT -f /tmp/ssocert.txt –g nobody
New Password:
Retype:
Input X.500 distinguished names.
What is your first and last name?
[Unknown]: authenticate_server.fujitsu.com
What is the name of your organizational unit?
[Unknown]: FUJITSU TOKYO
What is the name of your organization?
[Unknown]: FUJITSU
What is the name of your City or Locality?
[Unknown]: Shinjuku
What is the name of your State or Province?
[Unknown]: Tokyo
What is the two-letter country code for this unit?
[Un]: jp
Is <CN=authenticate_server.fujitsu.com, OU=FUJITSU TOKYO, O=FUJITSU,
L=Shinjuku, ST=Tokyo,C=jp> correct?
[no]: yes
UX:SCS: INFO: scs0101: CSR was issued </tmp/ssocert.txt>
UX:SCS: INFO: scs0180: The owners group of Interstage certificate
environment was set
#
2-66
Setup of Authentication Server
When the scsmakeenv command is terminated normally, the CSR is output to the file specified with the f option of the scsmakeenv command. Send the file to the certificate authority and request to issue the
CSR. The requesting method depends on the certificate authority.
The following is an example in which the Interstage certificate environment granted access permission
by using iscertg and then the CSR is created.
In this example, iscertg is created as the owner group permitted access to the Interstage certificate
environment. The effective user 'nobody' is added to the owner group iscertg. 'Nobody' is set as the
initial value in the User directive of the environment configuration file (httpd.conf) of the Interstage HTTP
server. The name of the CSR output destination file is '/tmp/ssocert.txt'. Change the CSR output
destination file when necessary.
Before requesting the CSR, set the JDK or JRE installation path in environment variable JAVA_HOME.
The following example uses the Bourne shell. When password input is requested, enter the password
for access to the Interstage certificate environment. The entered password is not displayed.
When you are requested to enter distinguished names, enter them in bold as shown below.
Site Certificate Nickname: 'SERVERCERT'
CSR output destination file name: '/tmp/ssocert.txt'
Country code: jp
Alphanumeric first and last name: authenticate_server.fujitsu.com
Alphanumeric organization name: FUJITSU
Alphanumeric organizational unit name: FUJITSU TOKYO
Prefecture name: Tokyo
Municipality name: Shinjuku
Group which is permitted to access to Interstage certificate environment: iscertg
# groupadd iscertg
# usermod -G iscertg nobody
# JAVA_HOME=/opt/FJSVawjbk/jdk14;export JAVA_HOME
# scsmakeenv -n SERVERCERT -f /tmp/ssocert.txt –g iscertg
New Password:
Retype:
Input X.500 distinguished names.
What is your first and last name?
[Unknown]: authenticate_server.fujitsu.com
What is the name of your organizational unit?
[Unknown]: FUJITSU TOKYO
What is the name of your organization?
[Unknown]: FUJITSU
What is the name of your City or Locality?
[Unknown]: Shinjuku
What is the name of your State or Province?
[Unknown]: Tokyo
What is the two-letter country code for this unit?
[Un]: jp
2-67
Chapter 2: Environment Setup (SSO Administrators)
Is <CN=authenticate_server.fujitsu.com, OU=FUJITSU TOKYO, O=FUJITSU,
L=Shinjuku, ST=Tokyo,C=jp> correct?
[no]: yes
UX:SCS: INFO: scs0101: CSR was issued </tmp/ssocert.txt>
UX:SCS: INFO: scs0180: The owners group of Interstage certificate
#
When the scsmakeenv command is terminated normally, the CSR is output to the file specified with the f option of the scsmakeenv command. Send the file to the certificate authority and request to issue the
CSR. The requesting method depends on the certificate authority.
Registering the Certificates for SSL Communication
The site certificate issued by a certificate authority and the CA certificate of the certificate authority that
issued the site certificate must be acquired and registered.
Use the certificate and CRL registration command (scsenter) to register these certificates.
In the scsenter command, specify the passwords and certificate nicknames that are specified in the
scsmakeenv command for access to the Interstage certificate environment. To register the site
certificate that was acquired from the certificate authority, use the scsmakeenv command to specify the
nickname specified in the private-key. Be sure to specify the -o option for registering the site certificate.
Refer to 'SSL Commands' in Reference Manual (Command Edition) for details of the scsenter command.
Example
CA certificate: 'C:\WINNT\temp\ca-cert.cer'
CA Certificate Nickname: 'CACERT'
Site certificate: 'C:\WINNT\temp\server-cert.cer'
Site Certificate Nickname: 'SERVERCERT'
The following shows an example of the scsenter command in which C:\WINNT\temp\ca-cert.cer is
specified as the CA certificate and C:\WINNT\temp\server-cert.cer is specified as the site certificate.
Change the file path of each certificate when necessary.
When password entry is requested, enter the password for access to the Interstage certificate
environment. The entered password is not displayed.
C:\>scsenter –n CACERT –f C:\WINNT\temp\ca-cert.cer
Password:
Certificate was added to keystore
SCS: INFO: scs0104: Certificate was imported
C:\>scsenter –n SERVERCERT –f C:\WINNT\temp\server-cert.cer –o
Password:
Certificate reply was installed in keystore
SCS: INFO: scs0104: Certificate was imported
C:\>
2-68
Setup of Authentication Server
CA certificate: '/tmp/ca-cert.cer'
CA Certificate Nickname: 'CACERT'
Site certificate: '/tmp/server-cert.cer'
Site Certificate Nickname: 'SERVERCERT'
The following shows an example of the scsenter command in which /tmp/ca-cert.cer is specified as the
CA certificate and /tmp/server-cert.cer is specified as the site certificate. Change the file path of each
certificate when necessary.
Before requesting the certificates, set the JDK or JRE installation path in environment variable
JAVA_HOME.
The following example uses the Bourne shell. When password input is requested, enter the password
for access to the Interstage certificate environment. The entered password is not displayed.
# JAVA_HOME=/opt/FJSVawjbk/jdk14;export JAVA_HOME
# scsenter –n CACERT –f /tmp/ca-cert.cer
Password:
Certificate was added to keystore
UX:SCS: INFO: scs0104: Certificate was imported
# scsenter –n SERVERCERT –f /tmp/server-cert.cer -o
Password:
Certificate reply was installed in keystore
UX:SCS: INFO: scs0104: Certificate was imported
#
Settings for SSL Communication
SSL configuration must be defined using the Interstage Management Console.
To define the SSL configuration, select the [Security] and then [SSL] from the System menu. Click the
[Create a new SSL Configuration] tab, and then perform [General Settings]. Select the nickname of the
confirmed site certificate, and define the SSL configuration.
Refer to the Operator’s Guide for an explanation of the start of the Interstage Management Console.
Refer to the Operator’s Guide for details of the items to be defined on the Interstage Management
Console.
Set each item of the SSL environment configuration as follows:
Configuration Name
Set the identifying the SSL configuration. The configuration name specified here is used for setting
the authentication server.
Site Certificate Nickname
Enter the nickname that was specified when the site certificate was registered in the Interstage
certificate environment as described in Preparations for SSL Communication. The registered site
certificate can be accessed on the Interstage Management Console by selecting [Security] and
then [Certificate] from the System menu and then clicking [Site Certificate].
2-69
Chapter 2: Environment Setup (SSO Administrators)
Protocol Version
Select 'SSL 2.0' and 'SSL 3.0'.
Verify Client Certificate?
Select 'Yes (Authenticate when client certificate is presented)'.
Encryption Method
When necessary, change the method. Refer to the Operator’s Guide.
CA Certificate Nickname
When necessary, change the nickname. Refer to the Operator’s Guide.
Preparations for Confirming Validity of Certificate Authentication
The validity of a certificate can be confirmed using the certificate revocation list (CRL) at certificate
authentication. The following explains the preparations for certificate validity confirmation.
SSL Communication using Authentication Server
If using SSL communication on the authentication server, perform the following steps.
1.
Registering the Certificate of the CRL-issuing Authority (*1)
2.
Registering CRL
*1 Register the CRL that was issued from a certificate authority that was not specified in the site
certificate described in Preparations for SSL Communication.
SSL Communication using SSL Accelerator or Application Gateway
When the authentication infrastructure uses SSL Accelerator or Application Gateway perform the
following describes:
1.
Creating Interstage certificate environment
2.
Registering the Certificate of the CRL-issuing Authority
3.
Registering CRL
Creating Interstage certificate environment
Set up the Interstage certificate environment using scsmakeenv command when the Interstage
certificate environment is not set up.
For details about scsmakeenv command, refer to 'SSL Commands' in the Reference Manual (Command
Edition)
2-70
Setup of Authentication Server
Example
The following shows an example in which the Interstage certificate environment is created for the first
time using the scsmakeenv command.
When password to input is requested, enter the password for access to the Interstage certificate
environment. The entered password is not displayed.
C:\> scsmakeenv –e
New Password:
Retype:
SCS: INFO: scs0100: Interstage certificate environment was created
C:\>
The following shows an example in which the Interstage certificate environment access permission is
granted to the user 'nobody' when it is created for the first time using the scsmakeenv command.
Before requesting the certificates, set the JDK or JRE installation path in environment variable
JAVA_HOME.
The following example uses the Bourne shell. When the password input is requested, enter the
password for access to the Interstage certificate environment. The entered password is not displayed.
# JAVA_HOME=/opt/FJSVawjbk/jdk14;export JAVA_HOME
# scsmakeenv -e -g nobody
New Password:
Retype:
UX:SCS: INFO: scs0100: Interstage certificate environment was created
UX:SCS: INFO: scs0180: The owners group of Interstage certificate
environment was set
#
The following shows an example in which the Interstage certificate environment in whichaccess
permission is granted to iscertg for the first time using the scsmakeenv command.
In this example, iscertg is created as the owner group permitted access to the Interstage certificate
environment. The effective user 'nobody' is added to the owner group iscertg. 'Nobody' is set as the
initial value in the User directive of the environment configuration file (httpd.conf) for the Interstage
HTTP server.
Before requesting the CSR, set the JDK or JRE installation path in environment variable JAVA_HOME.
The following example uses the Bourne shell. When password input is requested, enter the password
for access to the Interstage certificate environment. The entered password is not displayed.
#
#
#
#
groupadd iscertg
usermod -G iscertg nobody
JAVA_HOME=/opt/FJSVawjbk/jdk14;export JAVA_HOME
scsmakeenv -e -g iscertg
2-71
Chapter 2: Environment Setup (SSO Administrators)
New Password:
Retype:
UX:SCS: INFO: scs0100: Interstage certificate environment was created
UX:SCS: INFO: scs0180: The owners group of Interstage certificate
environment was set
#
Registering the Certificate of the CRL-issuing Authority
The certificate of the authority that issued the CRL must be acquired and registered before registering
the CRL. If the certificate of the CRL-issuing authority has not been registered, register the certificate of
the CRL-issuing authority.
To register the certificate of the CRL-issuing authority, use the certificate and CRL registration command
(scsenter).
In the scsenter command, specify the password and certificate nickname that were specified in the
scsmakeenv command for access to the security environment.
Refer to 'SSL Commands' in the Reference Manual (Command Edition)the Reference Manual
(Command Edition) for details of the scsenter command.
Example
Certificate of CRL-issuing authority: 'C:\WINNT\temp\crlca-cert.cer'
Nickname of certificate of CRL-issuing authority: 'CRLCACERT'
The following shows an example of the scsenter command in which C:\WINNT\temp\crlca-cert.cer is
specified as the certificate of the CRL-issuing authority. Change the file path of the certificate when
necessary.
When password entry is requested, enter the password for access to the Interstage certificate
environment. The entered password is not displayed.
C:\>scsenter –n CRLCACERT –f C:\WINNT\temp\crlca-cert.cer
Password:
Certificate was added to keystore
SCS: INFO: scs0104: Certificate was imported
C:\>
Certificate of CRL-issuing authority: '/tmp/crlca-cert.cer'
Nickname of certificate of CRL-issuing authority: 'CRLCACERT'
The following shows an example of the scsenter command in which /tmp/crlca-cert.cer is specified as
the certificate of the CRL-issuing authority. Change the file path of the certificate when necessary.
Before requesting the certificates, set the JDK or JRE installation path in environment variable
JAVA_HOME.
The following example uses the Bourne shell. When password input is requested, enter the password
for access to the Interstage certificate environment. The entered password is not displayed.
2-72
Setup of Authentication Server
# JAVA_HOME=/opt/FJSVawjbk/jdk14;export JAVA_HOME
# scsenter –n CRLCACERT –f /tmp/crlca-cert.cer
Password:
Certificate was added to keystore
UX:SCS: INFO: scs0104: Certificate was imported
#
Registering CRL
To confirm the validity of a certificate, the CRL that was acquired from the certificate authority must be
registered using the certificate and CRL registration command (scsenter).
In the scsenter command, specify the password that was specified in the scsmakeenv command to
access the security environment.
The -o option must always be specified to register the CRL.
Refer to 'SSL Commands' in the Reference Manual (Command Edition) for details of the scsenter
command.
The validity of a user's certificate can be confirmed by setting [Yes] in [Enable Certificate Revocation
Check?] of [Certificate Authentication Settings] during setup of the environment authentication server
after CRL registration.
Example
CRL that was acquired from certificate authority: 'C:\WINNT\temp\crl.crl'
The following is an example of the scsenter command in which C:\WINNT\temp\crl.crl is specified as the
acquired CRL. Change the CRL file path when necessary.
When password input is requested, enter the password for access to the Interstage certificate
environment. The entered password is not displayed.
C:\>scsenter –c –f C:\WINNT\temp\crl.crl
Password:
SCS: INFO: scs0105: CRL was imported
C:\>
CRL that was acquired from certificate authority: '/tmp/crl.crl'
The following shows an example of the scsenter command in which /tmp/crl.crl is specified as the
acquired CRL. Change the CRL file path when necessary.
Before registering the CRL, set the JDK or JRE installation path in environment variable JAVA_HOME.
2-73
Chapter 2: Environment Setup (SSO Administrators)
The following example uses the Bourne shell. When password input is requested, enter the password
for access to the Interstage certificate environment. The entered password is not displayed.
# JAVA_HOME=/opt/FJSVawjbk/jdk14;export JAVA_HOME
# scsenter –c –f /tmp/crl.crl
Password:
UX:SCS: INFO: scs0105: CRL was imported
#
Settings for SSL Communication Using SSL Accelerator
To use SSL Accelerator, perform the settings depending on the operating conditions. Refer to “Linkage
with SSL Accelerator” for an explanation of setting SSL Accelerator.
Settings for Operation using Application Gateway
To operate using Application Gateway the environment for the Application Gateway must be set up. For
details, refer to the explanation for the setting of the Application Gateway for 'Linkage with Application
Gateway'.
Setting up One Authentication Server
Set up an authentication server as follows using the Interstage Management Console of the machine on
which the authentication server is to be set up. For details of the items to be defined on the Interstage
Management Console, refer to the Operator’s Guide.
An authentication infrastructure setup file is required to set up the authentication server. Refer to
Downloading the Authentication Infrastructure Setup File under Constructing a Repository Server (One
Server or Update System) for an explanation of creating the authentication infrastructure file.
1.
Select [Security] and then [Single Sign-on] from the System menu. Click [Authentication
infrastructure] and then the [Authentication infrastructure Settings] tab.
2.
Select [Setup Repository server and Authentication server to the separate servers.], and then click
[Next].
3.
The window for selecting a server to be created is displayed. Select [Create a new Authentication
server], and then click [Next].
4.
[General Settings] is displayed. In [Authentication infrastructure setup file], select the
authentication infrastructure setup file that was downloaded from the repository server (update
system).
5.
Enter the password that was set for the authentication infrastructure setup file, and set the items for
SSL when necessary.
When SSL communication uses SSL Accelerator specify the HTTP header that is used by SSL
Accelerator to post the user certificate in [HTTP header name for user certificate acquisition].
2-74
Setup of Authentication Server
6.
To distribute load by setting multiple repository servers, specify [Host name and Port number of
Repository server (reference system)]. Up to five repository servers can be set at a time. To set
six or more repository servers (reference system), create an authentication server. Then click
[Authentication server] and the [Settings] tab, and select [Detailed Settings [Show]]. Specify the
servers using [Host name and Port number] of [Communication Settings with Repository server
(reference system)].
In this item, the same host name cannot be specified two or more times. A repository server
(update system) can also be specified.
7.
The UserID/Password input window of the password authentication is normally used as the Form
authentication page.
Using the basic authentication dialog on which the Web browser is operating, from the Interstage
Management Console, select [Detailed Settings [Show]], and specify 'Basic authentication dialog'
under [Input User ID/Password] of the [User ID/password authentication Settings].
8.
Click [Create]. The authentication server is created. A list of the created servers is displayed.
Confirm the port number.
9.
Activate the created authentication server.
Refer to 'Starting an Authentication Server' in 'Operation and Maintenance', for an explanation of
authentication server start.
10. Delete the authentication infrastructure setup file.
Remarks
The authentication server does not use the port number of the Web server (Interstage HTTP Server).
That is, it does not use the [Port Number] field in [Web Server Settings], which is found by clicking
[Services] and then [Web Server] on the System menu.
To use the Web server (Interstage HTTP Server) only from the authentication server, the above port
number is not used. Therefore, the value specified in [Port Number] must be the same as the port
number specified at authentication server setting. This setting prevents the unnecessary port from
opening.
Notes
•
When the Microsoft® Internet Explorer is used as the browser, an authentication infrastructure
setup file with an absolute path length exceeding 200 bytes may not be able to be specified with
the Browse button. In this case, change the location of the authentication infrastructure setup file
so that its absolute path length is shorter.
•
The authentication infrastructure setup file is important for security. Always delete this file after the
authentication server is set up.
2-75
Chapter 2: Environment Setup (SSO Administrators)
Adding an Authentication Server for Load Distribution
This section explains the process of adding an authentication server for load distribution.
To distribute the authentication server load using a load balancer such as the Interstage Traffic Director,
an authentication server must be configured to have the same environment as that of the already set
authentication server.
The Interstage Single Sign-on system provides the ssocloneac command to constitute the
authentication server in the same environment.
The ssocloneac command is also used to make copies of the messages to be displayed on a Web
browser. Customize these messages before making the copy of the authentication server. Refer to
'Customizing Messages Displayed on a Web Browser' for details of how to customize messages
displayed on a Web browser.
The following explains how to transfer the environment of the original authentication server already
installed to the additional authentication server using the ssocloneac command. Refer to 'Single Signon Operation Commands' in the Reference Manual (Command Edition) for details of the ssocloneac
command.
Preparations for Load Distribution
Note the following to add a load balancer such as the Interstage Traffic Director to an active
authentication infrastructure.
•
Do not change the URL of the authentication infrastructure by setting the host name of the alreadyinstalled authentication server in the load balancer such as the Interstage Traffic Director. Refer to
'Authentication Infrastructure URL' for an explanation of the URL of the authentication infrastructure.
Refer to the manual of the Interstage Traffic Director for details of the Interstage Traffic Director.
Preparing Target Machine
Set up the machine you are copying to with the same platform as that of the machine you are copying
from. Ensure the same Interstage version, edition, and installation directory is installed. The Interstage
Single Sign-on, Interstage HTTP Server, and SSL configuration (for SSL communication) on the
destination machine must be in the initial state immediately after installation.
Getting Environment Information
2-76
1.
On the source machine, execute the ssocloneac command with the -p option in order to fetch
environment information such as authentication server information, Interstage HTTP Server
information, and the SSL configuration for SSL communication (*1). When you are permitted to use
the same certificate for the load-balancing machine, and SSL Accelerator is not used, use the
scsexppfx command to transfer the site certificate and private-key. Refer to 'SSL Commands' in
the Reference Manual (Command Edition) for details of the scsexppfx command.
2.
Transfer the fetched environment information to the destination machine. Ensure that there is
adequate security to prevent third parties from electronically intercepting information during the
transfer. Additionally, during transfer, do not change the permission of the fetched environment
information file.
*1
The SSL configuration for SSL communication is fetched only when the authentication server uses
SSL communication.
Setup of Authentication Server
Setting Up Environment for Destination Machine for Copying
1.
For SSL communication using the authentication server, create the Interstage certificate
environment by executing the scsmakeenv command with the -e option on the destination machine
for copying.
Refer to 'SSL Commands' in the Reference Manual (Command Edition) for details of the
scsmakeenv command.
2.
When SSL communication is used by the authentication server and you are permitted to use the
same certificate for the load-balancing machines, transfer the site certificate and private-key using
the scsimppfx command. Refer to the Reference Manual (Command Edition) for details of the
scsimppfx command.
When SSL communication is used by the authentication server but using the same certificate for
the load-balancing machines is not permitted, newly acquire a site certificate and register it in the
site certificate environment as described in Preparations for SSL Communication. In this case, the
nickname of the site certificate to be used when requesting the certificate for SSL communication
must be the same as that specified in the authentication server already installed. Also the
nickname of the CA certificate to be used at registering the certificate for SSL communication must
be the same as that specified in the already set authentication server.
3.
On the destination machine for copying, execute the ssocloneac command with the -c option. The
environment for the authentication server, Interstage HTTP Server, and the SSL communication for
SSL communication (*1) are duplicated.
4.
On the Interstage Management Console, select [Security] and then [Single Sign-on] from the
System menu. Click [Authentication infrastructure] and [Authentication server]. On the [Settings]
tab, click [Detailed Settings [Show]]. The environment of the original authentication server for
copying is set in [Host name and Port number] of [Communication Settings with Repository server
(reference system)]. Therefore, change this environment depending on the operating conditions,
and click [Update].
For details of the items to be set on the Interstage Management Console, refer to the Operator’s
Guide.
5.
After the repository server (reference system) is set, start the authentication server.
Refer to 'Starting an Authentication Server' for an explanation of the authentication server start.
6.
Delete the environment information file of the authentication server.
*1 The SSL configuration for SSL communication is copied only when the authentication server uses
SSL communication.
Notes
•
For load distribution of the authentication server, the related multiple authentication servers must
have the Interstage Single Sign-on of the same version, edition, and installation directory. The
same platform must also be used.
•
The load balancer must be set up so that the requests from the same client transfer to same
authentication servers.
•
Use the following settings when the load balancer is Interstage Traffic Director.
−
Operation Mode: bridge
−
Measure of load Balancing and uniqueness of connection: Balancing for each node
2-77
Chapter 2: Environment Setup (SSO Administrators)
•
The environment information file of the authentication server is important for security. After the
authentication server is set up, always delete the environment information file.
Setting the Reference System Repository Server Information in
the Authentication Server
When a repository server (reference system) is set up, the information on the repository server must be
set in the authentication server using the Interstage Management Console according to the following
procedure. Refer to the Operator’s Guide for details of the items to be set on the Interstage
Management Console.
1.
Select [Security] and then [Single Sign-on] from the System menu. Click [Authentication
infrastructure], and then from [Authentication server] click the [Settings] tab.
2.
Set the host name and port number of the repository server (reference system) in [Host name and
Port number] of [Communication Settings with Repository server (reference system)] of [Detailed
Settings [Show]]. Then click [Update].
3.
After the reference system repository server is set, start the authentication server.
Refer to 'Starting an Authentication Server' for an explanation of the authentication server start.
2-78
Setting up a Repository Server and Authentication Server on a Single Machine
Setting up a Repository Server and Authentication
Server on a Single Machine
This section explains how to set a repository server and an authentication server on a single machine
according to the following procedure using the Interstage Management Console. Refer to the Operator’s
Guide for details of the items to be set on the Interstage Management Console.
1.
Select [Security] and then [Single Sign-on] from the System menu. Click [Authentication
infrastructure] and then click the [Authentication infrastructure Settings] tab.
2.
Select [Setup Repository server and Authentication server to a single server.] and click [Next].
3.
[General Settings] is displayed. Enter [Authentication infrastructure URL], and enter a necessary
SSO repository in [Repository Name]. Configure the items related to SSL as necessary.
When SSL communication uses SSL Accelerator the HTTP header that is used by SSL Accelerator
to post the user certificate must be specified in [HTTP header name for user certificate acquisition].
4.
The UserID/Password input window of the password authentication is normally used as the Form
authentication page.
Using the basic authentication dialog on which the Web browser is operating from the Interstage
Management Console, select [Authentication server Detailed Settings [Show]] and specify 'Basic
authentication dialog' under [Input User ID/Password] in the [Password Authentication Settings].
5.
Click [Create] to create the repository server and authentication server. A list of the created servers
is displayed. Confirm the port number.
6.
After the repository server and authentication server are created, start the repository server. When
the repository server is started, the authentication server is also started. Refer to 'Starting a
Repository Server' for an explanation of the repository server start.
Remark
The repository server and authentication server do not use the port number of the Web server
(Interstage HTTP Server). That is, they do not use the [Port Number] in the [Web Server Settings] tab,
which is found by clicking [Services] and then [Web Server] from the System menu.
To use the Web server (Interstage HTTP Server) only from the repository server and authentication
server, the above port number is not used. The value specified in the [Port Number] must be the same
as the port number of the repository server and authentication server. This setting prevents
unnecessary ports from opening.
2-79
Chapter 2: Environment Setup (SSO Administrators)
Registering a Business System
If a business server administrator requests an SSO administrator to add a business system to the
Interstage Single Sign-on system, the SSO administrator registers the business system.
This section explains SSO-administrator's work for business system addition.
Registration Flow of Business System
If a business server administrator requests an SSO administrator to add a business system to the
Interstage Single Sign-on system, the SSO administrator registers the business system. Refer to
'Environment Setup (Business Server Administrators)' for an explanation of business-serveradministrator's work.
Figure 2-9 Registration Flow of Business Systems
2-80
Registering a Business System
Information to be Acquired from Business Server Administrator
When a business server administrator requests you to add a business system to the Interstage Single
Sign-on system, acquire the following information from the business server administrator:
•
Business system public URL
•
Path configuration to be authorized
•
Use of SSL communication
•
Use of Interstage Portalworks linkage
•
Version and edition of Interstage
When non-SSL communication is not permitted in the Single Sign-on system, request the business
system administrator for SSL support.
Remark
Access to protection resources on the business server is restricted by the Interstage Single Sign-on
system. However, if SSL communication is not used on the business server, protection resources on
the network may be electrically intercepted. SSL communication on the business server avoids such
interception. Operating the business server using SSL communication is highly recommended.
Registering Protection Resources
The following information that was acquired from the business server administrator must be registered
in the SSO repository and the authentication server:
•
Business system public URL
•
Path configuration to be authorized
Registering Site Configuration of Business System
The site configuration of the business system must be registered.
Perform the following operations on the Interstage Management Console of the machine on which the
repository server (update system) was set up. Refer to the Operator’s Guide for details of the items to
be defined on the Interstage Management Console.
1.
Select the [Security] and then [Single Sign-on] from the System menu. Click [Authentication
infrastructure] and [Repository server]. Click [Protection resource] and then click the [Create a New
Site configuration] tab.
2.
Set [FQDN and Port number] in [Site Configuration Settings].
When a load balancer such as Interstage Traffic Director is installed before the business server, the
host name of the virtual IP address that was set in the load balancer (such as Interstage Traffic
Director) must be set in the business system public URL. When SSL Accelerator is installed before
the business server, the port number of SSL Accelerator must be set in the business system public
URL.
3.
Click [Create]. The added site configuration is displayed on the [Protection resource: List]. Confirm
the FQDN and port number of the business system.
2-81
Chapter 2: Environment Setup (SSO Administrators)
Remarks
When this system is linked with the Application Gateway and can be accessed only by clients on the
Internet, multiple business systems may have the same public URL. Therefore, the new site
configuration may be already registered. In this case, as the above registration procedure is
unnecessary, go to 'Registering protection path', below. Refer to 'Settings for Operation using
Application Gateway' for details.
Registering Protection Path
Access control information must be set for Web contents to be opened on the business server. In
addition to the access control information, set the access control path and access permission role.
Perform the following procedure on the Interstage Management Console of the machine on which the
repository server (update system) was created. Refer to the Operator’s Guide for details of the items to
be defined on the Interstage Management Console.
1.
Select [System] > [Security] > [Single Sign-on] > [Authentication infrastructure] > [Repository
server] >[Protection resource]. A list of defined sites is displayed in the [Protection resource] tree.
Select the site for which a protection path is to be set.
2.
Click [Protection path] in the tree. A list of path configurations is displayed. Click the [Create a New
Path configuration] tab.
3.
In [Path], set the path that is to be access-controlled. To control the access to a directory, always
write "/" at the end of the path. To control the access to a file, do not write "/" at the end of the path.
4.
After the path to be access-controlled is set, select the name of the role or role set that can access
the path. To permit the access by all users that are registered in the SSO repository, specify
nothing as the role name or role set name.
5.
Click [Create] to display a list of the specified paths and role information and check them.
6.
Request the business server administrator to update the access control information.
Refer to 'Information Required for Authorization Using Roles' in 'Overview' for an explanation of
permission by a role. Refer to 'Setting User Information Report with Environment Variables' in
'Developing Applications' for an explanation of the user attributes to be posted at authorization setting.
Note
When this system is linked with the Application Gateway and can be accessed only by clients on the
Internet, multiple business systems may have the same public URL. To avoid such duplication, these
business systems must be designed to have different protection paths.
If an already registered protection path was reported by the business server administrator, request the
business server administrator to review the business system design to prevent the protection paths from
duplicating.
Refer to Settings for Operation using Application Gateway for details.
Settings for Protection Resource
In the authentication server, configure both the site configuration of the business system registered in
the SSO repository, and the protection path information.
Use a text editor to open the configuration file of the authentication server, and add the protection
resource information. If modifying the configuration file, restart the authentication server. For details on
how to start and stop the authentication server, refer to 'Starting an Authentication Server and 'Stopping
an Authentication Server' in Chapter 4, Operation and Maintenance.
2-82
Registering a Business System
The file name and file path of the authentication server configuration file
Configuration file name:
ssoatcag.conf
Configuration file path (directory)
C:\Interstage\F3FMsso\ssoatcag\conf
/etc/opt/FJSVssoac/conf
Configuration items to Add
Table 2-8 Configuration Items to Add
Item
Configuration
Name
Setting Contents
Omissible or
Required
Restraint of
authentication
requests (except
from the protection
resource)
reject-incorrectprotectionresource-url
Set whether authentication requests (except
those from the business system protection
resource) are restrained.
Omissible.
YES : restrained
NO : unrestrained
Omitting this setting is the same as
specifying "NO". If values other than those
above are set, sso02040 is output to system
log, and “NO" is considered to have been set.
If users operate form authentication, and
directly access authentication Infrastructure
for authentication, the restraint of the
authentication request is invalid.
The protection
resource URL
which accepts
authentication
requests
protectionresource-url
If authentication requests, except those from
the business system protection resource are
restrained, set the protection resource URL
which accepts authentication requests. This
configuration is valid only when “YES” is set
to “reject-incorrect-protection-resource-url”.
In the protection resource URL, set the site
configuration and path configuration
registered in the SSO repository using the
following URL forms.
Omissible.
If “YES” is
specified for
“rejectincorrectprotectionresourceurl”, this
setting is
required.
<URL form>
[Protocol Scheme][Host Name][: Port
number][Path]
[Protocol Scheme]:
Set “http://” or “https://"
2-83
Chapter 2: Environment Setup (SSO Administrators)
Item
Configuration
Name
Setting Contents
[Host Name]:
Set the host name defined in the
protection resource site configuration
using FQDN. In the host name, "@", "?"
and "&" are invalid.
[: Port number]:
Set the port number defined in the
protection resource site configuration.
The Port number can be omitted. If it is
omitted, the port number is considered to
have been set as the following:
- If protocol scheme is "https://"
Port number: ":443"
- If protocol scheme is "http://"
Port number: ":80"
[Path]:
Set the path configuration of the protection
resource. The Path cannot be omitted.
Set carefully with the following:
- The path must start with "/".
- Relative paths ("/./", "/../"), continued "/"
("//") and ";" are invalid.
- The path cannot end with the characters
"/." or "/..".
Set the above URL form carefully as the
following:
- Only alphanumeric characters and
symbols can be used. However, the
following symbols cannot be used.
"<”, “>”, “"”, “{”, “}”, “|”, “\”, “^”, “[”, “]”, “`”,
“ ”, “%”
- Multi-bytes string (for example kanji
code) cannot be used.
- Specify the length of string within 2048
bytes.
- In URL form, query strings are invalid.
Example of setting the protection resource
URL:
2-84
Omissible or
Required
Registering a Business System
Item
Configuration
Name
Setting Contents
Omissible or
Required
Specifying the protection path "/protect/" of
the protection site "bus.example.com" of
operated port number 443 on https:
protection-resourceurl=https://bus.example.com:443/protect/
If the set protection resource URL ends with
“/”, it will be handled as a directory. In order
for the protection resource to be
authenticated, when authentication is
requested, the characters of the set value
and the URL must match from the first
character forward.
If the URL ends with a character other than
“/”, it will be handled as a file. In order for the
protection resource to be authenticated,
when authentication is requested, the
characters of the set value and the URL must
match completely from the first character
forward.
If setting more than one protection resource
URL, set the first protection resource URL on
one line, and subsequent URLs on separate
lines.
If multiple URLs are set, decide whether the
set URL corresponds to the protection
resource URL which accepts the
authentication request from the head in order.
Setting example:
Setting two protection resource URLs.
protection-resourceurl=https://bus.example.com:443/protect/
protection-resourceurl=https://bus.example.com:443/bussyste
m/
If these details are omitted when "rejectincorrect-protection-resource-url" is set to
"YES", sso02008 error message is output to
the system log when the authentication
server starts and stops.
2-85
Chapter 2: Environment Setup (SSO Administrators)
Item
Configuration
Name
Setting Contents
Omissible or
Required
If the value set for the protection resource
URL is incorrect, sso02007 error message is
output to the system log when the
authentication server starts and stops.
Note
•
If the configuration file is not correct (for example, a required item is not set, or set with invalid
values), Interstage HTTP Server cannot be started.
•
The error messages output when invalid settings are configured are registered in the system log.
When Interstage HTTP Server starts up, errors can be registered in this log more than once.
•
If the configuration item does not allow multiple lines, when multiple lines are entered only the top
line is valid, and other lines will be ignored.
•
Set the configuration file items using the “<configuration name>=<set value>” form from the head of
line. Do not include blanks in front of or behind “=”.
•
Set the items of configuration file without unnecessary blanks.
For example, “<configuration name>=123 ” (with a blank behind 123) and “<configuration name>=
NO” (with a blank in front of NO) are incorrect. Such entries will be ignored.
•
If an invalid configuration name is set, it is ignored.
•
Lines starting with “#” are regarded as comment lines.
The following example shows how to set a configuration file.
Example
The following is an example of a protection resource URL which accepts the authentication request and
restrains all authentication requests except those from the protection resource:
Protection resource URL:
https://bus.example.com:443/protect/
https://bus.example.com:443/bussystem/
Reject-incorrect-protection-resource-url=YES
protection-resource-url=https://bus.example.com:443/protect/
protection-resource-url=https://bus.example.com:443/bussystem/
About the set value of configuration item "protection-resource-url"
Set all protection resource information registered in the SSO repository in the configuration item
“protection-resource-url” of the authentication server correctly.
If the set value does not correspond to the protection resource information, restraint of authentication
requests, except those from the protection resource, cannot be performed correctly.
2-86
Registering a Business System
Addition, modification or deletion of protection resource information
If adding, modifying or deleting protection resource information of the SSO repository, modify the
configuration item “protection-resource-url” of the authentication server, and then restart the
authentication server.
Moreover, ask the business server administrator for access to real protection resources, or to confirm
that the authentication server is functioning with the configuration correctly.
Preparations for Setting up a Business System
When the business server administrator sets up a business system, a business system setup file must
be created.
The following operations also require the service ID file for the business server:
•
JAAS authentication
•
User authentication in response to SOAP message
The business server administrator must prepare the business system setup file or business-server
service ID file according to the products and operating conditions of the business system configuration.
Downloading Business System Setup File
Download the business system setup file according to the following procedure using the Interstage
Management Console of the machine on which the repository server (update system) was set up. Refer
to the Operator’s Guide for details of the items to be defined on the Interstage Management Console.
1.
Select the [Security] and then [Single Sign-on] from the System menu. Select [Authentication
infrastructure] and then click the [Business system setup file] tab.
2.
Enter necessary items.
To link the business system to Interstage Portalworks, select [Yes] in [Linkage with Interstage
Portalworks?], and specify a domain name as the authentication validity range.
When the authentication infrastructure uses two or more repository servers, specify the URL of the
repository server (reference system) in [Repository Server URL] of [Authentication Infrastructure
Information Settings].
3.
Click [Download] to download the business system setup file to the machine on which the Web
browser is operating.
4.
Send the business system setup file to the business server administrator, and then delete the
business system setup file.
The business system setup file is important for security, and is encrypted with a password. Ensure the
password is protected from unauthorized access. Pass the password and downloaded information file
to the business server administrator by secure means. The password must be arranged with the
business server administrator in advance so that the correctness of the distributed business system
setup file can be confirmed.
Notes
•
In the business system with the same domain, the business system setup file that was created by
specifying 'Yes' in [Linkage with Interstage Portalworks?] cannot be used together with the business
system setup file that was created by specifying 'No' in [Linkage with Interstage Portalworks?].
2-87
Chapter 2: Environment Setup (SSO Administrators)
•
The business system setup file is important for security. Be sure to delete this file after it was sent
to the business server administrator.
Creating a Service ID File for a Business Server
What is the service ID file?
The authentication information on a user registered in the SSO repository, such as mail address and
employee number is fetched from the repository server on the basis of the certificate, user ID, and
password the user used for authentication. The authentication information is posted to the business
server through the authentication server. The service ID file is required to securely communicate the
authentication information.
There is no need to be conscious of the service ID file when using the Interstage Management Console
to make the Interstage Single Sign-on environment settings.
Method to create the service ID file
Create a service ID file for a business server by using the ssomksid command.
The service ID file for a business server is important for security. Ensure that the file is protected from
unauthorized access by third parties. After the service ID file for the business server is sent to the
business server administrator, be sure to delete it.
Refer to 'Single Sign-on Operation Commands' in the Reference Manual (Command Edition) for details
of the ssomksid command.
2-88
More Secure Use
More Secure Use
Communication data and authentication information between servers are encrypted in the Interstage
Single Sign-on system. The following two methods make operation more secure:
Using Ipsec
IPsec is the encryption communication protocol defined as the standard protocol of the Virtual Private
Network (VPN) by IETF. IPsec encrypts data on the IP protocol level. Therefore, higher-level protocols
and applications need not be changed for the encryption.
Since communication between servers is protected on the IP protocol level by using IPsec, more secure
operation can be made to prevent electrical interception or alteration.
To use IPsec, set up IPsec so that IPsec encryption communication is performed between all of the
Interstage-Single-Sign-on repository servers, authentication servers, and business servers. IPsec is
provided as the standard function of the operating system from Windows ® 2000 or Solaris 8 0E.
Using firewall
A firewall controls access to data that flows between networks.
Using a firewall, authentication servers and repository servers can be set in an independent, secure
network. Since accesses using the Interstage Single Sign-on system are controlled, invalid accesses
are avoided.
To use a firewall, separately prepare a firewall product.
Using IPsec
To use IPsec, set up IPsec on all of the Interstage-Single-Sign-on repository servers, authentication
servers, and business servers so that IPsec encryption communication can be performed between
these servers.
IPsec provides encryption of communication data in the following cases:
•
Communication between business server and repository server
•
Communication between authentication server and repository server
The following shows an example of Interstage Single Sign-on configuration using IPsec in which
authentication-server load distribution and repository-sever availability are considered.
2-89
Chapter 2: Environment Setup (SSO Administrators)
Figure 2-10 Interstage Single Sign-on Using IPsec
1.
The IPsec encryption communication is set between the business server and repository server so
that communication from the business server is encrypted to prevent electrical interception or
alteration.
2.
The IPsec encryption communication is set between the authentication server and repository server
so that communication from the authentication server is encrypted to prevent electrical interception
or alteration.
3.
If SSO repository is set up in a repository server, data that the repository server fetches from the
SSO repository does not flow to the network. This prevents electronic interception or alteration.
4.
SSL communication is set between the replicating repository servers to prevent electronic
interception or alteration.
5.
SSL communication is set in authentication servers to prevent electronic interception or alteration
by encrypting communication from clients.
Refer to the operation manual of the related operating system for an explanation of the IPsec setting
method.
2-90
More Secure Use
Using a Firewall
When a firewall is set, a group of authentication servers and repository servers must be set up in an
independent network, and all accesses to the authentication serves and repository servers pass through
the firewall.
Any accesses from other than business servers or clients are blocked by the filtering function of the
firewall.
The following shows an example of the Interstage Single Sign-on configuration using a firewall:
Figure 2-11 Interstage Single Sign-on Using a Firewall
1.
A firewall is installed so that authentication servers and repository servers make up an independent,
secure network.
2.
The access control is set in the firewall so that accesses to repository servers through the firewall
can be made only from the business server, and other accesses are blocked as invalid accesses.
3.
Replication is secure because it is performed within the network protected by the firewall.
4.
SSL communication is set for authentication servers to prevent electrical interception or alteration
by encrypting communication from clients.
2-91
Chapter 2: Environment Setup (SSO Administrators)
For an explanation of installing the firewall and setting filtering function, refer to the manual of the
product in which the firewall is to be set up.
Table 2-9 lists an example of general filtering conditions common to the firewall products:
Table 2-9 Firewall Filtering Conditions
2-92
Service
Sender
Receiver
Processing
http
(repository-server port number/tcp)
Business server
Repository server
Transmitting
https
(authentication-server port
number/tcp)
Client
Authentication
server
Transmitting
domain-udp
(port number: 53/udp)
Authentication
server
DNS server
Transmitting
Chapter 3
Environment Setup (Business Server
Administrators)
This chapter explains the flow of, and method for, setting up the business system environment.
Use the Interstage Management Console to set up the Interstage Single Sign-on environment. Refer to
the Operator’s Guide for details of starting the Interstage Management Console. Refer to the Operator’s
Guide for details of the items to be defined in the Interstage Management Console.
Notes
•
Refer to the Security System Guide for information on how to set up and operate the system.
•
Administrator's authority is required to set up the business system environment.
3-1
Chapter 3: Environment Setup (Business Server Administrators)
Environment Setup Flow
This section explains how to add a business system. Refer to “Registering a Business System” for
further information.
Figure 3-1 shows the flow of environment setup as follows:
Figure 3-1 Environment Setup Flow
Remarks
To add a business system, you need to setup the target Web system and the Web services (all services
other than authentication and authorization) in advance:
3-2
•
To operate the business system using SSL communication, configure the settings for SSL
communication.
•
Set the port number for the Web server.
•
Prepare and setup Web services and Web contents.
•
Configure the Web system and Web services for operation.
Environment Setup Flow
For details regarding the set up of Web system and Web service environments, refer to the Web server
manual.
The configuration spread sheet (Excel file) for business systems is also provided to support the
calculation of connection information between servers to be set up on the Internet Management Console
during setup of the business system environment.
For details about the configuration spreadsheet for business systems, refer to “Using the Configuration
Spreadsheet for Business Systems.”
Environment Setup Flow by Case
Figure 3-2 Environment Setup Flow by Case
The stages required to set up the environment according to the operating mode is listed in table 3-1.
Table 3-1 Environment Setup According to Operating Mode
System
configuration
Setting up a business
server on a server
Setting up business
servers on multiple
servers
Designing a
business system
Designing a
business system.
Designing a business
system.
Setting up the
first business
server
Setting up the first
business server.
Setting up the first
business server.
Integrating into the
Web server
Integrating into the Web
server
Adding a business server to
the set up business system
3-3
Chapter 3: Environment Setup (Business Server Administrators)
System
configuration
Setting up a business
server on a server
Setting up the
second and
subsequent
business servers
Using the
configuration
spread sheet for
business systems
as required.
Using the
configuration
spreadsheet for the
business system
Setting up business
servers on multiple
servers
Adding a business server to
the set up business system
Setting up the second
and subsequent
business servers for
load balancing.
Setting up the second and
subsequent business
servers for load balancing.
Integrating into the Web
server
Integrating into the Web
server
Using the configuration
spreadsheet for the
business system
“SSO_Business.xls”
“SSO_Business.xls”
Using the Configuration Spreadsheet for Business Systems
The configuration spreadsheet (Excel file) for business systems is provided to support the calculation of
connection information between servers during setup of the business system environment when using
the Internet Management Console. Access and run the file from the following storage destination, as
required. For details about how to use the file, refer to [Procedure for Use] in this spreadsheet.
File Name and Storage Destination of Configuration Spreadsheet for Business Systems
File name of configuration spreadsheet for business systems
SSO_Business.xls
Storage destination of configuration spreadsheet for business systems
Folder "ApplicationServer\tuning" of Manual CD
3-4
Environment Setup Flow
Conditions for Using the Business System Configuration Spreadsheet
The business system configuration spreadsheet supports Microsoft(R) Excel 2000 and Microsoft(R)
Excel 2002. Ensure that Microsoft(R) Excel 2000 or Microsoft(R) Excel 2002 is installed on your
computer.
This spreadsheet uses a macro. Set the Microsoft(R) Excel security level beforehand to enable this
macro. Refer to Help for Microsoft(R) Excel for details of how to set the security level.
Contact your system administrator before changing the Microsoft(R) Excel security level.
The following procedure can be used for setting and enabling the macro security level in Microsoft(R)
Excel 2002:
1.
From Microsoft(R) Excel 2002 select [Macros], then [Security] from the Tool menu to display the
macro security setting window.
2.
Select [Medium] on the [Security level] page and click OK.
3.
Close Microsoft(R) Excel and restart.
4.
From the menu bar, select Open from the File menu and choose the business system configuration
spreadsheet.
5.
The dialog box asks if you want to enable the macro. Click [Enable macro].
After using this spreadsheet, restore the security level as necessary.
3-5
Chapter 3: Environment Setup (Business Server Administrators)
Designing a Business System
The business system administrator must clarify and report the following items to the SSO administrator
when adding a business system to the Interstage Single Sign-on:
•
Business system public URL
•
Path configuration to be authenticated
•
Whether to use SSL communication
•
Whether to use Interstage Portalworks linkage
•
Interstage version and edition
If the business system does not support SSL, the SSO administrator must check whether a non-SSL
connection is permitted.
Caution
Interstage Single Sign-on controls access to protect resources in the business server. However, if the
business server is not operated in SSL communication mode, the protected resources may be tapped
from the network. Operating the business server in SSL communication mode enables the
communication contents to be encrypted and protected from tapping. It is strongly recommended to
operate the business server in SSL communication mode.
Notes
3-6
•
Interstage Single Sign-on disables change of the business system public URL being operated.
If the public URL is to be changed, the business system must be set up again.
•
To set up a business system that links with Application Gateway and can be accessed from
clients only on the Internet, prevent all the first hierarchies of the URL path of the business
system from being the same as those of other business systems. The root path (“/”) of the
business system cannot be accessed from the clients. For details, refer to “Linkage with
Application Gateway.”
Setting up Business Servers
This section explains the procedure for setting up business servers. The Interstage Management
Console is used to add business servers.
Setting up the First Business Server
The SSO administrator (who has completed registration of a business system), notifies the business
server administrator regarding the business system setup file and its password.
The business server administrator uses the business system setup file to add a business server.
The Interstage Management Console (for the server on which the business server is to be set up) is
used to take the following steps. For details about the items defined on the Interstage Management
Console, refer to the Operator’s Guide.
1.
Select [Security] > [Single Sign-on] > [Business system] and the [Addition of Business server] tab
from the System menu.
2.
Enter the required items in [Server Settings].
3.
Specify the [Business system setup file] and [Password of file] as supplied by the SSO
administrator.
4.
If Interstage HTTP Server is not being used, select [Others (Excluding Interstage HTTP Server)] for
[Web server to use] and set [Port number].
5.
To update access control information automatically when the business server is started, select
[Execute when Business server is started] for [When updating Access Control Information?].
6.
Click the [Add] button to display a list of servers.
7.
Check the name of the added business system, port number, and business system public URL.
8.
To use linkage with Interstage Portalworks, select [System] > [Security] > [Single Sign-on] >
[Business system] > [Business system Name] > [Settings] tab to click [Detailed Settings [Show]].
Specify “No” for [Enable Client IP Address Check?] in [Authentication Information Settings] and
“Yes” for [Notify User Information?] in [Linkage with Web applications], then click the [Update]
button.
9.
Delete the business system setup file.
Note
•
Multiple types of Web servers can be used as the business servers for Single Sign-on in one
system.
−
Multiple InfoProvider Pro servers can be started and operated as business servers.
−
The following Web servers can be operated concurrently as business servers:
- Interstage HTTP Server
- InfoProvider Pro
3-7
Chapter 3: Environment Setup (Business Server Administrators)
- Microsoft(R) Internet Information Service
•
If multiple types of Web servers are to be used as business servers for Single Sign-on on one
system, assign a different name to the access log file of each business server. If the same file
name is assigned, the access log cannot be collected normally.
•
If “multi-host” of InfoProvider Pro is to be used, define the Web server and business server so
that a port number is not doubly specified in one system.
•
If Microsoft(R ) Internet Information Services are to be used, operation using multiple sites is not
supported.
Set up a business server for Single Sign-on for only one site. If it is set up for multiple sites, it is
access controlled for only the first site accessed after the Web server is started.
•
If Microsoft(R) Internet Explorer is used as a Web browser, a business system setup file with an
absolute path name exceeding 200 bytes in length may not be able to be specified using the
Browse button. In this case, allocate the business system setup file so that the absolute path is
sufficiently short.
•
If Interstage HTTP Server is to be used, operation using the virtual host function of Interstage
HTTP Server is not supported.
If a business server is set up for the port number to be used by the virtual host function, it is not
access controlled.
•
When a business server is started, the configurations of all business servers on the same
system are checked for errors. If one of the configurations is invalid, information is output to the
system log. In this case, the Web server starts, but returns the message “500 Internal Server
Error” for all accesses from the user.
•
The business system setup file is important for security. After the business server has been set
up, ensure that the business system setup file is deleted.
1.
Select [System] > [Security] > [Single Sign-on] > [Business system] > [Addition of Business server]
tab.
2.
Enter the required items in [Server Settings].
3.
Specify the [Business system setup file] and [Password of file] as supplied by the SSO
administrator.
4.
If Interstage HTTP Server is not being used, select [Others (Excluding Interstage HTTP Server)] for
[Web server to use] and set [Port number].
If [Others (Excluding Interstage HTTP Server)] has been selected, set the effective user name of
the Web server. For details about the effective user name, refer to “To change the effective user
name of the Web server for the business server.”
3-8
5.
To update access control information automatically when the business server is started, select
[Execute when Business server is started] for [When updating Access Control Information?].
6.
Click the [Add] button.
7.
A list of servers is displayed. Check the name of the added business system, port number, and
business system public URL.
Setting up Business Servers
8.
To use linkage with Interstage Portalworks, select [System] > [Security] > [Single Sign-on] >
[Business system] > [Business system Name] > [Settings] tab to click [Detailed Settings [Show]].
Set [Enable Client IP Address Check?] in [Authentication Information Settings] to “No” and [Notify
User Information?] in [Linkage with Web applications] to “Yes,” then click the [Update] button.
9.
Delete the business system setup file.
Note
•
Multiple types of Web servers can be used as business servers for Single Sign-on in one
system. To use multiple types of Web servers, be sure to make the effective user name of the
Web servers the same. For details about the effective user name of Web server, refer to “To
Change Effective User of Web Server for Business Server”
−
Multiple InfoProvider Pro servers can be started and operated as business servers.
−
Interstage HTTP Server, InfoProvider Pro, and Sun ONE Web Server, Enterprise Edition can
be operated concurrently as business servers.
•
If multiple types of Web servers are to be used as business servers for Single Sign-on on one
system, assign a different name to the access log file of each business server. If the same file
name is assigned, the access log cannot be collected normally.
•
If “multi-host” of InfoProvider Pro is to be used, define the Web server and business server so
that a port number is not doubly specified in one system.
•
If Sun ONE Web Server Enterprise Edition is to be used, operation using the virtual server is not
supported.
If access control for Single Sign-on is set up for the virtual server, it is not access controlled
normally.
•
If Microsoft(R) Internet Explorer is used as a Web browser, a business system setup file with an
absolute path name exceeding 200 bytes in length, may not be able to be specified using the
Browse button. In this case, allocate the business system setup file so that the absolute path is
sufficiently short.
•
If Interstage HTTP Server is to be used, operation using the virtual host function of Interstage
HTTP Server is not supported.
If a business server is set up for the port number to be used by the virtual host function, it is not
access controlled.
•
When a business server is started, the configurations of all business servers on the same
system are checked for errors. If one of the configurations is invalid, information is output to the
system log. In this case, the Web server starts, but returns the message “500 Internal Server
Error” for all accesses from the user.
•
The business system setup file is important for security. After the business server has been set
up, ensure that the business system setup file is deleted.
1.
Select [System] > [Security] > [Single Sign-on] > [Business system] > [Addition of Business server]
tab.
2.
Enter the required items in [Server Settings].
3.
Specify the [Business system setup file] and [Password of file] as supplied by the SSO
administrator.
3-9
Chapter 3: Environment Setup (Business Server Administrators)
4.
To update access control information automatically when the business server is started, select
[Execute when Business server is started] for [When updating Access Control Information?].
5.
Click the [Add] button.
6.
A list of servers is displayed. Check the name of the added business system, port number, and
business system public URL.
7.
To use linkage with Interstage Portalworks, select [System] > [Security] > [Single Sign-on] >
[Business system] > [Business system Name] > [Settings] tab to click [Detailed Settings [Show]].
Specify “No” for [Enable Client IP Address Check?] in [Authentication Information Settings] and
“Yes” for [Notify User Information?] in [Linkage with Web applications], then click the [Update]
button.
8.
Delete the business system setup file.
Notes
•
Only one Web server (Interstage HTTP Server) can be used as the business server for Single
Sign-on in one system.
•
If Microsoft(R) Internet Explorer is used as a Web browser, a business system setup file with an
absolute path name that exceeds 200 bytes in length, may not be able to be specified by using
the Browse button. In this case, allocate the business system setup file so that the absolute
path is sufficiently short.
•
If Interstage HTTP Server is to be used, operation using the virtual host function of Interstage
HTTP Server is not supported.
If a business server is set up for the port number to be used by the virtual host function, it is not
access controlled.
•
When a business server is started, the configurations of all business servers on the same
system are checked for errors. If one of the configurations is invalid, information is output to the
system log. In this case the Web server starts, but returns the message “500 Internal Server
Error” for all accesses from the user.
•
The business system setup file is important for security. After the business server has been set
up, ensure that the business system setup file is deleted.
Setting up the Second and Subsequent Business Servers for
Load Balancing
This section explains how to add business servers for load balancing.
If a load balancer (such as Interstage Traffic Director) is used to distribute business server load, the
second and subsequent servers must be configured with the same environment as the first server.
Interstage Single Sign-on provides the ssocloneaz command to set up business servers with the same
environment.
The ssocloneaz command also replicates messages to be displayed in a Web browser. Before making
a replicate of business server, customize messages. For details about how to customize messages to
be displayed in a Web browser, refer to “Customizing Messages Displayed on a Web Browser”.
3-10
Setting up Business Servers
The following procedure describes how to use the ssocloneaz command to migrate the environment of
the existing business server (replication source server) to the new business server (replication
destination server). For details about the ssocloneaz command, refer to “Single Sign-on Operation
Commands” in the Reference Manual (Command Edition).
Preparation before Load Balancing
When adding a new load balancer (such as Interstage Traffic Director) to an existing business system:
•
Set the host name of the installed business server in the load balancer (such as Interstage
Traffic Director) so that the business system public URL is not changed. For details about the
business system public URL, refer to “Business System Public URL”.
For details about Interstage Traffic Director, refer to the Interstage Traffic Director manual.
Preparing the Replication Destination Server
1.
Prepare a server that contains Interstage with the same platform, version, edition, and install
directory as the replication source server.
The Interstage Single Sign-on in the replication destination server must be in the status
immediately after installation.
2.
If the business system setup file notified from the SSO administrator is invalid, all business servers
to be added for load balancing purpose are re-created. Therefore, before fetching the environment
information about the business server, confirm that the access from the client is correctly
authenticated and authorized in the replication source server.
Fetching Environment Information
1.
Execute the ssocloneaz command using the -p option in the replication source server to fetch
environment information about the business server.
2.
Transfer the environment information fetched in the above Step 1 to the replication destination
server.
Transfer the environment information carefully so that the third party does not tap it. During transfer,
do not change the permission of the environment information file fetched in the above Step 1.
Setting up the Replication Destination Server Environment
1.
Execute the ssocloneaz command using the –c option in the replication destination server to
replicate the business server environment.
2.
Replicate the environment of the Web server with the same version on the replication destination
server so that the Web system, Web service, and replication source server environments are the
same.
3.
If Interstage HTTP Server is used, select [System] > [Security] > [Single Sign-on] > [Business
system] > [Business system Name] > [Settings] tab, and then click the [Update] button.
4.
Delete the environment information file for the business server.
Notes
•
If business server load is to be distributed, the version, edition, and install directory of Interstage
Single Sign-on for multiple business servers must be the same.
•
The load balancer must be set up so that the requests from a particular client transfer to the
relevant authentication servers.
3-11
Chapter 3: Environment Setup (Business Server Administrators)
•
•
Configure the following settings when the load balancer is Interstage Traffic Director
−
Operation Mode: bridge
−
Measure of load Balancing and uniqueness of connection: Balancing for each node
The environment information file for business server is important for security. After the business
server is set up, be sure to delete the environment information file.
Integrating into the Web Server
Business server is integrated into a Web server.
Use the procedure of your Web server to install a business server and restart the Web server. For
details about how to start a Web server, refer to “Starting a Business Server.”
To use multiple Web servers on one server, integrate a business server in all Web servers to be used as
the business system for Single Sign-on.
Integrating into Interstage HTTP Server
If Interstage HTTP Server is used, the Interstage Single Sign-on module is automatically integrated into
Interstage HTTP Server.
However the Interstage Single Sign-on module is only automatically integrated into Interstage HTTP
Server when the port number specified in the Business system public URL and the port number used by
Interstage HTTP Server, match.
Integrating into InfoProvider Pro
To use InfoProvider Pro, edit the environment configuration file for InfoProvider Pro.
Environment Configuration File Name and Storage Destination
Environment configuration file name
F3FMwww.dat(*1)
HTTPD.conf(*1)
Environment configuration file name
C:\Interstage\F3FMwww\conf
3-12
Setting up Business Servers
/etc/opt/FSUNprovd(*1)
*1 The configuration file name can be changed.
Table 3-2 Environment configuration file for InfoProvider Pro
Item name
Contents
hostname
Set the host name of the server to which a business server has been added.
The name (FQDN) registered in Domain Name System (DNS) must be
specified for the host name. The IP address cannot be set.
filter-file
Set the business server program with the absolute path.
filter-file: C:\Interstage\F3FMsso\ssoatzag\lib\F3FMssoatzipp.dll
filter-file: /opt/FJSVssoaz/lib/ssoatzipp.so
Example
hostname: test.fujitsu.com
filter-file: C:\Interstage\F3FMsso\ssoatzag\lib\F3FMssoatzipp.dll
hostname: test.fujitsu.com
filter-file: /opt/FJSVssoaz/lib/ssoatzipp.so
To use the multihost function of InfoProvider Pro to operate a business server, set the above items for
each environment configuration file for InfoProvider Pro.
Integrating into Sun ONE Web Server Enterprise Edition 4.1
To use Sun ONE Web Server Enterprise Edition 4.1, edit the environment configuration file for Sun ONE
Web Server.
The following shows the items to be added to the environment configuration file for Sun ONE Web
Server as required for operation of a business server.
3-13
Chapter 3: Environment Setup (Business Server Administrators)
Environment Configuration File Name and Storage Destination
Environment configuration file name
obj.conf
Storage destination of environment configuration file
/usr/netscape/server4/https-INSTANCE_NAME/config(*1)
*1 https-INSTANCE_NAME is the name of the server set up as a server by the user. It becomes httpswww.fujitsu.com if the server name is https-www.fujitsu.com
/usr/netscape/server4/https-www.fujitsu.com/config/obj.conf
Table 3-3 Sun ONE Web Server EE 4.1 environment configuration file
Item name
Contents
Init
Create two settings for initialization of a business server.
[First]
Specify “load-modules” for the fn argument.
Specify “/usr/lib/ssoatzipl.so” for the shlib argument.
Specify “GetFilterVersion,HttpFilterProc,sso_error” for the funcs argument.
[Second]
Specify “GetFilterVersion” for the fn argument.
Specify “yes” for EarlyInit.
Specify the settings as follows:
Init fn="load-modules" shlib="/usr/lib/ssoatzipl.so"
funcs="GetFilterVersion,HttpFilterProc,sso_error"
Init fn="GetFilterVersion" EarlyInit=yes
NameTrans
Specify “HttpFilterProc” for the fn argument as follows:
NameTrans fn="HttpFilterProc"
Error
Specify “sso_error” for the fn argument as follows:
Error fn="sso_error"
Example
Init fn="load-modules" shlib="/usr/lib/ssoatzipl.so"
funcs="GetFilterVersion,HttpFilterProc,sso_error"
Init fn="GetFilterVersion" EarlyInit=yes(*2)
<Object name=default>
NameTrans fn="HttpFilterProc"(*3)
Error fn="sso_error"
...
</Object>
*2 Code the initialization (Init) command for a business server in the first line of obj.conf.
*3 Code the “NameTrans fn=”HttpFilterProc” command at the beginning of <Object name=default>.
Code the Error fn=”sso_error” command after NameTrans fn=”HttpFilterProc.”
3-14
Setting up Business Servers
For details about the environment configuration file for Sun ONE Web Server, refer to “NSAPI
Programmer’s Guide for Sun ONE Web Server” in the Sun ONE Web Server manual.
Integrating into Sun ONE Web Server Enterprise Edition 6.0
To use Sun ONE Web Server Enterprise Edition 6.0, edit the environment configuration file for Sun ONE
Web Server.
The following shows the items to be added to the environment configuration file, for Sun ONE Web
Server required for operation as a business server.
Environment Configuration File Name and Storage Destination
Environment configuration file name
magnus.conf
obj.conf
Storage destination of environment configuration file
/usr/iplanet/servers/https-INSTANCE_NAME/config(*1)
*1 https-INSTANCE_NAME is the name of the server set up by the user. For example, it becomes
https-www.fujitsu.com if the server name is https-www.fujitsu.com
/usr/iplanet/servers/https-www.fujitsu.com/config/magnus.conf
Table 3-4 Settings for initialization of a business server
Item name
Contents
Init
There are two settings for initialization of a business server.
[First]
Specify “load-modules” for the fn argument.
Specify “/usr/lib/ssoatzipl.so” for the shlib argument.
Specify “GetFilterVersion,HttpFilterProc,sso_error” for the funcs argument.
[Second]
Specify “GetFilterVersion” for the fn argument.
Specify “yes” for EarlyInit.
Specify the settings as follows:
Init fn=load-modules shlib="/usr/lib/ssoatzipl.so"
funcs="GetFilterVersion,HttpFilterProc,sso_error"
Init fn="GetFilterVersion" EarlyInit=yes
3-15
Chapter 3: Environment Setup (Business Server Administrators)
Example
Init fn="load-modules" shlib="/usr/lib/ssoatzipl.so"
funcs="GetFilterVersion,HttpFilterProc,sso_error"
Init fn="GetFilterVersion" EarlyInit=yes(*2)
*2 Code the initialization (Init) command for a business server in the first line of magnus.conf.
/usr/iplanet/servers/https-www.fujitsu.com/config/obj.conf
Table 3-5 Environment configuration file settings
Item name
Contents
NameTrans
Specify “HttpFilterProc” for the fn argument. Specify the setting as follows:
NameTrans fn="HttpFilterProc"
Error
Specify “sso_error” for the fn argument. Specify the setting as follows:
Error fn="sso_error"
Example
<Object name=default>
NameTrans fn="HttpFilterProc"(*3)
Error fn="sso_error"
...
</Object>
*3 Code the NameTrans fn=”HttpFilterProc” command at the beginning of <Object name=default>.
Code the Error fn=”sso_error” command after NameTrans fn=”HttpFilterProc.”
For details about the environment configuration file for Sun ONE Web Server, refer to “NSAPI
Programmer’s Guide for Sun ONE Web Server” in the Sun ONE Web Server manual.
Notes
In the following cases, Sun ONE Web Server 6.0 cannot be started:
•
The environment configuration for the business server is invalid or resource shortage occurs.
•
The “/” (root path) is registered for protection resource.
To ensure that Sun ONE Web Server 6.0 can be started, comment out the servlet configurations of
magnus.conf and obj.conf of Sun ONE Web Server 6.0 according to the examples below.
If the servlet configurations are commented out, servlet operation cannot be done under Sun ONE Web
Server 6.0.
3-16
Setting up Business Servers
Example
Examples of magnus.conf and obj.conf that have been set immediately after installation of Sun ONE
Web Server 6.0 are used to explain how to comment out the servlet configurations.
Example of magnus.conf
#Init fn="load-modules"
shlib="/usr/iplanet/servers/bin/https/lib/libNSServletPlugin.so"
funcs="NSServletEarlyInit,NSServletLateInit,NSServletNameTrans,
NSServletService" shlib_flags="(global|now)"
#Init fn="NSServletEarlyInit" EarlyInit=yes
#Init fn="NSServletLateInit" LateInit=yes
Example of obj.conf
#NameTrans fn="NSServletNameTrans" name="servlet"
#NameTrans fn="pfx2dir" from="/servlet" dir="$docroot/servlet"
name="ServletByExt"
#Service type="magnus-internal/jsp" fn="NSServletService"
#<Object name="servlet">
#ObjectType fn=force-type type=text/html
#Service fn="NSServletService"
#</Object>
#<Object name="jsp092">
#ObjectType fn="type-by-extension"
#ObjectType fn="change-type" type="magnus-internal/jsp092" if-type="magnusinternal/jsp"
#Service fn="NSServletService" type="magnus-internal/jsp092"
#</Object>
#<Object name="ServletByExt">
#ObjectType fn=force-type type=magnus-internal/servlet
#Service type="magnus-internal/servlet" fn="NSServletService"
#</Object>
If invalid environment configuration for business server, and resource shortage have been removed, or
“/” (root path) for protection resource has been deleted, return the servlet configurations commented out
(according to the above examples) to their original state. Servlets can be operated.
If the protection resource has been changed, update access control information. For details about how
to update access control information, refer to “Updating Access Control Information”.
3-17
Chapter 3: Environment Setup (Business Server Administrators)
Microsoft(R) Internet Information Services 5.0 and 6.0
This section explains the procedure for installing a business server in Microsoft(R) Internet Information
Services (IIS). In this example Microsoft(R) Windows(R) 2000 Server is used to explain the procedure
for installing a business server in the Web site used under Microsoft(R) Internet Information Services 5.0.
1.
Select [Start] > [Programs] > [Administrative Tools] > [Internet Services Manager].
Figure 3-3 Internet Service Manager
3-18
Setting up Business Servers
2.
If Microsoft(R) Internet Information Services is running, stop it. To stop Microsoft(R) Internet
Information Services, select [Start] > [Programs] > [Administrative Tools] > [Services], select [World
Wide Web Publishing Service] from the window, and select [Action]. Then, select [Stop] from the
list.
Figure 3-4 Stop Microsoft IIS
3-19
Chapter 3: Environment Setup (Business Server Administrators)
3.
Select the Web site into which a business server is to be integrated.
In the following example a business server is integrated into the Web site called “Business server.”
Figure 3-5 Select a Web Site for Integration
3-20
Setting up Business Servers
4.
Select Properties to open the property sheet. Select the [ISAPI Filters] tab, and then click the Add
button.
Figure 3-6 Select Properties
5.
Enter a filter name, and specify the business server program with an absolute path name for the
executable file.
In the following example, “Business server” is specified for filter name and
“C:\Interstage\F3FMsso\ssoatzag\lib\F3FMssoatziis.dll” for executable file.
3-21
Chapter 3: Environment Setup (Business Server Administrators)
Figure 3-7 Specify Business Server
6.
After the settings have been made, click the [OK] button to start Microsoft(R) Internet Information
Services. To start, select [Start] > [Programs] > [Administrative Tools] > [Services], select [World
Wide Web Publishing Service] from the window, and select [Action]. Then, select [Start] from the
list.
Figure 3-8 Start Microsoft IIS
For details regarding Microsoft(R) Internet Information Services sites, refer to “Help (H)” of “Internet
Information Service” of Microsoft(R) Internet Information Services.
Note
To use Microsoft(R) Internet Information Services 6.0, operate it in IIS5.0 process isolation mode.
3-22
Setting up Business Servers
Setting the Access Permission for Operation Resources of a Web
Server Used by a Business Server
The Web server used by a business server can use access log functions to record the request contents.
These access logs contain important information that controls authentication and authorization of the
users.
To ensure more trustworthy use, set the access permission for the business server to prevent its access
log from leaking out.
This section explains how to set the access permission for the Web server access logs.
Only permit users who belong to the Administrators group and SYSTEM, to access the access log
output destination folder.
Use Windows Explorer to set access permission for the folder, to users with Administrator permission.
The following table lists examples of access log output destinations. In this example, the access log
output destinations may differ depending on the operating environment.
Table 3-6 Windows access log output destinations
Web server
Example of access log output folder
Interstage HTTP Server
C:\Interstage\F3FMihs\logs\
InfoProvider Pro
C:\Interstage\F3FMwww\log\
Microsoft(R) Internet Information Services
C:\WINNT\system32\LogFiles\W3SVC1\
For details about the settings for Microsoft(R) Internet Information Services, refer to “Help Topics (H)” in
“Help (H)” for “Internet Information Service” of Microsoft(R) Internet Information Services.
Permit only the owner and group to access the access log output destination directory. To set the
access permission for the files and directory, use the chmod command and chown command.
Set the access permission as a super user (root).
Table 3-7 Solaris access log output destinations
Web server
Example of access log output destination
directory
Interstage HTTP Server
/opt/FJSVihs/logs/
InfoProvider Pro
/var/opt/FSUNprovd/
Sun ONE Web Server Enterprise Edition
/usr/netscape/server4/https-server-name/logs/
(SunOne4)
/usr/iplanet/servers/https-server-name/logs/
(SunOne6)
3-23
Chapter 3: Environment Setup (Business Server Administrators)
Permit only the owner and group to access the access log output destination directory. To set the
access permission for the files and directory, use the chmod command and chown command.
Set the access permission as a super user (root).
Table 3-8 Linux access log output destinations
3-24
Web server
Example of access log output destination
directory
Interstage HTTP Server
/opt/FJSVihs/logs/
Chapter 4
Operation and Maintenance
This chapter explains the operation and maintenance of Interstage Single Sign-on, including starting
and stopping the system. It includes the following sections:
•
Starting Single Sign-on
•
Stopping Single Sign-on
•
Changing Environment Settings
•
User Related Operation
•
Authorization-related Operation
•
Maintenance Using Access Logs
•
Operating Notes for Large Systems
4-1
Chapter 4: Operation and Maintenance
Starting Single Sign-on
This section explains how to start the servers.
•
Starting a Repository Server
•
Starting an Authentication Server
•
Starting a Business Server
Starting a Repository Server
To start a repository server, use the Interstage Management Console on the server where the repository
server has been set up. Before starting the repository server, ensure that the SSO repository has
started.
For details on starting the Interstage Management Console, refer to the Operator’s Guide. For details
on using the Interstage Management Console window, refer to the Operator’s Guide.
Starting an SSO Repository
Use the Interstage Management Console to select [System] > [Services] > [Repository] > [Repository:
View Status], and then start the SSO repository.
For details on starting the SSO repository, refer to the Smart Repository Operator’s Guide.
Starting a Repository Server
Starting Interstage HTTP Server starts a repository server. Use the Interstage Management Console to
select [System] > [Services] > [Web server] > [Web Server: Web Server Status], and then start the
Interstage HTTP Server. If the repository server starts normally, information is output to the system log.
If the authentication server and repository server have been set up on the same server, both the
authentication server and repository server will start automatically when Interstage HTTP Server starts.
Depending on the number of role configuration entries and site configuration entries registered in the
SSO repository, delays may be experienced when starting Interstage HTTP Server. If a delay occurs, a
message “ihs81215: An error occurred when Interstage HTTP Server was started.” will be displayed on
the Interstage Management Console for the server in which the repository server has been installed. If
no error message is displayed in the system log, wait for a short time, and then select [System] >
[Services] > [Web Server] > [Web Server: Web Server Status] to check that Interstage HTTP Server is
running.
Service linkage with the SSO repository enables the SSO repository and the repository server, to be
started when the service is started. For details regarding service linkage with the SSO repository, refer
to “Service Linkage with SSO Repository.”
4-2
Starting Single Sign-on
Starting an Authentication Server
To start an authentication server, use the Interstage Management Console on the server where the
authentication server has been set up. The repository server must be running correctly in order for the
authentication server to operate.
For details on starting the Interstage Management Console, refer to the Operator’s Guide. For details
on using the Interstage Management Console window, refer to the Operator’s Guide.
Starting Interstage HTTP Server starts the authentication server. Use the Interstage Management
Console to select [System] > [Services] > [Web server] > [Web Server: Web Server Status], and then
start Interstage HTTP Server. If the authentication server starts normally, information is output to the
system log.
If the authentication server and repository server are installed on the same server, both the
authentication server and repository server will start when the Interstage HTTP Server starts.
Starting a Business Server
The method for starting a business server depends on the Web server where the business server runs.
The following examples show how to start a business server for each Web server being used as the
business server.
If the business server is started normally, information is output to the system log. The repository server
and authentication server must be running correctly in order for the business server to operate.
•
If Interstage HTTP Server is used
To start a business server, use the Interstage Management Console on the server where the
business server has been installed. Starting Interstage HTTP Server starts the business server.
Use the Interstage Management Console to select [System] > [Services] > [Web server] > [Web
Server: Web Server Status], and then start Interstage HTTP Server.
For details on starting the Interstage Management Console, refer to the Operator’s Guide. For
details on using the Interstage Management Console window, refer to the Operator’s Guide.
•
If InfoProvider Pro is used
Starting InfoProvider Pro automatically starts a business server. To start InfoProvider Pro, execute
the ippstart command.
For details on starting InfoProvider Pro, refer to “Web Server Operation Edition” – “InfoProvider Pro
Operation Commands” in the Reference Manual (Command Edition).
•
If Microsoft Internet Information Services 5.0 is used
Starting Microsoft Internet Information Services automatically starts a business server. To start
Microsoft Internet Information Services, select ‘Start’ in ‘World Wide Web Publishing Service’ in
Service.
For details on starting Microsoft Internet Information Services 5.0, refer to the online help in the
Microsoft Internet Information Services.
4-3
Chapter 4: Operation and Maintenance
•
If Microsoft Internet Information Services 6.0 is used
To start a business server, start Microsoft Internet Information Services, and then access the Web
server from a Web browser. To start Microsoft Internet Information Services, select ‘Start’ in ‘World
Wide Web Publishing Service’ in Service.
For details on starting Microsoft Internet Information Services 6.0, refer to the online help in the
Microsoft Internet Information Services.
•
If InfoProvider Pro is used
Starting InfoProvider Pro automatically starts a business server. To start InfoProvider Pro, execute
the ippstart command.
For details on starting InfoProvider Pro, refer to “Web Server Operation Edition” – “InfoProvider Pro
Operation Commands” in the Reference Manual (Command Edition).
•
If Sun ONE Web Server is used
Starting Sun ONE Web Server automatically starts a business server. To start Sun ONE Web
Server, execute the ‘start’ shell.
For details on starting Sun ONE Web Server, refer to the NSAPI Programmer’s Guide for Sun ONE
Web Server.
Notes
4-4
•
If the access log file for a business server cannot be initialized, the Web server where the business
server is operated has not been started. If the Web server does not start, check the contents of the
message starting with SSO output in the system log, and then remove the cause of the problem.
For details about the messages, refer to “Messages with Message Number Beginning ‘sso’” in
Messages.
•
If the setting “update the access control information in starting a business server” is selected, start
a repository server before starting a business server. For access control information, refer to
“Updating Access Control Information”.
•
After a business server has started, access the protection resource and ensure that authentication
and authorization are performed. If authentication and authorization are not performed, the
business server environment may be invalid. Check the contents of the message output to the
system log, and then remove the cause of the problem. For details about the message, refer to
‘Messages with Message Number Beginning ‘sso’” in Messages.
Stopping Single Sign-on
This section explains how to stop the servers.
•
Stopping a Business Server
•
Stopping an Authentication Server
•
Stopping a Repository Server
Stopping a Business Server
The method for stopping a business server is dependent on the Web server where the business server
operates. The following examples show how to stop a business server for each type of Web server on
which a business server may operate. If the business server stops normally, information is output to the
system log. Stopping the Web server may take several minutes depending on the load status.
•
If Interstage HTTP Server is used
To stop a business server, use the Interstage Management Console on the server where the
business server has been installed. Stopping Interstage HTTP Server automatically stops the
business server. Use the Interstage Management Console to select [System] > [Services] > [Web
server] > [Web Server: Web Server Status], and then stop Interstage HTTP Server.
For details about how to on starting the Interstage Management Console, refer to the Operator’s
Guide. For details on using the Interstage Management Console window, refer to the Operator’s
Guide.
•
If InfoProvider Pro is used
Stopping InfoProvider Pro automatically stops a business server. To stop InfoProvider Pro, execute
the ippstop command.
For details on stopping InfoProvider Pro, refer to “Web Server Operation Edition” – “InfoProvider
Pro Operation Commands” in the Reference Manual (Command Edition).
•
If Microsoft Internet Information Services 5.0 is used
Stopping Microsoft Internet Information Services automatically stops a business server. To stop
Microsoft Internet Information Services, select ‘Stop’ in ‘World Wide Web Publishing Service’ in
Service.
For details on stopping Microsoft Internet Information Services, refer to the online help in the
Microsoft Internet Information Services.
•
If Microsoft Internet Information Services 6.0 is used
Stopping Microsoft Internet Information Services automatically stops a business server. To stop
Microsoft Internet Information Services, select ‘Stop’ in ‘World Wide Web Publishing Service’ in
Service.
For details on stopping Microsoft Internet Information Services 6.0, refer to the online help in the
Microsoft Internet Information Services.
4-5
Chapter 4: Operation and Maintenance
•
If InfoProvider Pro is used
Stopping InfoProvider Pro automatically stops a business server. To stop InfoProvider Pro, execute
the ippstop command.
For details on stopping InfoProvider Pro, refer to “Web Server Operation Edition” – “InfoProvider
Pro Operation Commands” in the Reference Manual (Command Edition).
•
If Sun ONE Web Server is used
Stopping Sun ONE Web Server automatically stops a business server. To stop Sun ONE Web
Server, execute the ‘stop’ shell.
For details on stopping Sun ONE Web Server, refer to the NSAPI Programmer’s Guide for Sun
ONE Web Server.
Stopping an Authentication Server
To stop an authentication server, use the Interstage Management Console on the server where the
authentication server has been installed. If an authentication server is stopped, a business server
cannot operate. Extreme care must be taken when stopping authentication servers.
For details on starting the Interstage Management Console, refer to the Operator’s Guide. For details
on using the Interstage Management Console window, refer to the Operator’s Guide.
Stopping Interstage HTTP Server stops an authentication server. Use the Interstage Management
Console to select [System] > [Services] > [Web server] > [Web Server: Web Server Status] and then
stop the Interstage HTTP Server. If the authentication server stops normally, information is output to the
system log.
Stopping a Repository Server
To stop a repository server, use the Interstage Management Console on the server where the repository
server has been set up. If a repository server is stopped, an authentication server and business server
cannot operate. Extreme care must be taken when stopping repository servers.
Before stopping an SSO repository, ensure that the repository server has been stopped.
For details on starting the Interstage Management Console, refer to the Operator’s Guide. For details
on using the Interstage Management Console window, refer to the Operator’s Guide.
Stopping a Repository Server
Stopping Interstage HTTP Server automatically stops a repository server. Use the Interstage
Management Console to select [System] > [Services] > [Web server] > [Web Server: Web Server Status],
and then stop the Interstage HTTP Server. If the repository server stops normally, information is output
to the system log.
Stopping an SSO Repository
Use the Interstage Management Console to select [System] > [Services] > [Repository] > [Repository:
View Status] and then stop the SSO repository.
For details on stopping the SSO repository, refer to the Smart Repository Operator’s Guide.
4-6
Changing Environment Settings
This section explains how to change the operating environments of the repository server, authentication
server, and business server after environment setup.
•
Changing the Environment Settings of Repository Server, Authentication Server and Business
Server
•
Changing Effective User for Web Server
Changing the Environment Settings of Repository Server,
Authentication Server and Business Server
To change the environment settings of the repository server, authentication server, or business server,
use the following tabs on the Interstage Management Console. Select the server whose environment
setting requires changing in the bold portion.
•
Repository server
[System] > [Security] > [Single Sign-on] > [Authentication infrastructure] > [Repository server] >
[Settings] tab
•
Authentication server
[System] > [Security] > [Single Sign-on] > [Authentication infrastructure] > [Authentication server]
> [Settings] tab
•
Business server
[System] > [Security] > [Single Sign-on] > [Business system] > [Business system Name] >
[Settings] tab
If the environment settings of the repository server, authentication server, and business server have
been changed, stop and then restart the servers.
If the Java application using JavaAPI provided by Single Sign-on has been used to change the setting of
[Notify User Information?] in [Linkage with Web applications] during environment setup of business
server, the Java application must be restarted to enable the change.
Notes
•
If the SSL environment setting used by an authentication server has been changed, stop and then
restart the authentication server. To change the SSL environment setting, use the following tab on
the Interstage Management Console:
[System] > [Security] > [SSL] > [Configuration Name] > [SSL Settings] tab
•
If the following settings of the repository server (update system) have been changed using the
Interstage Management Console, re-create the repository server (reference system):
−
User information registration entry
−
Role configuration registration entry
4-7
Chapter 4: Operation and Maintenance
−
Protection resource registration entry
For details on creating the repository server (reference system), refer to “Adding a Repository
Server (Reference System)”.
Changing Effective User for Web Server
This section provides notes on changing the effective user for the Web server.
To change the effective user name specified in [Setting point of effective user name of Web server],
follow the procedure described in [Actions for Changing Effective User].
To Change Effective User for Repository Server
[Setting of Effective User Name for Web Server]
The effective user name for the Web server (Interstage HTTP Server) can be set using the User
directive in the configuration file (httpd.conf) for the Interstage HTTP Server.
[Actions for Changing Effective User]
After the effective user of the Web server is changed, use the Interstage Management Console to select
[System] > [Security] > [Single Sign-on] > [Authentication infrastructure] > [Repository server] >
[Settings] tab, and then click the [Update] button.
To Change Effective User for Authentication Server
[Setting of Effective User Name for Web Server]
The effective user name for the Web server (Interstage HTTP Server) can be set using the User
directive in the configuration file (httpd.conf) for the Interstage HTTP Server.
[Actions for Changing Effective User]
After the effective user of the Web server is changed, use the Interstage Management Console to select
[System] > [Security] > [Single Sign-on] > [Authentication infrastructure] > [Authentication server] >
[Settings] tab, and then click the [Update] button.
To Change Effective User for Business Server
[Setting of Effective User Name for Web Server]
•
If Interstage HTTP Server is used
The effective user name of the Web server (Interstage HTTP Server) can be set using the User
directive in the configuration file (httpd.conf) for the Interstage HTTP Server.
•
If InfoProvider Pro is used
The effective user name of InfoProvider Pro is fixed to the root and cannot be changed.
•
If Sun ONE Web Server Enterprise Edition is used
The effective user name of the Sun ONE Web Server Enterprise Edition can be set using the User
Directive in the configuration file (magnus.conf) for the Sun ONE Web Server Enterprise Edition.
4-8
Changing Environment Settings
[Actions for Changing Effective User]
•
If Interstage HTTP Server is used
After the effective user of the Web server is changed, use the Interstage Management Console to
select [System] > [Security] > [Single Sign-on] > [Business system] > [Business system Name] >
[Settings] tab, and then click the [Update] button.
•
If Sun ONE Web Server Enterprise Edition is used
After the effective user of the Web server is changed, use the Interstage Management Console to
select [System] > [Security] > [Single Sign-on] > [Business system] > [Business system Name] >
[Settings] tab, and then click [Detailed Settings [Show]]. Specify the effective user name set in the
Web server configuration file for [Effective user name] in [Web server to use] of [Web
ServerSettings], and then click the [Update] button.
Notes
If multiple business servers operate on one server, specify as follows:
•
To use InfoProvider Pro and other Web servers, set the effective user of the other Web server.
•
Specify the same effective user as the effective user for the Interstage HTTP Server of the Sun
ONE Web Server Enterprise Edition.
For example, the relationship between effective users set in the configuration files of Web servers and
effective users set on the Interstage Management Console is shown in Table 4-1.
Table 4-1 The Relationship Between Effective Users
Web server
Effective user of Web server
Setting on Interstage
Management Console
Interstage HTTP Server
nobody
Setting disabled (the value in
the left column is automatically
set)
InfoProvider Pro
root
nobody
Sun ONE Web Server
Enterprise Edition
nobody
nobody
4-9
Chapter 4: Operation and Maintenance
User Related Operation
This section explains how to manage user-related operations. Single Sign-on users are managed in the
SSO repository. To add a user, add the user entry to the user information in the SSO repository and
specify the user ID, password, and role name.
•
Adding a User
•
Deleting a User
•
Amending the Role of a User
•
Changing User Passwords
•
Taking Corrective Action if the User Password is Forgotten
•
Canceling Lockout
•
Checking User Lock Status
•
Checking and Changing User Validity Period
Adding a User
To add a user entry to the user information managed in the SSO repository, use the user program. For
details about the user program, refer to “Preparation for a User Program”.
When adding a user entry, note the following points:
•
If the authentication method is “certificate authentication” or “password authentication and
certificate authentication,” a certificate must be distributed to the user.
•
If the authentication method is “password authentication or certificate authentication,” a certificate
must also be distributed to a certificate authenticated user.
•
The addition of new users is effective immediately. The repository server, authentication server,
and business server need not be running.
For details on adding a user to the SSO repository, refer to “Registering User Information and Role
Configuration in the SSO Repository”.
Deleting a User
To delete a user entry from the user information managed in the SSO repository, use the user program.
For details about the user program, refer to “Preparation for a User Program”.
Deletion of users is effective immediately. The repository server, authentication server, and business
server need not be running.
4-10
User Related Operation
Amending the Role of a User
If the section or title of a user changes, the accessible resources can be amended by changing or
adding a user role.
To change or add a user role use the user program. For details about user program, refer to
“Preparation for a User Program”.
Changing User Passwords
To change a user password managed in the SSO repository, use the user program. For details about
user program, refer to “Preparation for a User Program”’
Note
When changing user passwords managed in the SSO repository, pay careful attention to password
security.
For details on password security refer to “Security Risks” – “Interstage Single Sign-on” – “Security
Measures” in the Security System Guide.
Taking Corrective Action if the User Password is Forgotten
If a user password managed in the SSO repository is forgotten, a new password must be set. To set a
new password, use the user program. For details about user program, refer to “Preparation for a User
Program”.
Note
When setting new user passwords managed in the SSO repository, pay careful attention to password
security.
For details on password security refer to “Security Risks” – “Interstage Single Sign-on” – “Security
Measures” in the Security System Guide.
Canceling Lockout
The Interstage Management Console is used to release lockout as follows:
1.
Select [System] > [Security] > [Single Sign-on] > [Authentication infrastructure] > [Repository
server] > [Release User Lock] tab, and then specify the ID of the user whose lockout is to be
released.
2.
Clicking the [Search] button displays information about the specified user.
3.
Check the user information, and then click the [Apply] button.
If the user is locked out because the password is forgotten, the user password can be reset by setting a
new password.
To reset a password, use the user program. For details about user program refer to “Preparation for a
User Program”.
4-11
Chapter 4: Operation and Maintenance
Notes
•
When resetting a password, pay careful attention to password security.
For details on password security refer to “Security Risks” – “Interstage Single Sign-on” – “Security
Measures” in the Security System Guide.
•
If the Interstage Management Console has been used to release user lockout, the consecutive
failure count will also be cleared.
Checking User Lock Status
To check the user lock status, use the user program. For details about user program, refer to
“Preparation for a User Program”.
To release a user lockout refer to “Canceling Lockout”.
Checking and Changing User Validity Period
To check and change the user validity period, use the user program. For details about user program,
refer to “Preparation for a User Program”.
4-12
Authorization-related Operation
This section explains changing role configurations and protection resources.
•
Amending Role Configurations
•
Amending Protection Resource
Amending Role Configurations
Role configuration amendments may be required due to organization change.
The role configuration is changed or added as follows:
The SSO administrator uses the SSO repository and repository server as follows:
1.
Change or add the role configuration in the SSO repository.
2.
Change or add the role to the path configuration of the protection resource as required.
3.
Change or add the role to the user entry as required.
4.
Use the repository server to retrieve role information and update the cache.
Use the Interstage Management Console to select [System] > [Security] > [Single Sign-on] >
[Authentication infrastructure] > [Repository server] > [Update Role information] tab, and then click
the [Update] button.
If the repository server (update system) and the repository server (reference system) are used,
update the cache on both servers.
5.
Request the business server administrator to update the access control information.
The business server administrator then operates the business server as follows: (*1).
1.
Update access control information on the business server.
Use the Interstage Management Console to select [System] > [Security] > [Single Sign-on] >
[Business system] > [Business system Name] > [Update access control information] tab, and then
click the [Update] button to update the access control information.
*1 If “Execute when business server is started” is selected in [Update access control information] in the
business server environment setup, this operation is required only when the business server is running.
If “Execute manually as needed” is selected, this operation is required regardless of whether the
business server is running or stopped.
For details about the setting [Update access control information], refer to “Updating Access Control
Information”.
For details about the role of the SSO repository, refer to “Role Configuration Entry”’.
4-13
Chapter 4: Operation and Maintenance
Notes
•
If the repository server (update system) and repository server (reference system) are allocated for
load balancing, change or add roles during off-peak hours (e.g. night hours) when only a few users
are accessing the servers.
•
Changing the role configuration in the SSO repository and then updating the role information in the
repository server will not reflect the changes in the authorization operation of the business server.
After role information in the repository server is updated, the access control information must be
updated on the business server.
•
If access control information is updated and an error message is output, the business server
remains in the state where it performs authorization according to the previous access control
information. Correct the error, and then stop the business server as required until the access
control information is updated normally.
Amending Protection Resource
If the user issues a request to access resources such as a Web application in a business server, the
business server determines whether the resource is an authentication or authorization target based on
the protection resource. If the business server determines that the resource is an authentication or
authorization target, it performs authentication and determines whether the user can access the
resource based on the user information and role managed in the SSO repository.
The SSO administrator amends protection resources in the SSO repository as follows:
1.
Change the protection resource in the SSO repository.
For details on how to change the resource, refer to 'Registering Site Configuration of Business
System' and 'Registering Protection Path' in Chapter 2, Environment Setup (SSO Administrators)
2.
Change the information of the business server's protection resources (the authentication server
accepts authentication request) which were set in the authentication server's configuration file.
For details on how to change the information, refer to the 'Settings for Protection Resource' in
Chapter 2, Environment Setup (SSO Administrators).
3.
Request the business server administrator to update access control information.
The business server administrator then operates the business server as follows: (*1)
1.
On the business server, use the Interstage Management Console to select [System] > [Security] >
[Single Sign-on] > [Business system] > [Business system Name] > [Update access control
information] tab, and then click the [Update] button to update the access control information.
*1
f [Update access control information] in the business server environment setup is set to “Execute
when business server is started,” this operation is required only when the business server is
running. If it is set to “Execute manually as needed”,” this operation is required regardless of
whether the business server is running or stopped.
For details about setting for [Update access control information], refer to “Updating Access Control
Information”.
For details about the protection resource in the SSO repository, refer to “Protection resource” in
“Information Required for Authorization Using Roles”.
4-14
Authorization-related Operation
Notes
•
If the repository server (update system) and repository server (reference system) are allocated for
load balancing, amend the role during the off-peak hours (eg. night hours) when only a few users
are accessing the servers..
•
Amendments to protection resource information in the SSO repository will not reflect in the
authorization operation of the business server without updating access control information. On the
business server, update access control information.
•
If an error message is output when access control information is updated, the business server
remains in the state where the server performs authorization according to the previous access
control information. Correct the error by stopping and restarting the business server as required
until access control information is updated normally.
4-15
Chapter 4: Operation and Maintenance
Maintenance Using Access Logs
Interstage Single Sign-on records authentication and authorization processing performed by the
repository server, authentication server, and business server as access logs. An access log (containing
authentication and authorization results, date and time, access source identification information and
user identification information) is recorded for each server. Each access log is output as a text file with
one record per line.
Use the Interstage Management Console of each server to specify the access log output destination file
name, maximum file size, and preferred saving method. These methods are described below;
For details about the configuration of the Interstage Management Console, refer to the Operator’s Guide.
Repository Server
[System] > [Security] > [Single Sign-on] > [Authentication infrastructure] > [Repository server] >
[Settings] tab > [Repository server : Settings]window
Authentication Server
System] > [Security] > [Single Sign-on] > [Authentication infrastructure] > [Authentication server] >
[Authentication server : Settings]window
Business Server
[System] > [Security] > [Single Sign-on] > [Business system] > [Business system Name] > [Settings] tab
> [Business system Name : Settings]window
Access Log of Repository server
The access log of the repository server records the results of obtaining user information contained in the
SSO repository after user authentication processing is requested from the authentication server.
The record format and contents are as follows:
Authentication-server – client [date/time] – “user-identificationinformation” processing-result (supplementary-information)
Authentication Server
IP address of authentication server that requested authentication processing
"unknown" is recorded if the authentication request is not provided from the authentication server.
Client
IP address of the client that requested authentication
Date/Time
Access date/time is recorded in the “YYYY/MM/DD HH:MM:SS+XXXX” format.
"+XXXX" refers to the time difference from UTC (Universal Time Coordinate). In cases where "-XXXX"
is used, it means the same as above.
4-16
Maintenance Using Access Logs
User Identification Information
User identification information (dn or uid) identifies the user who has requested authentication or has
been authenticated and records the information. If the user cannot be identified, ‘unknown’ is recorded.
If the certificate presented during certificate authentication is not registered in the SSO repository or the
user cannot be uniquely specified from the presented certificate, the serial number, issuer distinguished
name, and owner distinguished name of the certificate are recorded.
Processing Result
The processing result is recorded in the following format:
•
If user authentication processing is requested from the authentication server
Authentication (authentication method) [succeeded|failed]
One of the following is recorded for authentication method:
{basicAuth|certAuth|basicAuthAndCertAuth|unknown}
The meanings of the above authentication methods are as follows:
−
basicAuth
“Password Authentication”
−
certAuth
“Certificate Authentication”
−
basicAuthAndCertAuth
“Password Authentication and Certificate Authentication”
−
unknown
“The authentication method cannot be determined.”
If "password authentication” or “certificate authentication" was performed, the "basicAuth" or
"certAuth" access log is recorded.
•
Using the Interstage Management Console to select [System] > [Security] > [Single Sign-on] >
[Authentication infrastructure] > [Repository server] > [Update Role information] tab and click the
[Update] button
RoleInfoUpd {succeeded|failed}.
•
Using the Interstage Management Console to select [System] > [Security] > [Single Sign-on] >
[Business system] > [Business system Name] > [Update access control information] tab and click
the [Update] button
ResourceInfo {succeeded|failed}.
•
Updating the SSO repository for the repository server (update system)
Modification {succeeded|failed}.
4-17
Chapter 4: Operation and Maintenance
Supplementary Information
The cause of authentication failure is recorded in the access log.
For details about supplementary information in the access log, refer to “Messages Logged and Output in
Single Sign-on” – ‘Access Log In Single Sign-on Mode” – “Access Log of the Repository Server”’ –
“Supplementary Information in the Access Log of the Repository Server” in Messages.
The cause of the authentication failure will not always be recorded.
*1 This access log may be output two or more times.
Example
10.131.201.10 – 10.131.201.199 [2002/09/11 20:28:22 +0900] –
"cn=User001,ou=User,ou=interstage,o=fujitsu,dc=com"
Authentication(basicAuth)failed. (Count up failure count)
Access Log of Authentication Server
The access log of the authentication server records the result of the repository server authentication
processing in response to a user authentication request from the business server.
If load balancing is being performed using multiple authentication servers, the access log may be
distributed and recorded depending on the load balancing setting.
The record format and contents are as follows:
client – business-server – repository-server [date/time] – “useridentification-information” processing-result (supplementary-information)
Client
IP address of the client that requests authentication.
Business Server
IP address of the business server that issued the authentication request
For an authentication request from an application using Single Sign-on JavaAPI, the character string
“SSO-JavaAPI” is recorded. In this case, the IP address of the computer on which the application is
running is recorded.
"unknown" is recorded if the authentication request generation source cannot be determined.
Repository Server
IP address of the repository server requested for authentication processing. If repository server load is
distributed using the repository server (update system) and repository server (reference system), the IP
address of the repository server (reference system) is recorded.
"unknown" is recorded if the repository server is not requested to perform authentication processing.
4-18
Maintenance Using Access Logs
Date/Time
Access date/time is recorded in the “YYYY/MM/DD HH:MM:SS+XXXX” format.
"+XXXX" refers to the time difference from UTC (Universal Time Coordinate). In cases where "-XXXX"
is used, it means the same as above.
User Identification Information
User identification information (dn or uid) identifies the user who has requested authentication or has
been authenticated and records the information. If the user cannot be identified, ‘unknown’ is recorded.
If the certificate presented during certificate authentication is not registered in the SSO repository or the
user cannot be uniquely specified from the presented certificate, the serial number, issuer distinguished
name, and owner distinguished name of the certificate are recorded.
Processing Result
The processing result is recorded in the following format:
•
If user authentication processing is requested from the authentication server
Authentication (authentication method) [succeeded|failed]
One of the following is recorded for authentication method:
{basicAuth|certAuth|basicAuthAndCertAuth|unknown}
The meanings of the above authentication methods are as follows:
−
basicAuth
“Password Authentication”
−
certAuth
“Certificate Authentication”
−
basicAuthAndCertAuth
“Password Authentication and Certificate Authentication”
−
unknown
“The authentication method cannot be determined.”
If "password authentication or certificate authentication" was performed, the "basicAuth" or
"certAuth" access log is recorded.
Supplementary Information
The cause of authentication failure is recorded.
For details about supplementary information in the access log, refer to “Messages Logged and Output in
Single Sign-on” – “Access Log in Single Sign-on Mode” – “Access Log of the Authentication Server” –
‘Supplementary Information in the Access Log of the Authentication Server” in Messages.
The cause of the authentication failure will not always be recorded.
4-19
Chapter 4: Operation and Maintenance
Example
10.131.201.199 – 10.131.201.34 – 10.131.201.88 [2002/09/11 20:28:22 +0900]
– "cn=User001,ou=User,ou=interstage,o=fujitsu,dc=com" Authentication
(basicAuth) failed. (authentication by ID and password is required)
Access Log of Business Server
The access log of the business server records user access.
The record format and contents are as follows:
client [date/time] – “user-identification-information” “access-target”
processing-result (supplementary-information)
Client
IP address of the client that requested access
Date/Time
Access date/time is recorded in the “YYYY/MM/DD HH:MM:SS+XXXX” format.
"+XXXX" refers to the time difference from UTC (Universal Time Coordinate). In cases where "-XXXX"
is used, it means the same as above.
User Identification Information
User identification information (dn or uid) identifies the user that requested access and records the
information in the access log. If the user cannot be identified, ‘unknown’ is recorded.
Access Target
Information that specifies the access target.
Processing Result
The processing result is recorded in the following format:
•
If access is requested from the user
Authorization {succeeded|failed}.
Supplementary Information
The cause of authentication failure is recorded.
For details about supplementary information in the access log, refer to “Messages Logged and Output in
Single Sign-on” – “‘Access Log In Single Sign-on Mode” – “Access Log of the Business Server” –
“Supplementary Information in the Access Log of the Business Server’ in Messages.
The cause of the authentication failure will not always be recorded.
4-20
Maintenance Using Access Logs
Example
10.131.201.199 [2002/09/11 20:28:22 +0900] –
"cn=User001,ou=User,ou=interstage,o=fujitsu,dc=com" "/oa-admin/"
Authorization failed. (Role check error)
4-21
Chapter 4: Operation and Maintenance
Operating Notes for Large Systems
For operation using large systems, note the following points:
•
To update the SSO repository information in the repository server (update system), check whether
operation stopped because of a problem such as the SSO repository being down in the repository
server (reference system). If the SSO repository is stopped, start it immediately.
•
If the repository server (reference system) stays down for an extensive period of time, the data
integrity of the SSO repository may not be guaranteed. If irep15071 is output to the system log of
the repository server (update system), check the message contents and recover SSO repository
data. For details about messages output to the system log, refer to “Messages with Message
Number Beginning ‘irep’” in Messages.
If irep15071 is not output, restore the repository server (reference system). The update of the SSO
repository of the repository server (update system) is reflected in the SSO repository of the
repository server (reference system). The reflection is completed when the last update information
output to the access log of the SSO repository of the repository server (update system) is output to
the access log of the SSO repository of the repository server (reference system).
4-22
Chapter 5
Single Sign-on Customization
This chapter explains Interstage Single Sign-on Customization and includes the following sections:
•
Customizing Messages Displayed on a Web Browser
•
Service Linkage with SSO Repository
5-1
Chapter 5: Single Sign-on Customization
Customizing Messages Displayed on a Web Browser
Interstage Single Sign-on provides a function that customizes messages to be displayed on a Web
browser. Specifically, the messages displayed on a Web browser can be changed as required by
editing the message file in HTML format.
For example, this function enables messages displayed on the Web browser to include the destination
specific information) and also mail used for direct inquiries. Using this function, the contents of a
message can be modified to include more detailed information.
The Figure 5-1 shows an example of a customized message:
Figure 5-1 Error Message Example
Messages that Can be Customized
Interstage Single Sign-on enables the customization of the following three types of messages.
•
Messages displayed for form authentication
•
Authentication error messages
•
Authorization error messages
Messages are customized by editing the message file in HTML format.
Messages Displayed for Form Authentication
Messages displayed for form authentication can be customized. Customize the messages on the
machine on which the authentication server was built while the authentication server is stopped.
5-2
Customizing Messages Displayed on a Web Browser
If an authentication server has already been added for load balancing, also customize the messages for
the added authentication server. When customizing the messages for the added authentication server,
copy them from the replication source to the replication destination (added authentication server). Be
sure to back up the messages used before customization so that they are not overwritten by mistake.
Table 5-1 Form Authentication Messages
Cause of the message to be
displayed
Message Contents
Message File Name
The form authentication page
was accessed from a Web
browser, or the protection
resource was accessed and
authentication is required.
Enter your user name and
password.
403auth_form_en.template(*1)
Sign-on has been performed
directly from the form
authentication page with no
protection resource accessed.
Welcome to Single Sign-on.
200auth_succeeded_
en.template
The user name or password is
incorrect, or user information
corresponding to the
certificate could not be found.
User name or password is
incorrect.
403passwderr_form_
en.template(*1)
Authentication needs to be restarted because the
authentication information is
invalid, possibly due to term
expiration.
Authentication has been expired.
403authexpired_en
_template(*1)
The form authentication page
was accessed when
authentication had already
taken place.
User was already authenticated.
403alreadyauth_en_template
The protection resource was
accessed at any time from
display of the form
authentication page to the end
of authentication.
Authentication is processing.
403processingauth_
en.template
The correct certificate was not
used for authentication or the
relevant user information is not
contained in the certificate.(*2)
Certificate authentication is
needed.
403requestcert_en.template
5-3
Chapter 5: Single Sign-on Customization
Cause of the message to be
displayed
Message Contents
Message File Name
The specified certificate is
damaged or user identification
information is not contained in
the certificate.
Certificate is invalid.
403certinvalid_en.template
The certificate has expired.
Certificate has expired.
403certexpired_en.template
The specified certificate has
been revoked.
Certificate has been revoked.
403certrevoke_en.template
The user was locked out
because the password was reentered more than the allowed
number of times. (*2)
User was locked out.
403locked_en.template
Resources managed by
Interstage Single Sign-on
could not be accessed
because the user was locked
out. (*2)
User has been locked.
403alreadylocked_en.template
The user information is not
contained in the SSO
repository (*2).
User has not been found.
403noentry_en.template
An internal error occurred
during the Single Sign-on
operation.
An internal error has occurred.
500internalerr_en.template
The applicable message file is stored in the directory shown below. When editing messages, see
"Setting Access Authority for a Message File" to confirm message file access authorization.
C:\Interstage\F3FMsso\ssoatcag\pub\template\
/etc/opt/FJSVssoac/pub/template/
5-4
Customizing Messages Displayed on a Web Browser
Notes
•
Message files are available in Japanese and English versions. Select the appropriate message
files to be edited according to the language set for the client Web browser.
If languages other than Japanese are set for the client Web browser, messages will be displayed in
English.
•
A form tag for authentication must exist beforehand in the message file contents indicated in (*1) in
the table. For details on the authentication form tag specifications, see Authentication Form Tag
Specifications
•
If [No] is specified for [Notify Cause of Authentication Failure to user?] when the authentication
server environment is set up, the error causes marked (*2) in the above table are incorporated into
the message: “User name or password is incorrect.”
To specify [Notify Cause of Authentication Failure to user?], use the Interstage Management
Console to select [System] > [Security] > [Single Sign-on] > [Authentication infrastructure] >
[Authentication server] > [Authentication Server: Settings] window.
Authentication Error Messages
Messages that are displayed when authentication errors occur can be customized. The types of error
messages are displayed in Table 5.2. Customize the messages on the server where the authentication
server is set up and stopped.
If an authentication server has been added for load balancing purposes, also customize the messages
for the additional authentication server. To customize error messages for the additional authentication
server, copy the error messages from the replication source to the replication destination (the additonal
authentication server). Ensure that the messages have been backed up before customization so that
error messages are not overwritten inadvertently.
Table 5-2 Authentication Error Messages
Cause of Error
Message Contents
Message File Name
The user name or password is
invalid or the relevant user
information is not contained in
the certificate.
User name or password is
incorrect.
401passwderr_en.template
The correct certificate was not
used for authentication or the
relevant user information is not
contained in the certificate.(*3)
Certificate authentication is
needed.
403requestcert_en.template
The specified certificate is
damaged or user identification
information is not contained in
the certificate.
Certificate is invalid.
403certinvalid_en.template
The certificate has expired.
Certificate has expired.
403certexpired_en.template
The specified certificate has
been revoked.
Certificate has been revoked.
403certrevoke_en.template
5-5
Chapter 5: Single Sign-on Customization
Cause of Error
Message Contents
Message File Name
The user was locked out
because the password was reentered more than the allowed
number of times. (*3)
User was locked out.
403locked_en.template
Resources managed by
Interstage Single Sign-on
could not be accessed
because the user was locked
out. (*3)
User has been locked.
403alreadylocked_en.template
The specified resource could
not be accessed because an
user identification was
registered delicately (*3).
User is duplicated.
403notspecified_en.template
The user cannot access the
resource managed by
Interstage Single Sign-on
because the validity period
has not started or has expired.
(*3).
User is not available.
403notavailable_en.template
The user information is not
contained in the SSO
repository (*3).
User has not been found.
403noentry_en.template
An internal error occurred
during the Single Sign-on
operation.
An internal error has occurred.
500internalerr_en.template
When editing the messages, refer to “Setting Access Authority for Message Files” to check the access
authority for message files. The relevant message files are contained in the following directories.
C:\Interstage\F3FMsso\ssoatcag\pub\template\
/etc/opt/FJSVssoac/pub/template/
Notes
•
5-6
Message files are available in Japanese and English versions. Select the appropriate message
files to be edited according to the language set for the client Web browser.
If languages other than Japanese are set for the client Web browser, messages will be displayed in
English.
Customizing Messages Displayed on a Web Browser
•
If [No] is specified for [Notify Cause of Authentication Failure to user?] when the authentication
server environment is set up, the error causes marked (*3) in the above table are incorporated into
the message: “User name or password is incorrect.”
To specify [Notify Cause of Authentication Failure to user?], use the Interstage Management
Console to select [System] > [Security] > [Single Sign-on] > [Authentication infrastructure] >
[Authentication server] > [Authentication server:Settings] window.
Authorization Error Messages
Messages that are displayed when authorization errors occur can be customized. The types of error
messages are displayed in Table 5-3. The messages can be customized for each operation server.
Customize the messages on the server where the business server is set up and stopped.
If a business server has been added for load balancing purposes, also customize the messages for the
additional business server. To customize error messages for the additional business server, copy the
error messages from the replication source to the replication destination (the additional business server).
Ensure that the messages have been backed up before customization so that error messages are not
overwritten inadvertently.
Table 5-3 Authorization Error Messages
Cause of Error
Message Contents
Message File Name
The information cannot be
displayed because the user
has not been assigned to the
required role.
Access is not allowed.
403roleerr_en.template
The browser is not set to
accept cookies.
Browser does not accept
cookies.
403cookieerr_en.template
The authentication operation
must be retried because the
authentication information has
expired.
Authentication has been
expired.
403postdecodeerr_en.template
Authentication information
could not be found.
Authentication is needed. Try
again after authentication.
403postrequesterr_en.template
Authentication information is
not correct. The IP address
for accessing the
authentication server and the
IP address for accessing the
business server may be
different.
Authentication information is
invalid.
403ipcheckerr_en.template
5-7
Chapter 5: Single Sign-on Customization
Cause of Error
Message Contents
Message File Name
The system does not support
generation of an 8.3-format
file name from a long file
name or URLs that include
folders or filenames ending
with a period.
Requested path is invalid form.
403patherr_en.template
An internal error occurred
during the Single Sign-on
operation.
An internal error has occurred.
500internalerr_en.template
When editing the messages, refer to “Setting Access Authority for Message files” to check the access
authority for message files. The relevant message files are contained in the following directories.
C:\Interstage\F3FMsso\ssoatzag\pub\template\
/etc/opt/FJSVssoaz/pub/template/
Notes
•
Message files are available in Japanese and English versions. Select the appropriate message
files to be edited according to the language set for the client Web browser.
•
If languages other than Japanese are set for the client Web browser, messages will be displayed in
English.
•
“403patherr_en.template” is message file used only for Windows.
Customizing a Message
The following explains how to customize a message file.
1.
Edit the message file. Refer to the example below for more information about editing message files.
When editing the authentication form tag, refer to Authentication Form Tag Specifications.
2.
5-8
Display the edited message file to confirm that the message file displays correctly. The edited
message will be displayed the next time that type of error occurs. The Interstage Single Sign-on
does not need to be restarted for the edited messages to take effect.
Customizing Messages Displayed on a Web Browser
Example
An example of editing message file “403roleerr_en.template” is shown below.
Unedited Message Output
Figure 5-2 shows an unedited example of message file “403roleerr_en.template.”
Figure 5-2 Unedited Example of the Message File
Edited Message File
Open and edit the 403roleerr_en.template file.
In the following example, bold text indicates a change:
<!DOCTYPE HTML PUBLIC "-//W3C//DTD HTML 3.2 Final//EN">
<html>
<head>
<meta http-equiv="Content-Type" content="text/html; charset=euc-jp">
<title> 403 Forbidden </title>
</head>
<body TEXT="#000066" BGCOLOR="#FFFFCC" LINK="#660000" VLINK="#660000"
ALINK="#FFCC33">
<table border="0" cellpadding="10" width="100%">
<tr><td>
<b><font size="+2"> There is no authority to access the page.</font></b>
</td></tr>
</table>
<hr size="2" noshade>
<P>
The page cannot be displayed because there is no authority to access the
page.</P>
<P> Take the following action.<BR><BR>
5-9
Chapter 5: Single Sign-on Customization
- Ask the System Administrator to check whether the required access
authority has been assigned<BR>
If the access authority has not been assigned, request that it be assigned.
The setting requires the following information:
<UL>
<LI> Name
<LI> User ID
<LI> Mail address
<LI> Employee number
<LI> Section </UL>
For inquiries about this page, contact the Internal System Administrator
<a href="mailto:[email protected]</a> Extension number xxxxxxxx</P>
<h3 align="right"> Internal System Administrator, **** Limited </h3>
</body>
</html>
Edited Message Output
In the following example, the error message file has been edited using Netscape Communicator as the
Web browser.
Ensure that the edited message file can be displayed using any Web browser.
Figure 5-3 Edited Error Message Example
Notes
5-10
•
Be extremely careful when changing a message. Changes to an error message may prevent the
user from referencing the Messages and checking the details of the error that has occurred.
•
Do not use special HTML tags that are only effective on the server and specific Web browsers.
Customizing Messages Displayed on a Web Browser
•
If a message file is deleted or there is no authority to access a message file, the system log of
Interstage Single Sign-on is output and the non-edited English message will be displayed on the
Web browser. Do not delete message files or change their access authority. For details on the
messages output to the system log, refer to “Messages with a Message Number Beginning sso” in
Messages.
•
The error detail code is displayed in the “<!-SSO_DETAIL_CODE->” portion of the
500internalerr_en.template message file. Note that the error detail code is not displayed if “<!SSO_DETAIL_CODE->” is deleted.
•
When specifying images to be displayed or hyperlinks to other pages, note the following points:
−
Use the URL or the absolute path from the root path (“/”) to specify the location of the content.
−
To read the content from an active business server, do not specify files that are under a
protected path.
−
To read the content from the same port number as the authentication server, store the target
file in the following directory. The following directory becomes the root path (“/”) that can be
referenced from a Web browser.
C:\Interstage\F3FMsso\ssoatcag\pub\docroot\
/opt/FJSVssoac/pub/docroot/
•
Information to be displayed as a message may pose a security risk. When editing a message, be
extremely careful not to display information that could threaten security..
Setting Access Authority for a Message File
This section explains how to set the access authority for a message file.
To set the access authority, use Explorer to change the access permissions for the user and group.
Users require administrator authority to change user and group permissions.
To set the access authority, use the chmod or chown command.Set the access authority to superuser
(root).
5-11
Chapter 5: Single Sign-on Customization
Access Authorization for the Message File Output at Form Authentication
Table 5-4 Windows Access Authorization
Resource
Setting Authority to Access Content
Message file to be displayed on a
Web browser
Grant full control only to administrators and SYSTEM.
Table 5-5 Solaris and Linux Setting Authority
Resource
Setting Authority to Access Content
Message file to be displayed on a
Web browser
Set the access authority mode to 0600 and grant read and
write permission only to the user, such as nobody, that has
been specified for user name (User) in the configuration file
(httpd.conf) of the Interstage HTTP Server.
Access Authority for the Authentication Error Message File
Table 5-6 Windows Authentication Authority
Resource
Setting Authority to Access Content
Message file to be displayed on a
Web browser
Grant full control only to administrators and SYSTEM.
Table 5-7 Solaris and Linux Authentication Authority
Resource
Setting Authority to Access Content
Message file to be displayed on a
Web browser
Set the access authority mode to 0600 and grant read and
write permission only to the user, such as nobody, that has
been specified for user name (User) in the configuration file
(httpd.conf) of the Interstage HTTP Server.
Access Authority for the Authorization Error Message File
The setting contents vary depending on the types of Web servers being used.
5-12
Customizing Messages Displayed on a Web Browser
Table 5-8 [Microsoft Internet Information Services 6.0]
Resource
Setting Authority to Access Content
Message file to be displayed on a
Web browser
Grant full control only to administrators, SYSTEM, and the
account or user specified for the application pool ID of the
application pool.
For details on setting Microsoft Internet Information Services, refer to “Help Topics (H)” of “Help (H)” for
the Internet Information Service of Microsoft Internet Information Services.
Table 5-9 [Other than Microsoft Internet Information Services 6.0]
Resource
Setting Authority to Access Content
Message file to be displayed on a
Web browser
Grant full control only to administrators and SYSTEM.
The setting contents vary depending on the types of Web servers being used.
Table 5-10 [Interstage HTTP Server]
Resource
Setting Authority to Access Content
Message file to be displayed on a
Web browser
Set the access authority mode to 0600 and grant read and
write permission only to the effective user, such as nobody,
that has been specified for user name (User) in the
configuration file (httpd.conf) of Interstage HTTP Server.
Table 5-11 [InfoProvider Pro]
Resource
Setting Authority to Access Content
Message file to be displayed on a
Web browser
Set the access authority mode to 0600 and grant read and
write permission only to the superuser.
Table 5-12 [Sun ONE Web Server Enterprise Edition]
Resource
Setting Authority to Access Content
Message file to be displayed on a
Web browser
Set the access authority mode to 0600 and grant read and
write permission only to the effective user, such as nobody,
that has been specified for user account (User) in the
configurationfile (magnus.conf) of Interstage Sun ONE Web
Server Enterprise Edition.
Notes
If multiple Web servers are operating on one server, set the effective user as follows:
•
Set the access authority mode for the message file to 0600, and grant read and write permission
only to the effective user:
5-13
Chapter 5: Single Sign-on Customization
−
To use InfoProvider Pro and other Web servers, set the effective user to other Web servers.
−
Set the same effective user for the Interstage HTTP Server and Sun ONE Web Enterprise
Edition.
For details on setting the effective user, refer to “To Change Effective User for the Business Server” in
“Changing the Effective User for the Web Server”.
Table 5-13 [Interstage HTTP Server]
Resource
Setting Authority to Access Content
Message file to be displayed on a
Web browser
Set the access authority mode to 0600 and grant read and
write permission only to the effective user, such as nobody,
that has been specified for user name (User) in the
configuration file (httpd.conf) of Interstage HTTP Server.
Authentication Form Tag Specifications
The following explains the specifications for the password authentication form tags to be inserted into
the messages displayed at form authentication:
Example
The authentication form tags already inserted into the message file "403auth_form_en.template" are
shown below.
The bold portions are required.
<form action="/ssoatcag" method="post" autocomplete="off">
<table border="0">
<tr>
<td nowrap align="right">user name</td>
<td><input name="fj_is_sso_user_name" type="text" maxlength="255"></td>
</tr>
<tr>
<td nowrap align="right">password</td>
<td><input name="fj_is_sso_password" type="password"
maxlength="255"></td>
</tr>
<tr><td colspan="2">&nbsp;</td></tr>
<tr><td colspan="2" nowrap align="center"><input type="submit"
value="sign-on">&nbsp;<input type="reset" value="reset"></td></tr>
</table>
</form>
The following explains the specification of each tag:
5-14
Customizing Messages Displayed on a Web Browser
Form definition
<form action="/ssoatcag" method="post">
•
Set "/ssoatcag" for the action attribute value. (*1)
•
Set "post" for the method attribute value.
•
Omit the enctype attribute
User ID
<input name="fj_is_sso_user_name" type="text">
•
This text area is used for user ID input and is required.
•
Set "fj_is_sso_user_name" for the name attribute value.
•
Set "text" for the type attribute value.
Password
<input name="fj_is_sso_password" type="password">
•
This password input area is used for password input and is required.
•
Set "fj_is_sso_password" for the name attribute value.
•
Set "password" for the type attribute value.
*1 If the incorrect URL is specified, the following error occurs and authentication may fail.
•
The following message may output on the Web browser.
−
“403 Not Found”
−
“The requested page is not available”
•
The message sso02012 may output to the system log.
•
If client authentication is processed through SSL communication, the request window for the client
certificate is displayed several times.
•
Content may be displayed without authentication.
5-15
Chapter 5: Single Sign-on Customization
Service Linkage with SSO Repository
Before the repository server of the Interstage Single Sign-on is started, the SSO repository must be
started.
If the service dependency is set between the SSO repository and repository server, the repository server
is started after the SSO repository is started, and when a service starts at system start.
Interstage Single Sign-on provides the command that sets and cancels the service dependency. This
command enables setting and cancellation of the service dependency between the SSO repository and
repository server.
The following explains how to set and cancel the service dependency.
Setting the Service Dependency
1.
Check the repository name of the SSO repository.
Use the Interstage Management Console on the repository server to select [System] > [Security] >
[Single Sign-on] > [Authentication infrastructure] > [Repository server] > [Settings] tab, and then
click [Detailed Settings [Show]] to check [Repository Name] in [Repository Settings].
2.
Specify the repository name checked in Step 1 for the option of the ssosetsvc command and
execute the command to set the service dependency.
For details on the ssosetsvc command, refer to “Single Sign-on Operation Commands” in the Reference
Manual (Command Edition).
Example
“ssorep” is specified for the repository name of the SSO repository.
C:\>ssosetsvc ssorep
Notes
5-16
•
When the cluster service is to be used, the service dependency should not be set using this
command.
•
If the repository name of the SSO repository has changed, ensure that the service dependency has
been set for the changed repository name. The service dependency for the unchanged repository
name does not need to be canceled.
Service Linkage with SSO Repository
Canceling the Service Dependency
Use the ssounsetsvc command to cancel the service dependency.
For details on the ssounsetsvc command, refer to “Single Sign-on Operation Commands” in the
Reference Manual (Command Edition).
Example
C:\>ssounsetsvc
Note
To delete the SSO repository or to stop the SSO repository, cancel the service dependency.
5-17
Chapter 5: Single Sign-on Customization
5-18
Chapter 6
Troubleshooting
This chapter explains the action to be taken if an error occurs during operation of the Interstage Single
Sign-on system.
6-1
Chapter 6: Troubleshooting
Error Handling
This section explains how to respond to abnormalities that may occur during operation.
Error Investigation and Corrective Action
User
The user needs to respond to any messages displayed on the Web browser. When an error occurs that
the user cannot correct (for example a "500 Internal Server Error") they contact the Business Server
Administrator. In this case, the user must supply the following information:
•
Error-detected date and time
•
User ID or certificate used for authentication
•
Message and status code displayed on the Web browser.
Business Server Administrator
The Business Server Administrator must do the following:
•
Investigate the business server status
•
Request changes to the SSO repository, repository server, and authentication server
When receiving an inquiry from a user, investigate the cause of the error in the following sequence:
1.
Check the message and status code displayed on the Web-browser that are reported by the user.
Remove the cause of the trouble.
Refer to "Status Codes Reported from the Browser" in Messages for details of the message or
status code displayed on the Web browser.
When [Business Server Administrator Action] in "Status Codes Reported from the Browser"
describes user actions for the SSO repository, repository server, or authentication server errors,
post the user-reported information to the SSO administrator for investigation and any necessary
modification of settings.
2.
Check the "Trouble detection date and time" and "User ID or certificate used for authentication"
reported by the user. Also check the access log of the business server and remove the cause of
the error.
Refer to "Access Log of the Business Server" of "Access Log In Single Sign-on Mode" of
"Messages Logged and Output in Single Sign-on" of Messages for details of the access log of the
business server.
3.
If you cannot identify the cause of the trouble from the access log of the business server, use the
system log of the business server to remove the cause.
Refer to "sso03000 to sso03051" section in “Messages Beginning with sso" in Messages for details
of the system log of the business server.
4.
6-2
If you cannot identify the cause of the trouble from the system log of the business server, post the
user-reported information to the SSO administrator, and request the investigation.
Error Handling
SSO Administrator
The SSO administrator must perform the following steps as necessary:
•
Change the SSO repository settings
•
Investigate and change the authentication server settings
•
Investigate and change the repository server settings.
When receiving an investigation request or a request to change settings from the business server
administrator, the SSO administrator must investigate the cause of the error or change settings,in the
following order:
1.
When receiving a request to change settings from the business server administrator, check the
status code displayed on the Web browser, and change the settings according to [SSO
Administrator Action] in "Status Codes Reported from the Browser" of Messages.
2.
When receiving an investigation request from the business server administrator, check the "Trouble
detection date and time" and "User ID or certificate used for authentication" that were posted by the
business server administrator. Then refer to the authentication server access log to remove the
cause of the error.
Refer to "Access Log of the Authentication Server" of "Access Log In Single Sign-on Mode" of
"Messages Logged and Output in Single Sign-on" of Messages for details of the access log of the
authentication server.
3.
If the cause of the error cannot be identified from the authentication server access log, refer to the
authentication server system log and remove the cause of the error.
Refer to "sso02000 to sso02050" of "Messages with Message Numbers Beginning sso" of
Messages for details of the system log of the authentication server.
4.
If the cause of the error cannot be identified from the authentication server system log, check the
"Trouble detection date and time" and "User ID or certificate used in authentication" that were
reported by the business server administrator. Then refer to the repository server access log and
remove the cause of the error.
Refer to "Access Log of the Repository Server" of "Access Log In Single Sign-on Mode" of "
Messages Logged and Output in Single Sign-on " of Messages for details of the access log of the
repository server.
5.
If the cause of the error cannot be identified from the repository server access log refer to the
repository server system log and remove the cause of the error.
Refer to "sso01000 to sso01080" of "Messages with Message Numbers Beginning sso" of
Messages for details of the system log of the repository server.
Log output destination
The logs of the Single Sign-on system are output to the following destinations:
•
Output destination of system log
Event viewer (application log)
6-3
Chapter 6: Troubleshooting
/var/adm/messages
/var/log/messages
•
Output destination of access log of business server
The access log is output to the file that is set using the Interstage Management Console. Select
[System] > [Security] > [Single Sign-on] > [Business system] > [Business system Name] >
[Settings] tab and click [Access Log Settings] > [File name].
Storage destination of access log file
C:\Interstage\F3FMsso\ssoatzag\log
/var/opt/FJSVssoaz/log
•
Output destination of access log of authentication server
The access log is output to the file that is set using the Interstage Management Console. Select
[System] > [Security] > [Single Sign-on] > [Authentication infrastructure] > [Authentication server] >
[Settings] tab and click [Access Log Settings] > [File name].
Storage destination of access log file
C:\Interstage\F3FMsso\ssoatcag\log
/var/opt/FJSVssoac/log
•
Output destination of access log of repository server
The access log is output to the file that is set using the Interstage Management Console. Select
[System] > [Security] > [Single Sign-on] > [Authentication infrastructure] > [Repository server] >
[Settings] tab and click [Access Log Setting] > [File name].
Storage destination of access log file
C:\Interstage\F3FMsso\ssoatcsv\log
/var/opt/FJSVssosv/log
6-4
Examples of Errors
Examples of Errors
Errors are generally classified into the following items:
•
Errors that can be encountered while using the Smart Repository Replication Function
•
Errors in Authentication
•
Errors in Business Server Authentication
•
Errors in the Interstage Management Console
Errors that can be encountered while using the Smart Repository
Replication Function
The role information has been updated from the Interstage Management Console, but these modifications
or additions are not successful.
If the SSO repository has been synchronized using the Smart Repository replication function,
synchronization may take several seconds in certain conditions; for example under heavy network load.
If role information is updated before being able to undertake a synchronization, the contents of a role
configuration will not be reflected correctly.
In this case, update the role information, but ensure that the modifications made to the SSO repository
(on the repository server (update system)) have been reflected in the SSO repository (on the repository
server (reference system)), beforehand.
For information on how to make modifications or additions to the role configuration, see "Amending Role
Configurations" in the "Authorization-related Operation" section of the Single Sign-on Operator’s Guide.
The Entry Administration Tool can be used to identify entries in the SSO repository. For more
information, refer to the "Entry Management" section of the Smart Repository Operator’s Guide.
For further information regarding the replication function, refer to the “Overview “ section of the Smart
Repository Operator’s Guide.
Errors in Authentication
Although a business system protection resource is accessed, the content is displayed without
authentication.
Confirm that the [Port number] value of [Network Settings] in the business-server environment setup is
the same as the port number of the Web server on which the business server operates. (*1)
Although a business system protection resource is accessed, unexpected content is displayed.
Confirm that the [Public URL] of [Business system Information] or the [URL] of [Authentication
Infrastructure Information Settings] of the business-server environment setup is correctly set. (*2)
6-5
Chapter 6: Troubleshooting
Although a business system protected resource is accessed, no response is returned.
Confirm the following:
•
The business server and authentication server are operating.
•
The [Public URL] of [Business system Information] or the [URL] of [Authentication Infrastructure
Information Settings] of the business-server environment is setup correctly. (*2)
•
Check the following points before linking a business system with Interstage Portalworks.
•
−
The business system setup file used to configure the business server was created for linking
the business system with Interstage Portalworks. (*3)
−
In the business server environment settings, [Authentication Information Setting] > [Enable
Client IP Address Check?] is set to “No”. (*1)
If a load balancer such as the SSL accelerator or Interstage Traffic Director, or Application Gateway
is placed before the authentication server, check that the settings are correct. (*4)
Launching reauthentication before the user information validity period expires
Check that the system time on the repository server, authentication server, and business server is the
same. (*5)
User information expired so re-authentication does not occur.
Confirm the following:
•
If any re-authentication request is not issued to the user, the cache information of the Web browser
may be displayed.
•
Check that the system time for the repository server, authentication server, and business server is
the same. (*5)
*1
To check or modify [Port number] in [Network Settings], and [Enable Client IP Address Check?] in
[Authentication Information Settings], in the Interstage Management Console, click the [System] >
[Security] > [Single Sign-on] > [Business system] > [Business system Name] > [Settings] tabs, and
then click [Detailed Settings [Show]].
*2
For the [Public URL] of [Business system Information] or the [URL] of [Authentication Infrastructure
Information Settings], use the Interstage Management Console to select the [System] > [Security] >
[Single Sign-on] > [Business system] > [Business system Name] > [Settings] tab, and check
[Detailed Settings [Show]] in the tab.
To change the value, set up the business server again.
To set up the business server again, use the Interstage Management Console to select [System] >
[Security] > [Single Sign-on] > [Business system] window > [List] tab to delete the current business
server from [List] tab. Then, add a new business server by using the [Addition of Business server]
tab.
*3
6-6
To create a business system configuration file for linkage with the Interstage Portalworks business
system, use the Interstage Management Console for the repository server (update system). Click
[Security] > [Single Sign-on] > [Authentication infrastructure] > [Business system setup file], and in
[Linkage with Interstage Portalworks?] select “Yes”. Specify the validity range for authentication in
the domain name.
Examples of Errors
*4
Refer to “Linkage with SSL Accelerator” for details of the SSL accelerator settings. Refer to “Load
Balancing” for details of the load balancer. Refer to “Linkage with Application Gateway” for details
of the Application Gateway settings.
*5
When setting a system time for each server, take care with the time zone settings.
Errors in Business Server Authentication
Although a protection resource or path configuration for the SSO repository has been added, changed, or
deleted, it is not correctly authorized.
When a protection resource or path configuration for the SSO repository has been added, changed, or
deleted, always select [System] > [Security] > [Single Sign-on] > [Business system] > [Business system
Name] > [Update access control information] tab > [Update] on the Interstage Management Console.
When the role configuration has been changed, always update the role information and then update the
access control information. To update the role information, use the Interstage Management Console of
the repository server (update system) to select [System] > [Security] > [Single Sign-on] > [Authentication
infrastructure] > [Repository server] > [Update Role information] tab and click [Update].
The access control information file has been updated; however, authentication is not performed correctly.
When the access control information update command (ssorfinfaz) is executed, determine whether the
values specified in arguments host:port and -ac are correct.
Note
When load is distributed using a repository server for both update and reference, perform changes to
protection resources, path and role configurations during off-peak hours when fewer users access the
servers.
Errors in the Interstage Management Console
When a business server was added, warning message sso04604 or sso04608 is displayed.
The access control information was not updated successfully because the authentication infrastructure
was not ready. Take action according to the error message. After that action, always select the
[System] > [Security] > [Single Sign-on] > [Business system] > [Business system Name] > [Update
access control information] tab to click [Update] to confirm that the access control information is updated
successfully.
The setting procedure of the authentication infrastructure needs to be confirmed.
To confirm the authentication infrastructure setting procedure using the Interstage Management Console,
refer to the Operator’s Guide.
The site configuration or path configuration created in the SSO repository is not displayed on the List of
Site configuration Setting, Path configuration Setting, or Download Business-System Setup File.
The site configuration or path configuration in the SSO repository may have been changed into an
invalid state by using the entry management tool or ldapmodify command of the Smart Repository.
Refer to "Entry Attributes To Be Registered in SSO Repository" and correct the site configuration, or
path configuration by using the entry management tool or ldapmodify command of the Smart Repository.
For further information regarding entry operation of SSO repository, refer to the "Entry Management"
section of the Smart Repository Operator’s Guide.
6-7
Chapter 6: Troubleshooting
Message "ihs81215: The error occurred in start processing of Interstage HTTP Server. " is displayed on
the Interstage Management Console at repository server start.
It may take a while to start the Interstage HTTP Server if many role-configuration entries, or many siteconfiguration entries, have been defined in the SSO repository. In this case, message "ihs81215: The
error occurred in start processing of Interstage HTTP Server." is displayed on the Interstage
Management Console of the server on which the repository server was setup. Check the system log.
When the system is normal, wait for a while and select [System] > [Services] > [Web Server]. On [Web
Server: Status], confirm that the Interstage HTTP Server is operating.
6-8
Chapter 7
Developing Applications
Interstage SSO (single sign-on) supports authentication to Interstage single sign-on authentication
servers and to develop applications with the use of reported user information.
The authentication server function and repository server function for authentication environment setup
are provided with the following products:
•
Interstage Application Server Enterprise Edition
•
Interstage Application Server Standard Edition
•
Interstage Application Server Plus
This chapter explains the provided application interface and describes how to develop applications.
From this point onwards, single sign-on authentication executed via a Web browser when accessing a
protection resource in a business server is referred to as "SSO authentication". Authentication using a
provided Java application interface is referred to as "JAAS authentication".
For details on application security, refer to "Security Risks and Measures" of "Security Risks" in
"Application Programming" of the Security System Guide.
JDK installation folder
A JDK installation folder can be specified in implementation. In the following sections, it is assumed that
the default JDK installation folder (C:\Interstage\JDK13 or C:\Interstage\JDK14) is used. If a folder other
than the default is specified, replace the default value with the specified folder name in the following
sections.
J2EE common folder
The J2EE common folder can be specified in implementation. In the following sections, it is assumed
that the default J2EE common folder (C:\Interstage\J2EE\var\deployment) is used. If a folder other than
the default is specified, replace the default value with the specified folder name in the following sections.
7-1
Chapter 7: Developing Applications
Developing Java Applications
This section explains how to develop Java applications using the Java application interface (hereafter
referred to as "single sign-on JavaAPI") supported by Interstage single sign-on. The single sign-on
JavaAPI class library is contained in the business server function.
The single sign-on JavaAPI uses the Java(TM) Authentication and Authorization Service (hereafter
referred to as "JAAS") framework. Knowledge of JAAS application development is therefore required.
For details on Java application development using JAAS, refer to the JAAS documents provided by Sun
Microsystems, Inc.
To enable the use of JAAS authentication and JAAS authorization from a Java application, Interstage
single sign-on supports the JAAS functions listed in the table below. For the API specifications for
classes supported by the single sign-on JavaAPI (classes in packages under
"com.fujitsu.interstage.sso"), refer to the attached JavaDoc.
Table 7-1 Functions Supported by Interstage Single Sign-on
Packaged
Function
Explanation
Callback
Class for transferring information to be used for JAAS authentication (user
ID/password or SSO authentication confirmation) to LoginModule
CallbackHandler
Class for setting information to be used for JAAS authentication (user
ID/password or SSO authentication confirmation) in Callback. The application
creator can implement this class separately.
LoginModule
Class with interface for JAAS authentication implemented
Credential
Class for storing credentials information set when JAAS authentication is
successful
Principal
Class indicating an actor (such as user and role) set when JAAS authentication
is successful
The following two types of Java applications can be developed using the single sign-on JavaAPI:
•
Servlet application that receives authentication information from a client.
After SSO authentication in a client (Web browser), this application uses a servlet to receive
authentication success information (confirming successful execution of SSO authentication) from
the client. It then uses the received information to perform JAAS authentication and reference user
information.
•
Java application that receives a user ID/password from a client to perform authentication.
This client-server type Java application uses a user ID/password to perform authentication. For
example, a servlet application set up in a business server receives a user ID/password entered
from a Web browser. The servlet application uses the received user ID/password to perform JAAS
authentication and reference user information. It is possible to develop such a servlet application.
7-2
Developing Java Applications
Program Development Flow
Servlet Application that Receives Authentication Information from a Client
Figure 7-1 Servlet Application That Receives Authentication Information from a Client
After SSO authentication in a client (Web browser), a servlet application can receive authentication
success information (confirming successful execution of SSO authentication) from the client via a
Cookie. The Cookie key name is "fj-is-sso-credential." An application can be created that uses the
Cookie value for JAAS authentication and uses user information.
7-3
Chapter 7: Developing Applications
Processing Flow
Table 7-2 provides processing flow information.
Table 7-2 Process Flow Information
Processing Flow
Required?
Explanation
1. Converting
CallbackHandler
to instance
Required
Set login information for JAAS authentication. Use
the Cookie information set when SSO authentication
succeeded for conversion.
2. Converting
LoginContext to
instance
Required
To prepare for JAAS authentication, specify the
LoginModule and CallbackHandler to be used for
JAAS authentication.
3. Calling
LoginContext
login method
Required
Perform JAAS authentication processing.
4. Obtaining user
information
Required to obtain
authentication information
on an authenticated user
Obtain user information (Credential object, Principal
object).
5. Executing
authorization
Not available
The JAAS authorization function cannot be used with
a servlet.
Since JAAS authentication succeeded in SSO
authentication, actual authentication is not executed
for the authentication server.
Environment Setup
Table 7-3 lists the environment setup items required for application execution.
Table 7-3 Process Flow Information for Application Execution
7-4
Setup Item
Required?
Explanation
Setting
environment
variable
Required
Set the environment variables required for operation.
Obtaining service
ID file
Not Required
This file is obtained automatically during business
server environment setup.
Creating login
configuration file
Required
Create a login configuration file corresponding to the
entry name specified when converting LoginContext
to an instance.
Creating security
policy file
Not Required
-
Creating
truststore file
Not Required
-
Setting access
permission for
operated
resources
Required
Set the access permission for the login configuration
and security policy files. For security reasons, it is
recommended that the permission settings be
minimized..
Registering
Required
Register the servlet as a protection resource.
Developing Java Applications
Setup Item
Required?
Explanation
Required
Set the JavaVM options.
protection
resources
Executing
application
Obtaining User Information Without Using the JAAS Framework
Information on a user can be obtained as a character string from the HTTP header without using the
JAAS framework. For information on obtaining the HTTP header value with a servlet application, refer
to the servlet documents provided by Sun Microsystems, Inc. For details of the header names reported
from a business server, refer to Setting User Information Report with Environment Variables.
Note
The JAAS authorization function cannot be used with Servlet.
Java Application that Receives User ID/Password from a Client for Authentication
Figure 7-2 Java Application that Receives User or ID from a Client for Authentication
Enter the user ID/password from a client (Web browser). The Java application can then execute
authentication processing by specifying the user ID/password sent from the client for the authentication
server. Authentication processing is executed through communication with the authentication server
within the single sign-on JavaAPI. An application can be developed that uses information on the
authenticated user and application for JAAS authorization after authentication succeeds.
Preventing User ID/Password Security Breaches
When developing an application with Servlet application, set the Web server that runs the Servlet to use
SSL communication. This will prevent user ID/password security breaches.
7-5
Chapter 7: Developing Applications
When an Application Runs as a Stand-alone Application
When an application is run as a stand-alone application (server application), develop the application as
a service so that it can be run without login for security reasons.
When an application is run as a stand-alone application (server application), develop the application so
that it can be run as a daemon process without login for security reasons.
Processing Flow
Table 7-4 provides processing flow information.
Table 7-4 Process Flow Information
Processing Flow
Required?
Explanation
1. Converting
CallbackHandler
to instance
Required
Set the login information to be used for JAAS
authentication. Pass the user ID/password
received from the client to a constructor argument
for converting CallbackHandler to instance.
2. Converting
LoginContext to
instance
Required
Specify the LoginModule and CallbackHandler to
be used for JAAS authentication.
3. Calling
LoginContext
login method
Required
Execute JAAS authentication processing.
Execute authentication processing for the
authentication server.
4. Obtaining user
information
Required - to obtain
authentication information
for an authenticated user
Obtain user information (Credential object and
Principal object).
5. Executing
authorization
Optional
Code access permission can be controlled using
the authenticated user information.
Environment Setup
Table 7-5 lists the environment setup items required for execution.
Table 7-5 Environment Setup Items for Execution
7-6
Setup Items
Required?
Explanation
Setting
environment
variables
Required
Set the environment variables required for
operation.
Obtaining service
ID file
Required - when an
authentication server is
specified as the
authentication destination
without using a business
server configuration.
Use a repository server command to obtain the file.
Developing Java Applications
Setup Items
Required?
Explanation
Creating login
configuration file
Required
Creating security
policy file
Required to use the JAAS
authorization function
Create a login configuration file corresponding to
the entry name specified when converting
LoginContext to an instance.
Create a file in which the security policy for
JavaVM operation is written.
Creating trust
store file
Required
Created when a certificate is registered in an
Interstage certificate environment.
Setting access
permission for
operated
resources
Required
Specify the access permission for the login
configuration, trust store, and security policy files.
For security reasons, it is recommended that
permission settings be minimized.
Registering
protection
resources
Not Required
-
Executing
application
Required
Set the JavaVM options.
Notes
•
The JAAS authorization function cannot be used with a servlet.
•
If “certificate authentication” or “ password authentication and certificate authentication” is
registered in the SSO repository as the user information authentication method for a user, the user
ID of the user cannot be authenticated. If “password authentication or certificate authentication” is
specified as the user authentication method, certificate authentication cannot be used.
•
The application cannot be used if the SSL setting for the Web server in which the authentication
server is set up specifies that a client certificate must always be authenticated.
•
The following message is displayed in the authentication server access log on authentication. This
message can be ignored as it does not indicate an operating error.
192.168.10.10 - SSO-JavaAPI - unknown [2003/11/10 13:05:45 +XXXX] -"unknown"
Authentication(unknown) failed. (User's ID/password and certificate do not
exist.)
Note
"+XXXX" indicates the time difference to UTC (Universal Time Coordinate). If used, "-XXXX" has the
same meaning.
Developing Programs
This section explains how to develop a program that uses the single sign-on JavaAPI. The single signon JavaAPI uses the JAAS framework.
An example with sample code ISSsoJaas.java is shown below. In this example, authentication is
executed for an authentication server by using a user ID/password entered from a business server
window and JAAS authorization is executed according to the security policy.
7-7
Chapter 7: Developing Applications
Example
import
import
import
import
import
import
import
import
import
import
import
import
import
import
import
import
import
java.io.BufferedReader;
java.io.InputStreamReader;
java.io.IOException;
java.util.Arrays;
java.util.Iterator;
java.util.Map;
java.util.Set;
java.security.Principal;
java.security.PrivilegedAction;
javax.security.auth.Subject;
javax.security.auth.callback.CallbackHandler;
javax.security.auth.login.FailedLoginException;
javax.security.auth.login.LoginContext;
javax.security.auth.login.LoginException;
com.fujitsu.interstage.sso.auth.ISAuthenticationCredential;
com.fujitsu.interstage.sso.auth.ISAuthorizationCredential;
com.fujitsu.interstage.sso.auth.callback.ISCallbackHandler;
public class ISSsoJaas{
private Subject subject;
public ISSsoJaas(){
subject = new Subject();
}
public boolean login() throws Exception{
LoginContext loginContext = null;
BufferedReader reader = null;
reader = new BufferedReader(new InputStreamReader(System.in));
// attempt 3 times
for (int i=0 ; i<3; i++) {
// username is set from prompt
System.out.print("UserName=");
String username = reader.readLine();
// password is set from prompt
int PASSWORD_MAX_LENGTH = 128;
char[] tmp = new char[PASSWORD_MAX_LENGTH];
System.out.print("Password=");
int count = reader.read(tmp);
int lineSeparatorLength =
System.getProperty("line.separator").length();
char[] password = new char[count - lineSeparatorLength];
System.arraycopy(tmp, 0, password, 0, password.length);
// callback is created here by userid and password
// Converting CallbackHandler to instance
CallbackHandler myHandler = new ISCallbackHandler(username, password);
// create LoginContext object
// Converting LoginContext to instance
loginContext = new LoginContext(
"com.fujitsu.interstage.sso", subject, myHandler);
// Calling LoginContext login method
try{
loginContext.login();
return true;
}
catch(FailedLoginException ex){
System.out.println("Authenticate failed");
7-8
Developing Java Applications
continue;
}
finally {
Arrays.fill(password,' ');
Arrays.fill(tmp,' ');
}
}
return false;
}
public void authorize(){
System.out.println("\n" + "*** Credential Information ***");
// get privateCredential Set
// Obtaining user information
Set credentials = subject.getPrivateCredentials();
// display credential information
Iterator iterator = credentials.iterator();
while (iterator.hasNext()) {
Object credential = iterator.next();
// this credential identify login user
if (credential instanceof ISAuthorizationCredential){
ISAuthorizationCredential isCredential =
(ISAuthorizationCredential) credential;
System.out.println("AuthorizationCredential=" +
isCredential.getEncryptedCredential());
System.out.println("Dn=" + isCredential.getDN());
System.out.println("Uid=" + isCredential.getUID());
Set roles = isCredential.getRoles();
if (roles != null) {
Iterator ite = roles.iterator();
while(ite.hasNext()){
System.out.println("Role=" + ite.next());
}
}
System.out.println("ClientAddress=" +
isCredential.getClientAddress());
System.out.println("AuthMethod=" +
isCredential.getAuthMethod());
System.out.println("AuthTime=" + isCredential.getAuthTime());
System.out.println("Expiration=" +
isCredential.getExpiration());
}
}
System.out.println("\n" + "*** Principals Information ***");
// display principal information
// Obtaining user information
Set principals = subject.getPrincipals();
iterator = principals.iterator();
while (iterator.hasNext()) {
Principal principal = (Principal)iterator.next();
System.out.println("Principal=" + principal.getName());
}
System.out.println("\n" + "*** Execute PrivilegedAction ***");
// Privileged operation execute by the attested authority.
// Executing authorization
PrivilegedAction myAction = new ISSsoAction();
subject.doAs(subject, myAction);
}
7-9
Chapter 7: Developing Applications
public static void main(String args[]) {
ISSsoJaas sample = new ISSsoJaas();
try{
if (sample.login()) {
sample.authorize();
}
else{
System.out.println("Login failed");
}
}
catch(Exception ex){
ex.printStackTrace();
}
}
}
Converting CallbackHandler to an Instance
To use JAAS, CallbackHandler must be converted to an instance. The single sign-on JavaAPI supports
a CallbackHandler implementation class with the class name:
com.fujitsu.interstage.sso.auth.callback.ISCallbackHandler.
The information required for authentication is passed from CallbackHandler to LoginModule via Callback.
For a Java application that receives a user ID/password from a client for authentication, convert
ISCallbackHandler with the user ID/password obtained from the client.
CallbackHandler myHandler = new ISCallbackHandler(username, password);
When developing an application as a stand-alone application, security must be considered. For
example, use javax.net.ssl.SSLSocket for communication with a client.
For a servlet application that receives authentication information from a client, convert
ISCallbackHandler to an instance with information indicating SSO authentication success obtained from
the client. The target information is stored in a Cookie with the key name fj-is-sso-credential. The key
name is defined in variable COOKIE_KEY of class
com.fujitsu.interstage.sso.auth.ISAuthorizationCredential. The code is shown below.
Cookie cookie = null;
Cookie[] cookies = request.getCookies();
if (cookies != null){
for (int i=0; i< cookies.length;i++){
if (cookies[i].getName().equals(
ISAuthorizationCredential.COOKIE_KEY)){
cookie = cookies[i];
}
}
}
String credentialStr = cookie.getValue();
CallbackHandler myHandler = new ISCallbackHandler(credentialStr);
7-10
Developing Java Applications
Converting LoginContext to an Instance
Convert the LoginContext to an instance. The code is shown below.
LoginContext loginContext = new LoginContext("com.fujitsu.interstage.sso",
subject, myHandler);
Use the following arguments for conversion:
•
First argument
Login configuration file entry name. For login configuration file details, refer to Creating Login
Configuration File.
•
Second argument
Instance of a Subject object in which user authentication information set for successful
authentication is stored
•
Third argument
Instance created as described in Converting CallbackHandler to an Instance.
Note
For JDK1.3, java.lang.SecurityException may be generated if a Java application converts the
LoginContext simultaneously from two or more threads, so use JDK1.4 or synchronize the LoginContext
conversion items. The following is an example:
LoginContext loginContext = null;
synchronized (LoginContext.class) {
loginContext = new LoginContext("com.fujitsu.interstage.sso",
subject, myHandler);
}
Calling LoginContext Login Method
Authentication processing is executed by calling the LoginContext login method. LoginException or its
subclass is thrown in the login method. Catch a thrown LoginException or its subclass. This is shown
in the following example:
try{
loginContext.login();
return true;
}
catch(FailedLoginException ex){
System.out.println("Authenticate failed");
continue;
}
7-11
Chapter 7: Developing Applications
Obtaining User Information
When JAAS authentication is executed successfully, the objects listed below are associated with the
Subject object specified when converting the LoginContext to an instance.
•
Credential object that indicates authentication information
•
Principal object that indicates the user ID of the authenticated user
•
Principal object that indicates the name of the role to which the user belongs
•
Principal object that indicates the unique distinguished name in the SSO repository.
The object that indicates authentication information can be obtained with the following Subject object
methods:
•
public Set getPrivateCredentials()
•
public Set getPrivateCredentials(Class c)
A set of all Credential objects associated with the Subject object can be obtained with the
getPrivateCredentials() method. A set of Credential objects in the Class class (or a subclass of the
Class class) that are associated with the Subject object can be obtained with the
getPrivateCredentials(Class c) method
Table 7-6 lists the class of objects that can be associated with the Subject object.
Table 7-6 Object Classes Associated with the Subject Object
Class Name
Explanation
com.fujitsu.interstage.sso.auth.ISAuthorizationCredential
Retains information (a value obtained
from the Cookie) indicating SSO
authentication success and data in
authentication information.
The code is shown below.
Set credentials = subject.getPrivateCredentials();
// display credential information
Iterator iterator = credentials.iterator();
while (iterator.hasNext()) {
// Processing for referencing authentication information
if (credential instanceof ISAuthorizationCredential){
}
}
Principal objects can be obtained with the following Subject object methods:
•
public Set getPrincipals();
•
public Set getPrincipals(Class c);
The difference between these methods is the same as the difference between the getPrivateCredentials
methods.
Table 7-7 lists the classes of objects that can be associated with the Subject object.
7-12
Developing Java Applications
Table 7-7 Object Classes Associated with the Subject Object
Class Name
Explanation
com.fujitsu.interstage.sso.auth.ISUserPrincipal
Indicates the user ID of an authenticated user.
com.fujitsu.interstage.sso.auth.ISRolePrincipal
Indicates the name of the role to which the user
belongs.
If the user belongs to a role set, roles in the role set
are associated as ISRolePrincipal objects. No
object is set unless the user belongs to a role.
For JDK1.3
com.sun.security.auth.X500Principal
For JDK1.4
javax.security.auth.x500.X500Principal
Indicates the unique distinguished name (DN) of the
user in the SSO repository.
There is a difference between JDK1.3 and JDK1.4
in the implementation of the java.security.Principal
interface getName method.
When using the getName method, note the
following difference.
- JDK1.3: An space is inserted immediately after a
DN delimiter (comma).
- JDK1.4: No space is inserted immediately after a
DN delimiter (comma).
Example: Value returned with getName method
JDK1.3:
CN=user001, OU=User, OU=interstage, O=fujitsu,
DC=com
JDK1.4:
CN=
user001,OU=User,OU=interstage,O=fujitsu,DC=co
m
The code is shown below.
Set principals = subject.getPrincipals();
iterator = principals.iterator();
while (iterator.hasNext()) {
Principal principal = (Principal)iterator.next();
System.out.println("Principal=" + principal.getName());
}
Reported User Information
When a business server configuration is used to specify an authentication server of the authentication
destination, the following information (which is retained in the object ISAuthorizationCredential) is
reported when “Yes” is selected for [Notify User Information?] on the Interstage Management Console.
•
User DN, role name
•
Authentication method
•
User UID
7-13
Chapter 7: Developing Applications
•
Client IP address
•
Authentication time
•
Re-authentication time
•
Scope of authentication information.
On the Interstage Management Console, select [System] > [Security] > [Single Sign-on] > [Business
system] > [Business system Name]. Select the [Settings] tab and click [Detailed Settings [Show]] then
check [Notify User Information?] in [Linkage with Web applications]. For details, refer to the Operator’s
Guide.
The application must be restarted to reflect the [Report User Information] settings. If the application is a
servlet application, restart IJServer. For login configuration details, refer to Creating Login Configuration
File.
Reporting User Information At Indefinite Re-authentication Intervals
The re-authentication interval can be obtained using the ISAuthorizationCredential object getExpiration
method. If the re-authentication interval is indefinite, the time obtained with the getAuthTime method is
the same as that obtained with the getExpiration method.
Note
The X500Principal object cannot be used if JDK1.3 is used and a character other than alphanumeric
characters and symbols is contained in a unique distinguished name in the SSO repository. To obtain a
character-string object indicating the unique name, use the ISAuthorizationCredential object getDN
method or JDK1.4.
Executing Authorization
When JAAS authentication is executed successfully, the Subject object can be used to use the JAAS
authorization function.
The JAAS authorization function differs from the single sign-on authorization function that controls
access to resources opened by a Web server. It controls access for Java application processing on the
basis of principal information about an authenticated user.
In single sign-on JavaAPI, the user ID, role name, and unique distinguished name in the SSO repository
are defined as principal information, and the Java Security manager is used for access control. For
information on the Java Security manager, refer to the Java Security manager document from Sun
Microsystems, Inc.
Access control is explained below using sample ISSsoAction.java code as an example. In this class,
java.security.PrivilegedAction is implemented, and a run method is executed by assuming an
authenticated user.
Example
import java.security.AccessControlException;
import java.security.PrivilegedAction;
public class ISSsoAction implements PrivilegedAction{
public Object run() {
try{
System.out.println("java.home=" + System.getProperty("java.home"));
}catch(AccessControlException ex){
System.out.println("This user does not have a permission to " +
"read java.home property");
7-14
Developing Java Applications
}
try{
System.out.println("user.home=" + System.getProperty("user.home"));
}catch(AccessControlException ex){
System.out.println("This user does not have a permission to " +
"read user.home property");
}
return null;
}
}
A run method is executed with the access permission for principal information by passing the Subject
object and instances in the above classes to the Subject doAs method.
The code is shown below.
PrivilegedAction myAction = new ISSsoAction();
subject.doAs(subject, myAction);
To provide access permission to principal information, write a security policy file. For security policy file
details, refer to Creating a Security Policy File.
Authorization with Role Set
The JAAS authorization function cannot execute authorization by using the role set name. In a Java
application, if an authenticated user belongs to a role set, authorization is executed using the role name
in the role set.
Authorization by Re-authentication Intervals
The JAAS authorization function cannot execute authorization by using the re-authentication interval
contained in the authentication information for an authenticated user in an authentication server. A Java
application can use the ISAuthorizationCredential object getExpiration method to obtain and check the
re-authentication interval.
7-15
Chapter 7: Developing Applications
Setting the Application Execution Environment
This section explains how the administrator for the operating application should set the environments
required for application execution.
Setting Environment Variables
Set the following paths (directory names/file names) in the environment variables CLASSPATH,
JAVA_HOME, and PATH required for application operation:
JDK1.3
Table 7-8 Setting Environment Variables for Windows (JDK1.3)
Environment Variable
Values
CLASSPATH
Specify the Java Archive (jar) files listed below. An isj2ee.jar CLASSPATH
value must be specified after the jsse.jar, jnet.jar, and jcert.jar values.
- [Interstage install directory] \J2EE\lib\jsse.jar
- [Interstage install directory] \J2EE\lib\jnet.jar
- [Interstage install directory] \J2EE\lib\jcert.jar
- [Interstage install directory] \J2EE\lib\isj2ee.jar
- [Interstage install directory] \F3FMsso\ssoatzag\lib\isssomod.jar
JAVA_HOME
Set the following directory:
- JDK install directory
PATH
Set the following directory:
-%JAVA_HOME%\bin
The environment variables can be set as system environment variables. If a system environment
variable is changed, restart the system.
Example
Interstage install directory: C:\Interstage
JDK install directory: "C:\Interstage\JDK13"
C:\>set CLASSPATH=
C:\Interstage\J2EE\lib\jsse.jar;C:\Interstage\J2EE\lib\jcert.jar;
C:\Interstage\J2EE\lib\jnet.jar;C:\Interstage\J2EE\lib\isj2ee.jar;
C:\Interstage\F3FMsso\ssoatzag\lib\isssomod.jar
C:\>set JAVA_HOME=C:\Interstage\JDK13
C:\>set PATH=%JAVA_HOME%\bin;%PATH%
7-16
Developing Java Applications
Table 7-9 Setting Environment Variables for Solaris OE and Linux (JDK1.3)
Environment Variable
Values
CLASSPATH
Specify the Java Archive (jar) files listed below. An isj2ee.jar CLASSPATH
value must be specified after the jsse.jar, jnet.jar, and jcert.jar values.
- /opt/FJSVj2ee/lib/jsse.jar
- /opt/FJSVj2ee/lib/jnet.jar
- /opt/FJSVj2ee/lib/jcert.jar
- /opt/FJSVj2ee/lib/isj2ee.jar
- /opt/FJSVssoaz/lib/isssomod.jar
JAVA_HOME
Set the following directory:
- JDK install directory
PATH
Set the following directory:
- $JAVA_HOME/bin
Example
JDK install directory: "/opt/FJSVawjbk/jdk13"
# sh
# CLASSPATH=
/opt/FJSVj2ee/lib/jsse.jar:/opt/FJSVj2ee/lib/jcert.jar:
/opt/FJSVj2ee/lib/jnet.jar:/opt/FJSVj2ee/lib/isj2ee.jar:
/opt/FJSVssoaz/lib/isssomod.jar
# export CLASSPATH
# JAVA_HOME=/opt/FJSVawjbk/jdk13
# export JAVA_HOME
# PATH=$JAVA_HOME/bin:$PATH
# export PATH
JDK1.4
Table 7-10 Setting Environment Variables for Windows (JDK1.4)
Environment Variable
Values
CLASSPATH
Specify the following Java Archive (jar) file:
- [Interstage install directory] \F3FMsso\ssoatzag\lib\isssomod14.jar
JAVA_HOME
Set the following directory:
- JDK install directory
PATH
Set the following directory:
- %JAVA_HOME%\bin
The environment variables can be set as system environment variables. If a system environment
variable is changed, restart the system.
7-17
Chapter 7: Developing Applications
Example
Interstage install directory: C:\Interstage
JDK install directory: "C:\Interstage\JDK14"
C:\>set CLASSPATH=C:\Interstage\F3FMsso\ssoatzag\lib\isssomod14.jar
C:\>set JAVA_HOME=C:\Interstage\JDK14
C:\>set PATH=%JAVA_HOME%\bin;%PATH%
Table 7-11 Setting Environment Variables for Solaris OE and Linux (JDK1.4)
Environment Variable
Values
CLASSPATH
Specify the following Java Archive (jar) file:
- /opt/FJSVssoaz/lib/isssomod14.jar
JAVA_HOME
Set the following directory:
- JDK install directory
PATH
Set the following directory:
- $JAVA_HOME/bin
Example
JDK install directory: "/opt/FJSVawjbk/jdk14"
#
#
#
#
#
#
#
sh
CLASSPATH=/opt/FJSVssoaz/lib/isssomod14.jar
export CLASSPATH
JAVA_HOME=/opt/FJSVawjbk/jdk14
export JAVA_HOME
PATH=$JAVA_HOME/bin:$PATH
export PATH
CLASSPATH Setting for Using JAAS Authorization Function
To use the security manager, specify the jar files specified for the environment variable CLASSPATH for
the security policy file URL. If a class contained in a jar file specified for the security policy file is loaded
from jar files other than those specified for the security policy file, the specified security policy becomes
invalid. This occurs, for example, when a class is loaded from a class file with directories specified for
CLASSPATH.
CLASSPATH Set Automatically When Executed in IJServer
For IJServer of the Interstage Management Console, isj2ee.jar does not need to be set in the class path.
For details on IJServer CLASSPATH, refer to “IJServer file configuration” in “Environment Where J2EE
Applications are Operated (IJServer)” in “Design of J2EE Application” in the J2EE User’s Guide.
Note
The IJServer, jsse.jar, jcert.jar, and jnet.jar contained in the J2EE package are copied to an ext directory
under the IJServer directory so they can be accessed and used.
7-18
Developing Java Applications
Obtaining Service ID File
If an authentication server of the authentication destination is specified with a Java application that
receives a user ID/password from a client for authentication (without using a business server
configuration), the application operation administrator requests the SSO administrator to obtain the
service ID file. Store the obtained service ID file in the server where the Java application is to be
executed using a secure method.
A service ID file can be created by executing an ssomksid command in a repository server in which the
authentication infrastructure is set up.
For information on obtaining a service ID file, refer to “ssomksid” in “Single Sign-on Operation
Commands” in the Reference Manual (Command Edition).
Use the serviceidpath option for the login configuration file to specify a service ID file. For details of the
login configuration and login configuration file, refer to Creating Login Configuration File.
Creating Login Configuration File
The application operation administrator creates a login configuration file required for application
execution. Any file name can be specified for system property java.security.auth.login.config at
application execution time. In the login configuration file, write the login configuration in which a
LoginModule provided by single sign-on JavaAPI is set. For login configuration file details, refer to the
J2SDK and JAAS documents provided by Sun Microsystems, Inc.
Write the login configuration in the following format:
<entry-name> {
<loginmodule-class-name> <flag> <module-option>;
};
Write the name specified when LoginContext is converted to an instance in entry-name. All symbols can
be used if the entry name is enclosed with double or single quotation marks. Guidelines on the symbols
that can be used if the entry name is not enclosed with double or single quotation marks are as follows.
Symbols that can be used without enclosing the entry name with double or single quotation marks:
•
•
JDK1.3
−
Hyphen (-)
−
Period (.)
JDK1.4
−
Dollar sign ($)
−
Hyphen (-)
−
Period (.)
−
Underscore (_)
Set either of two LoginModules provided by the single sign-on JavaAPI in loginmodule-class-name.
•
Servlet application that receives authentication information from a client
com.fujitsu.interstage.sso.auth.module.ISCredentialLoginModule
7-19
Chapter 7: Developing Applications
•
Java application that receives a user ID/password from a client for authentication
com.fujitsu.interstage.sso.auth.module.ISLoginModule
Generally, "required" should be set in the flag. “requisite”, “sufficient”, and “optional” can also be set.
For details, refer to the J2SDK and JAAS documents provided by Sun Microsystems, Inc.
In module-option, write the information used by LoginModule such as authentication infrastructure
information of the authentication destination and the service ID file path name in list format where a
blank character is used as a delimiter. Insert an equals sign between an option name and a value and
enclose the value with double quotation marks. Use only lowercase letters to specify an option name to
be used by LoginModule provided by the single sign-on JavaAPI. If an uppercase letter is used in an
option name (or if an option name is specified incorrectly), it is assumed that the option name is omitted.
Insert a semicolon at the end of LoginModule specification items.
Table 7-12 lists the option that can be used with the
com.fujitsu.interstage.sso.auth.module.ISCredentialLoginModule.
Table 7-12 Option for module ISCredentialLoginModule
Option
Explanation
serverport
Specify the port number of the business server.
Use the Interstage Management Console to select [System] > [Security] >
[Single Sign-on] > [Business system] > [Business system Name]. Select the
[Settings] tab and click [Detailed Settings [Show]] then specify the value
specified for [Port number] in [Network Settings]. For details on Interstage
Management Console definition, refer to the Operator’s Guide.
Table 7-13 lists the options that can be used with the
com.fujitsu.interstage.sso.auth.module.ISLoginModule.
Table 7-13 Option for module ISLoginModule
Option
Explanation
serviceidpath
When specifying an authentication server of the authentication destination
without using a business server configuration, specify a service ID file by
using the absolute path name. If this option is specified, the authserver
option must also be specified.
When writing the path name of the specified service ID file, use \\ as a file
separator because \ is an escape character.
authserver
Specify this option when specifying an authentication server of the
authentication destination without using a business server configuration in
authentication infrastructure-URL+"/ ssoatcag” format
Example: https://www.fujitsu.com:443/ssoatcag
If this option is specified, the serviceidpath option must also be specified.
timeout
Specify a read timeout time from 0 to 300 (seconds), which is used for
communication with an authentication server.
When 0 is specified, timeout is not monitored.
When omitted, 60 is assumed.
7-20
Developing Java Applications
Option
Explanation
authservertrusted
Specify whether the site certificate of an authentication server presented
from the authentication server is verified in SSL communication with the
authentication server.
Set “yes” for no verification. "yes" is not case sensitive. If "yes" is omitted or
a value other than “yes” is specified, the certificate is verified.
serverport
Specify the port number specified in the business server configuration when
an authentication server of the authentication destination is specified using
the configuration.
This option is required when authentication is executed for an authentication
server with information set in business server environment setup.
Do not specify the serviceidpath and authserver options.
Use the Interstage Management Console to select [System] > [Security] >
[Single Sign-on] > [Business System] > [Business System Name]. Select the
[Setup Environment] tab and click [Show Detailed Setup] then specify the
port number specified for [Port Number] in [Network]. For details on
Interstage Management Console definition, refer to the Operator’s Guide.
File Encoding Mode for Login Configuration File
When a character other than alphanumeric characters and symbols is used in a login configuration file,
store the login configuration using the following file encoding mode:
•
JDK1.3
JavaVM default encoding mode
•
JDK1.4
UTF-8 encoding mode
Note
The site certificate destination CommonName registered at authentication server SSL environment
setup must correspond with the authentication server host name specified for the authserver option in
the login configuration file.
Login configuration file examples are provided below. In the examples, the login configuration entry
name com.fujitsu.interstage.sso is used.
Examples
Execution of a Servlet Application that Receives Authentication Information from a Client
Business server port number: 80
com.fujitsu.interstage.sso {
com.fujitsu.interstage.sso.auth.module.ISCredentialLoginModule required
serverport="80"
;
};
7-21
Chapter 7: Developing Applications
Execution of a Java Application that Receives a User ID/Password from a Client for Authentication
Business server configuration: Unused
Timeout time: 300 seconds
Connected authentication infrastructure URL: https://auth.fujitsu.com:443
Service ID file: "C:\Interstage\F3FMsso\ssoatzag\sample\javaapi\serviceid"
com.fujitsu.interstage.sso {
com.fujitsu.interstage.sso.auth.module.ISLoginModule required
timeout="300"
authserver="https://auth.fujitsu.com:443/ssoatcag"
serviceidpath="C:\\Interstage\\F3FMsso\\ssoatzag\\sample\\javaapi\\serviceid
"
;
};
Business server configuration: Unused
Timeout time: 300 seconds
Connected authentication infrastructure URL: https://auth.fujitsu.com:443
Service ID file: "/home/jaastest/javaapi/serviceid"
com.fujitsu.interstage.sso {
com.fujitsu.interstage.sso.auth.module.ISLoginModule required
timeout="300"
authserver="https://auth.fujitsu.com:443/ssoatcag"
serviceidpath="/home/jaastest/javaapi/serviceid"
;
};
Creating a Security Policy File
The application operation administrator creates a security policy file when the JAAS authorization
function is used by a Java application. Any file name can be specified for the system property
java.security.policy at execution of the java application. For details on the security policy file, refer to the
J2SDK and JAAS documents provided by Sun Microsystems, Inc.
The three grant entry formats shown below can be used to write a security policy.
To Grant Permission for all Codes
grant{
permission <access-permission-class-name> “<target-name>”, “<action-name>”;
...
};
7-22
Developing Java Applications
To Grant Permission for Each Code Base
grant codeBase <URL>{
permission <access-permission-class-name> “<target-name>”, “<action-name>”;
...
};
To Grant Permission for Each User Principal
grant codeBase <URL>,
principal <principal-class-name> “<principal-name>”,
... {
permission <access-permission-class-name> “<target-name>”, “<action-name>”;
...
};
•
codeBase Field
The codeBase value (<URL>) indicates the position where a code is set. Access permission is
given for a code loaded from the specified position. If this field is omitted, access permission is
granted for all codes regardless of the original code position.
•
principal Field
Specify both a principal-class-name and principal-name in this field as a pair. Access permission is
granted for a pair in a principal set for a thread under process. The Subject object associates the
principal set with a code to be executed. If this field is omitted, access permission is granted for all
pairs.
•
Access Permission Entry
This entry starts with permission. Specify an access permission class name such as
java.util.PropertyPermission or java.io.FilePermission in access-permission-class-name. Write a
target-name and action-name as required after the access permission class name. For example,
when java.util.PropertyPermission is specified, the system property name can be specified for
target-name and “read” and “write” can be specified for action-name. For information on setting
access permission, refer to the J2SDK and JAAS documents provided by Sun Microsystems, Inc.
Escape Character
The symbol \ is processed as an escape character in a security policy file. Therefore, use \\ as a file
separator when writing a path name in URL.
7-23
Chapter 7: Developing Applications
File Encoding for Security Policy File
When a character other than alphanumeric characters and symbols is used in a security policy file, store
the security policy file with the following file encoding format:
•
JDK1.3
JavaVM default encoding format
•
JDK1.4
UTF-8 encoding format format or the default encoding format used by JavaVM
To use the default encoding format, the system property com.sun.security.policy.utf8 should be
assigned the value false.
Granting Permission for Each Distinguished Name that is Unique Within the User SSO
Repository
•
JDK1.3
Insert a space after each comma between the attributeType=attributeValue values making up a
principal name.
Example
grant codeBase "file:isssoaction.jar" ,principal
com.sun.security.auth.X500Principal "CN=user001, OU=User, OU=interstage,
O=fujitsu, DC=com" {
permission java.util.PropertyPermission "java.home","read";
};
•
JDK1.4
Do not insert a space after each comma between the attributeType=attributeValue values making
up a principal name.
Example
grant codeBase "file:isssoaction.jar" , principal
javax.security.auth.x500.X500Principal "CN=
user001,OU=User,OU=interstage,O=fujitsu,DC=com" {
permission java.util.PropertyPermission "java.home","read";
};
Note
JDK1.3 cannot be used for JAAS authorization using a distinguished name unique within an SSO
repository where a value other than alphanumeric characters and symbols is used. In this situation, use
JDK1.4.
File Description
Specifying a security policy file used in an application that executes JAAS authorization is explained
below. To use the JAAS authorization function, the codes to be processed for each principal and other
codes must be set in different jar files as described in Table 7-14.
7-24
Developing Java Applications
Table 7-14 Jar File Descriptions
Jar File
Explanation
Jar file used by the single sign-on
JavaAPI (*1)
Specify permission for each code base.
Jar file that contains codes not
processed for each principal by a user
application
Specify minimal permissions for each code base
Jar file that contains codes processed
for each principal by a user application
Specify minimal permissions for each user principal.
*1 For details of the jar file used with the single sign-on JavaAPI and JSSE jar file, refer to CLASSPATH
setting information in Setting Environment Variables.
Examples of security policy files set in applications that use a user ID/password for authentication and
authorization are shown below.
Example
JDK1.3
Java application jar file: "isssojaas.jar"
grant codeBase "file:C:\\Interstage\\J2EE\\lib\\jsse.jar" {
grant codeBase "file:/opt/FJSVj2ee/lib/jsse.jar" {
permission java.security.AllPermission;
};
grant codeBase "file:C:\\Interstage\\J2EE\\lib\\jcert.jar" {
grant codeBase "file:/opt/FJSVj2ee/lib/jcert.jar" {
permission java.security.AllPermission;
};
grant codeBase "file:C:\\Interstage\\J2EE\\lib\\jnet.jar" {
grant codeBase "file: /opt/FJSVj2ee/lib/jnet.jar" {
permission java.security.AllPermission;
};
grant codeBase "file:C:\\Interstage\\J2EE\\lib\\isj2ee.jar" {
grant codeBase "file:/opt/FJSVj2ee/lib/isj2ee.jar" {
permission java.security.AllPermission;
};
grant codeBase "file:C:\\Interstage\\F3FMsso\\ssoatzag\\lib\\isssomod.jar"
{
grant codeBase "file:/opt/FJSVssoaz/lib/isssomod.jar" {
permission java.lang.RuntimePermission "loadLibrary.F3FMssojdec";
・・・
permission javax.security.auth.PrivateCredentialPermission
7-25
Chapter 7: Developing Applications
"com.fujitsu.interstage.sso.auth.ISAuthorizationCredential
com.fujitsu.interstage.sso.auth.ISUserPrincipal \"*\"", "read";
};
grant codeBase "file:isssojaas.jar" {
permission java.util.PropertyPermission "java.home","read";
permission java.util.PropertyPermission "user.home","read";
permission javax.security.auth.AuthPermission "createLoginContext";
permission javax.security.auth.AuthPermission "doAs";
permission javax.security.auth.PrivateCredentialPermission
"com.fujitsu.interstage.sso.auth.ISAuthenticationCredential
com.fujitsu.interstage.sso.auth.ISUserPrincipal \"*\"", "read";
permission javax.security.auth.PrivateCredentialPermission
"com.fujitsu.interstage.sso.auth.ISAuthorizationCredential
com.fujitsu.interstage.sso.auth.ISUserPrincipal \"*\"", "read";
};
Jar file containing classes to be processed based on access permission granted to an authenticated
user: "isssoaction.jar"
grant codeBase "file:isssoaction.jar" ,
principal com.fujitsu.interstage.sso.auth.ISUserPrincipal "guest" {
permission java.util.PropertyPermission "java.home","read";
};
grant codeBase "file:isssoaction.jar" ,
principal com.fujitsu.interstage.sso.auth.ISRolePrincipal "administrator"
{
permission java.util.PropertyPermission "user.home","read";
};
JDK1.4
Java application jar file: "isssojaas.jar"
Jar file containing classes to be processed based on access permission granted to an authenticated
user: "isssoaction.jar"
grant codeBase "file:isssoaction.jar" ,
principal com.fujitsu.interstage.sso.auth.ISUserPrincipal "guest" {
permission java.util.PropertyPermission "java.home","read";
};
grant codeBase "file:isssoaction.jar" ,
principal com.fujitsu.interstage.sso.auth.ISRolePrincipal "administrator"
{
permission java.util.PropertyPermission "user.home","read";
};
grant codeBase "file:isssojaas.jar" {
permission java.util.PropertyPermission "java.home","read";
permission java.util.PropertyPermission "user.home","read";
7-26
Developing Java Applications
permission javax.security.auth.AuthPermission
"createLoginContext.com.fujitsu.interstage.sso";
permission javax.security.auth.AuthPermission "doAs";
permission javax.security.auth.PrivateCredentialPermission
"com.fujitsu.interstage.sso.auth.ISAuthenticationCredential
com.fujitsu.interstage.sso.auth.ISUserPrincipal \"*\"", "read";
permission javax.security.auth.PrivateCredentialPermission
"com.fujitsu.interstage.sso.auth.ISAuthorizationCredential
com.fujitsu.interstage.sso.auth.ISUserPrincipal \"*\"", "read";
};
grant codeBase "file:C:\\Interstage\\F3FMsso\\ssoatzag\\lib\\isssomod14.jar
" {
grant codeBase "file:/opt/FJSVssoaz/lib/isssomod14.jar " {
permission java.lang.RuntimePermission
"accessClassInPackage.sun.net.www.protocol.https";
・・・
com.fujitsu.interstage.sso.auth.ISUserPrincipal \"*\"", "read";
permission javax.security.auth.PrivateCredentialPermission
"com.fujitsu.interstage.sso.auth.ISAuthorizationCredential
com.fujitsu.interstage.sso.auth.ISUserPrincipal \"*\"", "read";
};
Creating a Trust Store File
A trust store file is required when a Java application that receives a user ID/password from a client to
perform authentication uses a user ID/password for authentication with an authentication server in SSL
communication. By using the trust store file, the Java application can verify the site certificate of the
authentication server.
If the site certificate of an authentication server is not to be verified in SSL communication with the
authentication server, specify authservertrusted="yes" in the login configuration file. In this case, no
trust store file is required. For login configuration file details, refer to Creating Login Configuration File.
The following two methods can be used to create a trust store file:
1.
Using the Interstage certificate environment
2.
Using the JDK keytool command.
Using the Interstage Certificate Environment
Obtain the site certificate of the authentication server and the CA certificate that is a certificate of the site
certificate issuer. If a load balancer (such as Interstage Traffic Director) is used, use a site certificate
issued with the load balancer FQDN. Register the obtained certificate in the Interstage certificate
environment. For registration details, refer to “Configuring Environments” in “Setting and Use of the
Interstage Certificate Environment” in the Security System Guide.
When the certificate is registered, the trust store file is stored in a file with the paths shown below.
Specify the file name with the system property javax.net.ssl.trustStore when the application starts.
Interstage install directory: C:\Interstage
C:\Interstage\etc\security\env\keystore\.keystore
7-27
Chapter 7: Developing Applications
/etc/opt/FJSVisscs/security/env/keystore/.keystore
Using the Keytool Command
Obtain the site certificate of the authentication server and the CA certificate that is a certificate of the site
certificate issuer. If a load balancer (such as Interstage Traffic Director) is used, use a site certificate
issued with the load balancer FQDN then use a keytool command to create a trust store file.
For keytool command details, refer to the J2SDK documents provided by Sun Microsystems, Inc.
Usage
keytool -import –file certificate-file-absolute-pathname –keystore truststore-file-absolute-pathname
A trust store file can be specified by specifying its file name with the system property
javax.net.ssl.trustStore. If no file name is specified, the following default files are used:
•
JDK default file
%JAVA_HOME%\jre\lib\security\cacerts
$JAVA_HOME/jre/lib/security/cacerts
The initial password is “changeit.”
•
JSSE default file
%JAVA_HOME%\jre\lib\security\jssecacerts
$JAVA_HOME/jre/lib/security/jssecacerts
Note
Use JDK1.4 if UTF-8 is used for the authentication server site certificate and CA certificate.
7-28
Developing Java Applications
Setting Access Permission for Operation Resources
Resources (such as the configuration file and service ID file) are required for Java application operation
and must be securely protected. This section explains how to set access permission to protect these
resources.
The actual setting methods are shown below.
When Servlet Application Uses Business Server Configuration for Specifying an Authentication
Server of the Authentication Destination
Execute a Java application that uses a business server configuration as a user belonging to the
Administrators group.
To read a business server configuration, match an IJServer user with a user specified in the User
directive in the Interstage HTTP Server environment configuration file (httpd.conf).
When Nobody is specified as an IJServer user, set the environment as follows:
1.
Use the WorkUnit automatic activation and activate the IJServer with user nobody.
When an IJServer user other than nobody is specified, set the environment as follows:
1.
Use the useradd command to create an IJServer user. Grant user authority equivalent to the file
access permission of the user specified in the httpd.conf file User directive to the created user.
2.
Set access permission for the created user as explained below.
3.
Specify the user in the httpd.conf User directive.
4.
Use the Interstage Management Console to select [System] > [Security] > [Single Sign-on] >
[Business system] > [Business system Name] > [Settings] tab and click [Update].(*1)
*1
For further details, refer to “Changing Effective User for Web Server” in Chapter 4 – Operation and
Maintenance.
Setting Access Permission for Files
Use Windows explorer to change user and group access permission. Set access permission as a user
with Administrator authority.
7-29
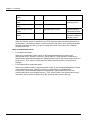
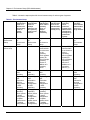
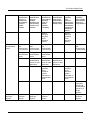
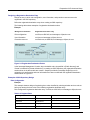
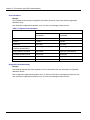
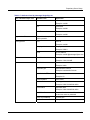
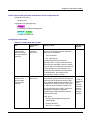
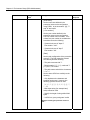
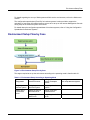
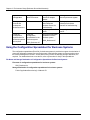
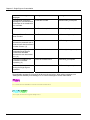
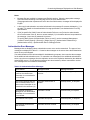
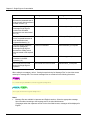
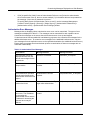
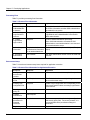
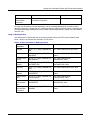
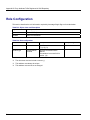
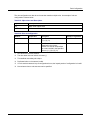
Chapter 7: Developing Applications
Table 7-15 Setting Access Permissions for Files (Windows)
Resource
Explanation
Service ID file
Set access permission when a Java application that receives a user
ID/password from a client to perform authentication is not to use the
business server configuration.
Permit only a Java application execution user (or IJServer user for a
servlet application) to read the file.
Login configuration file
Permit only a Java application execution user (or IJServer user for a
servlet application) to read the file.
Security policy file
Permit only a Java application execution user to read the file.
Trust store file
Set access permission when a Java application that receives a user
ID/password from a client to perform authentication is to be used.
- When a file is created using the Interstage certificate environment
Permit a Java application execution user (or IJServer user for a
servlet application) to read the file.
- When a file is created using a keytool command
Permit only a Java application execution user (or IJServer user for
a servlet application) to read the file.
Use a chmod or chown command. Set access permission with super user (root) authority.
Table 7-16 Setting Access Permissions for Files (Solaris and Linux)
Resource
Explanation
Service ID file
Set access permission when a Java application that receives a user
ID/password from a client to perform authentication is not to use the
business server configuration.
Permit only a Java application execution user (or IJServer user for a
servlet application) to read the file.
Login configuration file
Permit only a Java application execution user (or IJServer user for a
servlet application) to read the file.
Security policy file
Permit only a Java application execution user to read the file.
Trust store file
Set access permission when a Java application that receives a user
ID/password from a client for authentication is to be used:
- When a file is created using the Interstage certificate environment
Permit a Java application execution user (or IJServer user for a
servlet application) to read the file.
- When a file is created using a keytool command
Permit only a Java application execution user (or IJServer user for
a servlet application) to read the file.
7-30
Developing Java Applications
Registering Protection Resources
For a servlet application that receives authentication information from a client, the SSO administrator
must register the servlet application path in the SSO repository as a protection resource and set its role
name or role set name to enable its use.
For details, refer to “Registering Protection Resources” and “Using an LDIF File.”
Information about the registered resource must then be stored in the business server. The business
server administrator must use the Interstage Management Console to select [System] > [Security] >
[Single Sign-on] > [Business system] > [Business system Name] > [Update access control information]
tab and click [Update]. For details on Interstage Management Console definition, refer to the Operator’s
Guide.
For information on updating access control information, refer to “Amending Role Configuration” and
“Amending Protection Resource” in Chapter 4 – Operation and Maintenance.
Protection resource to be registered:
Business-server-name:port-number/servlet-application-path
Exceptions and Exception Handling
When an exception occurs in a single sign-on JavaAPI, check the exception object type and detailed
message obtained with the exception object getMessage method and take the required action after
referring to the Messages manual.
Example
Message displayed for an incorrect password
Error: Authentication failed
If an OutOfMemoryError occurs in a Java application that receives a user ID/password from a client to
perform authentication, the following Interstage HTTP Server messages may be displayed:
ERROR: ihs66999: SSL: unexpected error
(SSL_ServerHandshake,00700002,00020014)
Or
ERROR: ihs66038: SSL: chipher handshake error
(SSL_ServerHandshake,00700001,00020028)
Required Action If An OutOfMemoryError Error Occurs
If an OutOfMemoryError error occurs when a Java application is executed, the following causes are
possible.
•
The memory (heap area) used in Java is insufficient
7-31
Chapter 7: Developing Applications
An OutOfMemoryError error typically occurs in this situation.
The memory used in Java can be broadly divided into the following three categories:
•
−
New generation area
−
Old generation area
−
Permanent generation area
The amount of virtual memory is insufficient
An OutOfMemoryError error may also occur if the system virtual memory outside the heap area is
insufficient. In this situation, increase the virtual memory.
If a thread cannot be generated because the virtual memory is insufficient, an OutOfMemoryError
error containing the following information occurs.
java.lang.OutOfMemoryError: unable to create new native thread
•
The Java process user space is insufficient
Even if there is enough room in the heap area or system virtual memory, an OutOfMemoryError
error might occur if the upper limit for the memory determined by the OS for each process is
exceeded. This is particularly the case if, when a thread is generated, memory is secured in a
different area to the heap area. If a large number of threads is generated, the secured memory
exceeds the upper limit determined by the OS, causing the thread generation to fail, and an
OutOfMemoryError error containing the following information to occur.
java.lang.OutOfMemoryError: unable to create new native thread
In this situation, take the following action:
−
To generate a thread in the Java program, reduce the number of thread generations.
−
If the error is output along with message IJServer17654 in the IJServer WorkUnit container log,
check that the value set for the number of simultaneous processing events in the WorkUnit
Servlet container is not too large. If it is too large, reduce it. In this situation, the IJServer
process concurrency can be increased to maintain the number of requests (number of
simultaneous processing events x process concurrency) that can actually be processed
simultaneously in one WorkUnit, if required. However, if the process concurrency is increased
unnecessarily, it will use up a considerable amount of system memory.
−
If the Java process heap area is excessively large, the value specified for the Java command Xmx option can be reduced to relieve the upper limit.
−
If the Java process stack size is excessively large, reduce the stack size using the ulimit
command (B shell type) or the limit command (C shell type).
New Generation Area and Old Generation Area
The New generation area and Old generation area are areas for managing objects such as instances
and arrays. Areas are divided into New and Old generations so that garbage collection (GC) processing
for the generations can be executed separately.
The New generation area manages objects with short life spans. An object for which a request for
generation has occurred in a Java program is typically generated in the New generation area.
Objects that have been in a New generation area for a fixed period of time are moved to the Old
generation area.
7-32
Developing Java Applications
Objects in an Old generation area that are no longer required are recovered using FullGC processing.
The total memory size of the New generation area and the Old generation area is determined by the “Xmx” option that is specified when Java starts up. The default value is 64MB.
If the New generation area and Old generation area are insufficient (the number of objects is large), use
the Xmx option to increase the maximum value of the heap area. Specify the Xmx option in the JavaVM
option of the Interstage Management Console.
The GC “-verbose:gc” option can be set to check the extent to which the heap area is being used.
Example
The following is an output example when the “-verbose:gc” option is specified.
---------------------------------------------------------------------[GC 80229K->31691K(259776K), 0.4795163 secs]
[FullGC 57654K->4623K(259776K), 0.3844278 secs]
(1)
(2)
(3)
(4)
(5)
---------------------------------------------------------------------(1) This is the GC type (“GC” refers only to the New generation area; “FullGC” refers to the New, Old,
and Permanent generation areas).
(2) This is the size used for the heap (before GC).
(3) This is the size used for the heap (after GC).
(4) This is the heap size.
(5) This is the GC processing time.
The value in (2) is the amount used for the heap area.
Data for a heap area that is being executed can also be collected using “jheap”.
FJVM changes the New generation area and the Old generation area dynamically.
In HotSpot Server VM and HotSpot Client VM, the ratio for the New generation area and the Old
generation area is fixed. It is possible to change the ratio by specifying an option on startup. For details,
refer to the following website:
http://java.sun.com/docs/hotspot/VMOptions.html
Permanent Generation Area
In addition to the heap area that is managed by the maximum value in “-Xmx”, there is also a Permanent
generation area in the heap area for storing classes. An OutOfMemoryError error also occurs if this
area is insufficient.
The default value is 32MB in 1.3.1, and 64MB in 1.4.2.
The maximum value is determined by the “-XX:MaxPermSize” option that is specified when Java starts
up. For example, to set the maximum value of the Permanent generation area to 128MB, specify “XX:MaxPermSize=128m” in the option when Java starts up.
If an OutOfMemoryError error occurs even if the maximum value of the heap area in the “-Xmx” option is
increased, and the amount of heap area used appears to increase with time, there might be a memory
leak. In this situation, check the application.
“Qualyzer” can be used to investigate any possible memory leaks.
7-33
Chapter 7: Developing Applications
Executing Applications
This section explains how to execute a Java application that uses the single sign-on JavaAPI.
(1) Setting System Property
To execute a Java application that uses the single sign-on JavaAPI, the following system property must
be set on JavaVM activation.
Table 7-17 Setting System Properties (JavaAPI)
System Property
Value to be Set
java.security.auth.login.config
Login configuration file absolute path name
If the Java application uses the JAAS authorization function, the following system properties must also
be set.
Table 7-18 Setting System Properties (JAAS)
System Property
Value to be Set
java.security.manager
None
java.security.policy
Security policy file absolute path name
java.security.auth.policy
Absolute path name of the principal base security policy file
(can be written in a security policy file set with
java.security.policy for JDK1.4)
sun.security.policy.utf8
Can be set for JDK1.4 only. Specify "false" to read the
security policy file using the default encoding format. If "true"
or nothing is specified, UTF-8 is read
When a proxy server is used between the Java application and authentication server, the following
system properties must be set:
Table 7-19 Setting System Properties when Proxy Server is used
System Property
Value to be Set
http.nonProxyHosts
Name of a server that is not to be connected through a proxy
server
Set this value if a proxy server is set but there is a server
that is not to be connected through the proxy server. Insert
the symbol (|) between the server names when specifying
multiple servers. A corresponding wild card character can
also be specified"..
https.proxyHost
Name of a proxy server in HTTPS communication
Set this value when the authentication server is in an SSL
environment.
https.proxyPort
Port number of a proxy server
Set this value when the authentication server is in an SSL
environment.
7-34
Developing Java Applications
If the Java application to be executed uses a trust store file other than the JDK or JSSE default, a
system property must be specified as shown in the table below. For default file details, refer to Creating
a Trust Store File.
Table 7-20 Setting System Properties for Java Applications (Trust File other than JDK or JSEE)
System Property
Value to be Set
javax.net.ssl.trustStore
Absolute path name of trust store file to be used.
Remark
The same system property value is used by all applications that operate within the same VM.
(2) Activating Application
Information on how to activate an application is provided below.
Activation of a Servlet Application that Receives Authentication Information from a Client
Before activating a servlet application that uses the single sign-on JavaAPI, the Interstage Management
Console must be used to set an IJServer WorkUnit and copy JSSE libraries to a directory ext under the
IJServer directory.
•
Setting an IJServer WorkUnit
Use the Interstage Management Console to select [System] > [WorkUnit] > [IJServer] > [Settings]
tab and implement WorkUnit settings. The table below lists the values to be set. To change the
servlet JavaVM version, change the Java version.
Table 7-21 Values That Need To Be Set
•
Definition Name
Value to be Set
JavaVM option
-Djava.security.auth.login.config=login-configuration-fileabsolute-pathname
Add the system properties required for the environment. For
the required system properties, refer to “Setting System
Property.”
Class path
JDK1.3
Absolute path name of isssomod.jar
JDK1.4
Absolute path name of isssomod14.jar
Java version
Select 1.3 or 1.4
Copying JSSE libraries
Copy the JSSE library modules (jsse.jar, jcert.jar, jnet.jar) to an ext directory under the IJServer
directory where the servlet application is deployed.
The copy source directories are shown below.
C:\Interstage\J2EE\lib
7-35
Chapter 7: Developing Applications
/opt/FJSVj2ee/lib
The copy destination directories are shown below.
C:\Interstage\J2EE\var\deployment\ijserver\IJServer name\ext
/opt/FJSVj2ee/var/deployment/ijserver/IJServer name/ext
For details on servlet application operation, refer to “Calling Servlets” in “How to Call Web Applications”
in the J2EE User’s Guide.
Activation of a Java Application that Receives a User ID/Password from a Client to Perform
Authentication
Information on how to activate a Java application that uses the single sign-on JavaAPI from a command
line is provided below.
Activating a Java application that uses only authentication:
java
-Djava.security.auth.login.config=login-configuration-file-absolute-pathname
application-class-name
Activating a Java application that uses a trust store file other than the default:
java
-Djava.security.auth.login.config=login-configuration-file-absolute-pathname
-Djavax.net.ssl.trustStore=trust-store-file-absolute-pathname
application-class-name
Activating a Java application that uses authentication and authorization:
JDK1.3
java
-Djava.security.auth.login.config=login-configuration-file-absolute-pathname
-Djava.security.manager
-Djava.security.policy=security-policy-file-absolute-pathname
-Djava.security.auth.policy=principal-base-security-policy-file-absolutepathname application-class-name
7-36
Developing Java Applications
JDK1.4
java
-Djava.security.auth.login.config=login-configuration-file-absolute-pathname
-Djava.security.manager
-Djava.security.policy=principal-base-security-policy-file-absolute-pathname
application-class-name
When an application to be operated is developed with a servlet application, the Interstage Management
Console must be used to set an IJServer WorkUnit and copy JSSE libraries to an ext directory under the
IJServer directory in advance.
•
Setting an IJServer WorkUnit
Use the Interstage Management Console to display [System] > [WorkUnit] > [IJServer] > [Settings]
tab. The table below lists the values to be set. To change the servlet JavaVM version, change the
Java version.
Table 7-22 Values to be Set (JDK1.4)
Definition Name
Value to be Set
JavaVM option
-Djava.security.auth.login.config=login-configuration-fileabsolute-pathname
Add the system properties required for the environment.
For the required system properties, refer to “Setting System
Property.”
•
Class path
JDK1.3
Absolute path name of isssomod.jar
JDK1.4
Absolute path name of isssomod14.jar
Java version
Select 1.3 or 1.4
Copying JSSE libraries
Copy the JSSE library modules (jsse.jar, jcert.jar, jnet.jar) to an ext directory under the IJServer
directory where the servlet application is deployed.
The copy source directories are shown below.
C:\Interstage\J2EE\lib
/opt/FJSVj2ee/lib
The copy destination directories are shown below.
C:\Interstage\J2EE\var\deployment\ijserver\IJServer name\ext
7-37
Chapter 7: Developing Applications
/opt/FJSVj2ee/var/deployment/ijserver/IJServer name/ext
For details on servlet application operation, refer to “Calling Servlets” in “How to Call Web Applications”
in the J2EE User’s Guide.
When Reactivation of an Application is Required
An application must be reactivated if a security policy, login configuration, or service ID file is updated;
settings are changed in [Report User Information] in [Linkage with Web Application] in the business
server environment setup; or the business system is re-set up. If the application is a servlet application,
stop IJServer before reactivating it.
Sample Code
This section explains how to use single sign-on JavaAPI sample codes. The sample codes are
classified into two groups as follows:
•
Servlet application
Servlet application that receives authentication information from a client
Servlet application that receives a user ID/password from a client to perform authentication
•
Application that uses a user ID/password for authentication and authorization
Executing these samples requires single sign-on environments set up according to “Environment Setup
(SSO Administrators)” and “Environment Setup (SSO Business Server Administrators).”
Servlet Application
Outline
A servlet application sample receives authentication information confirming successful authentication
from a client and displays information on the authenticated user, or uses a user ID/password received
from a client to perform authentication for an authentication server. To use a sample, a Web server
linked to the servlet must be set up as a business server.
Table 7-23 Business Server setup
7-38
URL
Application
Registration
of Protection
Resource
http(s)://Business server name:port
number/jaassample/SampleServlet
Servlet application that receives
authentication success confirmation
from a client
Required
http(s)://Business server name:port
number/jaassample/UidPasswordServlet
Servlet application that receives a
user ID/password from a client to
perform authentication
Not Required
Developing Java Applications
Sample Code Storage Location
Sample codes are stored in the following directories (hereafter referred to as sample directories).
Interstage install directory: C:\Interstage
C:\Interstage\F3FMsso\ssoatzag\sample\javaapi
/opt/FJSVssoaz/sample/javaapi
Table 7-24 lists the files required to execute the sample code.
Table 7-24 Sample Code
File
Explanation
jaassample.war
War file
webapp/jaassample/WEBINF/isssojaaslogin.conf
Servlet login configuration file
webapp/jaassample/WEB-INF/web.xml
Web application environment configuration file
(Deployment Descriptor)
SampleServlet.java
Servlet java source file
UidPasswordServlet.java
Servlet java source file for authentication using
user ID/password
Execution Procedure
(1) Servlet Service Environment Setup
To enable the IJServer user to read the business server configuration, set up the environment as follows.
1.
Use the useradd command to create an IJServer user.
2.
Grant the created user authority equivalent to the file access permission of the user specified in the
User directive in the Interstage HTTP Server environment configuration file (httpd.conf).
3.
Specify the name of the created user in the User directive in the httpd.conf file.
4.
Use the Interstage Management Console to select [System] > [Security] > [Single Sign-on] >
[Business system] > [Business system Name] > [Settings] tab and click [Update]. (*1)
*1
For details, refer to “Changing Effective User for Web Server" in Chapter 4 – Operation and
Maintenance.
7-39
Chapter 7: Developing Applications
(2) Deploying Servlet Application
Use the Interstage Management Console to deploy the servlet application in a servlet container. The
example below shows how to deploy an application in the IJServer WorkUnit “IJServer”. For IJServer
details, refer to “Design of J2EE Application “ in “Environment Where J2EE Applications are Operated
(IJServer)” in the J2EE User’s Guide.
If the IJServer workUnit "IJServer" has not been created, create a new IJServer with the name
"IJServer" of either of the following types:
•
IJServer(Web + EJB[1VM])
•
IJServer(Web + EJB[other VM])
•
IJServer(Web Only)
Use the following procedure to deploy a servlet application:
1.
Use the Interstage Management Console to select [System] > [WorkUnit] > [IJServer] tab and click
[Deploy].
2.
Uncheck the check box specifying not to start IJServer automatically after completing deployment.
3.
Click [Reference] in [Deployment File] to select jaassample.war stored in the sample directory.
The Interstage Management Console may be installed on a server different from the Web browser
execution server on which the console is operated. If so, specify the jaassample.war path in the
server containing the console directly in the deployment file text box as shown below, after
choosing the radio button “Deploys files stored on the server”.
Interstage install directory: C:\Interstage
C:\Interstage\F3FMsso\ssoatzag\sample\javaapi\jaassample.war
/opt/FJSVssoaz/sample/javaapi/jaassample.war
4.
Click [Deploy] to deploy the file after specifying the jaassample.war path.
The sample application is deployed in the following directories:
Interstage install directory: C:\Interstage
C:\Interstage\J2EE\var\deployment\ijserver\IJServer\webapps\jaassample
/opt/FJSVj2ee/var/deployment/ijserver/IJServer/webapps/jaassample
7-40
Developing Java Applications
(3) Setting IJServer WorkUnit
Use the Interstage Management Console to select the [System] > [WorkUnit] > [IJServer] tab and click
[Settings]. Set a class path and JavaVM options with [WorkUnit] as shown below. To change the JDK
version used with the servlet, select the Java version pull-down menu. After completing the settings,
press the Update button to save the changes to the system.
JDK1.3
Interstage install directory: C:\Interstage
Class path
C:\Interstage\F3FMsso\ssoatzag\lib\isssomod.jar
JavaVM option
Djava.security.auth.login.config=C:\Interstage\J2EE\var\deployment\ijserver\
IJServer\webapps\jaassample\WEB-INF\isssojaaslogin.conf
-Djavax.net.ssl.trustStore=C:\Interstage\etc\security\env\keystore\.keystore
Class path
/opt/FJSVssoaz/lib/isssomod.jar
JavaVM option
-Djava.security.auth.login.config=/opt/FJSVj2ee/var/deployment/ijserver
/IJServer/webapps/jaassample/WEB-INF/isssojaaslogin.conf
Djavax.net.ssl.trustStore=/etc/opt/FJSVisscs/security/env/keystore/.keystore
JDK1.4
Interstage install directory: C:\Interstage
Class path
C:\Interstage\F3FMsso\ssoatzag\lib\isssomod14.jar
7-41
Chapter 7: Developing Applications
JavaVM option
-Djava.security.auth.login.config=C:\Interstage\J2EE\var\deployment\ijserver
\IJServer\webapps\jaassample\WEB-INF\isssojaaslogin.conf
-Djavax.net.ssl.trustStore=C:\Interstage\etc\security\env\keystore\.keystore
Class path
/opt/FJSVssoaz/lib/isssomod14.jar
JavaVM option
-Djava.security.auth.login.config=/opt/FJSVj2ee/var/deployment/ijserver/
IJServer/webapps/jaassample/WEB-INF/isssojaaslogin.conf
-Djavax.net.ssl.trustStore=/etc/opt/FJSVisscs/security/env/keystore/
.keystore
(4) Editing Login Configuration File
If the port number of the Web server set up as a business server is not 80, use the text editor to edit the
serverport value of login configuration file isssojaaslogin.conf in the servlet application deployed in Step
(2).
Path name in which the login configuration file is deployed by default:
Interstage install directory: C:\Interstage
C:\Interstage\J2EE\var\deployment\ijserver\IJServer\webapps\jaassample\WEBINF\isssojaaslogin.conf
/opt/FJSVj2ee/var/deployment/ijserver/IJServer/webapps/jaassample/WEBINF/isssojaaslogin.conf
Example
Login configuration file for a business server operating with port number 81
Entry “com.fujitsu.interstage.sso” is used by a servlet application that receives authentication
information from a client.
Entry “com.fujitsu.interstage.sso.uidpass” is used with a servlet application that uses a user ID/password
received from a client to execute authentication for an authentication server.
7-42
Developing Java Applications
/**
* sample login config file
*/
com.fujitsu.interstage.sso{
com.fujitsu.interstage.sso.auth.module.ISCredentialLoginModule Required
serverport="81" <- Edit here.
;
};
com.fujitsu.interstage.sso.uidpass{
com.fujitsu.interstage.sso.auth.module.ISLoginModule Required
serverport="81" <- Edit here.
;
};
(5) Copying JSSE Libraries
Copy JSSE library modules to directory ext under the IJServer directory.
C:\Interstage\J2EE\var\deployment\ijserver\IJServer\ext>copy
C:\Interstage\J2EE\lib\jsse.jar
copy one file.
C:\Interstage\J2EE\var\deployment\ijserver\IJServer\ext>copy
C:\Interstage\J2EE\lib\jnet.jar
copy one file.
C:\Interstage\J2EE\var\deployment\ijserver\IJServer\ext>copy
C:\Interstage\J2EE\lib\jcert.jar
copy one file.
# cp /opt/FJSVj2ee/lib/jsse.jar
/opt/FJSVj2ee/var/deployment/ijserver/IJServer/ext
# cp /opt/FJSVj2ee/lib/jnet.jar
/opt/FJSVj2ee/var/deployment/ijserver/IJServer/ext
# cp /opt/FJSVj2ee/lib/jcert.jar
/opt/FJSVj2ee/var/deployment/ijserver/IJServer/ext
(6) Registering Certificate
For a servlet application that receives a user ID/password from a client to perform authentication, the
SSL environment must be set up as a Java application operation environment. Obtain the site
certificate of the authentication server and CA certificate issued by the site certificate issuer and register
them in the business server Interstage certificate environment. For details, refer to Creating a Trust
Store File. If a load balancer (such as Interstage Traffic Director is used), use a site certificate issued
with the load balancer FQDN.
7-43
Chapter 7: Developing Applications
Note
Use JDK1.4 if the UTF-8 type is used for the site certificate or CA certificate.
(7) Defining Servlet Application as a Protection Resource
The SSO administrator should register the servlet application URL in the SSO repository as a protection
resource.
1.
Use the Interstage Management Console to select [System] > [Security] > [Single Sign-on] >
[Authentication infrastructure] > [Repository server] tab and click [Protection resource]. When
[Protection resource] is displayed, a list of sites is displayed under the [Protection resource] tree.
2.
Click the site configuration of the business server to which the sample application is deployed.
3.
Click [Protection path] to display the path configuration list window and then select the [Create a
New Path configuration] tab.
4.
Enter /jaassample/SampleServlet in [Path] as the access control target path then select the check
box for a role name with which the protection resource can be used.
5.
Click [Create] to display and check the specified path and role information.
Servlet application URL
http(s)://Business server name:port number/jaassample/SampleServlet
Protection resource to be registered
Business server name:port number/jaassample/SampleServlet
Example
Protection resource to be registered: "www.fujitsu.com:80/jaassample/SampleServlet"
Name of role name that can use protection resources: "Admin"
The business server site configuration (www.fujitsu.com:80) and role configuration need be registered in
the SSO repository before registering a protection resource. If these configuration s are not registered
in the SSO repository, refer to “Using an LDIF File” and “Registering Protection Resources" to register
them.
(8) Updating Business Server Access Control Information
The business server administrator stores information on a protection resource registered in the business
server in Step (7). Use the Interstage Management Console to select [System] > [Security] > [Single
Sign-on] > [Business system] > [Business system Name] > [Update access control information] tab and
click [Update]. For details on Interstage Management Console definition, refer to the Operator’s Guide.
For information on updating access control information, refer to “Amending Role Configuration” and
“Amending Protection Resource” in Chapter 4 – Operation and Maintenance.
(9) Changing Setting for Business Server Linkage to Web Application
The default setting for authenticated user information reported by the business server is "No." Change
this value to "Yes" because the user information is to be referenced in the sample application.
7-44
Developing Java Applications
Use the Interstage Management Console to select [System] > [Security] > [Single Sign-on] > [Business
system] > [Business system Name] > [Settings] tab. Click [Detailed Settings [Show]] then select
[Linkage with Web applications] > [Notify User Information?] to change the setting to “Yes” and click
[Update].
(10) Activating Business Server
Activate the business server. For Web server activation details, refer to “Starting Business Server.”
(11) Activating Servlet Service
Use the Interstage Management Console to select [System] > [WorkUnit] > [IJServer] tab. Click [Status]
then click [Start] to activate the WorkUnit.
(12) Calling Servlet Application from Web Browser
Specify the URL in the business server by using the Web browser as shown below.
Example
When the business server runs with www.fujitsu.com:80
http://www.fujitsu.com:80/jaassample/
https://www.fujitsu.com:80/jaassample/( For the business server is set up in
SSL)
(13) Execution Result
“SSO Authentication” and “Uid and Password Authentication” are displayed in the Web browser.
•
SSO Authentication: Servlet application that receives authentication information from a client
•
Uid and Password Authentication: Servlet application that receives a user ID/password from a
client to perform authentication
Click “SSO Authentication” to display the certificate selection window, the form authentication page,
and basic authentication window. Select the certificate of a user belonging to the role with which the
protection resource was registered in Step (7) or enter the user ID/password. When the authentication
is successful, authentication information on the authenticated user is displayed in the Web browser
window.
An execution example is shown below.
Example
When user “user001” belonging to role “Admin” is authenticated successfully.
com.fujitsu.interstage.sso.auth.ISUserPrincipal user001
com.sun.security.auth.X500Principal CN=user001, OU=User, OU=interstage,
O=fujitsu, DC=com
com.fujitsu.interstage.sso.auth.ISRolePrincipal Admin
Click “Uid and Password Authentication”, enter the Uid and password, and click the Login button. When
the authentication is successful, authentication information on the authenticated user is displayed in the
Web browser window.
An execution example is shown below.
7-45
Chapter 7: Developing Applications
Example
AuthorizationCredential ・・・
Dn
cn=user002,ou=User,ou=interstage,o=fujitsu,dc=com
Uid
user002
Role
Admin
ClientAddress
/10.34.157.109
AuthMethod
basicAuth
AuthTime
Tue Sep 30 18:15:12 JST 2003
Expiration
Tue Sep 30 18:45:12 JST 2003
Principal
user002
Principal
CN=user002,OU=User,OU=interstage,O=fujitsu,DC=com
Principal
Admin
Application that Uses a User ID/Password for Authentication and Authorization
Outline of Sample Code
This sample code is for an application using a user ID/password entered from the business server
window for authentication and executing authorization according to a security policy.
Sample Code Storage Location
The sample code is stored in the following directories (hereafter referred to as the sample directories).
Interstage install directory: C:\Interstage
C:\Interstage\F3FMsso\ssoatzag\sample\javaapi
/opt/FJSVssoaz/sample/javaapi
The table below lists the files required to execute the sample code.
Table 7-25 Sample Code
7-46
File
Explanation
ISSsoJaas.java
Sample Java source (class for authentication and authorization)
ISSsoAction.java
Sample Java source (class for accessing protection resource)
isssojaaslogin.conf
Login configuration file sample
isssojaas.policy
Sample of security policy file used for JDK1.3
isssojaasauth.policy
Sample of principal base security policy file used for JDK1.3
isssojaas14.policy
Sample of security policy file used for JDK1.4
Developing Java Applications
Execution Procedure
(1) Preparation
Perform the following steps:
1.
Obtain the authentication infrastructure URL to be connected.
2.
Obtain the site certificate of the authentication server and the CA certificate of the issuer of the site
certificate. If a load balancer (such as Interstage Traffic Director) is used, use the site certificate
issued with the load balancer FQDN.
3.
Obtain user information for the authentication server (user ID/password/role name for the password
authentication target user).
(2) Setting Environment Variables
Set the environment variables CLASSPATH, JAVA_HOME, and PATH.
Example
JDK1.3
Interstage install directory: C:\Interstage
JDK install directory: "C:\Interstage\JDK13"
C:\>set CLASSPATH=
C:\Interstage\J2EE\lib\jsse.jar;C:\Interstage\J2EE\lib\jcert.jar;
C:\Interstage\J2EE\lib\jnet.jar;C:\Interstage\J2EE\lib\isj2ee.jar;
C:\Interstage\F3FMsso\ssoatzag\lib\isssomod.jar;%CLASSPATH%
C:\>set JAVA_HOME=C:\Interstage\JDK13
C:\>set PATH=%JAVA_HOME%\bin;%PATH%
# sh
# CLASSPATH=
/opt/FJSVj2ee/lib/jsse.jar:/opt/FJSVj2ee/lib/jcert.jar:/opt/FJSVj2ee/lib/jne
t.jar:
/opt/FJSVj2ee/lib/isj2ee.jar:/opt/FJSVssoaz/lib/isssomod.jar:$CLASSPATH
# export CLASSPATH
# JAVA_HOME=/opt/FJSVawjbk/jdk13
# export JAVA_HOME
# PATH=$JAVA_HOME/bin:$PATH
# export PATH
JDK1.4
Interstage install directory: C:\Interstage
JDK install directory: "C:\Interstage\JDK14"
7-47
Chapter 7: Developing Applications
C:\>set CLASSPATH=C:\Interstage\F3FMsso\ssoatzag\lib\isssomod14.jar
C:\>set JAVA_HOME=C:\Interstage\JDK14
C:\>set PATH=%JAVA_HOME%\bin;%PATH%
#
#
#
#
#
#
#
sh
CLASSPATH=/opt/FJSVssoaz/lib/isssomod14.jar
export CLASSPATH
JAVA_HOME=/opt/FJSVawjbk/jdk14
export JAVA_HOME
PATH=$JAVA_HOME/bin:$PATH
export PATH
(3) Compiling Sample Java Sources and Converting Them to Files
Use the javac command to compile sample Java sources under the sample directory, then use the jar
command to convert them to jar files. For javac and jar command details, refer to the J2SDK
documents provided by Sun Microsystems, Inc.
Example
Interstage install directory: C:\Interstage
C:\>cd C:\Interstage\F3FMsso\ssoatzag\sample\javaapi
C:\Interstage\F3FMsso\ssoatzag\sample\javaapi>javac -d . ISSsoJaas.java
ISSsoAction.java
C:\Interstage\F3FMsso\ssoatzag\sample\javaapi>jar cf isssojaas.jar
sample\ISSsoJaas.class
C:\Interstage\F3FMsso\ssoatzag\sample\javaapi>jar cf isssoaction.jar
sample\ISSsoAction.class
C:\Interstage\F3FMsso\ssoatzag\sample\javaapi>
Working directory: "/home/jaastest"
#
#
#
#
#
#
7-48
cp -r /opt/FJSVssoaz/sample/javaapi /home/jaastest
cd /home/jaastest/javaapi
javac -d . ISSsoJaas.java ISSsoAction.java
jar cf isssojaas.jar sample/ISSsoJaas.class
jar cf isssoaction.jar sample/ISSsoAction.class
Developing Java Applications
(4) Obtaining Service ID File
Request that the SSO administrator creates a service ID file for the business server that executes the
sample. Store the created service ID file in the business server. For details, refer to Obtaining Service
ID File.
Example
Interstage install directory: C:\Interstage
Name of service ID file obtained from SSO administrator: "C:\ssosid\domainsid"
C:\Interstage\F3FMsso\ssoatzag\sample\javaapi>copy C:\ssosid\domainsid
C:\Interstage\F3FMsso\ssoatzag\sample\javaapi
copy one file.
Name of service ID file obtained from SSO administrator: "/ssosid/domainsid"
# cp /ssosid/domainsid /home/jaastest/javaapi
(5) Registering Certificates
Obtain the site certificate of the authentication server and the CA certificate of the issuer of the site
certificate and register them in the Interstage certificate environment. For details, refer to Creating a
Trust Store File.
Note
Use JDK1.4 if the authentication server site certificate or CA certificate is encoded in UTF-8 format.
(6) Editing Login Configuration File
Edit the sample login configuration file isssojaaslogin.conf to suit the execution environment. Set the
authentication infrastructure URL+"/ssoatcag" following the authserver option. Also set the absolute
path name of the service ID file to be used in the serviceidpath option.
Example
Interstage install directory: C:\Interstage
Authentication infrastructure URL: "https://authenticate_server.fujitsu.com:10443"
Absolute path name of service ID file: "C:\Interstage\F3FMsso\ssoatzag\sample\javaapi\domainsid"
/**
* sample login config file
*/
/* This sample does not use Business server configuration. */
7-49
Chapter 7: Developing Applications
com.fujitsu.interstage.sso{
com.fujitsu.interstage.sso.auth.module.ISLoginModule Required
authserver="https://authenticate_server.fujitsu.com:10443/ssoatcag" <- Edit
here.
serviceidpath="C:\\Interstage\\F3FMsso\\ssoatzag\\sample\\javaapi\\domainsid
" <- Edit here.
timeout="20"
;
};
Authentication infrastructure URL: "https://authenticate_server.fujitsu.com:10443"
Absolute path name of service ID file: "/home/jaastest/javaapi/domainsid"
/**
* sample login config file
*/
/* This sample does not use Business server configuration. */
com.fujitsu.interstage.sso{
com.fujitsu.interstage.sso.auth.module.ISLoginModule required
authserver="https://authenticate_server.fujitsu.com:10443/ssoatcag" <- Edit
here.
serviceidpath="/home/jaastest/javaapi/domainsid" <- Edit here.
timeout="20"
;
};
(7) Editing Security Policy File
JDK1.3
Edit the security policy file isssojaasauth.policy. In the sample security policy file, read permission of
property java.home is set for the user ID “guest” and read permission of property user.home is set for
the role name “administrator.” Change the user ID and role name to the user ID and role name
registered in the SSO repository.
The example below shows how to grant read permission of property java.home and read permission of
property user.home for user ID “user001” and role name “Admin.”
Example
/* sample policy file */
grant codeBase "file:isssoaction.jar" ,
principal com.fujitsu.interstage.sso.auth.ISUserPrincipal "user001" { <Change the user ID in the sample file.
permission java.util.PropertyPermission "java.home","read";
};
grant codeBase "file:isssoaction.jar" ,
principal com.fujitsu.interstage.sso.auth.ISRolePrincipal "Admin" { <-
7-50
Developing Java Applications
Change the role name in the sample file.
permission java.util.PropertyPermission "user.home","read";
};
JDK1.4
Edit the security policy file isssojaas14.policy. In the sample security policy file, read permission of
property java.home is set for the user ID “guest” and read permission of property user.home is set for
the role name “administrator.” Change the user ID and role name to the user ID and role name
registered in the SSO repository.
The example below shows how to grant read permission of property java.home and read permission of
property user.home for user ID “user001” and role name “Admin.”
Example
/* sample policy file */
grant codeBase "file:isssoaction.jar" ,
principal com.fujitsu.interstage.sso.auth.ISUserPrincipal "user001" { <Change the user ID in the sample file.
permission java.util.PropertyPermission "java.home","read";
};
grant codeBase "file:isssoaction.jar" ,
principal com.fujitsu.interstage.sso.auth.ISRolePrincipal "Admin" { <Change the role name in the sample file.
};
grant codeBase "file:isssojaas.jar" {
permission java.util.PropertyPermission "java.home","read";
permission java.util.PropertyPermission "user.home","read";
permission javax.security.auth.AuthPermission
"createLoginContext.com.fujitsu.interstage.sso";
permission javax.security.auth.AuthPermission "doAs";
permission javax.security.auth.PrivateCredentialPermission
"com.fujitsu.interstage.sso.auth.ISAuthenticationCredential
com.fujitsu.interstage.sso.auth.ISUserPrincipal \"*\"", "read";
permission javax.security.auth.PrivateCredentialPermission
"com.fujitsu.interstage.sso.auth.ISAuthorizationCredential
com.fujitsu.interstage.sso.auth.ISUserPrincipal \"*\"", "read";
};
grant codeBase "file:C:\\Interstage\\F3FMsso\\ssoatzag\\lib\\isssomod14.jar"
{
...
};
grant codeBase "file:/opt/FJSVssoaz/lib/isssomod14.jar" {
...
};
7-51
Chapter 7: Developing Applications
(8) Activating Sample Application
Activation examples are shown below.
Example
JDK1.3
Trust store file name: "C:\Interstage\etc\security\env\keystore\.keystore"
C:\>cd C:\Interstage\F3FMsso\ssoatzag\sample\javaapi
C:\Interstage\F3FMsso\ssoatzag\sample\javaapi>set CLASSPATH=
C:\Interstage\J2EE\lib\jsse.jar;C:\Interstage\J2EE\lib\jcert.jar;
C:\Interstage\J2EE\lib\jnet.jar;C:\Interstage\J2EE\lib\isj2ee.jar;
C:\Interstage\F3FMsso\ssoatzag\lib\isssomod.jar;
C:\Interstage\F3FMsso\ssoatzag\sample\javaapi\isssojaas.jar;
C:\Interstage\F3FMsso\ssoatzag\sample\javaapi\isssoaction.jar
C:\Interstage\F3FMsso\ssoatzag\sample\javaapi>java
-Djava.security.auth.login.config=C:\Interstage\F3FMsso\ssoatzag\sample\
javaapi\isssojaaslogin.conf
-Djava.security.manager
-Djava.security.policy=C:\Interstage\F3FMsso\ssoatzag\sample\javaapi\
isssojaas.policy
-Djavax.net.ssl.trustStore=C:\Interstage\etc\security\env\keystore\.keystore
sample.ISSsoJaas
Trust store file name: "/etc/opt/FJSVisscs/security/env/keystore/.keystore"
# sh
# CLASSPATH=
/opt/FJSVj2ee/lib/jsse.jar:/opt/FJSVj2ee/lib/jcert.jar:/opt/FJSVj2ee/lib/jne
t.jar:
/opt/FJSVj2ee/lib/isj2ee.jar:/opt/FJSVssoaz/lib/isssomod.jar:
isssojaas.jar:isssoaction.jar
# export CLASSPATH
# java -Djava.security.auth.login.config=isssojaaslogin.conf \
-Djava.security.manager -Djava.security.policy=isssojaas.policy \
-Djava.security.auth.policy=isssojaasauth.policy \
Djavax.net.ssl.trustStore=/etc/opt/FJSVisscs/security/env/keystore/.keystore
sample.ISSsoJaas
7-52
Developing Java Applications
JDK1.4
Trust store file name: "C:\Interstage\etc\security\env\keystore\.keystore"
C:\>cd C:\Interstage\F3FMsso\ssoatzag\sample\javaapi
C:\Interstage\F3FMsso\ssoatzag\sample\javaapi>set CLASSPATH=
C:\Interstage\F3FMsso\ssoatzag\lib\isssomod14.jar;
C:\Interstage\F3FMsso\ssoatzag\sample\javaapi\isssojaas.jar;
C:\Interstage\F3FMsso\ssoatzag\sample\javaapi\isssoaction.jar
C:\Interstage\F3FMsso\ssoatzag\sample\javaapi>java
-Djava.security.auth.login.config=C:\Interstage\F3FMsso\ssoatzag\sample\
javaapi\isssojaaslogin.conf
-Djava.security.manager
-Djava.security.policy=C:\Interstage\F3FMsso\ssoatzag\sample\javaapi\
isssojaas14.policy
-Djavax.net.ssl.trustStore=C:\Interstage\etc\security\env\keystore\.keystore
sample.ISSsoJaas
Trust store file name: "/etc/opt/FJSVisscs/security/env/keystore/.keystore"
# sh
# CLASSPATH=
/opt/FJSVssoaz/lib/isssomod14.jar:isssojaas.jar:isssoaction.jar
# export CLASSPATH
# java -Djava.security.auth.login.config=isssojaaslogin.conf \
-Djava.security.manager \
-Djava.security.policy=isssojaas14.policy \
Djavax.net.ssl.trustStore=/etc/opt/FJSVisscs/security/env/keystore/.keystore
sample.ISSsoJaas
(9) Execution Result
Enter the user ID registered in the authentication server when the “UserName=” prompt is displayed.
Enter the user password when the "Password=” prompt is displayed. When authentication is
successfully executed, user authentication information is displayed. As shown in the examples below,
the information displayed depends on the authentication server, repository server setting, and user
execution environment.
Example
When user “user001” belongs to role “Admin”
UserName=user001
Password=user001
*** Credential Information ***
AuthorizationCredential=AZEer+r5szu3Ha8Vw1kSGNMw13D1K92da9WvEtqo5Kf5niUzaAX/
7-53
Chapter 7: Developing Applications
psy6
zsl2A6d6FBzIsw7NeTkhBdjhq1Z506GaprHQ2zfqhWIzItto3x9dzSo2wQev/v4wn3Vc53lpWA/v
Mqkj
oMeVjQssloKIJfcF6gWBEHawuLDr1cwyx8VCE1+CPa+BtV4=
Dn=cn=user001,ou=User,ou=interstage,o=fujitsu,dc=com
Uid=user001
Role=Admin
ClientAddress=10.124.60.139/10.124.60.139
AuthMethod=basicAuth
AuthTime=Fri Feb 07 22:05:51 JST 2003
Expiration=Fri Feb 07 22:35:51 JST 2003
*** Principals Information ***
Principal=user001
Principal=CN=user001, OU=User, OU=interstage, O=fujitsu, DC=com
Principal=Admin
*** Execute PrivilegedAction ***
java.home=C:\Interstage\JDK13\jre
user.home=C:\Documents and Settings\jaastest
*** Execute PrivilegedAction ***
java.home=/opt/FJSVawjbk/jdk13/jre
user.home=/home/jaastest
7-54
Developing Java Applications
When user “user001” does not belong to role “Admin”
UserName=user001
Password=user001
*** Credential Information ***
AuthorizationCredential=AR1Z/CEv51vGO1kNAN7QCR+46c1f28tz6VZYOPtWmh4BBaTN3Azw
shGR
7t+v2Lpj4NNHh+N09f7B5T6tdLQoTd6aInP49i0t1WsI7Ili0dhwTktciL5UCgwrCciD5WObi2LR
xtJq
XVsiBnmmByrfsLW+amOKw4x4w+wPwSWUyVJVvRStpu4v2l7qwjrGxxFGLg==
Dn=cn=user001,ou=User,ou=interstage,o=fujitsu,dc=com
Uid=user001
Role=General
ClientAddress=10.124.60.139/10.124.60.139
AuthMethod=basicAuth
AuthTime=Fri Feb 07 23:57:27 JST 2003
Expiration=Sat Feb 08 00:27:27 JST 2003
*** Principals Information ***
Principal=user001
Principal=CN=user001, OU=User, OU=interstage, O=fujitsu, DC=com
Principal=General
*** Execute PrivilegedAction ***
java.home=C:\Interstage\JDK13\jre
This user does not have a permission to read user.home property
*** Execute PrivilegedAction ***
java.home=/opt/FJSVawjbk/jdk13/jre
This user does not have a permission to read user.home property
7-55
Chapter 7: Developing Applications
Setting User Information Report with Environment
Variables
Information on an authenticated user can be used in a Web application such as a CGI operating on a
business server. A business server reports information to a Web application by attaching it to an HTTP
request header. The Web application can obtain the information by referencing the HTTP request
header through the corresponding interface. For example, a CGI can obtain information from an
environment variable.
The table below lists the information that can be obtained by a Web application.
Table 7-26 Information that can be Obtained by a Web Application
User Information
Explanation
Example
User DN
The user entry stored in user information
in the SSO repository is reported using
DN.
cn=user001,ou=interstage,o
=fujitsu,dc=com
Role name
The role name set in the user entry
stored in user information in the SSO
repository is reported. If two or more role
names are set, they are reported by
inserting commas between them. If a
role set is set, the role name(s) set in it
are reported.
Admin,General,Leader
Number of role names
The number of reported role names is
reported.
3
Authentication method
The authentication method (basicAuth,
CertAuth, or basicAuthAndCertAuth) of
the authenticated user is reported.
basicAuth
When the authentication method
“password authentication or certificate
authentication” is set, basicAuth is
reported for success in password
authentication or CertAuth is reported for
success in certificate authentication.
7-56
User ID
The user ID presented by the user for
password authentication is reported.
user001
Client IP address
The client IP address used for
authentication is reported.
xxx.xxx.xxx.xxx
Authentication time
The time at which the user was
authenticated is reported in Greenwich
time (YYYYMMDDHHMMSSZ).
20030901151118Z
Re-authentication
time
The time at which re-authentication was
required is reported in Greenwich time
(YYYYMMDDHHMMSSZ).
20030901154118Z
Setting User Information Report with Environment Variables
User Information
Explanation
Example
Valid range for
authentication
information
The valid range for the authentication
information is reported.
www.fujitsu.com
To report user information to a Web application, use the Interstage Management Console to select
[System] > [Security] > [Single Sign-on] > [Business system] > [Business system Name] > [Settings] tab.
Click [Detailed Settings [Show]] then select [Linkage with Web applications] > [Notify User Information?]
and click “Yes.”
Usage in Web Application
User information is reported with the environment variable names and HTTP request headers listed
below. Values to be reported are encoded in UTF-8 format.
Table 7-27 User Information in Web Applications
User
Information
Environment Variable Names
HTTP Request Header
User DN
HTTP_X_FJ_SSO_CREDENTIAL_
DN
X-FJ-SSO-CREDENTIAL-DN: Value
Role name
HTTP_X_FJ_SSO_CREDENTIAL_
ROLELIST
X-FJ-SSO-CREDENTIAL-ROLELIST:
Value
Number of role
names
HTTP_X_FJ_SSO_CREDENTIAL_
ROLECOUNT
X-FJ-SSO-CREDENTIALROLECOUNT: Value
Authentication
method
HTTP_X_FJ_SSO_CREDENTIAL_
AUTHMETHOD
X-FJ-SSO-CREDENTIALAUTHMETHOD: Value
User UID
HTTP_X_FJ_SSO_CREDENTIAL_
UID
X-FJ-SSO-CREDENTIAL-UID: Value
Client IP
address
HTTP_X_FJ_SSO_CREDENTIAL_
IPADDRESS
X-FJ-SSO-CREDENTIAL-IPADDRESS:
Value
Authentication
time
HTTP_X_FJ_SSO_CREDENTIAL_
FIRSTACCESS
X-FJ-SSO-CREDENTIALFIRSTACCESS: Value
Reauthentication
time
HTTP_X_FJ_SSO_CREDENTIAL_
EXPIRATION
X-FJ-SSO-CREDENTIALEXPIRATION: Value
Valid range for
authentication
information
HTTP_X_FJ_SSO_CREDENTIAL_
DOMAIN
X-FJ-SSO-CREDENTIAL-DOMAIN:
Value
7-57
Chapter 7: Developing Applications
Notes
•
Information reported to a Web application must be within the size specified below. If it exceeds the
maximum size, authentication fails.
2048 bytes less than or equal to ((128 bytes + DN character string length) + user ID character
string length + 8 bytes * number of roles + sum of role name character string lengths) * 1.5 +
character string length of business server URL accessed by the user at authentication
* Each character string length is represented in units of bytes.
•
7-58
Only alphanumeric characters and symbols can be used in the user information reported to a Web
application. If other characters are used in information reported to a Web application, the Web
application may not obtain the correct value.
Appendix A
Samples of User Program Descriptions
This appendix provides examples of user programs developed with Java that are used to operate the
SSO repository.
•
Registering a Role Configuration in the SSO Repository
•
Registering User Information in the SSO Repository
•
Deleting User Information from the SSO Repository
•
Adding a User Role
•
Deleting a User Role
•
Displaying the User Lock Status
•
Displaying the User Validity Period
•
Changing the User Validity Period
•
Changing the User Password
When other user programs to operate the SSO repository are required, create the required user
programs based on the description examples below.
All the above processing requires common preprocessing and postprocessing. Each user processing
must be inserted between the pre-processing and post processing programs.
The common processing programs are explained below.
Pre-processing (opening the connection with the repository)
Example
Connect the sample program below to the host named "ssohost" using port number "389" in the security
level "simple."
Specify the administrator DN and password as Java strings in the "bindDn" and "password" parameters,
respectively.
java.util.Hashtable env = new java.util.Hashtable();
env.put(Context.INITIAL_CONTEXT_FACTORY,
"com.sun.jndi.ldap.LdapCtxFactory");
env.put(Context.PROVIDER_URL, "ldap://ssohost:389");
env.put(Context.SECURITY_AUTHENTICATION, "simple");
env.put(Context.SECURITY_PRINCIPAL, bindDn);
env.put(Context.SECURITY_CREDENTIALS, password);
A-1
Appendix A: Samples of User Program Descriptions
DirContext ctx = new InitialDirContext(env);
Note
Carefully handle the administrator DN and password to protect the password from attack.
For measures that can be taken against password attack, refer to "Security Measures" under "Interstage
Single Sign-on" of "Security Risks" of “Security Risks and Measures“ in the Security System Guide.
Postprocessing (closing the connection with the repository)
Example
Close the connection between the sample program and the repository made by the pre-processing.
Use the result obtained by the common pre-processing as the value of "ctx".
ctx.close();
A user program to operate the SSO repository must be based on a correct design of the SSO repository
and created very carefully to prevent invalid SSO repository data from being created.
For details about the design of the SSO repository, see "Designing a SSO Repository".
Remarks
•
Knowledge of LDAP and the Java programming language are necessary prerequisites. If you are
using the Java API, refer to Java API specifications and other JAVA resources.
For details about the environment properties required for the pre-processing and other details on
application programming using the Java language, refer to "Creating an Application (JNDI)" in the
Smart Repository Operator’s Guide. The sample programs shown here exclude the package
notation of classes to be used and the handling of exceptions. The actual user programs must
include the following import declarations and exception processing:
−
Add the import declarations below.
import javax.naming.*;
import javax.naming.directory.*;
−
Add the exception processing below.
javax.naming.NamingException
•
A-2
Arrange the user program in the location that satisfies the operation, while fully considering security.
In addition, add any error-handling descriptions when it is needed.
Registering a Role Configuration in the SSO Repository
Registering a Role Configuration in the SSO
Repository
This sample program assumes the environment setup below. Change the setup according to the actual
environment used.
•
The public directory at creation of the repository is "ou=interstage,o=fujitsu,dc=com".
•
The storage location of role information is "ou=Role,ou=SSO ACI,ou=interstage,o=fujitsu,dc=com".
•
The relevant role name is specified for "roleName" in java.lang.String.
•
The result of common preprocessing is used as the value of "ctx".
Description of User Program
Example
Close the connection between the sample program and the repository made by the pre-processing.
Use the result obtained by the common pre-processing as the value of "ctx".
Pre-processing
:
Attributes attrs = new BasicAttributes();
Attribute objectClass = new BasicAttribute("objectClass");
objectClass.add("top");
objectClass.add("ssoRole");
attrs.put(objectClass);
attrs.put("cn", roleName);
String dn = "cn=" + roleName + ",ou=Role,ou=SSO
ACI,ou=interstage,o=fujitsu,dc=com";
ctx.createSubcontext(dn, attrs);
:
Postprocessing
A-3
Appendix A: Samples of User Program Descriptions
Registering User Information in the SSO Repository
This sample program assumes the environment setup below. Change the setup according to the actual
environment used.
•
The public directory at creation of the repository is "ou=interstage,o=fujitsu,dc=com".
•
The storage location of user information is "ou=User,ou=interstage,o=fujitsu,dc=com".
•
RDN of user information is expressed by "cn".
•
The result of common preprocessing is used as the value of "ctx".
•
User information is read from the CSV file named "sample.csv" to be processed.
Note
Since the CSV file includes passwords, the file must be handled carefully to protect the password from
attack.
For details about the measures that can be taken against password attack, refer to "Security Measures"
under "Interstage Single Sign-on" of "Security Risks" of “Security Risks and Measures“ of the Security
System Guide.
Description of CSV File
Example
The CSV format uses the comma (,) as the delimiter. In this sample file, user attributes are described in
the following order:
1. cn
2. sn
3. uid
4. userPassword
5. employeeNumber 6. mail
7. ssoAuthType 8. ssoCredentialTTL
9. ssoNotBefore (*1) 10. ssoNotAfter 11. ssoUserStatus 12. ssoRoleName
The numbers shown at the top of the sample file below indicate the correspondence between user
information and the above attributes. Do not describe the numbers in the actual CSV file.
*1
In the following example, the date is specified in the format YYYYMMDDHHMMSS+XXXX.
"+XXXX" refers to the time difference from UTC (Universal Time Coordinate ). In cases where "XXXX" is used, it means the same as above.
1
2
3
4
5
6
7
8
9
10 11
12
user001, user001, user001, user001,100001,
[email protected],basicAuthOrCertAuth,60,20010101090000+0900,,
good,Admin
user002, user002, user002, user002,100002,
[email protected],basicAuthOrCertAuth,60,20010101090000+0900,,
good,Admin
user003, user003, user003, user003,100003,
[email protected],basicAuthOrCertAuth,60,20010101090000+0900,,
good,Leader
:
A-4
Registering User Information in the SSO Repository
Description of User Program
Example
// Associating the values in CSV file with attributes
private static final int INDEX_CN = 0;
private static final int INDEX_SN = 1;
private static final int INDEX_UID = 2;
private static final int INDEX_USERPASSWORD = 3;
private static final int INDEX_EMPLOYEENUMBER = 4;
private static final int INDEX_MAIL = 5;
private static final int INDEX_SSOAUTHTYPE = 6;
private static final int INDEX_SSOCREDENTIALTTL = 7;
private static final int INDEX_SSONOTBEFORE = 8;
private static final int INDEX_SSONOTAFTER = 9;
private static final int INDEX_USERSTATUS = 10;
private static final int INDEX_SSOROLENAME = 11;
private static final int INDEX_RDN = 0;
private static final String [] attributeNames = {
"cn",
"sn",
"uid",
"userPassword",
"employeeNumber",
"mail",
"ssoAuthType",
"ssoCredentialTTL",
"ssoNotBefore",
"ssoNotAfter",
"ssoUserStatus",
"ssoRoleName"
};
:
Pre-processing
:
// Opening the CSV file (current simple.csv)
java.io.FileInputStream fis = new java.io.FileInputStream("sample.csv");
java.io.InputStreamReader isr = new java.io.InputStreamReader(fis);
java.io.BufferedReader br = new java.io.BufferedReader(isr);
// Processing the CSV file by reading it line by line
String line;
String [] data;
while((line = br.readLine()) != null) {
java.util.StringTokenizer st = new java.util.StringTokenizer(line,
",", true);
int index = 0;
java.util.ArrayList al = new java.util.ArrayList(64);
al.add(0, null);
String s;
while(st.hasMoreTokens()) {
s = st.nextToken();
if(s.equals(",")) {
index++;
A-5
Appendix A: Samples of User Program Descriptions
al.add(index, null);
} else {
al.set(index, s);
}
}
data = (String[])al.toArray(new String[0]);
if( data == null || data.length == 0 ) {
continue;
}
Attributes attrs = new BasicAttributes();
Attribute objectClass = new BasicAttribute("objectClass");
objectClass.add("top");
objectClass.add("person");
objectClass.add("organizationalPerson");
objectClass.add("inetOrgPerson");
objectClass.add("ssoUser");
attrs.put(objectClass);
// Setting the values before ssoRoleName
for(int i = 0; i < INDEX_SSOROLENAME; i++ ) {
if( data[ i ] != null ) {
attrs.put( attributeNames[ i ], data[ i ] );
}
}
// Setting the value of ssoRoleName
Attribute ssoRoleName = new BasicAttribute( "ssoRoleName" );
for(int i = INDEX_SSOROLENAME; i < data.length; i++ ) {
if( data[ i ] != null ) {
ssoRoleName.add( data[ i ] );
}
}
if( ssoRoleName.size() > 0 ) {
attrs.put( ssoRoleName );
}
String dn = "cn=" + data[INDEX_RDN] +
",ou=User,ou=interstage,o=fujitsu,dc=com";
ctx.createSubcontext( dn, attrs );
}
:
Postprocessing
A-6
Deleting User Information from the SSO Repository
This sample program assumes the environment setup below. Change the setup according to the actual
environment used.
•
The public directory for creation of the repository is "ou=interstage,o=fujitsu,dc=com".
•
The storage location of user information is "ou=User,ou=interstage,o=fujitsu,dc=com".
•
RDN of user information is expressed by "cn".
•
The user name to be deleted is specified for "user" in java.lang.String.
•
The result of common preprocessing is used as the value of "ctx".
Description of User Program
Example
Pre-processing
:
String dn = "cn=" + user + ",ou=User,ou=interstage,o=fujitsu,dc=com";
ctx.destroySubcontext(dn);
:
Postprocessing
A-7
Appendix A: Samples of User Program Descriptions
Adding a User Role
This sample program assumes the environment setup below. Change the setup according to the actual
environment used.
•
The public directory for creation of the repository is "ou=interstage,o=fujitsu,dc=com".
•
The storage location of user information is "ou=User,ou=interstage,o=fujitsu,dc=com".
•
RDN of user information is expressed by "cn".
•
The name of the user whose role is to be added is specified for "user" in java.lang.String.
•
The role to be added is specified for "role" in java.lang.String.
•
The result of common pre-processing is used as the value of "ctx".
Description of User Program
Example
Pre-processing
:
String [] retAttributes = new String[1];
retAttributes[0] = "ssoRoleName";
SearchControls sc = new SearchControls();
sc.setSearchScope(SearchControls.OBJECT_SCOPE);
sc.setReturningAttributes(retAttributes);
sc.setCountLimit(1);
sc.setTimeLimit(5*1000); // 5 seconds
String filter = "(cn=" + user + ")";
String dn = "cn=" + user + ",ou=User,ou=interstage,o=fujitsu,dc=com";
NamingEnumeration ne = ctx.search(dn, filter, sc);
Attribute roleAttr = null;
while(ne.hasMore()) {
SearchResult sr = (SearchResult)ne.next();
Attributes attrs = sr.getAttributes();
if(attrs != null) {
roleAttr = attrs.get("ssoRoleName");
if(roleAttr != null) {
break;
}
}
}
if(roleAttr == null) {
roleAttr = new BasicAttribute("ssoRoleName", role);
} else {
// No processing if the role already exists
A-8
Adding a User Role
for(int i = 0; i < roleAttr.size(); i++) {
if(role.compareToIgnoreCase((String)roleAttr.get(i)) ==
0) {
ctx.close();
return;
}
}
roleAttr.add(role);
}
ModificationItem[] mods = new ModificationItem[1];
mods[0] = new ModificationItem(DirContext.REPLACE_ATTRIBUTE, roleAttr);
ctx.modifyAttributes(dn, mods);
:
Postprocessing
A-9
Appendix A: Samples of User Program Descriptions
Deleting a User Role
This sample program assumes the environment setup below. Change the setup according to the actual
environment used.
•
The public directory for creation of the repository is "ou=interstage,o=fujitsu,dc=com".
•
The storage location of user information is "ou=User,ou=interstage,o=fujitsu,dc=com".
•
RDN of user information is expressed by "cn".
•
The name of the user whose role is to be deleted is specified for "user" in java.lang.String.
•
The role to be deleted is specified for "role" in java.lang.String.
•
The result of common preprocessing is used as "ctx".
Description of User Program
Example
Pre-processing
:
String [] retAttributes = new String[1];
retAttributes[0] = "ssoRoleName";
SearchControls sc = new SearchControls();
sc.setSearchScope(SearchControls.OBJECT_SCOPE);
sc.setReturningAttributes(retAttributes);
sc.setCountLimit(1);
sc.setTimeLimit(5*1000); // 5 seconds
String filter = "(cn=" + user + ")";
String dn = "cn=" + user + ",ou=User,ou=interstage,o=fujitsu,dc=com";
NamingEnumeration ne = ctx.search(dn, filter, sc);
Attribute roleAttr = null;
while(ne.hasMore()) {
SearchResult sr = (SearchResult)ne.next();
Attributes attrs = sr.getAttributes();
if(attrs != null) {
roleAttr = attrs.get("ssoRoleName");
if(roleAttr != null) {
break;
}
}
}
if(roleAttr != null) {
if(roleAttr.remove(role)) {
ModificationItem[] mods = new ModificationItem[1];
mods[0] = new
A-10
Deleting a User Role
ModificationItem( DirContext.REPLACE_ATTRIBUTE, roleAttr );
ctx.modifyAttributes(dn, mods);
}
}
:
Postprocessing
A-11
Appendix A: Samples of User Program Descriptions
Displaying the User Lock Status
This sample program assumes the environment setup below. Change the setup according to the actual
environment used.
•
The public directory at creation of the repository is "ou=interstage,o=fujitsu,dc=com".
•
The storage location of user information is "ou=User,ou=interstage,o=fujitsu,dc=com".
•
RDN of user information is expressed by "cn".
•
The name of the user whose lock status is to be displayed is specified for "user" in java.lang.String.
•
The result of common preprocessing is used as the value of "ctx".
Description of User Program
Example
Pre-processing
:
String [] retAttributes = new String [1];
retAttributes[0] = "ssoUserStatus";
SearchControls sc = new SearchControls();
sc.setSearchScope(SearchControls.OBJECT_SCOPE);
sc.setReturningAttributes(retAttributes);
sc.setCountLimit(1);
sc.setTimeLimit(5 * 1000); // 5 seconds
String filter = "(cn=" + user + ")";
String dn = "cn=" + user + ",ou=User,ou=interstage,o=fujitsu,dc=com";
NamingEnumeration ne = ctx.search(dn, filter, sc);
while(ne.hasMore()) {
SearchResult sr = (SearchResult)ne.next();
Attributes attrs = sr.getAttributes();
if(attrs != null) {
Attribute a = attrs.get("ssoUserStatus");
if(a == null) {
System.out.println("Not locked");
return;
} else {
String value = (String)a.get();
if(value.compareToIgnoreCase("locked") == 0) {
System.out.println("Locked");
return;
} else {
System.out.println("Not locked");
return;
}
A-12
Displaying the User Lock Status
}
}
}
:
Postprocessing
A-13
Appendix A: Samples of User Program Descriptions
Displaying the User Validity Period
This sample program assumes the environment setup below. Change the setup according to the actual
environment used.
•
The public directory for creation of the repository is "ou=interstage,o=fujitsu,dc=com".
•
The storage location of user information is "ou=User,ou=interstage,o=fujitsu,dc=com".
•
RDN of user information is expressed by "cn".
•
The name of the user whose validity period is to be displayed is specified for "user" in
java.lang.String.
•
The result of common pre-processing is used as the value of "ctx".
Description of User Program
Example
Pre-processing
:
String [] ret = new String[2];
String [] retAttributes = { "ssoNotBefore", "ssoNotAfter" };
SearchControls sc = new SearchControls();
sc.setSearchScope(SearchControls.OBJECT_SCOPE);
sc.setReturningAttributes(retAttributes);
sc.setCountLimit(1);
sc.setTimeLimit(5 * 1000); // 5 seconds
String filter = "(cn=" + user + ")";
String dn = "cn=" + user + ",ou=User,ou=interstage,o=fujitsu,dc=com";
NamingEnumeration ne = ctx.search(dn, filter, sc);
ret[0] = ret[1] = null;
while(ne.hasMore()) {
SearchResult sr = (SearchResult)ne.next();
Attributes attrs = sr.getAttributes();
if(attrs != null) {
Attribute ba = attrs.get("ssoNotBefore");
if(ba != null) {
ret[0] = (String)ba.get();
}
Attribute aa = attrs.get("ssoNotAfter");
if(aa != null) {
ret[1] = (String)aa.get();
}
break;
}
A-14
Displaying the User Validity Period
}
if(ret[0] != null) {
System.out.println("Validity
} else {
System.out.println("Validity
}
if(ret[1] != null) {
System.out.println("Validity
} else {
System.out.println("Validity
}
period start time = " + ret[0]);
period start time not specified");
period end time = " + ret[1]);
period end time not specified");
:
Postprocessing
A-15
Appendix A: Samples of User Program Descriptions
Changing the User Validity Period
This sample program assumes the environment setup below. Change the setup according to the actual
environment used.
•
The public directory for creation of the repository is "ou=interstage,o=fujitsu,dc=com".
•
The storage location of user information is "ou=User,ou=interstage,o=fujitsu,dc=com".
•
RDN of user information is expressed by "cn".
•
The name of the user whose validity period is to be changed is specified for "user" in
java.lang.String.
•
The validity period start time is specified for "before" in java.lang.String.
•
The validity period end time is specified for "after" in java.lang.String.
•
The result of common pre-processing is used as the value of "ctx".
Description of User Program
Example
Pre-processing
:
String dn = "cn=" + user + ",ou=User,ou=interstage,o=fujitsu,dc=com";
ModificationItem[] mods = new ModificationItem[2];
mods[0] = new ModificationItem(DirContext.REPLACE_ATTRIBUTE,
new BasicAttribute("ssoNotBefore",
before));
mods[1] = new ModificationItem(DirContext.REPLACE_ATTRIBUTE,
new BasicAttribute("ssoNotAfter",
after));
ctx.modifyAttributes(dn, mods);
:
Postprocessing
A-16
Changing the User Password
This sample program assumes the environment setup below. Change the setup according to the actual
environment used.
•
The public directory for creation of the repository is "ou=interstage,o=fujitsu,dc=com".
•
The storage location of user information is "ou=User,ou=interstage,o=fujitsu,dc=com".
•
RDN of user information is expressed by "cn".
•
The new user password is specified for "newPassword" in java.lang.String.
•
The name of the user whose password is to be changed is specified for "user" in java.lang.String.
•
The result of common preprocessing is used as the value of "ctx".
Note
When a password is changed to new one, the new password must be handled carefully to protect the
password from attack.
For details about measures that can be used against password attack, refer to "Security Measures"
under "Interstage Single Sign-on" of "Security Risks" of “Security Risks and Measures” of the Security
System Guide.
Description of User Program
Example
Pre-processing
:
ModificationItem[] mods = new ModificationItem[1];
mods[ 0 ] = new ModificationItem(DirContext.REPLACE_ATTRIBUTE,
new BasicAttribute("userPassword", newPassword));
String dn = "cn=" + user + ",ou=User,ou=interstage,o=fujitsu,dc=com";
ctx.modifyAttributes(dn, mods);
:
Postprocessing
A-17
Appendix A: Samples of User Program Descriptions
A-18
Appendix B
Entry Attributes To Be Registered in SSO
Repository
This appendix describes the user information, role configurations and protection resources required by
Interstage Single Sign-on for authentication and authorization, and that must be registered in the SSO
repository.
•
User Information
This section describes the user information managed by Interstage Single Sign-on such as user ID,
password, and authentication method.
•
Role Configuration
This section describes the role information required by Interstage Single Sign-on for authorization.
•
Protection Resources
This section describes the target domain information required by Interstage Single Sign-on for
access control.
B-1
Appendix B: Entry Attributes To Be Registered in SSO Repository
User Information
This section describes the user information managed by Interstage Single Sign-on such as user ID,
password, and authentication method.
Table B-1 Object class and Description
Object class
Description
top
Basic LDAP object class
person
User information
inetOrgPerson
device
ssoUser
SSO user information
Table B-2 User information
Attribute name
Explanation
Description
Example of registration
cn
Name
Specifies the user's full name.
(*1)
user001
sn
Second name
Specifies the user's second
name.
user001
uid
User ID
Specifies the user ID that
identifies the user and is used for
password authentication. (*1) (*2)
user001
userPassword
Password
Specifies the password to be
used for password authentication.
(*3)
user001
employeeNumber
Employee
number
Specifies the number, such as
employee number, assigned to
the user. (*1)
000001
mail
E-mail address
Specifies the e-mail address. (*1)
[email protected]
tsu.com
Other information required for authentication (Attributes that must be specified depending on
operation.)
ssoRoleName
B-2
Role name
Specifies the name of the role
assigned to the user. (*1) (*4)
Admin
User Information
Attribute name
Explanation
Description
Example of registration
ssoAuthType
Authentication
method
Specifies the user authentication
method from one of the following
values:
basicAuth: Password
authentication
certAuth :Certificate
authentication
basicAuthAndCertAuth :
Password authentication and
certificate authentication
basicAuthOrCertAuth : Password
authentication or certificate
authentication
When this attribute is omitted,
specification of
"basicAuthOrCertAuth" is
assumed. (*1)
basicAuthOrCertAuth
ssoCredentialTTL
Reauthentication
interval
Specifies the interval of time (in
unit of minutes) from user
authentication to reauthentication.
60
Specify the re-authentication
interval as 0 or a value (in
minutes) between 30 and 1440.
When 0 is specified, the interval
is unlimited, and re-authentication
is not necessary.
When a value less than 30 is
specified, specification of 30
minutes is assumed.
When a value over 1440 is
specified, specification of 1440
minutes (24 hours) is assumed.
If this attribute is omitted, its
value defaults to the configuration
value in [Re-authentication
Interval] of [Operation after
Authentication] in the
environment setup of the
authentication server.
ssoUserStatus
User status
Specifies whether the user is
locked. The repository server
sets one of the following values:
good
good: The user is not locked.
locked: The user is locked.(*5)
B-3
Appendix B: Entry Attributes To Be Registered in SSO Repository
Attribute name
Explanation
Description
Example of registration
ssoNotBefore
Validity period
start time
Specifies the date and time from
when the user can use Single
Sign-on.
20030101000000+0900
Specify a date between
"20000101000000" and
"20371231235959" in
ssoNotBefore
If the user attempts to use Single
Sign-on before the specified time,
authentication will fail.
Use the format
"YYYYMMDDHHMMSS+XXXX".
(*8) To specify a Greenwich
Mean Time, use the format
"YYYYMMDDHHMMSSZ".
When this attribute is omitted, the
user can use Single Sign-on
immediately. (*6)
ssoNotAfter
Validity period
end time
Specifies the date and time from
when the user ends to access
Single Sign-on.
20030102000000+0900
Specify a date between
"20000101000000" and
"20371231235959" in
ssoNotBefore.
If the user attempts to use Single
Sign-on after the specified time,
the authentication will fail.
Use the format
"YYYYMMDDHHMMSS+XXXX".
(*8) To specify a Greenwich
Mean Time, use the format
"YYYYMMDDHHMMSSZ".
When this attribute is omitted, the
user can use Single Sign-on for
an indefinite period. (*6)
ssoFailureCount
B-4
Count of
failures in
authentication
with user
name/passwor
d
Specifies the number of times the
user failed in password
authentication due to incorrect
password. When the user
succeeds in authentication by
entering the correct password,
the count is reset to 0. The
repository server sets this value.
(*7)
0
User Information
Attribute name
Explanation
Description
Example of registration
ssoLockTimeStam
p
Lockout time
Specifies the date and time the
user was locked in the Greenwich
Mean Time
(YYYYMMDDHHMMSSZ). The
repository server sets this value.
(*7)
20020101090000Z
serialNumber
Serial number
Specifies the serial number of the
user. (*1)
1234-1234-AB
dnQualifier
DN qualifier
Specifies the DN qualifier of the
user. (*1)
000001
*1
Set values are not case sensitive.
*2
Alphanumeric characters and symbols except the colon (:) can be used for this attribute. If any
other character is used for this attribute, user authentication will fail. Do not set this attribute more
than once. If it is set more than once, user authentication fails.
*3
Alphanumeric characters and symbols can be set in this attribute. If any other character is set in
this attribute, user authentication fails. Do not set this attribute more than once. If it is set more
than once, user authentication may not be executed correctly.
*4
If a deleted or unregistered role or role set name is set in this attribute, the role or role name will be
ignored. When a role set name is specified, it is assumed that the user belongs to only the
registered roles in the role set. If the user does not belong to a specified role or role set name, they
will be prevented from accessing the site protected by Single Sign-on.
*5
[Release User Lock] of the Interstage Management Console is used to unlock the user account.
*6
Do not set the same date and time in "ssoNotBefore" and "ssoNotAfter" or user authentication will
fail. User authentication will also fail if the date and time set in "ssoNotBefore" is later than the date
and time set in "ssoNotAfter". If a date and time outside of this range is set, user authentication
will fail.
*7
Do not change the setting of this attribute.
*8
"+XXXX" refers to the time difference from UTC (Universal Time Coordinate). In cases where "XXXX" is used, it has the same meaning.
B-5
Appendix B: Entry Attributes To Be Registered in SSO Repository
Role Configuration
This section describes the role information required by Interstage Single Sign-on for authorization.
Table B-3 Object class and Description
Object class
Description
top
Basic LDAP object class
ssoRole
SSO role information
Table B-4 Role configuration
B-6
Attribute
Explanation
Description
Example of registration
cn
Name
Specifies a role name.
(*1) (*2) (*3)
Admin
ssoAuthType
Authentication
method
Specifies the authentication
method.
This attribute is not used in this
version. (*4)
-
*1
Set values are not case sensitive.
*2
The role name must not include a comma (,).
*3
This attribute must always be unique.
*4
This attribute must not be set or changed.
Role Configuration
The role configuration can also be a role set that contains multiple roles. An example of role set
configuration is shown below.
Table B-5 Object class and Description
Object class
Description
top
Basic LDAP object class
ssoRoleSet
SSO role set information
Table B-6 Role set configuration
Attribute
Explanation
Description
Example of registration
cn
Name
Specifies a role set name.
(*1) (*2) (*3)
AdminSet
ssoRoleName
Role name
Specifies the names of the roles
contained in the role set.
Another role set can be specified
as a role included in the specified
role set. (*1) (*4) (*5) (*6)
Admin
*1
Set values are not case sensitive.
*2
The role name must not include a comma (,).
*3
This attribute must always be unique.
*4
Duplicated roles or role sets are invalid.
*5
If a role set that causes a loop of configurations is set, the looped portion of configuration is invalid.
*6
Non-existent roles or role sets must not be specified.
B-7
Appendix B: Entry Attributes To Be Registered in SSO Repository
Protection Resources
This section describes the target domain information required by Interstage Single Sign-on for access
control.
Table B-7 Object class and Description
Object class
Description
Top
Basic LDAP object class
domain
Domain information
Table B-8 Protection resources
Attribute
Explanation
Description
Example of registration
dc
Domain
component
Specifies a domain component
name.
(*1) (*2)
com or fujitsu
*1
Set values are not case sensitive.
*2
The domain component name must not include a period (.).
Site Configuration
This section describes the target site information required by Interstage Single Sign-on for access
control.
Table B-9 Object class and Description
Object class
Description
top
Basic LDAP object class
domain
Domain
ssoSite
SSO site information
Table B-10 Site configuration
B-8
Attribute
Explanation
Description
Example of registration
dc
Domain
component
Specifies a site name.
(*1) (*2)
www
ssoPortNumber
Port number
Specifies a port number.
443
*1
Set values are not case sensitive.
*2
The domain component name must not include a period (.).
Protection Resources
Path Configuration
This section describes the target path information required by Interstage Single Sign-on for access
control.
Table B-11 Object class and Description
Object class
Description
top
Basic LDAP object class
ssoResource
SSO path information
Table B-12 Path configuration
Attribute
Explanation
Description
Example of registration
cn
Name
Specifies a path.
(*1) (*2) (*3)
/admin/
ssoRoleName
Role name
Specifies the name of the role or
role set that can use the relevant
resource. (*2) (*4) (*5)
AdminSet
ssoUserAttribute
User attribute
Specifies user attribute name that
is set in the user information to be
posted to Web applications, e.g.,
CGI.
This attribute is not used in this
version. (*6)
*1
Alphanumeric characters and symbols can be set in this attribute.
*2
Set values are not case sensitive.
*3
This attribute must always be unique.
*4
Do not set a role name that includes a comma (,) in this attribute.
*5
Multiple role names can be specified. When multiple role names are specified, the user is allowed
to access the protection resource when the user's role and any of the specified roles match.
*6
Do not set or change this attribute.
B-9
Appendix B: Entry Attributes To Be Registered in SSO Repository
B-10
Index
access authority
setting for message files, 5-11
authentication methods
combinations, 1-23
access control information
centralized management, 1-39
updating, 1-40
authentication server
adding for load distribution, 2-76
setting reference system repository server
information, 2-78
setting up, 2-74
setting up with repository server on single machine,
2-79
setup, 2-63
SSL communication environment setup, 2-63
starting, 4-3
stopping, 4-6
access logs
authentication server, 4-18
business server, 4-20
maintenance using, 4-16
repository server, 4-16
access permission
setting for Web server operation resources, 3-23
administrators
Interstage Single Sign-on, 1-14
Application Gateway linkage, 2-74
authentication, 1-2
certificate selection windows, 1-26
combination of authentication methods, 1-23
information, 1-25
Interstage Single Sign-on, 1-15
multi-domain environment, 1-25
password and certificate, 1-15
restrictions, 1-28
user information, 1-24
authorization, 1-2
centralized management of user & access control
information, 1-39
Interstage Single Sign-on, 1-35
roles, users and resources, 1-35
updating access control information, 1-40
using roles, 1-36
authorization error messages
customizing, 5-7
authorization-related operation, 4-13
basic system configuration
Interstage Single Sign-on, 1-6
authentication error messages
customizing, 5-5
business server
stopping, 4-5
authentication form tag specifications, 5-14
business server administrator
acquiring information from, 2-81
authentication infrastructure
Interstage Single Sign-on, 1-7
URL, 1-57
using configuration spreadsheet, 2-6
authentication infrastructure configuration
spreadsheet, 2-6
business servers
administrators environment setup, 3-1
administrators environment setup flow, 3-2
administrators environment setup flow by case, 3-3
integrating into Web server, 3-12
Index-1
Single Sign-on Operator’s Guide - Index
setting access permission for Web server operation
resources, 3-23
setting up, 3-7
setting up for load balancing, 3-10
starting, 4-3
business system
acquiring information from business server
administrator, 2-81
Interstage Single Sign-on, 1-11
preparations for setting up, 2-87
public URL, 1-61
registering, 2-80
registering protection path, 2-82
registering protection resources, 2-81
registering site configuration, 2-81
registration flow, 2-80
business systems
designing, 3-6
installing a business server in Microsoft Internet
Information Services, 3-18
integrating business servers into Web server, 3-12
integrating Interstage Single Sign-on into
InfoProvider Pro, 3-12
integrating Interstage Single Sign-on into Interstage
HTTP Server, 3-12
integrating Interstage Single Sign-on into Sun ONE
Web Server Enterprise Edition 4.1, 3-13
integrating Interstage Single Sign-on into Sun ONE
Web Server Enterprise Edition 6.0, 3-15
setting up business servers, 3-7
setting up business servers for load balancing, 310
using configuration spreadsheet, 3-4
certificate authentication
confirming validity, 2-70
certificate selection windows, 1-26
client
Interstage Single Sign-on, 1-13
configuration spreadsheet
for business systems, 3-4
conventional systems, problems of, 1-2
CSV data file
using, 2-19
Index-2
customization
authentication error messages, 5-5
authorization error messages, 5-7
Interstage Single Sign-on, 5-1
messages, 5-8
messages displayed for form authentication, 5-2
messages displayed on web browser, 5-2
designing
business systems, 3-6
effective user
changing for Web server, 4-8
environment settings
changing, 4-7
environment setup
business server administrators, 3-1
flow, 2-2, 3-2
flow by case, 3-3
flow by systems, 2-3
preparation for, 2-8
preparing for user programs, 2-11
SSO administrators, 2-1
firewall
using, 2-91
form authentication
customizing messages displayed for, 5-2
high-performance and high-reliability system, 1-42
host name
repository server, 1-65
implementation method
Interstage Single Sign-on, 1-5
InfoProvider Pro
integrating into, 3-12
Interstage HTTP Server
integrating into, 3-12
Interstage Security Director, 1-49
Interstage Single Sign-on
adding users, 4-10
administrators, 1-14
amending protection resources, 4-14
amending role configurations, 4-13
amending user roles, 4-11
Single Sign-on Operator’s Guide - Index
authentication, 1-15
authentication form tag specifications, 5-14
authentication infrastructure, 1-7
authentication server access log, 4-18
authorization, 1-35
authorization-related operation, 4-13
basic system configuration, 1-6
business server access log, 4-20
business system, 1-11
canceling lockout, 4-11
cancelling service dependency, 5-17
changing environment settings, 4-7
changing user passwords, 4-11
checking and changing user validity period, 4-12
checking user lock status, 4-12
choosing URLs, 1-57
client, 1-13
customization, 5-1
customizing authentication error messages, 5-5
customizing authorization error messages, 5-7
customizing messages, 5-8
customizing messages displayed for form
authentication, 5-2
customizing messages displayed on web browser,
5-2
deleting users, 4-10
effects of, 1-4
high-performance and high-reliability system, 1-42
implementation method, 1-5
increased system availability, 1-44
installing a business server in Microsoft Internet
Information Services, 3-18
integrating into InfoProvider Pro, 3-12
integrating into Interstage HTTP Server, 3-12
integrating into Sun ONE Web Server Enterprise
Edition 4.1, 3-13
integrating into Sun ONE Web Server Enterprise
Edition 6.0, 3-15
linkage with Interstage Security Director, 1-49
linkage with SSL Accelerator, 1-47
linkage with Web applications, 1-56
load balancing, 1-42
maintenance using access logs, 4-16
operating notes for large systems, 4-22
operation and maintenance, 4-1
overview, 1-1
repository server access log, 4-16
secure operation, 2-89
service linkage with SSO repository, 5-16
setting access authority for message files, 5-11
setting service dependency, 5-16
starting, 4-2
stopping, 4-5
user related operation, 4-10
using a firewall, 2-91
using IPsec, 2-89
IPsec
using, 2-89
Java applications
calling LoginContext login method, 7-11
converting CallbackHandler to an instance, 7-10
converting LoginContext to an instance, 7-11
creating login configuration file, 7-19
creating security policy file, 7-22
creating trust store file, 7-27
developing, 7-2
developing programs, 7-7
exceptions and exception handling, 7-31
executing, 7-34
executing authorization, 7-14
obtaining service ID file, 7-19
obtaining user information, 7-12
program development flow, 7-3
registering protection resources, 7-31
sample code, 7-38
setting access permission for operation resources,
7-29
setting environment variables, 7-16
setting execution environment, 7-16
setting user information report, 7-56
supported JAAS functions, 7-2
large systems
operating notes for, 4-22
LDIF file
using, 2-28
load balancing, 1-42
setting up business servers for, 3-10
load distribution
adding authentication server for, 2-76
Index-3
Single Sign-on Operator’s Guide - Index
lockout, 1-31
canceling, 4-11
messages
customizing, 5-8
customizing authentication error messages, 5-5
customizing authorization error messages, 5-7
customizing when displayed for form
authentication, 5-2
customizing when displayed on web browser, 5-2
setting access authority for message files, 5-11
changing settings of SSO repository, 2-62
constructing SSL communication environment, 252
repository server setup, 2-12
resources, 1-35
restrictions
authentication, 1-28
role configuration entry, 2-37
Microsoft Internet Information Services
installing a business server in, 3-18
role configurations
amending, 4-13
registering in SSO repository, 2-16
multi-domain environment
authentication, 1-25
roles, 1-35
authorization using, 1-36
operation and maintenance, 4-1
secure operation, 2-89
password and certificate authentication, 1-15
service dependency
cancelling, 5-17
setting, 5-16
problems, with conventional systems, 1-2
protection path
registering, 2-82
protection resources
amending, 4-14
registering, 2-81
re-authentication and re-authentication interval, 1-28
repository server
host name, 1-65
setting up with authentication server on single
machine, 2-79
starting, 4-2
stopping, 4-6
repository server (one server or update system), 2-51
repository server (reference system)
adding, 2-54
changing settings of SSO repository, 2-61
constructing SSL communication environment, 255
creating SSO slave repository, 2-56
restoring SSO repository, 2-58
setting information in authentication server, 2-78
setting up to add, 2-61
repository server (update system)
backing up SSO repository, 2-54
Index-4
site configuration
registering for business system, 2-81
SSL Accelerator, 1-47, 2-74
SSL communication
preparation for, 2-64
settings for, 2-69
settings using SSL Accelerator, 2-74
SSL communication environment
setting up, 2-63
setting up for repository server (reference system),
2-55
setting up for repository server (update system), 252
SSO administrators
acquiring information from business server
administrator, 2-81
adding authentication server for load distribution, 276
adding repository server (reference system), 2-54
backing up SSO repository (update system
repository server), 2-54
business system registration flow, 2-80
changing settings of SSO repository for restored
repository server, 2-61
Single Sign-on Operator’s Guide - Index
changing settings of SSO repository for update
system repository server, 2-62
confirming certificate authentication validity, 2-70
constructing repository server, 2-51
constructing SSL communication environment for
repository server, 2-52
creating an SSO repository, 2-13
creating SSO slave repository, 2-56
environment setup, 2-1
environment setup flow, 2-2
environment setup flow by systems, 2-3
importing user information from database to SSO
repository, 2-16
preparation for SSL communication, 2-64
preparations for setting up business system, 2-87
preparing for environment setup, 2-8
preparing for user programs, 2-11
registering business systems, 2-80
registering protection path, 2-82
registering protection resources, 2-81
registering site configuration of business system, 281
registering users and roles in SSO repository, 2-16
repository server setup, 2-12
restoring SSO repository in repository server, 2-58
role configuration entry, 2-37
secure operation, 2-89
setting reference system repository server
information in authentication server, 2-78
setting up authentication server, 2-63, 2-74
setting up repository server and authentication
server on single machine, 2-79
setting up SSL communication environment, 2-63
setting up SSL communication environment for
repository server, 2-55
setting up to add reference system repository
server, 2-61
settings for Application Gateway linkage, 2-74
settings for SSL communication, 2-69
settings for SSL communication using SSL
Accelerator, 2-74
user information entry, 2-41
using a CSV data file, 2-19
using a firewaIl, 2-91
using an LDIF file, 2-28
using IPsec, 2-89
adding repository server (reference system), 2-54
backing up (update system repository server), 2-54
cancelling service dependency, 5-17
changing settings, 2-61, 2-62
changing settings of for restored repository server,
2-61
changing settings of for update system repository
server, 2-62
constructing repository server, 2-51
constructing SSL communication environment for
repository server, 2-52
creating, 2-13
creating slave repository, 2-56
importing user information from database, 2-16
registering user information and role configurations,
2-16
restoring, 2-58
restoring in repository server, 2-58
role configuration entry, 2-37
service linkage with, 5-16
setting service dependency, 5-16
setting up SSL communication environment for
repository server, 2-55
starting, 4-2
stopping, 4-6
user information entry, 2-41
using an LDIF file, 2-28
using CSV data file, 2-19
SSO slave repository
creating, 2-56
starting
authentication server, 4-3
business servers, 4-3
Interstage Single Sign-on, 4-2
repository server, 4-2
SSO repository, 4-2
stopping
authentication server, 4-6
business server, 4-5
Interstage Single Sign-on, 4-5
repository server, 4-6
SSO repository, 4-6
Sun ONE Web Server Enterprise Edition 4.1
integrating into, 3-13
SSO repository
Index-5
Single Sign-on Operator’s Guide - Index
Sun ONE Web Server Enterprise Edition 6.0
integrating into, 3-15
user passwords
changing, 4-11
system availability, increased, 1-44
user related operation, 4-10
URL
authentication infrastructure, 1-57
Business system public URL, 1-61
user roles
amending, 4-11
URLS
choosing, 1-57
user information
centralized management, 1-39
importing from database to SSO repository, 2-16
registering in SSO repository, 2-16
user validity period, 1-31
checking and changing, 4-12
users, 1-35
adding, 4-10
deleting, 4-10
Web applications, 1-56
user information entry, 2-41
Web server
changing effective user, 4-8
integrating business servers into, 3-12
user lock status
checking, 4-12
Web server operation resources
setting access permission for, 3-23
user information authentication, 1-24
Index-6