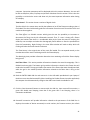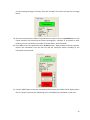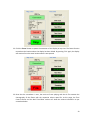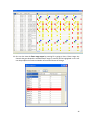
1
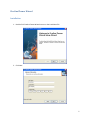
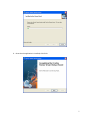
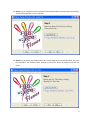
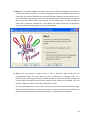
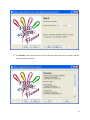
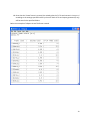
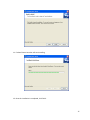
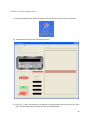
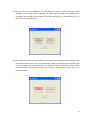
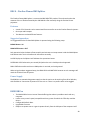
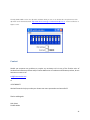
User Manual
Version 1.0
www.fireonemalta.com
Contents
ScriptMaker Visual................................................................................................................................... 3
FireOne Flames Wizard............................................................................................................................ 5
Installation .......................................................................................................................................... 5
Wizard Steps ....................................................................................................................................... 8
FireOne Flames Launcher ...................................................................................................................... 14
Installation ........................................................................................................................................ 14
Flames Launcher Application ............................................................................................................. 19
RDS 8 – FireOne Flames DMX Splitter .................................................................................................... 28
Features ............................................................................................................................................ 28
Suggested operation.......................................................................................................................... 28
Power Supply..................................................................................................................................... 28
DMX USB Pro......................................................................................................................................... 28
How to set up and address DMX channels ............................................................................................. 29
Contact ................................................................................................................................................. 31
2
FireOne Flames Choreography Steps
ScriptMaker Visual
1. Open ScriptMaker Visual
2. Load the flames database by going to ‘Product Database Options’ > ‘Open New Product File’
3. Navigate to the ScriptMaker Visual home installation folder (example C:\Program
Files\Fireone\Scriptmaker) and select the ‘Flames’ database. (If the Flames database has not yet
been installed, kindly download and run the FireOne Flames Database Installer.msi from
www.fireonemalta.com/fireone-flames).
4. Click Open
5. Your Flames database loaded in ScriptMaker should look like screenshot below:
6. In the ‘Vendor Select’, click the dropdown and select ‘Flames_13’ – this queries the whole
flames and light database and shows only the first set of 13 quad flame projectors with a total of
52 channels.
7. Load the wave file to which you want to perform the choreography with the flame projectors by
clicking on the ‘Open Session‘ button and selecting the desired wave file.
8. Once that the peak file is created and the green wave displays at the bottom part of the
application, the next step is to place the cursor at the desired time of shooting a particular flame
projector and select the appropriate flame projector at the desired channel from the database.
This will assign a flame assigned to that particular channel to shoot at the desired time. One can
keep on assigning flames throughout the whole stretch of music. Choreography is performed
3
exactly like performing a fireworks display. In fact, further details can be found at the
ScriptMaker Visual User Manual.
9. At this stage, it is important to point out that the delay between one flame and the other is
calculated automatically. Thus, the software automatically calculates the difference between
the first flame (or set of flames) and the second flame (or set of flames) and assigns that
difference as being the duration of the first flame (or set of flames). The same procedure applies
to the subsequent flames.
10. However, if you want that a particular flame (or set of flames) has duration other than the
automatic difference calculated and explained earlier, one can easily input the duration in
seconds in the ‘Comment’ column of ScriptMaker Visual and the software supersedes the
automatic calculated duration by the specified amount.
11. Close ScriptMaker Visual and open the file created in CueMaker Visual. Convert and save the .scr
file created in ScriptMaker Visual to .fir file. There is no need of any particular preference in the
assignment options. The important thing is that the final result is a .fir file.
4
FireOne Flames Wizard
Installation
1. Double Click FireOne Flames Wizard.exe to run the installation file.
2. Click Next
5
3. Input Your User Name, Company Name and Serial Number as provided in the license file sent
from FireOne Malta. (Note: Software Activation requires Internet connectivity)
4. Click Next
5. Accept the installation path provided or specify the desired installation folder.
6. Click Next
7. Click Install to perform the installation.
8. FireOne Flames Wizard will start the installation.
6
9. Once that the application is installed, click Finish.
7
Wizard Steps
10. Launch the FireOne Flames Wizard by double clicking on the icon on your desktop.
11. Step 1 lets you load the .fir file generated with CueMaker Visual. Just navigate to the .fir file
folder and specify the desired .fir file to load. Depending on the type of choreography that you
load, the wizard notifies you whether the loaded file contains flames only, lights only or both
flames and lights.
8
12. Step 2 lets you assign the music track that should be played when executing the flames display.
The wizard accepts both .wav or .mp3 files.
13. Step 3 lets you specify the location where the .scl file (show cue list) should be saved. This is the
file required by the FireOne Flames launcher to let off the flames in perfect synch with the
music.
9
14. Step 4 lets you specify whether you want to keep your existing choreography with all the 4
colours of the flame projectors or if the choreography should be changed automatically to
convert the red, green and blue flames to the yellow flames. What this convertor does is that it
grabs the channels pertaining to each and every individual Quad Flame Projector and changes
them to just the Yellow channel of each group. This functionality gives you the possibility to
make such a conversion automatically – thus without the need of going back to Scriptmaker
Visual and redo the choreography with just the yellow flames.
15. Step 5 lets you generate a report (either in text or Microsoft Word format) for the
channel/colour usage. This report gives the user an indication if a particular colour on a
particular channel is being over-used. The default number of seconds for the flames usage is 60
seconds which corresponds with the flame capacity of the aerosol cans provided. User can
actually change the number of seconds according to his needs.
The report generated will use this number of seconds as the limit for the flame duration usage.
Should the flame duration of a particular channel (in total) exceed the amount specified, the
report automatically identifies the channel and marks it…to grab the user’s attention.
10
16. Step 6 lets you update automatically any flame duration that is less tan ‘x’ seconds to ‘x+y’
seconds. Thus, if for example, there is a piece of choreography where the automatic flame
duration calculated from ScriptMaker Visual is less than 0.19 seconds, this wizard will let you
change anything that is 0.19 seconds or less to 0.2 seconds. This will automatically update any
flame duration that will be too short (and thus not perceivable to the human eye) to a duration
that is more acceptable and easily seen.
One can work around these figures as one wants to. Thus, whereas the main intention of this
wizard is to change anything that is too short to a decent time, it can also work the other way
round. Therefore, if user wants to grab any flame durations that are less than 3.5 seconds and
change them to 0.15 seconds for example, the wizard gives this option too.
11
17. The Summary screen provides details of all the decisions taken from Step 1 to Step 6 and lists
the most important features.
12
18. Once that the ‘Create’ button is pressed, the wizard grabs the .fir file and converts it into an .scl
according to the settings specified earlier by the user. Both scl file and report generated (if any)
will be saved in the specified folders.
Below is an example of a Report in text file format created:
13
FireOne Flames Launcher
Installation
1. Double Click the FireOne Flames Launcher.exe to start the installation.
2. If installation is performed for the first time, the wizard will search for some software
prerequisites. Should these prerequisites are not found installed, the software will let the user
install the missing drivers/components.
3. The Wizard will list and select the required drivers that need to be installed. User can interact
with the software by activating or deactivating the drivers that will be installed. Once that the
selection is performed, click Next to proceed with the installation of the required drivers. If this
is your first installation on your computer, it is highly suggested to install all the drivers
identified.
14
4. Accept all the defaults in the FireOne Flames drivers installation and proceed with the
installation of the FireOne Flames Launcher.
5. Click Next.
15
6. Input Your User Name, Company Name and Serial Number as provided in the license file sent
from FireOne Malta. (Note: Software Activation requires Internet connectivity)
7. Click Next
8. Accept the installation path provided or specify the desired installation folder.
9. Click Next
10. Click Install to perform the installation.
16
11. FireOne Flames Launcher will start installing.
12. Once the installation is completed, click Finish.
17
18
Flames Launcher Application
13. Launch the application by double clicking the FireOne Flames Launcher icon on the desktop.
14. The application will open with the following screen:
15. Click ‘File’ > ‘Open’ and browse to the desired scl file generated earlier with the wizard. Once
that a scl file is loaded the screen will look like the following image.
19
The firing screen is divided into 4 main sections:
•
•
•
•
File Information
Firing Control
Time Control
Real Time Editor
File Information – This section provides information related to the scl file loaded. It states the
name of the file, when it was saved and the location/path of the music track to which the
choreography was performed. Should the music track is missing or its location has been
changed, you can specify the new location of the music file by pressing the ‘Load’ button. The
embedded player makes it possible to hear the music and check whether it is the music track
required for the flames display.
Firing Control – This section relates to the connectivity with the hardware. From this section,
one will be able to connect with the ENTTEC USB Pro that will be attached to the USB of the
20
computer. Connection parameters will be displayed within this section. Moreover, the user will
be able to Safe/Arm, Pause, Fire/Stop and perform a Blackout from this section. There is also the
possibility to minimize the screen and show only the most important information when letting
off a display.
Time Control – This section shows a number of digital clocks.
The Shot Clock is the master time used by the software to let off the flames according to the scl
file loaded. The shot clock basically grabs the information from the music file and the scl file and
combines them together.
The Time Offset is a clickable counter which gives the user the possibility to increment or
decrement the firing time by 10 milliseconds intervals. Thus, if a user is letting off a flames
display and notices that there is a considerable delay by the time the sound is reaching the
audience, one can adjust and make the choreography launch before or after the specified time
from this functionality. Right Clicking in the time offset window will make a delay while Left
Clicking will make the flames launch in advance.
The Time Source is the original time of the music file loaded. This corresponds exactly to the
time duration of the music track being used for the flames display.
The Remaining time provides information about the time remaining to finish the flames display
being let off.
Real Time Editor – This section provides information related to the actual choreography. This is
divided into three grids. The bottom grid provides information related to the flames that still
need to be launched. The top grid shows information of the flames that were already launched,
while the grid in the middle provides information related to the flame that is firing at the
moment.
16. Grab the ENTTEC DMX USB Pro and connect it via the USB cable provided with your laptop. If
the drivers were installed successfully (when installing the FireOne Flames Launcher application)
the computer should automatically recognize the USB Pro and make it available for use.
17. Click the ‘Not Connected’ button to connect with the USB Pro. Upon successful connection, a
green LED should start bleeping. Note that if the green LED is not bleeping, there is no
connection established.
18. Successful connection will provide information related to the parameters of the DMX Pro. It
displays the number of device connected, its serial number, the firmware version, the refresh
21
rate for sending messages, the Break Time and the Maβ. The screen will look like the image
below.
19. One can even specify the number of seconds that one wants to use as a countdown prior to the
Flames launcher start executing the flames choreography. A default of 10 seconds is used,
however, the user can define any number of seconds from 1 second onwards.
20. Click ‘Safe’ to turn the application to an ‘Armed’ position. When Armed, the flame projectors
receive real information from the USB Pro and will launch/fire flames according to the
information sent/received.
21. Click the ‘Fire’ button to start the countdown and eventually the FireOne Flames display. When
the ‘Fire’ button is pressed, the ‘Remaining Time’ clock displays the countdown in real time.
22
22. Click the ‘Pause’ button to pause the execution of the display at any time. The Pause function
remembers the location where the display has been halted. By pressing ‘Fire’ again, the display
will continue from the exact location where it was paused.
23. Once that the countdown is over, the music will start playing and the scl file executes the
choreography of the flames with the respective colours opted for. At this stage, the Time
Control section and the Real Time Editor section will show the relative information as per
screenshot below.
23
19. If for any reason, one requires to stop the FireOne Flames from launching the flames but keep
the music playing without interrupting the audio, one can press the ‘Blackout’ button. This is
more a safety function rather than anything else. Considering that unlike fireworks, these flame
projectors can be pretty close to people, it can be that someone unexpectedly tries to go too
near the flame projectors. If such thing happens, user can keep the music playing and
deactivates the flame projectors as a safety precaution. The Blackout option can work at any
time between the countdown till the end of the flames display loaded. An activated blackout
will look like the following screenshot.
24
20. When letting off a display, the user can opt to show only a minimized screen with the most
salient information. If one presses the ‘Minimize Screen’ button in the Firing Control section,
one can actually display this screen. The button to press is:
and depressing it will return
to the original mode. The image below shows the application in minimized mode.
21. By pressing F2 or clicking on View > Show Cue List, the user will be able to view a graphical view
of the choreography. An example of the Cue List view can be seen in the following screenshot.
25
22. One can also view the flame usage report by pressing F3 or going to View > Flame Usage. Any
channel that goes beyond the available flame usage (in seconds) will be highlighted in red. User
can always adjust the maximum Number of seconds and save the change.
26
23. One can even perform testing on the four different channels of either the Quad Flame
Projectors or the Single Flame Projectors. To enter the test screen, one should have a
connection with the DMX USB Pro active. To perform the testing, one should click on Test to
open the testing window below:
24. One should click on the color that needs to be tested and upon clicking; the flame projectors will
shoot that particular color. Thus, if the ‘Red Flames’ button is pressed, the Flame projectors will
receive the signal to shoot the Red Flames. The flames will keep on shooting the color selected
until the button is depressed. An example of a testing on the red flames can be seen in the
screenshot below:
27
RDS 8 – FireOne Flames DMX Splitter
The FireOne Flames DMX Splitter is a customized RDS 8 ENTTEC product. The end result makes the
contents of the scl file distributed by the USB DMX Pro flow smoothly along the FireOne Flames
projectors.
Features
•
•
•
A total of 512 channels can be transmitted from controller out to the FireOne Flame Projectors.
One input and 8 outputs.
Two buttons to select different features.
Suggested operation
It is suggested that the FireOne DMX Splitter is operated using the following setup:
BYPASS button - IN
RDM FILTER button - OUT
Such operation helps the data to flow smoothly and activates a microprocessor inside the DMX Splitter
itself whose main aim is to handle such information smoothly.
An LED Display on the Splitter itself indicates the operational status.
SYSTEM OK: LED Flashes twice per second (2Hz) when the unit is healthy and not bypassed.
DMX: LED flashes at 8Hz each time a DMX packet is received, and not bypassed.
When using the above-suggested setup, the RDM LED should NOT blink because no such messages will
reach the FireOne Flame Projectors.
Power Supply
The RDS8 has an autoswitching power supply so that the mains can be anything from 96 to 240 volts,
with 50-60Hz AC. Connection to power turns the unit on. There is no power switch to be toggled.
DMX USB Pro
•
•
•
•
•
The DMX USB Pro has an internal frame buffering that makes it possible to work with any
computer.
It talks at any comm’s speed, compatible with any system for which the FTDI chip used has
drivers.
Configurable Refresh Rate.
Upgradable firmware.
Requires no power source. It gets its power directly from the USB port of the computer itself.
28
How to set up and address DMX channels
A simple guide to setting up your DMX Flame Projectors and getting them to communicate with each other.
This guide will run you through the setting up of the DMX fixtures in simple easy to follow steps.
1: To start with we are going to set up the flame projectors ready for operation. You need to connect all of the Flame
Projectors in a daisy chain fashion from one Flame Projector to the next using the XLR inputs and outputs provided.
The last fixture in the line should have a ‘Terminator’ plug connected to it.
It is worth mentioning at this point that the order in which the flame projectors are connected in the chain does not
relate to the position on the desk.
The DMX start address sets where the controls are located amongst the 512 channels. Since the position of the
flame projectors in this chain don't matter you can connect them in the most convenient way, as in you could connect
the flame projector that is closest to the RDS8 first yet it doesn't have to be controlled by the first set of channels.
2: Now you have all of the flame projectors connected to each other, and one of those flame projectors connected to
the RDS8, you can select which out of the 512 channels you want to control your flame projectors. This is done using
the DMX Dip Switches. They are 10 DIP switches for setting the DMX address, these are set using binary. Each
switch has a corresponding value, and the DMX address is calculated by adding together these values.
29
The numbers on the DIP switches correspond to the following values:
SWITCH VALUE
1:1
2:2
3:4
4:8
5 : 16
6 : 32
7 : 64
8 : 128
9 : 256
10 : N/A
Switch 10 is not used for DMX addressing. Notice then setting switches 1-9 to the ON position will give a maximum
DMX address of 511.
Quad Flame Projectors have a total of 4 channels where:
Channel 1 = Red; Channel 2 = Yellow; Channel 3 = Green; Channel 4 = Blue
As you can see from above quad flame projector, one can have a different amount of channels and the channels are
assigned to different functions. Keeping this in mind, we can now proceed with setting the dip switches.
When we set the dip switches we set where channel one is located (Channel 1- Channel 512) and all the other
channels will come after channel one whatever order they are in.
So, if we put dip switch one ON and keep the rest off on the quad flame projector, channel one on our RDS8 will be a
red flame color for the first flame projector, and channel two will be a yellow flame color and so on.
If we want our flame projector channels to start on channel 9 we can do this by putting switch 1 and 4 down, this will
mean that the values of both of the switches will add up to 9, meaning that now the red flame color will be on 9,
yellow will be on 10 and so on.
You can set any of your flame projectors in your chain to start on different channels meaning that you can control
them individually, alternatively you can also have more than just one flame projector on one channel, you can group
flame projectors together and control them with the same choreography.
One thing that commonly confuses people is what happens if you set say one Quad Flame Projector on channel one
and then a second Quad Flame Projector on two, all that will happen in this case is that every time you use the red
color on quad flame projector one the other quad flame projector will use the yellow color instead of the red. To
operate the flame projectors successfully, it is important that you separate them according to the amount of channels
(or functions) the flame projector has. Since you have Quad Flame Projectors that use 4 channels, the next fixture
should start on channel 5, and so on.
30
A handy downloadable version of a dip switch calculator which you can use to calculate the exact placement of the
dip switch can be downloaded from: http://www.sabretechnology.co.uk/downloads/dipcalc.exe. You'll need Flash 8 or
higher to run it.
Contact
Should you encounter any problems or require any assistance vis-à-vis any of the FireOne suite of
hardware and software products and/or FireOne Malta suite of hardware and software products, do not
hesitate to contact us at:
[email protected]
or
+356 79010677
We look forward to help you make your shows even more spectacular and successful!!!
Thanks and Regards
Nick Spiteri
FireOne Malta
31