1
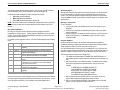
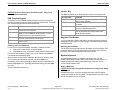
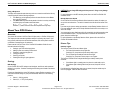
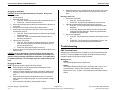
Healthcare Point-of-Service Transactions
VeriFone® TRANZ® Terminals
Point-of Service Terminal User’s Guide:
Multipayer Suites on POS TRANZ® Terminals
October 21, 2005
About Your POS Terminal
Memory Segments
Overview
This guide provides basic instructions for using, updating, and supporting your VeriFone®
TRANZ® 1 Point-of-Sale (POS) terminal running an EmdeonTM multipayer suite of
healthcare transactions. Please review your VeriFone TRANZ Installation Guide and the
Printer 250™ or PrintPak 350™ Installation Guides for more information about:
• Setting up your POS and printer.
• Connecting your POS to a telephone line and power source.
• Adding accessories to your POS.
• Cleaning and caring for your POS and printer.
• Servicing your POS and printer.
Detailed instructions for running individual payer transactions and interpreting responses
are provided in separate payer transaction guides. These guides are available from one
of the following sources:
• the CD provided with your equipment.
• the Emdeon Fax On Demand service (800.760.2804).
• from www.emdeon.com: choose Business Services - Provider Solutions Physicians or Hospital & IDNs – Customer Support.
• Emdeon Customer Support.
NOTE: Users of the Massachusetts Multipayer (MAV) should use the POS Terminal
Users Guide for the Massachusetts Multipayer.
1
VeriFone, the VeriFone logo, and TRANZ are registered trademarks of VeriFone, Inc.
Customer Support – 800.333.0263
58110
Your TRANZ 380x2 has two memory segments, each capable of running a distinct
software application. For example, your device may be programmed with two Emdeon
multipayer suites or one Emdeon multipayer suite and another from a third-party vendor,
such as a credit card company.
Each memory segment displays an idle prompt when not being used. If each memory
segment is programmed with a distinct application, then two different idle prompts can
appear on your POS device. Idle prompts for Emdeon multipayer applications are
different than idle prompts for third-party applications.
To switch between memory segments (idle prompts), press the Enter key twice.
Multipayer Concept
An Emdeon multipayer suite is a software program for your POS device that contains a
combination of healthcare transactions for a variety of governmental and commercial
payers based on a geographical region in which the payers are active. Each multipayer
suite is identified by a unique idle prompt consisting of the geographical region and
version number.
For example, the Florida multipayer suite contains payers from Florida as well as
surrounding states such as Alabama, Georgia, and South Carolina. Multipayer suites
also contain national commercial payers such as Aetna, Cigna, Humana, Medicare, and
Tricare.
Multipayer Version Numbers
The multipayer version number is displayed as part of the idle prompt. The idle prompt
consists of an abbreviation for the primary state in the geographical region, the letter V,
and the version number.
For example, the idle prompt for the Florida multipayer suite is FLV 1.50A, where FL
represents the primary state in the geographical region, V indicates that the program is a
multipayer suite, and 1.50 represents the multipayer suite’s version number.
Page 1 of 6
© 2005 Emdeon Business Services LLC. All Rights Reserved
Fax-on-Demand – 800.760.2804
Document Order # 5993
User’s Guide to Emdeon TRANZ Multipayers
October 21, 2005
Activating Payers
Although your multipayer suite contains the necessary programs to run all transactions
on your POS terminal, your site also must be activated with each payer you want to
access. Your initial sales agreement determines the payers to which you have access.
To activate additional payers, contact Emdeon Customer Support or your Emdeon sales
representative.
The letter A indicates the geographical subregion: some regions, such as Tennessee,
have two multipayer suites, one for subregion A, and one for subregion B).
Listed below are other examples of Emdeon multipayer idle prompts:
•
•
•
AZV 1.51A (Arizona multipayer)
MNV 1.36A (Minnesota multipayer)
TNV 1.45B (Tennessee multipayer, subregion B)
NOTE: The version numbers used in the examples represent those active at the time of
publication, but may differ from the actual multipayer version numbers on your POS
terminal.
Key Version Numbers
Each key (1 through 9) on the POS terminal accesses a program that controls
transactions for a group of payers. The key program is identified by its own key version
number. A key’s program version number displays briefly after you press the key from
the idle prompt to start a transaction.
For example, the key programs on version 1.50 of the Florida multipayer suite are listed
below:
Key
Version
1
FL 2.09
2
3
GA 2.06
NSM 1.07
4
AL 1.09
5
M/H 1.04
6
C/A 1.12
7
U/M 1.09
8
J/A 1.01
9
A/C 1.02
Running a Transaction
To run a transaction:
1. From the idle prompt, press <Func> then 2 to print a list of payers on your
Multipayer.
2. Press the key (1 through 9) corresponding to the payer to whom you wish to
submit a transaction.
3. Follow the prompts. For transaction-specific instructions, see the Transaction
Guide for that transaction. The Overview on page 1 tells how to acquire
transaction guides.
Program Updates
As payer requirements change or as new payers and transactions are added, it is
occasionally necessary to update your POS terminal with the latest multipayer software.
These changes are made to your POS via a down line load, or DLL.
DLLs are transaction-driven. When your POS is scheduled for a DLL, it will occur after
you submit a query but before the response is printed. DLLs typically take less than five
minutes to complete. During this time, you will not be able to use your POS terminal.
The following sequence of events occurs during a DLL:
1. The display will alternate between TRANSMITTING and RECEIVING, for a
time period longer than a typical transaction (several minutes, but seldom over
five).
2. Next, the response to your transaction will print. A message may be included
at the end of the response that describes the DLL change, such as this
example:
Payers
Florida Medicaid Eligibility and Claim Status, BCBS Florida
Eligibility
Georgia Medicaid Eligibility, BCBS Georgia Eligibility
North Carolina Medicaid Eligibility, South Carolina Medicaid
Eligibility, MAMSI Eligibility
Alabama Medicaid Eligibility, BCBS Alabama Eligibility and
Benefits, BCBS Alabama Medicare Part B Eligibility
Medicare Part A Eligibility, Humana Eligibility and Claim
Status
Cigna Eligibility, Aetna Eligibility, Aetna LTC Eligibility and
Claim Status, and several other Commercial payer eligibility
and claim status transactions.
UHC Eligibility and Claim Status, Careplus Eligibility,
Neighborhood Health Eligibility
Jackson Memorial Hospital Health Plan Eligibility, AvMed
Eligibility
Address Verification, Credit Score
Unless you are using the Florida multipayer suite, your POS terminal will have a different
set of key programs and payer transactions than those listed in the chart above. To print
a list of the payers on each key on your multipayer suite, press <Func> then 2.
Customer Support – 800.333.0263
58110
FL MEDICAID XTN HAS BEEN MODIFIED TO
INCLUDE MEDICALLY NEEDY INFO WHERE
APPLICABLE. CALL 800-333-0263 IF THERE
ARE PROBLEMS WITH UPDATE. ONLINE
DOCUMENTATION AT WWW.EMDEON.COM.
3. Next, the display will show PLEASE WAIT for a few seconds, as the new
program data is loaded into the appropriate memory locations.
4. Next, you will see DOWNLOAD DONE. Press <Clear> to return to the idle
prompt. You can now resume running transactions.
Page 2 of 6
© 2005 Emdeon Business Services LLC. All Rights Reserved
Fax-on-Demand – 800.760.2804
Document Order # 5993
User’s Guide to Emdeon TRANZ Multipayers
October 21, 2005
<Func> Key
CAUTION! Do not turn off the power to the POS during a DLL. Doing so may
cause the terminal to malfunction.
The <Enter> key doubles as the <Func> key and is used for the following functions:
POS Terminal Keypad
The keypad on your POS terminal resembles the keypad on a touch-tone telephone.
Note that the number keys also have letters and characters printed on them. The keypad
also contains special keys which are used for the following:
Key
<Alpha>
<Backspace>
<Clear>
<Enter>
Press <Func> twice.
Switches between program idle prompts on a TRANZ
380x2 (memory segments).
Reprints the response for the transaction just
completed.
Prints a complete list of current payers on the POS
and their corresponding startup keys.
Prints a list of plan network IDs for payers that require
entry of plan network IDs to identify specific plans
under the payer’s umbrella.
Press <Func>, then 2.
Changes the number you just typed into one of the letters or
characters listed on the number key.
Deletes the information you just typed.
NOTE: If you pressed <Enter> to save the information, you cannot
use the backspace key to return and edit the information.
Clears the information you just entered, cancels the current
transaction, and returns the POS to the idle prompt.
Saves the information you just typed and proceeds to the next
prompt or process.
Entering Letters and Characters
If you do not have a keyboard attachment, enter letters or characters as follows:
1. Press the key on which the letter or character appears.
2. Press Alpha once, twice, or three times to display the correct letter/character.
If you pass the letter/character you want to enter, you can continue to press Alpha to
cycle through the letters/characters again.
Special characters are found on the * and 0 keys. SP on the 0 key stands for "space".
To enter a blank space between two characters, press 0, then Alpha twice.
Occasionally, you may need to use the @ (at) character to enter an e-mail address (for
example, [email protected]). To enter @, press # (the pound key), then press Alpha
three times.
The letters Q and Z are found on key 1.
58110
Command
Press <Func>, then 1.
Function
Customer Support – 800.333.0263
Key Combination
Press <Func> then 6
Magnetic Card Reader
Your POS terminal has a magnetic card reader to use if the payer supports inquiries by
magnetically-encoded cards or if you plan to use your POS terminal to support credit or
payment transactions.
Operating the Card Swipe
Turn the card so that the long edge nearest to the magnetic stripe is at the bottom. With
the magnetic stripe facing the right-hand side of the POS terminal, run the card evenly
from the top of the card slot through and out the bottom of the slot.
Optional Keyboard
An optional keyboard accessory is available for use with your POS. For more
information about adding a keyboard, please contact Emdeon Customer Support. For
detailed information about installing a keyboard and other accessories, see your
VeriFone TRANZ Installation Guide.
Adding a Keyboard
CAUTION! Do not plug in your keyboard with the power on! Doing so may damage
your equipment.
Keyboards have a six-pin, circular jack that plugs into the back of the POS terminal.
Only two ports of the proper size are available. The keyboard port fits the six-pin, circular
jack; the other eight-pin port is for your printer.
Page 3 of 6
© 2005 Emdeon Business Services LLC. All Rights Reserved
Fax-on-Demand – 800.760.2804
Document Order # 5993
User’s Guide to Emdeon TRANZ Multipayers
October 21, 2005
Using a Keyboard
The laptop-size keyboards make data entry much more convenient and function like any
computer keyboard, with the following exceptions:
•
•
The <Esc> key on the keyboard performs the same function as the <Clear>
key on the POS terminal.
The <Num Lock> key allows the keyboard to function in a ten-key mode using
the following keys as numbers rather than letters:
M=0
J=1
K=2
L=3
U=4
I=5
O=6
Numbers 7, 8, and 9 remain the same and complete the ten-key setup.
About Your POS Printer
Overview
Your printer will be either a VeriFone Printer 250 (dot-matrix) or PrintPak 350 (thermal).
This chapter provides some basic guidelines and tips for operating the printers. If you
have a printer model other than the one discussed here, refer to the printer's manual or
call Emdeon Customer Support for assistance.
Please read the VeriFone Printer 250 or PrintPak 350 Installation Guides for more
information about the following:
•
•
•
•
•
•
Indicator Lights
The VeriFone Printer 250 has two indicator lights:
Setting up your POS terminal and printer
Adding a printer to an existing POS terminal
Changing or removing the paper roll
Testing your printer
Servicing your printer
Cleaning and caring for your equipment
•
The Power light located on the top right side.
If this light is on, the printer has power and is ready to print.
• The Low Paper light located just below the Power light.
If this light is on, the printer is low on paper or out of paper.
The VeriFone PrintPak 350 has a single indicator light to identify certain printer
conditions:
DIP Settings
On the PrintPak 350, the DIP settings control baud rate, word format, and operational
defaults for your printer. Switches controlling the DIP settings are located on the bottom
of the printer.
Printers are shipped with the correct DIP settings to support Emdeon transactions. If for
some reason the DIP settings on your printer are altered, reset them to the following
positions:
•
•
If the indicator light is a steady green, the printer is on and ready to print.
If the indicator light is flashing about once per second, the printer is out of
paper.
If an indicator light is flashing faster than once per second, the printer cables may be
loose or unplugged. Check all cable connections.
Switch 1 – ON (Up position)
Switch 2, 3, 4 – OFF (Down position)
Customer Support – 800.333.0263
58110
Receipt Selection Switch
On the PrintPak 350, the Receipt Selection Switch controls the number of receipts you
can print for each transaction. The switch is located on the left side of the bottom of the
printer.
If you want to print just one receipt per transaction, set the Receipt Selection Switch to 1.
If you want additional copies, set the Receipt Selection Switch to 2 for two receipts, or to
3 for three receipts.
You must press the paper feed button within 60 seconds after the initial transaction prints
to receive additional copies. The paper feed button is located on the left side of the
printer, above the indicator light.
For more information on the Receipt Selection Switch, please refer to the VeriFone
PrintPak 350 Installation Guide.
Printer Tips
Settings
•
•
CAUTION! Do not change DIP settings with the power on! Doing so may damage
your equipment.
For more information on the DIP switches, please refer to the VeriFone PrintPak 350
Installation Guide.
Page 4 of 6
© 2005 Emdeon Business Services LLC. All Rights Reserved
Fax-on-Demand – 800.760.2804
Document Order # 5993
User’s Guide to Emdeon TRANZ Multipayers
October 21, 2005
Changing the Paper Roll
CAUTION! Do not pull the paper backwards out of the printer. Doing so may
damage the printer.
1. Turn the printer on.
2. Remove the paper roll cover.
• Printer 250: Press the tab at the rear of the printer and lift the cover up.
• PrintPak 350: Lift the cover firmly from the rear.
3. Remove any remaining paper by pressing the line feed button to advance it out
of the printer.
4. Cut the end of the new paper roll into a point for easier insertion.
5. Insert the point of the paper into the paper slot, so that the paper is feeding
from the bottom of the roll.
• Printer 250: Press the paper feed button to advance the paper through
the metal paper slot.
• PrintPak 350: Paper will automatically feed and advance after it is
inserted into the paper slot.
6. Place the paper roll in the tray.
• Printer 250: Place the paper roll spindle into the paper roll. Place the
paper roll into the tray making sure the ends of the spindle are in the
slots on each side of the tray.
• PrintPak 350: Simply place the paper roll in the tray.
7. Replace the paper roll cover making sure the paper extends through the slot on
top of the printer.
CAUTION! For the PrintPak 350 only, handle the single-ply, thermal paper with
care. Impact, temperature, humidity, light, and oil (such as found on fingers) can
affect the coloring and storage characteristics of this paper. Cut all paper cleanly
for optimum performance. Do not load paper that is torn, folded, wrinkled, or has
holes.
Changing the Ribbon
NOTE: The following instructions apply to the Printer 250 only.
1. Remove the ribbon cover by pressing the front tab and lifting the cover.
2. Lift the old ribbon out to remove it.
3. Insert the new ribbon cartridge into the printer, right side first. Make sure the
round knob is facing up and the ribbon is between the print head and ribbon
guide.
4. Press the left side of the ribbon cartridge down into place. If it does not fit
easily, remove the cartridge and try again. Do not force the ribbon cartridge
into place.
5. Remove any slack in the ribbon by turning the knob clockwise.
Customer Support – 800.333.0263
58110
6.
Replace the ribbon cover by inserting the tabs on the rear of the cover into the
tab slots on the printer. Press the front of the cover down until it snaps into
place.
Running a Print Test
1. Cut the power to the printer.
• Printer 250: Turn the power switch off.
• PrintPak 350: Unplug the power cable from the rear of the printer.
2. Hold down the paper feed button and resupply power to the printer.
• Printer 250: Turn the power switch on while holding down the paper
feed button.
• PrintPak 350: Plug the power cable into the rear of the printer while
holding down the paper feed button. Release the paper feed button
immediately when printing begins.
3. The print test is generated.
• Printer 250: The print test will run continuously until the power is turned
off.
• PrintPak 350: The print test will run for approximately 120 lines. Stop
the print test at any time by pressing the paper feed button.
Troubleshooting
POS Terminal Issues
Messages may occasionally appear on the display of your POS terminal during normal
processing. This section highlights the messages, the conditions that may cause the
messages to appear, and the steps to remedy the problem.
Waiting for Line
Problem
The POS terminal cannot access a telephone line.
Solution
This message indicates the telephone line for the POS terminal is in use or is not
connected properly. Check the cable connections, and/or determine if the
telephone line is in use. Try again. If the problem persists, call Emdeon Customer
Support.
Page 5 of 6
© 2005 Emdeon Business Services LLC. All Rights Reserved
Fax-on-Demand – 800.760.2804
Document Order # 5993
User’s Guide to Emdeon TRANZ Multipayers
October 21, 2005
Waiting for Answer
Problem
The POS terminal is waiting for an answer from Emdeon Customer Support.
Solution
This message indicates the POS terminal successfully dialed into the Emdeon data
center but is waiting for an answer. This message occurs periodically during normal
operation and does not necessarily indicate a problem. However, if the problem
persists, call Emdeon Customer Support.
Redialing
Problem
The POS terminal is redialing.
Solution
This message indicates the POS terminal is redialing because it did not receive an
answer from Emdeon within 30 seconds. This message occurs periodically during
normal operation and does not necessarily indicate a problem. However, if the
problem persists, call Emdeon Customer Support.
Printer Issues
Problem
Your printer is not printing.
Solution
Check all cable connections. Turn the power switch off and back on. Run a print
test. See “Running a Print Test” on page 5. If the problem persists, call Emdeon
Customer Support.
Customer Support
7:00 AM to 6:00 PM CST Monday through Friday
Telephone
800▪333▪0263
Fax
615▪843▪2539
E-mail
[email protected]
hours are subject to change
No Answer
Problem
The POS did not receive an answer from the Emdeon Data Center.
Solution
This message indicates the POS dialed all primary and secondary numbers three
times and did not receive an answer from Emdeon. Call Emdeon Customer
Support.
Bad RX Communication or Bad TX Communication
Problem
The POS could not transmit data.
Solution
This message appears if data could not be transmitted because of noise or other
interference on the telephone line. Try again. If the problem persists, call Emdeon
Customer Support.
Customer Support – 800.333.0263
58110
Page 6 of 6
© 2005 Emdeon Business Services LLC. All Rights Reserved
Fax-on-Demand – 800.760.2804
Document Order # 5993