1
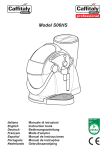
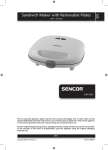
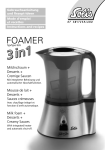
Model S06HS
Imported by Maranatha Pty Limited
Unit 33 / 9 Hoyle Avenue, Castle Hill, N.S.W. 2154
Phone: 02 9846 0307
E-Mail: [email protected]
Web Site Contact: www.caffitalysystem.com.au
Instruction manual
Coffee maker
Safety
EMC
DE
KR
A C e r t i fi c a t i
tested
on
English
INDEX
•
•
•
•
•
•
•
•
•
•
•
•
•
Follow the instructions - Symbols .................................................................................
Your Caffitaly System contact .......................................................................................
Machine Elements ........................................................................................................
Safety warnings ............................................................................................................
Instructions for use and disposal ..................................................................................
First use or after a long period no operation ................................................................
Correct use of the buttons ............................................................................................
Dispensing coffee .........................................................................................................
Programming the quantity of coffee in a cup ................................................................
Turning on the appliance ..............................................................................................
General operating indications .......................................................................................
Dispensing hot water ....................................................................................................
Preparing Steamed Milk / Dispensing steam ...............................................................
2
2
3
4
5
5
6
6
7
7
7
8
8
Cleaning and Maintenance:
•
•
•
•
•
Saving energy ............................................................................................................... 9
Daily maintenance ......................................................................................................... 9
Changing the gasket ..................................................................................................... 9
Descaling..................................................................................................................... 10
Descaling Instructions ................................................................................................ 10
Miscellaneous:
•
•
•
Restore original settings (RESET) ............................................................................. 11
Troubleshooting .......................................................................................................... 11
Technical data ............................................................................................................ 12
Dear Valued Customer,
Congratulations and thank you for having chosen our product and for your confidence in
our company. We are delighted you have chosen the Caffitaly system. You can now savour
your favourite hot beverages at any time of the day with our appliance, by choosing any of
the capsules that Caffitaly System offers you. For example: an espresso, a cocoa-flavoured
beverage or a tea, are all now easy to prepare, mess free and ready in seconds. Enjoy.
Follow the instructions (Symbols)
Caution.
This is the safety warning symbol.
It is used to call your attention to possible risks of personal injury.
Abide by the safety messages provided in order to avoid possible injury or death.
Note.
This is the symbol used to highlight some actions that will optimise use of the appliance.
Not dishwasher safe
Maintenance tips
Your Caffitaly System contact
[email protected]
Ph: 02 9846 0307
2
English
MACHINE ELEMENTS
A: “Espresso Shot” (30ml) button;
B: “Espresso Shot” (60ml) button;
C: “Tea/Hot Water” button;
D: “Multifunction” indicator light;
E: Hot Water/Steam Control lever;
F: Capsule compartment;
G: Used capsule drawer;
H: Power on/off Button;
I: Lever for opening and closing capsule compartment;
J: Water tank cover;
K: Water tank;
L: Dispensing spout (adjustable);
M: Hot Water/Steam dispensing tube;
N: Drip tray;
O: Power cord;
D
J
A
K
F
E
B
L
G
C
O
M
H
I
N
3
English
Safety warnings
If you do not comply with the operating instructions and safety warnings in this Instruction
Manual, the machine may become dangerous to operate. Please ensure you keep this
Instruction Manual in a safe place. Carefully read the following instructions. This way you will
avoid the risk of personal injury and damage to the appliance.
•
This appliance is intended to be used in domestic and similar applications such as:
staff kitchens, offices and other business environments; home kitchens; facilities such
as bed and breakfasts, or guests in hotels.
•
Use only Caffitaly System capsules.
•
Use of the appliance in any manner other than as directed herein in this Instruction
Manual could cause harm to persons and void the warranty.
•
The manufacturer will not be responsible for injury or damage resulting from improper
use of the appliance.
•
After removing the packaging, ensure that the appliance is intact. If damage is found,
or at the first sign of a defect (unusual noise or odours), or if any problem is detected
inside the appliance, do not use it and contact the Caffitaly support line on 02 9846
0307.
•
The packaging elements (plastic bags, etc.) must not be left within reach of children as
they are a potential source of danger.
•
Only use the appliance if the power cord is intact. If the cord is damaged, it should be
replaced due to potential electrical safety risks. Contact the Caffitaly support line on 02
9846 0307.
•
Only use and store the appliance indoors. Ensure the electrical elements, plug and
cord are dry. Never submerge the appliance in water. Protect the appliance from sprays
and drips. Water and electricity together constitute a risk of electrocution.
•
Only connect the appliance to power outlets complying with the requirements of the
law. Ensure the power supply voltage matches the rating shown on the data plate on
the bottom of the appliance.
•
The surface on which the appliance is installed must be solid, stable and heat-resistant,
with an incline no greater than 2 degrees.
•
Do not allow the appliance to be used by children or people with impaired mental,
physical or sensory faculties or insufficient experience and/or skills. Children must be
kept under supervision to prevent them from playing with the appliance.
•
Do not leave the power cord near hot surfaces, sharp edges or other sharp objects.
•
Never place your hands inside the capsule compartment. This places you in danger of
injury.
•
Ensure the machine is never unattended during beverage preparation.
•
Always close the lever. Never open the lever while the appliance is operating.
•
Never place your fingers under the spout while a beverage is being prepared as this
may result in scalding.
•
Never remove parts of the appliance. Do not insert objects into the openings. This
could cause electric shocks. Any operation that is not described in this Instruction
Manual should only be performed by an Authorised Service Centre.
•
Descale the appliance regularly, following the instructions provided. If you do not, the
appliance may be damaged.
•
Clean the appliance carefully and regularly. If it is not cleaned, the build-up that forms
may be hazardous to your health. Unplug the appliance and allow it to cool before
cleaning.
•
If you do not expect to use the appliance for a long period of time (going on holiday,
etc.), unplug it.
4
English
Instructions for use and disposal
The appliance has been manufactured using high quality materials that can be
reused or recycled. Dispose of the appliance in a suitable waste collection centre
such as a public recycling yard.
First use or after a long period no operation
•
Fill the tank with fresh, still water (either by filling through the water tank cover or
removing the water tank).
Plug in the appliance and turn it on.
Make sure the lever is closed.
Along with the A-B-C keys, the D indicator light will also alternately blink RED.
Place a large container (at least 250 ml) under the dispensing spout.
Press one of the buttons A-B-C. Wait for the machine to complete the priming cycle and
fill with water (you will hear the pump noise during this period). The D indicator light will
switch off.
•
•
•
•
•
NOTE: If the buttons A-B-C and the D indicator light continue to blink after the filling
Procedure/priming cycle has ended but not been successful, repeat the steps in
previous point.
•
•
•
When the buttons A-B-C blink at the same time; the machine is warming up.
When the buttons A-B-C turn on and remain steadily lit, rinse by pressing the C button.
Press the button again to rinse a second time. Wait for the machine to complete the
rinse cycle.
At the end of this operation, empty out any water from the used capsule drawer.
•
1
B
A
D
2
3
6
7
4
C
5
English
Correct use of the buttons
To dispense an Espresso shot (30ml or 60ml) use solely buttons A (30ml shot) or B (60ml
shot) (both lit in WHITE).
The same buttons, depending on the quantity, are to be used for dispensing capsules of Hot
Chocolate (follow the specific instructions on the capsule box) or refer to the website for “your
guide to creating cafe quality beverages at home”).
Button C (lit in BLUE) should only be used for Tea capsules (it can also be used just for hot
water).
Do not use button C for espresso coffee. When operating in this mode, the machine is set
for low pressure and this reduces the “crema”, diminishes the flavour of the coffee, and could
cause a break in the flow.
(Capsules appropriate for the C button will be noted on the packaging).
NOTE: Traces of the product just dispensed may remain in the circuit of the machine.
To retain maximum beverage flavour, when changing from one product to another,
rinse it briefly. Rinsing is carried out by pressing either one of the buttons (A-B-C)
without a capsule in the chamber of the machine.
Dispensing coffee – Using Factory Settings
•
•
•
•
•
Raise the lever to open the capsule compartment.
Insert the capsule, pressing it gently into place.
Close the lever fully.
Place a cup or mug under the coffee dispensing spout.
Press and release button A, B or C corresponding to the type of beverage you would like.
A – Espresso Shot (30ml).
B - Espresso Shot (60ml).
C - Tea/ Hot Water (Low pressure).
(Capsules appropriate for the C button will be noted on the packaging).
The pressed button will blink. The machine will stop dispensing on reaching the
programmed quantity and emit a beep.
Raise the lever to eject the used capsule into the drawer.
Close the lever.
•
•
•
1
B
2
A
3
4
D
C
NOTE: the quantities of coffee dispensed can be programmed according to personal
taste and the size of the cups or mugs used.
Please refer to chapter “Programing the quantity of coffee in a cup”.
6
English
Programming the quantity of coffee in a cup
•
•
•
•
•
•
Raise the lever to open the capsule compartment.
Insert the capsule, pressing it gently into place.
Close the lever fully.
Place a cup or mug under the dispensing spout.
Press and hold the desired coffee button (through the entire cycle).
On reaching the desired amount in your cup or mug, release the button. Now the button is
programmed. The quantity of coffee dispensed can be programmed from a minimum
of 30ml up to a maximum of 250 ml.
Recommended Programming/ Current Programming:
30ml Espresso shot (A Button)
60ml: Espresso shot (B Button)
120ml: Tea and Hot Water (C Button). (Maximum 250ml)
Raise the lever to eject the used capsule into the drawer.
Close the lever.
•
•
•
Turning on the appliance - Daily and Regular Usage
•
•
•
Fill the tank with fresh, still water.
Switch on the appliance by pressing the power on/off button.
The Buttons A-B-C blink at the same time; the machine is warming up. When the buttons
turn on and remain steadily lit, the appliance is ready for use.
1
2
B
A
D
C
General operating indications
DESCALING SIGNAL:
•
When warning light D blinks YELLOW/ ORANGE and the machine emits 3 beeps
(after which will remain lit), it is advisable to perform the descaling cycle (See section:
Descaling).
HEATING: (this will typically take 45-50 sec):
•
Buttons A-B-C blink at the same time.
WHEN THE WATER RUNS OUT DURING OPERATION:
•
When warning light D blinks RED and the machine emits 3 beeps, the water tank is empty.
•
Fill the water tank with fresh, still water.
•
Press one of the buttons A-B-C (making sure there is no capsule in the chamber). Wait
for the machine to complete the priming cycle.
•
When buttons A-B-C turn on and remain steadily lit, the machine is ready for use.
IF THE LEVER IS RAISED:
•
If the lever is raised during the delivery of a product, the machine can emit jets of hot
•
water. Risk of burns!
•
The D indicator light blinks RED and a beep is emitted. The appliance will immediately
stop dispensing.
•
Close the lever.
•
Press a button A-B-C to reset the alarm.
•
The appliance is ready for use.
7
English
Dispensing hot water
WARNING! The tube for dispensing hot water reaches very high temperatures:
Danger of scalding! The tube must only be handled using the special rubber
grip. After each use, clean the tube with a damp cloth.
•
•
•
•
Place a metal container or cup under the hot water dispensing pipe.
Turn the control lever forwards. Start dispensing hot water.
To end dispensing, set the control lever back to its central position.
Remove the container of hot water.
1
2
3
Preparing Steamed Milk / Dispensing steam
WARNING! During preparation there may be some brief splashes of hot water
and the steam dispensing tube reaches very high temperatures. Danger of
scalding! The tube must only be handled using the special rubber grip. After
each use, clean the tube with a damp cloth.
•
•
•
Place a metal container under the hot water dispensing pipe.
Turn the control lever backward; this discharges any water left in the circuit.
After a few seconds, only steam will start to come out; return the control lever to a central
position. Empty the container.
Half-fill a cup/jug with milk, then immerse the steam tube in the cup.
Turn the control lever backwards to start dispensing steam.
Move the cup in a slight circular motion to ensure the milk is evenly heated.
When preparation is complete, return the control lever to a central position.
Finally add completed Steamed/Frothed milk to your beverage of choice.
•
•
•
•
•
NOTE: Do not lift the lever while steam is being dispensed. If the lever is lifted,
steam dispensing will stop immediately, warning light D begins to blink RED and
the machine beeps. To reset the machine, close the lever, return the control lever to
a central position and press any button.
1
8
2
3
English
Saving energy
The machine will automatically reduce consumption after 1 hour of inactivity.
Buttons A-B-C blink slowly and sequentially. To restore normal operating conditions,
press any button or raise the lever. The appliance will start warming up.
When buttons A-B-C turn on and remain steadily lit, the machine is ready for use.
Daily maintenance
•
•
•
•
Remove the drip tray and used capsule drawer.
Pull out the capsule drawer; empty and rinse it.
Remove the grid. Empty the drip tray and rinse it out with water.
Remove the water tank. Empty and rinse out the tank. The water tank is NOT dishwasher
safe.
Gently turn the coffee dispensing spout clockwise by approximately 45° until it comes to a
stop, then remove it. Remove the top cover of the coffee dispensing spout and wash the
components in hot water.
Remove the outside of the steam dispensing tube and wash it in hot water to remove any
milk residue. Clean the inside using a damp cloth.
•
•
Use a soft cloth and a neutral
detergent to clean the surfaces of the
appliance. Do not use jets of water to
clean the appliance.
The plastic parts of the machine,
including the water tank, are
NOT dishwasher safe.
Changing the gasket
CAUTION! If the gasket shows signs of wear (small cuts or cracks, warping)
you can replace it easily using the spare gasket supplied in the pack.
Perform the following operations only when the machine is cold; contact with
the inside surfaces of the machine could cause burns.
•
•
•
•
•
Raise the lever.
Find the gasket that was supplied in the original box.
Remove the worn gasket, extracting it if necessary with the aid of a screwdriver.
Insert the new gasket, ensuring that it fits snugly in place.
Close the lever.
1
2
3
9
English
Descaling
Descaling signal: When the D blinks YELLOW/ORANGE and the machine emits 3 beeps,
it is advisable to perform the descaling cycle, as illustrated below.
The machine features an advanced program that monitors how much water is used to
dispense beverages. This measurement provides the user with indications as to when the
machine needs to be descaled. CAREFULLY read the directions for use on the package
of the descaling agent. Avoid contact with eyes, skin and machine surfaces. Switch the
appliance off during descaling, and do not lift the lever. A person must be present during the
operation.
Do not use vinegar: it could damage your appliance.
Descaling instructions
•
Begin with Machine Off, Empty and rinse used capsule drawer and drip tray, and lower
lever.
Remove and empty the water tank.
Mix 125ml of the Cafetto Organic Descaling agent and 625ml of water (to make 750ml of
solution), add to water tank and replace.
Place a container (at least 750ml) under the coffee dispensing spout.
Press and hold the buttons A - B and at the same time turn on the machine (B Button will
be on and D light will blink).
Press the B button to start the descaling cycle.
The appliance will dispense the descaling solution at intervals:
- 5 doses with a 4 minute pause between each one, Total time approx 25 minutes.
- Buttons must not be pressed, the D indicator light blinks alternately
When the first step is complete, the B button lights up beeps twice. The water tank is empty.
Rinse water tank and fill it with fresh drinking water to max line.
Empty and rinse used capsule drawer, the drip tray and container & replace.
Press the B button to start the rinse cycle.
Rinse water (about 500 ml) will be run through the appliance.
When the rinse cycle is complete, the machine beeps and A-B-C buttons will blink at the
same time; (machine warming up).
When the buttons turn on and remain steadily lit, the appliance is ready for use.
Rinse water tank and fill it with fresh drinking water.
Empty and rinse used capsule drawer, the drip tray and container & replace.
•
•
•
•
•
•
•
•
•
•
•
•
•
•
•
1
2
B
C
5
B
C
10
A
D
A
D
4
Restore original settings (RESET)
These instructions, allow you to reset the machine back to its factory settings – Helpful if you
experience an issue with the machine, or you have changed the pour levels for example and
cannot change them back to their original levels.
The reset of the machine can be done with the following procedure:
1. Start with machine OFF.
2. Start with silver handle up.
3. Hold down Espresso button (A button.Top / white button).
4. While still holding down the A Button - Switch ON and then,
after 1sec, close and open the silver handle,
5. 5 beeps is signaling that the reset has been done; then release
the espresso button.
NB: At the end of
this procedure,
machine is driven
in 1st use state
and you will need
to go back and
perform the first
use procedures.
If you try to reset after experiencing a problem with the machine, this may not
always solve the problem. If this is the case please Contact the Maranatha
Customer Service line 02 9846 0307.
Troubleshooting
PROBLEM
No coffee comes out.
Warning light D blinks RED.
POSSIBLE CAUSE
- The water tank is empty
- incorrect use of capsule
with C button.
SOLUTION
- Fill the tank with fresh water. Press
a button to refill the circuit. When the
buttons remain steadily lit, the appliance
is ready for use.
- Reset Machine using the outlined
instructions and ensure the Use of
Only Tea Capsules and hot water
with C Button.
The coffee is not hot
enough.
- Cold cups / espresso cups.
- Scale build-up in machine.
- Preheat cup.
- Descale machine.
The lever cannot be
lowered.
- The used capsule drawer
is full.
- Capsule stuck inside the
machine.
- Empty out the used capsule drawer.
Warning light D is lit steadily
in RED.
Heating problems.
Contact the Maranatha Customer
Service line 02 9846 0307.
When a button is pressed to
dispense coffee, the machine
starts then stops without
dispensing any or only a very
small amount of coffee.
Incorrect quantity
programming.
Reprogram the quantity associated with
that button.
See the section on page 8:
"Programming the quantity of coffee in
a cup".
Coffee is dispensed very
slowly, and is of poor quality.
Button C was used with an
espresso capsule.
Use buttons A or B.
- Remove the used capsule.
11
Technical data
See the data plate on the base of the machine.
Max. 15 bar
< 70dB A
About 5 kg
1.2 litres
ambient temperature: 10°C - 40°C
220 mm
12
290 mm
332 mm
The materials and
objects in contact with
food products comply
with the requirements
of European Regulation
1935/2004.
.............................................................................................................
.............................................................................................................
.............................................................................................................
.............................................................................................................
.............................................................................................................
.............................................................................................................
.............................................................................................................
.............................................................................................................
.............................................................................................................
.............................................................................................................
.............................................................................................................
.............................................................................................................
.............................................................................................................
.............................................................................................................
.............................................................................................................
.............................................................................................................
.............................................................................................................
13
.............................................................................................................
.............................................................................................................
.............................................................................................................
.............................................................................................................
.............................................................................................................
.............................................................................................................
.............................................................................................................
.............................................................................................................
.............................................................................................................
.............................................................................................................
.............................................................................................................
.............................................................................................................
.............................................................................................................
.............................................................................................................
.............................................................................................................
.............................................................................................................
.............................................................................................................
14
.............................................................................................................
.............................................................................................................
.............................................................................................................
.............................................................................................................
.............................................................................................................
.............................................................................................................
.............................................................................................................
.............................................................................................................
.............................................................................................................
.............................................................................................................
.............................................................................................................
.............................................................................................................
.............................................................................................................
.............................................................................................................
.............................................................................................................
.............................................................................................................
.............................................................................................................
15
IB0600600 - Rev.02 del 17-06-13