1
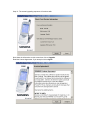
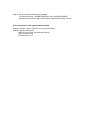
Instructions to upgrade Siemens SX56 to PocketPC 2003
The following is a list of step-by-step instructions on how to upgrade the operating system to
PocketPC 2003 on Siemens SX56 handhelds. As result of the radio stack and ROM image
upgrade the device will become more stable and the connection speed will improve.
Note: The screen shots in this document were taken during the upgrade of a Siemens SX56 with
the following initial configuration:
-
Model PW10B1
Version 3.0.12039 (Build 11178)
ROM version R.20.11 Eng 06/05/03
Radio version A.20.11
Protocol version 324e4
Read carefully this document and the Readme file associated to the Software Upgrade Utility
(also provided at the end of this document for your convenience).
During the upgrade process read carefully and follow all the on-screen instructions on both your
PC and the Siemens SX56.
The upgrade phases are the following:
Phase 1: Establish an ActiveSync Standard Partnership between your PC and the Siemens
SX56. IMPORTANT - Back-Up all data on your Siemens SX56
Phase 2: Hard reset the Siemens SX56 and reconnect to PC after disabling the synchronization
in ActiveSync.
Phase 3: Download the software upgrade utility from Rogers Wireless web to your PC
Phase 4: Run the downloaded Software Upgrade Utility.
Phase 1
Step1: Check that the PC complies with the following system requirements
-
Microsoft Windows 98, Windows 98SE, Windows ME, Windows NT 4.x, Windows
2000, or Windows XP
ActiveSync 3.5 (build 12007) or later installed
Step 2: Remove the SIM card from the Siemens SX56.
Make sure that the Siemens SX56 is fully charged.
Put the Siemens SX56 in the cradle and connect it directly to an USB port on the PC.
Do NOT connect through an USB Hub.
Make sure the cradle is also connected to its Power Adapter
Step 3: Establish an ActiveSync Standard Partnership between your PC and the Siemens SX56
Step 4: Fully back-up your personal data and the user installed software using ActiveSync as the
upgrade process will erase them from the device.
Phase 2
Step 5: Take the Siemens SX56 from the cradle and perform a Hard Reset by pressing the
battery switch once with the unscrewed end of the stylus – see picture.
The device will be turned off. Do not put it in the cradle now.
Step 6: In ActiveSync (on the PC) click on Options, select Sync Options and clear all the
checkboxes to stop all synchronizations. Click OK to exit the Options screen
Step 7: Place the Siemens SX56 in the cradle. Device will turn on again.
Re-establish the Standard Partnership in ActiveSync.
Phase 3
Step 8: Use the PC’s browser to open the download web page at www.rogers.com/QWERTY
Step 9: Click on the Software Download link, select the Save to disk or Save option and click
OK
Step 10: Save the software to a location on your computer (for example Desktop) and click the
Save button. The following file will be downloaded:
Siemens_SX56_Software_Upgrade.exe
Correct file size is “Size 17.0 MB (17,862,766 bytes)”
Phase 4
Step 11: Double click on the icon of the downloaded file (shown above).
The Install Shield Wizard will start.
Click on Next.
When all the files will be extracted the SX56 Pocket PC Phone Software Upgrade Utility will be
started.
Step 12: Read carefully the on-screen instructions and click on View Readme to read the
Readme file. Act accordingly to the indications.
When ready click on Next.
Before starting the upgrade process the Upgrade Utility checks some necessary conditions.
The power adapter must be connected to the cradle. Otherwise you will be prompted to do so.
On some systems the device driver will be updated first and the all previous Phase 4 steps will
need to be run through again after executing the steps indicated in the next window.
Step 13: The normal upgrading sequence will continue with:
Note down the information on this screen then click on Upgrade.
Read the License Agreement. If you accept it click on Agree.
Step 14: The Upgrading Procedure starts with the upgrade of the radio stack.
The PC screen will remain at 0% for about 6 minutes with the Siemens SX56 screen in
the normal initial screen.
After that the message “UPGRADING THE RADIO STACK and DO NOT DETACH
DEVICE FROM PC” will be displayed on the Siemens SX56 screen and the percentage
will start to increase on both screens.
Step 15: The radio stack upgrade will take almost 4 minutes then the SX 56 will display:
“UPGRADING IS COMPLETE 100%”
The upgrade of the ROM image will start.
The SX56 will display also: “UPGRADING OS AND APPS…
ROM image upgrade takes about 5 minutes.
… %”.
When the upgrade is finished SX56 will display: “RESET THE DEVICE”.
Step 16: Perform the HARD reset twice as indicated.
The SX56 will display: “ROGERS WIRELESS” then “WINDOWS MOBILE”.
After taping the screen the Align Screen and the initialization procedure will start.
Device information on the upgraded Siemens SX56:
Settings > System > About: Pocket PC ver.4.20.0 (Build 14053)
Settings > System >Device Info:
ROM ver.R.30.07 Eng and ROM date 05/04/04
Radio Version A.33.03
Protocol Version 1.3.3
Readme file from the Upgrading Utility
readme.rtf
SX56 Pocket PC Phone Software Upgrade Utility v2.09 release notes
System Requirements:
•
Microsoft Windows 98, Windows 98SE, Windows ME, Windows NT 4.x, Windows 2000,
or Windows XP.
•
Need ActiveSync 3.5 (build 12007) or later.
•
Should use USB or Serial port connection directly.
Trouble Shooting:
•
If this upgrade fails and a pop up error message appears, please be careful to read the
error message and follow the instructions to recover from the error. If you follow the
instructions in the error message and run the utility again, almost all errors that happen in
the upgrade process can be recovered.
•
Do not do a hard-reset when you encounter an error message, unless you are instructed
to do so.
•
If an error occurs while upgrading the ROM image( that is, the progress bar appears on
both the PC and device screens), the error message will instruct you to reset the device
and run the utility again. At this moment, you will find that the screen in your device is a
progress bar. This is normal, because your Windows CE in device is destroyed.
Following the instructions and running the utility again, it will be recovered.
•
If you find that you fail to upgrade through the USB connection, please check the device
manager in your PC to see if the USB device works properly. If the USB device fails,
please restart your PC and try again.
•
If you find that you can not connect to your Pocket PC Phone through ActiveSync, please
try to reset your Pocket PC Phone or restart your PC.
•
If you find that your ActiveSync fails after you finish upgrading, please restart your PC
again.
•
If you still have a problem upgrading your ROM image, please feel free to contact our
service center.
Known Issues:
•
When you have finished upgrading, you will find that there are two ActiveSync icons on
the tray. One is active and the other is disabled. Move the mouse cursor over the
disabled icon and it will disappear.
•
Do not upgrade through the USB hub, as this will cause a communication error.