1
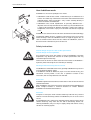
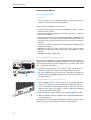
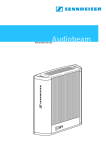
AudioBeam
Bedienungsanleitung
Instructions for use
Notice d‘emploi
Instrucciones para el uso
Instructions for use
Contents
How AudioBeam works ..................................................................................... 12
Safety instructions ............................................................................................ 12
Connections and operating controls .............................................................. 13
Mounting AudioBeam ....................................................................................... 14
Putting AudioBeam into operation ................................................................ 15
Troubleshooting ................................................................................................. 16
Accessories .......................................................................................................... 16
Specifications ...................................................................................................... 17
Thank you for choosing Sennheiser!
We have designed this product to give you reliable operation over many
years. Over half a century of accumulated expertise in the design and
manufacture of high-quality electro-acoustic equipment have made
Sennheiser a world-leading company in this field.
Please take a few moments to read these instructions carefully, as we want
you to enjoy your new Sennheiser product quickly and to the fullest.
11
How AudioBeam works
How AudioBeam works
AudioBeam is an acoustic spotlight. This means:
! AudioBeam is able to focus sound – either directly or via reflections on a
surface. This allows e.g. information in museums and at exhibitions to be
radiated directly from the exhibits – only visitors standing directly in
front of an exhibit are addressed.
! AudioBeam limits sound reproduction to precisely defined areas –
adjacent areas are kept sound-free. This allows e.g. the soundtrack from
a video to be projected in different languages, without the need for
headphones. The visitors simply have to enter the desired “language
area”.
AudioBeam uses state-of-the-art ultrasonic sound transmission technology:
The desired audible sound is created at a distance of four to up to ten
meters directly in front of AudioBeam and at an angle of approx. 30°. As
soon as someone comes closer than four meters to AudioBeam, a built-in
distance sensor automatically turns off the unit.
Safety instructions
Possible danger for persons with cardiac pacemakers!
Possible danger of hearing defects!
At a distance of less than four meters in front of AudioBeam, ultrasonic
frequencies may disturb the function of cardiac pacemakers and may
cause damage to the hearing!
Make sure that no-one can come closer than four meters to AudioBeam –
especially when mounting the unit movably or rotatably.
Warning of life-threatening electrical shock!
If AudioBeam is connected to the mains, opening AudioBeam may result in
a life-threatening electric shock!
If AudioBeam should be defective, repair must be carried out by your
Sennheiser service partner. If the unit is opened in breach of this
instruction, the warranty becomes null and void.
Risk of fire!
AudioBeam generates heat! Make sure that the air vents of the unit are not
covered or blocked!
Keep AudioBeam away from heat sources and never expose AudioBeam to
direct sunlight! Maintain a minimum distance of 1 meter between
AudioBeam and combustible materials.
Attention!
If liquids or small parts which conduct electricity find their way into the
interior or to the connecting sockets of AudioBeam, this can cause a short
circuit!
Use AudioBeam in dry rooms only and keep liquids and small parts which
conduct electricity away from the unit and its connecting sockets. For
cleaning AudioBeam, only use a dry or slightly damp cloth. Never use any
solvents or cleansing agents.
12
Connections and operating controls
Connections and operating controls
Delivery includes:
! AudioBeam
! 3 mains cables with plugs
! Interchangeable thread
5 "
/8 to 3/8"
! Instruction manual
! Document of warranty
INPUT
OVERLOAD
OUTPUT
LED operation indicator: green: AudioBeam is operational (standby)
red:
AudioBeam is not operational
Sensitivity selector switch (+6 dBm, –14 dBm)
On/off switch for distance sensor
(it is vital to observe the warning on page 15!)
XLR-3 socket for audio input INPUT
OVERLOAD LED
BNC socket for modulator signal output OUTPUT
5 "
8
/ thread with adapter to 3/8" thread
IEC mains socket
Air vents
Steel clamp for securing the mains cable
13
Mounting AudioBeam
Mounting AudioBeam
Correct mounting location
Warning!
Failure to comply with the following location conditions may result in
danger to persons and damage to AudioBeam!
When mounting AudioBeam, make sure that:
! the ultrasonic sound wave can travel undisturbed for at least 1 m before
it strikes the first surface.
! the sound (including the reflections) can travel for at least 4 m before it
strikes a human being
! a minimum distance of 10 cm is maintained between AudioBeam and
adjacent objects so that any heat generated can dissipate. Make sure
that the air vents at the top and rear of the unit are not covered or
blocked!
! a minimum distance of 1 meter is maintained between AudioBeam and
combustible materials
! AudioBeam is kept away from heat sources such as central heating
radiators, spot lights and lamps. Never expose AudioBeam to direct
sunlight.
! AudioBeam never gets damp or wet
Mounting AudioBeam in a fixed position
INPUT
OVERLOAD
To ensure that AudioBeam is always orientated towards the correct area
of interest, you should mount AudioBeam fixedly. Use a mounting plate for
wall or ceiling mounting. For free installation, use a table or floor stand
(see: „Accessories“ on page 16).
OUTPUT
왘 Screw the mounting plate or the table or floor stand to the
thread . If necessary, use the interchangeable thread to do this.
5 "
8
/
왘 By using a gooseneck or swivel joint (see: „Accessories“ on page 16),
directly orientate AudioBeam towards the correct area of interest or
the reflection area.
Mounting AudioBeam movably or rotatably
왘 Screw AudioBeam onto a drive mechanism or a rotating mechanism
using the 5/8" thread . Use the interchangeable thread if necessary.
왘 Start up AudioBeam as described on page 15 and ensure that the
distance sensor does not trigger in rotating mode (LED operation
indicator is constantly lit green).
If the distance sensor triggers (LED operation indicator lights up red):
왘 Remove all objects from the rotating range scanned by AudioBeam up
to a distance of 4m.
If the distance sensor still triggers (LED operation indicator lights up red
again), you must turn off the built-in distance sensor as follows:
14
Putting AudioBeam into operation
Warning!
If you turn off the built-in distance sensor, persons who come closer
than 4 m to AudioBeam may be in danger from ultrasound.
Always ensure that nobody can come closer than 4 m to AudioBeam
across the entire rotating range!
! To do this, mount AudioBeam at a height of more than 7 m.
! If necessary, take the appropriate structural measures (barriers) to
keep people away.
왘 Disconnect AudioBeam from the mains.
왘 Set the On/Off switch for the distance sensor to the lower
position (OFF).
왘 Reconnect AudioBeam to the mains.
Putting AudioBeam into operation
왘 Ensure that AudioBeam is not connected to the mains!
왘 Use the sensitivity selector switch to adapt AudioBeam’s input
sensitivity to the audio source:
! Sources with a high output power (e.g. mixing console, CD or DVD
player): upper position (+6 dBm)
! Sources with a low output power (e.g. portable mini disk player):
lower position (–14 dBm)
INPUT
OVERLOAD
OUTPUT
왘 Use an XLR-3 cable to connect the audio source (e.g. CD or DVD player,
mixing console, receiver of a wireless microphone) to the audio input
INPUT .
AudioBeam automatically emits ultrasound as soon as an audio signal
(see “Specifications” on page 17) is present at the audio input
INPUT .
왘 Use the mains cable to connect AudioBeam to the mains. Secure the
mains cable with the steel clamp .
The LED lights up green, indicating that AudioBeam is ready for
operation (standby).
Note:
If you do not use the unit, pull the mains connector out of the wall
socket. This helps to increase the service life of AudioBeam and save
energy.
15
Troubleshooting
Troubleshooting
If the LED operation indicator lights up red, one of the following
problems may have occured:
The distance sensor has triggered
1. Someone has entered the security area of 4 meters in front of or
around AudioBeam and the distance sensor has triggered. After the
person has left this area, AudioBeam automatically turns on again after
30 seconds.
2. You are operating the device in rotating mode and the distance sensor
has triggered because objects or persons are located within the sensor
range of the built-in distance sensor.
o solve the problem, see: „Mounting AudioBeam movably or rotatably“
on page 14.
AudiBeam is defective
Please contact your Sennheiser distributor or the Sennheiser Customer
Service (for address, see last page).
Accessories
The following accessories are available from your Sennheiser distributor:
GZP 10
GZG 1029
Swivel joint for attachment to stands or the GZP 10 mounting plate,
includes 1/4" interchangeable thread
MZT 14
Mounting bolt for mounting goosenecks and swivel joints with 3/8" thread
to table tops
MZT 100
MZT 1019
SEMS 3134
16
Mounting plate for wall and ceiling mounting
Stable, metal table stand with 3/8" thread
Mounting bar for two units with 3/8" internal thread
Floor stand with 3/8" thread
Specifications
Specifications
AudioBeam Master:
Modulation:
wideband AM
Carrier frequency:
40 kHz
Peak limiter:
limiter amplifier
Audio channels:
1
Audio input:
XLR-3F socket, balanced, DC-isolated
Input level for max. peak SPL:
+6 dBm (1.55 V) = upper switch position
–14 dBm (150 mV) = lower switch position
Switching threshold:
–46 dBm (4 mV) = upper switch position
–66 dBm (0.4 mV) = lower switch position
Impedance:
600 Ω
Sound pressure level:
75 dB ± 5 dB (at a distance of 4 m)
Output:
1 x BNC, 50 Ω shortcircuit-proof
Amplifier power:
approx. 90 W
Power supply:
switchable power supply 110 - 240 V,
50 - 60 Hz max. 100 W
Dimensions:
264 x 82 x 320 mm
Weight:
approx. 4 kg
XLR-3 pin assignment:
1
2
+NF
3
-NF
17
18
Sennheiser electronic GmbH & Co. KG
30900 Wedemark, Germany
Phone +49 (5130) 600 0
Fax +49 (5130) 600 300
www.sennheiser.com
Printed in Germany
Publ. 06/04
89056 / A02