1
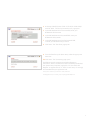
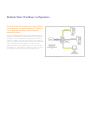
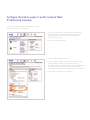
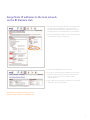
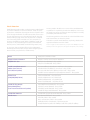
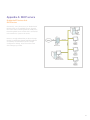
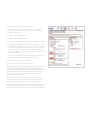
Small Office Network Guide
BT Business Broadband
with the BT Business Hub
www.btbroadbandoffice.com
Notice to users
Updates and additions to software may require an additional
charge. Subscriptions to online service providers may require
a fee and credit card information. Financial services may require
prior arrangements with participating financial institutions.
Owner's Record
Customers are advised to check and ensure that the use of BT
Share/Network is permitted by their broadband service provider
and that any applicable consent or licences from landlords or
other third parties have been obtained before installing and
operating this product. © British Telecommunications plc 2006.
Record the serial number in the space provided here
and refer to it when you call the helpdesk.
The serial number is located on the bottom of the
BT Business Hub.
Serial Number:
Registered office: 81 Newgate Street, London EC1A 7AJ.
Registered England No. 1800000.
BT and the 'connected world' logo are trademarks of British
Telecommunications plc.
Safety Information
The symbol shown here and on the product means that the product is classed
as Electrical or Electronic Equipment and should not be disposed with other household
or commercial waste at the end of it's working life
The Waste of Electrical and Electronic Equipment (WEEE) Directive (2002/96/EC) has been put in place
to recycle products using best available recovery and recycling techniques to minimise the impact on the
environment, treat any hazardous substances and avoid the increasing landfill.
• Use of an alternative power supply may damage the BT Business Hub, and will invalidate the
approval that accompanies it.
• To prevent fire or shock hazard, do not expose the BT Business Hub to rain or moisture.
• To avoid electrical shock, do not open the hub. Refer servicing to qualified personnel only.
• An electrical storm could damage the hub. To avoid this possibility, we recommend you
disconnect it from the mains power and telephone line during an electrical storm.
• Never install telephone sockets in wet locations unless the socket is specifically designed
for wet locations.
• Never touch uninsulated telephone wire or terminals unless the telephone line has been
disconnected at the network interface.
• Use caution when installing or modifying cable or telephone lines.
• Do not use the hub or a telephone to report a gas leak in the vicinity of the leak.
• Install the BT Business Hub within 1830mm of a mains socket. Use caution when laying
out the cable to avoid hazard to people walking near or using the equipment.
Product disposal instructions for residential users
When you have no further user for it, please remove any batteries and dispose of them and the
product as per your local authority's recycling processes. For more information please contact
your local authority or the retailer where the product was purchased.
Product disposal instructions for business users
Business users should contact their suppliers and check the terms and conditions of the purchase
contract and ensure that this product is not mixed with other commercial waste for disposal.
2
Contents
Introduction
4
Sample network using Small Business Server (SBS) 2003
5
Manually configure the BT Business Hub
5
Multiple Static IP address configuration
7
Configure the hub to support public network Static IP addressing manually
8
Assign the Static IP addresses to the local network via the BT Business Hub
9
Assign Static IP addresses to each network server manually
10
Assign Static IP addresses to each server via DHCP
11
Allow all inbound traffic to flow to the SBS 2003
13
Sample small-to-medium business network
14
Allow WAN traffic to flow to network servers
15
Allow all inbound traffic to flow to a specified server
15
Allow specific inbound ports to flow to a server
16
Edit advanced firewall settings
17
• Security settings
• Inbound and outbound control
• Attack detection
Resolve DNS entries
19
Summary
19
Appendix A: DHCP service
20
• Disable the BT Business Hub's DHCP service
• Use the BT Business Hub's DHCP service
Appendix B: The BT Business Hub's inter-operability with VPN
23
• Outbound VPN client connections
• Inbound connections to local VPN server
3
Introduction
This document describes how to configure the BT Business Hub
(firmware v4.25.23 and higher) to operate within an existing small
office network. We have provided a sample network within this guide
to assist with your configuration. The elements in this sample
network include:
• a DHCP server (including SBS 2003)
• hardware firewall
• dedicated VPN server
• a web server
Specific sections of the document can be ignored if not applicable to the network
into which the BT Business Hub is being deployed.
4
Sample network using Small Business Server (SBS) 2003
The network described in this section includes SBS 2003 with two
Network Interface Cards (NICs). The SBS is providing DHCP service to the
Local Area Network (LAN) and is routing Internet-based network traffic
from the LAN to the Wide Area Network (WAN). Using a Public Network
Address of 217.46.146.192/29, the BT Business Hub is assigned the
217.46.146.198/29 address, and the SBS WAN-facing NIC is assigned
the 217.46.146.193/29 address.
The private LAN uses the 192.168.17.0/24
address, and the SBS LAN-facing NIC is
assigned the 192.168.17.2/24 address.
Manually configure the BT Business Hub
IMPORTANT: Do NOT run the BT Business Hub installation CD on the
SBS 2003 as it will automatically configure your connection. Please consult
the SBS documentation for instructions on configuring the SBS to receive
an IP address via DHCP.
1. From the workstation that you have designated as the configuring
terminal, open a web browser
2. In the address bar, enter ‘http://home/setup **’ A web browser
security warning may be displayed, requesting that you
confirm that you wish to visit a web site that you have not
previously visited
3. Click ‘Add’, then ‘Close’. The ‘Set Up Your 2700HGV Gateway’
page opens
5
4. In the Key Code field, enter ‘528Y-2374-A222-22BJ-B2QA’
and click ‘Next’. ‘The Set Up Connection Info’ page opens
5. In the PPP Authentication Username field, enter your
BT Network ID Username*
6. In the PPP Authentication Password field, enter your
BT Network ID Password*
7. In the PPP Authentication Confirm Password field,
re-enter your BT Network ID password
8. Click ‘Next’. The ‘Time Zone’ page opens
9. From the Time Zone pull-down menu, select the appropriate
time zone
10. Click ‘Next’. The ‘Connecting’ page opens
The BT Business Hub retrieves specialised configuration
information. After a connection has been successfully established,
the ‘System Setup Complete’ page opens. You can either click
‘Register’ to register the hub, or ‘Finish’ to exit setup. It is strongly
recommended that you register the hub.
*These can be found in your welcome emails and letters
**if http://home does not work, please try http://192.168.1.254
6
Multiple Static IP address configuration
The BT Business Hub supports the use of multiple,
service provider-assigned broadband IP addresses
and is designed to enable a 'Public Network'
addressing scheme.
The pool of assigned publicly accessible IP addresses can be
completely independent of the BT Business Hub's broadband
IP address. In this configuration, the BT Business Hub still
requires an address out of the pool. However, this address is
logically enabled to represent the BT Business Hub LAN and
acts as the default gateway address for public static IP
addressed devices on the LAN. BT refers to this form of static
IP addressing as 'Public Network' addressing and is the type
of IP address scheme shown in the following example.
Static IP addressing - Public Network
7
Configure the hub to support public network Static
IP addressing manually
To manually configure the BT Business Hub to support
'Public Network' static IP addressing:
1. From one of the servers, open a browser and connect to
the BT Business Hub user interface by browsing to the
following address: http://home. The ‘View Network
Summary’ page opens
2. Click the ‘Local Network’ tab
3. Click the ‘Advanced Settings’ link
4. Click the ‘Public Network’ checkbox and enter the router
(hub) IP address and the appropriate subnet mask.
For this example, the router IP address is 208.35.206.198 and
the subnet mask is 255.255.255.248. Your IP address
information can be found in your welcome emails and letters
5. Click ‘SAVE’ after making your selection
8
Assign Static IP addresses to the local network
via the BT Business Hub
1. From the hub's homepage, click the Local Network tab.
The ‘View Network Summary’ page shows what is
connected to the BT Business Hub and allows you to
configure settings associated with this local network
2. Click the ‘Advanced Settings’ link. The 'Edit Advanced
Local Network Settings' page opens
3. Click the ‘Edit Address Allocation’ button
4. To assign an available static IP address to each server,
select the DHCP Fixed option from the list box next
to each server name. For this example, select
‘208.35.206.193’
5. Click ‘SAVE’ after making your selections to ensure the
addresses are properly assigned
Note: After you perform these steps, you may
need to release and renew your IP addresses.
9
Assign Static IP addresses to each network server manually
After the broadband connection has been
established and multiple Static IP addresses
enabled, the VPN server, web server, and network
server must be assigned Static IP addresses from the
available pool. To do this, use one of the following
3 methods:
• manually change the server TCP/IP settings
• manually change the computer's TCP/IP settings from
'Obtain an IP address automatically' to 'Use the following
IP address'
• select one of the usable static IP addresses. In this example,
the TCP/IP settings would be configured as follows:
VPNSRV
WEBSRV
MASTERSRV
This is for the network interface
connected to the BT Business Hub
only. The other network interface
connected to the LAN remains
unchanged. Also, after this address
is configured, check that traffic from
the VPN network is properly routed
to the LAN network. Refer to the
VPN software or hardware instructions
for more information on how to
perform this step.
This is for the network interface
connected to the BT Business
Hub only.
This is for the network interface
connected to the BT Business Hub
only. The other network interface
connected to the LAN remains
unchanged. Also, after this address
is configured, check that traffic from
the LAN is properly routed to the
WAN. Refer to the operating system
instructions for more information
on how to perform this step.
IP Address: 208.35.230.194
Subnet Mask: 255.255.255.248
Default Gateway: 208.35.230.198
DNS: 12.10.32.5
IP Address: 208.35.230.193
Subnet Mask: 255.255.255.248
Default Gateway: 208.35.230.198
DNS: 12.10.32.5
IP Address: 208.35.230.195
Subnet Mask: 255.255.255.248
Default Gateway: 208.35.230.198
DNS: 12.10.32.5
It is recommended that you restart each server after the
configuration changes are complete. This will ensure that
the server operating system and installed application services
correctly adjust to the new IP address. In addition, this step
will help ensure that your server is recognised and its traffic
properly routed by the BT Business Hub.
10
Assign Static IP addresses to each server via DHCP
Check that the BT Business Hub-connected network interface for each server
is configured as a DHCP client (i.e. to ‘Obtain an IP address automatically’).
You can then assign the Static IP addresses directly to each server via DHCP.
To assign the Static IP addresses from the BT Business Hub:
1. From one of the servers, open a web browser and connect
to the hubs user interface by browsing to the following
address: http://home
2. Click the ‘Local Network’ tab
3. Click the ‘Advanced Settings’ link
4. Click the ‘Edit Address Allocation’ button
11
5. To assign an available Static IP address to each server,
select the DHCP Fixed option from the list box next
to each server name. For this example, select the
following options:
Device
VPNSRV
WEBSRV
MASTERSRV
IP Address
DHCP Fixed 208.35.230.193
DHCP Fixed 208.35.230.194
DHCP Fixed 208.35.230.195
6. Click ‘SAVE’ after making your selections to ensure
the addresses are properly assigned
7. Restart each server. After the restart, the network
interface for each server will be issued the desired
Static IP address
12
Allow all inbound traffic to flow to the SBS 2003
Note: To protect your network, it is recommended that you
enable the SBS firewall. To allow all inbound traffic to flow
through the firewall to the SBS 2003:
1. From a computer connected to the BT Business Hub,
open a browser and connect to the BT Business Hub user
interface by browsing to the following address: http://home
2. Click the ‘Firewall’ tab, as shown in the image
3. Click the ‘Firewall Settings’ link
4. Select the computer to which you would like to have
specific ports through the BT Business Hub firewall.
In the following example, the computer selected is SBS.
Please see 1 on the image opposite
5. Select ‘Allow All’ applications. This allows all inbound data
destined for the SBS 2003 to pass through the firewall.
Please see 2 on the image opposite
6. Click ‘DONE’
7. Close the browser
8. Perform an IP address release and IP address renew. This
will move the computer from the 192.168.1.0 IP range to
the designated Static IP address
9. Return to the SBS setup screen
13
Sample small-to-medium business network
The network described in this section represents a typical small-to
medium business network. In the following example, the customer
has purchased 5 broadband static IP addresses (208.35.230.192/29).
This sample is a multi-homed network server and provides DHCP service to the
Local Area Network (LAN) and routes Internet-based network traffic from the
LAN to the Wide Area Network (WAN). One of the server network interfaces is
connected to the LAN and the other is connected to a hardware firewall.
Firewall protection is provided by the network server operating system and is
applied to the WAN connected network interface. Alternatively, a specialised
hardware firewall might be installed between the BT Business Hub and the
WAN-connected network card in the network server.
A multi-homed VPN server
This server might be used to connect individual
remote clients to the LAN. It could also be
connected to another VPN server at a remote
location to link two networks together.
The VPN server is connected directly to the
BT Business Hub.
Publicly accessible web server
This server is directly connected to the
BT Business Hub and is not connected to the
local network. In some networks, this server may
be behind a hardware firewall and may have an
additional network interface connected to the
private LAN. The following sections describe
how to configure the servers.
Note: The configuration information listed in the following sections are examples ONLY.
Depending on your network setup, your actual settings (such as values for DNS and
IP addresses) may vary.
14
Allow WAN traffic to flow to network servers
After each server is configured with one of the available static IP
addresses, the BT Business Hub's firewall must be configured to
allow the appropriate WAN traffic to flow to each server.
In this example, all WAN traffic destined for the VPN server and the
network server will be allowed. Allowing all inbound traffic disables
the inbound port blocking feature of the BT Business Hub's firewall.
However, stateful packet inspection will still occur as the traffic passes
through the hub providing continued protection against Denial of
Service and other common Internet attacks.
In the case of the web server, the 'hosted application' feature of the BT
Business Hub will be used. This feature provides a quick and easy way
to allow specific types of unsolicited traffic through the BT Business
Hub firewall including traffic on TCP port 80 http.
Allow all inbound traffic to flow to a specified server
To allow all inbound traffic to flow through the firewall to a
particular destination IP address or server:
1. From a computer connected to the BT Business Hub,
open a browser and connect to the BT Business Hub user
interface by browsing to the following address: http://home
2. Click the ‘Firewall’ tab
3. Click the ‘Firewall Settings’ link
4. Select the computer to which you would like to have
all data sent. In the following example, the computer
selected is VPNSRV as shown under 1 opposite
5. Select ‘Allow All Applications’. This allows all inbound data
destined for the selected server to pass through the
firewall. As shown under 2 opposite
6. Click ‘DONE’
To allow all traffic for network server, repeat the above steps selecting
MASTERSRV from the list of computers.
15
Allow specific inbound ports to flow to a server
To allow specific types of inbound ports to flow
to a given server:
1. From a computer connected to the BT Business Hub,
open a browser and connect to the BT Business Hub user
interface by browsing to the following address: http://home
2. Click the ‘Firewall’ tab
3. Click the ‘Firewall Settings’ link
4. Select the computer to which you would like to have
specific ports through the BT Business Hub firewall.
In the following example, the computer selected is
WEBSRV as shown under 1 opposite
5. Select the ‘Allow individual application(s)’ option as
shown under 2 opposite
6. Select the appropriate application from the application list.
In this example, the application type is Web Server
7. Click ‘DONE’
Each application type in the hosted application list is
associated with one or more UDP or TCP ports. Clicking
the ‘View firewall details’ link displays the current ports
that are being directed to each computer on the network.
If the desired application type is not available in the list,
custom port grouping (both UDP and TCP) can be specified.
To do this, click the Add a user defined application link, enter
a name for the custom application, and enter the ports that
are to be allowed.
16
Edit Advanced Firewall Settings
The 'Edit advanced firewall settings' page allows you to
configure advanced features on your firewall.
NOTE: These features should be used only if you are thoroughly familiar with
firewalls and networking.
Security Settings
The BT Business Hub firewall provides a high level of security.
You can configure the firewall to provide advanced security
features, including stealth mode, block pings, or strict UDP
session control.
• Stealth Mode. When in stealth mode, the BT Business Hub
firewall will not return any information in response to
network queries; that is, it will appear to anyone who tries
to access your network that your network does not exist
• Block Ping. Enabling this feature ensures that your network
will block all ping requests
• Strict UDP Session Control. Enabling this feature provides
increased security by preventing the BT Business Hub from
accepting packets sent from an unknown source over an
existing connection
Inbound and Outbound Control
The Inbound and Outbound Control page displays some common protocol
types. When one of the Inbound protocol boxes is checked, the firewall
allows the corresponding protocol to pass through from the Internet to
the network. If one of the Outbound protocol boxes is checked, the
firewall allows the traffic from the network to pass through the firewall
to the Internet. You must click ‘SAVE’ for the changes to take effect.
Note: Allowing inbound traffic does not mean that the firewall automatically
allows this type of traffic to pass through the firewall to the network.
Even if a particular protocol/application type is allowed via the Advanced
Configuration settings, the firewall still checks and blocks all unsolicited
traffic from the Internet unless the firewall is configured to allow the
traffic through using an application profile.
Note: Firewall filtering takes precedence over application hosting. If you
disable the incoming traffic, you may disable support for hosted applications
that require that type of inbound communication.
17
Attack detection
The BT Business Hub provides a robust business-grade firewall
to protect all devices on the local network. There are some
applications and devices that require the use of specific data
ports through the firewall. The BT Business Hub allows users
to open the necessary ports through the firewall using the
Firewall Settings page. If the user requires that a computer
has all incoming traffic available to it, this computer can
be set to the DMZplus mode. While in DMZplus mode, the
computer is still protected against numerous broadband
attacks (such as SYN FLOOD, Invalid TCP flag attacks, etc.)
In rare cases, the incoming traffic may be inadvertently
blocked by the firewall (for example when integrating with
external third-party firewalls or VPN servers).
You may need to disable one or more of the attack detection
capabilities for any device placed in the DMZplus. In this case,
the third-party server provides the attack protection normally
provided by the BT Business Hub.
The following table lists the attacks for which the BT Business
Hub firewall filters continuously check.
To disable a specific attack detection capability, deselect the
applicable checkbox and click ‘SAVE’.
Note: It is highly recommended that any computer in the DMZplus has its own
firewall protection. This applies for both single IP and dynamic service offerings.
Attack
Description and Action Taken
Excessive Session Detection
Blaster or similar worm intrusion detection
TCP/UDP Port Scan
UDP port scan detected - drop packet
TCP port scan detected - drop packet
Invalid Source/Destination IP
address (scan inbound
and outbound packets)
IP source address is broadcast or multicast - drop packet
TCP destination IP address is not unicast - drop packet
IP source and destination address are the same - drop packet
Invalid IP source received from private/home network - drop packet
Packet Flood
(SYN/UDP/ICMP/ Other)
SYN Flood detected - stop SYN Flood
UDP Flood detected - stop UDP Flood
ICMP Flood detected - stop ICMP Flood
Other Flood detected - stop Other Flood
Invalid TCP Flag Attacks
(NULL/XMAS/Other)
(scan inbound and outbound packets)
TCP SYN/FIN attack detected - drop packet
TCP NULL attack detected - drop packet
TCP XMAS attack detected - drop packet
Invalid TCP flags attack detected - drop packet
Invalid ICMP Detection
Invalid ICMP type/code attack detected - drop packet
Miscellaneous
Port 0 attack detected - drop packet
TCP SYN packet - drop packet
Not a start session packet - drop packet
ICMP destination unreachable - terminate session
Stateful Packet Inspection for DMZplus and other public IP address
18
Resolve DNS entries
The BT Business Hub maintains a local DNS table so that one LAN device can
access other LAN devices by using the computer's network name. As LAN devices
are assigned IP addresses, the BT Business Hub populates its local DNS table,
which associates the computer name with an IP address.
To access the DNS Resolve table and manually add additional entries please see
the 'Resolve DNS entries' section in the Product Support Guide.
Summary
Configuration of the sample network is complete.
After completing the steps in this guide, the following network properties are in place:
• the BT Business Hub is configured to support multiple static broadband IP addresses
• each server has been assigned its proper static IP address, either by manually configuring the
TCP/IP settings of the server or by assigning the address directly from the BT Business Hub
• both the VPN server and network server are receiving all inbound traffic destined for their
respective static IP address
• the web server is receiving only TCP port 80 inbound traffic for its static IP address
19
Appendix A: DHCP service
Disable the BT Business Hub
DHCP Service
Occasionally, it may be necessary to disable the BT
Business Hub's on-board DHCP service. Typically,
this occurs when an existing network already has a
functioning DHCP server and the hub is connected
to the network as a peer to this server.
Note: It is strongly advised that you do not change
the hub's configuration settings until full broadband
connectivity is established. If you do change
configuration settings, be sure to make a note
of the changes you make.
20
To disable the BT Business Hub DHCP server:
1. From one of the servers, open a browser and connect
to the hub's user interface by browsing to the following
address: http://home
2. Click the ‘Local Network’ tab
3. Click the ‘Advanced Settings’ link
4. In the ‘Private Network’ panel, choose ‘Configure manually’
5. In the ‘Router Address’ field, enter the IP address for the hub.
This address should be a part of your local network range but
must not be part of the DHCP address pool. In other words,
the BT Business Hub must have a local Static IP address that
does not change. In the example case, the IP address would
be 192.168.0.62
6. Enter the subnet mask of the local network. In the example
case, the subnet mask would be 255.255.255.0
7. Deselect the ‘Enable DHCP’ checkbox
8. Click ‘SAVE’ after making your selections
Steps 1-9
After DHCP has been disabled in the BT Business Hub, one final
but important change is required to the existing DHCP server.
Using the existing DHCP server software, the Default Gateway
must be changed to the IP address of the BT Business Hub.
This is necessary so that Internet traffic can flow from the
local network to the Internet.
In the example, the existing DHCP server software would
be reconfigured such that the Default Gateway (sometimes
referred to as the 'Router' field) issued was 192.168.0.2
After the new configuration is in place, all computers, workstations,
and other devices connected to the local network should be
restarted to ensure that the proper network information is received.
21
Use the BT Business Hub's DHCP service
The BT Business Hub has a built-in DHCP server that provides
IP addresses to any device on the local network. By default, the
BT Business Hub provides the following range of IP addresses:
You can also configure a custom range of IP addresses.
You must select the ‘ENABLE DHCP’ checkbox and click
the ‘SAVE’ button to submit your changes.
192.168.x.x IP Range
• IP Range
• Subnet Mask
• Gateway
• DNS
1. Set up and configure the BT Business Hub using
a network computer. Follow the instructions in
the Quick Start Guide, and ensure that broadband
connectivity has been established through
this computer
192.168.1.64 to 192.168.1.253
255.255.255.0
192.168.1.254
192.168.1.254
If the default IP range is not suitable for your environment,
the BT Business Hub can also be set to provide the following
pre-configured IP address ranges:
172.16.x.x IP Range
• IP Range
• Subnet Mask
• Gateway
• DNS
172.16.1.33 to 172.16.1.250
255.255.0.0
172.16.0.1
172.16.0.1
10.x.x.x IP Range
• IP Range
• Subnet Mask
• Gateway
• DNS
10.0.1.33 to 10.0.1.250
255.255.0.0
10.0.0.1
10.0.0.1
2. Make sure that the existing network DHCP server has
been disabled
3. Connect the remaining computers to the BT Business
Hub, and release and renew the IP address to request
a new IP address from the BT Business Hub
4. If any computers require Static IP, manually
change the computer's TCP/IP settings to one
of the 1 to 32 IP addresses
5. Test connectivity to the Internet
For each IP range, the first 32 IP addresses are available for
devices that require Static IP assignment.
22
Appendix B: The BT Business Hub's
inter-operability with VPN
The BT Business Hub is designed to inter-operate with a wide range of existing
VPN options. Typical VPN scenarios are described below, including any additional
BT Business Hub configuration required.
Outbound VPN client connections
Clients on the LAN can establish VPN connections to
external VPN concentrators. Local network clients with
three types of IP addressing are noted in this section:
• Client Type A - Local clients with non-routable
addresses issued by the BT Business Hub and which
connect to the Internet via Network Address
Translation (NAT/dynamic).
• Client Type B - Clients for which the BT Business
Hub firewall has been configured for DMZplus
operation. In this scenario, the local client 'shares'
the broadband IP address with the BT Business
Hub. Only one client can share the broadband
IP address; thus, only one computer may be
configured for DMZplus at a time.
VPN Scheme
Client Type
Supported Configuration
L2TP Client
NAT (A)
Fully Supported
DMZplus (B)
Fully Supported
Static IP (C)
Fully Supported
NAT (A)
Fully Supported
DMZplus (B)
Fully Supported
Static IP (C)
Fully Supported
NAT (A)
ESP Tunnel-mode only
DMZplus (B)
ESP Tunnel-mode only
Static IP (C)
ESP Tunnel-mode only
PPTP Client
IPSec Client
• Client Type C - Client computers on the network
for which a routable, Static IP address has been
configured. This IP address is configured either directly
by changing the TCP/IP settings of the computer or by
assigning the Static IP address automatically using
the BT Business Hub address allocation feature.
Inbound connections to local VPN server
A VPN server can be hosted on the local network.
However, to allow for remote clients to connect to
the VPN server, the BT Business Hub firewall must be
configured to 'Allow All Applications' to pass through
to the VPN server. In the case where multiple
broadband (Static) IP addresses are not available, the
single broadband IP address will be shared via the BT
Business Hub DMZplus feature with the VPN server.
As such, when only one broadband IP address is
available, only one VPN server can be hosted on the
local network.
VPN Scheme
Supported Configuration
Hosted L2TP Server
Fully supported when firewall
configured to allow all applications
Hosted PPTP Server
Fully supported when firewall
configured to allow all applications
Hosted IPSec Server
Fully supported when firewall
configured to allow all applications
Dual servers may be used to load balance VPN traffic
using multiple public IP addresses.
23
www.btbroadbandoffice.com
Offices worldwide
The services described in this publication are subject to availability
and may be modified from time to time. Services and equipment
are provided subject to British Telecommunications plc’s respective
standard conditions of contract. Nothing in this publication forms
any part of any contract.
© British Telecommunications plc 2006
Registered office: 81 Newgate Street, London EC1A 7AJ
Registered in England No. 1800000
Designed by Design Directions Ltd
PHME 50953
Item Code: 027049