1
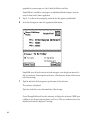
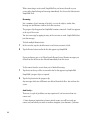
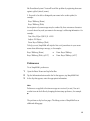
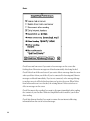
SimpleMail 4.3 User’s Guide
This booklet tells you how to set up and use the SimpleMail internet e-mail
transport. For the background on Newton e-mail, please refer to Apple’s Newton
E-Mail guide [1].
Getting started
There are several things you need to do in order to use e-mail.
■
■
■
You need to create an Internet setup using the Newton Internet Enabler (NIE) [5]
so that your Newton device can communicate with your Internet Service Provider
(ISP) or intranet.
If you’re using a modem, you need to set your modem preferences.
You need to set up SimpleMail [8].
Once these steps are done, you should be able to use e-mail on your Newton
device.
Note
Because SimpleMail uses the Newton Internet Enabler, it will only work with
Newton 2.x devices. It will not work on the Original MessagePad (OMP), MP100,
MP110 or early models of the MP120 which use Newton 1.x. ◆
1
Installation
System Update
If you don’t already have the latest Newton System Update [4], you should install
that first. To find out your system version:
1
2
Open the Extras Drawer and tap the Information button.
In the list that appears, tap Memory Info.
A slip appears showing you your ROM Version at the bottom left. When Apple
abandoned Newton on 27 February 1998, the versions were:
US & International English
German
MP120
2.0 (516263)
2.0 (536205)
MP130
2.0 (526205)
2.0 (536205)
MP2000
2.1 (717145)
2.1 (747260)
MP2100
2.1 (717260)
2.1 (747260)
eMate 300
2.1 (737246)
Since then Paul Guyot has created a 2.1 (710031) update for the English MP2000 and
MP2100 that fixes a Dates/Find bug.
The six-digit number tells you what type of Newton device the system update applies
to, and when it was built. See the Newton FAQ: Newton OS [3] for a full description
of the numbering system.
Newton Internet Enabler
Your Newton must be Internet Enabled before you can use SimpleMail. You need to
install Apple’s Newton Internet Enabler (NIE) [5], of which there are two versions.
■
■
NIE 1.1 works on any Newton 2.x device. It is the only option for the MP120 and
MP130.
NIE 2.0 works only on Newton 2.1 devices, ie MP2000, MP2100 and eMate. It offers
more connection options over NIE1.1.
Follow the directions in the NIE folder to set up a link to your Internet Service
Provider (ISP) using Internet Setup.
2
▲WARNING
Apple didn’t support NIE on the MP120 because of its limited system memory.
(Adding PC card memory doesn’t overcome this limitation.) You can use NIE 1.1
with the MP120, but you may need to freeze all non-mail packages to free up
enough memory for NIE to operate, and you may not be impressed by its
performance. ▲
Modem Enabler
If you’re using a modem to connect to your ISP, you need the appropriate
Modem Enabler [6]. Enablers for common modems are built-in to Newton.
SimpleMail
If you’ve used versions of SimpleMail earlier than 4.0, you may find the number of
packages in 4.x a little bewildering. Don’t panic! SimpleMail is no longer as simple
as it once was, and you may want to control exactly what to download to your
MessagePad.
If you install SimpleMail on a PC card, the SimpleMail transport will go away when
the card is removed and return when it is replaced. However, SimpleMail will put
the dreaded “Grip of Death” on the card, warning you to replace the card when
you attempt to eject it. For this reason it’s recommended you install SimpleMail
on the Internal store.
The following section describes which packages you need.
Minimum Installation
SimpleMail.pkg
TextStationery.pkg
At the very least you need the core SimpleMail package and stationery to be able
to view text in the InOut box.
The Text Stationery package has two scrolling modes, by line and by page, which
you can select by tapping the Text Stationery icon in Extras/Extensions.
3
PaperStationery.pkg
2.1 This package only works with Newton 2.1.
This alternative to the TextStationery package offers improved scrolling
performance.
vCard
vCardDecoder.pkg
Install this package to to have vCard (.vcf ) enclosures converted to Name cards
which may be viewed in your In Box and put away.
Images
ImageDecoder.pkg
ImageStationery.pkg
Install both these packages to be able to view JPEG and GIF format image enclosures
in your In Box.
The image decoder package calls upon Newt's Cape[7] and its JPEG conversion
helper to perform the actual conversion. You must acquire and install NewtsCape
and JPEGConvert separately . The image decoder will not install unless both these
packages are present.
Note
Newt’sCape is shareware - please encourage Steve Weyer to develop more great
Newton software by registering your copy of NewtsCape if you use these packages. ◆
Tibet Format.pkg
If you’re a user of TIBET you can use this package to send its JPEG images via
SimpleMail. This also allows you to CC images to multiple recipients, something
TIBET doesn’t normally allow. Just download the package to patch TIBET’s routing
button.
If you’ve installed the image decoder and stationery, the images may be viewed in
your Out Box.
4
Sounds
AudioDecoder.pkg
AudioStationery.pkg
Install both these packages to be able to hear AIFF (Macintosh), .wav (Windows),
muLaw (MIME audio/basic) and GSM format sound enclosures in your In Box.
When viewing a sound (sic) you can use the Tag button to put it away, after which
you can choose it as a system alert sound.
Currently there is no encoder for sending Newton sound in these formats.
Monaco
The Monaco.pkg contains a monospaced Monaco 9- and 12-point font good for
viewing messages in the In/Out Box. Its use is optional - you don’t need to install
it on your Newton device.
Help
The Help.pkg contains a condensed version of this book. To access it:
1
2
Open the Extras Drawer and tap InOut Box.
Tap the Information button and in the list that appears, tap SimpleMail Prefs.
SimpleMail’s Preferences slip appears.
3
Tap the Information button and in the list that appears tap Help.
Its use is optional - you don’t need to install it on your Newton device.
Configuration
You should have already created an Internet Setup and added it to your worksite see your NIE documentation for instructions on how to do this. The Internet
Setup holds the username and password used to log in to your ISP so that you
can access the internet.
SimpleMail needs additional information specific to e-mail. You add this to the
personal information held in your owner card:
• Your e-mail address for people to reply to.
5
• Your e-mail username & password for receiving mail.
• The addresses of your ISP’s POP or IMAP and SMTP hosts.
Add your e-mail address
If you’ve already entered your own E-Mail address, skip this section.
1
2
3
4
Go to Owner Info in the Extras Drawer.
Tap the owner you want to modify.
Tap Add and in the list that appears, tap E-Mail.
In the slip that appears, enter the appropriate information.
• Enter the address you want people to reply to and set the type of address to EMail or Internet. Alternatively, if your ISP appears in the address picker, choose
that and enter just your mailbox name (the part before the “@”) in the address
field.
• Ignore the “Set E-Mail Password” button.
If you have several E-Mail addresses, you can add them all to your owner card.
SimpleMail lets you choose which one you want to use in the routing slip when you
send something. You set the address you usually use in the mail host information
slip (next).
Add mail host information
1
2
6
Go to Owner Info in the Extras Drawer.
Tap the owner you want to modify.
3
4
Tap Add and in the list that appears, tap SimpleMail.
In the slip that appears, enter the appropriate information.
• Tap E-Mail to choose your e-mail address (the one you want to appear in
outgoing messages). You can only choose from E-Mail addresses you’ve
already entered in this owner card. When you come to mail something you
have a chance to change this if you need to.
The remaining information can be obtained from your ISP.
• Against Username enter your POP or IMAP e-mail login username.
• Tap Pop Host and in the list that appears choose the type of your account,
POP or IMAP.
• Against that label enter your mail host’s name. If you need to specify a port
number, append a colon and the number to the server name.
• If your account requires encryption of login details (APOP for POP or CRAMMD5 for IMAP), check the “Authenticate” box.
• Tap the Set Password button and in the slip that appears enter your POP or
IMAP e--mail login password.
7
• Against SMTP Host enter your SMTP host’s name. If you need to specify a port
number other than SMTP’s usual 25, append a colon and the number to the host
name.
• If your SMTP account requires authentication, check the “Authenticate” box.,
then tap the Set SMTP Login button and in the slip that appears enter your
SMTP login username and password.
If you have more than one mail account, for example at work or university and
home, you can add them all as SimpleMail items to your Owner card. SimpleMail will
check them all in turn when receiving mail, so you don’t have to manually connect to
each one. However, you can temporarily disable a setup by unchecking its Enabled
box.
Add mail host information to a worksite
The worksite SMTP mail host information overrides your owner card. Adding this
information means that when you switch worksites you switch to the right SMTP
server for the NIE setup at that worksite. Some ISPs will only accept mail from their
own servers as a security measure.
This function is provided only as a convenience. You don’t normally need to enter
worksite server information.
1
2
3
4
8
Go to Owner Info in the Extras Drawer.
Tap the worksite you want to modify.
Tap Add and in the list that appears, tap SimpleMail.
In the slip that appears, enter the appropriate information.
• Enter the address you want people to reply to when you’re mailing from this
worksite. “None” means there will be no Reply-To address in your messages
and your owner card E-Mail address will apply as usual.
• Against SMTP Host enter your SMTP host’s name. If you need to specify a
port number other than SMTP’s usual 25, append a colon and the number to
the host name.
• If your SMTP account requires authentication, check the Authenticate box.,
then tap the Set SMTP Login button and in the slip that appears enter your
SMTP login username and password.
Add an e-mail signature
1
2
3
4
Go to Owner Info in the Extras Drawer.
Tap the owner you want to modify.
Tap Add and in the list that appears, tap E-Mail Signature.
In the slip that appears, enter the appropriate information.
When you mail something, check the “Sign letter” checkbox in the routing slip to
append this signature to your message.
Using Electronic Mail
Refer to your MessagePad User’s Manual [2] for guidance with e-mail and the
InOut Box.
SimpleMail extends the usual set of e-mail functions. Firstly, it adds a few items to
the routing slip.
If the owner has several e-mail addresses, you can choose which one should be
used to reply to by tapping the address that appears beneath the owner/worksite
in the top left corner of the slip. If the worksite has a Reply-To address, that takes
precedence over your default e-mail address (the first listed in this picker) but is
overridden if you make any other choice.
If you want your E-Mail Signature to be appended to your message, check the
Sign letter box.
If you want your Owner Info contact details (address, phone and e-mail) to be
9
appended to your message as a vCard, check the Enclose card box.
SimpleMail lets you address a message to an individual without having to create an
entry for them in the Names application.
1
2
Tap To, Cc or Bcc in the routing slip, and in the list that appears tap Individual.
In the slip that appears, enter the appropriate information.
SimpleMail stores all enclosures in received messages, even though you may not be
able to view them. If a message has enclosures, a Part button is shown at the bottomleft of the message.
1
Tap Part and in the list that appears, tap the name of the enclosure.
The enclosure is displayed.
Tap Letter in the list to view the main body of the message.
If your MessagePad doesn’t have the stationery to display the enclosure’s MIME type
(and this is true for most non-text items) you’ll see a “This uses stationery that is not
installed and cannot be displayed.” message.
10
SimpleMail adds a few items to the Tag button’s popup list.
Unwrap
Many e-mail applications hard-wrap text when sending it. (They insert newline
characters at the end of each line on the sender’s screen.) This can make
paragraphs appear broken or badly formatted when displayed on a smaller screen
such as the MessagePad’s. To unwrap message text:
1
2
Open the e-mail message, or check it in the overview.
Tap the Tag button and in the list that appears tap Unwrap.
The text is unwrapped into paragraphs.
Tap Undo to restore the original message text.
Select All
When replying to a message you can quote text from the original by selecting it
before tapping Reply. To quote the entire original message, you need to select all
its text. To do this:
1
2
Ensure the caret is visible, or select some of the e-mail message text.
Tap the Tag button and in the list that appears tap Select All.
If there’s no caret or selection, Select All won’t appear in the list.
Delete a message on the server
This action helps you manage messages left on your mail server (‘remote’
messages).To delete a remote message:
1
2
Open the e-mail message, or check it in the overview.
Tap the Tag button and in the list that appears tap Delete Remote.
If the message is no longer on the server, Delete Remote won’t appear in the list.
If you’re connected for browsing mail, the message is deleted immediately. If
you’re not connected it will be deleted next time you log in to the server. It is not
deleted from your Newton In Box.
11
When connecting to receive mail, SimpleMail lets you browse the mail on your
server rather than fetching each message immediately. You choose this behaviour in
SimpleMail Prefs.
Browsing
Just a summary of each message is fetched - you see the subject, sender, date,
message size and Remote status in the In Box overview.
The progress slip disappears but SimpleMail remains connected. A small star appears
at the top of the screen.
You view a message by tapping its entry in the overview as usual - SimpleMail fetches
just that message.
To fetch multiple Remote items:
1
2
In the overview, tap the checkbox next to each item you want to fetch.
Tap the Receive button and in the list that appears tap SimpleMail.
If your preferences are set to Delete from In Box and server, Remote messages you
delete from the In Box are also deleted immediately from the server.
To disconnect from the server when you’ve finished browsing:
1
Tap the star at the top of the screen and in the list that appears tap SimpleMail.
SimpleMail’s progress slip is re-opened.
2
Tap the Stop button in the progress slip.
Any messages which are still Remote are deleted from the In Box - but not from the
server.
And finally…
There are a couple of problems you may experience if you have more than one
owner card.
1. Some shareware registration schemes naïvely assume you will have only one
owner card, and when you switch to another unregister your shareware. (Schemes
12
like Foundation Systems’ NewtonID avoid this problem by registering shareware
against a global (virtual) owner.)
2. You need to be able to distinguish your names in the sender picker, for
example:
Royce Walthrop (Home)
Royce Walthrop ( Work)
but recipients of your messages may be confused by these extraneous characters
or words when they read your name in the message’s addressing information - for
example:
Date: Mon, 22 Jun 1998 12:32 +0100
Subject: NS Objects
From: Royce Walthrop ( Work)
To help you out, SimpleMail will strip the first set of parentheses in your owner
name when addressing a message, so for example:
Royce Walthrop (Home)
Royce Walthrop ( Work) (x2117)
→
→
From: Royce Walthrop
From: Royce Walthrop (x2117)
Preferences
To set SimpleMail’s preferences:
1
2
3
Open the Extras Drawer and tap InOut Box.
Tap the Information button and in the list that appears, tap SimpleMail Prefs.
In the slip that appears, enter the appropriate information.
Note
Preferences are applied at the time messages are received (or sent). You can’t
reorder items in the In Box by changing the timestamp preference, for example.
◆
The preferences slip has four pages. The debug version of SimpleMail has an
additional debug page.
13
Basic
Check Leave mail onn server if you want to leave messages on the server after
fetching them. Otherwise messages are deleted automatically after being fetched.
Check Delete from In Box and server if you want to delete a message from the server
when you delete it from your In Box. If you’re connected for browsing mail, Remote
messages are deleted immediately. If you’re not connected, or the message belongs
to another server, it will be deleted next time you log in to the server. When Delete
from In Box and server is not checked, the routing button’s Delete action has no
effect on messages on the server.
Check Disconnect after sending if you want to disconnect immediately after sending
the contents of your Out Box. Otherwise SimpleMail looks for mail for your In Box
after sending.
Check Strip Internet headers if you want to remove the raw internet addressing
information from the start of received messages.
14
Otherwise messages have an Envelope part which contains the original internet
header.
2.1 Tap Open InOut as to select whether the In Box or Out Box should be opened
when you tap the InOut icon. In the list that appears, tap your choice.
Note
Open InOut as applies only to Newton 2.1. ◆
•
•
•
•
•
Tap When connecting to choose how you want to receive messages.
Browse mail - a summary of each message is retrieved from the server and shown
in the In Box overview. You choose which messages you want to download in full.
Download mail - messages are downloaded immediately.
Tap When Sending to set when you want to send an item.
Send now - always sends the item right away.
Send later - always routes the item to the InOut Box. Items wait in the Out Box
until you choose to send them.
Specify when - gives you a choice of Now or Later when you fill out the routing
slip.
Tap After sending to select what to do with an item after it is sent. In the list that
appears, tap your choice.
Tap File read items in to choose where to file received items that you have already
read. In the list that appears, tap your choice.
Note
Items aren’t actually filed until you close then re-open the InOut Box. ◆
15
Sending
NTE Tap Text encoding to enable a Newton Text Encoding (NTE) module. In the list that
appears, tap your choice.
Note
Text encoding applies only to SimpleMail-NTE. NTE modules are packages you
install separately. They perform language encoding for communications applications
- they can also be used by Newt’sCape, for example. ◆
Check Prefix reply wih originator if you want replies to be prefixed with a line saying
who sent the original message.
Against Quote lines with enter text that you want to be added at the start of every
line you’ve selected when you reply to a message.
Against Qutoe block with enter text that you want to be added at the start and end of
the text you’ve selected when you reply to a message.
16
Leave quote text blank if you don’t want to quote excerpts from a message in this
way.
Tap Always Cc to select recipients you’d like always to receive a copy of your
messages. In the list that appears, tap your choice.
You can change the Cc field for individual messages when you actually route the
item.
To remove this preference choose Other Names and uncheck all selected names.
If you want to send an x-face with all your messages, enter its definition in the
Face block.
An x-face is a 48x48 icon.
Receiving
17
Tap You have mail to specify a sound to be played when mail download is complete.
In the list that appears, tap your choice.
Check Enable no mail alert if you want an alert to be displayed when you are
receiving but there is no mail for your In Box. Otherwise SimpleMail silently returns
control to Newton, which is more suitable for unattended scheduled operation.
Tap Timestamp with to select the time zone with which you want received messages
to be stamped.
Tap Put Away text to to specify where multiple selections should be put away to. In
the list that appears, tap your choice.
2.1 Check Put away items automatically if you want received items to be put away to
applications that can automatically receive them.
Note
Put away items automatically applies only to Newton 2.1. ◆
Filter
18
•
•
•
•
•
Tap Receive to limit the number and type of messages you want to receive.
number - the number of messages to be received is limited to the chosen number
unlimited - no limit to the number of messages to be received will be applied
new - only messages not previously seen by this MessagePad will be received
unread - only messages having the POP Status: Unread header will be received
all - messages will be received, whether you’ve already read them or not
You can define what you want to do with received messages by defining filters.
•
•
•
•
Tap but to choose what you would like to do with a message that matches some
criterion you define below.
skip - the message will be ignored
file - the message will be received and filed in the folder you choose
abbreviate - only the first twenty lines of the message will be received
delete - the message will be deleted from the mail server without being fetched
into your Newton In Box
Note
Abbreviated messages will not be deleted from the mail server even if your
preference is not to “Leave mail on server”. ◆
Tap if to select the attribute of a message you want to test. In the slip that
appears, tap your choice.
The layout of this line changes depending on the attribute you’ve chosen. Tap the
text next to the diamond to choose a relationship for the attribute, and the item
to its right to define the value for your filter.
Messages which match this relationship will have the chosen action applied to
them. Messages which match none of your criteria will be received in full.
Note
On this line “is” means “contains” (and takes up much less screen space). ◆
19
Tap the Add button to add your filter to the list.
Tap a filter to select it, then tap Remove to remove a filter from the list.
During the receive process, filter criteria are tested in the order they appear in the
list and the first that matches has its action applied. Currently there is no way to reorder the list other than removing and re-adding filters.
Check the Enabled checkbox to enable filtering. If this box is unchecked then all
messages will be received in full.
Tap Mail Font to choose the font used for displaying your message text. In the slip
that appears, select the appropriate information.
Tap Delivery to set the schedule when you want your Newton device to send and
receive mail. In the slip that appears, select the appropriate information.
Tap Add to add the specified time and days to the schedule.
To remove a scheduled time, tap the time in the window then tap Remove.
Tap Enabled to turn on or off the automatic delivery of mail.
When SimpleMail is scheduled in this way it attempts to send anything in your
OutBox before receiving, so remember to set your preferences not to “Disconnect
after sending” if you want to receive messages automatically.
Debug
The debug page appears only in the debug version of SimpleMail. It lets you specify
what debug information you want to capture during an e-mail session, and where
you want the log to appear.
You can examine the log yourself to see what’s going wrong, or you can send it to
Simon Bell <[email protected]> for analysis.
20
Check The usual suspects to capture useful checkpoint data.
Check Account information to capture your mail account data as Mail V extracts it
from your owner card.
Check All I/O to capture Mail V’s conversation with the mail server.
Check ViewFrame to create a log in ViewFrame. This option does not appear if
ViewFrame is not installed.
Check NTK Inspector if your Newt is tethered. This is the preferred option since
the log is then on your desktop.
Check Notepad to create a new unfiled note containing the log.
Limitations & Known Problems
■
1
2
3
■
If your preference is When connecting : Browse mail:
If you’ve created multiple SimpleMail items in your owner card, only the first
account will be browsed.
Tapping Receive/SimpleMail in the In Box overview with no selection will always
re-fetch all message summaries.
Any attempt to Send will be queued for later; you can’t change hosts while
connected.
SimpleMail does not forward enclosures.
21
Frequently Asked Questions
If your question isn’t answered here, reread the NIE Users Guide, particularly the
Troubleshooting section.
Q
A
Q
A
Q
A
Q
A
Q
22
SimpleMail sends an attachment with every message, which recipients can’t read.
How can I disable this “feature”?
The attachment is Newton data, readable by other SimpleMail users. For example,
you can mail a note including ink and sketches. If you want to send text only, check
the “Text Only” box in the routing slip when you mail a message.
When I try to connect I get a message saying “You need to set your owner
SimpleMail information before you can connect to the mail server.” but I’m sure it’s
all filled in correctly. What’s missing?
You’re probably not connecting as the right owner. The owner name shown in the
routing slip (top left corner) must be the one you’ve set up for SimpleMail. You can
run the Diagnostic package to check whether you really have set everything
correctly.
When I’m trying to receive SimpleMail, everything seems okay until the status slip
says “Checking for mail” and then I’m alerted to a “POP -ERR”. Why?
The POP server rejected your login information. Re-check your POP username and
password in the Owner card’s SimpleMail setup slip, and ensure you’ve not checked
Authenticate if your server does not support APOP.
When I’m trying to receive SimpleMail, my modem just hangs up when the status
slip says “Looking up host...”, but there’s no error message. What’s going on?
Your mail server couldn’t be found on the net. Check the POP or IMAP Host info in
your owner card.
My mail service provider authenticates my SMTP connection by only allowing me to
log in to their SMTP server for a short interval after I have successfully logged in to
their POP server. How can I set SimpleMail to receive before sending?
A
Unfortunately SimpleMail doesn’t do this. You have to Receive then Send
manually.
Q
Occasionally SimpleMail reports a server error 999, which is not a valid POP or
SMTP error code. What does it mean?
A
SimpleMail uses 999 when reporting a POP -ERR response and the cause of the
error cannot be identified.
Diagnostic
Diagnostic is a separate package which shows you all SimpleMail’s settings so you
can check them over in one place. It lists all your E-Mail addresses and SimpleMail
setups for each of your Owner cards so you can quickly check them yourself for
missing or mis-spelt items.
Tap here to choose an
owner and worksite.
Indicates your e-mail
address.
Indicates an IMAP
host and username.
Indicates your SMTP
host.
Tap the Clear button to
delete all SimpleMail
information.
Tap the Go Back button
to see the previous
SimpleMail setup for
this owner.
Tap the Next button to
see the next SimpleMail
setup for this owner.
23
Feedback
If you find some aspect of SimpleMail not up to snuff, or if you have helpful
suggestions, please feel free to let me know:
Simon Bell <[email protected]>
Acknowledgements
Thanks and kudos go to Jason Harper for ViewFrame. Debugging has never been so
painless.
This book was inspired by one created by Peter Rand using Newt’s Cape 2.0 [7].
Legal
While I have done extensive testing to make sure SimpleMail is well-behaved, I
cannot take responsibility for its use or misuse. If you don’t like being responsible for
trying SimpleMail, don’t!
SimpleMail is copyright ©1997-2001 by Simon Bell. All rights reserved.
Apple, MessagePad and Newton are trademarks of Apple Computer, Inc., registered
in the U.S. and other countries.
24
References
Apple no longer hosts Newton manuals or developer tools. It does, however, host
Newton system software on its Older Software web page.
1
Newton E-Mail Guide
2
MessagePad User’s Manual
3
Newton FAQ
4
Newton System Updates
5
Newton Internet Enabler
6
Modem Enabler
7
Newt’sCape Web Browser
8
SimpleMail
http://www.unna.org/unna/apple/documentation/misc/UsingE-Mail(NIE2.0).pdf
http://www.unna.org/unna/apple/documentation/2x00/2000UsersManual.PDF
http://www.chuma.org/newton/faq/
http://www.info.apple.com/support/oldersoftwarelist.html#newton
http://www.info.apple.com/support/oldersoftwarelist.html#newton
http://www.info.apple.com/support/oldersoftwarelist.html#newton
http://www.kagi.com/weyer/#NewtsCape
http://www.simple.dial.pipex.com/
25
Contents
Getting started
Installation
System Update
Newton Internet Enabler
Modem Enabler
SimpleMail
Configuration
Add your e-mail address
Add mail host information
Add mail host information to a worksite
Add an e-mail signature
Using Electronic Mail
Unwrap
Select All
Delete a message on the server
Browsing
And finally…
Preferences
Basic
Sending
Receiving
Filter
Debug
Limitations & Known Problems
Frequently Asked Questions
Diagnostic
Feedback
Acknowledgements
Legal
References
26