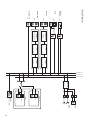
1
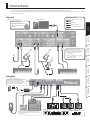
English
Owner’s Manual
Deutsch
Français
Battery powered stereo amp with high audio quality and high output
• Specially designed circuit allows up to 50 W output using eight AA batteries.
• ECO mode allows up to approximately 20 hours of use on rechargeable Ni-MH batteries.
Italiano
• Two-way stereo speakers with woofer and tweeter allow wide-range sound to be produced.
Lightweight cabinet for convenient portability
• A dedicated case CB-CS2 (sold separately) made of water-repellent material is also available.
• Four inputs and AUX IN are provided, including XLR-compatible mic input jacks and line input jacks that support input from a
keyboard or other instrument.
• Three choices of COSM amp type optimized for electric guitar are provided: CLEAN, CRUNCH, and LEAD. These types cover the
tonal range from transparently clean sounds to hard distortion.
• Line output and a STEREO LINK function allow the CUBE Street EX to be used for a variety of purposes such as a monitor or a
simple PA system.
i-CUBE LINK function makes it easy to enjoy recording or mixdown
By using the included four-conductor mini cable to connect your iPad or iPhone to the CUBE Street EX, you can use it as an audio
interface. You can further expand your performance possibilities by using the system in conjunction with apps on your device.
Before using this unit, carefully read the sections entitled “USING THE UNIT SAFELY” (p. 2) and “IMPORTANT NOTES” (p. 3). These sections provide important
information concerning the proper operation of the unit. Additionally, in order to feel assured that you have gained a good grasp of every feature of your
new unit, read Owner’s Manual in its entirety. This manual should be saved and kept on hand as a convenient reference.
Copyright © 2014 ROLAND CORPORATION
All rights reserved. No part of this publication may be reproduced in any form without the written permission of ROLAND CORPORATION.
Nederlands
• A dedicated preamp optimized for acoustic guitar performance is provided, delivering a rich and natural sound.
Português
A rich variety of inputs and outputs to support a variety of instruments
Español
• The cabinet is made of ABS injection molded resin, for a lightweight and tough design.
USING THE UNIT SAFELY
About
WARNING and
CAUTION Notices
Used for instructions intended to alert the
user to the risk of death or severe injury
should the unit be used improperly.
Used for instructions intended to alert the
user to the risk of injury or material
damage should the unit be used
improperly.
* Material damage refers to damage or
other adverse effects caused with
respect to the home and all its
furnishings, as well to domestic animals
or pets.
About the Symbols
The symbol alerts the user to important instructions or
warnings.The specific meaning of the symbol is
determined by the design contained within the triangle. In
the case of the symbol at left, it is used for general
cautions, warnings, or alerts to danger.
The symbol alerts the user to items that must never be
carried out (are forbidden). The specific thing that must
not be done is indicated by the design contained within
the circle. In the case of the symbol at left, it means that
the unit must never be disassembled.
The symbol alerts the user to things that must be
carried out. The specific thing that must be done is
indicated by the design contained within the circle. In the
case of the symbol at left, it means that the power-cord
plug must be unplugged from the outlet.
ALWAYS OBSERVE THE FOLLOWING
WARNING
Make sure that the power cord is grounded
Connect mains plug of this model to a
mains socket outlet with a protective
earthing connection.
To completely turn off power to the unit, pull out
the plug from the outlet
Even with the power switch turned off, this
unit is not completely separated from its
main source of power. When the power
needs to be completely turned off, turn off
the power switch on the unit, then pull out the plug
from the outlet. For this reason, the outlet into which
you choose to connect the power cord’s plug should
be one that is within easy reach and readily accessible.
Do not disassemble or modify by yourself
Do not carry out anything unless you are
instructed to do so in the owner’s manual.
Otherwise, you risk causing malfunction.
Do not repair or replace parts by yourself
Refer all servicing to your retailer, the
nearest Roland Service Center, or an
authorized Roland distributor, as listed on
the “Information.”
Do not use or store in the following types of
locations
• Subject to temperature extremes (e.g.,
direct sunlight in an enclosed vehicle,
near a heating duct, on top of heatgenerating equipment); or are
• Damp (e.g., baths, washrooms, on wet
floors); or are
• Exposed to steam or smoke; or are
• Subject to salt exposure; or are
• Exposed to rain; or are
• Dusty or sandy; or are
• Subject to high levels of vibration and shakiness.
Use only the stand that is recommended
This unit should be used only with a stand
that is recommended by Roland.
Do not place in a location that is unstable
When using the unit with a stand
recommended by Roland, the stand must
be carefully placed so it is level and sure
to remain stable. If not using a stand, you
still need to make sure that any location you choose
for placing the unit provides a level surface that will
properly support the unit, and keep it from wobbling.
2
WARNING
WARNING
Precautions regarding placement of this unit on a
stand
Turn off the unit if an abnormality or malfunction
occurs
Be sure to follow the instructions in the
Owner’s Manual carefully when placing this
unit on a stand (p. 10).
If it is not set up properly, you risk creating
an unstable situation which could lead to the unit
falling or the stand toppling, and may result in injury.
Immediately turn the unit off, remove the
AC adaptor from the outlet, and request
servicing by your retailer, the nearest
Roland Service Center, or an authorized
Roland distributor, as listed on the “Information” when:
• The AC adaptor or the power cord has been
damaged; or
• If smoke or unusual odor occurs; or
• Objects have fallen into, or liquid has been spilled
onto the unit; or
• The unit has been exposed to rain (or otherwise
has become wet); or
• The unit does not appear to operate normally or
exhibits a marked change in performance.
Use only the supplied AC adaptor and the correct
voltage
Be sure to use only the AC adaptor supplied
with the unit. Also, make sure the line
voltage at the installation matches the
input voltage specified on the AC adaptor’s
body. Other AC adaptors may use a different polarity,
or be designed for a different voltage, so their use
could result in damage, malfunction, or electric shock.
Use only the supplied power cord
Use only the attached power cord. Also, the
supplied power cord must not be used with
any other device.
Do not bend the power cord or place
heavy objects on it
Otherwise, fire or electric shock may result.
Avoid extended use at high volume
Use of the unit at high volume for extended
periods of time may cause hearing loss. If
you ever experience any hearing loss or
ringing in the ears, you should immediately
stop using the unit and consult a specialized
physician.
Do not allow foreign objects or liquids to enter
unit; never place containers with liquid on unit
Do not place containers containing liquid
(e.g., flower vases) on this product. Never
allow foreign objects (e.g., flammable
objects, coins, wires) or liquids (e.g., water
or juice) to enter this product. Doing so
may cause short circuits, faulty operation,
or other malfunctions.
Be cautious to protect children from injury
Always make sure that an adult is on hand
to provide supervision and guidance when
using the unit in places where children
are present, or when a child will be using
the unit.
Do not drop or subject to strong impact
Otherwise, you risk causing damage or
malfunction.
Do not share an outlet with an unreasonable
number of other devices
Otherwise, you risk overheating or fire.
Do not use overseas
Before using the unit in overseas, consult
with your retailer, the nearest Roland
Service Center, or an authorized Roland
distributor, as listed on the “Information.”
Handle batteries carefully
If used improperly, you risk the dangers of
fluid leakage, overheating, combustion,
explosion, etc. Carefully observe the
following:
• Do not heat, disassemble, or toss them
into a fire or water.
• Do not expose them to sunlight, flame,
or any other source of extreme heat.
• Do not attempt to charge a dry cell
battery.
• When using a rechargeable battery and
a charger, make sure to use only the
combination of rechargeable battery
and charger that has been specified
by the battery manufacturer. Also,
be sure to read all of the precautions
that were supplied with the rechargeable battery
and charger, and abide by them when using the
battery/charger.
IMPORTANT NOTES
CAUTION
CAUTION
Place in a well ventilated location
The unit and the AC adaptor should be
located so their location or position does
not interfere with their proper ventilation.
Use only the specified stand(s)
Evaluate safety issues before using stands
When disconnecting the power cord, grasp it by
the plug
Injury could result if someone were to trip
on a cable and cause the unit to fall or
topple.
Avoid climbing on top of the unit, or placing heavy
objects on it
Otherwise, you risk injury as the result of
the unit toppling over or dropping down.
Never connect/disconnect a power plug if your
hands are wet
Otherwise, you could receive an electric
shock.
Disconnect all cords/cables before moving the unit
Before moving the unit, disconnect the
power plug from the outlet, and pull out all
cords from external devices.
Before cleaning the unit, disconnect the power
plug from the outlet
An accumulation of dust or foreign objects
between the power plug and the power
outlet can lead to fire or electric shock.
At regular intervals, be sure to pull out the
power plug, and using a dry cloth, wipe away any dust
or foreign objects that may have accumulated.
Whenever there is a threat of lightning, disconnect
the power plug from the outlet
If the power plug is not removed from the
outlet, you risk receiving an electric shock.
If the power plug is not removed from the
outlet, you risk receiving an electric shock.
Batteries may reach a high temperature;
please be careful to avoid burning yourself.
Handle leaking batteries carefully
• Do not touch the liquid with your bare
hands.
• If any of the leaking fluid gets into your
eyes, the loss of vision may result. Do
not rub your eyes; use clean water to
flush them thoroughly. Then, promptly
see a doctor.
• Burning of the skin or dermatitis may result if fluid
has gotten onto your skin or clothing. Use clean
water to flush affected areas thoroughly; then,
promptly see a doctor.
• Using a soft cloth, carefully wipe any remaining
fluid from the inside of the battery compartment.
Then, install new batteries.
Italiano
Periodically clean the power plug
Take care not to get burned
Français
To prevent conductor damage, always
grasp the power cord by its plug when
disconnecting it from this unit or from a
power outlet.
Route all power cords and cables in such a way as
to prevent them from getting entangled
If used improperly, batteries may explode
or leak and cause damage or injury. In the
interest of safety, please read and observe
the following precautions.
• Carefully follow the installation
instructions for batteries, and make sure
you observe the correct polarity.
• Avoid using new batteries together with
used ones. In addition, avoid mixing
different types of batteries.
• Remove the batteries whenever the unit is to
remain unused for an extended period of time.
• Never keep batteries together with metallic objects
such as ballpoint pens, necklaces, hairpins, etc.
• Used batteries must be disposed of in compliance
with whatever regulations for their safe disposal
that may be observed in the region in which you
live.
Power Supply: Use of Batteries
• Before installing/removing batteries, make sure to
turn off the power to this unit and disconnect all
connections to other devices.
• If operating this unit on batteries, please use
rechargeable Ni-MH batteries or Alkaline batteries.
Placement
• Using the unit near power amplifiers (or other
equipment containing large power transformers)
may induce hum. To alleviate the problem, change
the orientation of this unit; or move it farther away
from the source of interference.
• Do not expose the unit to direct sunlight, place
it near devices that radiate heat, leave it inside
an enclosed vehicle, or otherwise subject it to
temperature extremes. Excessive heat can deform
or discolor the unit.
• When moved from one location to another where
the temperature and/or humidity is very different,
water droplets (condensation) may form inside
the unit. Damage or malfunction may result if you
attempt to use the unit in this condition. Therefore,
before using the unit, you must allow it to stand
for several hours, until the condensation has
completely evaporated.
• Depending on the material and temperature of the
surface on which you place the unit, its rubber feet
may discolor or mar the surface. You can place a piece of felt or cloth under the
rubber feet to prevent this from happening. If you
do so, please make sure that the unit will not slip or
move accidentally.
Maintenance
• For everyday cleaning wipe the unit with a soft,
dry cloth or one that has been slightly dampened
with water. To remove stubborn dirt, use a cloth
impregnated with a mild, non-abrasive detergent.
Afterwards, be sure to wipe the unit thoroughly
with a soft, dry cloth.
• Never use benzine, thinners, alcohol or solvents of
any kind, to avoid the possibility of discoloration
and/or deformation.
Additional Precautions
• Use a reasonable amount of care when using the
unit’s buttons, sliders, or other controls; and when
using its jacks and connectors. Rough handling can
lead to malfunctions.
• When disconnecting all cables, grasp the connector
itself—never pull on the cable. This way you will
avoid causing shorts, or damage to the cable’s
internal elements.
• To avoid disturbing others nearby, try to keep the
unit’s volume at reasonable levels.
• When you need to transport the unit, pack it in
shock-absorbent material. Transporting the unit
without doing so can cause it to become scratched
or damaged, and could lead to malfunction.
3
Nederlands
• The AC adaptor will begin to generate heat after
long hours of consecutive use. This is normal, and is
not a cause for concern.
• Noise may be produced if wireless communications
devices, such as cell phones, are operated in the
vicinity of this unit. Such noise could occur when
receiving or initiating a call, or while conversing.
Should you experience such problems, you should
relocate such wireless devices so they are at a
greater distance from this unit, or switch them off.
• Do not place containers or anything else containing
liquid on top of this unit. Also, whenever any liquid
has been spilled on the surface of this unit, be sure
to promptly wipe it away using a soft, dry cloth.
Português
• Do not connect this unit to same electrical outlet
that is being used by an electrical appliance that
is controlled by an inverter or a motor (such as a
refrigerator, washing machine, microwave oven, or
air conditioner). Depending on the way in which
the electrical appliance is used, power supply noise
may cause this unit to malfunction or may produce
audible noise. If it is not practical to use a separate
electrical outlet, connect a power supply noise filter
between this unit and the electrical outlet.
• This unit may interfere with radio and television
reception. Do not use this unit in the vicinity of such
receivers.
Español
IMPORTANT NOTES
Power Supply
Deutsch
Even if you observe the cautions given
in the owner’s manual, certain types of
handling may allow this product to fall
from the stand, or cause the stand to
overturn. Please be mindful of any safety issues before
using this product.
Fire may result in the unlikely event that a
breakdown occurs.
Handle batteries carefully
English
This unit is designed to be used in
combination with specific stands (STA95) manufactured by Roland. If used
in combination with other stands, you
risk sustaining injuries as the result of this product
dropping down or toppling over due to a lack of
stability.
Disconnect the power plug whenever the unit will
not be used for an extended period of time
CAUTION
About the Power Supply
Battery Operation
Checking the Remaining Battery Amount
The CUBE Street EX can be powered with eight AA batteries (sold
separately). We recommend that you keep batteries installed in the
unit even though you’ll be powering it with the AC adaptor. That way,
you’ll be able to continue a performance even if the cord of the AC
adaptor gets accidently disconnected from the unit.
* If you handle batteries improperly, you risk explosion and fluid leakage.
Make sure that you carefully observe all of the items related to batteries
that are listed in “USING THE UNIT SAFELY” (p. 2) and “IMPORTANT NOTES”
(p. 3).
* When operating on battery power only, the unit’s indicator will become
blink when battery power gets too low. Replace the battery as soon as
possible.
When the [BATTERY CHECK/MUTE] switched on, you
can check the amount of power remaining in the
batteries.
* When the [BATTERY CHECK/MUTE] switched on, the
indicator blinks, and sound will not produced from the
CUBE Street EX’s speakers or from LINE OUT jacks and PHONES jack.
* Sounds may distort easily or may cut off when played at high volume as
the battery power begins to fade, but this is normal and does not indicate
a malfunction. In such instances, either replace the batteries or use the AC
adaptor included with the unit.
Battery indicator
* The remaining battery power
indication is only an approximation.
Choosing Batteries
This unit can be used with alkaline batteries or rechargeable Ni-MH
batteries. The operating time will depend on the characteristics of
the batteries. Refer to the following table and choose the type of
batteries that you want to use.
Operating time
OUTPUT POWER
switch
MAX
Rechargeable Ni-MH
NORMAL
battery
ECO
Alkaline battery
Approx. 5 hours
Approx. 10 hours
Approx. 20 hours
MAX
Approx. 4 hours
NORMAL
Approx. 8 hours
ECO
Approx. 16 hours
* The times given in the table are approximate, and will differ depending on
the conditions of use.
Installing Batteries
1
Remove the battery cover.
Insert the batteries, taking
care to orient them as shown
in the illustration.
2
3
Removing the Battery Case
Although you can replace the batteries while the battery case is still
attached, it’s easier to replace the batteries if you remove the battery
case.
Loosen the two screws.
Remove the battery
case.
4
Light out
Full charge
Low charge
Use only the AC adaptor included with the CUBE Street EX. Use of
other AC adaptors may damage the amp or result in other problems.
Operating time
Loosen the two screws.
Blink
AC Adaptor Operation
The operating time on batteries will depend on the
type of batteries and on the setting of the [OUTPUT
POWER] switch.
Type of battery
Light
1
2
Connections
* To prevent malfunction and equipment failure, always turn down the volume, and turn off all the units before making any connections.
* When connection cables with resistors are used, the volume level of equipment connected to the inputs (AUDIO IN) may be low. If this happens, use connection cables
that do not contain resistors.
Top panel
About plugs in figures
iPhone, iPad, etc
XLR
About combo jacks
1/4” phone
Stereo 1/4” phone
(Included)
4-pole miniature phone
English
You can connect either XLR
plugs or phone plugs to the
combo jacks.
Deutsch
Français
Acoustic feedback could be produced
depending on the location of microphones
relative to speakers. This can be remedied by:
• Changing the orientation of the
microphone(s).
• Relocating microphone(s) at a greater
distance from speakers.
• Lowering volume levels.
Italiano
Español
Rear panel
Português
To prevent the inadvertent disruption of power
to your unit (should the plug be pulled out
accidentally), and to avoid applying undue stress
to the DC IN jack, anchor the power cord using
the cord hook, as shown in the illustration.
Nederlands
U
FS-5U
Setting of the switches
This setting sets the [LINE OUT/STEREO LINK] switch to
“LINE OUT.” Refer to “Connecting Two Units to Increase
the Output (STEREO LINK)” (p. 10), if you set this switch to
“STEREO LINK.”
Setting of the switches
5
Panel Description
Top Panel
4
1
Number
Name
2
5
10
3
6
7
11
12
8
9
15
16
13
17 18
14
Explanation
MIC/INSTRUMENT CHANNEL
INPUT
1
INPUT jack
Here you can connect a mic, guitar, keyboard, or other
electronic musical instrument (balanced connection).
Switch this to choose the input level that’s appropriate for
the device you’ve connected.
2
[SELECT] switch
Choose the “MIC” setting if you’re connecting a mic, or
choose the “INST” setting if you’re connecting an acoustic
guitar or a keyboard.
3
[VOLUME] knob
Adjusts the volume of the MIC/INSTRUMENT channel.
* This instrument is equipped with balanced (XLR/TRS) type jacks.
Wiring diagrams for these jacks are shown below. Make connections
after first checking the wiring diagrams of other equipment you
intend to connect.
EQUALIZER
4
[BASS] knob
Adjusts the sound level of the low-frequency range.
[MIDDLE] knob
Adjusts the sound level of the middle-frequency range.
[TREBLE] knob
Adjusts the sound level of the high-frequency range.
[REVERB] knob
Spacious-sounding stereo reverb is provided. Turn the knob to adjust the reverb level.
REVERB
5
MIC/GUITAR CHANNEL
INPUT
6
[INPUT] jack
Here you can connect an electric guitar, acoustic guitar, or
mic (unbalanced connection).
7
[TUNER] button
The switch lights in red when the tuner function is on;
the switch is unlit when the tuner is off. For more detailed
information, refer to “Using the Tuner” (p. 9).
* This instrument is equipped with unbalanced (XLR/TRS) type jacks.
Wiring diagrams for these jacks are shown below. Make connections
after first checking the wiring diagrams of other equipment you
intend to connect.
AMPLIFIER
You can select from the following six types. When the tuner function (p. 9) is on, you can use this to select the name of the
string (1E - 6E)to be tuned.
8
9
6
Type switch
[VOLUME] knob
Type
Explanation
A-GUITAR
Choose this if you’ve connected an acoustic guitar that’s equipped with a pickup.
ACOUSTIC SIM
This is an original amp that transforms the sound of a connected electric guitar into the sound of
an acoustic guitar.
CLEAN
This is an original amp that provides a clean and natural sound with a sense of transparency.
When used in conjunction with the chorus and reverb of the CUBE Street EX, it provides a
spacious, three-dimensional sound.
CRUNCH
This original amp delivers a fat crunch sound that allows each note to be clearly defined.
LEAD
This is a high-gain original amp that produces thick-sounding distortion.
MIC
Choose this if you’ve connected a microphone.
Adjusts the volume of the MIC/GUITAR channel.
Panel Description
Number
Name
Explanation
EQUALIZER
10
[BASS] knob
Adjusts the sound level of the low-frequency range.
[MIDDLE] knob
Adjusts the sound level of the middle-frequency range.
[TREBLE] knob
Adjusts the sound level of the high-frequency range.
CHORUS/DELAY
Turn this knob to CHORUS or DELAY to switch to that effect.
Type
Explanation
CHORUS
11
[CHORUS/DELAY] knob
English
This is a spacially synthesized chorus.
With spacially synthesized chorus, a method available only in stereo, the chorus effect
is created by taking the sound from the right speaker (from which the effect sound is
output), and the sound from the left speaker (which outputs the direct sound), and
then mixing them in the actual space. This creates a greater lateral spread than that
produced when the sounds are mixed electronically, providing a more natural sense
of breadth.
Turn the knob to change the time and amount of delay effects.
Deutsch
DELAY
REVERB
[REVERB] knob
Spacious-sounding stereo reverb is provided.
Turn the knob to adjust the reverb level.
Français
12
OTHER JACKS AND KNOBS
LINE IN
13
L/MONO, R jacks
Line-level devices such as a keyboard can be connected here.
14
[VOLUME] knob
Adjusts the volume of the LINE IN.
Italiano
AUDIO IN
15
AUDIO IN (i-CUBE LINK) jack
[VOLUME] knob
Here you can use a stereo mini-type cable to connect your audio player or similar device, and output its sound from the
speakers of the CUBE Street EX.
If you use the mini-cable (four-conductor) included with the CUBE Street EX to connect your iPad or iPhone, you’ll be able
to use the CUBE Street EX as an audio interface for your iPad or iPhone.
Adjusts the volume of the AUDIO IN (i-CUBE LINK).
Español
POWER/BATTERY
BATTERY CHECK/MUTE
[BATTERY CHECK/MUTE] switch
16
BATTERY indicator
If this is on, the BATTERY indicator blinks, and the output from the speakers, LINE OUT jacks, and PHONES jack of the
CUBE Street EX are muted.
Indicates the remaining battery amount.
For details on how to check the remaining amount, refer to “Checking the Remaining Battery Amount” (p. 4).
Português
OUTPUT POWER
Changing the setting of this switch changes the maximum volume of the internal speaker and the remaining available
time of battery operation.
17
[OUTPUT POWER] switch
Explanation
MAX
The maximum volume is louder than with the NORMAL setting, but the available operating time is
shorter.
NORMAL
This setting provides a balance between maximum volume and operating time.
ECO
The maximum volume is less than with the NORMAL setting, but the available operating time is longer.
Nederlands
Setting
POWER
18
[POWER] switch
This switches the power on and off (p. 8).
POWER indicator
This indicator lights when the unit is turned on.
7
Turning the Power On/Off
Rear Panel
19
Number
20 21
22
23
Name
Explanation
19
Cord hook
Hook the AC adaptor cord here (p. 5).
20
DC IN jack
21
PHONES jack
LINE OUT/STEREO LINK switch
Connect the included AC adapter to this jack.
* Use only the AC adaptor included with the CUBE Street EX.
Connect the headphones to this jack.
* No sound is played through the unit’s speaker while the PHONES jack is in use.
Switches the functions of the LINE OUT/STEREO LINK OUT jacks.
AUX IN/STEREO LINK IN jack
[LINE OUT/STEREO LINK] switch setting
LINE OUT
AUX IN/
STEREO LINK IN jack
22
LINE OUT/STEREO LINK OUT jack
STEREO LINK
Connect an audio player or similar device, and
output the playback from the speakers of the
CUBE Street EX.
* The input to the AUX IN jack is not output from
the LINE OUT jacks.
If you are connecting two CUBE Street EX units to
increase the output volume (STEREO LINK), use
these jacks as input/output jacks.
The jacks output the same sound as the speakers
of the CUBE Street EX. You can connect an audio For details, refer to “Connecting Two Units to
LINE OUT/
interface or recorder to record your performance, Increase the Output (STEREO LINK)” (p. 10).
STEREO LINK OUT jack or output the sound to a mixer.
To adjust the output volume, use the [VOLUME]
knob located beside each input jack.
23
FOOT SW jacks
Connect a footswitch (BOSS FS-5U or FS-6: sold separately). You can use the footswitch to turn on/off the MIC/GUITAR channel’s
CHORUS/DELAY and REVERB, or the MIC/INSTRUMENT channel’s REVERB.
* If you use a monaural cable to connect just one footswitch to the MIC/GUITAR jack, you can’t control the REVERB.
Turning the Power On/Off
Once everything is properly connected (p. 5), be sure to follow the
procedure below to turn on their power. If you turn on equipment in
the wrong order, you risk causing malfunction or equipment failure.
* Before turning the unit on/off, always be sure to turn the volume down.
Even with the volume turned down, you might hear some sound when
switching the unit on/off. However, this is normal and does not indicate a
malfunction.
1. Turn all [VOLUME] knobs of the CUBE Street EX to 0.
2. Minimize the volume of the devices connected to the
CUBE Street EX.
3. Turn on the power of the devices that are connected to
the INPUT jacks, LINE IN (L/MONO, R) jacks, and AUDIO IN
(i-CUBE LINK) jacks of the CUBE Street EX.
8
4. Turn on the power of the CUBE Street EX.
* This unit is equipped with a protection circuit. A brief interval (a few
seconds) after power up is required before the unit will operate normally.
5. Turn on the power of the devices that are connected to the
LINE OUT jacks and PHONES jack.
* When turning the power off, turn the volume to 0 for all devices that are
connected to the CUBE Street EX and then turn off their power; finally, turn
off the power of the CUBE Street EX.
Convenient Functions
Using the Tuner
Using Your iPad/iPhone (i-CUBE LINK)
You can use “manual tuning,” whereby you switch to each
individual string to tune it separately, and “chromatic tuning,” which
automatically determines the closest pitch to that played by the
string.
* The sound of the MIC/INSTRUMENT channel will not be heard from the
unit’s speakers while you’re using the tuner function.
“i-CUBE LINK” allows you to use the included mini cable (4-pole) to
connect your iPad/iPhone so that audio can be played back from the
iPad/iPhone while the sound of your guitar playing and or voice on
the CUBE Street EX is sent to the iPad/iPhone. This function lets you
use an iPad/iPhone app to record and play back the sound of your
guitar or mic.
iPad/iPhone app
1. Press the [TUNER] button.
Guitar or Mic sound
English
Tuning in “Manual Mode”
iPad/iPhone output
2. Use the Type switch to select the name of the string you
Deutsch
iPad/iPhone output
+
Guitar or Mic sound
want to tune, then play a single note on the open string.
String Name
6E
Open sixth string
5A
Open fifth string
4D
Open fourth string
3G
Open third string
2B
Open second string
1E
Open first string
The sound of your guitar or mic will be sent
from the CUBE Street EX to the iPad/iPhone.
* If you want to hear only the sound that’s being input from the iPad/iPhone,
turn down the [VOLUME] knob of each channel.
For details on i-CUBE LINK and on iPhone/iPad apps that can use
i-CUBE LINK, refer to Roland website.
http://www.roland.com/
Italiano
* Reference pitch: A4=440 Hz
3. Tune the string until the green indicator lights.
Flat
Lights green
Sharp
Español
Lights red
Pitch is correct
Français
Type Switch Position
Lights red
* The red indicator blinks if the pitch is substantially out of tune.
4. When you have finished tuning, press the [TUNER] button
Português
once again.
Tuning in “Chromatic Mode”
1. Press and hold the [TUNER] button for one second or
Nederlands
longer.
The indicator blinks (chromatic mode).
2. Play a single note on the open string you want to tune.
3. Tune the string until the green indicator lights.
4. When you have finished tuning, press the [TUNER] button
once again.
9
Setup
1. On the L-side unit and the R-side unit, set the [LINE OUT/
Mounting on a Stand
STEREO LINK] switch to “STEREO LINK.”
2. Connect the STEREO LINK OUT R jack on the L-side unit and
By using a speaker stand (ST- ST-A95
A95:sold separately ), you can
mount the CUBE Street EX at
Stopper
the optimal height for use as a
monitor speaker or simple PA
device.
Upper tube
Height adjustment
knob
the STEREO LINK IN jack on the R-side unit.
* If you want to use the input jacks of the R-side unit, connect the STEREO
LINK OUT L jack of the R-side unit to the STEREO LINK IN jack of the L-side
unit.
3. Connect your guitars or mics to the input jacks of the L-side
NOTE
Tripod
knob
* Always have at least one
other person assist you when
Tripod
mounting the CUBE Street EX
on a speaker stand, or when
adjusting the height of the stand
while the CUBE Street EX remains mounted on it.
(R-side) unit.
Connections When Using the Input Jacks
of Both Units
* Be careful not to pinch your fingers, when you assemble.
1. Loosen the tripod knob and open the tripod.
After opening the tripod wide enough,
tighten the tripod knob again.
* The distance between lower ends of the tripod
should be 98 cm (38-5/8”) as shown in right
figure. If the tripod is not opened wide enough,
the stand may be unstable.
L-side
2. Loosen the height adjustment knob
and make the upper tube longer.
3. Set up the upper tube at the required
R-side
INPUT
Leg spread:
98 cm (38-5/8”)
or more
AUDIO IN
LINE IN
INPUT
AUDIO IN
LINE IN
height less than 130 cm (51-3/16”) and insert the stopper
into the hole of the upper tube.
* Always use the ST-A95 with the stopper inserted into the upper tube.
4. Tighten the height adjustment knob.
5. Fit the hole on the CUBE Street EX onto the upper tube.
Connecting Two Units to Increase the
Output (STEREO LINK)
You can use two CUBE Street EX units to increase the output. This
function is called “STEREO LINK.” You’ll need to provide one or two
phone (monaural) cables depending on how you use this function.
Connection When Using the Input Jacks of
Only One Unit
L-side
INPUT
AUDIO IN
LINE IN
10
R-side
1. On the L-side unit and the R-side unit, set the [LINE OUT/
STEREO LINK] switch to “STEREO LINK.”
2. Connect the STEREO LINK OUT R jack on the L-side unit and
the STEREO LINK IN jack on the R-side unit.
3. Connect the STEREO LINK OUT L jack on the R-side unit and
the STEREO LINK IN jack on the L-side unit.
4. Connect your guitars and mics to the input jacks.
Adjusting the Volume
Adjust the L and R volume levels using their [VOLUME] knobs.
Main Specifications
Roland CUBE Street EX BATTERY POWERED STEREO AMPLIFIER
Maximum Power
Output
50 W (25 W + 25 W)
MIC/INSTRUMENT INPUT: -50/-10 dBu
Nominal Input
Level (1 kHz)
Trademarks
Roland, BOSS, COSM, CUBE, CUBE STREET are either registered trademarks or
trademarks of Roland Corporation in the United States and/or other countries.
Company names and product names appearing in this document are registered
trademarks or trademarks of their respective owners.
MIC/GUITAR INPUT: -10 dBu
LINE IN: -10 dBu
AUDIO IN (i-CUBE LINK): -10 dBu
AUX IN, STEREO LINK IN: -10 dBu
LINE OUT (L/MONO, R): -10 dBu
English
Nominal Output
Level (1 kHz)
STEREO LINK OUT (L, R): -10 dBu
[OUTPUT POWER switch: MAX (Maximum power output: 50 W)]
Alkaline battery: Approximately 4 hours
Rechargeable Ni-MH battery: Approximately 5 hours (*1)
[OUTPUT POWER switch: NORMAL (Maximum power output: 25
W)]
Alkaline battery: Approximately 8 hours
Deutsch
Expected
battery life under
continuous use
Rechargeable Ni-MH battery: Approximately 10 hours (*1)
[OUTPUT POWER switch: ECO (Maximum power output: 10 W)]
Alkaline battery: Approximately 16 hours
Rechargeable Ni-MH battery: Approximately 20 hours (*1)
*1 When using batteries having a capacity of 2,450 mAh.
Speakers
Français
* These can vary depending on the specifications of the
batteries, capacity of the batteries, and the conditions of use.
Woofer: 20 cm (8 inches) x 2
Tweeter: 5 cm (2 inches) x 2
[MIC/INSTRUMENT]
• INPUT jack: Combo type (XLR type, 1/4-inch TRS phone),
balanced
Italiano
• FOOT SW (REVERB) jack: 1/4-inch TRS phone type
[MIC/GUITAR]
• INPUT jack: Combo type (XLR type, 1/4-inch TRS phone),
unbalanced
• FOOT SW (TIP: CHORUS/DELAY, RING: REVERB) jack: 1/4-inch
TRS phone type
[AUDIO IN]
• STEREO AUDIO IN (i-CUBE LINK) jack: 4-pole miniature phone
type
Español
Connectors
[LINE IN]
• STEREO LINE IN (L/MONO, R) jacks: 1/4-inch phone type
• AUX IN, STEREO LINK IN jack: 1/4-inch phone type
Português
• LINE OUT (L/MONO, R), STEREO LINK OUT (L, R) jacks: 1/4-inch
phone type
• PHONES jack: Stereo 1/4-inch phone type
• DC IN jack
AC adaptor (DC 13 V)
Power Supply
Alkaline battery (AA, LR6) x 8
Dimensions
Nederlands
Rechargeable Ni-MH battery (AA, HR6) x 8
Current Draw
730 mA
490 (W) x 341 (D) x 305 (H) mm
19-5/16 (W) x 13-7/16 (D) x 12-1/16 (H) inches
7.4 kg (excluding batteries)
Weight
16 lbs 6 oz
Owner’s manual
Accessories
AC adaptor
Power cord
Mini cable (4-pole miniature phone type)
Options (sold
separately)
Carrying case: CB-CS2
Footswitch (BOSS FS-5U, BOSS FS-6)
Speaker stand: ST-A95
0 dBu=0.775 Vrms
* In the interest of product improvement, the specifications and/or
appearance of this unit are subject to change without prior notice.
11
R
L/MONO
STEREO
Block Diagram
AUDIO IN
(i-CUBE LINK)
LINE IN
MIC/GUITAR
INPUT
MIC/INSTRUMENT
MIDDLE/BASS/TREBLE
EQ
EFFECT
CHORUS/DELAY, REVERB
EFFECT
COSM AMPLIFIER
VOLUME
EQ
REVERB
<MIC/INSTRUMENT>
<6 types>
PRE AMP
MIDDLE/BASS/TREBLE
VOLUME
STEREO LINK
CONTROL
STEREO LINK
OUT L
OUT R
LINE OUT
L (MONO)
R
AUDIO IN
PHONES
L
SPEAKER
R
OUTPUT i-CUBE LINK
12
INPUT
AUX /STEREO LINK
IN
SPEAKER OUT L
SPEAKER OUT R
STEREO LINK IN
For the U.K.
WARNING:
THIS APPARATUS MUST BE EARTHED
IMPORTANT: THE WIRES IN THIS MAINS LEAD ARE COLOURED IN ACCORDANCE WITH THE FOLLOWING CODE.
GREEN-AND-YELLOW: EARTH, BLUE: NEUTRAL, BROWN: LIVE
As the colours of the wires in the mains lead of this apparatus may not correspond with the coloured markings identifying
the terminals in your plug, proceed as follows:
The wire which is coloured GREEN-AND-YELLOW must be connected to the terminal in the plug which is marked by the
letter E or by the safety earth symbol or coloured GREEN or GREEN-AND-YELLOW.
The wire which is coloured BLUE must be connected to the terminal which is marked with the letter N or coloured BLACK.
The wire which is coloured BROWN must be connected to the terminal which is marked with the letter L or coloured RED.
FEDERAL COMMUNICATIONS COMMISSION
RADIO FREQUENCY INTERFERENCE STATEMENT
For the USA
This equipment has been tested and found to comply with the limits for a Class B digital device, pursuant to Part 15 of the
FCC Rules. These limits are designed to provide reasonable protection against harmful interference in a residential
installation. This equipment generates, uses, and can radiate radio frequency energy and, if not installed and used in
accordance with the instructions, may cause harmful interference to radio communications. However, there is no guarantee
that interference will not occur in a particular installation. If this equipment does cause harmful interference to radio or
television reception, which can be determined by turning the equipment off and on, the user is encouraged to try to correct the
interference by one or more of the following measures:
– Reorient or relocate the receiving antenna.
– Increase the separation between the equipment and receiver.
– Connect the equipment into an outlet on a circuit different from that to which the receiver is connected.
– Consult the dealer or an experienced radio/TV technician for help.
This device complies with Part 15 of the FCC Rules. Operation is subject to the following two conditions:
(1) this device may not cause harmful interference, and
(2) this device must accept any interference received, including interference that may cause undesired operation.
This equipment requires shielded interface cables in order to meet FCC class B limit.
Any unauthorized changes or modifications not expressly approved by the party responsible for compliance could void the user’s
authority to operate the equipment.
For Canada
CAN ICES-3 (B)/NMB-3 (B)
For Korea
WARNING
For C.A. US (Proposition 65)
This product contains chemicals known to cause cancer, birth defects and other reproductive harm, including lead.
For EU Countries
For China
*
5
1
0
0
0
3
8
5
8
2
-
0
1
*