1
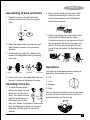
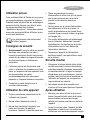
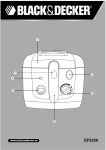
www.blackanddecker.ae FS1600R ENGLISH 1 8 11 21 6 4 7 9 10 5 12 3 2 14 13 15 19 16 17 18 20 22 23 Parts Identification 1. 2. 3. 4. 5. 6. 7. 8. 9. 10. 11. 12. 2 Front guard Locking screw Guard securing clip Guard ring Blade cap Fan blade Guard lock nut Rear guard Motor shaft Main unit Oscillation control knob Control panel 13. 14. 15. 16. 17. 18. 19 20. 21. 22. 23. Securing screw Switch housing Adjusting tube Tighten/ loosen screw Support tube Base plate Screw Base plate screw Handle Remote control Two AAA size Alkaline batteries ENGLISH Intended use Your Black & Decker fan has been designed for indoor household use only. Remove all the parts from the packaging material and keep them aside . Ensure that you have all the parts as identified in the part identification list else get in touch with your nearest Black & Decker service agent assistance. Read this entire manual carefully before using the appliance. Safety instructions • Warning! When using mains-powered appliances, basic safety precautions, including the following, should always be followed to reduce the risk of fire, electric shock and personal injury. • The intended use is described in this manual. The use of any accessory or attachment or the performance of any operation with this appliance other than those recommended in this instruction manual may present a risk of personal injury. • Retain this manual for future reference. Using your appliance • Always take care when using the appliance. • Do not use the appliance outdoors. • Do not operate the appliance if your hands are wet. Do not operate the appliance if you are barefoot. • Guide the power supply cord neatly so it does not hang over the edge of a worktop and cannot be caught accidentally or tripped over. • Never pull the power supply cord to disconnect the plug from the socket. Keep the power supply cord away from heat, oil and sharp edges. • If the power supply cord is damaged during use, disconnect the appliance from the power supply immediately. Do not touch the power supply cord before disconnecting from the power supply. • Disconnect the appliance from the power supply when not in use and before cleaning. Safety of others • This appliance is not intended for use by persons (including children) with reduced physical sensory or mental capabilities, or lack of experience and knowledge, unless they have been given supervision or instruction concerning use of the appliance by a person responsible for their safety. • Children should be supervised to ensure that they do not play with the appliance. After use • Switch off, remove the plug from the socket and let the appliance cool down before leaving it unattended and before changing, cleaning or inspecting any parts of the appliance. • When not in use, the appliance should be stored in a dry place. Children should not have access to stored appliances. 3 ENGLISH Inspection and repairs • Switch off the appliance before cleaning, changing accessories or approaching parts which move in use • Before use, check the appliance for damaged or defective parts. Check for breakage of parts, damage to switches and any other conditions that may affect its operation. • Do not use the appliance if any part is damaged or defective. • Have any damaged or defective parts repaired or replaced by an authorised repair agent. • Before use, check the power supply cord for signs of damage, ageing and wear. • Do not use the appliance if the power supply cord or mains plug is damaged or defective. • If the power supply cord or mains plug is • Check that the supply voltage shown on the rating plate of the appliance matches that of your electrical system. Any connection error will invalidate the guarantee. Mains Plug Replacement If a new mains plug needs to be fitted: • Safely dispose of the old plug. • Connect the brown lead to the live terminal of the new plug. • Connect the blue lead to the neutral terminal. • If the product is class l (earthed), connect the green / yellow lead to the earth terminal. Warning! If your product is class ll double insulated (only 2 wires in the cord set), no connection is to be made to the earth terminal. Follow the fitting instructions supplied with good quality plugs damaged or defective it must be repaired by Any replacement fuse must be of the same rating an authorised repair agent in order to avoid a as the original fuse supplied with the product. hazard. Do not cut the power supply cord • If the supply cord is damaged, it must be and do not attempt to repair it yourself. replaced by the manufacturer or an • Never attempt to remove or replace any authorised Black & Decker Service Centre in parts other than those specified in this order to avoid a hazard. manual. • Allow the appliance to cool before fitting or Electrical safety removing any parts and before cleaning. Before use, check that the mains voltage • Do not immerse the appliance in liquid. corresponds to the voltage on the rating plate. This appliance is double insulated in accordance with EN 60335-2-14; therefore no earth wire is required. Fitting and Assembling Make sure your fan is switched off before connecting to or disconnecting from power supply. Ensure that the voltage rating on the To avoid the risk of electric shock, do not immerse the cord, plug or motor unit in water base plate corresponds to the main voltage at your home. or other liquid. • 4 ENGLISH Assembling of base and stand 1. Rotate the screw in the anti-clockwise direction and remove it from the support tube. 2. Place the support tube onto the base and then tighten the screw in the clockwise direction. 2. Mount the fan blade onto the motor shaft. Fasten the blade cap by rotating it in the anti-clockwise direction until the blade is fixed firmly into place. 3. Open the securing clip at the bottom of the front guard and loosen the clip screw. Position the top clip on the uppermost part of the rear guard. Push the top clip down and press rim of the front guard onto the rear guard. Close the bottom clip and tighten the screw. 3. To assemble the main unit, release a few inches of the adjustable tube by operating the screw. Operations Motor Rear guard Fan blade Front guard 4. Fit the main unit on the adjustable tube and secure it in place by tightening the screw. Assembly of the fan 1. To install the rear guard, remove the blade cap and guard nut from the motor shaft. Then attach the rear Finish guard by positioning it on the location pins on the main unit. Secure the guard on to the motor body by fastening the guard nut, turning it clockwise until the guard is locked into position. Your Fan has three speed control to keep the desired air flow through your room 0 - Off 1 - Low 2 - Medium 3 - High 3 21 0 You can press the oscillating control knob down to make the fan oscillate to position the fan in specific direction pull the knob up. 5 ENGLISH The Fan guard can also be positioned vertically depending upon the direction of flow desired. For this switch OFF the fan first, let the fan come to halt, then with one hand hold the stand and with the other hand, move the guard assembly up or down depending upon the desired angle required. To make the fan oscillate pin down. To make it stop oscillation, pull it up. ON/OFF button set the running time which will be displayed on the LCD. + TIMER - For example: If the timer is pressed once, the operating time will be set at 1hr and if the timer is pressed 4 times, the operating time will be set at 4 hours. The can be operated by remote control as well fan. The Fan guard can also be positioned vertically depending upon the direction of flow desired. For this switch OFF the fan first, let the fan come to a halt, then with one hand hold the stand and with the other hand, move the guard assembly up or down depending upon the desired angle required. Your fan can be controlled by pushing the buttons, which can be set on the ON/OFF Control panel or on the Remote Control. To make the fan oscillate, press the oscillation pin down. To make it stop oscillation, pull it up. Press the On/Off button once to operate the fan and once again to make the fan stop running. Please inset 2’AAA’ size batteries into the remote as per making in the remote cavity. Speed button Always face the LED on your remote towards the fan when you are operating the fan with remote. Your Fan has a speed control button to keep the desired air + SPEED flow through your room. The speed of the fan can be adjusted by pressing the button. The speed will be displayed on the LCD. To increase the speed press the ” + “ button continually until it reaches the maximum of 4.To decrease the speed press the “ _ ” button continually until the running speed reaches the minimum of 1. The can be operated by remote control as well fan. Timer The timer can be used to set the running time of the fan, which can vary from 1 to 8 hrs. The number of times the timer button is pressed will 6 Remote control To increase the speed, press the increase speed button once with every press of button the speed increases by onestep.Your fan is a four speed fan.To run the fan at maxmimum speed , press the “speed+” button four times. In similar fashion, to reduce speed press the “speed_” button. Your remote also has timer control functions. As explained under “Times” functioning, the “time+” & ”time_” buttons can be operated to set the running time of fan. The On/Off button operates and switches off the fan from your remote. ENGLISH Replacing battery • Operate the appliance only with dry hands. With normal use, the batteries should last for about six months, when the remote no longer operates the fan, replace the batteries with new ones. Always check your batteries inside the remote periodically to check for corrosion or leakage. Warning ! • Never use the fan without the guard in place or if the guard is damaged. • Do not touch moving parts • Always allow motor to stop before approaching the blades or changing an accessory. • If the power supply cord is damaged during use, disconnect the appliance from the power supply immediately . Do not touch the power supply cord before disconnecting from the power supply. • When not in use, the appliance should be stored in a dry place. Children should not have access to stored appliance. • Do not cover the rear housing of the fan with any cloth or curtain. • Do not operate this unit in tropical climate or • Keep your fingers, long hair, loose clothes and supply cord away from moving parts. • Never pull the power cord to disconnect the plug from the socket. • Keep the power supply cord away from in areas where the temperature exceeds 40ºC. Technical Data Voltage 220 – 240V ~ 50Hz Power input 60W Weight 8.75kg heat, oil and sharp edges. • Do not place the appliance on or near heat source or in a heated oven • Do not use the appliance outdoors. Always protect the motor unit from water or excessive humidity 7 ENGLISH Protecting the environment Separate collection. This product must not be disposed of with normal household waste. Should you find one day that your Black & Decker product needs replacement, or if it is of no further use to you, do not dispose of it with other household waste. Make this product available for separate collection. • Black & Decker provides a facility for recycling Black & Decker products once they have reached the end of their working life. This service is provided free of charge. To take advantage of this service please return your product to any authorised repair agent who will collect them on our behalf. • You can check the location of your nearest authorised repair agent by contacting your local Black & Decker office at the address indicated in this manual. Alternatively, a list of authorized Black & Decker repair agents and full details of our after-sales service and contact are available on the Internet at: www.2helpU.com. Guarantee Black & Decker is confident of the quality of its products and offers an outstanding guarantee. This guarantee statement is in addition to and in no way prejudices your statutory rights. The guarantee is valid within the territories of the Member States of the European Union and the European Free Trade Area. If a Black & Decker product becomes defective due to faulty materials, workmanship or lack of conformity, within 24 months from the date of purchase, Black & Decker guarantees to replace defective parts, repair products subjected to fair wear and tear or replace such products to ensure minimum inconvenience to the customer unless: The product has been used for trade, professional or hire purposes; The product has been subjected to misuse or neglect; The product has sustained damage through foreign objects, substances or accidents; Repairs have been attempted by persons other than authorised repair agents or Black & Decker service staff. To claim on the guarantee, you will need to submit proof of purchase to the seller or an authorised repair agent. You can check the location of your nearest authorised repair agent by contacting your local Black & Decker office at the address indicated in this manual. Alternatively, a list of authorised Black & Decker repair agents and full details of our after-sales service and contacts are available on the Internet at: www.2helpU.com. 8 ARABIC 1 8 11 21 6 4 7 9 10 5 12 3 2 14 13 15 19 16 17 18 20 22 ºµëàdG áMƒd .12 23 AGõLC’ÉH ∞jô©àdG ¿ÉeC’G »ZôH .13 á«eÉeC’G á«bGƒdG áµÑ°ûdG .1 ìÉàØŸG â«Ñe .14 ∫ÉØbE’G »ZôH .2 §Ñ°†dG ´GQP .15 á«bGƒdG áµÑ°ûdG ¿ÉeCG ∂Ñ°ûe .3 ∂ØdG /§HôdG »ZôH .16 á«bGƒdG áµÑ°ûdG á≤∏M .4 ºYódG ´GQP .17 áMhôŸG ¢ûjQ AÉ£Z .5 IóYÉ≤dG áMƒd .18 áMhôŸG ¢ûjQ .6 »ZôH .19 á«bGƒdG áµÑ°ûdG â«ÑãJ ádƒeÉ°U .7 IóYÉ≤dG áMƒd »ZôH .20 á«Ø∏ÿG á«bGƒdG áµÑ°ûdG .8 ¢†Ñ≤e .21 ∑ôëŸG OƒªY .9 ó©H øY ºµëàdG RÉ¡L .22 á«°ù«FôdG IóMƒdG .10 AAA ¢SÉ≤e ¿ÉàaÉL ¿ÉàjQÉ£H .23 ácô◊G ‘ ºµëàdG ´GQP .11 9 ARABIC π°üØd »FÉHô¡µdG QÉ«àdG ∂∏°S ó°T Ék ≤∏£e ∫hÉ– ’ • ΩGóîà°S’G ¢VôZ »FÉHô¡µdG QÉ«àdG ∂∏°ùH ßØàMG .¢ùÑ≤ŸG øY ¢ùHÉ≤dG ºb .§≤a ‹õæŸG ΩGóîà°SÓd ôµjO ófBG ∑ÓH áMhôe ⪪°Uo .IOÉ◊G ±Gƒ◊Gh âjõdGh IQGô◊G øY kGó«©H .kÉÑfÉL É¡©°Vh ∞«∏¨àdG OGƒe øe AGõLC’G ™«ªL êGôNEÉH áªFÉb ‘ IOóëŸG AGõLC’G ™«ªL OƒLh øe ócCÉJh ,ΩGóîà°S’G AÉæKCG »FÉHô¡µdG QÉ«àdG ∂∏°S ∞∏J ádÉM ‘ • ≈Lôj ,™£b …CG ¢ü≤f ádÉM ‘h ,AGõLC’ÉH ∞jô©àdG .»FÉHô¡µdG QÉ«àdG Qó°üe øY QƒØdG ≈∏Y áMhôŸG π°üaG ôµjO ófBG ∑ÓÑd ™HÉJ áeóN π«ch ÜôbCÉH ∫É°üJ’G ¬∏°üa πÑb »FÉHô¡µdG QÉ«àdG ∂∏°S ¢ùŸ ÖæŒ »¨Ñæjh .IóYÉ°ùŸG ≈∏Y ∫ƒ°üë∏d .»FÉHô¡µdG QÉ«àdG Qó°üe øY ΩGóîà°SG πÑb ájÉæ©H π«dódG Gòg IAGôb »¨Ñæj .áMhôŸG ΩóY AÉæKCG »FÉHô¡µdG QÉ«àdG Qó°üe øY RÉ¡÷G π°üaG • .∞«¶æàdG πÑbh ΩGóîà°S’G øjôNB’G áeÓ°S hhP ¢UÉî°TC’G É¡eóîà°ù«d ᪪°üe ÒZ áMhôŸG √òg • IÈÿG hCG IOhóëŸG á«∏≤©dG hCG á«°ù◊G ájó°ù÷G äGQó≤dG πX ‘ ’EG (∫ÉØWC’G ∂dP ‘ ÉÃ) Úà∏«∏≤dG áaô©ŸGh á≤∏©àŸG äɪ«∏©àdG º¡FÉ£YEG hCG º¡«∏Y ±GöTE’G øY ∫hDƒ°ùŸG ¢üî°ûdG πÑb øe áMhôŸG ΩGóîà°SÉH .º¡àeÓ°S º¡ãÑY ΩóY ¿Éª°†d ∫ÉØWC’G ≈∏Y ±GöTE’G Ωõ∏j • .áMhôŸÉH ΩGóîà°S’G ó©H ¢ùÑ≤ŸG øe ¢ùHÉ≤dG ´õfGh áMhôŸG 𫨰ûJ ±É≤jEÉH ºb • πÑbh áÑbGôe ¿hO É¡côJ πÑb OÈJ ≈àM áMhôŸG ∑ôJGh .É¡°üëa hCG É¡Ø«¶æJ hCG É¡FGõLCG øe …CG Ò«¨J áeÓ°ùdG äɪ«∏©J QÉ«àdG Qó°üà á∏°üàŸG Iõ¡LC’G ΩGóîà°SG óæY !ôjò– • áeÓ°ùdG äÉWÉ«àMG IÉYGôe Ék ªFGO Ú©àj ,»°ù«FôdG √ÉfOCG IQƒcòŸG äÉWÉ«àM’G ∂dP ‘ Éà ᫰SÉ°SC’G áeó°üd ¢Vô©àdGh ≥jô◊G ´’ófG ôWÉfl øe óë∏d .á«°üî°T äÉHÉ°UE’Gh á«FÉHô¡c áMhôŸG √òg ΩGóîà°SG øe ¢Vô¨dG π«dódG Gòg Oóëj • á≤aôe äGóMh hCG äÉ≤ë∏e ájCG ΩGóîà°SG ¿CG IÉYGôe ™e ∂∏J ÒZ áMhôŸG √òg ΩGóîà°SÉH á«∏ªY ájCG ò«ØæJ hCG IQƒ£N ≈∏Y …ƒ£æJ ób π«dódG Gòg ‘ É¡H ≈°UƒŸG .á«fóH áHÉ°UE’ ¢Vô©àdG .kÓÑ≤à°ùe ¬«dEG ´ƒLô∏d π«dódG Gò¡H ®ÉØàM’G ≈Lôj • áMhôŸG ΩGóîà°SG .áMhôŸG ΩGóîà°SG óæY Ék ªFGO Qò◊G ñƒJ • .∫õæŸG êQÉN áMhôŸG Ωóîà°ùJ ’ • ¿ƒµJ ÉeóæY ’h ,Úà∏àÑe ∑Gójh áMhôŸG π¨°ûJ ’ • .Úeó≤dG ‘ÉM ‘ É¡æjõîJ Öéj ,áMhôŸG ΩGóîà°SG ΩóY ádÉM ‘ • ¥ƒa ≥∏©àj ’ å«ëH ábóH »FÉHô¡µdG QÉ«àdG ∂∏°S OôaG • ¤EG ∫ƒ°UƒdÉH ∫ÉØWCÓd ìɪ°ùdG ΩóY Öéjh .±ÉL ¿Éµe hCG Ì©àdG ºàj ’ å«ëHh Ió°†æŸG hCG πª©dG í£°S ±GƒM .áfõîŸG Iõ¡LC’G .ICÉéa ¬H πbô©àdG 10 ARABIC ≈∏Y áë°VƒŸG RÉ¡÷G á«£dƒa ≥aGƒJ øe ócCÉàdG Ωõ∏j • ‘ »FÉHô¡µdG ΩɶædG á«£dƒa ™e RÉ¡÷G ∞«æ°üJ áMƒd ∫É£HEG ¤EG π«°UƒàdG ‘ CÉ£N …CG …ODƒj ±ƒ°S .∂dõæe .¿Éª°†dG »°ù«FôdG òNCÉŸG ¢ùHÉb ∫GóÑà°SG ìÓ°UE’Gh ¢üëØdG Ò«¨J hCG É¡Ø«¶æJ πÑb áMhôŸG 𫨰ûJ ±É≤jEG Ωõ∏j • AÉæKCG ∑ôëàJ »àdG AGõLC’G øe ÜGÎb’G hCG äÉ≤ë∏ŸG .𫨰ûàdG øeBG ƒëf ≈∏Y Ëó≤dG ¢ùHÉ≤dG øe ¢ü∏îàdG • AGõLCG ájCG ±É°ûµà°S’ ΩGóîà°S’G πÑb áMhôŸG ¢üëaG • AGõLCG ájCG OƒLh ΩóY øe ócCÉàdGh áÑ«©e hCG áØdÉJ ób iôNCG ±hôX ájCG hCG í«JÉØŸG ∞∏J ΩóYh IQƒ°ùµe .É¡∏«¨°ûJ IAÉØc ≈∏Y ôKDƒJ ‘ QÉ«àdÉH π°üàŸG ±ô£dÉH ¿ƒ∏dG »æÑdG ∂∏°ùdG π«°UƒJ • ójó÷G ¢ùHÉ≤dG hCG ∞dÉJ AõL …CG OƒLh ádÉM ‘ áMhôŸG Ωóîà°ùJ ’ • .Ö«©e Ωõ∏j ,»°ù«FôdG òNCɪ∏d ójóL ¢ùHÉb Ö«cÎd áLÉ◊G ádÉM ‘ :»∏j Ée ´ÉÑJG ójÉëŸG ±ô£dÉH ¿ƒ∏dG ¥QRC’G ∂∏°ùdG π«°UƒJ • ájCG ìÓ°UE’ óªà©ŸG áfÉ«°üdG π«cƒH áfÉ©à°S’G »¨Ñæj • .É¡dGóÑà°SG hCG áÑ«©e hCG áØdÉJ AGõLCG ºb ,(á°VQDƒŸG) 1 áÄØdG äÉéàæe øe èàæŸG Gòg ¿Éc GPEG • ±ô£dÉH ¿ƒ∏dG ôØ°UC’G /ö†NC’G ∂∏°ùdG π«°UƒàH »FÉHô¡µdG QÉ«àdG ∂∏°S ¢üëa ΩGóîà°S’G πÑb Ωõ∏j • »°VQC’G .πcBÉàdG hCG Ωóq ≤dG hCG ∞∏àdG äÉeÓY øe √ƒ∏N øe ócCÉà∏d á«FÉæK á«fÉãdG áÄØdG äÉéàæe øe èàæŸG Gòg ¿Éc GPEG !ôjò– Ú©àj ,(π«°UƒàdG πÑc ‘ §≤a Úµ∏°S ’EG óLƒj ’) ∫õ©dG QÉ«àdG ∂∏°S ∞∏J ádÉM ‘ áMhôŸG ΩGóîà°SG ΩóY Öéj • .ɪ¡æe …CÉH Ö«Y OƒLh hCG ¢ùHÉ≤dG hCG »FÉHô¡µdG .»°VQC’G ±ô£dÉH èàæŸG π«°UƒJ ΩóY ¢ùHGƒ≤dG ™e á≤aôŸG π«°UƒàdGh Ö«cÎdG äɪ«∏©J ™ÑJG .IOƒ÷G á«dÉY ∞«æ°üàdG å«M øe Ék ≤aGƒàe πjóH ô¡°üe …CG ¿ƒµj ¿CG Ú©àj .RÉ¡÷G ™e OhõŸG »∏°UC’G ô¡°üŸG ™e ∫ÓN øe ¬MÓ°UEG Ωõ∏j ,π«°UƒàdG ∂∏°S ∞∏J ádÉM ‘ • ófBG ∑ÓH øe Ióªà©ŸG áeóÿG õcGôe óMCG hCG ™æ°üŸG .ôWÉîŸG Öæéàd ôµjO øe …CG ´õf hCG Ö«côJ πÑb OÈJ ≈àM áMhôŸG ∑ôJ Ωõ∏j • .∞«¶æàdG πÑb hCG É¡FGõLCG .πFGƒ°ùdG ‘ áMhôŸG ôª¨J ’ • hCG Ék ØdÉJ »°ù«FôdG QÉ«àdG ¢ùHÉb hCG QÉ«àdG ∂∏°S ¿Éc GPEG • óªà©e áfÉ«°U π«ch áaô©Ã ¬MÓ°UEG Ú©àj ,kÉÑ«©e ádhÉfih QÉ«àdG ∂∏°S ™£b ÖæŒh .ôWÉfl ájC’ Ék ÑæŒ .∂°ùØæH ¬MÓ°UEG AGõLC’G ÒZ AGõLCG …CG ∫GóÑà°SG hCG ∂a Ék ≤∏£e ∫hÉ– ’ • .π«dódG Gòg ‘ IOóëŸG á«FÉHô¡µdG áeÓ°ùdG òNCÉŸG á«£dƒa ≥aGƒJ øe áMhôŸG ΩGóîà°SG πÑb ≥≤– .∞«æ°üàdG áMƒd ≈∏Y IOóëŸG á«£dƒØdG ™e »°ù«FôdG QÉ«©ª∏d Ék ≤ah ∫õ©dG êhOõe èàæŸG Gòg êÉàëj ’ ∂dòdh , "EN 60335-2-14 " .¢†jQCÉJ ¤EG Qó°üà ɡ∏«°UƒJ πÑb áMhôŸG 𫨰ûJ ±É≤jEG øe ócCÉJ á«£dƒØdG ≥aGƒJ øe ócCÉJh .¬æY É¡∏°üa hCG »FÉHô¡µdG QÉ«àdG ΩóY Öéj ,á«FÉHô¡c áeó°üd ¢Vô©àdG ô£N Öæéàd • ‘ »°ù«FôdG QÉ«àdG á«£dƒa ™e IóYÉ≤dG áMƒd ≈∏Y IOóëŸG …C G hCG AÉŸG ‘ ∑ôëŸG IóMh hCG ¢ùHÉ≤dG hCG ∂∏°ùdG ôªZ .∂dõæe .ôNBG πFÉ°S ™«ªéàdGh Ö«cÎdG 11 ARABIC §HQG .∑ôëŸG OƒªY ≈∏Y áMhôŸG ¢ûjQ â«ÑãàH ºb .2 ÜQÉ≤Y √ÉŒG ¢ùµY √ôjhóJ ᣰSGƒH ¢ûjôdG AÉ£Z .ΩɵMEÉH É¡fɵe ‘ ¢ûjôdG â«ÑãJ ºàj ≈àM áYÉ°ùdG á«bGƒdG áµÑ°ûdG πØ°SCG OƒLƒŸG ¿ÉeC’G ∂Ñ°ûe íàaG .3 ≈∏Y …ƒ∏©dG ∂Ñ°ûŸG ™°V .∂Ñ°ûŸG »ZôH ∂ah á«eÉeC’G ∂Ñ°ûŸG ™aOG .á«Ø∏ÿG á«bGƒdG áµÑ°ûdG øe …ƒ∏©dG Aõ÷G á«bGƒdG áµÑ°ûdG QÉWEG ≈∏Y §¨°VGh πØ°SCÓd …ƒ∏©dG ∂Ñ°ûŸG ≥∏ZCG .á«Ø∏ÿG á«bGƒdG áµÑ°ûdG ≈∏Y á«eÉeC’G .»ZÈdG §HQGh »∏Ø°ùdG πeÉ◊Gh IóYÉ≤dG Ö«côJ áYÉ°ùdG ÜQÉ≤Y √ÉŒG ¢ùµY ‘ »ZÈdG ôjhóàH ºb .1 .ºYódG ´GQP øe ¬YõfGh ‘ »ZÈdG §HQGh IóYÉ≤dG ≈∏Y ºYódG ´GQP ™°V .2 .áYÉ°ùdG ÜQÉ≤Y √ÉŒG πjó©à∏d πHÉ≤dG ´GQòdG ∂a ,á«°ù«FôdG IóMƒdG ™«ªéàd .3 .»ZÈdG ôjhóJ ∫ÓN øe á∏«∏b äÉ°UƒH QGó≤Ã π«¨°ûàdG ´É°VhCG áYöùdG ‘ ºµëà∏d äÉjƒà°ùe çÓK áMhôŸG øª°†àJ .áaô¨dG πNGO ܃ZôŸG AGƒ¡dG ≥aóJ ≈∏Y ®ÉØë∏d 𫨰ûàdG ±É≤jEG – 0 á°†Øîæe – 1 3 21 0 á«bGƒdG áµÑ°ûdG á«Ø∏ÿG áMhôŸG ¢ûjQ á«bGƒdG áµÑ°ûdG á«eÉeC’G πHÉ≤dG ´GQòdG ≈∏Y á«°ù«FôdG IóMƒdG Ö«cÎH ºb .4 .»ZÈdG §HQ ∫ÓN øe É¡fɵe ‘ É¡£HQGh πjó©à∏d ᣰSƒàe – 2 áMhôŸG ™«ªŒ á©ØJôe - 3 ,á«Ø∏ÿG á«bGƒdG áµÑ°ûdG Ö«cÎd .1 áMhôŸG ¢ûjQ AÉ£Z ´õfG øe á«bGƒdG áµÑ°ûdG ádƒeÉ°Uh Finish §HQG ,∂dP ó©H .∑ôëŸG OƒªY ΩGóîà°SÉH á«Ø∏ÿG á«bGƒdG áµÑ°ûdG §HQG .á«°ù«FôdG IóMƒdG ≈∏Y IOƒLƒŸG ÒeÉ°ùŸG §HQ ᣰSGƒH ∑ôëŸG º°ùL ≈∏Y á«bGƒdG áµÑ°ûdG áYÉ°ùdG ÜQÉ≤Y √ÉŒÉH É¡Ødh á«bGƒdG áµÑ°ûdG ádƒeÉ°U .É¡fɵe ‘ á«bGƒdG áµÑ°ûdG â«ÑãJ ºàj ≈àM π©éàd πØ°SC’ ácô◊G ‘ ºµëàdG ´GQP ≈∏Y §¨°†dG ∂æµÁ √ÉŒG ‘ áMhôŸG ±É≤jE’h ,kGQÉ°ùjh Ék æ«Á ∑ôëàJ áMhôŸG .≈∏YC’ ´GQòdG Öë°SG Ú©e 12 ∑ôëŸG ARABIC + TIMER - QR ⣨°V GPEG :∫ÉãŸG π«Ñ°S ≈∏Y ºàj ±ƒ°S ,IóMGh Iôe âbDƒŸG áYÉ°S ≈∏Y 𫨰ûàdG âbh §Ñ°V ™HQCG ¬«∏Y ⣨°V GPEG ÉeCG ,IóMGh âbh §Ñ°V ºàj ±ƒ°ùa ,äGôe øµÁh .äÉYÉ°S ™HQCG ≈∏Y 𫨰ûàdG RÉ¡L ∫ÓN øe âbDƒŸG §Ñ°V ºµëàdG áMƒd øeh ó©H øY ºµëàdG .kÉ°†jCG áMhôŸÉH ≈∏Y Ék «°SCGQ á«bGƒdG áMhôŸG áµÑ°T ™°Vh Ék °†jCG øµÁh §Ñ°†d .¬«dEG AGƒ¡dG ¬«LƒJ ‘ ÖZôJ …òdG √ÉŒ’G Ö°ùM É¡côJGh áMhôŸG 𫨰ûJ ±É≤jEÉH ºb ,kÉ«°SCGQ á«bGƒdG áµÑ°ûdG ióMEÉH πeÉ◊G ∂°ùeG ºK øeh ,ácô◊G øY ∞bƒàJ ≈àM ¤EG iôNC’G ∑ó«H á«bGƒdG áµÑ°ûdG áYƒª› ∑ôMh ,∂jój ∂jôëàdh .É¡H ÖZôJ »àdG ájhGõdG Ö°ùM πØ°SCG hCG ≈∏YCG ,ácô◊G ‘ ºµëàdG ´GQP §¨°VG ,kGQÉ°ùjh Ék æ«Á áMhôŸG .≈∏YCG ¤EG ´GQòdG ™aQG ,óMGh ™°Vh ‘ áMhôŸG â«Ñãàdh Ö°ùM ≈∏Y Ék «°SCGQ á«bGƒdG áµÑ°ûdG §Ñ°V Ék °†jCG øµÁh §Ñ°†dh .¬«dEG AGƒ¡dG ≥aóJ ¬«LƒJ ‘ ÖZôJ …òdG √ÉŒ’G É¡côJGh áMhôŸG 𫨰ûJ ±É≤jEÉH ºb ,kÉ«°SCGQ á«bGƒdG áµÑ°ûdG ióMEÉH πeÉ◊G ∂°ùeG ºK øeh ,ácô◊G øY ∞bƒàJ ≈àM ¤EG iôNC’G ∑ó«H á«bGƒdG áµÑ°ûdG áYƒª› ∑ôMh ,∂jój .É¡H ÖZôJ »àdG ájhGõdG Ö°ùM πØ°SCG hCG ≈∏YCG ‘ ºµëàdG ´GQP §¨°VG ,kGQÉ°ùjh Ék æ«Á áMhôŸG ∂jôëàd ¤EG ´GQòdG ™aQG ,óMGh ™°Vh ‘ áMhôŸG â«Ñãàdh ,ácô◊G .≈∏YCG 𫨰ûàdG ±É≤jEG /𫨰ûàdG QR ON/OFF ó©H øY ºµëàdG §¨°†dG ∫ÓN øe áMhôŸG ‘ ºµëàdG øµÁ ºµëàdG áMƒd ≈∏Y ÉeCG IOƒLƒŸG QGQRC’G ≈∏Y .ó©H øY ºµëàdG RÉ¡L hCG 𫨰ûàd IóMGh Iôe 𫨰ûàdG ±É≤jEG /𫨰ûàdG QR §¨°VG RÉ¡L ‘ AAA ¢SÉ≤e ÚàjQÉ£ÑdG ∂∏°†a øe πNOCG .áMhôŸG 𫨰ûJ ±É≤jE’ iôNCG Iôe ¬«∏Y §¨°VGh ,áMhôŸG RÉ¡L ∞jƒŒ ‘ í«ë°üdG ™°VƒdG ≥ah ó©H øY ºµëàdG .ó©H øY ºµëàdG áYöùdG QR ó©H øY ºµëàdG RÉ¡L ‘ LED á°TÉ°T ¬«LƒàH ɪFGO k ºb RÉ¡L ΩGóîà°SÉH áMhôŸG 𫨰ûJ óæY áMhôŸG √ÉŒG ‘ .ó©H øY ºµëàdG ,IóMGh Iôe áYöùdG IOÉjR QR ≈∏Y §¨°VG ,áYöùdG IOÉjõd .IóMGh áLQO áYöùdG OGOõJ QõdG ≈∏Y ᣨ°V πc ™ªa 𫨰ûàd .äÉYöS ™HQCG äGP áMhôe øY IQÉÑY áMhôŸG ™HQCG "+ áYöùdG" QR ≈∏Y §¨°VG ,áYöS ≈°übCÉH áMhôŸG QR ≈∏Y §¨°VG áYöùdG π«∏≤àd ,á∏Kɇ á≤jô£Hh .äGôe ."– áYöùdG" ‘ ºµëàdG ∞FÉXh ≈∏Y ∂dòc ó©H øY ºµëàdG RÉ¡L πªà°ûj øµÁ ,"äÉbhC’G" ∞FÉXh §Ñ°V ‘ í°VƒŸG ≥ah .âbDƒŸG 𫨰ûJ âbh §Ñ°†d "– âbƒdG"h "+ âbƒdG" …QR 𫨰ûJ .áMhôŸG ±É≤jEGh 𫨰ûJ ≈∏Y 𫨰ûàdG ±É≤jEG /𫨰ûàdG QR πª©j .ó©H øY ºµëàdG RÉ¡L øe áMhôŸG 𫨰ûJ ºµëà∏d QR ≈∏Y áMhôŸG …ƒà– AGƒ¡dG áYöSh áMhôŸG áYöS ‘ SPEED πjó©J øµÁh .áaô¨dG ‘ ´RƒŸG áYöS ¢Vô©Jh .QõdG Gòg ≈∏Y §¨°†dÉH áMhôŸG áYöS §¨°†H áMhôŸG áYöS IOÉjR øµÁh ,á°TÉ°ûdG ≈∏Y áMhôŸG ,4 »gh áYöS ≈∏YCG ¤EG ∫ƒ°UƒdG ≈àM QGôªà°SÉH "+" QR ≈fOCG ≈àM QGôªà°SÉH "-" QR §¨°†H É¡àYöS π«∏≤J øµÁh RÉ¡L ∫ÓN øe áYöùdG ‘ ºµëàdG øµÁh .1 »gh áYöS .áMhôŸG ‘ ºµëàdG áMƒd øeh ó©H øY ºµëàdG + - âbDƒŸG øµÁh ,áMhôŸG 𫨰ûJ âbh ójóëàd âbDƒŸG §Ñ°V øµÁ .äÉYÉ°S á«fɪK ¤EG áYÉ°S øe Ióe …CG ≈∏Y âbDƒŸG §Ñ°V QR ≈∏Y §¨°†dG äGôe OóY Ö°ùM 𫨰ûàdG âbh §Ñ°V ºàjh .á°TÉ°ûdG ≈∏Y OóëŸG 𫨰ûàdG âbh ô¡¶jh âbDƒŸG 13 ARABIC .áaÉL …ójCG ΩGóîà°SÉH RÉ¡÷G π¨°T • ájQÉ£ÑdG ∫GóÑà°SG ‘ ájQÉ£ÑdG ôªà°ùJ ¿CG »¨Ñæj ™e ∂dPh ô¡°TCG 6 IóŸ πª©dG ∞bƒàj ÉeóæYh ,…OÉ©dG ΩGóîà°S’G ,πª©dG øY ó©H øY ºµëàdG RÉ¡L .IójóL iôNCÉH äÉjQÉ£ÑdG ∫óÑà°SG π°üaG ,ΩGóîà°S’G AÉæKCG »FÉHô¡µdG ∂∏°ùdG ∞∏J ádÉM ‘ • ∂∏°ùdG ¢ùª∏J’ .GQƒaAÉHô¡µdG Qó°üe øe RÉ¡÷G .ábÉ£dG Qó°üe π°üb πÑb »FÉHô¡µdG RÉ¡L πNGO äÉjQÉ£ÑdG øe Ék jQhO ≥≤ëàdG ≈∏Y ¢UôMG .ÖjöùJ hCG ájQÉ£ÑdG ‘ πcCÉJ …CG ±É°ûàc’ ó©H øY ºµëàdG Öéj ,𫨰ûàdG ΩóY ádÉM ‘ • .±ÉL ¿Éµe ‘ RÉ¡÷G ßØM øY Gó«©H Iõ¡LC’G ßØM Öéj .∫ÉØWC’G ∫hÉæàe hCG áfɵe ‘ »bGƒdG OƒLh ¿hóH áMhôŸG Ωóîà°ùJ ’ • .»bGƒdG ∞∏JóæY øe »Ø∏ÿG AÉ£ØdG á«£ØàH º≤J’ • á©£b …CG ΩGóîà°SÉH áLhôŸG .IQÉà°ShCG ¢Tɪb äGôØ°ûdG øe ÜGÎb’G πÑ≤ØbƒàdÉH ÉePGO ∑ôëª∏d ™ª°SG • .≥MÓe …CG πjóÑJhCG !ôjò– .ácôëàŸG AGõLC’G ¢ùª∏J’ • á«FGƒà°S’G AGƒLC’G ‘ IóMƒdG √òg 𫨰ûàH º≤J’ • áLQO 40 øY É¡«a IQGô◊G áLQO ójõJ »àdG ≥WÉæŸGhCG .ájƒÄe á«æØdG äÉfÉ«ÑdG õJôg 50 ~ âdƒa 220-240 á«£dƒØdG äGh 60 ábÉ£dG º¨c 8.75 ¿RƒdG ∂∏°ùdGh ¢ùHÓŸG ,πjƒ£dG ô©°ûdG ,∂©HÉ°UCG ó©HG • .ácôëàŸG AGõLC’G øY »FÉHô¡µdG òNCÉe øe ¢ùHÉ≤dG π°üØd »FÉHô¡µdG ∂∏°ùdG Öë°ùJ’ • .AÉHô¡µdG ±GôWC’Gh äƒjõdG ,IQGô◊G øY »FÉHô¡µdG ∂∏°ùdG ó©HG • .IOÉ◊G …QGôM Qó°üe …CG ÖfÉéH hCG »∏Y RÉ¡L ∫Éeóîà°ùJ’ • .øNÉ°Sóbƒe »∏Y hCG IóMƒd ɪFGO ájɪ◊G ôah .êQÉN ∫G ‘ RÉ¡÷G ™°†J’ • .IóFGõdG áHƒWôdG hCG AÉŸG øe ∑ôëŸG 14 ARABIC ¿Éª°†d Éfk ɪ°V ¢Vô©Jh É¡JÉéàæe IOƒL ‘ ôµjO ófBG ∑ÓH ≥ãJ .πLC’G πjƒW »àdG ∂bƒ≤M ¤EG áaÉ°VE’ÉH ¿ƒµj Gòg ¿Éª°†dG ¿É«H .∫GƒMC’G øe ∫ÉM …CÉH É¡H πîj ’h ¿ƒfÉ≤dG É¡ëæÁ OÉ–’G ‘ AÉ°†YC’G ∫hódG º«dÉbCG ‘ ¿Éª°†dG …öùj .á«HhQhC’G Iô◊G IQÉéàdG á≤£æeh »HhQhC’G ‘ Ö«Y ÖÑ°ùH ôµjO ófBG ∑ÓH èàæe ‘ π∏N OƒLh ádÉM ‘ 24 ∫ÓN ,ÒjÉ©ŸG ™e ≥aGƒàdG ΩóY hCG áYÉæ°üdG hCG OGƒŸG ∫GóÑà°SG ôµjO ófBG ∑ÓH øª°†J ,AGöûdG ïjQÉJ øe Gô¡°T k πcBÉàdG IÉYGôe ™e äÉéàæŸG ìÓ°UEGh áÑ«©ŸG AGõLC’G πbCG ¿Éª°†d äÉéàæŸG √òg ∫GóÑà°SG hCG »©«Ñ£dG ≈∏ÑdGh :⁄ Ée 𫪩∏d êÉYREG á«æ¡e hCG ájQÉŒ ¢VGôZCG ‘ èàæŸG ΩGóîà°SG ºàj ;ÒLCÉJ ¢VGôZCG hCG ;∫ɪgE’G hCG ΩGóîà°S’G Aƒ°ùd èàæŸG ¢Vô©àj áÑjôZ OGƒe hCG AÉ«°TCG áé«àf ∞∏à∏d èàæŸG ¢Vô©àj ;çOGƒM hCG ÒZ ¢UÉî°TCG ᣰSGƒH èàæŸG ìÓ°UEG ádhÉfi ºàj ™HÉàdG áfÉ«°üdG ≥jôa hCG øjóªà©ŸG áfÉ«°üdG AÓch .ôµjO ófBG ∑ÓH ácöûd áÄ«ÑdG ájɪM Gòg øe ¢ü∏îàdG ΩóY Ωõ∏j .π°üØæŸG ™ª÷G .ájOÉ©dG á«dõæŸG áeɪ≤dG ™e èàæŸG ôµjO ófBG ∑ÓH èàæe ∫GóÑà°SG ΩÉjC’G øe Ωƒj ‘ Ωõd GPEG ™e ¬æe ¢ü∏îàJ Óa ,¬eóîà°ùJ ó©J ⁄ GPEG hCG ,∂H ¢UÉÿG èàæŸG Gòg áMÉJEG øe ócCÉJ πH ,iôNC’G á«dõæŸG áeɪ≤dG .π°üØæŸG ™ªé∏d ôjhóJ IOÉYE’ ≥aôe ôµjO ófBG ∑ÓH ácöT ôaƒJ • ájÉ¡f ¤EG É¡dƒ°Uh Oôéà ôµjO ófBG ∑ÓH äÉéàæe √òg Ëó≤J ºàjh .πª©∏d É¡à«MÓ°U ΩóYh ÉgôªY ≈Lôj ,áeóÿG √òg øe IOÉØà°SÓd .Éfk É› áeóÿG ±ƒ°S …òdGh óªà©e áfÉ«°U π«ch …CG ¤EG èàæŸG IOÉYEG .ÉæY áHÉ«f äÉéàæŸG ™ªL √QhóH ¤ƒàj óªà©e áfÉ«°U π«ch ÜôbCG ™bƒe ≈∏Y ±ô©àdG ∂æµÁ • »∏ëŸG ôµjO ófBG ∑ÓH Öàµe ≈∏Y ∫É°üJ’G ∫ÓN øe ,∂dP øe ’k óHh .π«dódG Gòg ‘ í°VƒŸG ¿Gƒæ©dG ‘ Ú©HÉàdG øjóªà©ŸG áfÉ«°üdG AÓcƒH áªFÉb óLƒJ Ée äÉeóÿ á∏eɵdG π«°UÉØàdGh ôµjO ófBG ∑ÓH ácöûd âfÎfE’G ≈∏Y ÉæH á°UÉÿG ∫É°üJ’G πFÉ°Shh ™«ÑdG ó©H .www.2helpU.com :ÊhεdE’G ™bƒŸG ≈∏Y Ëó≤J ¤EG êÉà– ±ƒ°S ,¿Éª°†dG ÖLƒÃ áÑdÉ£e Ëó≤àd ∂æµÁh .óªà©ŸG áfÉ«°üdG π«ch hCG ™FÉÑ∏d AGöûdG π«dO ∫ÓN øe óªà©e áfÉ«°U π«ch ÜôbCG ™bƒe ≈∏Y ±ô©àdG ¿Gƒæ©dG ‘ »∏ëŸG ôµjO ófBG ∑ÓH Öàµe ≈∏Y ∫É°üJ’G .π«dódG Gòg ‘ í°VƒŸG øjóªà©ŸG áfÉ«°üdG AÓcƒH áªFÉb óLƒJ ,∂dP øe ’k óHh äÉeóÿ á∏eɵdG π«°UÉØàdGh ôµjO ófBG ∑ÓH ácöûd Ú©HÉàdG âfÎfE’G ≈∏Y ÉæH á°UÉÿG ∫É°üJ’G πFÉ°Shh ™«ÑdG ó©H Ée .www.2helpU.com :ÊhεdE’G ™bƒŸG ≈∏Y 15 FRENCH 1 8 11 21 6 4 7 9 10 5 12 3 2 14 13 15 19 16 17 18 20 22 23 Identification des pièces 12. Panneau de commandes 1. Corbeille avant 13. Vis de fermeture 2. Vis de fixation 14. Logement du commutateur 3. Clip de fermeture de la corbeille 15. Tube télescopique 4. Bordure de la corbeille 16. Vis serrage / desserrage 5. Capuchon d’hélice 17. Tube support 6. Hélice de ventilation 18. Socle 7. Ecrou de fixation de la corbeille 19. Vis 8. Corbeille arrière 20. Vis socle 9. Axe moteur 21. Poignée 10. Bloc moteur 22. Télécommande 11. Bouton de réglage de l’oscillation 23. Deux piles Alkaline de type AAA 16 FRENCH Utilisation prévue • Placez soigneusement le cordon Votre ventilateur Black & Decker est conçu pour un usage domestique uniquement à l’intérieur. Déballez toutes les pièces de leur emballage et posez-les à côté. Assurez-vous d’avoir toutes les pièces identifiées dans la partie ‘Identification des pièces’, sinon prenez contact avec votre représentant Black & Decker le plus proche pour assistance. • Ne tirer jamais sur le cordon d’alimentation Lire attentivement cette notice avant d’utiliser l’appareil. Consignes de sécurité • Avertissement! Lorsqu’on utilise un appareil électrique, des précautions de base, y compris les suivantes, doivent toujours être suivies afin de réduire les risques d’incendie, de chocs électriques ou de blessures corporelles. • L’utilisation prévue est décrite dans cette notice. L’utilisation d’un accessoire ou d’une pièce, ou l’exécution de toute opération avec cet appareil autres que celles recommandées dans cette notice peut présenter un risque de blessures corporelles. • Conservez ce mode d’emploi pour le consulter ultérieurement. d’alimentation et veillez à ce qu’il ne pende pas du plan de travail pour éviter de le prendre ou de trébucher dessus par mégarde. pour débrancher la fiche de la prise. Le cordon d’alimentation ne doit jamais être à proximité d’une source de chaleur, de graisse ou d’angles vifs. • Si le cordon d’alimentation est endommagé lors de l’utilisation, débranchez l’appareil immédiatement. Ne touchez pas le cordon d’alimentation avant d’avoir débranché l’alimentation électrique. • Débranchez l’appareil de l’alimentation électrique lorsqu’il n’est pas utilisé ou avant de le nettoyer. Sécurité d’autrui • Cet appareil n’est pas destiné à être utilisé par des personnes (y compris des enfants) ayant des capacités physiques, sensorielles ou mentales réduites, ou ayant un manque d’expérience et de connaissances, à moins qu’elles n’aient été formées et encadrées sur l’utilisation de l’appareil par une personne responsable de leur sécurité. • Les enfants doivent être surveillés pour s’assurer qu’ils ne jouent pas avec l’appareil. Utilisation de votre appareil Après utilisation • Toujours prendre des précautions lors de • Eteindre, puis retirer la fiche de la prise et l’utilisation de l’appareil. • Ne pas utiliser l’appareil en plein air. • Ne pas faire fonctionner l’appareil si vos mains sont humides. Ne pas faire fonctionner l’appareil si vous êtes pieds nus. laisser l’appareil refroidir avant de le laisser sans surveillance et avant de changer, nettoyer ou inspecter une pièce ou partie de l’appareil. • Lorsqu’il n’est pas utilisé, l’appareil doit être rangé dans un endroit sec. Les enfants ne doivent pas avoir accès aux appareils rangés. 17 FRENCH Inspection et réparations • Eteindre l’appareil avant de le nettoyer, de changer les accessoires ou d’approcher les pièces en mouvement lors de son fonctionnement. • Avant son utilisation, vérifier que l’appareil n’a aucune pièce endommagée ou défectueuse. Vérifier la présence de pièces cassées, d’interrupteurs endommagés ou toute autre condition qui pourraient affecter son fonctionnement. • Ne pas utiliser l’appareil si une pièce est endommagée ou défectueuse. • Faites réparer ou remplacer les pièces endommagées ou défectueuses par un réparateur agréé. • Avant utilisation, vérifier l’état du cordon d’alimentation pour des signes de dommages, de vieillissement ou d’usure. • Ne pas utiliser l’appareil si le cordon d’alimentation ou la fiche secteur est endommagée ou défectueuse. • Si le cordon d’alimentation ou la fiche secteur est endommagée ou défectueuse, il doit être réparé par un réparateur agréé afin d’éviter tout danger. Ne pas couper le cordon d’alimentation et ne pas tenter de le réparer vous-même. • N’essayez jamais de retirer ou de remplacer une pièce autre que celles spécifiées dans cette notice. Sécurité électrique Avant son utilisation, vérifiez que la tension électrique correspond à celle indiquée sur l’étiquette signalétique. Cet appareil possède une double isolation selon la norme EN 60335-2-14; de ce fait un fil de terre n’est pas nécessaire. • Pour éviter tout risque de choc électrique, n’immergez pas le cordon, la prise ou le bloc moteur dans de l’eau ou dans tout autre liquide. 18 • Vérifiez que la tension d’alimentation indiquée sur l’étiquette signalétique de l’appareil correspond bien à celle de votre installation électrique. Toute erreur de branchement annule la garantie. Remplacement d’une prise électrique En cas d’installation d’une nouvelle prise: • Jetez l’ancienne prise avec prudence. • Connecter le fil marron sur la borne sous tension de la nouvelle prise. • Connecter le fil bleu sur la borne neutre. • Si l’appareil est de type classe l (mis à la terre), connecter le fil vert/jaune sur la borne terre. Avertissement! Si votre appareil est du type classe ll à double isolation (2 fils seulement dans le cordon), il n’y a pas de connexion à faire à la borne terre. Suivre les instructions de montage fournies avec les prises de bonne qualité. En cas de remplacement du fusible, il doit être du même calibre que le fusible d’origine livré avec l’appareil. • Si le cordon d’alimentation est endommagé, il doit être remplacé par le fabricant ou par un centre de service agréé Black & Decker afin d’éviter tout danger. • Laisser l’appareil refroidir avant de monter ou démonter des pièces et avant de le nettoyer. • Ne pas immerger l’appareil dans un liquide. Montage et assemblage Assurez-vous que votre ventilateur est à l’arrêt avant de le brancher ou de le débrancher de l’alimentation électrique. Assurez-vous que le voltage indiqué sur le socle de l’appareil corresponde bien à celui de votre installation électrique. FRENCH Assemblage du socle et du pied 1. Tournez la vis dans le sens contraire des aiguilles d’une montre et retirez-la du tube support. 2. Placez le tube support sur le socle puis serrez la vis dans le sens des aiguilles d’une montre. 3. Pour assembler le bloc moteur, relâchez quelques centimètres du tube télescopique en agissant sur la vis. 2. Montez l’hélice de ventilation sur l’axe moteur. Boulonnez le capuchon d’hélice en le tournant dans le sens contraire des aiguilles d’une montre jusqu`à ce que l’hélice soit solidement en place. 3. Ouvrez le clip de fixation en bas de la corbeille avant et desserrer la vis du clip. Placez la partie supérieure du clip sur la partie la plus haute de la corbeille arrière. Poussez le clip de haut en bas et pressez le bord de la corbeille avant sur la corbeille arrière. Fermez le clip du bas et serrez la vis. Fonctionnement Moteur Corbeille arrière Hélice de ventilation Corbeille avant 4. Montez le bloc moteur sur le tube télescopique et maintenez-le en place en serrant la vis. Votre ventilateur possède trois réglages de vitesse pour maintenir le flux d’air souhaité dans votre pièce 0 - Arrêt Assemblage du ventilateur 1 - Lent 1. Pour installer la corbeille arrière, retirez le capuchon d’hélice et l’écrou de fixation de la corbeille de Finir l’axe moteur. Fixez ensuite la corbeille arrière en la positionnant sur les broches d’emplacement du bloc moteur. Maintenir la corbeille sur le bloc moteur en serrant l’écrou de fixation de la corbeille, en tournant dans le sens des aiguilles d’une montre jusqu’au blocage de la corbeille en position. 2 - Moyen 3 – Rapide 3 21 0 Vous pouvez appuyer sur le bouton de contrôle d’oscillation pour faire osciller le ventilateur et pour le positionner dans une inclinaison particulière, tirez le bouton vers le haut. 19 FRENCH La corbeille du ventilateur peut également être positionnée verticalement selon la direction du flux souhaité. Pour ce faire appuyez d’abord sur le commutateur en position arrêt (OFF), laissez le ventilateur s’arrêter, puis à l’aide d’une main tenir le pied et avec l’autre main, inclinez l’assemblage des corbeilles vers le haut ou le bas, selon l’angle souhaité. Pour faire osciller le ventilateur, appuyez sur le bouton. Pour arrêter l’oscillation, tirez sur le bouton. Bouton Marche/Arret (ON/OFF) Vous pouvez contrôler votre ventilateur ON/OFF soit en pressant les boutons sur le panneau de commandes soit en pressant les touches de la télécommande. Appuyez sur le bouton Marche/Arrêt (On/Off) une fois pour mettre le ventilateur en marche et encore une fois pour l’arrêter de fonctionner. Touche de réglage de la vitesse Votre ventilateur possède une touche de réglage de la + SPEED vitesse pour maintenir le flux d’air souhaité dans la pièce. La vitesse du ventilateur peut être ajustée en pressant cette touche. La vitesse est affichée sur l’écran LCD. Pour augmenter la vitesse appuyez sur la touche ” + “ de manière continue jusqu’à l’obtention du 4 maximum. Pour réduire la vitesse appuyez sur la touche “ _ ” de manière continue jusqu’à l’obtention d’une vitesse de fonctionnement minimale de 1. Cette commande peut être activée à partir de la télécommande ou du ventilateur. Minuterie Vous pouvez programmer la durée de fonctionnement du ventilateur pour une période allant de 1 à 8 h. Le nombre de pressions sur le bouton de la minuterie (timer) donnera le temps 20 de fonctionnement qui sera affiché sur l’écran LCD. + Par exemple: Si le bouton de la minuterie est pressé une fois, le temps de fonctionnement sera d’1 h et si le bouton est pressé 4 fois, le temps de fonctionnement sera de 4 heures. Cette commande peut être activée à partir de la télécommande ou du ventilateur. TIMER - La corbeille du ventilateur peut également être positionnée verticalement selon la direction du flux souhaité. Pour ce faire appuyez d’abord sur le commutateur en position arrêt (OFF), laissez le ventilateur s’arrêter, puis à l’aide d’une main tenir le pied et avec l’autre main, inclinez l’assemblage des corbeilles vers le haut ou le bas, selon l’angle souhaité. Pour faire osciller le ventilateur, appuyez sur le bouton. Pour arrêter l’oscillation, tirez sur le bouton. Télécommande Insérez 2 piles de type ’AAA’ dans l’emplacement prévu de la télécommande. Orientez toujours la lampe LED de la télécommande en direction du ventilateur lorsque vous faites fonctionner le ventilateur avec la télécommande. Pour augmenter la vitesse, appuyez sur la touche d’augmentation par pression successive, à chaque pression la vitesse augmente d’un cran. Votre ventilateur possède quatre vitesses de ventilation. Pour activer la vitesse maximale du ventilateur, appuyez sur la touche “speed+” (vitesse +) quatre fois. De manière similaire, pour réduire la vitesse appuyez sur la touche “speed -” (vitesse -). Votre télécommande possède aussi des fonctions de minuterie. Comme expliqué dans la rubrique “Minuterie”, les touches “time+” et ”time -” (temps + et temps -) peuvent être utilisée pour définir la durée de fonctionnement du ventilateur. La touche Marche/arrêt (On/Off) permet de mettre en marche et d’arrêter le fonctionnement du ventilateur à partir de la télécommande. FRENCH Remplacement des piles Avec une utilisation normale, les piles devraient durer environ six mois, lorsque la télécommande n’active plus le ventilateur, remplacer les piles par des neuves. Il est toujours bon de vérifier l’état des piles dans la télécommande périodiquement pour des signes de corrosion ou de fuite. Avertissement! • Ne jamais utiliser le ventilateur sans la guarde en place ou si le guarde est endommagé • Ne pas toucher les pièces mobiles • Laisser toujours le moteur arrêter avant d'aborder les lames ou de changer un accessoire. • Ne pas utiliser l'appareil à l'extérieur. Toujours protéger le moteur de l'eau ou l' humidité excessive. • Faire fonctionner l'appareil uniquement avec les mains sèches. • Si le cordon d’alimentation est endommagé lors de l’utilisation, débranchez l’appareil immédiatement. Ne touchez pas le cordon d’alimentation avant d’avoir débranché l’alimentation électrique. • Lorsqu’il n’est pas utilisé, l’appareil doit être rangé dans un endroit sec. Les enfants ne doivent pas avoir accès aux appareils rangés. • Ne pas couvrir arrière boîtier du ventilateur avec un chiffon ou un rideau. • Gardez vos doigts, cheveux longs, vêtements amples et cordes d'alimentation loin des pièces mobiles. • Ne tirer jamais sur le cordon d’alimentation pour débrancher la fiche de la prise. • Le cordon d’alimentation ne doit jamais être à proximité d’une source de chaleur, de graisse ou d’angles vifs. • Ne pas faire utiliser cet appareil en climat tropical ou dans des zones où la température dépasse 40 º C. Données techniques Tension 220 – 240V ~ 50Hz Puissance 60W Poids 8.75kg • Ne pas placer l'appareil sur ou près d une source de chaleur ou dans un four chauffé. 21 FRENCH Protection de l'environnement Collecte séparée. Ce produit ne doit pas être jeté avec les déchets domestiques normaux. Si vous décidez de remplacer ce produit Black & Decker, ou si vous n'en avez plus l'utilité, ne le jetez pas avec vos déchets domestiques Rendez-le disponible pour une collecte séparée. • Black & Decker fournit un dispositif permettant de collecter et de recycler les produits Black & Decker lorsqu'ils ont atteint la fin de leur cycle de vie. Pour pouvoir profiter de ce service, veuillez retourner votre produit à un réparateur agréé qui se chargera de le collecter pour nous. • Pour connaître l'adresse du réparateur agréé le plus proche de chez vous, contactez le bureau Black & Decker à l'adresse indiquée dans ce manuel. Vous pourrez aussi trouvez un liste des réparateurs agréés de Black & Decker et de plus amples détails sur notre service après-vente sur le site Internet à l'adresse suivante : www.2helpU.com 22 FRENCH Garantie Black & Decker est confiant dans la qualité de ses produits et vous offre une garantie très étendue. Ce certificat de garantie est un document supplémentaire et ne peut en aucun cas se substituer à vos droits légaux. La garantie est valable sur tout le territoire des Etats Membres de l'Union Européenne et de la Zone de Libre Echange Européenne. Si un produit Black & Decker s'avère défectueux en raison de matériaux en mauvaises conditions, d'une erreur humaine, ou d'un manque de conformité dans les 24 mois suivant la date d'achat, Black & Decker garantit le remplacement des pièces défectueuses, la réparation des produits usés ou cassés ou remplace ces produits à la convenance du client, sauf dans les circonstances suivantes : Le produit a été utilisé dans un but commercial, professionnel, ou a été loué. Le produit a été mal utilisé ou avec négligence. Le produit a subi des dommages à cause d'objets étrangers, de substances ou à cause d'accidents. Des réparations ont été tentées par des techniciens ne faisant pas partie du service technique de Black & Decker. Pour avoir recours à la garantie, il est nécessaire de fournir une preuve d'achat au vendeur ou à un réparateur agréé. Pour connaître l'adresse du réparateur agréé le plus proche de chez vous, contactez le bureau Black & Decker à l'adresse indiquée dans ce manuel. Vous pourrez aussi trouver une liste des réparateurs agréés de Black & Decker et de plus amples détails sur notre service après-vente sur le site Internet à l'adresse suivante : www.2helpU.com 23 Names & Addresses for Black & Decker Service Concessionaries AFGANISTAN: United Ceramics & Building Materials Ltd. - Kolola Poshta, Kabul, Afghanistan, Tel: 0093-799-333128. ALGERIA: SARL Outillage Corporation, After Sale Service Center - 08, Rue Mohamed Boudiaf - Cheraga, Algiers, Algeria, Tel: 00213 21 375131, Fax: 00213 369667. AZERBAIJAN: Kontakt-NN LLC, Mehdiabad, Novkhani road14, Baku, Azerbaijan Az1000. Tel: +994 12 4086761, Fax: 0099-4125980378. BAHRAIN: Alfouz Services Co. WLL., P.O. Box 26562, Tubli, Manama, Tel: 00973-17783562/ 17879987, Fax: 00973-17783479. Kewalram & Sons Co. WLL - P.O. Box 84, Manama, Kingdom of Bahrain, Tel: 00973-17213110/ 17210617/ 17210619, Fax: 00973-17213211/ 17210627. BANGLADESH: Ultra Corporation, 8, Kushol Centre, Uttara, Dhaka 1230. Tel: +880-2-8922144, Fax: +880-2-8951339. EGYPT: Anasia Egypt for Trading S.A.E. (Mentrade), P.O. Box 2443, 9, Mostafa Refaat, St.sheraton, Heliopolis, Cairo, Tel: 00202 22684 159, Fax: 00202 22684 169. ETHIOPIA: Seif Tewfik Sherif - Arada Sub City, Kebele 01-02, Global Insurance Bldg., 2nd Flr. Room 43, P.O.Box 2525, Addis Ababa, Ethiopia, Tel: 00-251-11-1563968/ 1563969, Fax: 00-251-11-1558009. INDIA: Gryphon Impex Pvt. Ltd., D-6/4, Okhla Industrial Area, Phase-I, New Delhi-110020. Tel: +91-11-26372602-4, Fax:+91-11-26372601. JORDAN: Palestine Bldg. Matl.(Bashiti Hardware), 93 King Abdullah 2nd St., Opp ELBA House, PO Box 1564, Tel: 00962.6.5349098 ext.11, Fax: 00962.6.5330731. KENYA: Zylog Enterprises Ltd. (T/A Leading Concepts), IPS Building, Kaunda Street, P.O. Box 40877-00100, Nairobi, Tel: 00254-20-6905000, Fax: 00254-20-6905111. KUWAIT: Al Omar Technical Co., P.O. Box 4062, Safat 13041, Kuwait, Tel: 00965-24848595/ 24840039, Fax: 00965-24845652. The Sultan Centre, P.O. Box 26567-13126 Safat, Kuwait, Tel: 00965-24343155 Etn. 432, Fax: 00965-24319071. LEBANON: Aces Service Centre (Est. F.A.Ketaneh SA), P.O. Box 90-102, Nahr El Mot, Seaside Highway, Pharaon Building, Beirut. Tel: 00961-1-898989, Fax: 00961-1-245880. LIBYA: Homeworld Co., Building No.5, Senidal St., Amr Ibn Elaas Road, Benghazi, Libya. Tel: 00218-61-9094183. Service Center 1 - Benghazi: 0614705021, Service Center 2 - Tripoli: 0214622531. MAURITIUS: J.M. Goupille & Co. Ltd., Rogers Industrial Park 1, Riche Terre, Mauritius, Tel: 00230-2069450, Fax: 00230-2483188. MOROCCO: UATS 26 Rue Ennarjisse, Hay Erraihan, Beausejour - Hay Hassani - Casablanca, Morocco. Tel: +212 522945114, Fax: +212 522942442. NEPAL: Universal Trading Centre, P.O.Box 1947, Tripureswor, Kathmandu. Tel: +977-1-4265191. NIGERIA: Dana Electronics Limited, No. 54 Marina, Lagos, Nigeria, Tel: 00234-7431818/ 00234-803776774. Dana Electronics Limited - 33, Akin Adesola, VI, Lagos, Nigeria. Tel: +234 1 4610009, 4610027, +234 8057445477, +234 7028053630, Fax: +234 1 4610018. OMAN: Oman Marketing & Service Co. (Omasco), P.O. Box 2734, Behind Honda Showroom, Wattayah, Oman, Tel: 00968-24560232/ 24560255, Fax: 00968-24560993. Oman Marketing & Service Co. (Omasco), Al Ohi, Sohar, Oman, Tel: 00968-26846379, Fax: 00968-26846379. Oman Marketing & Service Co. (Omasco) - Sanaya, Salalah, Oman, Tel: 00968-23212290, Fax: 00968-23210936. PAKISTAN: Ammar Service & Spares - 60-Bank Arcade, Serai Road, Karachi, Pakistan, Tel: 0092-21-32426905, Fax: 0092-21-32427214. PHILIPPINES: 476 J. P. Rizal St., cor Kakarong St. Brgy Olympia, Makati City, Tel: +632 403-5698. QATAR: Al Muftah Service Centre - Al Wakrah Road, P.O. Box 875, Doha, Qatar. Tel: 00974-4650880/ 4650110/ 4446868, Fax: 00974-4441415/ 4662599. SAUDI ARABIA: (Al Khobar) Al-Suwaiket Catering & Trading Co., P.O.Box 4228, King A.Aziz Street, Al Khobar, Tel: 00966-3-8591088, Fax: 00966-3-8595648. Fawaz Ebrahim Al Zayani Trading Est. P.O. Box 76026, Al Khobar # 31952, Tel: 00966-3-8140914, Fax: 00966-3-8140824. (Jeddah) Banaja Trading Co. Ltd, P.O. Box 366, Jeddah-21411, Tel: 00966-2-6511111, Fax: 00966-2-6503668. EAC (Al Yousef Contg. & Trdg. Est.), P.O. Box 30377, Jeddah -21477, Tel: 00966-2-6519912, Fax: 00966-2-6511153. (Riyadh) Banaja Trading Co. Ltd, P.O. Box 566, Riyadh-11421, Tel: 00966-1-4124444, Fax: 00966-1-4033378. SOUTH AFRICA: Trevco Power Tool Service 14 Steenbok Street, Koedoespoort, 0186, Pretoria, South Africa, Tel: 0027-86-1873826, Fax: 0027-86-5001771. SRI LANKA: Delmege Construction Products (Pvt) Ltd., No51 Stork Place, Colombo-10, Sri Lanka, Tel: +94-11-2688462-3, TUNISIA: Société Tunisienne De Chauffage - Rue de la Physique, Nouvelle Zone Industrielle de Ben Arous-2013 Tunisie, Tel: 00216-71-386102/ 380620, Fax: 00216-71380412 ext216. UGANDA: Anisuma Investment and Services Ltd., J R complex, Ware House No.5, Plot No 101, 3rd Street Industrial Area, Jinja Road, Kampala, Tel: 0414-237106. UAE: (Abu Dhabi) Light House Electrical, P.O. Box 120, Abu Dhabi, Tel: 00971-2-6726131, Fax: 00971-2-6720667. (Dubai) Black & Decker (Overseas) GmbH, P.O. Box 5420, Dubai, Tel: 00971-4-8127400/ 8127406, Fax: 00971-4-2822765. (Musaffah) Light House Electrical, P.O. Box 120, Abu Dhabi, Tel: 00971-2-5548315, Fax: 00971-2-5540461. (Sharjah) Mc Coy Middle East LLC, P.O. Box 25793, Sharjah, Tel: 00971-6-5395931, Fax: 00971-6-5395932. (Ras Al Khaimah) Mc Coy Middle East LLC, P.O.Box 10584, Ras Al Khaimah, Tel: 00971-7-2277095, Fax: 00971-7-2277096. YEMEN: (Aden) Muala St., Tel: +967 2 222670, Fax : + 967 2 222670. (Sana'a) Middle East Trad. Co. Ltd., P.O. Box 12363, Hayel Street, Sana'a. Tel: +967-1-204201, Fax: +967-1-204204. (Taiz) Middle East Trading Co.(METCO), 5th Flr.Hayel Saeed Anam Bldg, Al-Mugamma St. Taiz, Yemen, Tel: 00967-4-213455, Fax: 00967-4-219869. WARRANTY REGISTRATION CARD YOUR NAME/ rßù« YOUR ADDRESS Ê«uMF∞« POSTCODE Íb¥d∂∞« e±d∞« DATE OF PURCHASE ¡«dA∞« a¥¸U¢ DEALER'S NAME & ADDRESS/ lzU∂∞« Ê«uM´ Ë rß≈ PRODUCT MODEL NO. FS1600R