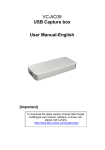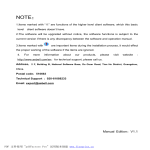
1
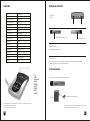
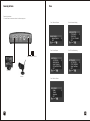
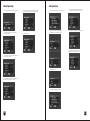
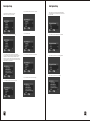
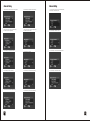
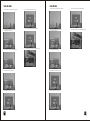
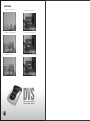
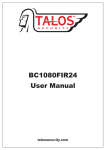
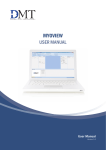
DVS
Digital Motion Detect Video Record System
INSTRUCTION MANUAL
PLEASE READ CAREFULLY AND SAVE
This manual contains important information about this product's operation.
If you are installing this product for others, you must leave this manual -or a
copy-with the end user
RoHS
2002/95/EC
Color
CONTENTS
Note before Use
Notice..................................................................................01
Function..................................................................................01
Using range...............................................................................01
Parts include in package...........................................................01
Technical Data............................................................................02
Unit Description of front Panel................................................03
SD Card using............................................................................03
Connecting the Device.............................................................04
Function Setup
Menu............................................................................................05
Manual capture Setup..................................................................06
Motion Detect Setup....................................................................07
Motion Detect Setup....................................................................08
Auto Capture Setup......................................................................09
Advanced Setting.........................................................................10
Advanced Setting.........................................................................11
Time/Date Setting..........................................................................12
Playback Operation
Preview Mode...............................................................................13
Delete One Mode..........................................................................14
Delete All Mode.............................................................................15
Format Memory............................................................................16
Note Before Use
Notice
1.Please connect the parts of all demands
first, then open power supply
2.Please cut off power supply when you
inserting or pulling out SD card to be avoiding
the equipments have damage.
3.Please do not touch the metals part of the
SD card directly by your hand. In order to
prevent the SD card have damage
permanence.
4.Please use AC/DC power adaptor we offer
5.Please far away from water or liquid, to
avoid short circuit of devise
6.In order to prevent the computer is frozen.
When you use the equipment, Please don’t
push multi- keystrokes at one time, or operate
abnormal and continually.
6.it is can be connect two cameras, and then
have the function is Picture in picture, but just
shoot the image of main camera
7.Supply to all kind of CCD/CMOS camera
8.The stored photos/video clips will not lose
when power off
9.Support video signal of NTSC/PAL
10.The setting of “motion detect sensing area,
sensitivity, interval” will not lose when power
off
11.The shooting date is stored as file name,
the format of picture is JPEG, and the format
of video is AVI
12.Can look for, and check images/video
according to the shooting date
13.Support playback the image on
TV/Monitor/Computer
Function
Digital Motion Detect Video Record System
(DVS for short). It is new shoot and record
system of distinguish from high intelligent and
digital motion picture. The basic function is
DVS=CCTV+DVR. When the motion object
appears, the system can be take a picture or
shoot and record the picture by auto or Manu.
And then keep the picture into the inside
memorizer or SD. and that user can be view TV
(monitor) or computer (need install card reader)
anytime. User can be kept the picture into
computer from SD card.
1.Get into the state of "detecting moving
objects" once power on
2.Automatically take photos/record (record
images and sound simultaneously) once
detecting moving objects
3.Stop taking photos when the moving objects
stop moving
4.Support maximally 32G SD card which can
greatly enlarge the storage of images
5.Photos/Videos will overwrite when have no
space of hard disk
Using Range
High performance, low cost, easy operating,
can be connected all CCTV cameras, alarm
systems and other devises as a combination to
use.
Suitable for monitoring home, office,
supermarket, warehouse, school, traffic tool,
police, Government and so on.
Parts include in package
1.DVS x1
2.DC12V adaptor x1
3.Video cable x2
4.Din video cable x1
5.User’s manual x1
01
Unit Description of front Panel
Technical Data
Model
LCW-503
Power
DC12V
Working Current
250mA
Working Temperature
-10°C- +50°C
Normal Capacity
128Mb SD Card
Max. Capacity
32GB SD card
Picture Form
JPEG
Picture Element
640×480/D1
Video Form
AVI
Frame Element
320×240/D1
Frame Rate
30fps
Record Time
10s/pc
Compress Method
Motion JPEG
Record Signal
Two Way Audio
Video input
Audio input 600Ω Typ
Video output
Audio output 600Ω Typ
Dimension
155x95x30mm
Weight
135g
1.VIDEO OUT
2.DC12V
1
SD CARD: SD card insert groove
PW switch On/Off
Direction of SD card
Support Max.capacity of 32GB
SD card Notice
Don’t touch metal part of SD card directly, otherwise, it will damage permanently by static
Please inset or put off SD card, when devise turn off.
⑥
⑦
⑧
⑨
①
②
③
④
⑤
SD card faucet direction
①UP
②LEFT
③MENU/OK
④RIGHT
⑤DOWN
⑥SHOT
⑦MODE
⑧DISP
⑨ZOOM
Please accord the following indication to inset SD card.
SD card
DISP: Input signal swith, AV1,AV2,PIR;Use for wireless, as for channel switch function
SHOT: Shutter, playback, shop function
Zoom: 10x digital zoom, review function
02
2
Please turn on secure button
Please cut off power supply when inset or put off SD card
Make sure secure button is turning on.
03
Menu
Connecting the Device
Connecting indicates:
1, Use vide cable to connect monitor into video output port
Part 1: Manual Capture
Part 4: Advanced Setting
Part 2: Auto Capture
Part 5: Time/Date Setting
Special adapter of DC12V
TV/monitor
Camera
Part 3: Motion Detect
04
05
Auto Capture Setup
Manual Catpure Setup
1, Press MENU, enter into Manual Catpure setup interface
2, Use UP/DN key to select Photo 1,press OK/SHOT
key to capture for 1 picture
5, Use UP/DN key to select Movie Clip, press OK/SHOT key to
begin/stop recording, saving for several I minute AVI videos,
1, Press LF/RT key to enter into Auto Capture setup interface
2,Press OK key to enter into Auto capture interface,
use UP/DN key to select Auto Capturet On/OFF
5, Press OK key to enter into Master Capture Mode,
use UP/DN key to select Master auto capture 1 picture
6,Use UP/DN key to select Master auto capture 3 pictures
6, Use UP/DN key to exit
7,Use UP/DN key to select Movie 5 seconds,
Master auto recording, saving for AVI video
3, Use UP/DN key to select Photo 3, press OK/SHOT key to
continue catpure for 3 pictures
3, Use UP/DN key to exit
4, Use UP/DN key to select Movie, press OK/SHOT key to
begin/stop recording, saving for one AVI video
4, Use UP/DN to select Master Capture Mode
06
07
Auto Capture Setup
Auto Capture Setup
12, Use UP/DN key to select prerecord for 10 seconds.
8,Use UP/DN key to select Movie 10 seconds,
Master auto recording, saving for AVI video
16,Press OK key to enter into File Overwrite Setting interface,
use UP/DN key to select On, it will auto continue to record and
cover before files
9, Use UP/DN key to select TimeSlot
9, Use UP/DN key to Exit Master Capture Mode
10, Use UP/DN key to enter into Movie PrerRcord interface,
note: choose Movie prerecord function, Picture-Picture function
will ineffective. And buttons will not high sensitivity as before.
Prerecord: Use prerecord,it can prerecord several seconds video
when you begin to prerecord. It can help user to review clear whan
happen in before,moment and after.
13, Use UP/DN key to Off
17,Use UP/DN key to select Off, it will clew SD card is full
14, Use UP/DN key to exit Movie PreRecord interface
18,Use UP/DN key to Exit File Overwrite Setting interface
19,Use UP/DN key to Exit Auto Capture interface
15, Use UP/DN key to select File Overwrite Setting
11, Use UP/DN key to select prerecord for 5 seconds.
08
09
Motion Detect Setup
Motion Detect Setup
1, Press LF/RT key to enter into Motion detect interface
6,Use UP/DN key to exit Range
2, Use UP/DN key to select Range
7,Use UP/DN key to select TimeSlot
3, Press OK key to enter into Range interface,use
UP/DN key to select MD range for whole screen
10,Use UP/DN key to select internal time for 5 seconds
15,Use UP/DN key to select Level of Sensitivity for High
11,Use UP/DN key to exit Timeslot
16,Use UP/DN key to Exit Sensitivity interface
12, Use UP/DN key to select Sensitivity
17, Use UP/DN key to Exit Motion Dection
8,Press OK key to enter in Timeslot interface,
Use UP/DN key to select internal time for 1 second
13,Press OK key to enter in Sensitivity interface,
Use UP/DN key to select Level of Sensitivity for Low
4,Use UP/DN key to select MD range for 1/4 screen
9,Use UP/DN key to select internal time for 3 seconds
14,Use UP/DN key to select Level of Sensitivity for Middle
5,Use UP/DN key to select MD range for 1/6 screen
10
11
Advanced Setting
Advanced Setting
1,Press LF/RT key to enter into Advanced setup interface
6, Use UP/DN key to select Movie Quality interface
2,Press OK key to enter into Photo Quality interface,
use UP/DN key to select High Quality
7, Press OK key to enter into Movie Quality interface,
use UP/DN key to select QVGA
12, Use UP/DN key to select PAL system
8, Use UP/DN key to select DI
13, Use UP/DN key to exit TV Output Standard interface
4, Use UP/DN key to select Low Quality
9, Use UP/DN key to Exit Movie Quality interface
14, Use UP/DN key to Exit Advanced Setting
5,Use UP/DN key to Exit Photo Quality interface
10, Use UP/DN key to select TV Output Standard
3, Use UP/DN key to select Standard Quality
12
11, Press OK key to enter into TV Output Standard interface,
use UP/DN key to select NTSC system
13
Time/Date Setting
Preview Mode
1, Press LF/RT key to enter into Time/Date Setting interface
5, Use UP/DN key to select Movie TimeStamp interface
2,Press OK key to enter into Set Time/Date interface,
use UP/DN key to set Time/Date
6, Use UP/DN key to select Movie TimeStamp On/OFF
1, Press MODE key, enter into preview Mode interface
6, Use UP/DN, LF/RT key to select browse file
2, Press ZOOM key, enter into preview folder directory
7, Press MENU/OK key to open browse file
3, Select Folder directory, press ZOOM key enter into root directory
8, Press SHOT key to play/stop select file
3, Press OK key to enter into Photo TimeStamp interface
7, Use UP/DN key to Exit Time/Date Setting
4, Use UP/DN, LF/RT key to select browse file
4, Use UP/DN key to select Photo TimeStamp ON/OFF
5, Press MENU/OK key enter into browse file interface
14
9, Use UP key to quit play file
15
Delete One Mode
1, At preview Mode, use UP/DN, LF/RT key to select file
2, Press MENU key to enter into playback menu,
use UP/DN to select File Delete
Delete All Mode
6, Use LF/RT key to select Yes key to delect
1, At preview Mode, use UP/DN, LF/RT key to select file
6, Use LF/RT key to select No to quit delete interface
7, Use LF/RT key to select No to quit delete interface
2, Press MENU key to enter into playback menu,
use UP/DN to select File Delete
7, Use UP/DN key to select Cancel, press MENU key to exit
8, Use UP/DN key to select Cancel, press MENU key to exit
3, Press MENU key to enter into File Delete interface
3, Use UP/DN key to select delete All
4, Use UP/DN key to select delete single
4, Press MENU key to enter into confirm menu
5, Press MENU key to enter into confirm menu
5, Use LF/RT key to select Yes key to delect
16
17
Format Memory
1, Press MODE, enter into preview Mode
4, Press MENU key to open Format menu
2, Press MENU key, enter into Playback Menu
5, Use LF/RT key to select Yes, all files will lose
3, Use UP/DN key to select Format
6, Use LF/RT key to select No, press MENU key to exit
DVS
DIGITAL MOTION DETECT
VIDEO RECORD SYSTEM
18