1
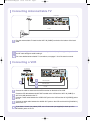
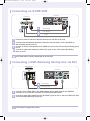
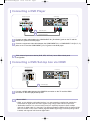
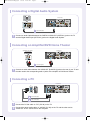
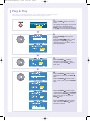
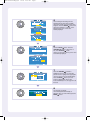
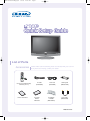
BN68-00515U-X0Eng.qxd
1/5/05 10:00 PM
Page 1
List of Parts
Accessories
Remote Control (BN59-00460A)
& Batteries (AAA x 2)
Owner's Instructions
Please make sure the following items are included with your LCD TV.
If any items are missing, contact your dealer.
RF Cable
(AA39-00039A)
Anynet AV
Owner’s
Instructions
Power Cord
(3303-000085)
Cover-Bottom
LN-R408D
(BN63-01640A)
Cleaning Cloth
(BN63-001798A)
Anynet Cable
(BN39-00518B)
BN68-00515U-00
BN68-00515U-X0Eng.qxd
1/5/05 10:00 PM
Page 2
Connecting Antenna/Cable TV
TV Rear Panel
Antenna
RF Cable
Cable TV
1
Plug the antenna/cable TV lead into the ANT1 IN (CABLE) terminal on the bottom of the back
panel.
When connecting the RF cable to the antenna input terminal, keep the copper wire portion of
the RF cable straight to avoid bending it.
For more detailed antenna/cable TV connections, see pages 7-10 of the owner's manual.
Connecting a VCR
TV Rear Panel
VCR Rear Panel
1
Cable
or
Antenna
1
2
3
4
4
3
2
Audio Cable (Option)
Video Cable (Option)
RF Cable
Connect the cable or antenna to the ANT IN terminal on the back of the VCR.
Connect an RF cable between the ANT OUT terminal on the VCR and the ANT1 IN (CABLE) or
ANT 2 IN (AIR) terminal on the TV.
Connect a video cable between the VIDEO OUT jack on the VCR and the AV IN [VIDEO] jack on
the TV.
Connect an audio cable between the AUDIO OUT jacks on the VCR and the AV IN [R-AUDIO-L]
jacks on the TV.
If you have a “mono” (non-stereo) VCR, use a Y-connector (not supplied) to hook up to the
R-AUDIO-L jacks on the TV.
BN68-00515U-X0Eng.qxd
1/5/05 10:00 PM
Page 3
Connecting an S-VHS VCR
TV Rear Panel
VCR Rear Panel
4
1
3
2
Cable
or
Antenna
1
2
3
4
Audio Cable (Option)
S-Video Cable (Option)
RF Cable
Connect the cable or antenna to the ANT IN terminal on the back of the VCR.
Connect an RF cable between the ANTOUT terminal on the VCR and the ANT1 IN(CABLE) or
ANT 2 IN(AIR) terminal on the TV.
Connect an S-video cable between the S-VIDEO OUT jack on the VCR and the [S-VIDEO] jack on
the TV.
Connect an audio cable between the AUDIO OUT jacks on the VCR and the [R-AUDIO-L]
jacks on the TV.
An S-Video cable is usually included with an S-VHS VCR.
Connecting a DVD / Samsung Set-top box via DVI
DVD Player Rear Panel
TV Rear Panel
2
1
Audio Cable (Option)
DVI to HDMI Cable (Option)
1
Connect a DVI to HDMI cable or DVI-HDMI Adapter (DVI to HDMI) between the HDMI/DVI
connector on the TV and DVI connector on the DVD player/Set-top box.
2
Connect an audio cable between the DVI [R-AUDIO-L] jacks on the TV and the AUDIO OUT jacks
on the DVD player/Samsung Set-top box.
DVI-D does not support PC function.
BN68-00515U-X0Eng.qxd
1/5/05 10:00 PM
Page 4
Connecting a DVD Player
TV Rear Panel
DVD Player Rear Panel
1
2
Audio Cable (Option)
Component Cable (Option)
1
Connect an audio cable between the COMPONENT IN 1 [R-AUDIO-L] jacks on the TV and the
AUDIO OUT jacks on the DVD player.
2
Connect a component video cable between the COMPONENT IN 1 or COMPONENT 1 IN [PR, PB, Y]
jacks on the TV and the COMPONENT [Y, PB, PR] jacks on the DVD player.
Each external input source device (DVD, STB, VCR etc.) has a different back panel
configuration.
Connecting a DVD / Set-top box via HDMI
DVD Player Rear Panel
TV Rear Panel
1
1
HDMI Cable (Option)
Connect a HDMI cable between the HDMI/DVI connector on the TV and the HDMI
connector on the DVD player/Set-top box.
What is HDMI?
• HDMI, or high-defintion multimedia interface, is a next-generation interface that enables the
transmission of digital audio and video signals using a single cable without compression.
• “Multimedia interface” is a more accurate name for it especially because it allows multiple
channels of digital audio (5.1 channels). The difference between HDMI and DVI is that the HDMI
device is smaller in size, has the HDCP (High Bandwidth Digital Copy Protection)coding feature
installed, and supports multi-channel digital audio.
BN68-00515U-X0Eng.qxd
1/5/05 10:00 PM
Page 5
Connecting a Digital Audio System
Digital Audio System
TV Rear Panel
1
1
Optical Cable (Option)
Connect an audio Optical between the DIGITAL AUDIO OUT (OPTICAL) jack on the TV
and the Digital Audio Input (OPTICAL) jack on the Digital Audio System.
Connecting an Amplifier/DVD Home Theater
TV Rear Panel
Amplifier/DVD Home Theater
1
1
Audio Cable (Option)
Connect an audio cables between the AUDIO OUT [R-AUDIO-L] jacks on the rear of your TV and
the other ends to the corresponding audio in jacks on the Amplifier or DVD Home Theater.
Connecting a PC
TV Rear Panel
PC
2
1
1
2
PC Audio Cable (Option)
PC Video Cable (Option)
Connect the D- Sub cable to “PC” (PC IN) on the TV.
Connect the stereo audio cable to “AUDIO” (PC IN) on the TV and the other end to
“Audio Out” of the sound card on the computer.
BN68-00515U-X0Eng.qxd
1/5/05 10:00 PM
Page 6
Plug & Play
When the TV is initially powered on, two basic customer settings proceed
automatically and subsequently: Setting Auto program, Clock.
1
Press the POWER
control.
button on the remote
The message “Menu language, Channels and
Time will be set.” is displayed. Press the
ENTER
button, then “Select the language
of the OSD” menu is automatically displayed.
2
Press the ENTER
button to enter the
language.
Press the UP/DOWN
buttons to select
language, then the ENTER
button.
“Select the antennas to memorize.” menu is
automatically displayed.
3
Press the UP/DOWN
buttons to
memorize the channels of the selected
connection. Press the ENTER
button to
select “Start”.
4
Press the UP/DOWN
buttons to select
“Digital Channel”, then press the ENTER
button.
Press the UP/DOWN
buttons to select
“STD”, “HRC” or “IRC”, press the ENTER
button.
Press the UP/DOWN
buttons to select
“Analog Channel”, then press the ENTER
button. Press the UP/DOWN
buttons to
select “STD”, “HRC” or “IRC”, press the
ENTER
button.
Press the UP/DOWN
buttons to select
“Start”, then press the ENTER
button to
memorize the channels.
BN68-00515U-X0Eng.qxd
1/5/05 10:01 PM
Page 7
5
The TV will begin memorizing all of the
available channels. After all the available
channels are stored, the Auto program menu
reappears. Press the ENTER
button when
channel memorization is complete. “Set to
daylight savings time.” menu is auto
matically displayed.
6
Press the ENTER
button. Press the
UP/DOWN
buttons to select “Yes” or
“No”, then the ENTER
button.
“Select your time zone in which you live” menu
is automatically displayed.
7
Press the UP/DOWN
buttons to
highlight the time zone for your local area
(and to move the highlight to the appropriate
time zone on the map of the United States).
Press the ENTER
button.If you have
received a digital signal, the time will
be set automatically. If not, see page 70 to set
the clock.
8
The message “Completed.
Time will be updated automatically.” is
displayed. When you have finished, press the
ENTER
button.
BN68-00515U-X0Eng.qxd
1/5/05 10:01 PM
Page 8
Setting the Function Help
Displays help on the menu functions.
1
Press the MENU
button to display the
menu. Press the UP/DOWN
buttons to
select “Setup”, then press the ENTER
button.
2
Press the UP/DOWN
buttons to select
”Function Help:, then press the ENTER
button.
3
Press the UP/DOWN
buttons to select
”On”, then press the ENTER
button.
To Select the Source
Press the SOURCE button on the remote control
You can select the TV mode or an input
source (AV, S-Video, Component 1,
Component 2, PC, HDMI) connected to the
TV set. Use this button to choose an input
source that you would like to watch.
BN68-00515U-X0Eng.qxd
1/5/05 10:01 PM
Page 9
Remote control Functions Chart
POWER
PRE-CH
Turns the TV on and off.
Tunes to the previous channel.
ANTENNA
Press to select “AIR” or “CABLE”.
CH
and CH
(Channel UP/Down)
GUIDE
Press CH
or CH
change channels.
Press to display he on-screen
Electronic Program Guide (EPG).
Press to select additional channels
(digital and analog) being broadcast by
the same station. For example, to
select channel “54-3”, press “54”,
then press “-” and “3”.
to
VOL + and VOL Press to increase or decrease
the volume.
SOURCE
Press to display all of the available
video sources.
INFO
MUTE
Press to temporarily cut off
the sound.
Use to see information on the current
broadcast.
EXIT
Anynet
Press the Anynet button to bring up the
Anynet menu. Refer to “Anynet AV
Owner’s Instructions”.
MENU
Displays the main on-screen
menu.
Press to exit the menu.
UP / DOWN / LEFT / RIGHT /
ENTER
Use to select on-screen menu items
and change menu values.
CH.LIST
MTS
Displays the channel list.
FAV.CH
Press to choose stereo, mono or
Separate Audio Program (SAP
broadcast).
Press to switch to your favorite
channels.
PIP
Picture-in-Picture ON/OFF.
STILL
Press to stop the action during a
particular scene.
Press again to resume normal video.
SLEEP
Press to select a time for the TV to
turn off automatically.
P.SIZE
Press to change the screen size.
DNIe
Press to improve the digital video
quality.
SRS
Selects TruSurround XT mode.
SET
Adjusts 5 separate devices - TV,
VCR, CABLE, DVD or Samsung
Set-top box.
MODE
Selects a target device to be con
trolled by the Samsung remote control
(TV, VCR, CABLE, DVD or Samsung
Set-top box)
Press to make sure that the TV LED,
STB LED, VCR LED, CATV LED, or
DVD LED is illuminated.
CH
Displays the available channels
in sequence.
(These buttons change channels
in the PIP window only.)
CAPTION
Controls the caption decoder.
VCR/DVD Functions
(Only Anynet mode)
- Rewind
- Stop
- Play/Pause
- Rast/Forward
RESET
When your remote does not work,
change the batteries and press the
Reset button for 2-3 seconds before
use.
NUMERIC BUTTONS
Press to change the channel.
Note: If you are trying to program this remote to use another manufacturer's DVD, VCR or
Cable box, see page 31 of the owner's manual.
BN68-00515U-X0Eng.qxd
1/5/05 10:01 PM
Page 10
FAQ
Check the following
items before calling
a Samsung authorized
service center.
Image is not centered on the
screen.
If a still image is displayed for an
extended period of time, residual
images or blurring may appear.
Remote control malfunctions
When you need to leave the TV unused
for an extended period of time, adjust
the settings so that the TV automatically
goes into energy saving mode or
activates the screen saver to display
moving images.
Replace the remote control batteries.
Clean the upper edge of the remote
control (transmission window).
Check the battery terminals.
No picture or sound.
No sound or sound is too low
at maximum volume.
Try another channel.
Adjust the horizontal and vertical
position. The screen position must be Press the SOURCE button.
Make sure the TV is plugged in.
adjusted on the output source
Check the antenna connections.
(i.e. STB) with a digital signal.
First, check the volume of units connected
to your TV (digital broadcasting receiver,
DTV, DVD, cable broadcasting receiver,
VCR, etc.). Then, adjust the TV volume
accordingly.
Poor picture
“Not Supported Mode”
message.
Image is not stable and may
appear to vibrate.
Try another channel.
Adjust the antenna.
Check all wire connections.
Check the maximum resolution and
the frequency of the Video Adapter.
Compare these values with the data
in the Display Modes.
If the setting is not correct, use your
computer utility program to change
the display settings.