1
Mythos STS
Mythos STS SuperTower® Loudspeaker with Built-In Powered Subwoofer
Owner's Manual
Thank You
Thank you for choosing the Definitive Technology
Mythos STS SuperTower Loudspeaker System. The Mythos
STS is a unique speaker which includes a built-in powered
subwoofer system with a high-power digital amplifier. This
extraordinary speaker truly revolutionize the state-of-the-art
in music and home theater loudspeaker technology and
performance. You chose wisely.
Our engineers have spent many years in developing this
product. In order to ensure that you experience the finest
performance possible, we encourage you to take a moment
to fully read this owner's manual and familiarize yourself
with the proper installation and set-up procedures for your
Mythos STS speakers.
Safety Precautions
CAUTION! To reduce the risk of electric shock and fire, do not remove the cover or back plate of this
device. There are no user serviceable parts inside. Please refer all servicing to licensed service technicians.
Avis: Risque de choc electricque, ne pas ouvrir.
CAUTION! The international symbol of a lightning bolt inside a triangle is intended to alert the user to
uninsulated "dangerous voltage" within the device's enclosure. The international symbol of an exclamation
point inside a triangle is intended to alert the user to the presence of important operating, maintenance and
servicing information in the manual accompanying the device.
CAUTION! To prevent electrical shock, match wide blade of plug to wide slot, fully insert. Attention: Pour
eviter les chocs electriques, introduire la lame la plus large de la fiche dans la borne correspondante de la
prise et pousser jusqu'au fond.
CAUTION! To reduce the risk of electrical shock, do not expose this equipment to rain or moisture.
1. Read Instructions-All safety and operating instructions should be read before operating the device.
2. Retain Instructions-The safety and operating instructions should be retained for future reference.
3. Heed Warnings-All warnings on the device and in the operating instructions should be adhered to.
4. Follow Instructions-All operating and safety instructions should be followed.
5. Water & Moisture-The device should never be used in, on or near water for risk of fatal shock.
6. Carts & Stands-The device should only be used on carts or stands recommended by the manufacturer.
7. Wall & Ceiling Mounting-The device should be mounted on a wall or ceiling only as recommended
by the manufacturer.
8. Ventilation-The device should always be located in such a way that it maintains proper ventilation.
It should never be placed in a built-in installation or anywhere that may impede the flow of air through
its heat sink.
9. Heat-Never locate the device near heat sources such as radiators, floor registers, stoves or other
heat-generating devices.
10. Power Supply-The device should only be connected to a power supply of the type described in the
operating instructions or as marked on the device.
11. Power Cord Protection-Power cables should be routed so they are not likely to be stepped on or
crushed by items placed on them or against them. Special attention should be paid to areas where the
plug enters a socket or fused strip and where the cord exits the device.
12. Cleaning-The device should be cleaned in accordance with manufacturer's instructions.
13. Periods Of Non-Use-The device should be unplugged when not being used for extended periods.
14. Dangerous Entry-Care should be taken that no foreign objects or liquids fall or are spilled inside
the device.
15. Damage Requiring Service-The device should be serviced by licensed technicians when:
• The plug or power supply cord has been damaged.
• Objects have fallen or liquid has spilled inside the device.
• The device has been expos~ to moisture.
• The device does not appear to be operating properly or exhibits a marked change in performance.
• The device has been dropped or the cabinet becomes damaged.
16. Service-The device should always be serviced by licensed technicians. Only replacement parts
specified by the manufacturer should be used. The use of unauthorized substitutions may result in fire,
shock, or other hazards.
Safety Precautions Specific to Mythos STS
The cautionary marking label is located on the bottom of the speaker,
visible through an opening in the granite base.
Power Supply
1. The fuse and power disconnect device are located on the bottom of the
speaker, accessible through a hole in the granite base.
2. The disconnect device is the power cord, detachable at either the speaker
or the wall.
3. The power cord must be disconnected from the speaker before servicing.
Unpacking Your Mythos STS
Please Inspect For Shipping Damage
Each loudspeaker leaves our plant in perfect condition. Any visible or
concealed damage most likely occurred in handling after it left our plant and
should be reported at once to your Definitive dealer or the delivery company that
delivered your loudspeaker. Please unpack your system carefully. Save·all cartons
and packing materials in case you move or need to ship your system. Record the
serial number found on the back of the Mythos STS in the appropriate place on
your warranty card, answer all questions and send it in.
VERY IMPORTANT: Accessories
Various parts and accessories that you will need to assemble your Mythos STS
are in the carton but are easy to overlook. Open both ends of the shipping carton.
Carefully examine the contents of the shipping carton and packing material to find
the plastic bags with accessories.
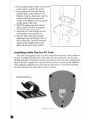
Base Installation Instructions
Tools required: 4mm (or 5/32") Allen wrench (also called Hex Key driver) included
in carton
Parts required: Polished Granite Base, Cable Clip for AC Cord, four Allen head
bolts, eights plastic washers. All required parts are included in the
product carton.
Instructions:
1. Carefully lay the Mythos STS on its side. Lift the base of the speaker about six
inches and support it with a soft padded object, such as a pillow. Do NOT
support the speaker with a hard object, as you might dent or scratch the
aluminum finish.
2. Place one plastic washer on each bolt.
3. Insert the bolts into the granite base from the bottom (the same side that the
levelling feet are attached).
4. Place another plastic washer on each bolt
so the washer is against the granite.
5. Finger tighten all four bolts into the
threaded holes on the bottom of the
Mythos. If this has been done correctly,
washers will be between the metal
surface of the Mythos STS, the granite,
and the heads of the bolts.
6. GENTLY tighten each bolt with the
Allen wrench. Do NOT overtighten
or you may crack the granite.
7. Attach the AC cord through the hole
at the bottom of the granite base.
8. Note the label showing the height
adjustment ring and locking collar on
the levelling feet. Carefully return the
speaker to the upright position and
adjust the feet to level the speaker.
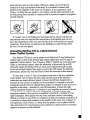
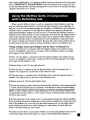
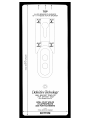
Installing Cable Clip for AC Cord
The cable clip supplied in the accessories bag holds the power cable in place to
prevent accidental disconnection of the cable from the inlet socket. To use, peel
backing and apply to bottom of granite base half-way between center opening and
back of the base, slightly off to one side of the rear foot, as shown in the diagram.
After plugging supplied power cable into the inlet socket, it may then be pressed
into the opening in the cable clip to secure it in place.
SELF-ADHESIVE POWER CABLE
RESTRAINING CLIP FOR MYTH OS STS
SUGGESTED CLIP LOCATION
Installing Leveling Feet and Spikes
We have provided leveling feet and metal spikes with your Mythos STSs; they
are in the same bag as this manual. The plastic tips are for hard floor surfaces such
as tile and wood while the metal spikes are for use on carpeted floors. Be careful
when using spikes as they may cause damage to wooden or other floors which are
susceptible to being scratched. Definitive Technology is not responsible for floor
damage which may result from the use of spikes.
Screw the leveling feet into the five threaded inserts on the bottom of the
base. If you plan on using spikes, it would be best to experiment with speaker
positioning first, then add the spikes once you are sure you've detennined the
speakers' permanent position. To install the carpet spikes, unscrew the nonmarking tips from the centers of the five leveling feet and screw the spikes in
their places. Then, with the help of another person, lift the speaker upright and
lower it to the desired location; push down on the top of the speaker to force the
spikes through the carpet and make contact with the floor beneath.
Once you have positioned the speakers, wiggle them to see if they are stable and
level. Adjust the height of the leveling feet/spikes accordingly for best stability.
Positioning the Mythos Speakers in Your Room
Your new Mythos speakers are very flexible in terms of positioning and
placement options and they will produce excellent sound in almost any location.
Following a few simple guidelines will, however, optimize their performance for
the more critical listener. Although the following recommendations will usually
yield the best results, all rooms and listening sets-ups are different, so do not be
afraid to experiment with the speaker placement. Whatever sounds best to you
is correct.
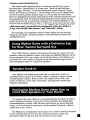
Positioning Mythos STS as
Left/Right Main Speakers
For best results create an equilateral
triangle between the speakers and the
listening position as shown in the
illustration. Angle the speakers toward
the center of the listening position for
brighter, clearer sound with a sharper
focus and a more solid central image
(recommended). Pointing the speakers
straight forward, parallel with each
other, will result in a warmer less
sharply focused sound.
'3'(
A
V--··· _-L-
lMI
J--_.-
/
........
••••
//
.,o'
The Mythos STSs are magnetically shielded for safe placement near TV or
video monitors. If you notice video distortion or discoloration, immediately move
the speakers farther away from the video display. To get the best possible imaging
and most even tonal response avoid placing the speakers less than 3 feet (1 Meter)
from back and side walls.
Positioning Mythos STS as Rear/Side Surrounds
When used as rear or side surround speakers, Mythos STSs may be located on
the side or behind the listeners. When used on the sides, take care never to locate
the speakers forward of the listeners (figure A). When the side/rear speakers are
close to the listening position, do not aim the speakers at the listeners. If positioned
several feet behind the listener, experiment with speaker aiming (figure B).
B
<>
~
L··· . ·..
\\....
·O
./'....
..- "
/("<>
,
Connecting Your Loudspeakers
Connecting Mythos STS to a Two-Channel System
Your Mythos STSs have a set of speaker level (high level) 5-way binding posts
plus an LFE input. If you are using your Mythos STS in a two channel system you
only need connect to the high-level binding posts. To start, strip liz inch (l2.7mm)
of insulation from each of the two conductors of the speaker wire to expose the bare
metal and twist each of the individual conductors into single unfrayed strands. Note
that one of the terminals on the rear of each speaker is marked with red band (+)
and the other is marked
with black band (-).
Make certain that you
/
connect the wire from
I
the red (+) terminal of
your amplifier or
()
receiver to the red (+)
~
terminal on your
speaker and the wire
)).
from the black (-)
AMPLIFIER OR
+
RECEIVER
terminal of your
~
amplifier or receiver
,'--to the black (-) terminal
on your speaker.
Most speaker wire has
~
0
n/
some indicator (such as color-coding, ribbing or writing) on one of the two
conductors to help you maintain consistency. It is essential to connect both
speakers to the amplifier in the same way (in phase). If you experience a lack
of bass, it is likely that one speaker is out of phase with the other and needs to be
rewired paying closer attention to connect positive to positive; negative to negative
on both channels.
To connect wire to the binding post [see figure above], unscrew the hex nut
and insert the bare wire into the hole near the base of the binding post. Do not
insert the insulated part of the wire into the hole as this will not give you a good
connection. Twist the hex nut back down the binding post until it firmly meets
the wire. Do not over tighten.
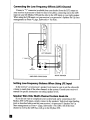
Connecting Mythos STS to a Multi-Channel
Home Theater System
Your Mythos STSs have a set of speaker level (high level) 5-way binding post
speaker inputs to feed in the left and right channel signals plus an LFE input to
separately feed the discrete "Low Frequency Effects" channel into each subwoofer.
Unlike a conventional system, where the subwoofer is driven only by an LFE
subwoofer signal, the Mythos STSs are much more sophisticated and can play
by the left and right channel bass signal as well as the LFE signal. For optimum
performance, please fully read and closely follow the directions in this manual.
To start, strip 1/2 inch (12.7mm) of insulation from each of the two conductors
of the speaker wire to expose the bare metal and twist each of the individual
conductors into single unfrayed strands. Connect the left front channel red (+)
terminal of your receiver or amplifier to the red marked (+) terminal of your left
loudspeaker and the left front channel black marked (-) terminal of your receiver or
amplifier to the black (-) terminal of your left loudspeaker. Connect the right
channel main/front channel red (+) terminal of your amplifier or receiver to the red
(+) terminal of your right loudspeaker and the black (-) terminal of the right
main/front channel of your receiver or amplifier to the black (-) terminal of your
right loudspeaker. Most speaker wire has some indicator (such as color-coding,
ribbing or writing) on one of the two conductors to help you maintain consistency. It
is essential to connect both speakers to the amplifier in the same way (in phase). If
you experience a lack of bass, it is likely that one speaker is out of phase with the
other and needs to be rewired paying closer attention to connect positive to positive;
negative to negative on both channels.
Connecting the Low Frequency Effects (LFE) Channel
Connect a "Y" connector (available from your dealer) from the LFE output on
your receiver or processor to feed two line level cables, connecting one to the LFE
input on your left Mythos STS and the other to the LFE input on your right speaker.
When using the LFE inputs, set your receiver's or processor's Speaker Set Up (bass
management) as Front =Large, Subwoofer =Yes (On).
LEFT SPEAKER
+
LFE
OUTPUT
LEFT
RIGHT
AMPLIFIER OR RECEIVER
RIGHT SPEAKER
Setting Low-Frequency Balance When Using LFE Input
In the receiver's or processor's speaker level menu be sure to set the subwoofer
volume to match that of the other channels in the system. Consult your receiver's
manual for specific instructions on setting speaker levels.
Speaker Wire Only Multi-Channel System Hook-Up
If you do not want to complicate your system hook up by connecting to the
Mythos STS' LFE inputs, simply connect to the speakers' high-level input binding
posts as described above and set your receiver's or processor's Speaker Set Up
(bass management) as Front =Large, Subwoofer =No (Off). All of the front
channel as well as the LFE bass will go to the Mythos STS.
VERY IMPORTANT: Setting Bass Management and
Channel Balance
Dolby Digital and DTS multi-channel systems have critical channel
balance and bass management procedures which must be followed if the
system is to perform properly. We have spoken with many users with system
sound problems which could be clearly traced back to improper system
balance and bass management set-up. Consult your receiver's or processor's
manual to learn how to access your system set up menus. If you have
connected the LFE output of your receiver or processor to the LFE input of
the Mythos STS, using the Speaker Set Up (or bass management) menu set
the front left speakers as "Large" and subwoofer as "Yes." If you have
connected the speakers using only speaker wire, set the front speakers as
"Large" and subwoofer as "No."
If you have a Definitive center channel with a built-in powered subwoofer
or other full range center channel, set your receiver's Speaker Set Up center
channel setting to "Large" (although you should experiment with this to see
what sounds best in your specific system). For almost every other center
channel speaker set it as "Small." If you are using large rear surround
speakers with very extended low frequency response such as a large
Definitive floor-standing system or one with a built-in powered subwoofer,
set the rear channels of your decoder's bass management system to "Large."
If you are using medium to small-sized center and surround speakers, set
them to "Small."
Use the Speaker Level menu in your receiver or processor to set each
channel in the system to the same volume level. While you can get decent
results doing this by ear, it is best to use an inexpensive Sound Pressure
(SPL) meter to get perfect channel to channel balance. Some new receivers
and processors have Auto Set Up functions that use a supplied microphone
to set levels.
Using Multi-Channel SACD or DVD-Audio with
your Mythos STS
Because of the nature of their bass management systems, a multi-channel
SACD player or DVD-Audio player (or any other format that requires using
6-channel interconnects) requires the use of an LFE connection between your
receiver or processor and your Mythos STS. If you are using one of these players,
please use the connection method outlined in the "Connecting the Low Frequency
Effects (LFE) Channel" section.
Surround Channel Hook-Up
If you are using the Mythos STS as side/rear surround speakers, hook up the
left surround red (+) terminal of your receiver or amplifier to the red (+) terminal
of your left surround speaker and the left surround black (-) terminal of your
receiver or amplifier to the black(-) terminal of your left surround speaker.
Connect the right surround red (+) terminal of your amplifier or receiver to the
red (+) tenninal of your right surround loudspeaker and the black (-) tenninal of
the right surround channel of your receiver or amplifier to the black (-) tenninal
of your right surround loudspeaker. Most speaker wire has some indicator (such
as color-coding, ribbing or writing) on one of the two conductors to help you
maintain consistency. It is essential to connect both speakers to the amplifier in
the same way (in phase). If you experience a lack of bass, it is likely that one
speaker is out o( phase with the other and needs to be rewired paying closer
attention to connect positive to positive; negative to negative on both channels.
Set the receiver's or processor's Speaker Set-Up menu a~ Surround =Large.
Powering the Active Subwoofer
Your Mythos STSs contain a built-in, active powered subwoofer section as well
as an electronic crossover and must be plugged into an electrical socket of the
appropriate voltage (as indicated on the back of your unit) using the electrical cord
which you have attached to the bottom of the speaker. The Mythos STS has a
special circuit which automatically turns the powered subwoofer section on when
a signal is fed to the loudspeaker and does not require an on-off switch. Please note
that if you hear a pop from the speaker when the amp powers up, this is nonnal.
The LED on the back panel will light up when a signal is sensed and the amplifier
turns on. After the cessation of a signal, it may take up to an hour for the amplifier
to actually tum off. In some instances, because of stray radio signals (RF) in your
area, the LEDs may not tum off. However, this is nothing to be concerned about
as the amplifiers draw almost no power when they are idling.
Setting Your Speakers' Low-Frequency Level Control
Your Mythos STSs have bass level controls which allow you to tune the output
level of the powered subwoofers to match your room and personal listening
preferences. Please note that there are no controls to vary the crossover points
or phase because these have been factory calibrated and set to provide perfect
blending (a major perfonnance benefit of this innovative product). We suggest
beginning with the level control set at approximately 1 o'clock.
Nonnally the level control of the left speaker will be set the same as the level
control of the right speaker. However, these controls can also be set differently on
the two speakers in order to allow you to vary the response of left and right speakers
to compensate asymmetrical positioning of the speakers in your room (i.e., when
one is closer to a side wall or comer, etc.). This is a useful feature which allows you
much greater flexibility in loudspeaker placement, as well as the ability to
compensate for what could otherwise be difficult placement situations.
To prevent accidental damage to the subwoofers built into your Mythos
STSs from overdriving the system, the subwoofers feature an internal
overload protection circuit, which will turn the subwoofers off or down
when overdriven or overheated and will then resume normal operation
after a few minutes.
Setting Low-Frequency Level When Using Separate LFE Input
If your Mythos STS built-in subwoofers are connected with the LFE input,
first set the bass volume level on your Mythos STSs to sound balanced when
listening to music in stereo~ Then use your receiver or processor's Speaker Level
(or Channel Balance) menu to set the subwoofer level to at least equal volume with
the other speakers in the system. If you want more bass output on movies, you are
better off raising the .1 channel subwoofer level in the Speaker Level menu than
turning up the subwoofer volume control on the speakers.
Speaker Pre-Conditioning (Break-in)
Your Mythos STSs should sound good right out of the box; however, an
extended pre-conditioning (break-in) period of 40-60 hours or more of normal
playing is required to reach full performance capability. Pre-conditioning allows
the driver suspensions to loosen and results in fuller bass, clearer more open
midrange and smoother high frequency reproduction.
Using your Mythos STS with an
Additional Subwoofer
Although the built-in subwoofers in your Mythos STSs deliver superb low
frequency response and are all that are required for amazing performance, some
listeners with large rooms may want to add an additional powered subwoofer to
their system. If you choose to do so, we strongly suggest using a Definitive
SuperCube subwoofer in order to achieve the highest level of sound quality
possible. In this case connect the Mythos STS with the speaker wire only method
and connect the LFE output to the separate subwoofer. Your receiver or processor's
Speaker Set Up bass management system should be set to Front Speakers =
"Large" and Subwoofer =. "Yes."
Complete Home Theater Systems
We strongly suggest that you use matching Definitive center channel and
rear/surround speakers to complete your Definitive home theater system. Please
note that you can use Definitive Mythos STS SuperTowers as rear or side surround
speakers with excellent results for both music and movies.
Setting Bass and Treble Controls on
Your Receiver or Amplifier
Nonnally we recommend that you set the "Bass" and "Treble" controls on flat
or 0 dB. This will give you the most linear and natural sound. If you want more
bass, raise the subwoofer's "Level" control on your Mythos STS, keeping in mind
that even a little tum of the knob can make a big difference in the sound. Also, if
your amplifier or receiver has a graphic equalizer, we recommend that you leave it
flat. The reason for this is that we have spoken with many consumers about what
they thought were improperly sounding speakers when, in fact the problem was
misadjusted tone controls. When in doubt, leave them flat; this almost always
sounds the best.
Audible distortion when the speakers are playing at loud levels is caused
by driving (turning up) your receiver or amplifier louder than it or the
speakers are capable of playing. Most receivers and amplifiers put out
their full-rated power well before the volume control is turned all the way
up, so the position of the volume control is a poor indicator its power limit.
If your speakers distort when you play them loud, turn the volume down!
Troubleshooting
If you experience any difficulties with your Mythos STS loudspeakers, try the
suggestions below. If you still have problems, contact your Definitive Technology
Authorized Dealer for assistance.
1. Make sure all your system interconnects and power cords are solidly in place.
2. Should you hear hum or noise coming from your speakers, try plugging the
speakers' power cords into a different AC circuit than your amplifier.
3. The system has sophisticated internal protection circuitry. If for some reason
the protection circuitry trips, tum off your system and wait five minutes
before trying the system again. If the speakers' built-in amplifier should
overheat, the system will tum off until the amplifier cools down and resets.
4. Check to be sure that your power cord has not been damaged.
5. Check that no foreign objects or liquid has entered the speaker cabinet.
6. If you cannot get the subwoofer driver to tum on or if no sound comes out
and you are sure the system is set up properly, please bring the loudspeaker
to your Definitive Technology Authorized Dealer for assistance. Call First.
Service
Service and warranty work on your Definitive loudspeakers will normally be
performed by your local Definitive Technology dealer. If, however, you wish to
return the speaker to us, please contact us first, describing the problem and
requesting authorization as well as the location of the nearest factory service
center. Please note that the address eiven in this booklet is the address of our
offices only. Under no circumstances should loudspeakers be shipped to our
offices or returned without contactine us first and obtainine return
authorization.
Definitive Technology Offices
11433 Cronridge Drive,
Owings Mills, Maryland 21117
Phone: (800) 228-7148 (US & Canada),
01 (410) 363-7148 (all other countries)
Technical Assistance
It is our pleasure to offer assistance if you have any questions regarding your
Mythos STS or their set-up. Please contact your nearest Definitive Technology
dealer or call us directly at (800) 228-7148 (US & Canada), 01 (410) 363-7148
(all other countries) or e-mail [email protected].
Specifications
Mythos STS
Dimensions:
Base Dimensions:
Frequency Response:
Efficiency:
Nominal Impedance:
Driver Complement:
Rec. Assoc. Amplification:
Built-In Subwoofer
Power Amplifier:
Fuse Size:
5l/t W x 81h" D x 47 1/t H
(height incl!1des granite base & leveling feet/spikes)
101h" W x 14" D
16 Hz-3D kHz
93 dB
4-8 ohms
Two 41fz" high definition cast-magnesium basket midrange
drivers. One 1" (25 mm) pure aluminum dome tweeter.
One 5" x 10" long-throw racetrack subwoofer coupled
to two 5" x 10" racetrack radiators.
20 - 250 Watt/channel
300 Watt Digitally-Coupled Class D amplifier
3.25-amp 250-volt slow-blow fuse for llO-volt version and
2-amp 250-volt slow-blow fuse for the 240-volt version
Specifications subject to change without notice.
Visit us at www.definitivetech.com.
Notes
Limited USA Warranty:
5-Years for Drivers and Cabinets,
3-Years for Electronic Components
Definitive Technology warrants to the original retail purchaser only that this Definitive
Technology Loudspeaker Product (the "Product") will be free from defects in materials and
workmanship for a period of five (5) years covering the drivers and cabinets, and three (3)
years for the electronic components from the date of the original purchase from a Definitive
Technology Franchised Dealer. However, this warranty will automatically terminate prior
to the expiration of five (5) years for the drivers and cabinets and three (3) years for the
electronic components if the original retail purchaser sells or otherwise transfers the Product
to any other party. The original retail purchaser shall hereinafter be referred to as "you." To
obtain the warranty protection for your Definitive Technology Product(s), you must fill out
the Warranty Registration Card(s), within ten days of the date of purchase.
Defective Products must be shipped, together with proof of date of purchase, prepaid
insured to the Franchised Dealer from whom you purchased the Product, or to the nearest
factory service center. Product(s) must be shipped in the original shipping container or its
equivalent; in any case the risk of loss or damage in transit is to be borne by you. If, upon
examination at the Factory or a Definitive Technology Franchised Dealer, it is determined
that the unit was defective in materials or workmanship at any time during this Warranty
period, Definitive Technology or the Definitive Technology Franchised Dealer will, at its
option, repair or replace this Product at no additional charge, except as set forth below. All
replaced parts and Product(s) become the property of Definitive Technology. Product(s)
replaced or repaired under this Warranty will be returned to you, within a reasonable time,
freight collect.
This Warranty does not include service or parts to repair damage caused by accident,
misuse, abuse, negligence, inadequate packing or shipping procedures, commercial use,
voltage in excess of the rated maximum of the unit, cosmetic appearance ofcabinetry not
directly attributable to defects in materials or workmanship, or service, or repair or
modification ofthe Product which has not been authorized by Definitive Technology.
Definitive Technology makes no Warranty with respect to its Products purchased
from dealers or outlets other than Definitive Technology Franchised Dealers.
This Warranty is in lieu ofall other expressed Warranties. If this Product is defective
in material or workmanship as warranted above, your sole remedy shall be repair or
replacement as provided above. In no event will Definitive Technology be liable to you
for any incidental or consequential damages arising out ofthe use or inability to use
the Product, even if Definitive Technology or a Definitive Technology Franchised Dealer
has been advised of the possibility ofsuch damages, or for any claim by any other party.
Some states do not allow the exclusion or limitation of consequential damages, so the
above limitation may not apply to you.
All implied warranties on the Product are limited to the duration of this expressed
Warranty. Some states do not allow limitation on how long an implied Warranty lasts,
so the above limitations may not apply to you. This Warranty gives you specific legal
rights, and you also may have other rights which vary from state to state.
«(
This product complies with the essential
requirements of the EMC directive 89/336/EEC.
EDAT041808
Defi[l.iti~e_Te_ch nolo~,,_
•
~
You could win a FREE powered subwoofer worth $400 retail value*
There are important benefits to registering your new Definitive Technology product:
- We'll automatically enter your name into a monthly drawing for a FREE $400 powered subwoofer*
- You'll have peace of mind knowing that we have a permanent record of your product purchase for
warranty verification (with upload of receipt scan)
- You'll be assured of receiving service/upgrade alerts
-It's fast and easy
- Privacy. The data we gather during on-line registration is never sold
http://registration.definitivetech.com
*Definitive Technology ProSub 800 or equivalent. See Official Rules for Details. No purchase necessary.
Sweepstakes void outside the SO United States and the District of Columbia, and where prohibited by law.
ProSub 800
Failure to complete and submit the product registration form does not diminish your warranty rights.
Warranties apply ~s stated in the product manual. Please be sure to keep your original purchase receipt.
No Internet access?
Call Defmitive Technology Customer Service M-F 9:30 AM - 6:30 PM US Eastern Standard Time at (410) 363-7148, and we'll help you with the simple registration process.
Or you can send u~ a letter to Definitive Warranty Registration at the address below with your name, address, phone number, serial number(s) of the product(s) and
a photocopy of your sales receipt or upload a scan as part of the on-line registration process. Your name will be entered into the drawing regardless of how you choose to register.
Definitive Tech11fJlogl
The Leader in High-Performance Loudspeakers'"
Thank You
Thank you for choosing the Definitive Technology Mythos Nine Loudspeaker
System. Our engineers have spent many years in developing this product. In order
to ensure that you experience the finest performance possible, we encourage you
to take a moment to fully read this owner's manual and familiarize yourself with
the proper installation and set-up procedures for your Mythos Nine speakers.
DefinitiveTechno1fJgy®
The Leader in High-Performance Loudspeakers®
Specifications
Unpacking Your Mythos Nine Speakers
Mythos Nine
Dimensions:
Weight
Sensitivity:
Frequen<y Response:
NominollmpedarKe:
Driver Complement
28" long x 5.4' wide x 4.13' deep (711mm Ix 137mm wx I05mm d)
(speaker on~, not induding brocket)
.131bs. (6 kG)
90 dB
38 Hz - 30 kHz
Bohms
Two each 4Jf' (lI.4on) BDSS High output drivers presslKe.1o
1wo 4Jf' x8" (l1.4on x2O.3an1 Low Boss~, One I' (2Smm)
ferro.rno"etk l'aJid damped Pure Aluminum dome twMIer.
Please Inspect For Shipping Damage
Each loudspeaker leaves our plant in perfect condition. Any visible or concealed
damage most likely occurred in handling after it left our plant and should be reported
at once to your Definitive dealer or the delivery company that delivered your
loudspeaker. Please unpack your system carefully. Save all cartons and packing
materials in case you move or need to ship your system. Record the serial number
found on the back of the Mythos Nine in the appropriate place on the product
registration card, answer all questions and send it in.
VERY IMPORTANT: Accessories
Various parts and accessories that you will need to use your Mythos Nine are in the
carton but are easy to overlook. Open both ends of the shipping carton. Carefully
examine the contents of the shipping carton and packing material to find the plastic
bags with accessories.
Specificntionssubje<t to change without nolke.
Positioning the Mythos Nine
;';
':
The Mythos Nine may be used vertically as a L&R maln
maID or surround
speaker or oriented horizontally and used as a center channelloudspeitker.
¢
ail»
D
¢
When used as a center speaker the
Mythos Nine may be mounted on the
wall above or below the video screen.
eM 'I
D
@O@
..
It may be placed on a table or shelf
in front of the TV.
..
If placed on a shelf under a TV, adjust the
leveling feet (screwed all the way in) to
aim the speaker up towards the listeners.
..
..
;9 1\'"
' e;
The Mythos Nine may be plad~d~Yi
on top of ivs that have at l~asf5"in.ch~ .
(13 ern) of flat surface on top. Do not.;.
place the speaker on top of any 1:~C!
that is not large or stable enoughto
securely support the speaker. If the
speaker seems at all unstable or "tipsy'"
place the speaker somewhere else. The.
warranty does not cover damage caUsed
by falls due to improper positioning of
the speaker. If the speaker is above seated
listener height, extend the leveling foot
to point the speaker downward
(See Using the Leveling Foot on page 3).
When used as L&R main or surround
speaker the Nine must be wallmounted flanking the screen as
illustrated. Allow at least 3 inches
(75 mm) between the edge of the
video screen and the nearest edge of
the speaker. If you need a speaker
that can be shelf-mounted, please
contact your Definitive Technology
retailer. Definitive offers other
models of Mythos Series speakers
that have shelf-mount stands..,
Even if you intend to place the Mythos Nine on a TV or shelf, you must attach the wall-mount bracket to the speaker. See Using the In'eling Foot on page 3.
Wall Mounting the Mythos Nine
•
We recommend that wall mounting of speakers be performed
by professional installers or by those appropriately skilled in the
use of power tools and the knowledge of building codes and
structural issues.
•
We recommend that you determine a suitable location for
your speaker installation, and that you complete all wiring
(especially "hidden" in-wall wiring) before mounting
brackets to your walls.
•
Mythos Brackets are not suitable for ceiling mounting.
2. Make sure the location you have selected for wall-mounting
does not conceal behind-wall electrical wiring or plumbing.
3. The supplied cardboard mounting template is double-sided; one
side is for horizontal orientation and the other is for vertical
mounting. Be sure to face the correct side toward you. Hold the
cardboard template (included) in the intended location. Make
sure the speaker clears the ceiling, adjacent walls, comers, beams,
lighting fixtures and door/window frames. Leave at least
1)1" (38 mm) above or to the side of the speaker location to
allow the speaker to slide onto the bracket.
1
I
101'
1
rol"
1
I
......""' .... _Cl.E"IWaOF"IT...ar:>.oETOPOF~
- - - -
~;[ ,-~~
II'
'II
( )
o IJ 0
II
4. Make sure the center of the template is
centered with the TV screen's center points.
The Mythos Nine loudspeaker comes with a wall mounting bracket and
template that makes secure mounting a breeze. Follow these directions
for installing the wall mounting bracket.
1. Two X"-20 screws have been factory installed on the back of
the speaker. Gently hand-tum the screws to make sure they are
in as far as they can go. Do not force them beyond the "stop"
point. The screws cannot screw all the way into the speaker and
should protrude as shown in the illustration.
5. When mounting the speaker horizontally
use a bubble level to make sure the template
is level. When mounting the speaker
vertically, use a plumb line to find perfect
vertical. If the TV is off-level or off plumb,
the speaker will look better if it is off-level
or plumb in exactly the same way as the TV.
6.
Use push pins to secure the template to the wall.
[I
I
7.
Mark the location of pilot holes noted on the Mounting Template
with a pencil; remove the template.
8.
Pre-drill the pilot-hole locations for mounting screws (not
included). Use screws rated to hold securely in the wall material
(we recommend #10 screws).
9.
It is best if at least one screw hits a wall stud. If there is no stud
behind the pilot hole location, install wall anchors (not included)
to secure the bracket screws. Follow the wall anchor manufacturer's
directions. Each wall anchor should be rated to hold at least onehalf of the product net weight [see specifications on front cover].
Using the Leveling Foot
If you are going to use the Mythos Nine in horizontal mode on a shelf
or table, first attach the wall bracket to the speaker as described above.
Attach the one "L" bracket to the wall bracket using one M4 x lOmm
screw provided. Thread the foot screw into "L" bracket and adjust to
required height.
Attaching the Logo Badge
10. For masonry walls, use a masonry drill bit to pre-drill holes, and
use masonry anchors and screws (not included).
11. Pull the speaker wires through the hole in the bracket.
12. Screw the bracket to the wall.
13. The bracket has two sets of keyhole slots, one set for vertical and
the other set for horizontal orientation. When the wall mounting
bracket is securely screwed to the wall, line up the speaker's
protruding Mounting Screws with the appropriate keyhole slots on
the wall mounting bracket. Let the speaker slide straight down
(in horizontal alignment) or push the speaker sideways (vertical
alignment), allowing the screw heads to slip behind the smaller
end of the keyhole slots. Gently push the edge of the speaker
opposite the screw heads toward the wall until the speaker snaps
onto the lower lip of the bracket.
Mythos Nine can be mounted either vertically as main or surround
speakers, or horizontally for use as a center channel speaker. The logo
badge is not pre-attached to the grille and is packaged in a plastic bag
along with the other accessories, and should be affixed in the correct
place on the grille once you have determined the speaker's alignment.
For horizontal (center channel) use, align the badge with the location
on the long side of the grille (see illustration); for vertical use, align the
badge with the location on the short side of the grille. To affix the logo
badge, hold the grille in your hands as shown in the illustration. Using
your thumbs, carefully press the badge posts through the cloth and into
the two badge slot holes. The logo badge should snap into place. Do not
press the badge too hard or you may crack the grille.
Connecting the Mythos Nine
To connect the speaker to your receiver or amplifier, strip Ji inch
(15 mm) of insulation from each conductor of the speaker wire to
expose the bare metal and twist each of the individual conductors into
single un-frayed strands.
«)
Mounting the Mythos Nine to an articulating
TV bracket
If you have a Plasma or LCD TV that is attached to the wall via a
swing-out articulating bracket such as those offered by Chief, Sanus
and OmniMount, the Mythos Nine speaker may be attached
to the bracket without using the supplied wall-mount plate. Simply
use )("-20 screws to attach the speakers directly to the TV bracket.
Consult the TV bracket manufacturer's user manual for more
specific speaker mounting instructions.
AMPLIFIER OR
RECEIVER
.
. .
.~
+-
=
~
-~
~
~
1/
"\
Note that one of the terminals is marked with red band (+) and the other
is marked with black band (-). Make certain that you connect the wire
from the red (+) terminal of your amplifier or receiver to the red (+)
terminal on your speaker and the wire from the black (-) terminal of your
amplifier or receiver to the black (-) terminal on your speaker. Most
speaker wire has some indicator (such as color-coding, ribbing or writing)
on one of the two conductors to help you maintain consistency. It is
essential to connect both speakers to the amplifier in the same way (in
phase). If you experience a lack of bass or poor surround effect, it is likely
that one or more of the channels is connected in incorrect polarity and
needs to be rewired, paying closer attention to connect positive to
positive; negative to negative on all channels.
To connect wire to the binding post [see figure above], unscrew the
knurled nut and insert the bare wire into the hole near the base of the
binding post. Do not insert the insulated part of the wire into the hole as
this will not give you a good connection. Twist the hex nut back down
the binding post until it firmly meets the wire. Do not over-tighten.
Connect a single RCA cable from the "SUB OUT" of your receiver to the
LFE input of the subwoofer (not included). This connecting method
bypasses the subwoofer's internal "crossover" or low pass filter and relies
on the crossover filter built into your receiver.
Receiver/Speaker Set-up
Access Your Receiver's "Speaker Set-up" or "Speaker
Configuration" Menu
~,
~~~
1.
M,
~'ii ~~:1 ;l
~ ... ~
In the Speaker Set-up/Configure function of your receiver, set all
channels that are connected to Mythos Nines to "Small."
~,
-
l:1~ffi
'5!1J6)Il,.IJ1IfI!;fJ,g
If:'~'. ~il
if =~
.
~l,j~
2.
Select "Yes" when asked if you are using a subwoofer.
3.
Set the subwoofer crossover frequency on the receiver to 100 Hz.
Service
Service and warranty work on your Definitive loudspeakers will
normally be pedormed by your local Definitive Technology dealer.
If, however, you wish to return the speaker to us, please contact us
first, describing the problem and requesting authorization as well as
the location of the nearest factory service center. Please note that
the address given in this booklet is the address of our offices only.
Under no circumstances should loudspeakers be shipped to our
offices or returned without contacting us first and obtaining
return authorization.
o
ENAT080608
For more information on Definitive Technology Loudspeakers and accessories,
visit www.definitivetech.com. or email [email protected].
Definitive Technology, Owings Mills, Maryland, USA. 800-228-7148
Definitive Technology Offices
11433 Cronridge Drive, Owings Mills, Maryland 21117
Phone: 18001 228-7148 (US & Canada),
01 (410) 363-7148 (all other countries)
Technical Assistance
It is our pleasure to offer assistance if you have any questions
regarding your Mythos Nine or its set-up. Please contact your nearest
Definitive Technology dealer or call us directly at (800) 228-7148
(US & Canada), 01 (410) 363-7148 (all other countries) or e-mail
[email protected].
Limited USA Warranty:
5-Years for Drivers and Cabinets
Definitive Technology warrants to the original retail purchaser only that this
Definitive Technology Loudspeaker Product (the "Product") will be free from
defects in materials and workmanship for a period of five (5) years from the
date of the original purchase from a Definitive Technology Franchised Dealer.
However, this warranty will automatically terminate prior to the expiration of
five (5) years if the original retail purchaser sells or otherwise transfers the
Product to any other party. The original retail purchaser shall hereinafter be
referred to as "you." To obtain the warranty protection for your Definitive
Technology Product(s), you must fill out the Warranty Registration Card(s),
within ten days of the date of purchase.
Defective Products must be shipped, together with proof of date of purchase,
prepaid insured to the Franchised Dealer from whom you purchased the
Product, or to the nearest Factory service center. Product(s) must be shipped in
the original shipping container or its equivalent; in any case the risk of loss or
damage in transit is to be borne by you. If, upon examination at the Factory or
a Definitive Technology Franchised Dealer it is determined that the unit was
defective in materials or workmanship at any time dUring this Warranty period,
Definitive Technology or the Definitive Technology Franchised Dealer will, at
its option, repair or replace this product at no additional charge, except as set
forth below. All replaced parts and Product(s) become the property of Definitive
Technology. Product(s) replaced or repaired under this Warranty will be
returned to you, within a reasonable time, freight collect.
This Warranty does not include service or parts to repair damage caused by
accident, misuse, abuse, negligence, improper mounting, inadequate packing or
shipping procedures, commercial use, voltage in excess of the rated maximum
of the unit, normal wear and tear, cosmetic appearance of cabinetry or components not directly attributable to defects in materials or workmanship, or
service, or repair or modification of the Product which has not been authorized
by Definitive Technology.
Definitive Technology makes no Warranty with respect to its Products purchased from
dealers or outlets other than Definitive Technology Franchised Dealers.
This Warranty is in lieu ofall other expressed Warranties. If this Product is defective
in material or workmanship as warranted above, your sole remedy shall be repair or
replacement as provided above. In no event will Definitive Technology be liable to you
for any incidental or consequential damages arising out ofthe use or inability to use
the Product, even ifDefinitive Technology or a Definitive Technology Franchised
Dealer has been advised ofthe possibility ofsuch damages, or for any claim by allY
other party. Some states do not allow the exclusion or limitation ofconsequential
damages, so the above limitation may not apply to you.
All implied warranties on the Product are limited to the duration ofthis expressed
Warranty. Some states do not allow limitation on how long an implied Warranty
lasts, so the above limitations may not apply to you. This Warranty gives you specific
legal rights, and you also may have other rights which vary from state to state.
C(
This product complies with the essential requirements
of the EMe directive 89/336/EEC.
': j
t
~l
1/Jefinitive Technnlngy®
jj
The Leader in High-Performance
Loudspeakers~
r
r
r
TOP
r
ALLOW MINIMUM CLEARANCE OF
1 1/2" ABOVE TOP OF SPEAKER
PILOT
PILOT
HOLE
HOLE
•
•
oC=J 0
U'
U
o
PILOT
PILOT
HOLE
HOLE
•
•
u
u
-C=J
•
U
U
~
0
0
PILOT
PILOT
HOLE
HOLE
•
•
DRILL PILOT HOLES TO
APPROPRIATE SIZE FOR FASTENER
ONLY IN LOCATIONS AS LABELLED
I
•
•
m
G)
IN
-Iro
0
0=
"Tl-l
0
(/)-1
""0»
mr
»
A
m
;0
0
0
0
0
0
DefinitiveTechmlogy®
WALL BRACKET TEMPLATE FOR
MYTHOS® NINE
SATELLITE
PART NUMBER: 5632A101
57/16"TOTAL
WIDTH OF SPEAKER
BOTTOM
r
TOP
r
r
r
ALLOW MINIMUM CLEARANCE OF 1 1/2" ABOVE TOP OF SPEAKER
PILO~HOLE (
)
(
DefinitiveTechmlogy®
WALL BRACKET TEMPLATE FOR
MYTHOS® NINE
CENTER CHANNEL
PART NUMBER: 5632A 101
~
)
)
(
)
PILOT HOLE
•
(
)
•
(
)
(
)
\ )
(
\
=)
•
PILOT HOLE
(
(
)
~
)
(
)
•
PILOT HOLE
(
)
•
PILOT HOLE
•
)
0
(
)
•
I
0
)
(
-"
)
•
PILOT HOLE
0
•
11=
.-1
Cf)o
m»
»r
A
m
"1J-I
0
DRILL PILOT HOLES TO APPROPRIATE SIZE FOR FASTENER
ONLY IN LOGA TlONS AS LABELLED
BOTTOM
G)()'l
Ocr>
0 0
(
m
-
I-...J
-I-
:J
(
)
)
(
28" TOTAL
WIDTH OF SPEAKER
:::0
~1-l.".J
~
,..11 ...
•~
~
You could 'win a FREE powered subwoofer worth $400 retail value*
There are important benefits to registering your new Definitive Technology product:
•- We'll automatically enter your name into a monthly drawing for a FREE $400 powered subwoofer*
•- You'll have peace of mind knowing that we have a permanent record of your product purchase for
warranty verification (with upload of receipt scan)
•- You'll be assured of receiving service/upgrade alerts
It's fast and easy
•-It's
•- Privacy. The data we gather during on-line registration is never sold
http://registration.definitivetech.com
"Definitive Technology ProSub 800 or equivalent. See Official Rules for Details. No purchase necessary.
Sweepstakes void outside the SO
50 United States and the District of Columbia, and where prohibited by law.
ProSub 800
Failure to complete and submit the product registration form does not diminish your warranty rights.
Warranties apply as stated in the product manual. Please be sure
ure to keep your original purchase receipt.
No Internet access?
Call Definitive Technology Customer Service M-F 9:30 AM - 6:30 PM US Eastern Standard Time at (410) 363-7148, and we'll help you with the simple registration process.
Or you can send us a letter to Definitive Warranty Registration at the address below with your name, address, phone number, serial number(s) of the product(s) and
a photocopy of your sales receipt or upload a scan as part of the on-line registration process. Your name will be entered into the drawing regardless
regardle s of how you choose to register.
.:.
Definitive Technology
11433 Cronridge Dr. Suite K • Owings Mills, MD 21117
(410) 363-7148 • [email protected]
I
'"'.:1',
,. ~
.
'.
DeFnitive TechYlfJlngl
Def!.11i.#1j£erf£~!!!f2gl
The Leader in High-Performance
Loudspeakers~
M ythos GeIriM
Satellite/Surround Speaker System
Owner's Manual
Congratulations
Congratulations on your purchase of the Definitive
Technology Mythos Gem Satellite/Surround Speaker System.
This revolutionary loudspeaker utilizes state-of-the-art
components (homopolymer-coned bass-midrange drivers,
moving coil ferrofluid-cooled pure aluminum dome high
frequency radiators, uniphase crossover networks, etc.),
housed in a beautiful non-resonant polished aluminum
aircraft-grade cabinet in order to achieve the most lifelike
sound possible in your listening room for many years to come.
Your Mythos Gem is a unique speaker which may be used
as a high-performance rear or side surround matched with any
of our Mythos or any of our other fine speakers. In addition,
it is a superb front left and right satellite speaker which may
be combined with any of our subwoofers. Four Mythos Gem
speakers combined with a Mythos Seven center channel
and a Definitive subwoofer make a fantastic, complete,
high-performance home theater 5.1 speaker system.
Please Inspect For Shipping Damage
Each loudspeaker leaves our plant in perfect condition. Any visible or concealed
damage most likely occurred in handling after it left our plant and should be
reported at once to your Definitive dealer or the shipping company which delivered your loudspeaker.
.
Connecting Your Loudspeakers
It is critical for proper performance that both speakers (left and right) be connected in proper phase. Note that one terminal on each speaker (the +) is colored red and
the other (the -) is colored black. Please make certain that you connect the red (+)
terminal on each speaker to the red (+) terminal of its channel on your amplifier or
receiver, and the black (-) terminal to the black (-) terminal. It is essential that both
speakers be connected in the same way to the amplifier (in phase). If you experience
a great lack of bass, it is likely that one speaker is out of phase with the other.
Usually if distortion is heard when the speakers are being driven at
loud levels, it is caused by driving (turning up) the amplifier too loud and
not driving the speakers with more power than they can handle. Remember,
most amplifiers put out their full rated power well before the volume control
is turned all the way up! (Often, turning the dial half way up is actually full
power.) If your speakers ~istort when you play them loud, turn down the
amplifier or get a bigger one.
Mythos Gem is a Very Versatile Speaker
The Mythos Gem is a tremendously versatile speaker which makes a perfect left
and right channel front satellite speaker (when used with a Definitive subwoofer)
as well as a superb rear or side surround speaker. We will describe the various
aspects of its use for both of these applications starting with the simplest instructions
first: for its use as a rear or side surround.
,
Positioning the Mythos Gem as a Rear or
Side Surround Speaker
For Rear or Side Surround Speakers
The Mythos Gem is designed to be extremely flexible in terms of their placement when used as surround speakers. They may be used on the side walls, rear
walls or in the rear comers of the listening room. When placed along the side walls
the speakers should normally be located adjacent to or behind the listening position.
The speakers may also be placed near the rear comers of the room or located on the
rear wall. If you have your couch or listening position near or against the rear wall,
we suggest rear wall placement of the Mythos Gem with them positioned on either
side of the couch and in from the side wall. High placement is preferred; however,
midwall or floor placement is certainly acceptable. Normally speakers would be
hung on the wall with the input connection plate up against the wall, however, the
Mythos Gem may also be placed on shelves or stands. Of course, experimentation is
encouraged to get the best performance in your particular room. As a starting point,
we suggest mounting the speakers on the side walls behind the listening position
about 3-6 feet off the floor and halfway between the listening position and the rear
wall.
When using Mythos gem in Dolby EX and other 6.1 and 7.1 systems (which they
are perfect for), one pair will normally be located on the side walls as described
above and an additional 1 or 2 speakers will be located on the rear wall as described
above. IMPORTANT, PLEASE READ: When the Mythos Gem is used as a rear
or side surround speaker, the bass management of your receiver or decoder for those
channels :;hould be set to "Small."
,
Using the Mythos Gems in Conjunction
with a Definitive Sub
When a pair of Mythos Gems is used in conjunction with a Definitive sub, they
may be connected either directly to the left and right channel of your amplifier or
receiver, or to the left and right speaker level outputs on a Definitive sub (when the
Definitive sub is connected via the high-level speaker wire inputs to the left and
right channel speaker outputs on your receiver). Connecting the Mythos Gems to a
Definitive Sub (which includes a built-in high-pass crossover for the Mythos Gems)
will result in greater dynamic range (the system can be played louder without overdriving the satellites) and is recommended for most installations, especially when
the system is being used for home theater. Because this is the most common set-up,
the following instructions relate to wiring the Mythos Gems to a Definitive sub.
Wiring 2 Mythos Gems and 1 Definitive Sub for Stereo (2-Channel) Use
1) First, wire the red (+) terminal of the left channel speaker wire output of your
receiver or amplifier to the red (+) terminal of the left channel speaker wire (high
level) input of your Definitive Sub.
2) Next, wire the black (-) terminal of the left channel speaker wire output of your
receiver or amplifier to the black (-) terminal of the left channel speaker wire (high
level) input of the Definitive sub.
3) Repeat Steps 1 and 2 for the right channel.
4) Wire the red (+) terminal of the left Mythos Gem to the left channel red (+)
speaker wire (high level) on the back of the Definitive sub.
S) Wire the black (-) terminal of the left Mythos Gem to the left channel black (-)
speaker wire (high level) on the back of the Definitive sub.
6) Repeat steps 4 & 5 for the right Mythos Gem.
7) Set the low frequency filter control on the back of the Definitive sub to approximately
2 0' clock. Please note that the exact frequency will depend on many factors including
specific positions of the speakers in the room, so you might experiment with a slightly
higher or lower setting to achieve ideal blending between the sub and the satellites for
your particular set-up. Listen to a wide variety of music to determine the correct setting
for this in your system.
8) Set the subwoofer level control so that it sounds properly balanced with the satellites.
Please note that the exact level depends on many factors including your room size, position of the speakers, etc. as well as your personal listening taste, so you might experiment with the subwoofer level while listening to a wide variety of music until you
achieve the ideal setting for your system.
9) If your receiver allows you to choose whether or not the main speakers are to receive
a full-range signal, choose full range (or "Large Left and Right Main Speakers").
Using Mythos Gems with a Definitive Sub
in Home Theater
There are many different variations of the basic Dolby ProLogic and Dolby
Digital AC-3 fonnats and features, as well as a multiplicity of ways in which the
speakers can be hooked up to these systems. We will discuss the simplest and most
effective hookups and adjustments. If you have a particular question regarding your
set-up, please call us.
For Dolby ProLogic Systems
Follow Steps 1-9 provided earlier. The subwoofer will receive its low frequency
signal through the full-range speaker level outputs. If, however, your system has a
separate subwoofer RCA low level output which has a remote control level adjustment, you might also want to hook this up using an RCA-to-RCA low level cable
to the LFE/subwoofer-in low level input (the lower RCA input) on a Definitive sub.
Then use your remote control sub level adjustment to fine-tune the low frequency
level for different types of program material. You might find you want a higher level
for some music or for movies.
For Dolby Digital AC-3 5.1 Systems
Please note that Dolby Digital decoders have bass management systems (systems
which direct the bass to the various channels) which vary from unit to unit. It is
absolutely critical that the bass management system be properly set in order to
achieve proper perfonnance.
The simplest way to hook up and use your system with Dolby Digital decoders is
to hook up the left and right front Mythos Gems and Definitive sub as described in
Steps 1 through 9 earlier. Wire your center channel to the center channel out on your
receiver (or center channel amplifier) and your left and right rear surround speakers
to the rear channel outputs on your receiver or rear channel amplifier (taking care that
all speakers are in phase, i.e. red (+) to red (+) and black (-) to black (-). Set the bass
management system of your receiver or decoder for "Large" left and right main speakers, "Small" center, "Small" rear surround speakers and "No" subwoofer. All the
bass infonnation including the .1 channel LFE signal will be directed to the main left
and right channels and into the subwoofer giving you all the benefits of Dolby Digital
AC-35.1.
Optional Hook-Up
An option on this hook-up (if your decoder will allow you to select "Large" left and
right main speakers and "Yes" subwoofer), in addition to the hook-up as described
above, is to use an RCA- to-RCA low level cable to connect the LFE/sub-out on your
receiver to the low-level LFE/sub-in (the lower RCA input) on a Definitive sub. Tell
your bass management system that you have "Large" left and right main speakers,
"Yes" subwoofer and "Small" center and "Small" surrounds. You will then be able to
raise the LFE .1 channel level being fed to the subwoofer by either using the LFE/sub
remote level adjustment on your decoder (if it has one) or the LFE .1 channel level control on your Dolby Digital channel balancing procedure. This set-up has the advantage
of allowing you to set the low frequency level on the Definitive sub for smooth
balance with music while also allowing you to "juice up the bass" for movies with
the controls on your decoder. It should also sound somewhat better.
Variation on the Optional Hook-up
One variation on the optional hook-up is to hook up and adjust the system as
described under "Optional Hook-Up" except select "Small Left and Right Main
Speakers" and a "Subwoofer" on the bass management system (along with "Small
Center" and "Small Rear Surrounds"). The advantage of this over the Optional HookUp will be somewhat greater dynamic range (i.e., you can play the system louder).
However, depending on the specific characteristics of the crossovers designed into your
bass management system, the transition and blending between the satellites and subwoofer may not be quite as smooth and continuous as the Optional Hook-Up, or with
the basic hook-up detailed above in Steps 1-9. However, if you wish to play the system
louder, you can experiment with this variation. In addition, this variation is also one
which can be used if your decoder bass management system does not allow a
"Large Left and Right Main Speakers" and "Subwoofer" setting.
We encourage you to experiment with the various settings on your subwoofer,
settings on your decoder, and hook-up options as described until you find the best
combination for you.
Using Mythos Gems with a Definitive Sub
for Rear Channel Surround Use
Since Dolby Digital is capable of delivering a full-range bass signal to the rear
channels, some more elaborate systems will include an additional Definitive sub for
the rear channels. In this case, simply wire the Mythos Gems to the Definitive sub
as described in 1 thru 8 earlier, except wire to the rear surround outputs. Set the
bass management system for "Large Rear Speakers."
Speaker Break-In
Your Mythos Gems should sound good right out of the box; however, an
extended break-in period of 20-40 hours or more of playing is required to reach
full performance capability. Break-in allows the suspensions to work in and
results in fuller bass, a more open "blossoming" midrange and smoother high
frequency reproduction.
Positioning Mythos Gems when Used as
Front Main Speakers in Your Room
It is important that some simple set-up recommendations be followed in order to
assure optimum performance in your room. Please remember that although these
recommendations are usually valid, all rooms and listening set-ups are somewhat
unique, so do not be afraid to experiment with the speakers. Remember, whatever
sounds best to you is correct.
The Mythos Gem Loudspeakers may be placed on a stand or shelf or be mounted
on the wall. Placement close to the wall will increase the bass output while
placement further from the rear wall will decrease the bass output.
When used as fronts, the speakers should usually be placed 6 to 8 feet apart
and kept away from the side walls and comers. A good rule of thumb is to place
the speakers separated by one half the length of the wall they are positioned along,
and each speaker one quarter the length of the wall behind them away from the
side wall.
Mounting Your Mythos Gem with the
Supplied Wall-Mount Template
Your Mythos Gem comes with an optional wall-bracket designed to securely
mount your speaker flush to your wall. The bracket can ONLY be used with a
vertical installation. For safety, it is extremely important that this bracket be installed
with molly-bolts or similarly effective fasteners appropriate for the construction of
your wall. Be sure to use all four of the mounting holes when fastening the bracket
to the wall. Never use unanchored or improperly anchored screws in your wall.
Professional installation is strongly recommended. Your dealer can either arrange
this for you, or refer you to a qualified installer.
To determine the bracket's position on the wall, use the mounting template which
comes with your speakers. If you are mounting your Mythos Gem close to anything
above it, please allow an extra 1 1/4 inches above the top of the speaker for the
speaker to slide onto its bracket.
If your speaker wires are to be hidden inside the wall, be sure to conform to your
local building codes. When installed on the bracket, the center of the Mythos Gem
speaker terminals will be as indicated on the template.
To install the Mythos Gem on'its bracket, securely fasten the mounting screw
supplied into the threaded hole on the rear of the speaker, screwing it in as far as it
will go. The speaker will then hang in the "keyhole" on the bracket. After placing the
screw in this opening, pressing down firmly on the top of the speaker will seat
the speaker properly and avoid any rattles during use.
In addition, the Mythos Gem has a threaded insert on the back which may be
used with a wall-mount pivoting bracket such as the Definitive ProMount 80.
VERY IMPORTANT: SETTING CHANNEL BALANCE AND BASS MANAGEMENT SYSTEMS
Dolby Digital and Dolby ProLogic systems and decoders have a critical channel balancing
procedure for the left and right front speakers, center channel, rears and subwoofer (if it
is hooked up through the LFE or Sub Out low-level connection) which must be followed if
the system is to perform properly. We have spoken with many system users with problems
relating to the overall sound of their system which could be clearly traced back to improper
system balance.
Also note that Dolby Digital decoders have bass management systems (systems which
direct the bass to the various channels) which vary from unit to unit. This bass management
system must also be properly adjusted. H your Mythos Gem loudspeakers are hooked up
with speaker level wires coming directly from your amplifier and you are using a separate
subwoofer which is connected to your receiver only with a LFE low-level connection, your
receiver's or decoder's bass management system should be set for ''Small'' left and right
main speakers, ''Small'' center, "Small" surrounds, and "Yes" subwoofer. H your Mythos
. Gem loudspeakers are hooked up with speaker level wires coming directly from your subwoofer (as described in the hook-up directions) and your subwoofer is connected to YQur
receiver or amplifier with speaker level wire, then your receiver's or decoder's bass management system should be set for "Larl:e" left and right main speakers, "Small" center,
''Small'' surrounds, and "No" subwoofer if your subwoofer is just hooked up to your amplifier with speaker level wires, or "Yes" if your subwoofer is hooked up to your amplifier with
both speaker wires and a LFE low-level connection (as described in the hook-up directions).
Hyou are using the Mythos Gem speakers as rear or side surround speakers, set the rear or
side surround bass management to "Small". Also, do not be afraid to experiment.
Remember, whatever sounds best to you is correct.
Technical Assistance
It is our pleasure to offer assistance if you have any questions regarding your
Mythos Gems or their set-up. Please contact your nearest Definitive Technology
dealer or contact us directly at 410-363-7148.
Service
Service and warranty work on your Definitive loudspeakers will normally be performed by your local Definitive Technology dealer. If, however, you wish to return
the speaker to us, please contact us first, describing the problem and requesting
authorization as well as the locations of the nearest factory service center. Please
note that the address given in this booklet is the address of our offices
only. Under no circumstances should loudspeakers be shipped to our
offices or returned without contacting us first and obtaining return
authorization.
Definitive Technology Offices
11433 Cronridge Drive, Suite K
Owings Mills, Maryland 21117
phone: 410-363-7148
Visit our website: www.definitivetech.com.
Mythos Gem Specifications
Dimensions:
Frequency Response:
Efficiency:
Nominal Impedance:
Driver Complement:
10.25"H x 4.25"D x 4.13"W
60Hz-30kHz
89dB
Compatible with 8 ohm outputs
Two 3.5" long-throw upper bass/midrange drivers with
butyl rubber surrounds, one ferroftuid-dampened pure
aluminum dome tweeter
Polished extruded aircraft-grade aluminum
Enclosure:
Rec. Assoc. Amplification: 10-200 watts per channel
Limited 5-year Warranty
Definitive Technology warrants to the original retail purchaser only that this Definitive Technology
Loudspeaker Product (the "Product") will be free from defects in materials and workmanship for a period
of five (5) years from the date of the original purchase from a Definitive Technology Franchised Dealer.
However, this warranty will automatically terminate prior to the expiration of five (5) years if the original
retail purchaser sells or otherwise transfers the Product to any other party. The original retail purchaser
shall hereinafter be referred to as "you." To obtain the warranty protection for your Definitive Technology
Product(s), you must fill out the Warranty Registration Card(s), within ten days of the date of purchase.
Defective Products must be shipped, together with proof of date of purchase, prepaid insured to the
Franchised Dealer from whom you purchased the Product, or to the nearest Factory service center.
Product(s) must be shipped in the original shipping container or its equivalent; in any case the risk of loss
or damage in transit is to be borne by you. If, upon examination at the Factory or a Definitive Technology
Franchised Dealer it is determined that the unit was defective in materials or workmanship at any time during this Warranty period, Definitive Technology or the Definitive Technology Franchised Dealer will, at its
option, repair or replace this product at no additional charge, except as set forth below. All replaced parts
and Product(s) become the property of Definitive Technology. Product(s) replaced or repaired under this
Warranty will be returned to you, within a reasonable time, freight collect.
This Warranty does not include service or parts to repair damage caused by accident, misuse, abuse,
negligence, inadequate packing or shipping procedures, commercial use, voltage in excess of the rated
maximum of the unit, cosmetic appearance of cabinetry not directly attributable to defects in materials or
workmanship, or service, or repair or modification of the Product which has not been authorized by
Definitive Technology.
Definitive Technology makes no Warranty with respect to its Products purchased from dealers or outlets other than DefiniTive Technology Franchised Dealers.
This Warranty is in lieu ofall oTher expressed Warranties. If this Product is defective in maTerial or
workmanship as warranted above. your sole remedy shall be repair or replacement as provided above. In
no event will Definitive Technology be liable to you for any incidental or consequential damages arising
out ofthe use or inahility to use the Product. even if Definitive Technology or a Definitive Technology
Franchised Dealer has been advised of The possibility of such damages. or for any claim by any other
party. Some states do not allow the exclusion or limitation of consequential damages. so the above limitaTion may noT apply to you.
All implied warranties on the Product are limiTed to The duration ofthis expressed Warranty. Some
states do not allow limitation on how long an implied Warranty lasts. so the above limitations may not
apply to you. This Warranty gives you specific legal rights, and you also may have other rights which vary
from sTate to state.
CE:
This product complies with the essential requirements of
EMC directives 89/336/EEC and 73/23/EEC (inclusive of
93/68/EEC) and carries the CE mark accordingly.
CZAT 062304
Defjniti~e Jedmology
You could win a FREE powered subwoofer worth $400 retail value*
There are important benefits to registering your new Definitive Technology product:
• We'll automatically enler your name inlo a monthly drawing for a FREE $400 powered subwoofer"
• You'll have peace of mind knowing thai we have a permanent record of your product purchase for
warranty verification (with upload of receipt scan)
• You'll be assured of receiving service/upgrade alerts
• It's fast and easy
• Privacy. The data we gather during on-line registration is never sold
http://registration.definitivetech.com
"Ocr""""" 1'e<:MoIocY ProSub llOO or
Sw<ep<tok<o V<IId _ _ IlIt 50 Un,1td S<aces
""'1_ '" compIeI< ODd _ , "'" pn:cluo:' .."
Warn<lua oppl~ alW<d ,n "'" poudu<:I",....w
s... oo""ol R~'" f« o..wJ.. No purrn...... IIOCe5AI)'
\he
o..1nCI of CoI"-" md .._
JI"lh,bol<d by .....
ProSub 800
dI""..... )'011< """'....Y"&1M..
b<.....,10 k~ )'OII<on"o.all'l""<haoe '='1"<
fQ<m ...... _
_
No Internet access?
Call Dc:finJli,,, T«hllOk>gy CIiSlOltlCT &("\'iCll M-F 9:30 AM - 6:30 PM US Easltm S,andard Time It (~IO) 363-11~8, aJ>d ",'e'li help you "'lIh the simple regiStrollon process,
Or you C;)(J send uS I Iener to Definitive Wamully Re,istrat"", II the addre's1; below w,llI yoo' name. address, phooe number, serial "umbe",) of the prodl>Cl(') and
I pIIoIocopy or)'OW' sales ~ipl or upload. scan all pan of the on-line re,i:;lnltion J>I'OCC'SS. Your name will be entered ,nto,he dnr.win, re,ardless orbow you choose:.o re,isltr,
I>Cfinili\c Tcchnulog}
114.tl ('rnnrid~c I>r. Suitc K. Owings Mills.!\1\) 21117
(4IU) .~tl.I-714K. inlll(a'JcfinithcTcch.cum