1
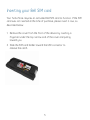
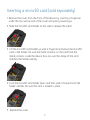
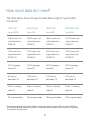
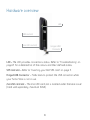
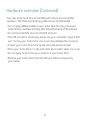
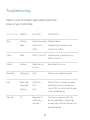
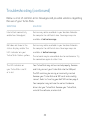
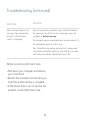
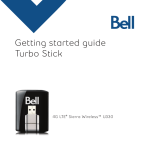
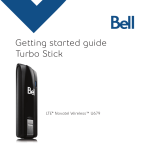
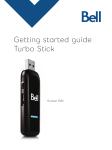
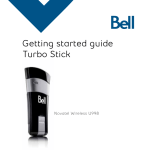
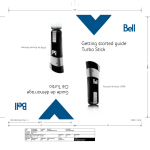
Getting started guide
Turbo Stick
Novatel Wireless U547
Welcome
Thank you for purchasing a Turbo Stick from Bell. This Turbo Stick will
enable you to connect to the Internet. This guide provides an overview of
your new Turbo Stick and details on how to configure your computer for
use with this Turbo Stick.
Getting started . . . . . . . . . . . . . . . . . . . . . . . . . . . . . . . . . . . . . . . . . . . . . . . . . . . . . . 2
System requirements. . . . . . . . . . . . . . . . . . . . . . . . . . . . . . . . . . . . . . . . . . . . . . . . . . 3
Inserting your Bell SIM card. . . . . . . . . . . . . . . . . . . . . . . . . . . . . . . . . . . . . . . . . . . . 5
Inserting a microSD card (sold separately) . . . . . . . . . . . . . . . . . . . . . . . . . . . . . . 7
Preparing your computer for installation. . . . . . . . . . . . . . . . . . . . . . . . . . . . . . . . 8
Installing Mobile Connect for Windows. . . . . . . . . . . . . . . . . . . . . . . . . . . . . . . . . . 9
Start-up. . . . . . . . . . . . . . . . . . . . . . . . . . . . . . . . . . . . . . . . . . . . . . . . . . . . . . . . . . . . . 11
Using your Turbo Stick . . . . . . . . . . . . . . . . . . . . . . . . . . . . . . . . . . . . . . . . . . . . . . . 12
Installing Mobile Connect for Macintosh. . . . . . . . . . . . . . . . . . . . . . . . . . . . . . . . 13
How much data do I need?. . . . . . . . . . . . . . . . . . . . . . . . . . . . . . . . . . . . . . . . . . . . 15
Hardware overview. . . . . . . . . . . . . . . . . . . . . . . . . . . . . . . . . . . . . . . . . . . . . . . . . . 16
Inserting and removing your Turbo Stick from your computer. . . . . . . . . . . . 18
Unblocking a SIM card. . . . . . . . . . . . . . . . . . . . . . . . . . . . . . . . . . . . . . . . . . . . . . . 20
Troubleshooting. . . . . . . . . . . . . . . . . . . . . . . . . . . . . . . . . . . . . . . . . . . . . . . . . . . . . . 21
Getting started
Before installing your Turbo Stick, please ensure you have the following:
• A Bell wireless account with a Mobile Internet plan. (If you don’t
have an account or a Mobile Internet plan, speak with a Bell account
representative to get set up.)
• An active Bell SIM card.
• Your Mobile Directory Number (MDN),
or phone number __________________________________.
2
System Requirements
To install and operate your Turbo Stick, ensure your computer has
the following system resources:
WINDOWS
Microsoft® Windows XP (SP 2 – 3, 32-bit only),
Operating system
Windows Vista™ (SP 1 – 2, 32/64-bit) and Windows 7
(32/64-bit) with 500MHz CPU
Card slot
1 USB port, version 2.0 (recommended) or 1.1
COM ports
4 free COM ports
I/O Resources
1 IRQ, 4096 bytes of I/O space
RAM Memory
256MB (XP), 1GB (Vista), or 1GB (7)
Disk space
100MB
3
System Requirements (continued)
MACINTOSH
Operating system
Macintosh OS 10.4 (Tiger), 10.5 (Leopard), and
10.6 (Snow Leopard) with 300 MHz Intel CPU
Card slot
1 USB port, version 2.0 (recommended) or 1.1
RAM Memory
256MB
Disk space
100MB
4
Inserting your Bell SIM card
Your Turbo Stick requires an activated Bell SIM card to function. If the SIM
card was not inserted at the time of purchase, please insert it now, as
described below.
1.Remove the cover from the front of the device by inserting a
fingernail under the top narrow end of the cover and pulling
toward you.
2.Slide the SIM card holder toward the USB connector to
release the catch.
5
Inserting your Bell SIM card (continued)
3.Lift the SIM card holder up with a fingernail. Insert the SIM card so
the metal contacts on the the card face the metal contacts inside the
device. The cut corner on the card goes in last.
4.Push the inserted SIM card in the SIM card holder down and then
slide it forward until the SIM card holder catches. Be sure the card
is locked in place.
5. Replace the cover
6
Inserting a microSD card (sold separately)
1. R
emove the cover from the front of the device by inserting a fingernail
under the top narrow end of the cover and pulling toward you.
2. Slide the microSD card holder to the side to release the catch.
3. L
ift the microSD card holder up with a fingernail and place the microSD
card in the holder. Be sure the metal contacts on the card face the
metal contacts inside the device. Also, be sure the shape of the card
matches the holder exactly.
4. P
ush the microSD card holder down and then slide it forward until the
holder catches. Be sure the card is locked in place.
5. Replace the cover.
7
Preparing Your Computer for Installation
Mobile Connect from Bell is a software application that allows you to
set up and manage your wireless connections over the Bell network.
Mobile Connect for Windows and Macintosh is pre-loaded onto your
Turbo Stick and can be installed directly from it to your computer
– no CD required.
Before inserting your Turbo Stick into the computer:
1.If you are already using Mobile Connect or have it installed on the
computer, you should uninstall the current version and restart before
inserting your new Turbo Stick.
2.Ensure that computer security software (antivirus and firewall programs)
are set to allow software installation.
3.Ensure that you have Administrator Rights and the login user name and
password before attempting to install – check your computer’s Help files
for details on this feature.
8
Installing Mobile Connect for Windows
Insert your Turbo Stick into an available USB port on your computer. Do
not forcibly insert your Turbo Stick as this may damage both the device
and the port. Your Turbo Stick powers on when inserted, and your
computer may beep.
Note: Your computer may display a security warning stating that Mobile
Connect is not a trusted application. You may safely dismiss this warning
and continue with the installation.
Installation should automatically begin. However, you may be prompted to
install Mobile Connect. Select Install/Run Mobile Connect.
If the auto install fails to start, remove your Turbo Stick and use an
alternate Internet connection to download and install the software from
our website at bell.ca/mobileconnect before inserting your Turbo Stick, or
you can manually install the software from your Turbo Stick by:
1. Selecting Start > Run > Browse...
2. Look in “My Computer” to find your Turbo Stick disk drive
3. Run the file “mobileconnect.exe”
Note: The drive letter assigned to your Turbo Stick by the computer’s
operating system will be the next available drive letter (e:\, f:\, g:\, etc.).
9
Follow the InstallShield® Wizard, it will guide you
through the process of installing the Mobile
Connect application.
Use the “Next” and “Back” buttons to navigate
through the installation steps.
To continue the installation, you must read and
accept the terms of the License Agreement.
The installation process may take several
minutes to complete with no progress shown
on the progress bar – please be patient.
Select “Finish” to complete the installation.
Once the installation is complete, you may need to
restart your computer. If a restart is not required,
Mobile Connect will launch automatically. If your
computer restarts, launch Mobile Connect by
double-clicking on the Mobile Connect icon.
10
Start-up
With your Turbo Stick inserted, double-click on the Mobile Connect icon
from your desktop.
Mobile Connect will initialize, scan for your Turbo Stick, and the main
program window will appear with “Bell high-speed network is available.”
Click “Connect.”
For information on how to download the full Mobile Connect user manual
or software updates, visit bell.ca/mobileconnect.
11
Using your Turbo Stick
From the Mobile Connect main
program window, you can establish
a network connection and view
the connection status.
SOME OF THE KEY INDICATORS AND BUTTONS INCLUDE:
A. Connect/Disconnect button
Connect or disconnect from the network.
B. Signal strength indicator
Graphically illustrated network signal status.
C. Status display
Indicates the availability of the network and status
of current network connection.
D. Usage counters
An overview of the data you have transmitted
and received during an active data session.
E. Minimize and close buttons
Minimize Mobile Connect to the System tray, or
close the program.
F. Roaming indicator
Notification that your network connection is with a Bell
partner network (additional roaming charges will apply).
G. Menu Buttons
Buttons to access the Tools menu, SMS Messaging
window, Wi-Fi Hotspot Finder, and Help menu.
H. Quick Buttons
Customize buttons to launch support programs.
I. Connection Type Tabs
Switch between Mobile and Wi-Fi connections, when Wi-Fi
connection management is enabled.
J. SMS Message Indicator
Indicates if new SMS messages have been received.
To connect to the Internet, click the Connect button on the Mobile Connect main program window. To disconnect, click the Disconnect button. Check your SMS Messaging
Window often for updates and information from Bell. NOTE: Bell administrative SMS messages are free to receive. Additional charges may apply for other SMS
messages sent or received. Visit www.bell.ca/text for more information.
12
Installing Mobile Connect for Macintosh
Insert your Turbo Stick into an available USB port on your computer. Do not
forcibly insert the device as this may damage both the device and the port.
Your Turbo Stick automatically powers on when inserted. Your Turbo Stick will
appear as a CD-ROM drive on your desktop.
1. D
ouble-click the CD-ROM icon, then find and drag the
“Mobile Connect.dmg” image to your desktop.
2. D
ouble-click the “mobileconnect.dmg”
file and then double-click the “Install
Mobile Connect.mpkg” file to launch
the installation program.
3. F
ollow the step-by-step instructions to install the
software drivers for your Turbo Stick, you must
read and click “Agree” to accept the terms of the
License Agreement to continue the installation.
13
4. Y
ou may need to enter your name and password, and restart your
computer, during the installation process.
5. O
nce the installation is complete, double-click the Mobile Connect icon to
start the program.
6. If your Turbo Stick was removed during installation, re-insert. Do not
forcibly insert the device as this may damage both the device and the
USB port. Mobile Connect will initialize, scan for your Turbo Stick, and be
ready to connect.
You may configure the settings using the Tools Menu, or click “Connect” to
connect to the Internet. When Mobile Connect runs, it will check if your Turbo
Stick and account have been activated on the Bell network. Your Turbo Stick
must be activated, and in an area with network coverage, to operate on the
Bell Mobility high-speed data network.
14
How much data do I need?
The chart below shows the approximate data usage for typical data
transaction.*
Light user
(up to 500MB)
Medium user
(up to 1GB)
Heavy user
(up to 3GB)
very Heavy user
(up to 5GB)
12,800 emails with
small attachments
(40KB) OR
26,200 emails with
small attachments
(40KB) OR
78,600 emails with
small attachments
(40KB) OR
131,000 emails with
small attachments
(40KB) OR
1,000 emails with
large attachments
(500KB) OR
2,000 emails with
large attachments
(500KB) OR
6,200 emails with
large attachments
(500KB) OR
10,400 emails with
large attachments
(500KB) OR
5,100 web pages
viewed OR
10,400 web pages
viewed OR
30,400 web pages
viewed OR
52,400 web pages
viewed OR
500 picture
downloads OR
1,000 picture
downloads OR
3,000 picture
downloads OR
5,100 picture
downloads OR
4 hours streaming
video OR
8 hours streaming
video OR
25 hours streaming
video OR
42 hours streaming
video OR
125 song downloads
256 song downloads
768 song downloads
1,280 song downloads
* These examples are approximations only. Estimates are based on the following data-per-activity assumptions: 40KB/small attachment; 500KB/large
attachment; 100kb/web viewed; 1MB/digital photo; 2MB/min. of streaming video; 4MB/song. Actual data usage can vary and it is your responsibility
to track and monitor your own data usage.
15
Hardware overview
LED
SIM card slot
microSD card slot
Hinged USB
Connector
LED – The LED provides connections status. Refer to “Troubleshooting” on
page 21 for a detailed list of the colours and their defined states.
SIM card slot – Refer to “Inserting your Bell SIM card” on page 5.
Hinged USB Connector – Folds back to protect the USB connector while
your Turbo Stick is not in use.
microSD card slot – The microSD card slot is located under the back cover
(Card sold separately, maximum 32GB).
16
Hardware overview (Continued)
Your new Turbo Stick must be handled with care to ensure reliable
operation. The following handling guidelines are recommended:
• Do not apply adhesive labels to your Turbo Stick; this may cause your
Turbo Stick to overheat and may alter the performance of the antenna.
• Do not force the SIM card into the SIM card slot.
• The USB connector should plug easily into your computer’s Type A USB
port. Forcing your Turbo Stick into a port may damage the connector.
• Protect your Turbo Stick from liquids, dust and excessive heat.
• Store your Turbo Stick in a dry and clean environment when not in use.
• Do not apply force to the top or bottom of your Turbo Stick.
• Remove your Turbo Stick from the USB port before transporting
your laptop.
17
Inserting and removing your Turbo Stick from
your computer
Now that the Mobile Connect software is installed on your computer, your
Turbo Stick can be inserted or removed at any time.
As an external device, your Turbo Stick is vulnerable to damage during
transport. It is recommended that you remove and securely store your
Turbo Stick when transporting your computer.
To insert your Turbo Stick:
1. F
lip open the USB connector and insert your Turbo Stick into the USB
port. Do not forcibly insert your Turbo Stick; this may damage both your
Turbo Stick and the USB port.
2. Your computer may beep.
3. Start Mobile Connect from the desktop or from the AutoPlay prompt.
4. Your Turbo Stick powers on when inserted.
18
Inserting and removing your Turbo Stick from
your computer (continued)
To remove your Turbo Stick:
1. D
isconnect from the network and Exit or Quit Mobile Connect
from the Tools menu.
2. Carefully remove your Turbo Stick from the USB port.
3. The computer may beep.
Using your Turbo Stick on another computer:
Your Turbo Stick can be used on multiple computers. Simply install the
Mobile Connect software on each new computer you wish to use. Please
note that data network usage is tied to your Turbo Stick itself and that
usage between computers is cumulative and will be billed together.
The usage shown in your Event History Manager (Tools>Diagnostics>Event
History Manager) is for the data solely used on that computer. For more
accurate total usage amounts when using multiple computers with your
Turbo Stick, please login to www.bell.ca/mybell to view your unbilled
data usage up to the previous 2 hours.
19
Unblocking a SIM card
Some SIM cards will be provisioned with a Personal Identification Number
(PIN) which locks user access to your Turbo Stick. When using a blocked
SIM card, you may be asked to enter the PIN number.
Service providers frequently limit the number of incorrect PIN entry
attempts. If you fail to enter a correct PIN within the number of permitted
attempts, the SIM card may become blocked. You will see a warning
message on your last attempt.
In the event that the card becomes blocked, you have the ability to
re-enable the PIN mechanism by entering a Personal Unblocking Key (PUK).
You will be prompted to enter a new PIN in combination with the PUK code
to unblock and reset the PIN lock.
IMPORTANT:
You will have a limited number of attempts to enter the correct PUK code.
If you fail to enter the correct code within the allowed number of attempts,
it will be necessary to replace the SIM card.
The PUK is available through eCare at www.ca/mybell or by calling
Bell Client Care.
20
Troubleshooting
Below is a list of indicator lights which outline the
status of your Turbo Stick.
LED COLOUR
SERVICE
LED STATE
Blue
Flashing
Ready to connect Network found
Solid
Dual-Carrier
HSPA+
Connected to a network using
Dual-Carrier HSPA+
Green
Solid
HSPA+, 3G or 2G
Connected to a network using
HSPA+, 3G or 2G
Yellow
Flashing
Searching for
service
Searching for service
Blue/Red
Alternating
Error
Device error, contact support
Red
Short solid
Initializing
Long solid
Error
Flashing
Error
Normal start-up, changes to yellow
quickly Device error, remove and
reinsert SIM card error, refer to page
21 for Troubleshooting
Off
No power or
incorrectly
inserted
No Light
DESCRIPTION
The device is powered off. The
device bend angle is too narrow
or too wide; return the device to its
original position.
21
Troubleshooting (continued)
Below is a list of common error messages and possible solutions regarding
the use of your Turbo Stick.
SYMPTOMS
SOLUTION
Intermittent connectivity
and/or low throughput.
ervice may not be available in your location. Relocate
S
the computer to a different area. Coverage maps are
available at bell.ca/coverage.
Bell does not show in the
status display and/or the
LED indicator on your
Turbo Stick flashes yellow.
ervice may not be available in your location. Relocate
S
the computer to a different area. Coverage maps are
available at bell.ca/coverage.
The LED indicator on
your Turbo Stick is not lit
or is red.
our Turbo Stick may not be inserted properly. Remove
Y
and firmly reinsert your Turbo Stick into the USB port.
he network may be unavailable due to maintenance. Try
T
the connection again at a later time.
The SIM card may be missing or incorrectly inserted.
Remove your “Turbo Stick and SIM card” and carefully
reinsert. Refer to “Inserting your Bell SIM card on page 5.
our computer may not have the correct hardware
Y
drivers for your Turbo Stick. Remove your Turbo Stick,
uninstall the software, and reinstall.
22
Troubleshooting (continued)
SYMPTOMS
SOLUTION
When clicking Connect, the
message “Your connection
attempt to the network
failed” is displayed.
ervice may not be available in your location. Relocate
S
the computer to a different area. Coverage maps are
available at bell.ca/coverage.
he network may be unavailable due to maintenance. Try
T
the connection again at a later time.
Your Turbo Stick may not be activated. First, remove your
Turbo Stick, uninstall the software, and reinstall. If this does
not resolve the problem, contact Bell Client Care.
Before contacting Bell Client Care:
• Shut down your computer and remove
your Turbo Stick.
• Restart the computer and reinsert your
Turbo Stick after startup is complete.
• If the above actions do not resolve this
problem, contact Bell Client Care.
23
Regulatory Information
This device has been tested to and conforms to the essential regulatory requirements of the European
Union R&TTE directive 1999/5/EC and has attained CE Marking.
Federal Communications Commission Notice (FCC United States)
This equipment has been tested to, and found to be within the acceptable limits for a Class B
digital device, pursuant to part 15 of the FCC Rules and Industry Canada ICES-003. These limits
are designed to provide reasonable protection against harmful interference when the equipment
is operated in a residential environment.
This equipment generates radio frequency energy and is designed for use in accordance with the
manufacturer’s user manual. However, there is no guarantee that interference will not occur in any
particular installation. If this equipment causes harmful interference to radio or television reception,
which can be determined by turning the equipment off and on, you are encouraged to try to correct the
interference by one or more of the following measures:
• Reorient or relocate the receiving antenna.
• Increase the separation between the equipment and the receiver.
• Consult the dealer or an experienced radio/television technician for help.
This device complies with Part 15 of the Federal Communications Commission (FCC) Rules and Industry
Canada ICES-003. Operation is subject to the following two conditions:
• This device may not cause harmful interference.
• This device must accept any interference received, including interference that may cause undesired
operation.
WARNING: DO NOT ATTEMPT TO SERVICE THE WIRELESS COMMUNICATION DEVICE YOURSELF.
SUCH ACTION MAY VOID THE WARRANTY. THE OVATION DEVICE IS FACTORY TUNED. NO CUSTOMER
CALIBRATION OR TUNING IS REQUIRED. CONTACT YOUR SERVICE PROVIDER FOR INFORMATION ABOUT
SERVICING YOUR WIRELESS COMMUNICATION DEVICE.
NOTE: The Radio Frequency (RF) emitter installed in your modem must not be located or operated
in conjunction with any other antenna or transmitter, unless specifically authorized by Novatel Wireless
Technologies.
24
MODIFICATIONS: Any changes or modication not expressly approved by Novatel Wireless, Inc. could void
the user’s authority to operate this equipment.
The FCC has granted an Equipment Authorization for this wireless modem with all reported SAR levels
evaluated as in compliance with the FCC RF exposure guidelines.
FCC Equipment Authorization ID: NBZNRM-MC547
In order to comply with FCC RF exposure requirements, the device must be installed so that a minimum
separation distance of 0.5 cm (0.2”) is maintained between the antenna and all persons during ordinary
operating condition.
Safety Notices
Do not operate your Ovation MC547 in any area where medical equipment, life support equipment, or
near any equipment that may be susceptible to any form of radio interference. In such areas, the host
communications device must be turned on. The MC547 may transmit signals that could interfere with this
equipment.
On an aircraft, either on the ground or airborne
In addition to FAA requirements, many airline regulations state that you must suspend wireless
operations before boarding an airplane. Please ensure that the host device is turned o and your
Ovation MC547 is removed from the USB port prior to boarding aircraft in order to comply with
these regulations. Ovation MC547 can transmit signals that could interfere with various onboard systems
and controls.
While operating a vehicle
The driver or operator of any vehicle should not operate a wireless data device while in control of a
vehicle. Doing so will detract from the driver or operator’s control and operation of that vehicle. In some
countries, operating such communications devices while in control of a vehicle is an offense.
Note: Please consult the User Guide for complete regulatory and safety information, available at
www.novatelwireless.com
Copyright © 2010 Bell, Inc.
All rights reserved.
The information in this document is subject to change without notice. The statements, configurations,
technical data, and recommendations in this document are believed to be accurate and reliable, but are
presented without express or implied warranty. Users must take full responsibility for their applications
of any products specified in this document.
The information in this document is proprietary to Bell.
The software described in this document is furnished under a license agreement and may only be used in
accordance with the terms of that license.
25
Third-Party Trademarks
Product trademarks and registered trademarks are the property of their respective owners.
Statement of Conditions
In the interest of improving internal design, operational function, and/or reliability, Bell reserves the right
to make changes to the products described in this document without notice.
Bell does not assume any liability that may occur due to the use or application of the product(s) or circuit
layout(s) described herein.
In addition, the program and information contained herein are licensed only pursuant to a license
agreement that contains restrictions on use and disclosure (that may incorporate by reference certain
limitations and notices imposed by third parties).
PER-KILOBYTE DATA TRANSPORT CHARGES USING YOUR HANDHELD DEVICE FOR “TETHERED” DATA
TRANSMISSION (E.G. USING YOUR DEVICE AS A MODEM FOR YOUR PC), INCLUDING TO DOWNLOAD
APPLICATIONS OR CONTENT, OR FOR GAMING, WILL RESULT IN PER-KILOBYTE DATA TRANSPORT CHARGES
AT BELL MOBILITY’S THEN CURRENT RATES.
You will be charged for data transmissions from or to your PC or other device through your Bell Mobility
handheld device. Data transmissions include automated security updates to your PC, Internet gaming,
sending and receiving emails including attachments, and downloading music or other content. If you
subscribe to a data plan, you will be charged additional per-kilobyte rates as set out in the plan, for any
data transport usage in excess of the data transport included in the monthly data plan fee.
Data roaming charges may also apply if you are transmitting data through your device on one of Bell
Mobility’s roaming partners’ networks.
Note to subscribers of Bell Mobility’s Unlimited Mobile BrowserTM: In tethering your Bell Mobility handheld
device to your PC or other device, data transmission does NOT occur through the Unlimited Mobile
Browser. You will be charged for data transport usage in addition to the monthly charge for the browser.
We encourage you to minimize these charges by subscribing to an appropriate price plan or feature.
Visit www.bell.ca or call 1-888-4-MOBILE to subscribe. Be sure to check the Connection Details and
Session Log in Mobile Connect to keep track of your data usage.
26
Speeds may vary with your technical configuration, Internet traffic, server, environmental conditions or other factors. Novatel Wireless Images:
©2010. Novatel Wireless, Inc. All rights reserved. Ovation, Novatel Wireless and the Novatel Wireless logo are trademarks of Novatel Wireless,
Inc. Designed in the United States of America. Microsoft, Windows and Windows Vista are registered trademarks and/or trademarks of Microsoft
Corporation in the United States and/or other countries. Macintosh is a registered trademark of Apple Inc. InstallShield is a registered trademark
or trademark of Macrovision Corporation in the United States of America and/or other countries. All other brands and product names are
trademarks of their respective holders.
System requirements for laptops: Microsoft Windows XP (SP 2 – 3, 32 bit only) or Vista (SP 1 - 2, 32/64 bit) with 500MHz CPU, or Windows 7
(32/64-bit) with 1 GHz Intel CPU, 1 USB 1.1 or 2.0 port, 4 free COM ports; I/O resources: 1 IRQ, 4096 bytes of I/O space, memory: 128 MB (XP) or
512 MB (Vista) or 1 GB (7) and disk space: 50 MB. Macintosh OS 10.4.10 or later with 300MHz Intel CPU, 1 USB 1.1 or 2.0 port, memory: 256MB
and disk space: 15MB.
You may also contact Bell Wireless Data Support at:
1 877 DATA-123 (1 877 328-2123)
27