1
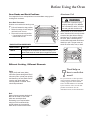
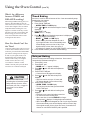
Owner's Manual Covering Model ART6522 Contents Electric Smoothtop Range Important Safety Information .............. 3 Cooking on the Smoothtop ................. 6 Cookware Suggestions ...................... 8 Before Using the Oven ....................... 9 Displays and Sounds ........................ 10 Custom Features .............................. 11 Using the Oven Control .................... 12 Cooking Baking ............................................ 16 Broiling ........................................... 19 Roasting ......................................... 20 Braising ............................................ 21 Care and Cleaning ............................ 22 Troubleshooting ................................ 25 Amana Warranty .............................. 28 Keep instructions for future reference. Be sure manual stays with range. Part No.36-31985701-0 Thank you for buying an Amana Range! Please take the time to complete the registration card and return promptly. If registration card is missing, call Amana Consumer Affairs Department. When contacting Amana, provide product information from serial plate found on upper left hand corner of storage door opening: Model Number __________________________________ Manufacturing (P) Number _________________________ Serial Number (S/N) ______________________________ Purchase Date __________________________________ Dealer Name ___________________________________ Dealer Address _________________________________ Dealer Phone ___________________________________ Rating Plate Keep this manual and your sales receipt together in a safe place for future reference or if warranty service is required. For answers to questions or to locate an authorized servicer, call 1-800-NAT-LSVC (1-800-628-5782) inside USA or 319-622-5511 outside USA. Warranty service must be performed by an authorized servicer. Amana Appliances also recommends contacting an authorized servicer if service is required after warranty expires. Asure Extended Service Plan Amana Appliances offers long-term service protection for this new range. Asure™ Extended Service Plan, covering functional parts, labor, and travel charges, is specially designed to supplement a strong warranty. Call 1-800-528-2682 for information. Parts and Accessories Purchase replacement parts and additional accessories such as cleaning supplies by phone. To order accessories for your Amana product, call 1-800-843-0304 inside USA or 319-622-5511 outside USA. Save Time and Money For more information on this and other Amana products, visit our Web site www.amana.com or call Consumer Affairs Department at 1-800-843-0304 If something seems unusual, please check “Troubleshooting” section, which is designed to help you solve problems before calling service. If you have a question, call us at (800) 843-0304 or write us at: Consumer Affairs Department Amana Appliances 2800 - 220th Trail Amana, Iowa 52204 Remember to include model number of your appliance and your phone number. What You Need to Know about Safety Instructions Warning and Important Safety Instructions appearing in this manual are not meant to cover all possible conditions and situations that may occur. Common sense, caution, and care must be exercised when installing, maintaining, or operating range. Always contact your dealer, distributor, service agent, or manufacturer about problems or conditions you do not understand. Recognize Safety Symbols, Words, Labels ! DANGER DANGER—Immediate hazards which WILL result in severe personal injury or death. ! WARNING WARNING—Hazards or unsafe practices which COULD result in severe personal injury or death. ! CAUTION CAUTION—Hazards or unsafe practices which COULD result in minor personal injury or product or property damage. 2 IMPORTANT SAFETY INFORMATION ! WARNING ! WARNING To reduce risk of the appliance tipping, it must be secured by a properly installed anti-tip bracket(s). To verify bracket has been installed properly, remove the storage drawer or panel and look under the range with a flashlight. Bracket(s) must be engaged in the rear corner of the range. • ALL RANGES CAN TIP • INJURY TO PERSONS COULD RESULT • INSTALL ANTI-TIP BRACKET(S) PACKED WITH RANGE • REFER TO INSTALLATION INSTRUCTIONS ! CAUTION DO NOT TOUCH SURFACE UNITS OR AREAS NEAR UNITS—Surface units may be hot though they are dark in color. Areas near surface units may become hot enough to cause burns. During and after use, do not touch, or let clothing or other flammable materials contact surface units or areas near surface units until they have had enough time to cool. These areas include the rangetop and backguard. ! CAUTION DO NOT TOUCH HEATING ELEMENTS OR INTERIOR SURFACES OF OVEN—Oven heating elements may be hot though they are dark in color. Interior surfaces of an oven may become hot enough to cause burns. During and after use, do not touch, or let clothing or other flammable materials touch heating elements or interior surfaces of oven until they have had enough time to cool. Other range surfaces that may become hot enough to cause burns are the oven door, oven cavity, and oven vent. To avoid personal injury, do not sit, stand or lean on oven door or oven drawer. ! WARNING To avoid risk of electrical shock, personal injury, or death, verify your range has been properly grounded and always disconnect it from main power supply before servicing. California Safe Drinking Water and Toxic Enforcement Act (Proposition 65) The Governor of California is required to publish a list of substances known to the state of California to cause cancer or reproductive harm and requires businesses to warn customers of potential exposures to such substances. Some appliances contain or produce a chemical or chemicals which can cause death or serious illness and which are known to the State of California to cause cancer, birth defects, or other reproductive harm. To reduce the risk from substances during the self-clean cycle make sure this appliance is installed, operated, and maintained according to the manufacturer’s instructions. SAVE THESE INSTRUCTIONS 3 IMPORTANT SAFETY INFORMATION (cont'd) ALL APPLIANCES 1. Proper Installation—Be sure your appliance is properly installed and grounded by a qualified technician. 2. Never Use Your Appliance for Warming or Heating the Room. 3. Do Not Leave Children Alone—Children should not be alone or unattended in the area where the appliance is in use. They should never be allowed to sit or stand on any part of the appliance. 4. Wear Proper Apparel—Loose fitting or hanging garments should never be worn while using appliance. 5. User Servicing—Do not repair or replace any part of the appliance unless specifically recommended in the manual. All other servicing should be referred to a qualified technician. 6. Storage in or on Appliance—Flammable materials should not be stored in an oven or near surface units. 7. Do Not Use Water On Grease Fires—Smother fire or flame, or use dry chemical or foam-type extinguisher. 8. Use Only Dry Potholders—Moist or damp potholders on hot surfaces may result in burns from steam. Do not let potholder touch elements. Do not use a towel or other bulky cloth. SURFACE COOKING UNITS 1. Use Proper Pan Size—This appliance is equipped with one or more surface units of different sizes. Select utensils having flat bottoms large enough to cover the surface unit heating element. The use of undersized utensils will expose a portion of the heating element to direct contact and may result in ignition of clothing. Use of oversized utensils concentrates heat on cooking surface and can cause damage to range. Proper relationship of utensil to burner improves efficiency. 2. Never Leave Surface Units Unattended—Boilover causes smoking and greasy spillovers that may ignite. 3. Glazed Cooking Utensils—Only certain types of glass, ceramic, earthware, or other glazed utensils are suitable for rangetop service without breaking due to sudden change in temperature. 4. Utensil Handles Should Be Turned Inward and Not Extended Over Adjacent Surface Units—To reduce the risk of burns, ignition of flammable materials, and spillage due to unintentional contact with the utensil, the handle of a utensil should be positioned so that it is turned inward, and does not extend over adjacent surface units. GLASS/CERAMIC COOKING SURFACES 1. Do Not Cook on Broken Cooktop—If cooktop should break, cleaning solutions and spillovers may penetrate the broken cooktop and create a risk of electrical shock. Contact a qualified technician immediately. 2. Clean Cooktop With Caution—If a wet sponge or cloth is used to wipe spills on a hot cooking area, be careful to avoid a steam burn. Some cleaners can produce noxious fumes if applied to a hot surface. ! CAUTION Do not store items of interest to children in cabinets above a range or on the backguard of a range—children climbing on the range to reach items could be seriously injured. SAVE THESE INSTRUCTIONS 4 IMPORTANT SAFETY INFORMATION (cont'd) OVENS 1. Use Care When Opening Door—Let hot air or steam escape before removing or replacing food. 2. Do Not Heat Unopened Food Containers—Build-up of pressure may cause container to burst and result in injury. 3. Keep Oven Vent Ducts Unobstructed. 4. Placement of Oven Racks—Always place oven racks in desired location while oven is cool. If rack is removed while oven is hot, do not let potholder contact hot heating element in oven. 5. Protective Liners—Do not use aluminum foil to line drip bowls, oven racks or oven bottoms. Improper installation of these liners may result in a risk of electrical shock, or fire. In Case of Fire Fires can occur as a result of over cooking or excessive grease. Though a fire is unlikely, if one occurs, proceed as follows: Surface Element Fire 1. Smother the fire with a nonflammable lid or baking soda, or use a Class ABC or BC extinguisher. Not water. Not salt. Not flour. 2. As soon as it is safe to do so, turn the surface controls to OFF. Turn off power at main circuit breaker or fuse box. Oven Fires 1. If you see smoke from your oven, do not open oven. 2. Turn temperature knob to OFF position. 3. As an added precaution, turn off power at main circuit breaker or fuse box. 4. Turn on vent to remove smoke. 5. Allow food or grease to burn itself out in oven. 6. If smoke and fire persist, call fire department. 7. If there is any damage to components, call an authorized servicer before using range. SELF-CLEANING OVENS 1. Do Not Clean Door Gasket—The door gasket is essential for a good seal. Care should be taken not to rub, damage, or move the gasket. 2. Do Not Use Oven Cleaners—No commercial oven cleaner or oven liner protective coating of any kind should be used in or around any part of the liner. 3. Clean Only Parts Listed in Manual 4. Before Self-Cleaning the Oven—Remove broiler pan, oven racks, and other utensils. 5. Remove All Items From Rangetop and Backguard. ! • VENTILATION HOODS 1. Clean Ventilating Hoods Frequently—Grease should not be allowed to accumulate on hood or filter. 2. When flaming foods under the hood, turn the fan on. • • • • • • • Precautions • Do not cook food directly on rangetop surface, always use cookware. Do not mix household cleaning products. Chemical mixtures may interact with objectionable or even hazardous results. Do not put plastic items on warm cooking areas. They may melt and stick. Do not lift or move range by grasping oven door. This can result in window glass breaking or shattering. Do not slide rough metal objects across rangetop surface. Scratching or metal marking can result. Do not leave fat heating unless you remain nearby. Fat can ignite if overheated by spilling onto hot surfaces. Do not allow pots to boil dry as this can cause damage to cooking surface and pan. Do not use rangetop surface as a cutting board. Do not use range for storage or as a display counter. SAVE THESE INSTRUCTIONS 5 Cooking on the Smoothtop Cooking Safely with Surface Elements ! WARNING To avoid risk of serious personal injury, property damage, or fire, do not leave surface elements unattended while in operation. Grease and spillovers can ignite causing a fire. ! WARNING To avoid risk of electrical shock or serious personal injury, • never cook on a broken smoothtop cooking surface. Spillovers can penetrate broken surface and cause electric shock. • never clean broken cooktop. Cleaners can penetrate broken surface and cause electric shock. If smoothtop cooking surface breaks, discontinue use and notify an authorized servicer immediately. Setting Surface Element Controls Push in and turn the surface element control knobs in either direction to turn on the surface elements. Surface elements are located under the ceramic cooking surface and radiate heat through the cooktop. It is normal for the element to cycle on and off during heating. The controls have infinite settings between LO and HI for fine temperature control. 1. Push in and turn surface element control to desired setting. 2. When finished cooking, turn control to OFF position. Dual Surface Elements Dual surface elements have an inner and outer element that can be set according to your pan size. The outer edge of your pan should always cover the element graphic, with a maximum overhang of 1 inch. To use inner and outer element simultaneously, depress switch to LARGE position. To use inner element only, turn switch to SMALL position. SURFACE ELEMENT CONTROL SETTINGS HI To avoid serious personal injury, do not use a damp or wet cloth to clean up spills on a hot or warm cooktop. Moist or damp cloths on hot surfaces may result in burns from steam. OFF HI MED LARGE SMALL WHEN TO USE SETTING Use to prepare food at less than boiling temperatures or to simmer. Use to maintain boiling of larger amounts of food, low temperature frying. Use to bring food to boiling temperatures. When food is boiling temperature setting should be reduced to LO through MED. LO MED ! WARNING LO Indicator Lights Surface elements are indicated by an indicator light that glows when the element is turned on. The location and number of indicator lights vary with each model. After a surface control is turned off, the surface indicator light will continue to glow until each surface elements have cooled to approximately 145°F. The length of time the light remains on will vary. If there is more than one surface element light, do not expect the lights to shut off at the same time. After you cook... ...remember to establish a cleaning routine for your smoothtop. Cooktops can be sensitive to certain cooking spillovers. Unlike conventional ranges, smoothtops should not be cleaned with a wet dishcloth when wiping down other counters. Daily care is quick, easy and can prevent damage. To purchase Amana recommended cleaning products, contact our Consumer Affairs department at (800) 843-0304. 6 Cooking on the Smoothtop (cont'd) Using the Warming Zone Your new range is equipped with a convenient warming zone. The warming zone is designed to keep hot foods hot until serving time. When cooking such foods as pancakes, fried chicken, or even stir-fry the warming zone can keep cooked foods hot as other portions are cooked. All food placed on the warming zone should be covered with aluminum foil or a lid to maintain quality. For best results, when warming pastries or breads, cover should have a vent to allow moisture to escape. Do not use plastic wrap to cover food. Plastic wrap could melt onto the surface and be very difficult to clean. Cookware should be restricted to utensils designed for use with a smoothtop cooktop. Cookware used on the warming zone should also not exceed the pattern of the element by more than one inch, or be taller than six inches to allow easy access to the oven control. 1. Push in and turn surface element control to desired setting. Warming zone element approximate temperatures are: • 145°F on LO setting • 175°F on MED-LO setting • 205°F on MED setting • 250°F on MED-HI setting • 325°F on HI setting 2. When finished with warming zone, turn control to OFF position. Temperature Selection To decrease the likelihood of food borne illness, hot foods should be kept at a minimum of 140°F. Use a meat thermometer to verify foods kept on the warming zone are at this temperature. Use the chart below to approximate what heat setting to begin using for a particular food. Adjust as necessary depending on the maintained temperature of the food. Warming Zone Recommended Settings Heat Setting Approximate Temperature °F (Element) Breads/Pastries LO 145 Casseroles LO 145 Dinner Plates with Food LO 145 Eggs LO 145 Food Item Mashed Potatoes LO 145 MED-LO 175 Gravies MED 205 Meats MED 205 Sauces MED 205 Cream based soups MED 205 Stews MED 205 Vegetables HI 325 Fried Foods HI 325 Hot Beverages HI 325 Soups HI Hamburger Casserole 325 7 LO OFF MED LO HI MED HI ! CAUTION Always use potholders or oven mitts when removing food from the warming zone as cookware and plates will be hot. Warming Zone Utensil Recommendations Because the warming zone is a part of the smoothtop cooktop, it is recommended only to use utensils designed specifically for use on the smoothtop (see Cookware Suggestions section). Using cookware not designed for use with a smoothtop may result in poor cooking performance, damage to the smoothtop, or damage to the cookware. Cookware should not be wider than 8 inches around or taller than 6 inches in height. Indicator Light The warming zone has its own indicator light. It turns on when the control is set. The indicator light will remain on after the knob is turned to an off position if the surface is still warm (approximately 145 °F). When the glass of the cooktop has cooled down sufficiently, the indicator light will then shut off. Cookware Suggestions What Should You Consider in Cookware? Flat Pan Test For best cooking results, use a pan with a flat bottom. To determine if pan has a flat bottom. 1. Rotate a ruler along bottom of pan. If pan is not flat, gaps between bottom of pan and edge of ruler can be seen. 2. A small groove or mark on a pan does not affect cooking times. However, if a pan has a gap, formed rings, or an uneven bottom, it does not cook efficiently and in some cases may not boil liquid. Select Avoid Flat bottomed cookware. Cookware with rounded or warped bottoms. Pans with aluminum disk bottoms. Glass, glass-ceramic, enamel porcelain or cast iron cookware, canners or pressure cookers. Heavy gauge metal cookware. Light gauge metal cookware. Handles that are secure, that are not heavy enough to tilt pan. Cookware with loose or broken handles. Proper pan size. Cookware that is smaller than or greater than heating element size by 1 inch. Flat bottomed wok Wok with a ringstand on bottom Can I can? Canning is not recommended with any of the Amana smoothtop ranges or cooktops due to the intense heat and large cookware required to can. The heat generated by the canning cookware overheats both the elements and the smoothtop of the range. This can cause the smoothtop to crack, cause failure of the heating elements, and can cause damage to the backguard. COOKWARE MATERIAL USES Aluminum Heats and cools quickly. Use for frying, braising, and roasting. Stainless Steel Heats and cools at moderate rate. Use for soups, sauces, vegetables, general cooking. Copper Clad / Tin Lined Heats and cools quickly. Use for gourmet cooking, wine sauces, egg dishes. Damage incurred by canning, or attempting to can, using the smoothtop cooktop is not covered under warranty. 8 Before Using the Oven Aluminum Foil Oven Racks and Rack Positions Your range has 5 oven rack positions to accommodate many types of cooking and cookware . Oven Rack Placement Position oven rack before turning oven on. 1. Pull rack forward to stop position. 2. Raise front edge of rack and pull until rack is out of oven. 3. Place rack in new rack position. • Curved edge of rack must be toward rear of oven. ! WARNING 5 To avoid risk of personal injury, property damage or fire, do not line oven bottom, racks, or broiler pan and grid with aluminum foil. 4 3 2 1 RACK POSITION GUIDELINES Rack Position Food Type 1 and 2 For large cuts of meat such as roasts or turkeys. For baked foods such as frozen pies or angel food cakes. 3 For most baked foods on a cookie sheet or shallow pan. 4 and 5 For broiled or toasted foods. When placed on the oven bottom or racks, aluminum foil not only creates a hazard, but also affects cooking performance. To minimize spills in the oven, place a shallow pan or cookie sheet underneath food items that drip or spill. The pan must not touch the oven walls, front, or back. Different Cooking, Different Elements Bake Upper (broil) and lower (bake) elements operate during bake. Broil element cycles to heat oven quickly and brown top of food. Bake can be used to cook foods which are normally baked or roasted. Oven should be preheated. Broil Upper element operates during broil. Broil can be used to cook foods which are normally broiled. Preheating is not required when using broil. All foods should be turned at least once except fish, which does not need to be turned. Bake Broil Need help on how to cook that meat? For your reference we have provided meat preparation, handling safety and cooking suggestions in this manual. These recommendations are furnished by the USDA as well as several meat producer associations. See the individual sections for the information. Broil 9 Displays and Sounds DELAY OVEN O N CLEAN STOP TIMER Timer Signal When time elapses, timer beeps 3 times then approximately once every 6-8 seconds until TIMER ON/ OFF pad is pressed. Preheat Signal DELAY OVEN ON CLEAN STOP TIMER After setting oven to bake and selecting a temperature, oven preheats. When oven reaches set temperature, 1-second signal sounds. 8888 HR : 8888 HR 888 : BAKE BROIL CLEAN LOCK O N 888 BAKE BROIL CLEAN LOCK O N Displays time-of-day, timer and timed or delayed settings. Displays temperature and cooking method or function for oven. End-of-Cycle Signal DISPLAYS DESCRIPTION When a timed cooking cycle is complete, three long signals sound. End of cycle signal continues to sound until OVEN CANCEL pad is pushed. TIME or HR TIME appears in display while time-of-day is entered. TIME HR appears when time is entered for timed or delayed baking or delayed selfcleaning. TIMER Timer displays while timer is set and while timer counts down. BAKE BAKE displays while bake oven temperature is entered. While oven is heating BAKE displays. ON Displays when oven is heating. OVEN TIME BAKE Displays when a timed baking cycle is set. DELAY OVEN TIME BAKE Displays when delayed bake is set. DELAY CLEAN STOP TIME CLEAN LOCK Displays when delayed self clean is set. STOP TIME Displays when setting the stop time for a delayed baking or self-clean cycle. BROIL Displays when a broil is set. CLEAN Displays when self-clean cycle is entered and set. LOCK LOCK flashes while oven door is locking and remains in display while door is locked. After cycle is complete and oven has cooled to a safe temperature, LOCK no longer displays and door can be opened. 10 Custom Features ¸ 12-hour automatic cancel This safety feature prevents oven from continuing to operate if it has been left on for over 12 hours. If a cooking function continues longer than 12 hours without any options on oven control being touched, this feature turns oven off. Any time an option is touched, 12-hour automatic cancel is reset. Child lockout B This safety feature is used to prevent children from accidentally programming oven by disabling electronic oven control. Press and hold BAKE and CLOCK for 5 seconds. “OFF” displays where the temperature normally appears. To reactivate control, press and hold BAKE and CLOCK pads for 5 seconds on the upper oven control. Child lockout must be reset after a power failure. Oven temperature control adjustment Your new range is calibrated at the factory for temperature. Due to individual variances and preferences, it may be necessary to adjust individual ovens once they have been installed. When first using oven, follow recipe times and temperatures. Before adjusting oven baking temperature, test a recipe by using a temperature set higher or lower than the recommended temperature. The baking results should help you to decide how much adjustment is needed. Remember that a convection oven will cook food more quickly than a standard (conventional) oven. An accurate digital thermometer is necessary to calibrate the oven. Store purchased oven thermometers do not measure oven temperature accurately. NOTE: Remove aluminum foil from oven—it will alter oven performance. Check for blocked heat vents. If it still appears the oven is not performing as expected, a calibration may be done. 1. 2. 3. 4. 5. Push BAKE pad. Push up arrow pad until an oven temperature more than 500°F displays. Immediately push and hold BAKE pad (approximately 5 seconds) A double digit number will display ranging from -35 to 35. Immediately, press either • + to increase oven temperature by 5°F. Maximum change is 35°F. • - to decrease oven temperature by 5°F. Maximum change is 35°F. • When temperature is adjusted to a cooler setting, a minus sign (-) will display with the offset temperature. 4. When desired temperature change is displayed, push OVEN CANCEL button. Temperature adjustment will be retained through a power failure. Service codes and tones Electronic oven control is equipped with a self-diagnostic system. Self-diagnostic system alerts you if there is an error or problem with the unit. If the electronic range control sounds a series of beeps and display shows an F-code, record the F-code shown and turn control to OFF. Some F-codes can be cleared by disconnecting power to the range. If the code continues to reoccur disconnect electrical supply to range and contact an authorized servicer. 11 Fcode Warning F1 Shorted pad button F2 Oven cavity over temperature F3 Open circuit in oven temperature sensor circuit F4 Shorted circuit in oven temperature sensor circuit F5 Failed control. F7 Failure of door lock switch sensing with door locked. F9 Failure of door lock switch sensing with door unlocked DOOR Door Latch Failure Using the Oven Control OVEN LIGHT OVEN CANCEL TIMER ON/OFF DELAY OVEN ON CLEAN STOP TIMER CLOCK STOP TIME 888 HR BAKE BROIL O CLEAN LOCK N COOK TIME CLEAN BROIL BAKE Setting Electronic Clock Flashing Display When power is connected or interrupted, oven display flashes. Press CLOCK to clear display. Clock may need to be reset. Making the Numbers Increase at a Faster Rate The 12 hour clock does not display AM, PM or military time. When power is connected or restored, display flashes until pad is pressed. 1. Press CLOCK pad. • TIME displays in lower left corner 2. Press + or pad until correct time-of-day displays. CLOCK 3. Press CLOCK pad to set time. • If CLOCK pad is not pressed, approximately 60 seconds after last entry, TIME disappears and clock is set. Time increases in larger increments the longer + or pad is held. Timer Signal When time elapses, timer beeps 3 times then approximately once every 6-8 seconds until TIMER ON/OFF pad is pressed. End-of-Cycle Signal When a timed cooking cycle is complete, three long signals sound. End of cycle signal continues to sound until OVEN CANCEL pad is pushed. Setting Minute Timer The timer is a timer only. Electronic timer does not control bake, broil, or self-clean function. Timer can be set from 5 seconds to 9 hours and 50 minutes. 1. Press TIMER pad. • TIMER displays 2. Press + or pad until desired amount of time displays. • Timer begins counting down TIMER automatically after time is entered. 3. Press and hold TIMER pad to cancel timer signal. • After time elapses, timer beeps 3 times then approximately once every 6 to 8 seconds until TIMER pad is pressed. Resetting and Canceling Timer To reset the time when remaining time is displayed, press TIMER pad, then + or pad until new time displays. To cancel timer when remaining time is displayed or when signal is beeping, press TIMER pad and hold for approximately 5 seconds. 12 Using the Oven Control (cont'd) Preheating Baking 1. Press BAKE pad. • BAKE and - - -° display. 2. Press or pad until desired OVEN BAKE temperature is displayed. CANCEL • BAKE, ON , and baking temperature are displayed 3. Press OVEN CANCEL pad when finished. • Remove food from oven when cooking time has elapsed. Food left in oven can overcook. In most cases, you should preheat the oven before baking. After the range control is set, the oven temperature will begin to rise until the desired cooking temperature is reached. When cooking temperature is reached oven signal beeps for approximately 1 second. For delicate baking, preheat approximately 15–20 minutes before placing food inside oven or wait 10 minutes after oven signal beeps before placing food in oven. The extra time creates a more stable oven temperature. Broiling Broiling system generates immediate, intense heat using a special reflector. This reflector focuses heat directly on the food; searing in natural juices and providing restaurant quality, charbroiled flavor. Center food on broiling grid and pan and place on rack in oven. Oven door can be opened to the first stop, or closed. Broiling does not require preheating. OVEN 1. Press BROIL pad. BROIL CANCEL • BROIL and - - -° display. 2. Press + pad to set HI broil or - pad to set lower broil temperature. • Temperature setting can be set to HI and 1 through 5. • Oven begins to broil within 5 seconds. BROIL, ON and heat setting display. 3. Press OVEN CANCEL pad when finished. BROILER SETTING APPROXIM ATE TEMPERATURE USE TO COOK How High or Low Can I Set the Temperature? Oven temperature can be set from 170°F to 550°F in 5° increments. Temperature starts at 100°F and increases in 5° increments until reaching the set temperature. Some minor smoking is normal when using oven for first few times. Broiling Hints ! WARNING Never leave oven unattended while broiling. Overcooking may result in a fire. • HI 600°F Red meats 5 550°F Pork 4 525°F Poultry 3 475°F Seafood 2 425°F Fruits and vegetables 1 400°F Toasting and warming breads • • • RACK POSITION GUIDELINES • Rack Position Food Type 1 and 2 For large cuts of meat such as roasts or turkeys. For baked foods such as frozen pies or angel food cakes. 3 For most baked foods on a cookie sheet or shallow pan. 4 and 5 For broiled or toasted foods. 13 • Remove excess fat from meat before broiling. Cut edges of meat to prevent curling. Place food on a cold ungreased broiling pan. If pan is hot, food sticks. All food except fish should be turned at least one time. Begin broiling with skin side down. Season meat after it has browned. Broiling does not require preheating. Begin cooking using suggested rack levels in Broiling section to test broiler results. If food is not brown enough, cook on a higher rack position. If food is too brown, cook on a lower rack position. Using the Oven Control (cont'd) What's the difference between TIMED and DELAYED cooking? When using TIMED cooking, the oven begins to heat immediately after the oven control is set. Then, the oven cooks for the desire length of time set. When using DELAYED cooking, the oven begins to cook later in the day. Set the time that you want to end cooking and the how long you want to cook. The oven control calculates when to start cooking from those times. How Far Ahead Can I Set the Time? Cook time and stop time can be set up to 11 hours and 55 minutes ahead. To view cook time, press and hold COOK TIME pad. When cooking time has elapsed, an end of cycle signal sounds, oven automatically turns off and display returns to time of day. Oven signal sounds 3 times, then once every 3 seconds for 5 minutes or until OVEN CANCEL pad is pressed. Broil can not be set to Timed or Delayed. ! CAUTION To reduce the risk of food poisoning due to bacterial growth and production of toxins, never hold meat, milk, fish, or eggs for more than 2 hours before cooking. Timed Baking Set oven to cook for desired amount of time. Oven automatically stops heating after time elapses. 1. Place food in oven. O 2. Press COOK TIME pad. N COOK • OVEN, TIME, and HR display. TIME 3. Press or pad until desired length of time is displayed. 4. Press BAKE pad. BAKE and - - -° display. 5. Press or pad until desired temperature is displayed. • Cooking begins automatically. O N • BAKE, ON , TIME, and HR display BAKE • When cooking time has elapsed an end of cycle signal sounds. Oven automatically turns off and display returns to time of day. Oven signal sounds 3 times, then once every 3 seconds for 5 minutes or until OVEN CANCEL pad is pressed. 6. Press OVEN CANCEL pad when finished baking. Delayed Baking Set oven to begin and end baking at later time. Oven control automatically calculates starting time. 1. Place food in oven. 2. Press BAKE pad. O N • BAKE and - - -° appear in display BAKE 3. Press or pad until desired temperature displays. 4. Press STOP TIME pad. • Current time of day appears in display. 5. Press or pad until desired stop time O N displays. STOP TIME • Stop time can be set up to 11 hours and 55 minutes ahead of current time of day. 6. Press COOK TIME pad. • OVEN, TIME, and HR display. • To view the cook time later, press and hold COOK TIME pad. O N COOK 7. Press or pad until desired cooking time TIME displays. • Electronic oven control calculates start time. • 10 minute minimum cooking time. • When start time is reached DELAY no longer displays and ON displays. Cooking begins automatically. • When cooking time has elapsed an end of cycle signal sounds. Oven automatically turns off and display returns to time of day. Oven signal sounds 3 times, then once every 3 seconds for 5 minutes or until OVEN CANCEL pad is pressed. 14 Using the Oven Control (cont'd) ! WARNING ! CAUTION To avoid fire or smoke damage, remove any flammable materials from storage drawer. Items like plastic containers and paper manuals can melt or burn. To avoid risk of personal injury, do not touch oven vents or area around vents during selfcleaning. These areas can become hot enough to cause burns. Self-cleaning Self-clean feature uses high oven temperature to clean oven interior. 1. Prepare oven for self-cleaning (see below right). 2. Press CLEAN pad. • CLEAN and TIME display. 3. Press or pad to adjust cleaning time. CLEAN • 3:00 displays when arrows are first pressed. • Oven begins to clean approximately 5 seconds after input. • CLEAN, TIME, and ON display during cycle. LOCK flashes in display when automatic door latch is locking. • LOCK is displayed during self-clean cycle while door is locked. • When oven has cooled to a safe temperature, the LOCK light flashes while the door latch opens. When oven has cooled enough to open, the LOCK light no longer displays and door can be opened. • No signal sounds at end of self clean cycle. Delayed Self-clean Cycle Set oven to begin and end cleaning at later time using. Range control calculates back from end time to determine starting time. 1. Prepare oven for self-cleaning (see right). 2. Press CLEAN pad. • CLEAN and TIME display. CLEAN 3. Press or pad until desired amount of cleaning time is displayed. 4. Press STOP TIME pad. or pad until desired stopping time 5. Press appears in display. • Starting time is automatically calculated based on amount of cleaning time and stop time. CLEAN, TIME, and ON display during cycle. STOP TIME • LOCK flashes in display when automatic door latch is locking and is displayed during cycle. • When oven has cooled to a safe temperature, the LOCK light flashes while the door latch opens. When oven has cooled enough to open, the LOCK light no longer displays and door can be opened. • No signal sounds at end of self clean cycle. 15 ! CAUTION To avoid risk of fire or smoke damage, clean excess spills before starting self-clean. How Long Should the SelfClean Cycle Last? The self-clean cycle can be set from 2 to 4 hours. Minimum recommended cleaning time is 3 hours. After the self-clean cycle ends, the oven must cool before the oven door can be opened. When the LOCK light no longer glows in the display, you can safely open the oven door. DO NOT force the oven door open while the LOCK light shows in the display. The oven door lock can be damaged. Do I need to prepare? To get the best results from the selfclean cycle, follow these steps: • • • • • Remove birds or animals susceptible to smoke or other fumes from the room or adjoining room. Make sure oven light cover is properly in place. Do not use cleaning cycle if it is not. Remove oven racks and all cooking utensils from oven. Clean excess spills from oven interior. Remove items from range top and backguard. These areas can become hot during selfcleaning cycle. Interrupt Self-Clean 1. Press OVEN CANCEL pad. 2. When oven has cooled to a safe temperature, door will unlock and can be opened. DO NOT force door. This can cause damage to the latch. Cooking Baking Guidelines When baking with a new oven, keep in mind temperatures vary from oven to oven. Store-bought thermometers are generally not accurate and should not be used to calibrate oven temperatures. Hints for Cookies, • • Shiny, flat cookie sheets should be used. Avoid cookie pans with high sides - this will cause uneven browning on the top. Cookie sheet should not touch the sides of the oven or door. Cakes, • • Follow recipe’s directions for pan size. Shiny pans work best for cakes. Cake baked in too large a pan will be thin and dry. Too small a pan will be undercooked or unevenly cooked and may spill. Pies • • Pies should be baked in dark or dull pans to increase browning. Frozen pies should be heated on an aluminum cookie sheet. BAKING TIME GUIDELINES Cake Pan Type Cups of batter Oven Temp. Minutes 7 ¾” x 5 ¾” 2½ 350°F 25 to 30 13” x 9 ¾” 8 350°F 25 to 30 6” 2 350°F 25 to 30 8“ 3 350°F 30 to 35 14” 10 350°F 50 to 55 8” 5 325°F 60 to 65 12” 11 325°F 75 to 80 Half Round, 2” layer 18” 9 325°F 60 to 65 Half Round, 3” layer 18” 12 325°F 60 to 65 Square 6” 2 350°F 25 to 30 10” 6 350°F 35 to 40 16” 15 1/2 350°F 45 to 50 Oval Pan size Round, 2” layer Round, 3” layer BAKEWARE GUIDELINES Dark or dull pans Absorb more heat and result in darker browning. Recommended for pies and breads. Shiny pans (no sides) Recommended for cookies. Shiny pans (sides) Recommended for cakes Glass pans Lower recommended oven temperature by 25°F. Bake Pan Placement • Keep pans and baking sheets 2 inches from oven walls. • Stagger pans placed on different racks so one is not directly over the other. 16 Cooking (cont'd) Common Baking Problems If you begin to notice consistent problems refer to the chart below for possible solutions. If results are still poor, contact Amana Consumer Affairs at (800) 843-0304. Problem Cause Lopsided cakes (bake unevenly) Pans touching each other or oven walls. Batter spread unevenly in pan. Uneven heat distribution in oven. Oven is not level. Cakes, cookies, biscuits too brown on bottom or top Oven not preheated. Pans touching each other or oven walls. Using glass, darkened, warped or dull finish metal pans. Rack position too high or low. Incorrect use of aluminum foil. Oven temperature too high. Pies don’t brown Incorrect rack position. Using shiny metal pans. Temperature set too low. Cakes not done in center Temperature too high. Pan too small. Baking time too short. Pan not centered in oven. Cakes fall Too much shortening or sugar. Too much or too little liquid. Temperature too low. Old or too little baking powder. Pan too small. Oven door opened frequently (peeking). Insufficient baking. Excessive shrinkage Too little leavening. Mixing batter too long. Pan too large. Oven temperature too high. Baking time too long. Cakes high in middle or cracked Temperature set too high. Overmixing. Too much flour. Pans touching each other or oven walls. 17 Test your cakes for doneness While they are still in the oven. Because of variances across individual ovens, it is best to test for the proper consistency rather than solely relying on time and visual appearance as an indicator. It may not be the oven Cake problems may be in the mixing of the batter. Overbeating can cause cake structure to break down and excessive shrinkage of the cake. Underbeating can result in lumpy cakes that may not be cooked thoroughly. All ingredients should be at room temperature—not out of the refrigerator. Make sure to follow the recipes directions for how long the batter should be mixed. Cake stuck? Allow cake to cool in cake pan on a rack for 10 minutes before removing. Larger cakes (over 14 inches in diameter) may take 15 minutes. If the cake has cooled too long, reheat in the oven at 250°F for a few minutes. Cooking (cont'd) Meat Basics While cooking has always been a talent, it is now becoming a science, also. Amana provides this information as a guide to aid in preparation. For specific questions regarding meat preparation, handling, or storage contact USDA (United States Department of Agriculture) Meat & Poultry Hotline at (800) 535-4555. Handling Hints Cooking Tips Storage Safety • • • • • • • • When shopping, put meat in its own separate plastic sack to keep drips off other foods. Defrost frozen meats in refrigerator, not at room temperature. Keep meat cool and covered until it is time to cook. Wash hands with warm soapy water before and after handling meat or raw egg. Thoroughly wash any surface or utensil raw meat or egg touched. Do not put cooked meat on the same plate that held raw meat. Tenderizing Braising is only one way to tenderize less tender cuts. Before cooking, you may pound, cube, marinate, or use commercially prepared meat tenderizers. You may then use a dry method to cook the meat. • • • • Marinades are acidic liquids such as wine, citrus, or vinegar. Marinades soften meat fibers but only penetrate about one-fourth of an inch into the interior of the meat. Do not marinate meat for longer than 24 hours. Pounding with a heavy meat mallet breaks down the connective tissue to tenderize meat. Cubing breaks down the structure more than pounding. Cubing is done at the meat counter. Commercial tenderizers are primarily enzymes that work on the outer fourth inch on a meat cut. Make sure to follow the manufacturer’s directions. • • • • Marinate meat in the refrigerator. Throw out excess marinade that came into contact with meat. Use an oven-proof meat thermometer. Cook meat to internal temperature recommended by USDA. When reheating foods, heat to an internal temperature of at least 165 °F. While cooking meats, turn over at least once. • • • • Once carved, refrigerate unused portion immediately. Keep hot foods hot and cold foods cold when serving meals. Separate cooked foods into small portions for fast cooling. Do not store cooked ground meats or meals containing ground meats for longer than 3 to 4 days in the refrigerator. Do not allow cooked or uncooked meat juices to come into contact with ready-to-eat foods such as fruits or vegetables. Using a Meat Thermometer When using a meat thermometer, remember to insert it at a slight angle, in the thickest part of the meat, away from fat and bone. The meat should be removed when 5°F below the desired final temperature. While the meat sits before carving, it will continue to cook internally, raising the last 5°F by itself. A meat thermometer can • • Take the guesswork out of cooking to a desired ‘doneness’. Help reduce the risk of foodborne illness. Oven-safe Thermometer • Inserted before the meat is placed in the oven, this thermometer stays with the meat while it cooks. • The internal temperature will rise slowly as the meat cooks. Instant-read Thermometer • Not oven safe, these thermometers are placed in the meat when it is removed from the oven. • While times may vary, an accurate temperature is normally displayed within one to two minutes. • When using an instant-read, remember to clean the thermometer stem with warm, soapy water between readings. 18 Cooking (cont'd) Broiling Guidelines Broiling is a dry heat cooking method that allows a restaurant quality charbroiled flavor. Meat is exposed directly to the heating element at high temperatures. 1. Place meat on rack in broiler pan, with the surface of cuts the specified distance from the heating element (specified below). 2. Broil for half the recommended time, or until the surface is browned. 3. Turn meat and continue broiling to desired internal temperature. 4. Season, if desired. Thickness (inches) Weight (pounds) Distance From Heat (inches) Approximate Cooking Time (minutes) ¼ ¼ to 1 1 to 1 ¼ 2 to 3 3 to 4 12 to 14 8 to 12 ½ ½ to ¾ ¾ to 1 2 to 3 3 to 4 4 to 5 8 to 12 10 to 15 20 to 25 1 to 1 ¾ 1 ½ to 3 2 ¼ to 4 2 to 3 3 to 4 4 to 5 10 to 15 16 to 21 21 to 25 1 1½ ¾ to 1 1 ½ to 2 2 to 3 2 to 3 3 to 4 4 to 5 8 to 12 10 to 15 20 to 25 Filet Mignon (Tenderloin) ¼ to ½ 2 to 4 10 to 15 Flank Steak 1 to 1 ½ 2 to 3 12 to 14 1 3 to 4 10 to 15 Meat Cut Recommended Internal Temperature BEEF Chuck Shoulder Steak 1 ¾ Rib Eye Steak Sirloin Steak Porterhouse Steak Ground Beef Patties 1 Very Rare 130°F Rare 140°F Medium Rare 145°F ¾ Medium 160°F 1½ Well Done 170°F Very Well Done 180°F 1½ 1 ¾ 160°F minimum ¾ to 1 PORK ¾ 4 6 to 8 ¾ 4 6 to 8 ½ to 1 4 15 to 25 1 inch cubes 4 10 to 20 ½ 4 8 to 10 Loin Chops 1 3 to 4 10 to 15 Rib Chops 1 3 to 4 10 to 15 Sirloin Steaks 1 3 to 4 12 to 15 1 3 to 4 12 to 15 Center Leg Steaks 1 3 to 4 15 to 20 Cubes for Kabobs 1 ¼ pieces 3 to 4 10 to 15 ½ x 4 inches ¼ each 3 to 4 12 Chops, bone in Chops, boneless Tenderloin Kabobs Lean Ground Pork Patties All pork must be cooked to an internal temperature of at least 160°F to reduce the likelihood of Trichinosis. Failing to cook the meat to this temperature could result in personal injury or illness. LAMB Top Round Steaks Medium Well Done 160°F 170°F Lamb Patties All times and recommended temperatures are provided by the USDA, the Beef Industry Council, the National Pork Producer’s Council, and the American Sheep Industry Council. 19 Cooking (cont'd) Roasting Guidelines Tender cuts such as rib and loin cuts are best cooked by dry heat methods, such as roasting. To roast: 1. Heat oven to desired temperature. 2. Place roast directly from refrigerator fat side up in a shallow roasting pan. 3. Insert ovenproof meat thermometer so tip is centered in thickest part of roast. Make sure thermometer does not rest in fat or on bone. 4. Remove roast 5°F below desired degree of finished internal temperature. 5. Transfer roast to carving board and tent loosely with aluminum foil for approximately 15 minutes. Approximate Cooking Time (minutes) Oven Temperature Weight (pounds) 325°F 4 to 6 325°F 3 ½ to 4 30 to 40 325°F 4 to 6 20 to 30 425°F 2 to 3 4 to 6 35 to 45 45 to 60 325°F 4 to 6 6 to 8 26 to 42 23 to 35 350°F 4 to 6 18 to 24 350°F 3 to 5 350°F 2 to 4 450°F ½ to 1 325°F 7 to 8 325°F 3 ½ to 6 35 to 40 375°F 1½–2½ 30 to 35 375°F 2 to 3 25 to 30 325°F 1 ¼ to 1 ¾ 45 to 55 325°F 5 to 7 7 to 9 15 to 20 20 to 25 Capon 325 to 350°F 4 to 8 Cornish Hens, whole 325 to 350°F 1 ¼ to 1 ½ 50 to 60 total Duck, whole 325 to 350°F 18-20 min/lb. 325 to 350°F 20 to 25 min/lb. 325 to 350°F 2 30 min/lb. Meat Cut Recommended Internal Temperature BEEF Boneless Rump Roast Tip Roast Eye Round Roast Tenderloin Roast Rib Roast Very Rare 130°F Rare 140°F Medium Rare 145°F Medium 160°F Well Done 170°F Very Well Done 180°F Rib Eye Roast 25 to 30 PORK Loin Roast, bone-in Rib Roast, boneless Tenderloin All pork must be cooked to an internal temperature of at least 160°F to reduce the likelihood of Trichinosis and other food-borne illnesses. Ham bone-in, cook-before-eating 20 minutes per pound LAMB Shoulder Rib Roast Rib Crown Roast, not stuffed Loin Roast Medium-Rare Medium Well Done 150°F 160°F 170°F Leg, Frenched Style or Half Shank POULTRY (unstuffed) Goose, whole Pheasant, whole To reduce the risk of food-borne illnesses, poultry must be cooked to an internal temperature of 180°F. Quail, whole Turkey 20 to 30 min/lb. 325 to 350°F — 20 minutes total 325°F 8 to 16 3 ½ to 5 ½ hours All times and recommended temperatures are provided by the USDA, the Beef Industry Council, the National Pork Producer’s Council, and the American Sheep Industry Council. 20 Cooking (cont'd) Braising Guidelines Less tender cuts such as those from the round, chuck, brisket and shank require moist cooking. A longer cooking time at lower temperatures with moisture helps soften the meat. 1. Brown meat with a small amount of oil in heavy pan. 2. Pour off excessive drippings, season, if desired. 3. Add small amount of liquid (1/2 to 2 cups) and cover tightly. • Simmer gently over low heat on top of the range or in a 325°F oven, until meat is fork tender. Meat Cut Recommended Internal Temperature Oven Temperature Weight (pounds) OR Thickness Approximate Cooking Time (hours) BEEF Blade Pot Roast 325°F 3 to 5 1 ½ to 2 Arm Pot Roast 325°F 3 to 5 2 to 3 325°F 3 to 5 2 to 3 325°F 2 inches x 2 inches x 4 inches thick 1 ½ to 2 ½ Round Steak 325°F ¾ to 1 inch thick 1 to 1 ½ Flank Steak 325°F 1 ½ to 2 inches thick 1 ½ to 2 ½ 325°F 1 inch thick 1 to 1 ¼ 325°F 3 pounds 1 ½ to 2 325°F 3 pounds 1 to 1 ½ 325°F 1 inch pieces 1 ¼ lbs. 1 ¼ to 1 ½ Chuck Roast (boneless) Short Ribs Meat should be cooked to a temperature of at least 160°F to reduce the likelihood of foodborne illnesses. LAMB Shoulder Chops, Round Bone or Blade Riblets Shanks Meat should be cooked to a temperature of at least 160°F to reduce the likelihood of foodborne illnesses. Stew Cubes All times and recommended temperatures are provided by the USDA, the Beef Industry Council, the National Pork Producer’s Council, and the American Sheep Industry Council. 21 Care and Cleaning Removing Oven Door 1. Make sure oven is cool. 2. Open door fully. 3. Remove screw on each side of lower portion of oven door. 4. Close door to first stop (broiler position), grasp door firmly on each side, and lift upward until door is off hinges. • Do not lift door by handle. Glass can break. • If necessary, push hinges closed once oven door is removed. Use both hands when closing hinges. Hinges snap closed. ! CAUTION To avoid personal injury or property damage, handle oven door with care. • Door is heavy and can be damaged if dropped. • Avoid placing hands in hinge area when door is removed. Hinge can snap closed and pinch hands. • Do not scratch or ship glass or twist door. Glass may break suddenly. • Replace door glass if damaged. • Do not lift door by handle. Cleaning Oven Door Not all areas of the oven are cleaned by the self-clean cycle. The oven door gasket and the area surrounding the gasket will not be cleaned effectively by the self-clean cycle. DO NOT clean the gasket. Do not wet, rub, soak or use any type of cleaning material to clean the oven gasket. Any damage or defects occurring from attempting to clean or remove the gasket are not covered by warranty. To clean the area around the gasket make sure oven is cool to the touch. Using a cloth with a mild soap wipe area needing to be cleaned. Avoid gasket. Gasket should not be removed while cleaning. Do not allow water or cleaning solution to spill or drip onto gasket. Door Gasket Removing Storage Drawer 1. Slide drawer out until it stops. 2. Remove stored items. 3. Grasp drawer sides near back of drawer. 4. Lift up and out. Reverse to reinstall. 22 Care and Cleaning (cont'd) Replacing Oven Light ! WARNING To avoid risk of burns or electrical shock: • disconnect electrical supply to oven before changing light bulb. • before replacing light bulb make sure oven and bulb are cool. • Do not operate oven without bulb and cover in place. 1. Disconnect electrical supply. 2. Remove oven door if desired. 3. While wearing protective gloves, unscrew counter clockwise the light bulb cover located in rear of oven cavity. Then turn light bulb counterclockwise to remove. 4. Replace light bulb with 120-volt, 40-watt appliance bulb. Do not over tighten bulb or cover or they may be difficult to remove later. 5. Replace light bulb cover and oven door before use. 6. Reconnect power supply. ! CAUTION Wear gloves to protect hands from accidental bulb breakage. To keep your smoothtop looking like new, Amana recommends routine cleaning. The following general instructions for routine and tough spot cleaning are based on the performance of Amana recommended products. To order these products, contact the Consumer Affairs department at 800-843-0304. PART GENERAL DIRECTIONS Bake and broil element Do not clean bake element or broil element. Any soil will burn off when element is heated. Bake element is hinged and can be lifted to clean oven bottom. Broiler pan and grid Drain fat, cool pan and grid slightly. (Do not stand soiled pan and grid in oven to cool.) Sprinkle with soap. Fill the pan with warm water. Let pan and grid stand for a few minutes Control knobs Pull off knobs. Wash gently with mild soap and water but do not soak. Dry and return knobs to oven, making sure to match flat area on the knob to the flat area on the shaft. Outside finish Wash all glass with cloth dampened in soapy water. Rinse and polish with a dry cloth. If knobs are removed, do not allow water to run down inside surface while cleaning. Oven racks For heavy soil, place oven racks in large plastic bag with ammonia and water in cup. Seal tightly and allow to stand overnight. Wash and rinse, dry thoroughly. Storage drawer For heavy soil, clean by hand and rinse thoroughly. Remove drawer for ease in cleaning. Be sure drawer is dry before replacing. 23 Care and Cleaning (cont'd) Caring for the smoothtop For routine cleaning, allow top to cool before cleansing. Wash surface with a dampened cloth and smoothtop cleaner conditioner. Use another clean damp paper towel to wipe off the cleaner. Use a dry paper towel, buff the smoothtop to make sure all the cleaner conditioner is removed. The smoothtop cleaner conditioner provides a thin layer of protective polish that prevents scratching. Do not use a harsh cleanser or steel wool pad. For specific problems, see below. PROBLEM CAUSE REMOVAL Brown streaks and specks Cleaning with sponge or cloth containing soiled detergent water Normal cleansing (provided above) Blackened, burnt on spots Spatters or spillovers on a hot cooking area or accidental melting of plastic like a bread bag Clean area with smoothtop cleaner conditioner with clean damp paper towel, nonabrasive nylon pad, or scouring brush. If spot is not removed, on cool cooktop carefully scrape area with a safety scraper held at a 30degree angle. Fine brown gray lines, fine scratches or abrasions Course particles, like salt, become embedded in top if trapped under pan. Using abrasive cleaning materials. Scratches from rough ceramic, glass, or ceramic coated cookware. Fine scratches are not removable but can be minimized by daily use of smoothtop cleaner conditioner. Smearing or streaking Using too much smoothtop cleaner conditioner or using a soiled dish cloth. Follow label instructions carefully. See Routine Cleaning, above. Metal or silver/gray marks Sliding or scraping metal utensils across top. Remove marks before top is used again. If marks are not removed by normal cleaning, use a safety scraper at a 30° angle and cooktop cleaner conditioner to carefully scrape off the mark. Pitting or flaking Boilovers of sugar syrup on a hot smoothtop can cause pitting if not removed immediately. Turn control to LOW setting. Wipe up excess spill with dry cloth. Allow top to cool and carefully scrape area with a safety scraper held at a 30degree angle. Hard water spots Condensation from cooking can cause minerals found in water and acids in food to drip onto smoothtop and cause gray deposits. Spots are often so thin they appear to be in or under smoothtop. Mix smoothtop cleaner conditioner with water and apply thick paste to stained area. Scrub vigorously. If stain is not removed, reapply cleaner and repeat process OR make sure the surface is cool and put a small amount of white vinegar on the spot and let it sit a few minutes. Take a nonabrasive nylon pad and gently rub the spot. Wipe off any excess with a damp paper towel, then dry. 24 Troubleshooting You may save time and money by checking items below before calling for service. List includes common concerns that are not the result of defective workmanship or materials. If your question is not explained below, contact Amana Consumer Affairs Department at 800-843-0304. Topic Possible Cause Solution Appliance not working Power outage Make sure appliance is plugged in. Verify that circuit breaker is not tripped. Replace household fuse but do not change fuse capacity. Oven not working Programming error Shut off power to oven for five minutes by switching off circuit breaker. Reset circuit breaker and try oven again. Clock and timer not working Power outage Make sure appliance is plugged in. Verify that circuit breaker is not tripped. Replace fuse but do not change fuse capacity. Oven light not working Loose bulb Burnt out bulb Check for loose bulb. Tighten. Check for burnt out bulb. Replace if necessary with an appliance bulb. Self Clean not working Door handle not locked Lock oven door handle. Oven door will not unlock Oven is self-cleaning Allow cycle to complete. Oven still hot Will not unlatch until a certain cooler temperature has been reached. Do not force door open – will void warranty. May blow cooler air on latch with hair dryer at cool setting to quicken process. Too much soil, grime left in oven Wipe out and remove excess soil prior to running selfclean cycle. OPERATION Oven not clean after a self clean cycle Normal. Soot remains in oven after cycle Frequent cycling of surface elements or warming zone Normal Element cycles to maintain set temperature and to prevent damage to smoothtop. Locked light displayed Door locked If oven is hot, allow to cool rather than trying to force door latch open. Display flashing Power failure reset clock Press CLOCK. F-(numeric) display Service code Shut off power to oven for one to two minutes by switching off circuit breaker. Reset breaker. If continues, contact service department. Oven smokes the first few times used Normal Minor smoking is normal the first few times the oven is used. Food not baking properly Various causes See Cooking, Common Baking Problems Food not roasting properly Various causes See Cooking, Roasting Food not broiling properly Various causes See Cooking, Broiling Oven temperature too hot or cold Calibrate oven temperature See Using the Oven Control, Oven Temperature Control Adjustment Oven has strong odor Normal Ovens will have a ‘new’ odor. Run a self-clean cycle to remove the odor. Not boiling or cooking fast enough Improperly sized cooking utensils Make sure pans fit heating elements. See Cookware Requirements. COOKING 25 Troubleshooting (cont'd) NOISE Frequent cycling off and on of oven. Normal To maintain a temperature for baking, the oven cycles on and off. Cracking or popping sound Normal Wet cooking utensils or possible spillage. Gritty dirt or rough surface on cooking utensils Use recommended smoothtop cleaner conditioner. APPEARANCE Scratches May be a metal mark. Make sure surface is cool. Use a safety scraper to carefully scrape off the mark. Apply smoothtop cleaner conditioner and gently rub with nonabrasive nylon pad. Shiny scratches Discoloration Dirt Use recommended smoothtop cleaner conditioner to remove dirt from smoothtop. Water spots/marks Make sure surface is cool. Put a small amount of white vinegar on the spot and let sit for a few minutes. Rub with nonabrasive nylon pad. Wipe off any excess with damp paper towel. Hot sugar or plastic melted to surface Items on top of warm cooktop Warm slightly and remove with safety scraper. Pattern fading/wearing off Dirt/film buildup Use recommended cleaner conditioner to remove build up and dirt from smoothtop. 26 27 Amana Warranty Full ONE Year Warranty Amana Appliances will repair or replace, including related labor and travel, any part (f.o.b. Amana Iowa) which proves defective as to workmanship or materials. Limited Warranty After one year from the date of original retail purchase, Amana will provide a free part, as listed below, to replace any part that fails due to a defect in materials or workmanship. The owner will be responsible for paying all other costs including labor, mileage, and transportation. Second Year Amana will provide replacement part, part only (f.o.b. Amana Iowa), which proves defective as to workmanship or materials. Third through Fifth Year Amana will provide replacement glass/ceramic cooktop, part only (f.o.b. Amana Iowa) which proves defective as to workmanship or materials. Amana will provide replacement electric surface elements or gas surface burners, part only (f.o.b. Amana Iowa) which prove defective as to workmanship or materials. What is not covered by these warranties • • • • • • • • Replacement of household fuses, resetting of circuit breakers, or correction to household wiring or plumbing. Normal product maintenance and cleaning, including light bulbs. Products with original serial numbers removed, altered, or not readily determined. Products purchased for commercial, industrial, rental, or leased use. Products located outside of the United States or Canada. Premium service charges, if the servicer is requested to perform service in addition to normal service or outside normal service hours or area. Adjustments after the first year. Repairs resulting from the following: • Improper installation, exhaust system, or maintenance. • Any modification, alteration, or adjustment not authorized by Amana. • Accident, misuse, abuse, fire, flood, or acts of nature. • Connections to improper electrical current, voltage supply, or gas supply. • Use of improper pans, containers, or accessories that cause damage to the product. To Receive Warranty Service Service must be performed by an authorized Amana service representative. To schedule service, contact the Amana dealer where you purchased your appliance or contact Amana Appliances Factory Service. Amana Appliances Factory Service 1-800-628-5782 inside USA For more information, Amana Appliances Consumer Services Amana Appliances 2800 220th Trail Amana, Iowa 52204 1-800-843-0304 inside USA (319) 622-5511 worldwide When contacting Amana Appliances please include the following information: • • • • • Your name, address, and telephone number. Model number and serial number of your appliance (found on upper left hand corner of storage drawer opening). The name and address of your dealer and the date of purchase. A clear description of the problem. Proof of purchase (sales receipt). IN NO EVENT SHALL AMANA BE LIABLE FOR INCIDENTAL OR CONSEQUENTIAL DAMAGES. This warranty gives you specific legal rights, and you may have others which vary from state to state. For example, some states do not allow the exclusion or limitation of incidental or consequential damages, so this exclusion may not apply to you. Amana Appliances Online • http://www.amana.com Part No.36-31985701-0 Printed in U.S.A.02/00 2000 Amana Appliances Amana, Iowa 52204