1
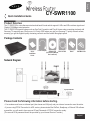
English
Quick Installation Guide
CY-SWR1100
Product Overview
The CY-SWR1100 is a simultaneous wireless dual band N router which supports 2.4Ghz and 5Ghz wireless signals and
Gigabit (1000Mbps) wired networks.
The CY-SWR1100's special features such as One Foot Connection and Plug & Access make connecting wirelessly with
Samsung TV especially easy. What's more, it's Priority QOS feature can give your Samsung TV priority network access,
ensuring you get the highest quality streaming contents and the fastest throughput speed.
Package Contents
Quick
Installation
Guide
Power Adapter
Ethernet Cable
Software CD
(Quick Setup Wizard,
User's manual)
Stand
Wall Mount kit
Network Diagram
High Speed Modem
Please check the following information before starting.
• Your modem must have an ethernet port (also known as LAN port) and your internet connection must be active.
• If you are using PPPoE Connection for xDSL service, please uninstall the WinPoet, Broadjump, or Ethernet 300 software.
meanwhile, you will need to have account ID and Password of PPPoE connection ready.
(The account ID & password should be provided by your Internet Service Provider.)
English-1
English
CY-SWR1100
How to connect the CY-SWR1100 to your modem and computer.
Follow the directions below to connect the CY-SWR1100 to your modem and computer.
Windows OS users, please run QSW (Quick Setup Wizard) on the provided CD which will guide you through the CY-SWR1100
setup. If your computer uses Linux or a Mac OS, please follow the steps on the following page to set up the router manually.
1
High Speed
Modem
2
Unplug your ethernet cable from the modem.
Turn off your modem.
4
3
Connect this ethernet cable to one of the
CY-SWR1100's four ethernet ports.
5
①
Connect the blue ethernet cable provided in this
package from the device's internet port to the
modem's ethernet port.
6
②
① Turn on your modem and wait until the
boot-process is completed. (about 30 seconds)
② Turn on the CY-SWR1100 and wait until the
boot-process is completed. (about 50 seconds)
English-2
Try to access to the internet. If your computer has no
access to the internet, open a web browser on the
computer that is connected to the CY-SWR1100 and
follow the steps on next page.
How to set up CY-SWR1100 manually.
If you are using the computer with Linux or MAC OS, you need to set up the CY-SWR1100 manually.
Step 1
Open the internet browser on your computer, enter the CY-SWR1100's IP address (192.168.0.1) into the address field,
and then press Enter or click 'Go'.
Step 2
When the login window appears, enter "admin" in User Name field, leave the Password field blank, and then click “Login”.
Step 3
Please refer to the manual on CD for details.
Router Placement
To Get the best Wireless coverage, place your router in an open area away from your computer, monitor, and speaker.
Since each House is different, you may need to try rotating your router to get the best coverage.
English-3
English
CY-SWR1100
English
CY-SWR1100
Special features of CY-SWR1100
One Foot Connection
The One Foot Connection function lets you connect your One Foot Connection compliant
Samsung TV/AV/Touch Control automatically to the Samsung CY-SWR1100 wireless router.
* This function is only supported by some of Samsung TV/AV/Touch Control products made in 2011
and after. Each product has a different way of using One Foot Connection. For more information,
see the manual for each product.
* When WPS is disabled, OFC function will not work.
Network Setting
Network Setting
Select a network connection type.
Wireless network and Internet connection completed.
Wired
MAC Address 00:12:fb:2b:56:4d
Wireless (general)
WPS(PBC)
One Foot Connection
IP Address
Previous
Connect to wireless network
Router supports One Foot
Connection. Select this
192.168.0.100
Subnet Mask 255.255.255.0
Next
automatically if your Wireless
SWR1100_media
Gateway
192.168.0.1
DNS Server
192.168.0.1
Cancel
connection type after placing
the Wireless Router within 10
inches (25cm) of your TV.
Retry
IP Setting
Internet is connected successfully.
If you have a problem with using Internet Service, contact your Internet service
OK
provider.
To connect a Samsung TV using One Foot Connection, follow these steps:
1. Turn on the Samsung wireless router and the TV.
2. Go to Network Settings screen.
(Menu → Network → Network Settings → ENTER.)
3. Select One Foot Connection, and press ENTER,
then press ENTER again.
4. Place the wireless router in parallel with your TV set, and no
farther away than 25cm(about 9 3/4 inches)
*Note : If One Foot Connection does not connect your TV to
your router, a pop-up window appears on the screen notifying
you of the failure. If you want to try using One Foot Connection
again, reset the wireless router, and then try again from Step 1.
You can also choose one of the other connection setup methods.
5. The network connection screen appears, and network setup is
complete.
6. Move the wireless router to a desired location.
*Note : If the wireless router's settings change or you install a new
wireless router, you must perform the One Foot Connection
procedure again, beginning from Step 1.
English-4
English
CY-SWR1100
Plug & Access
The Plug & Access function lets you easily connect your Plug & Access compliant Samsung TV to
your Samsung wireless router by using a USB memory stick to transfer the setup information from
the router to the TV.
* Plug & Access is only supported by some Samsung TVs made in 2011 and after. For more
information, see the manual of the individual TV.
*USB flash memory Requirements
File system - FAT16 or FAT32
Free space - 2KB (Minimum)
To connect a Samsung TV using Plug & Access, follow these steps:
1. Turn on the Samsung wireless router and your TV.
2. Insert a USB memory stick into the USB port in your
Samsung wireless router. Check the router’ s LED
to make sure it is on
’ (Blinking → on).
3. About a minute later, take the USB memory stick out of
the router, and then insert it into a USB port on your
Samsung TV. Samsung TV downloads the connection
information from the USB memory stick.
4. Wait until the connection is automatically established.
*Note : If Plug & Access does not connect your TV to your
wireless router, a pop-up window appears on the screen
notifying you of the failure.
If you want to try using Plug & Access again, reset the AP,
disconnect the Samsung Wireless LAN adapter and then try
again from Step 1. You can also choose one of the other
connection setup methods.
5. The network connection screen appears, and the network setup
is complete.
6. Place the wireless router in a desired location.
*Notes:
• If the wireless router’ s settings change or you install a new
wireless router, you must perform the Plug & Access procedure
again, beginning from Step 1.
• After the connection data transfer has been completed,
the WPS light on the router glows continuously.
English-5
English
CY-SWR1100
Priority QoS
Samsung wireless routers are optimized to stream HD AV to Samsung TV / BDP.
* Priority QoS is only supported by some Samsung TVs and Blu-ray players made in 2011 and after.
For more information, see the manual of the individual unit.
The Priority QoS function is unique to the CY-SWR1100.
You can connect a Samsung wireless router to many devices, such as laptops, mobile phones, BD players etc.
However, when you connect a Samsung TV or Blu-ray player to a Samsung wireless router, the Samsung wireless router
gives the Samsung TV or player a priority connection. This ensures your TV or player gets the fastest throughput speed
and displays the highest quality streaming contents.
*Note : To activate Priority QoS, please kindly refer to user manual for details.
Technical Service
Please
call the
numbers
listed below for technical assistance.
Australia
& New
Zealand
Australia
1300 766 870
New Zealand
0800 035 465
Copyright ©2010 All rights reserved. Samsung and the Samsung logo are registered trademarks of Samsung Corporation or its subsidiaries.
trademarks are the property of their respective owners. Product specifications, size and shape are subject to change without
notice, and actual product appearance may differ from that depicted on the packaging . Visit samsung.com for more details.
English-6
SAFETY INSTRUCTIONS
Please adhere to the following safety guidelines to help ensure your own personal safety and protect your system from potential
damage. Any acts taken that are inconsistent with ordinary use of the product, including improper testing, etc., and those not
expressly approved by Samsung may result in the loss of product warranty.
Unless expressly approved by an authorized representative of Samsung in writing, you may not and may not permit others to:
ㆍDisassemble or reverse engineer the device or attempt to derive source code (underlying ideas, algorithms, or structure)
from the device or from any other information provided by Samsung, except to the extent that this restriction is expressly
prohibited by local law.
ㆍModify or alter the device.
ㆍRemove from the device any product identification or other notices, including copyright notices and patent markings, if any.
To reduce the risk of bodily injury, electrical shock, fire, and damage to the device and other equipment, observe the following
precautions:
Power Sources
ㆍObserve and follow service markings.
ㆍDo not push any objects into the openings of your device unless consistent with the authorized operation of the device.
Doing so can cause a fire or an electrical shock by shorting out interior components.
ㆍThe powering of this device must adhere to the power specifications indicated for this product.
ㆍDo not overload wall outlets and/or extension cords as this will increase the risk of fire or electrical shock.
ㆍDo not rest anything on the power cord or on the device (unless the device is made and expressly approved as suitable for
stacking).
ㆍPosition system cables and power cables carefully; route cables so that they cannot be stepped on or tripped over.
Be sure that nothing rests on any cables.
ㆍOperate the device only from the type of external power source indicated on the electrical ratings label.
ㆍTo help avoid damaging your device, be sure the voltage selection switch (if provided) on the power supply is set to match
the power available at your location.
ㆍAlso be sure that attached devices are electrically rated to operate with the power available in your location.
ㆍUse only approved power cable(s). If you have not been provided a power cable for your device or for any AC-powered
option intended for your device, purchase a power cable that is approved for use in your country and is suitable for use with
your device. The power cable must be rated for the device and for the voltage and current marked on the device’ s electrical
ratings label. The voltage and current rating of the cable should be greater than the ratings marked on the device.
ㆍTo help prevent an electrical shock, plug the device and peripheral power cables into properly grounded electrical outlets.
These cables are equipped with three-prong plugs to help ensure proper grounding. Do not use adapter plugs or remove
the grounding prong from a cable. If you must use an extension cable, use a 3-wire cable with properly grounded plugs.
ㆍObserve extension cable and power strip ratings. Ensure that the total ampere rating of all products plugged into the
extension cable or power strip does not exceed 80 percent of the ampere ratings limit for the extension cable or power strip.
ㆍTo help protect your device from sudden, transient increases and decreases in electrical power, use a surge suppressor,
line conditioner, or uninterruptible power supply (UPS).
English-7
English
CY-SWR1100
ㆍDo not modify power cables or plugs. Consult a licensed electrician or your power company for site modifications.
Always follow your local/national wiring rules.
ㆍWhen connecting or disconnecting power to hot-pluggable power supplies, if offered with your device, observe the following
guidelines:
ㆍInstall the power supply before connecting the power cable to the power supply.
ㆍUnplug the power cable before removing the power supply.
ㆍIf the system has multiple sources of power, disconnect power from the device by unplugging all power cables from the
power supplies.
Servicing/Disassembling
ㆍDo not service any product except as expressly set forth in your system documentation.
ㆍOpening or removing covers that are marked with the triangular symbol with a lightning bolt may expose you to an electrical
shock. Only a trained service technician should service components inside these compartments.
ㆍTo reduce the risk of electrical shock, never disassemble this device. None of its internal parts are user-replaceable; therefore,
there is no reason to access the interior.
ㆍDo not spill food or liquids on your system components, and never operate the device in a wet environment. If the device
gets wet, see the appropriate section in your troubleshooting guide or contact your trained service provider.
ㆍUse the device only with approved equipment.
ㆍMove products with care; ensure that all casters and/or stabilizers are firmly connected to the system. Avoid sudden stops
and uneven surfaces.
Environment
ㆍDo not use this device near water (e.g. near a bathtub, sink, laundry tub, fish tank, in a wet basement or near a swimming pool).
ㆍDo not use this device in areas with high humidity.
ㆍThis device must not be subjected to water or condensation.
ㆍKeep your device away from radiators and heat sources. Also, do not block cooling vents.
Cleaning
ㆍAlways unplug the power before cleaning this device.
ㆍDo not use liquid or aerosol cleaners of any kind. Use only compressed air that is recommended for electronic devices.
ㆍUse a dry cloth for cleaning.
PROTECTING AGAINST ELECTROSTATIC DISCHARGE
Static electricity can harm delicate components inside your system. To prevent static damage, discharge static electricity from
your body before you touch any of the electronic components, such as the microprocessor. You can do so by periodically touching
an unpainted metal surface on the chassis.
You can also take the following steps to help prevent damage from electrostatic discharge (ESD):
1. When unpacking a static-sensitive component from its shipping carton, do not remove the component from the antistatic
packing material until you are ready to install the component in your system. Just before unwrapping the antistatic packaging,
be sure to discharge static electricity from your body.
2. When transporting a sensitive component, first place it in an antistatic container or packaging.
3. Handle all sensitive components in a static-safe area. If possible, use antistatic floor pads, workbench pads, and an antistatic
grounding strap.
English-8
English
CY-SWR1100