1
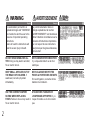
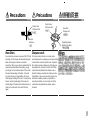
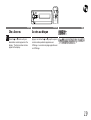
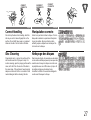
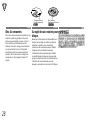
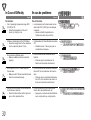
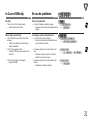
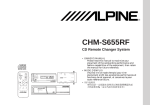
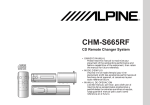
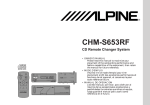
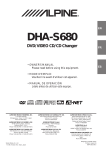
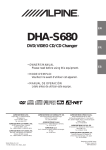
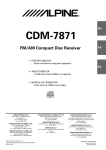
R
CHM-S655RF
CD Remote Changer System
FREQ.
REMOTE
CONTROL
UNIT
LEVEL
1
DISC SEL.
2
PWR
ANTENNA
MIN
RUE-4178
TRACK
DN
REPEAT ALL
MIX
FREQ
TO CAR
TO RADIO
MAX
MHz
UP
ALPINE ELECTRONICS, INC.
CD CHANGER SYSTEM CHM-S655RF
AUTO LIMITTER
DISP
TITLE
PLAY
PAUSE
CD CHANGER SYSTEM
CHM-S655RF
POWER
TO CHANGER
DN
TO REMOTE DISPLAY
ACCESSORY or IGNITION (RED)
BATTERY (YELLOW)
GROUND (BLACK)
• OWNER'S MANUAL
Please read this manual to maximize your
enjoyment of the outstanding performance and
feature capabilities of the equipment, then retain
the manual for future reference.
• MODE D'EMPLOI
Veuillez lire ce mode d'emploi pour tirer
pleinement profit des excellentes performances et
fonctions de cet appareil, et conservez-le pour
toute référence future.
•
UP
M.S.CD
M.I.X.
REPEAT
SCAN
REGULATED 1bit DAC
HIGH SPEED DISC CHANGE
DIGITAL SERVO
SILICON-OIL DAMPERS
COMPACT DISC CHANGER
CHM-S620
1
WARNING
AVERTISSEMENT
English
2
Français
The exclamation point within an
equilateral triangle and "WARNING"
are intended to alert the user to the
presence of important operating
instructions.
Failure to heed the instructions will
result in severe injury or death.
Le point d'exclamation dans un
triangle équilatéral et la mention
"AVERTISSEMENT" sont destinés à
attirer l'attention de l'utilisateur sur la
présence d'instructions importantes.
Le non respect de ces instructions
peut provoquer de graves blessures,
voire la mort.
DO NOT DISASSEMBLE OR ALTER. Doing so may lead to accident,
fire or electric shock.
NE PAS DEMONTER NI MODIFIER.
Il y a risque d'accident ou de choc
électrique.
KEEP SMALL ARTICLES OUT OF
THE REACH OF CHILDREN. If
swallowed, consult a physician
immediately.
NE PAS LAISSER DE PETITES
PIECES A PORTEE DES ENFANTS.
En cas d'ingestion, consultez immédiatement un médecin.
USE THE CORRECT AMPERE
RATING WHEN REPLACING
FUSES. Failure to do so may result in
fire or electric shock.
UTILISEZ DES FUSIBLES DE
L'AMPERAGE APPROPRIE. Il y a
risque d'incendie ou de choc électrique.
WARNING
AVERTISSEMENT
English
Français
HALT USE IMMEDIATELY IF A
PROBLEM APPEARS. When problems occur such as a lack of sound or
video, foreign objects inside the unit,
smoke coming out, or noxious odors,
stop use immediately and contact the
dealer where you bought the equipment. Failure to do so may result in
an accident or injury.
ARRETEZ-VOUS IMMEDIATEMENT
EN CAS DE PROBLEME. Si un
problème se présente, absence du
son ou de l'image, objets tombés
dans l'appareil, dégagement de fumée
ou d'odeurs nocives, arrêtez immédiatement l'appareil et contactez le
revendeur où vous avez acheté
l'appareil. Il y a risque d'accident et de
blessure.
DO NOT OPERATE THE EQUIPMENT OR LOOK AT THE SCREEN
WHILE DRIVING THE VEHICLE.
Operating the equipment may distract
the driver from looking ahead of the
vehicle and cause accident. Always
stop the vehicle in a safe location
before operating this equipment.
NE PAS FAIRE DE REGLAGES OU
REGARDER L'ECRAN PENDANT
LA CONDUITE. Votre attention sera
détournée de la route et vous risquez
un accident. Avant de faire fonctionner l'appareil, arrêtez-vous et garezvous dans un lieu sûr.
DO NOT RAISE THE VOLUME
EXCESSIVELY. Keep the volume at a
level where you can still hear outside
noises while driving. Driving while
unable to hear outside noises could
be the cause of accident.
NE PAS TROP AUGMENTER LE
VOLUME. Réglez le volume de
manière à pouvoir entendre les bruits
extérieurs pendant la conduite. Si
vous ne pouvez pas entendre les
bruits extérieurs quand vous conduisez, vous risquez un accident.
3
WARNING
AVERTISSEMENT
English
4
Français
DO NOT USE THIS EQUIPMENT
FOR PURPOSES OTHER THAN
STATED FOR THE VEHICLE. Failure
to do so may result in electric shock or
injury.
NE PAS UTILISER L'APPAREIL
DANS D'AUTRES BUTS QUE CEUX
ENONCES. Il y a risque de choc
électrique ou de blessure.
DO NOT PLACE FOREIGN OBJECTS IN INSERTION SLOTS OR
GAPS. Do not insert hands, fingers or
foreign objects in the disc or cassette
insertion slots, or in gaps during
monitor startup/storage. Doing so may
result in personal injury or damage to
the equipment.
NE PAS INSERER D'OBJETS
ETRANGERS DANS LES FENTES
D'INSERTION OU ORIFICES. Ne pas
mettre les mains, les doigts ou des
objets étrangers dans les fentes
d'insertion de disque ou de cassette,
ou dans les orifices pendant la mise
en marche/rangement de l'appareil.
Vous pourriez vous blesser ou
endommager l'appareil.
DO NOT MIX NEW BATTERIES
WITH OLD BATTERIES. INSERT
WITH THE CORRECT BATTERY
POLARITY. When inserting the
batteries, be sure to observe proper
polarity (+ and –) as instructed.
Rupture or chemical leakage from the
battery may cause fire or personal
injury.
NE PAS UTILISER EN MEME TEMPS
DES PILES USEES ET DES PILES
NEUVES. RESPECTEZ AUSSI LA
POLARITE DES PILES. Quand vous
insérez les piles, veillez à respecter la
polarité (+) et (–), comme indiqué. Une
rupture ou une fuite des piles peuvent
causer un incendie ou des blessures
corporelles.
English
Contents
Page
Precautions ............................................................... 8
Page
Remote Control ........................................................ 26
Preparation .............................................................. 11
Basic Operation
Initial System Setup ............................................. 14
Turning Power On and Off .................................. 15
Modulator Frequency Setting .............................. 16
Disc Care ..................................................................27
In Case of Difficulty ................................................. 29
Specifications ........................................................... 34
Index ..........................................................................37
CD Operation
Controlling CD Shuttle ........................................ 17
Pause .................................................................. 18
Disc Access ......................................................... 19
Music Sensor (Skip) ............................................ 20
Fast Forward and Fast Backward ....................... 21
M.I.X. (Random Play) .......................................... 22
Repeat Play on Single Track or Entire Disc ........ 23
Disc Scan ............................................................ 24
To Deactivate the CD Shuttle and
Listen to the Radio .............................................. 25
5
Français
Contenu
Page
Précautions .............................................................. 8
Page
Télécommande ....................................................... 26
Préparation ............................................................. 11
Fonctionnement de base
Mise en marche initiale du système ................... 14
Mise sous et hors tension ................................... 15
Réglage de la fréquence du modulateur ............ 16
Fonctionnement du lecteur de CD
Contrôle d'un changeur CD ................................
Pause .................................................................
Accès au disque .................................................
Recherche musicale (saut) .................................
Avance rapide et retour rapide ...........................
M.I.X. (Lecture aléatoire) ....................................
Reproduction répétée d'un morceau
ou d'un disque entier ..........................................
Balayage de disque ............................................
Pour désactiver le CD Shuttle et
écouter la radio ...................................................
6
17
18
19
20
21
22
23
24
25
Soin des disques ...................................................
En cas de problème ...............................................
Spécifications .........................................................
Index ........................................................................
27
29
35
38
8
....................................................................... 26
11
14
15
16
27
29
34
39
17
18
19
20
21
22
23
24
25
7
Precautions
Précautions
English
8
Français
Temperature
Température
Be sure the temperature inside the vehicle is
between +60°C (+140°F) and –10°C (+14°F)
before turning your unit on.
Assurez-vous que la température interne du
véhicule est comprise entre +60°C (+140°F) et
–10°C (+14°F) avant de mettre l'appareil sous
tension.
Damaged Disc
Disque endommagé
Do not attempt to play cracked, warped, or
damaged discs. Playing a bad disc could
severely damage the playback mechanism.
Ne pas reproduire un disque craquelé,
déformé ou endommagé sous peine de
détériorer sévèrement le mécanisme de
lecture.
Maintenance
Entretien
If you have problems, do not attempt to repair
the unit yourself. Return it to your Alpine dealer
or the nearest Alpine Service Station for
servicing.
En cas de problème, n’essayez pas de réparer
la panne vous-même. Rapportez l’appareil à
votre revendeur Alpine, ou à défaut, apportezle dans un centre de réparation AIpine.
Irregular Shaped Discs
Disques à forme irrégulière
Make sure the discs you use in this unit do not
have any irregularities. The outer and inner
edges should be round and smooth. Use of
irregularly shaped discs may cause damage to
the mechanism.
Veillez à n'utiliser que des disques sans aucune
irrégularité avec cet appareil. Les bords extérieur et
intérieur doivent être ronds et unis. L'utilisation de
disques à forme irrégulière pourrait endommager le
mécanisme.
Precautions
Précautions
English
Français
Center Hole
Orifice central
Center Hole
Orifice central
Bumps
Résidus
New Discs
Disques neufs
As a protective measure to prevent the CD from
jamming, the CD player will automatically eject
discs with irregular surfaces or inserted
incorrectly. When a new disc is inserted into the
player and ejected after initial loading, using
your finger, feel around the inside of the centre
hole and outside edge of the disc. If you feel
any small bumps or irregularities, this could
inhibit proper loading of the disc. To remove the
bumps, rub the inside edge of the hole and
outside edge of the disc with a ball-point pen or
other such instrument, then insert the disc
again.
Par mesure de protection, le lecteur éjecte
automatiquement un disque qui n'est pas inséré
correctement ou dont la surface est irrégulière.
Si le lecteur éjecte un disque neuf chargé pour
la première fois, toucher le contour de l’orifice
central et de la périphérie du disque avec le
doigt. Si le disque contient des résidus ou des
irrégularités, il ne pourra pas être chargé. Pour
enlever les résidus, passer un stylo-bille ou
autre objet similaire sur le contour de l’orifice
central et de la périphérie du disque, puis le
réinsérer.
New Disc
Disque neuf
Outside (Bumps)
Périférie (résidus)
9
Precautions
Précautions
English
Français
Installation Location
Emplacement de montage
Make sure the CHM-S655RF will not be
installed in a location subjected to:
N'installez pas le CHM-S655RF dans un endroit
exposé:
•
•
•
•
•
•
•
•
Direct sun and heat
High humidity and water
Excessive dust
Excessive vibrations
Only compact discs containing the mark shown
can be used.
10
directement au soleil ou à la chaleur
à l'humidité et à l'eau
à la poussière
à des vibrations excessives
Utilisez seulement les disques compacts
identifiés comme ci-dessous.
•
•
•
•
Préparation
Preparation
English
CD Magazine
Magasin CD
Français
89
-67
2345
C1
AB
ACT
COMP
L AUDIO
INS
ERT
DIGITA
IN
THI
S DIR
ECT
ION
DA
AN
AK REHI
ND
A
NA RAHO PA 0 AA
HA PARA789
PA 456
123
CO
MP
AC
T
DIG
ITA
L AU
DIO
INS
ERT
THE
EAC
LAB
H
COM
EL
SUR
PAC
FAC
T
E FACDISC
ING WITH
UP
Levers
Leviers
1
2
CD Tray
Plateau de CD
Preparation for Playback
Préparation pour la lecture
Before operating the unit, follow the
procedure below for loading the CD
magazine.
Avant d'utiliser cet appareil, faites ce qui suit
pour charger le magasin de disques compacts.
To remove the CD tray from the CD
magazine, pull the lever with your finger.
Pour retirer le plateau de CD du magasin de
disques compacts, tirez le levier avec votre
doigt.
Insert one disc into each CD tray of the
magazine (up to 6 discs). Make sure the
label side of the disc is facing up.
Note: Hold the disc so you will not leave
fingerprints on the disc surface
(refer to "Disc Care" section).
When removing the CD tray from
the CD magazine, hold the tray
securely not to drop the disc.
Mettre un CD dans chaque plateau de CD du
magasin (jusqu'à six disques). Assurez-vous
que l'étiquette est tournée vers le haut.
Remarque: Tenez le disque de manière à ne
pas laisser d'empreintes sur sa
surface (reportez-vous à la section
"Entretien des disques").
Lorsque vous retirez le plateau CD
du magasin de disques compacts,
tenez-le fermement pour ne pas
laisser tomber le disque.
➡ next page
YO
IPI
PIP
OYO
IPI
APO
APO PIP
HYA
N
DO
1. APO
APO PIP
OYO
IPI
2. APO
APO
PIP IPI KER
3. APO
4. APO
APO PIP IPI
5. APO
APO PIP
6. APO
APO
7. APO
APO
8. APO
9. APO
➡ page suivante
➡
11
Preparation
Préparation
English
Français
INS
ERT
IN
THIS
DIR
ECT
ION
CO
MP
AC
T
DIG
ITA
L AU
DIO
INSE
THE RT EAC
LAB
H
COM
EL
SUR
PAC
FAC
T
E FACDISC
INS
ERT
IN
THIS
DIR
ECT
ION
ING WITH
UP
CO
MP
89
-67
2345
C1
AB
AC
T
DIG
ITA
L AU
DIO
ACT
COMP
L AUDIO
DIGITA
INSE
THE RT EAC
LAB
H
COM
EL
SUR
PAC
FAC
T
E FACDISC
ING WITH
UP
A
ND
AKA REHI
ND
NA RAHOAPA 0 AAA
HA AR 789
PAP 456
123
YO
IPI
PIP
OYO
IPI
APO
YA
APO PIP
N
DOH
1. APO
APO PIP
OYO
IPI
2. APO
APO
PIP IPI KER
3. APO
4. APO
APO PIP IPI
5. APO
APO PIP
6. APO
APO
7. APO
APO
8. APO
9. APO
INSE
RT
IN
THIS
DIRE
CTIO
N
DIGI
TAL
INSER
THE
T
LABEEACH
L SURF
COMP
ACE ACT
DISC
FACIN
WITH
G UP
COM
PAC
T
AUD
IO
CD Tray
Plateau de CD
3
4
12
With a disc loaded onto the tray, reinsert
the tray all the way into the CD magazine.
Make sure that all 6 CD trays are
reinserted back into the magazine
whether or not they contain a disc.
Before inserting the magazine into the
CHM-S655RF, make sure all the CD
trays are straight. If any of the trays are
crooked or improperly installed, changer
malfunction will result.
Avec un disque chargé dans le plateau,
réinsérez, à fond, celui-ci dans le magasin de
disques compacts.
Assurez-vous de réinsérer dans le magasin les
6 plateaux de CD avec ou sans disques
chargés.
Avant d'insérer le magasin dans le CHMS655RF, assurez-vous que tous les plateaux
CD sont plats. Si l'un des plateaux est courbé
ou incorrectement installé, le changeur peut
avoir des problèmes de fonctionnement.
Insert the CD magazine all the way into
the Shuttle with the narrow side facing
the unit as shown. After inserting the CD
magazine, slide the Shuttle door to the
left to close.
Insérez le magasin de disques compacts à fond
dans le changeur (Shuttle), la face étroite
tournée vers l'appareil comme montré. Après
l'insertion du magasin de disques compacts,
faire glisser la porte du changeur vers la
gauche pour fermer.
Preparation
Préparation
English
Français
Eject Button
Touche d'éjection
INSER
T IN
THIS
DIRE
CTIO
N
Sliding Door Knob
Protubérance de la porte coulissante
1
COM
DIGI
TAL
INSER
THE
T EACH
LABEL
PAC
T
AUD
IO
COMP
SURF
ACE ACT
DISC
FACIN
WITH
G UP
To eject
Pour l'éjection
Slide the Shuttle door to the right to open.
Press the Eject button to eject the CD
magazine.
Pour ouvrir, faire glisser la porte du changeur
vers la droite. Appuyez sur la touche
d'éjection pour éjecter le magasin de disques
compacts.
13
English
1
14
Français
Initial System Setup
Mise en marche initiale du
système
Immediately after installing or applying
power to the unit, it should be initialized.
Using a sharp pencil or other pointed
object, press the Reset button.
Immédiatement après l'installation ou après la
mise sous tension de l'unité, celle-ci doit être
initialisée. Appuyer sur la touche de remise à
zéro avec un porte-mines ou autre objet pointu.
English
1
Français
Turning Power On and
Off
Mise sous et hors tension
Press the POWER button to turn on the
unit.
Appuyez sur la touche POWER pour mettre
l'appareil sous tension.
Note: The Remote Display Unit can be
turned on by pressing any button.
Remarque: Vous pouvez mettre l'unité
d'affichage de télécommande sous
tension en appuyant sur n'importe
quelle touche.
Press the POWER button again to turn
off the unit.
Appuyer de nouveau sur la touche POWER
pour mettre l'appareil hors tension.
Notes:
Remarques:
•
• When turning the unit On or Off with
• Si vous mettez l'unité sous ou hors tension
the POWER button, be sure to lower
avec la touche POWER, assurez-vous de
the volume level of the factorybaisser le niveau de volume de la radio
installed radio. This will prevent any
installée à l'usine. Ceci évitera que les bruits •
electrical pop noises from entering the
de crachement électrique entrent dans le
system.
système.
• Once you are sure all connections are • Après la vérification des connexions, vous
proper, you may turn the unit on.
pouvez mettre en marche l'unité.
15
English
1
2
3
4
16
Français
Modulator Frequency
Setting
Réglage de la fréquence
du modulateur
Press the POWER button to turn on the
unit.
Appuyer sur la touche POWER pour allumer
l'unité.
Press and hold the POWER button (for at Appuyer sur la touche POWER et la maintenir
enfoncée (pendant au moins 2 secondes).
least 2 seconds).
Use the UP and DN buttons to select the
desired frequency. Make the selection
while the Frequency mode is displayed.
The Frequency is varied by 200 kHz (0.2
MHz) steps from 87.7 to 89.9 MHz.
Pour sélectionner la fréquence désirée utilisez
les touches UP et DN. Effectuez la sélection
pendant l'affichage du mode de fréquence. La
fréquence varie par pas de 200 kHz (0,2 MHz)
de 87,7 à 89,9 MHz.
Press the POWER button.
Appuyer sur la touche POWER.
Notes:
• Select a frequency that is not used
by a strong, local FM station. This
will prevent interference while
listening to CD.
• To listen to an FM broadcast, turn
down the volume of the radio then
turn power off to the CHM-S655RF.
Tune the radio to your desired station
and adjust the volume to your
preference.
Remarques:
• Choisir une fréquence non utilisée par
•
une station FM locale puissante. Ceci
évitera des interférences lors de l'écoute
d'un CD.
• Pour écouter des émissions en FM, baisser •
le volume de la radio, puis mettre le CHMS655RF hors tension. Syntoniser la station
désirée et régler le volume selon vos goûts.
English
1
2
Français
Controlling CD Shuttle
Contrôle d'un changeur
CD
Turn power off from the Remote Display
or Wireless Remote Control. Insert the
magazine into the CD Shuttle.
Mettre hors tension avec l'affichage de
télécommande ou la télécommande sans fil.
Insérer le magasin dans le CD Shuttle.
Note: Turn on the radio and lower the
volume level.
Remarque: Activer la radio et baisser le niveau
de volume.
Press the POWER button to turn on the
unit.
Select the FM band.
Tune to the same frequency you selected
on the Modulator Unit and adjust for the
desired volume level. The display shows
the disc number and track number.
Appuyer sur la touche POWER pour mettre
l'unité sous tension.
Sélectionner la gamme FM.
Syntoniser la même fréquence sélectionnée
sur l'unité du modulateur et régler au niveau
de volume désiré. L'affichage indique le
numéro de disque et le numéro de la plage.
Note: After the last track on the last disc Remarque: Lorsque la dernière plage sur le
is played, the optical pickup
dernier disque a été lue, la tête
returns to disc 1. Playback will
optique de lecture revient au
continue from the beginning of disc
disque 1. La lecture continue à
1 unless the REPEAT function has
partir du début du disque 1 à
been activated.
moins que la fonction REPEAT ait
été activée.
17
English
1
18
Français
Pause
Pause
Press the PLAY/PAUSE button to
temporarily stop playback.
Appuyer sur la touche PLAY/PAUSE pour
arrêter temporairement la lecture.
To resume playback, press the PLAY/
PAUSE button again.
Pour reprendre la lecture, appuyer sur la touche
PLAY/PAUSE à nouveau.
English
1
Français
Disc Access
Accès au disque
Press the 8 or 9 button until your
desired disc number appears in the
display. The track number will also
appear in the display.
Appuyer sur la touche 8 ou 9 jusqu'à ce que le
numéro du disque désiré apparaisse sur
l'affichage. Le numéro de plage apparaît aussi
sur l'affichage.
19
English
Music Sensor (Skip)
With this feature, you can get to the
beginning of the music track of your
choice simply and quickly. It is
functional in the play or pause mode.
1
c
Momentarily press the DN button once
to return to the beginning of the current
track. If you wish to access a track further
back, repeatedly press until you reach
the desired track.
f
Press the UP
button once to advance to
the beginning of the next track. If you
wish to access a track further ahead,
press repeatedly until the desired track is
reached.
20
Français
Recherche musicale
(saut)
Avec cette fonction, il est possible de venir sur
le début de la plage musicale sélectionnée de
façon simple et rapide. La recherche musicale
est fonctionnelle en mode de lecture ou de
pause.
c
c
Appuyer une fois, momentanément, sur la
touche
DN pour revenir au début de la plage
en cours de lecture. Pour localiser les plages
précédentes, appuyer de façon répétée jusqu'à
ce que la plage souhaitée soit atteinte.
f
Appuyer une fois sur la touche UP
pour aller
au début de la plage suivante. Pour localiser les
plages suivantes appuyer de façon répétée
jusqu'à ce que la plage souhaitée soit atteinte.
f
English
Fast Forward and Fast
Backward
The audible Fast Forward/Fast
Backward feature works only in the
play mode. This feature is convenient
to access a specific passage within a
musical track. Fast Forward/Fast
Backward also works in the Pause
mode, although it will not be audible.
1
c
f
Français
Avance rapide et retour
rapide
La touche d'avance rapide/retour rapide
audible ne fonctionne qu'en mode de lecture.
Cette fonction est pratique pour trouver un
passage spécifique sur la plage désirée. La
fonction d'avance rapide/retour rapide
fonctionne aussi dans le mode de pause,
mais elle n'est pas audible.
c
f
Press and hold the DN or UP
button
for at least 2 seconds. The pickup will
quickly move backward or forward until
you reach the desired section of the
track.
Appuyer sur la touche DN ou UP
et la
maintenir enfoncée pendant au moins 2
secondes. La tête de lecture reculera ou
avancera rapidement jusqu'au passage
souhaité de la plage.
When the pickup reaches the end of the
disc in the Fast Forward mode, the unit
will go into the pause mode. When the
pickup reaches the beginning of the disc
in the Fast Backward mode, the unit will
begin playback.
Lorsque la tête de lecture atteint la fin du
disque en mode d'avance rapide, l'unité se met
en mode de pause. Lorsque la tête de lecture
atteint le début du disque en mode de retour
rapide, l'unité commence la lecture.
c
f
21
English
1
22
Français
M.I.X. (Random Play)
M.I.X. (Lecture aléatoire)
Press the M.I.X. button in the play or
pause mode. The M.I.X. indicator will
illuminate and the tracks on the disc will
be played back in a random sequence.
After all the tracks on the disc have been
played back once, the player will load the
next disc and begin a new random
sequence until the M.I.X. mode is
canceled.
Appuyez sur la touche M.I.X. en mode de
lecture ou de pause. L’indicateur M.I.X.
s’allume et les plages du disque sont reproduites dans un ordre aléatoire. Quand toutes les
plages du disque ont été reproduites une fois,
le lecteur charge le disque suivant et commence une nouvelle séquence de lecture
aléatoire jusqu’à ce que le mode M.I.X soit
annulé.
To cancel M.I.X. play, press the M.I.X.
button again.
Pour annuler la lecture M.I.X. appuyez de
nouveau sur la touche M.I.X.
English
Repeat Play on Single
Track or Entire Disc
1
Français
Reproduction répétée d'un
morceau ou d'un disque
entier
This feature allows you to continuously
repeat a single track or one entire disc.
Cette caractéristique permet de répéter continuellement une plage unique ou un disque entier.
Press the REPEAT button. The REPEAT
indicator will illuminate. The music track
will be played back repeatedly.
To stop repeat play, press the REPEAT
button twice. The indicator switches from
REPEAT to REPEAT ALL and the
illumination will be off.
Appuyer sur la touche REPEAT. Le témoin
REPEAT s'allumera. La plage musicale sera
lue avec répétition.
Pour arrêter la lecture répétée, appuyer deux
fois sur la touche REPEAT. Le témoin commutera de REPEAT à REPEAT ALL et l'illumination s'éteindra.
→REPEAT→REPEAT ALL→OFF
While playing a disc, press the REPEAT
button until the REPEAT and REPEAT
ALL indicators are displayed. The CD
Shuttle will repeatedly play back all the
tracks on that disc.
→REPEAT→REPEAT ALL→OFF
→REPEAT→REPEAT ALL→OFF
Pendant la lecture d'un disque, appuyer sur la
touche REPEAT jusqu'à ce que les témoins
REPEAT et REPEAT ALL soient affichés. Le
CD Shuttle lit toutes les plages sur le disque
avec répétition.
Pour arrêter la lecture répétée, appuyer une
To stop repeat play, press the REPEAT
button once. The indicator illumination will fois sur la touche REPEAT. L'illumination du
témoin s'éteindra.
be off.
Note: When the M.I.X. function is ON,
Remarque: Avec la fonction M.I.X. activée,
only REPEAT ALL will be available.
uniquement REPEAT ALL est
utilisable.
23
English
Disc Scan
This function plays the first 10 seconds
of each track in succession. This function is useful in searching ahead on a
disc for a specific selection.
1
Press the SCAN button to activate the
Disc scan function. The SCAn indicator
will illuminate.
Français
Balayage de disque
Cette fonction reproduit les premières 10 secondes de chaque plage successivement.
Cette fonction est utile pour chercher une sélection spécifique en avant sur le disque.
Appuyer sur la touche SCAN pour activer la
fonction de balayage du disque. Le témoin
SCAn s'allumera.
To stop the Scan, press the SCAN button Pour arrêter et désactiver le mode de balayage
to deactivate the Scan mode.
de disque, appuyer sur la touche SCAN.
24
English
1
Français
To Deactivate the CD
Shuttle and Listen to
the Radio
Pour désactiver le CD
Shuttle et écouter la radio
To listen to your factory-installed radio,
turn off the Remote Display Unit by
pressing the POWER button.
Notes:
• When you set the Modulator Unit to a
frequency which has no FM broadcast, your audio system may produce
some harsh, interstation noises when
CD playback is stopped.
• With the FM Modulator connected,
there will be a slight loss in signal
strength to the radio.
Pour écouter la radio installée en usine,
éteindre l'unité d'affichage de télécommande en
appuyant sur la touche POWER.
Remarques:
• Lorsque l'unité du modulateur est réglée à
•
une fréquence où il n'y a pas d'émission FM,
votre système audio peut produire un bruit
de syntonisation aigu lorsque la lecture de
•
disque compact est arrêtée.
• Avec le modulateur de FM connecté, peut
se produire une légère perte de puissance
de la radio.
25
C
R
2025
1
2
English
Remote Control
Français
Télécommande
Battery Replacement
Remplacement de la pile
Applicable battery: Use one CR2025 or
equivalent.
Pile utilisable: Utiliser une pile CR2025 ou
équivalente.
Opening the battery case
Ouverture du logement de la pile
1 Place the remote upside down on a flat,
1 Placer la télécommande à l'envers sur une
level surface.
surface plate et horizontal.
Looking at the back of the remote, grasp the
En regardant la partie postérieure de la
battery holder at the bottom of the unit
télécommande, saisir le support de la
between your forefinger and thumb. Insert a
batterie au bas de l'unité entre l'index et le
pointed object into the left side of the
pouce. Insérer un objet pointu dans le côté
elongated hole.
gauche de l'orifice allongé.
Slide the pointed object to the right (as
Faire glisser l'objet pointu vers la droite
indicated by the arrow) while at the same
(dans la direction montrée par la flèche), et
time pulling on the battery holder.
au même moment tirer sur le support de la
batterie.
2 Pull the battery holder gently out with your
thumb and forefinger.
2 Enlever doucement le support de la batterie
avec l'index et le pouce.
Replacing the battery
Put the battery in the case with the (+) indication upward as shown in the illustration.
Remplacement de la pile
Insérer la pile dans le compartiment avec
l'indication (+) vers le haut comme montré dans
l'illustration.
Closing the case
Push the battery holder back into the remote
until a click is heard.
Fermeture du compartiment
Remettre le support de la pile dans la télécommande jusqu'à ce qu'on écoute un bruit sec.
26
1
2
CORRECT
CORRECTE
INCORRECT
INCORRECTE
English
CORRECT
CORRECTE
Français
Correct Handling
Manipulation correcte
Do not drop the disc while handling. Hold the
disc so you will not leave fingerprints on the
surface. Do not affix tape, paper, or gummed
labels on the disc. Do not write on the disc.
Veiller à ne pas faire tomber le disque. Tenir le
disque de manière à ne pas laisser d'empreintes sur la surface. Ne pas coller de ruban
adhésif, papier ou étiquette sur le disque. Ne
rien écrire sur le disque.
Disc Cleaning
Nettoyage des disques
Fingerprints, dust, or soil on the surface of the
disc could cause the CD player to skip. For
routine cleaning, wipe the playing surface with a
clean, soft cloth from the centre of the disc to
the outer edge. If the surface is heavily soiled,
dampen a clean soft cloth in a solution of mild
neutral detergent before cleaning the disc.
Des traces de doigts, de poussière ou de saleté
sur la surface du disque peuvent provoquer des
sauts de son. Essuyer le disque du centre vers
la périphérie avec un chiffon doux et propre. Si
la surface du disque est vraiment sale,
humidifier le chiffon d'une solution détergente
neutre avant d'essuyer le disque.
27
Transparent Sheet
Feuille transparente
English
Disc Accessories
There are various accessories available on the
market for protecting the disc surface and
improving sound quality. However, most of
them will influence the thickness and/or
diameter of the disc. Using such accessories
can cause the disc to be out of standard
specifications and may create operational
problems. We recommend not using these
accessories on discs played in Alpine CD
players.
28
Disc Stabilizer
Stabilisateur de disque
Français
Au sujet des accessoires pour
disque
Beaucoup d'accessoires sont disponibles sur le
marché pour protéger la surface du disque et
améliorer la qualité sonore. Cependant,
certains de ces accessoires peuvent affecter
l'épaisseur et/ou le diamètre du disque.
L'utilisation de tels accessoires peut modifier
les spécifications du disque et provoquer des
erreurs de fonctionnement. Nous déconseillons
l'utilisation de tels accessoires avec des
disques à reproduire sur les lecteurs CD Alpine.
In Case of Difficulty
En cas de problème
English
Français
If you encounter a problem, please review the
items in the following check list. This guide will
help you isolate the problem if the unit is at
fault. Otherwise, make sure the rest of your
English
system is properly connected or consult your
authorized Alpine dealer.
En cas de problème, consulter la liste de
vérifications suivantes. Ce guide devrait vous
aider à résoudre tout problème provenant de
l'appareil. Sinon, vérifier les connexions
du
Français
reste du système ou consulter un revendeur
Alpine autorisé.
No Sound.
Pas de son.
•
Volume level too low.
– Turn Volume Control clockwise to
desired level.
•
Volume sonore trop faible.
– Tourner le contrôle de volume vers la
droite au niveau désiré.
•
No tuning of FM frequency.
– Tune to the correct frequency.
•
Pas de syntonisation de fréquence FM.
– Syntoniser la fréquence correcte.
•
No connection of FM modulator and
antenna.
– Make sure the FM modulator is connected to the antenna.
•
Pas de connexion de modulateur FM et de
l'antenne.
– S'assurer que le modulateur FM est
connecté à l'antenne.
•
When the interference with broadcasting
stations occurs.
– Change the oscillator frequency of the
FM modulator.
•
Lors de l'interférence avec des stations de
radiodiffusion.
– Changer la fréquence d'oscillateur du
modulateur FM.
29
In Case of Difficulty
En cas de problème
English
Français
No function.
Pas de fonction.
•
Out of operating temperature range 50°C
(120°F) for CD.
English
– Allow the temperature of the car's
interior (or trunk) to cool.
•
La température de fonctionnement est en
dehors de 50°C (120°F) pour les disques
Français
compacts.
– Laisser refroidir la température à
l'intérieur du véhicule (ou coffre).
•
•
Moisture condensation in the CD Module.
– Allow the enough time for the condensation to evaporate (about 1 hour).
Condensation de l'humidité dans le module
CD.
– Attendre environ 1 heure pour que la
condensation s'évapore.
•
No connection of Battery lead.
– Make sure Battery lead is connected
properly.
•
•
No connection of ACC Power lead and
Ground lead.
– Make sure ACC Power lead and Ground
lead are connected properly.
Pas de connexion du conducteur d'alimentation ACC et du conducteur de mise à la
terre.
– S'assurer que le conducteur d'alimentation ACC et le conducteur de mise à la
terre sont connectés correctement.
•
Internal micro-computer malfunctioned due
to interference noise etc.
– Press the Reset button with a ball-point
pen or other pointed article.
•
Disfonctionnement du microprocesseur
interne dû à des interférences, etc.
– Appuyez sur la touche de réinitialisation
avec un stylo-bille ou un objet pointu.
30
•
Pas de connexion du conducteur de la
batterie.
– S'assurer que le conducteur de la
batterie est connecté correctement.
50ϒC 120ϒF
In Case of Difficulty
En cas de problème
English
•
The unit is set to the Pause mode.
– Press the disc play button.
Français
Pas de reproduction.
No Play.
•
English
L'unité est réglée en mode de pause.
– Appuyer sur la touche de reproduction
de
Français
disque.
Music skips excessively.
La musique saute excessivement.
•
The CD Shuttle has not been mounted
securely.
– Follow the installation instructions for
proper installation.
The CD being played is dirty.
– Clean the CD being very careful not to
scratch it.
•
Le CD Shuttle a été mal monté.
– Suivre les instructions d'installation pour
une installation correcte.
•
The CD being played is damaged.
– Replace the disc.
•
Le disque compact en cours de lecture est
sale.
– Nettoyer le disque compact en faisant
attention de ne pas le rayer.
Le disque compact en cours de lecture est
abîmé.
– Remplacer le disque compact.
•
•
31
In Case of Difficulty
En cas de problème
English
Indication for CD
Shuttle
Français
Indication pour le CD
Shuttle
English
Français
–––H
•
Protective circuit is activated due to high
temperature.
– The indicator will disappear when the
temperature returns to within operation
range.
•
Le circuit de protection s'est déclenché car
la température est trop élevée.
– L'indication disparaît quand la température revient dans la gamme de fonctionnement.
T
•
No magazine is loaded.
– Insert a magazine.
•
Le magasin n'est pas inséré.
– Insérer un magasin.
E-01
•
32
Malfunction in the unit.
•
– Press the eject button and remove the
CD from the CD magazine. Inspect the
CD for any deformities or irregularities. If
there appears to be no problems with the
disc, insert the CD back into the magazine. When the "E-01" indication
disappears from the display, insert the
magazine into the unit.
If the magazine does not eject, consult
your Alpine dealer.
Mauvais fonctionnement de l'unité.
– Appuyez sur la touche d'éjection et
sortez le CD du magasin CD. Vérifier que
le CD n'est pas déformé, et qu'il n'a pas
de surfaces irrégulières. S'il n'y a pas de
problèmes avec le disque, le réinsérer
dans le magasin. Lorsque l'indication "E01" disparaît de l'affichage, insérez le
magasin dans l'unité.
Si vous ne pouvez pas éjecter le magasin,
consultez votre revendeur Alpine.
In Case of Difficulty
En cas de problème
English
Indication for CD
Shuttle
Français
Indication pour le CD
Shuttle
English
Français
•
Magazine ejection not possible.
– Press the magazine eject button. If the
magazine does not eject, consult your
Alpine dealer.
•
Impossible d'éjecter le magasin.
– Appuyez sur la touche d'éjection du
magasin. Si le magasin n'est pas éjecté,
consultez votre revendeur Alpine.
•
Magazine ejects without CD.
– Press the eject button to activate the
eject function. Insert an empty CD
magazine into the CD Shuttle to receive
the disc left inside the unit.
If the CD cannot be removed, consult
your Alpine dealer.
•
Le magasin est éjecté sans CD.
– Appuyer sur la touche d'éjection pour
activer la fonction d'éjection. Insérez un
magasin CD vide dans le CD Shuttle
pour recevoir le disque coincé dans
l'unité.
Si vous ne pouvez pas faire sortir le CD,
consultez votre revendeur Alpine.
EEEE
•
Misconnection or disconnection of CD
Shuttle.
– Check connection between CD Shuttle
and control unit.
•
Mauvaise connexion ou déconnexion du
CD Shuttle.
– Vérifier la connexion entre le CD
Shuttle et l'unité de commande.
33
English
Specifications
CD SHUTTLE SECTION
Sampling Rate ........................................................................... 44.1 kHz
System ................................................... Optical (Compact Disc System)
English
Number of Quantization Bits ................................................
16-bit Linear
Oversampling .............................................................................. 8 Times
Number of Channels ................................................................ 2 (stereo)
Frequency Response .................................. 5 – 20,000 Hz (+0, –0.5 dB)
Wow & Flutter ................................................... Below measurable limits
Total Harmonic Distortion ........................................... 0.004% (at 1 kHz)
Dynamic Range ............................................................................. 94 dB
Signal-to-Noise Ratio ................................................................. 103 dBA
Channel Separation ...................................... More than 85 dB (at 1 kHz)
Power Requirement ............................... 14.4V DC (11 – 16V allowable)
Output Voltage ...................................................... 850mV into 10k ohms
Weight ...................................................................... 1.7 kg (3 lbs. 11 oz)
Dimensions (W x D x H) .............................. 255mm x 161.5mm x 63mm
(10" x 6-3/8" x 2-1/2")
REMOTE DISPLAY UNIT/MODULATOR/WIRELESS REMOTE
CONTROL UNIT SECTION
RF Output Frequency (Selectable) ............................... 87.7 – 89.9 MHz
Français
RF Output Voltage
..................................................................... 70 dBµV
RF Modulator Input Sensitivity/Impedance ................ 500 mV/10k Ohms
Weight
Remote Display Unit .................................................... 0.18 kg (6 oz)
Wireless Remote Control Unit .................................. 0.02 kg (0.7 oz)
FM Modulator Unit ....................................................... 0.4 kg (14 oz)
Chassis Dimensions (W x H x D)
Remote Display Unit ............................... 113mm x 39.5mm x 19mm
(4-7/16" x 1-9/16" x 25/32")
Wireless Remote Control Unit ....................... 40mm x 6mm x 90mm
(1-9/16" x 1/4" x 3-1/2")
FM Modulator Unit ..................................... 130mm x 35mm x 74mm
(5-1/8" x 1-3/8" x 2-15/16")
Note: Due to continuous product improvement, specifications and
design are subject to change without notice.
34
Français
Spécifications
SECTION DU CD SHUTTLE
Taux d'échantillonnage .............................................................. 44,1 kHz
Système .......................................................... Optique (disque compact)
English
Nombre de bits de quantification ...................................
Linéaire à 16 bit
Suréchantillonnage ..................................................................... Octuple
Nombre de canaux ................................................................... 2 (stéréo)
Réponse en fréquence ................................ 5 à 20.000 Hz (+0, –0,5 dB)
Pleurage et scintillement ................................................. Non mesurable
Distorsion harmonique totale ....................................... 0,004% (à 1 kHz)
Gamme dynamique ........................................................................ 94 dB
Rapport signal-bruit .................................................................... 103 dBA
Séparation des canaux ............................. Supérieure à 85 dB (à 1 kHz)
Alimentation ....................................... 14,4 V CC (tension admissible de
11 à 16 V)
Tension de sortie ..................................................... 850 mV à 10 kohms
Poids .......................................................................... 1,7 kg (3 li. 11 on.)
Dimensions (larg. x prof. x haut.) ................ 255mm x 161,5mm x 63mm
(10" x 6-3/8" x 2-1/2")
SECTION DE L'UNITE D'AFFICHAGE DE TELECOMMANDE/
MODULATEUR/UNITE DE TELECOMMANDE SANS FIL
Fréquence de sortie RF (sélectionnable) ...................... 87,7 à 89,9 MHz
Français
Tension de sortie
RF .................................................................. 70 dBµV
Impédance/Sensibilité d'entrée du modulateur RF ..... 500 mV/10 kohms
Poids
Unité d'affichage de télécommande .............................. 0,18 kg (6 on.)
Unité de télécommande sans fil ................................. 0,02 kg (0,7 on.)
Unité du modulateur FM ................................................ 0,4 kg (14 on.)
Dimensions du châssis (L x H x P) ..........................................................
Unité d'affichage de télécommande .......... 113mm x 39,5mm x 19mm
(4-7/16" x 1-9/16" x 25/32")
Unité de télécommande sans fil ....................... 40mm x 6mm x 90mm
(1-9/16" x 1/4" x 3-1/2")
Unité du modulateur FM ............................... 130mm x 35mm x 74mm
(5-1/8" x 1-3/8" x 2-15/16")
Remarque: La conception et les spécifications sont modifiables sans
préavis en vue de l'amélioration des produits.
35
µ
English
36
Français
English
Index
A–F
Basic Operation .................................................................... 14
CD Operation ........................................................................ 17
English
Controlling CD Shuttle ..........................................................
17
Disc Access .......................................................................... 19
Disc Care .............................................................................. 27
Disc Scan .............................................................................. 24
Fast Forward and Fast Backward ......................................... 21
R–Z
Remote Control ..................................................................... 26
Repeat Play on Single Track or Entire Disc .......................... 23
Français
Specifications
........................................................................ 34
To Deactivate the CD Shuttle and Listen to the Radio ......... 25
Turning Power On and Off .................................................... 15
G–P
In Case of Difficulty ............................................................... 29
Initial System Setup .............................................................. 14
M.I.X. (Random Play) ........................................................... 22
Modulator Frequency Setting ................................................ 16
Music Sensor (Skip) .............................................................. 20
Pause .................................................................................... 18
Precautions ............................................................................. 8
Preparation ........................................................................... 11
37
Français
Index
A–F
Accès au disque ................................................................... 19
Avance rapide et retour rapide ............................................. 21
English
Balayage de disque ..............................................................
24
Contrôle d'un changeur CD .................................................. 17
En cas de problème .............................................................. 29
Fonctionnement de base ...................................................... 14
Fonctionnement du lecteur de CD ........................................ 17
G–P
M.I.X. (Lecture aléatoire) ...................................................... 22
Mise en marche initiale du système ...................................... 14
Mise sous et hors tension ..................................................... 15
Pause .................................................................................... 18
Pour désactiver le CD Shuttle et écouter la radio ................. 25
Précautions ............................................................................. 8
Préparation ........................................................................... 11
38
R–Z
Recherche musicale (saut) ................................................... 20
Réglage de la fréquence du modulateur ............................... 16
Français
Reproduction
répétée d'un morceau ou d'un disque entier .. 23
Soin des disques .................................................................. 27
Spécifications ........................................................................ 35
Télécommande ..................................................................... 26
A–F
R–Z
English
17
27
15
23
Français
8
16
14
19
26
29
18
20
11
G–Q
25
34
14
17
21
22
24
39
ALPINE ELECTRONICS, INC.
Tokyo office: 1-1-8 Nishi Gotanda,
Shinagawa-ku, Tokyo 141-8501, Japan
Tel.: (03) 3494-1101
ALPINE ELECTRONICS OF AMERICA, INC.
19145 Gramercy Place, Torrance,
California 90501, U.S.A.
Tel.: 1-800-ALPINE-1 (1-800-257-4631)
ALPINE ELECTRONICS OF CANADA, INC.
Suite 203, 7300 Warden Ave. Markham,
Ontario L3R 9Z6, Canada
Tel.: 1-800-ALPINE-1 (1-800-257-4631)
ALPINE ELECTRONICS OF AUSTRALIA PTY. LTD.
6-8 Fiveways Boulevarde Keysborough,
Victoria 3173, Australia
Tel.: (03) 9769-0000
ALPINE ELECTRONICS GmbH
Kreuzerkamp 7-11 40878 Ratingen,
Germany
Tel.: 02102-45 50
ALPINE ITALIA S.p.A.
Via C. Colombo 8, 20090 Trezzano Sul
Naviglio MI, Italy
Tel.: 02-48 40 16 24
ALPINE ELECTRONICS FRANCE S.A.R.L.
(RCS PONTOISE B 338 101 280)
98, Rue De La Belle Etoile, Z.I. Paris Nord II
B.P. 50016 F-95945, Roissy,
Charles de Gaulle Cedex, France
Tel.: 01-48 63 89 89
ALPINE ELECTRONICS OF U. K., LTD.
13 Tanners Drive, Blakelands,
Milton Keynes MK14 5BU, U.K.
Tel.: 01908-61 15 56
ALPINE ELECTRONICS DE ESPAÑA, S.A.
Portal De Gamarra 36, Pabellón 32
01013 Vitoria (Alava) - Apdo. 133, Spain
Tel.: 34-45-283588
SERIAL NUMBER/NUMERO DE SERIE/
INSTALLATION DATE/DATE D'INSTALLATION/
INSTALLATION TECHNICIAN/INSTALLATEUR/
PLACE OF PURCHASE/LIEU D'ACHAT/
Designed by ALPINE Japan
Printed in China (S)
68P00967K67-O
Dalian Ikemiya Printing Co., Ltd.
4 Jin Zhou Street Economic &
Technical Development
Dalian China
R