1
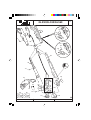
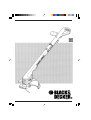
English
1
Trimmer
GL550/GL555/GL560
Congratulations!
Safety instructions
Your purchase of this Black & Decker Reflex® grass
trimmer and lawn edger assures you of years of
problem free trimming. The Reflex® not only trims
grass and edges the lawn, it also has a unique totally
automatic line feed system. You do nothing - the
Reflex® system means non-stop trimming; by the use
of a simple mechanism it senses when the line has
worn and, when needed, automatically feeds out line
to its optimum cutting length. You just switch the unit
on and trim.
Read all of this manual carefully, observing all
the recommended safety instructions before,
during and after using your machine. Maintain
your machine in good working order.
Familiarise yourself with the controls on
your machine before attempting to operate
it, but above all, be sure you know how to
stop your machine in an emergency.
Retain this manual and all other literature
supplied with your machine for future reference.
Description
Electrical connection
• Your machine is designed for use on
AC (mains) electrical supplies only. Do
not attempt to use on any other supply.
• Plug your machine into a power point,
never in a light socket.
• Do not leave your machine
unattended whilst it is connected to
the electrical supply.
• Always switch off and remove the
plug from the mains before cleaning,
inspecting or adjusting any part of the
trimmer, or if the supply cable has
become damaged or entangled.
Following is a list of the parts that will be mentioned
in this instruction leaflet and are shown in the
appropriate diagrams:
Body (1)
Secondary handle (2)
Supply cord restraint (3)
Locking ring (4)
Cutting line (5)
Guard (6)
Line trimming blade (7)
Edge guide (9)
Cable storage hooks (11)
Hanging hole (18)
Power inlet or supply cord (19)
Switch handle (20)
Trigger switch (21)
Arrow (24)
Skid (25)
Guard retaining lugs (10)
Guard screw (22)
Guard screw hole (23)
Spool cover (8)
Spool housing (12)
Spool cover tab (13)
Eyelet (15)
Spool (17)
1
2
4
5
6
7
2
User manual
Arrow (16)
Lever (14)
!
Power supply cord
• The power supply cord should be
regularly inspected for signs of damage or
ageing and only used if in good condition.
• Always keep the power supply cord
away from the cutting line (5), be aware
of its position at all times.
• Never carry your machine by the cord or
jerk the cord to separate the connectors.
Keep the cord away from heat, oils and
sharp edges.
• Have damaged cords replaced
completely by your nearest Black & Decker
service centre. Do not attempt to do this
yourself as the switch handle is not
customer serviceable.
Cutting line
• Take care against injury from line trimming
blade (7) during unpacking and assembly
and any excess line which may be cut off
when the trimmer is first operated.
• The cutting line (5) will continue to run for
a short time after releasing the switch
lever.
•
ENGLISH
Under no circumstances should you
attempt to stop the cutting line, always
allow it to stop on its own.
Never fit metal cutting line.
Using your machine
• Always use your machine in the manner
outlined in this manual. Your machine is
designed to be used in an upright
position and if it is used in any other way
an injury may result.
• Before using your machine, disconnect
it from the electrical supply and visually
inspect the rotating parts for damage.
Also, check that the spool assembly
is secure.
• Always check that your lawn or cutting
path is clear of all sticks, stones, wire
and other debris. Contact with such
debris may damage your machine.
• Keep your machine away from your feet
and other parts of your body when
switching on and during operation.
• Do not switch on your machine when it is
upside down.
• Walk, never run with the unit.
• Do not use your machine in the rain and
do not allow it to get wet.
• Use your machine only in daylight or
good artificial light.
• Do not cross gravel paths or roads whilst
the cutting line is rotating.
• Do not cut excessively steep slopes. Be
sure of your footing and cut across the
face of slopes, never up and down.
• Never use your machine with a
damaged guard (6) or without the guard
fixed in position.
• Be careful when trimming as freshly cut
grass is damp and slippery.
Safety of others
• Never allow children or persons who are
unfamiliar with this type of machine to
use it, nor anyone who has not read
this leaflet.
360˚
6m/20ft
Clothing
• Always wear safety glasses when using
your machine.
• To protect your feet, always wear stout
shoes or boots (not bare footed or
wearing open sandals).
• Wear long trousers to protect your legs any debris left on the lawn or cutting path
may be picked up and ejected by the
cutting line.
•
Do not allow children, animals or other
adults near your machine when in use always keep them well away from the
cutting area.
Care of your machine
• Store your machine in a dry place when
not in use, out of the reach of children.
• Do not use solvents or cleaning fluids to
clean your machine - use a blunt scraper
to remove grass and dirt. Always
disconnect from the electrical supply and
ensure the cutting line (5) is stationary
before cleaning.
• Do not operate your machine if any parts
are defective.
• Do not attempt to remove any parts other
than those mentioned in these instructions.
• Use only Black & Decker recommended
replacement parts and accessories.
Electrical safety
Your machine should always be switched
off at the mains before disconnecting any
plug and socket connector, extension cables
or cordsets.
Mains plug replacement (UK only)
Should your mains plug need replacing and
you are competant to do this, proceed as
instructed below. If you are in doubt,
contact a Black & Decker service centre or
a qualified electrician.
• Disconnect the plug from the supply.
• Cut off the plug and dispose of it safely.
A plug with bared copper conductors
is dangerous if engaged in a live
socket outlet.
• Only fit 13 amp BS1363A approved
plugs fitted with the correctly rated fuse.
• The cable wire colours, or a letter, will be
marked at the connection points of most
good quality plugs. Attach the wires to
their respective points in the plug.
• Brown is L (live) and blue is N (neutral).
• Before replacing the top cover of the
mains plug ensure that the cable
restraint is holding the outer sheath of
the cable firmly and that the two leads
are correctly fixed at the terminal
screws.
3
•
Warning! Never connect Live or Neutral
wires to Earth pin marked ‘E’ or
.
Fuse replacement (UK only)
Your machine is supplied with cable fitted
with a non-wireable plug.
• The plug is fitted with a 5 amp fuse
which is the recommended fuse for
your machine.
• Only use replacement fuses which are
approved to BS1362.
• When changing the fuse in your plug,
always ensure the fuse cover is refitted.
If the fuse cover is missing or damaged
do not use the plug.
Note: Fuses do not give personal protection
against electric shock. The recommended
Black & Decker RCD is available from your
nearest Black & Decker service centre.
Increased safety can be obtained by having
a qualified electrician install a high sensitivity
(30mA) circuit breaker in the house wiring.
If you do not have such a circuit breaker
installed, or you do not wish to have one
installed, then we strongly recommend that
the electrical power to the machine be
supplied through a high sensitivity residual
current device (RCD). The RCD is designed
to provide a high degree of personal
protection against harmful electric current
should fault conditions occur.
Warning! The use of an RCD or other circuit
breaker unit does not release the operator of
the machine from the safety instructions and
safe working practices given in this manual.
In transit, your trimmer is packed in
‘Edging’ mode, if you want to ‘Trim’ refer
to the section ‘How to convert between
the trimming and edging mode’.
• In transit, the end of the cutting line (5) is
taped to the side of the spool cover (8).
Please discard the tape to release the
length of line. There should be a
minimum of 9cm (3.5") of cutting line
protruding from the spool housing (12)
before using your trimmer.
Note: When your machine is operated for
the first time any excess line will be cut off by
the line trimming blade (7) housed in the
guard. This is also the case for any
subsequent line adjustment. Because line
cut off by the blade in the guard may be
ejected, it is important that the amount of
excess line is kept to a minimum. Where an
excessive amount of line is pulled out, the
line should be cut back to the outside of the
guard before switching on your trimmer. Cut
the line off on the trimmer blade by hand.
• Always ensure that the spool cover is
secure before and after use.
How to use your trimmer (Fig. A - K)
In order to get the most from your trimmer please be
sure to follow the techniques shown. Do not be
impatient; you will obtain the best results by
experience and by following these simple rules.
Do not use your trimmer without
its guard.
Do not cut wet grass; best results are
achieved when the grass is dry.
A
B
Extension cables and cordsets
You can use up to 100 feet (30 metres) extension
cord without undue loss of power. Extension cables
and cordsets should comply with national regulations.
Preparing the trimmer for use (Fig. 2)
• Take the trimmer and the guard (6) out of
2
•
•
•
•
•
4
the box.
Remove the guard screw (22) which is
located on the base of the trimmer body
(1) (Fig. 2.1).
Place the guard into the channel on the
trimmer body.
Push the guard fully home until the guard
is flush with the body (Fig. 2.2).
Replace the guard screw (Fig. 2.3).
If correctly assembled, the guard will now
be secured to your trimmer.
C
D
E
F
G
H
Trimming
• To switch on your trimmer, squeeze the
trigger switch (21).
• To switch the unit off, release the
trigger switch.
• To carry the trimmer when not in use,
it is preferred that you use the secondary
handle (2).
Cut at an angle and with the tip of the
cutting line (5).
Swing the trimmer gently from side to side.
Do not overload the trimmer. It operates best
at high speeds.
On long grass, start at the top.
Take small cuts.
Use the edge of the guard (6) to keep the
trimmer away from hard surfaces and
delicate items.
I
J
K
Edging
Best results are achieved on edges greater
than 50mm deep.
Note: Your trimmer is a maintenance tool for
trimming overhanging grass and should not
be used to create edges. Edges can be
created using an edging spade.
With the skid (25) on the grass edge and the
edge guide (9) hooked over the edge, pull
the unit along while keeping the edge guide
in contact with the lawn edge.
A closer cut can be achieved by angling
the trimmer.
If your trimmer is suitable for use with a
‘Detachable’ extension cord, loop a length of
cord through the cord restraint (3) to avoid
the plug and socket coming apart
accidentally if the cord is pulled.
ENGLISH
For maximum reliability, never put on a heavier or
lighter line (e.g. fishing line) which will prevent the
automatic feed from functioning, cause motor failure
or reduce cutting performance.
How to fit a new spool of cutting line
(Fig. 4 & 5)
• Disconnect your trimmer from the
4
How to convert between the trimming
and edging mode (Fig. 3)
3
In addition to conventional trimming (Fig. D),
your trimmer can be used to trim
overhanging grass along lawn edges and
flower beds (Fig. J).
To convert your trimmer between the
trimming and edging mode:
•
5
Unlock
• With the trimmer switched off and the
edge guide (9) resting on the ground,
place one hand on the switch handle
(20). Using your other hand, turn the
locking ring (4) anti-clockwise, as far as
it will go (approximately quarter of a
turn) (Fig. 3.1).
Convert
• While keeping hold of the switch handle,
grasp the trimmer body (1) and rotate
half a turn in the direction of the arrow
(24), until the body ‘clicks’ into position
(Fig. 3.2).
Lock
• While still holding the switch handle,
tighten the locking ring clockwise, using
the other hand. Only light finger pressure
is required to secure it (Fig. 3.3).
Replacement line
A new spool containing 10 metres of cutting line
(cat. no. A6481) may be purchased from your
Black & Decker dealer. Alternatively, replacement
line packs are available.
•
•
•
power supply.
Remove the spool cover by pushing the
spool cover tabs (13) inwards and
upwards (Fig. 4), then pull off (it is not
necessary to push both tabs in at the
same time). The empty spool can now
be withdrawn from the drive shaft.
Remove any dirt or grass that may have
collected inside the spool housing (12)
and cover (8).
Unwind approximately 9cm (3.5") of
cutting line (5) from the new spool (17).
Feed the cutting line through the eyelet
and then push the spool onto the
centre drive shaft (Fig. 5). Rotate as
necessary to fully seat the spool, taking
care not to trap the cutting line
underneath the spool and making sure
that there is a minimum of 9cm (3.5")
protruding from the
spool housing.
Replace the spool cover by aligning
both tabs on it (13) with the slots in the
spool housing and pushing them into
place. Make sure that both tabs are
securely located.
How to wind new line onto an empty
spool (Fig. 6 & 7)
• A maximum of 10 metres of new cutting
6
•
•
line can be wound onto the empty spool.
The spool has an ‘Indicator’ to help you
avoid winding an excessive quantity of
cutting line on the spool, as too much will
prevent the automatic feed system from
functioning (Fig. 6).
Remove any remnant of old cutting line
from the spool (17).
Push the end of the new cutting line into
one of the two holes provided in the
spool (17) and insert 20mm.
5
•
•
•
•
Bend the cutting line over, pulling it
through the adjacent ‘L’ shaped slot.
The cutting line should now be firmly
anchored to the spool and you may
proceed to wind it on in the direction of
the arrows (16).
Take time to wind the cutting line on
neatly, in layers. Do not criss cross.
When you have wound on sufficient
cutting line, temporarily park it in one of
the ‘L’ shaped slots to prevent the spool
unravelling, ensuring you leave a
minimum of 9cm (3.5") protruding.
Fit the spool and spool cover (8) to the
spool housing as described for fitting a
new spool.
Care and maintenance
• For best performance, please keep the cutting
•
•
line, spool and air slots in the trimmer body
clean. Use a dry brush or cloth to remove grass,
sap or other dirt.
Plastic parts may be cleaned by using a mild
soap and a cloth dampened with hot water.
Do not use any type of detergent, cleaner or
solvent which might contain chemicals which
could seriously damage the plastic. Do not spray
your trimmer with water.
Self lubricating bearings are used in your trimmer,
therefore, lubrication is not required.
Line still jammed on spool
• Disconnect the power supply and remove
the cover, as previously described.
• Lift out the spool (17) completely, holding the
coiled cutting line in place to prevent it
unravelling from the spool (Fig. 7).
• Carefully unwind the cutting line (5) from the
spool until any crossed or trapped loops are
cleared. Rewind the cutting line evenly, in the
direction of the arrows (16) on the spool.
• Temporarily park the cutting line end in one
of the ‘L’ shaped slots to prevent the spool
unravelling. Ensure you leave a minimum of
9cm (3.5") protruding.
• Turn the lever (14) backwards and forwards
to ensure it operates freely.
• Remove any dirt or grass that may have
collected inside the spool housing and cover.
• Feed the end of the line through the eyelet
and then push the spool into the centre drive
shaft while pulling the free end of the line to
release it from the ‘L’ shaped slot. To fully
seat the spool, rotate as necessary, taking
care not to trap the line underneath the
spool, and making sure that there is a
minimum of 9cm (3.5") of line protruding from
the spool housing.
• Finally, replace the cover as previously
described.
Protecting the environment
Fault finding
Before checking your trimmer for any faults,
disconnect it from the mains.
• If the trimmer will not start, check that all power
cords are properly connected. If this does not work,
check your power point, finally (UK only) check the
fuse and wiring on the extension cord plug.
• If the automatic line feed fails to operate, it
could be for one of the following reasons:
6
Line too short or line jammed on spool
• Disconnect your trimmer from the
power supply.
• Remove the spool cover (8) by pushing both
tabs (13) inwards and upwards (Fig. 4).
• Lift the spool (17) approximately 6mm (1/4")
from the spool housing (12), while pulling the
cutting line (5). This will allow you to lengthen
the line while clearing any line jammed inside
the spool. Ensure there is a minimum of 9cm
(3.5") protruding from the spool housing.
• Rotate the spool as necessary to fully seat
the spool and replace the cover by aligning
both tabs on the cover with the slots in the
spool housing and push into place. Ensure
that both tabs are securely located.
Black & Decker provides a facility for
recycling Black & Decker products once
they have reached the end of their working
life. This service is provided free of charge.
To take advantage of this service please
return your product to any authorised repair
agent who will collect them on our behalf.
You can check the location of your nearest
authorised repair agent by contacting your local
Black & Decker office at the address indicated in
this manual. Alternatively, a list of authorised
Black & Decker repair agents and full details of our
after-sales service and contacts are available on the
Internet at: www.2helpU.com.
Guarantee
Black & Decker is confident of the quality of its
products and offers an outstanding guarantee.
This guarantee statement is in addition to and in no
way prejudices your statutory rights. The guarantee
is valid within the territories of the Member States
of the European Union and the European Free
Trade Area.
If a Black & Decker product becomes defective due
to faulty materials, workmanship or lack of
conformity, within 24 months from the date of
purchase, Black & Decker guarantees to replace
defective parts, repair products subjected to fair
wear and tear or replace such products to ensure
minimum inconvenience to the customer unless:
• The product has been used for trade,
professional or hire purposes;
• The product has been subjected to misuse or
neglect;
• The product has sustained damage through
foreign objects, substances or accidents;
• Repairs have been attempted by persons other
than authorised repair agents or Black & Decker
service staff.
To claim on the guarantee, you will need to submit
proof of purchase to the seller or an authorised
repair agent. You can check the location of your
nearest authorised repair agent by contacting your
local Black & Decker office at the address indicated
in this manual. Alternatively, a list of authorised
Black & Decker repair agents and full details of our
after-sales service and contacts are available on the
Internet at: www.2helpU.com.
Other outdoor tools
Black & Decker has a full range of outdoor power
tools that make life in the garden easy. If you would
like further information on the following products,
please contact our Service and Information Centre
(see the address page towards the end of this
manual) or your local Black & Decker retailer.
String trimmers
Chainsaws
Cordless shear
Hedgetrimmers
Lawnmowers
Lawnrakers
Leafbusters
Shredders
Not all products are available in all countries.
ENGLISH
EC Declaration of conformity
GL550/GL555/GL560
Black & Decker declares that these tools
conform to:
98/37/EC, 89/336/EEC, 73/23/EEC,
EN 55014, EN 60335, EN 61000,
2000/14/EC, Lawn trimmer, L ≤ 50 cm
Annex VIII, No. 0086
B.S.I., HP2 4SQ, United Kingdom
Level of sound pressure, measured according to
2000/14/EC:
LpA (sound pressure) dB(A) 81
LWA (acoustic power) dB(A) 94
LWA (guaranteed)
dB(A) 96
Hand/arm weighted vibration value according to
EN 50144: 4 m/s2
Brian Cooke
Director of Engineering
Spennymoor, County Durham DL16 6JG,
United Kingdom
1-12-2001
7
8
TYP.
GL550/GL555/GL560
1-2
123
140
144
122
142
117
120
141
145
119
122
118
143
121
106
106
131
117
108
116
110
111
145
112
113
117
836
837
117
104
115
E11003 / 806622
101
114
109
25-02-99
9
Australia
DEWALT Industrial Power Tool Company
7 Clarice Road
Box Hill, Victoria 3128
Tel. 03 9895 9200
Fax 03 9899 7465
New Zealand
Black & Decker
81 Hugo Johnson Drive
Penrose, Auckland, New Zealand
Tel. 09 579 7600
Fax 09 579 8200
South Africa
Black & Decker South Africa (Pty) Ltd
Physical address:
39 Commerce Crescent
Eastgate, ext. 12, Sandton, Kramerville 2148
Postal address:
Postnet Suite 107, Private Bag X65
Halfway House 1685
Tel. (011) 653-1400
Fax (011) 653-1499
United Kingdom
Black & Decker
210 Bath Road
Slough, Berkshire SL1 3YD
Tel. 01753 511234
Fax 01753 551155
Helpline 01753 574277
10 806620-13
○
○
○
○
○
○
○
○
○
○
○
○
○
○
○
○
○
○
○
○
○
○
○
○
○
○
○
○
○
○
○
○
○
○
○
○
○
○
Yes
No
Was this tool your first purchase?
Yes
No
Was this tool a gift?
Postal code: .............................................................................................
Town: .......................................................................................................
Address: ...................................................................................................
Name: ......................................................................................................
○
Dealer address
○
○
○
○
○
○
○
○
○
○
○
○
○
○
○
○
○
○
○
○
○
○
○
○
○
○
○
○
○
○
○
○
Data protection act:
Tick the box if you prefer not to receive further information.
Dealer address: ........................................................................................
.................................................................................................................
.................................................................................................................
Yes
No
Was this tool bought as a replacement?
○
Date of purchase
○
✁
11
○
○
○
○
○
○
○
○
○
○
○
○
○
○
○
○
○
○
○
○
○
○
○
○
○
○
○
○
○
○
○
○
○
○
○
○
○
○
○
○
○
○
○
○
○
○
○
○
○
○
○
○
GUARANTEE CARD
○
○
○
○
○
○
○
○
○
○
○
○
○
○
○
○
○
○
○
○
○
○
○
○
○
○
✁
Please complete this section immediately after the purchase of your tool and send it to Black & Decker in your
country. If you live in Australia or New Zealand, please register by using the alternative guarantee card
supplied.
12 806620-13
○
○
○
○
○
○
○
○
13
14
15
16