1
CS450
User Manual
143163999-2
COPYRIGHT
SLC BV 1997. All rights reserved. No part of this publication may be
reproduced, transmitted, stored in a retrieval system, or transmitted in any
form, or by any means - electronic, photocopying, recording, or otherwise without the prior written permission of SLC BV.
DISCLAIMER
SLC BV makes no representations or warranties with respect to the contents
hereof and specifically disclaim any implied warranties of merchantability or
fitness for any particular purpose. Further SLC BV reserve the right to revise
this publication and to make changes from time to time in the contents hereof
without the obligation of SLC BV to notify any person of any such revision.
2
CS450 User Manual
Table of Contents
Important Telephone Numbers ........................................................ 4
Alarm Zones .................................................................................... 4
The Keypad ..................................................................................... 5
Using the Keypad ............................................................................ 5
Short Codes..................................................................................... 6
Before You Begin............................................................................. 7
Different Types of Arming ................................................................ 8
Turning on the Alarm System ........................................................ 10
Direct Arming ................................................................................. 11
Partguard 1 .................................................................................... 12
Partguard 2 .................................................................................... 13
Inhibiting Zones ............................................................................. 14
Forced Arming ............................................................................... 15
Turning off the Alarm System ........................................................ 16
What to Do After an Alarm ............................................................ 17
Reading the Operator Log ............................................................. 18
Reading the Engineer Log ............................................................. 19
Changing the Time ........................................................................ 20
Changing the Date......................................................................... 21
Codes ............................................................................................ 22
Code Rules .................................................................................... 23
Changing Your Code ..................................................................... 24
Changing Other People’s Codes ................................................... 25
Setting Code 8 as a Temporary Code .......................................... 26
User Privileges............................................................................... 27
Changing User Privileges .............................................................. 28
Testing the Bell Buzzer and Flashing Light ................................... 29
Turning on the Door Chime ........................................................... 30
Using the Keyswitch ...................................................................... 31
Questions and Answers................................................................. 33
Glossary......................................................................................... 36
CS450 User Manual
3
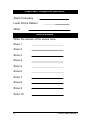
Important Telephone Numbers
Alarm Company
Local Police Station
Other
Alarm Zones
Write the names of the zones here
Zone 1
Zone 2
Zone 3
Zone 4
Zone 5
Zone 6
Zone 7
Zone 8
Zone 9
Zone 10
4
CS450 User Manual
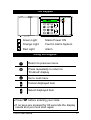
The Keypad
Green Light
Mains Power ON
Orange Light
Fault in Alarm System
Red Light
Alarm
Using the Keypad
Return to previous menu
t
Press repeatedly to return to
‘Finished’ display
Go to next menu
Cancel displayed item
Select displayed item
• Press
t before entering your code.
• If no keys are pressed for 60 seconds the display
resets and you must start again
CS450 User Manual
5
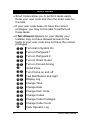
Short Codes
• Short Codes allow you to perform tasks easily.
Enter your user code and then the short code for
the task.
• If your user code does not have the correct
privileges, you may not be able to perform all
these tasks.
• If Not Allowed appears on your display your
installer may not have allowed access to the
tasks or your user code may not have the correct
privileges.
uu Turn Alarm System On
uv
uw
ux
uy
v
wu
wv
xu
xv
xw
yu
yv
yw
yx
z
6
Turn on Partguard 1
Turn on Partguard 2
Turn on Direct Guard
Turn on Forced Arming
Inhibit Zone
Turn Chime on and off
Test Bell Buzzer and Light
Display Log
Change Time
Change Date
Change Own Code
Change Codes
Change Code Privileges
Change Code Count
View Operator Log
CS450 User Manual
Before You Begin
• The step by step instructions on the following
pages are the simplest way to perform the tasks.
Please remember that your user code must have
the correct privileges assigned to it to carry out
the task. If it does not, contact your installer.
• The system may have been set up in such a way
that you will not have to do all the steps.
For example, you may not always have to press
the accept key
.
• Around 90% of alarms are false alarms. These
are often caused by incorrect use of the system.
Ensure all regular users know how to turn on and
off the alarm and the entrance and exit routes.
There should also be an agreed routine as to
what to do in the event of an alarm.
• Remember to check that all doors and windows
are securely locked before you turn on the alarm
system.
• Check that that there is no possibility of objects
falling in front of movement detection devices.
• Should a fault occur to your alarm system, call the
alarm company without delay. Your display may
prompt you to do this.
CS450 User Manual
7
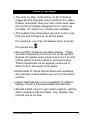
Different Types of Arming
• Arming means turning the system on.
• There are several different ways of arming.
Normal Set
Turns on the entire system.
Direct Arming
This turns on the system
without allowing an exit time.
Your keypad cannot be in the
guarded area.
Partguard 1
This arms part of the premises
but leaves unarmed some
preprogrammed areas that you
use. If you enter the secured
area without turning off the
alarm system an alarm will go
off.
Partguard 2
This arms part of the premises
but leaves unarmed some
preprogrammed areas you use.
If you enter the secured area
without turning off the alarm
system an alarm will go off.
Key Switch
This is a mechanical switch
which arms and disarms the
system without a code.
8
CS450 User Manual
Arming with
inhibited zones
If a zone is open the alarm
system cannot be switched on
until the zone has been
inhibited. This means that the
zone, for example the kitchen,
is left unguarded but the rest of
the premises will be guarded.
Only inhibit zones when
absolutely necessary.
If an open zone has the letter T
in front of it on the display, it is
a Tamper zone. This means
that the alarm system itself has
been tampered with in some
way. Zones cannot be inhibited
if tampering has occurred and
you must contact the installer.
After disarming, all the inhibited
zones are shown in the
Operator Log
Forced Arming
This switches on the system
when a number of zones are
open without having to inhibit
each one individually.
Zones which cannot be inhibited
individually cannot be inhibited
by forced arming.
Zones cannot be inhibited if
tampering has occurred.
CS450 User Manual
9
Turning on the Alarm System
• This is known as ARMING.
• Check that the premises are secure.
• Go to the keypad.
Press
t+ user code
CODE ACCEPTED
ARM MENU
Press
uu
NORMAL SET
•
•
The buzzer will sound.
Leave the premises
Quick Code
Turn the system on quickly without a
code by pressing
10
t x
CS450 User Manual
Direct Arming
• Turns on the system without an exit time.
• You should not be in the area to be guarded.
• Go to the keypad.
Press
t+ user code
CODE ACCEPTED
ARM MENU
Press
ux
SET (NO BUZZER)
SYSTEM ARMING
SYSTEM ARMED
Quick Code
Direct Arm quickly without a code by
pressing
CS450 User Manual
t
y
11
Partguard 1
• This has been set up by your installer.
• It arms part of the premises but leaves unarmed
some areas you use.
• Go to the keypad.
Press
t+ user code
CODE ACCEPTED
ARM MENU
Press
uv
PARTGUARD 1
•
•
The buzzer will sound.
You should remain in the unsecured part of the
premises until the system is turned off.
Quick Code
Turn Partguard 1 on quickly without a
code by pressing
12
t {
CS450 User Manual
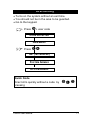
Partguard 2
• This has been set up by your installer.
• It arms part of the premises but leaves unarmed
some areas you use.
• Go to the keypad.
Press
t+ user code
CODE ACCEPTED
ARM MENU
Press
uw
PARTGUARD 2
•
•
The buzzer will sound.
You should remain in the unsecured part of the
premises until the system is turned off.
Quick Code
Turn Partguard 2 on quickly without
a code by pressing
CS450 User Manual
t |
13
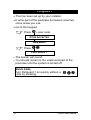
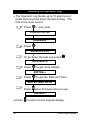
Inhibiting Zones
• Sometimes a fault can occur in your alarm system
which leads to an Open Zone message on the
display.
• The system cannot be armed until all open zones
are inhibited.
SYSTEM ARMING
OPEN ZONE(S)
03 HALL
Press
to start inhibiting
INHIBIT ZONE ___
Press
w(the number of the zone)
03 HALL
IS INHIBITED
SYSTEM ARMING
LEAVE NOW
SYSTEM ARMED
Note:You must inhibit the open zones each time
you turn on the alarm system until the fault is fixed.
14
CS450 User Manual
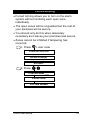
Forced Arming
• Forced Arming allows you to turn on the alarm
system without inhibiting each open zone
individually.
• The open zones will be unguarded but the rest of
your premises will be secure.
• You should only do this when absolutely
necessary as it leaves your premises less secure.
• Zones cannot be inhibited if tampering has
occurred.
Press
t+ user code
CODE ACCEPTED
OPEN ZONE(S)
03 HALL
Press
FORCED ARM ___
LEAVE NOW
SYSTEM ARMED
CS450 User Manual
15
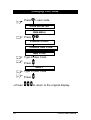
Turning off the Alarm System
• This is known as DISARMING.
• Open the entry door.
• The buzzer will sound.
• Follow these steps.
Press
t+ user code
CODE ACCEPTED
DISARM
SYSTEM DISARMED
FINISHED
Press
16
CS450 User Manual
What to Do After an Alarm
• The Red LED on the Alarm Panel will be lit.
Press
t user code
CODE ACCEPTED
DISARM?
Press
SYSTEM DISARMED
EVENTS IN LOG
The Display scrolls through the incidents
in all the zones. When you are finished
viewing
Press
until you see
FINISHED?
Press
SYSTEM DISARMED
CS450 User Manual
17
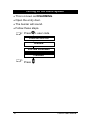
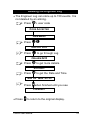
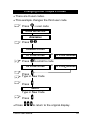
Reading the Operator Log
• The Operator Log stores up to 10 alarms and
faults that occurred since the last arming. The
first is the most recent.
Press
t+ user code
CODE ACCEPTED
ARM MENU
Press
z
OPERATOR LOG
To go down through Log press
# ALARM G=8
Press
t to get more details.
003THALL
Press
t to get the Date and Time
SUN 03 MAR 23:33
Press
when finished until you see
FINISHED?
• Press
18
to return to the original display.
CS450 User Manual
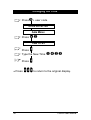
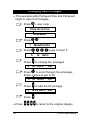
Reading the Engineer Log
• The Engineer Log can store up to 150 events. It is
not deleted by an arming.
Press
t+ user code
CODE ACCEPTED
ARM MENU
Press
xu
DISPLAY LOG
Press
to go through Log
# ALARM G=8
Press
t to get more details.
03THALL
Press
t to get the Date and Time
SUN 03 MAR 23:33
Press
when finished until you see
FINISHED?
• Press
to return to the original display.
CS450 User Manual
19
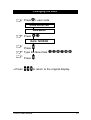
Changing the Time
Press
t+ user code
CODE ACCEPTED
ARM MENU
Press
xv
TIME 12:23
Press
Type the New Time
uxvw
Press
• Press
20
to return to the original display.
CS450 User Manual
Changing the Date
Press
t+ user code
CODE ACCEPTED
ARM MENU
Press
xw
DATE 12/03/96
Press
Type the New Date
uvt{}z
Press
• Press
CS450 User Manual
to return to the original display.
21
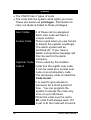
Codes
• The CS450 has 4 types of code
• The code tells the system what rights you have.
These are known as privileges. Permission to
carry out tasks is linked to these privileges
User Codes
8 of these can be assigned.
Each user code will have a
unique number.
Duress Code
This is used when you are forced
to disarm the system unwillingly.
The alarm system will be
switched off. If you have a
dialler connected a message will
then be sent to the alarm
company.
Engineer Code This is used by the installer.
Code 8
Code 8 is the eighth user code.
It can be used as a normal user
code or as a temporary code.
The temporary code is called the
Code Count.
It is used to give access to
someone for a short period of
time. You can program the
system to accept the code only
once or up to 98 times.
When the code count is set to
99, code 8 will always work. If it
is set to 0, the code will not work.
22
CS450 User Manual
Code Rules
Who can assign
a Code?
You must have the privilege
Mg to create and delete other
people’s codes.
How many digits You must use 4 -6 digits.
can be used?
Can two codes
A code must be unique
have the same
You cannot program a code
numbers?
which has the same first 4
digits as another code which
contains those numbers.
Example: If you have 1234 as
a code you cannot create
12345 as a code.
CS450 User Manual
23
Changing Your Code
Press
t+ user code
CODE ACCEPTED
ARM MENU
Press
ÎÊ
CHANGE CODES
CHANGE OWN CODE
NEW CODE
Type in New Code
Press
VERIFY
Type in New Code
Press
• Press
24
to return to the original display.
CS450 User Manual
Changing Other People’s Codes
• There are 8 user codes.
• This example changes the third user code
Press
+ user code
CODE ACCEPTED
ARM MENU
Press
º
CHANGE CODES
01 CODE IN USE
Press
or
01 CODE UNUSED
to scroll to code
03 CODE IN USE
or
03 CODE UNUSED
Press
Type in New Code
Press
VERIFY
Type in New Code
Press
• Press
CS450 User Manual
to return to the original display.
25
Setting Code 8 as a Temporary Code
• Code 8 can be used as a temporary code.
• This means that the code can only be used a set
number of times.
• The count can be set for between 1 and 98.
• If code 8 is set to 0, it will not work. If it is set to
99 code 8 will work as a normal user code.
• This example sets the count to 12. This means
that code 8 can be used up to 12 times.
Press
t+ user code
CODE ACCEPTED
ARM MENU
Press
º¹
CODE COUNT 99
Press
¶·
Press
• Press
26
to return to the original display.
CS450 User Manual
User Privileges
• User privileges tell the alarm system which parts
you can access. Your user code must have the
correct privileges assigned to it to carry out the
task. If it does not, contact your installer.
• You can only assign privileges if you have the
‘Mg’ privilege.
• It is not possible to assign privileges which you do
not possess.
Fs
Ps
Us
In
Mg
User Privileges
Turn on alarm system
Turn on partguard 1
Turn on partguard 2
Turn off alarm system.
Inhibit zones
Turn on forced arming
Do chime/bell test
Change all codes
View engineer log
Alter time and date
• The installer should leave one code with the Mg
privilege assigned to it. The user of that code
should then assign codes and privileges as
necessary.
• Most users will only need Fs and Us.
CS450 User Manual
27
Changing User Privileges
• This example adds Partguard Day and Partguard
Night to User 5’s Privileges.
Press
t+ user code
CODE ACCEPTED
ARM MENU
Press
yw
1
MGINPSUSFS
Press
to get to User 5
5
Press
5
IN USFS
to change the privileges
IN USFS
OK
Press
to scroll through the privileges
Press 3 times to get to Ps
5
Press
5
IN USFS
PS
to add the Ps privilege
IN PS USFS OK
Press
• Press
28
to return to the original display.
CS450 User Manual
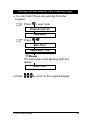
Testing the Bell Buzzer and Flashing Light
• You can test if these are working from the
keypad.
Press
t+ user code
CODE ACCEPTED
ARM MENU
Press
wv
BELLTEST
TIMING BELL TEST
Beeep
The bell buzzer and flashing light are
tested
BELL TEST
• Press
CS450 User Manual
to return to the original display.
29
Turning on the Door Chime
• A door can be programmed with a chime that
sounds every time it opens.
• This is set by the installer.
• When the chime is on it is enabled.
• When the chime is off it is disabled.
• These steps let you turn it enable and disable the
chime.
Press
t + user code
CODE ACCEPTED
ARM MENU
Press
wu
CHIME ENABLED
The chime was disabled but is now
enabled
Press
to switch between ‘Chime
Enabled’ and ‘Chime Disabled’
• Press
30
to return to the original display.
CS450 User Manual
Using the Keyswitch
• This is a mechanical switch which can turn the
system on and off without a code.
• Information on faults and alarms appears on the
keypad.
Turning on the Alarm System
Go to the key switch.
OK
Check whether the “System OK”
LED is on.
If this LED is not on, check the
keypad for a fault.
The system can now arm.
ON Turn the key switch to the ON
position.
Beeep
The beeper begins to beep. The
exit time has begun.
Leave now.
ON
The “System ON” LED shows that
the system is armed.
CS450 User Manual
31
Turning off the Alarm System
The entry period starts when you
open the entrance door, or enter
the entry zone.
Beep Beep
You can switch off the system
without activating the alarm while
the beeping continues.
ON
The “System ON” LED is on. The
system is armed.
Turn the key switch to the OFF
position if your key switch has a
OFF separate position for arming and
disarming.
The “System ON” LED is off. The
OFF system is now disarmed.
32
CS450 User Manual
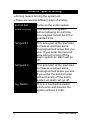
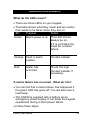
Questions and Answers
What do the LEDs mean?
• There are three LEDs on your keypad.
• This table shows what they mean and any action
that needs to be taken when they are on.
LED
Purpose
Action
Green
Mains power is on This LED should
always be on.
If it is not follow the
steps for a mains
failure
Orange Fault in alarm
system.
Contact installer
Red
Check the logs
Contact installer if
necessary
Alarm has
occurred
A mains failure has occurred. What do I do?
• You can tell that a mains failure has happened if
the green LED has gone off. You will also hear a
loud beep.
• The CS450 is supplied with a battery as an
emergency power supply. It can keep the keypad
operational during a short power failure.
• Follow these steps
CS450 User Manual
33
1.Enter your code to turn off the beep.
2.If there is electricity elsewhere in the building
check the fuse in the building’s fuse box. If this
has blown replace the fuse and check again.
3. If the fuse in the switch box is working but the
green LED is still off, contact the installer.
The display shows ‘Not Allowed’ when I try and
carry out a task
• You have probably not been assigned the user
privilege for that task. Contact the installer if you
want the privilege.
The display shows ‘Open Zone’ when I try and
arm. What do I do?
• Part of the alarm system has been left open. This
may mean that there is a door or window open or
that there is a fault in the system.
• Check that the doors and windows are closed.
• If there is still a fault try inhibiting the zone.
I cannot close an open zone. What do I do?
• Look closely at the open zone on the display. If
there is a T in front of it it is tamper zone. This
means that there has been some interference in
the alarm system. You must contact the installer.
• Check that you have the user privilege to inhibit
zones
How can I avoid false alarms?
• Make sure that nothing is going to fall against a
door or window.
• Make sure all users know:34
CS450 User Manual
1.How to turn the alarm system on and off.
2.The entrance and exit routes.
3.The number of the alarm company
What do I do if there is a false alarm?
• Disarm as usual.
• Contact the alarm centre to which you are linked.
My alarm won’t stop when I disarm the system
• Try entering your code again. You may have
entered it incorrectly.
• If this does not work, someone may have cut the
wire or there may be a problem with the control
box. Contact your installer.
CS450 User Manual
35
Glossary
Armed
Chime
The alarm system is ON.
An audible signal that a door has
been opened.
Code
A series of 4-6 numbers that allow
access to the system.
Code Count A counter that can be set with code
8 to tell the system how many times
the code can be used.
Code
Privileges assigned to a user code
Privileges
which tell the alarm system which
parts the user can access.
Direct Arm
Turns on the alarm system without
an exit time.
Disarmed
The alarm system is OFF.
Display
The window on the keypad.
Duress Code A code which disarms the system
but sends an alarm message when
a forced disarming takes place.
Engineer Log A permenant log which can contain
up to 150 events. These include
arming, disarming, alarms and
faults. It is not deleted at the next
arming.
Entry route
The route taken to enter and reach
the control panel to disarm the
system.
Exit route
The route taken to leave the
secured area after arming.
36
CS450 User Manual
Forced Arm
Switches on the alarm system when
a number of zones are open without
inhibiting each one individually.
Inhibited
Zones that are left open when the
Zones
rest of the system is armed. They
can be entered without triggering an
alarm.
KeySwitch
A mechanical device that can turn
the system on or off without a code.
Operator Log A temporary log which contains all
the alarms and faults between two
armings. It is deleted after every
arming.
Partguard 1 Sets the alarm system to guard part
of the premises in the day.
Partguard 2 Sets the alarm system to guard part
of the premises in the night.
Tamper
If the alarm system is interfered with
a tamper is recorded. You will not
be able to arm the alarm system
again until you have contacted your
installer.
Zone
An area guarded by a group of one
or more detection devices .
CS450 User Manual
37
Notes
38
CS450 User Manual
Notes
CS450 User Manual
39


![[ENG] CE60-3 GSM Software ComCE v4-2](http://vs1.manualzilla.com/store/data/005829621_1-1503a18c5b086c34f94e34b38a52b968-150x150.png)