1
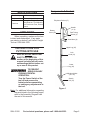
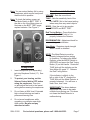
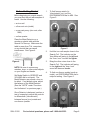
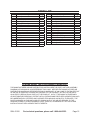
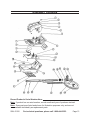
6-function
metal Detector
43150
Set up and Operating Instructions
Visit our website at http://www.harborfreight.com
Read this material before using this product.
Failure to do so can result in serious injury.
Save this manual.
Copyright© 2000 by Harbor Freight Tools®. All rights reserved. No portion of this manual or any artwork
contained herein may be reproduced in any shape or form without the express written consent of
Harbor Freight Tools. Diagrams within this manual may not be drawn proportionally. Due to continuing
improvements, actual product may differ slightly from the product described herein. Tools required for
assembly and service may not be included.
For technical questions or replacement parts, please call 1-800-444-3353.
Revised Manual 10c
not avoided, could result in
minor or moderate injury.
Save This Manual
Keep this manual for the safety
warnings and precautions, assembly,
operating, inspection, maintenance and
cleaning procedures. Write the product’s
serial number in the back of the manual
near the assembly diagram (or month
and year of purchase if product has no
number). Keep this manual and the
receipt in a safe and dry place for future
reference.
NOTICE is used to
address practices
not related to personal injury.
CAUTION, without
the safety alert
symbol, is used to address
practices not related to
personal injury.
General Power Tool Safety
Warnings
Important SAFETY
Information
WARNING Read all safety
warnings and instructions.
Failure to follow the warnings and
instructions may result in electric
shock, fire and/or serious injury.
Save all warnings and
instructions for future reference.
The term ″power tool″ in the
warnings refers to your batteryoperated (cordless) power tool.
In this manual, on the labeling,
and all other information
provided with this product:
This is the safety alert
symbol. It is used to alert
you to potential personal
injury hazards. Obey all
safety messages that
follow this symbol to avoid
possible injury or death.
DANGER indicates
a hazardous
situation which, if not
avoided, will result in death or
serious injury.
1.
Do not expose power tools to rain
or wet conditions. Water entering
a power tool will increase the risk of
electric shock.
WARNING
indicates a
hazardous situation which, if
not avoided, could result in
death or serious injury.
CAUTION, used
with the safety
alert symbol, indicates a
hazardous situation which, if
SKU 43150
Electrical safety
2.
Personal safety
a.Stay alert, watch what you are
doing and use common sense
when operating a power tool. Do
not use a power tool while you
are tired or under the influence
of drugs, alcohol or medication.
A moment of inattention while
operating power tools may result in
serious personal injury.
b.Do not overreach. Keep proper
footing and balance at all times.
For technical questions, please call 1-800-444-3353.
Page 2
information. If unreadable or missing,
contact Harbor Freight Tools for a
replacement.
This enables better control of the
power tool in unexpected situations.
3.
Power tool use and care
a.Do not use the power tool if the
switch does not turn it on and
off. Any power tool that cannot
be controlled with the switch is
dangerous and must be repaired.
b.Remove the batteries from
the power tool before making
any adjustments, changing
accessories, or storing power
tools. Such preventive safety
measures reduce the risk of starting
the power tool accidentally.
c. Store idle power tools out of
the reach of children and do not
allow persons unfamiliar with the
power tool or these instructions
to operate the power tool. Power
tools are dangerous in the hands of
untrained users.
d.Maintain power tools. Check
for misalignment or binding of
parts, breakage of parts and any
other condition that may affect
the power tool’s operation. If
damaged, have the power tool
repaired before use. Many
accidents are caused by poorly
maintained power tools.
4.
Service
a.Have your power tool serviced by
a qualified repair person using
only identical replacement parts.
This will ensure that the safety of the
power tool is maintained.
Metal Detector Safety Warnings
1.
Maintain labels and nameplates on
the tool. These carry important safety
SKU 43150
2.
Handle Tool carefully at all times.
Dropping Tool can cause damage to
circuit boards and housing, which can
cause tool malfunction or failure.
3.
Position batteries in proper polarity
and do not install batteries of different
types, charge levels, or capacities
together.
4.
Wear ANSI-approved safety goggles
and heavy-duty work gloves when
assembling and digging holes.
5.
Consult local regulations before
using detector, digging, or taking
any findings. Obtain property
owner’s permission before detecting
on their property.
6.
Only use and store in normal
temperature environments.
Extremes in temperature can shorten
effectiveness of electronic devices
and melt or damage plastic parts.
7.
Avoid electrical shock. Any metal
detector may discover underground
power lines, explosives or other
items which when struck could
cause personal injury. Do not use
this product in areas where there
might be underground electric lines
or pipes buried at shallow depths.
Never search in military zones where
bombs or other explosives may be
buried. Avoid striking any line known
or suspected to be carrying electric
power. Do not search any pipeline,
particularly if it could contain a
flammable gas or liquid. In areas of
uncertain conditions, use reasonable
caution before using the Tool. If there
For technical questions, please call 1-800-444-3353.
Page 3
is any question about a condition
being safe of unsafe, do not operate
the Tool.
8.
Keep the Metal Detector away from
any lights, TVs, computers, and
moble telephones. These can all
cause electromagnetic interference.
9.
Only the Search Coil (27) and
plastic section of the Lower
Leg (26) are water proof. Do not
immerse the unit any further into
water beyond the plastic section of
the Lower Leg.
10. Keep the Tool clean. Wipe the
housing after each use. The search
coil is washable and can be fully
submerged. Never submerge the
control housing. Protect the control
housing from rain, blowing surf and
heavy mist. Disassemble the Leg
and wipe it clean after use in sandy
areas.
14. WARNING: This product contains
or, when used, produces a chemical
known to the State of California to
cause cancer and birth defects or
other reproductive harm. (California
Health & Safety Code § 25249.5, et
seq.)
15. The warnings, precautions,
and instructions discussed in
this instruction manual cannot
cover all possible conditions and
situations that may occur. It must
be understood by the operator that
common sense and caution are
factors which cannot be built into this
product, but must be supplied by the
operator.
Save these
instructions.
11. Use the right tool for the job.
There are certain applications for
which this tool was designed. Do not
modify this tool and do not use this
tool for a purpose for which it was not
intended.
12. This product is not a toy. Keep it
out of reach of children.
13. People with pacemakers should
consult their physician(s) before
use. Electromagnetic fields in close
proximity to heart pacemaker could
cause pacemaker interference or
pacemaker failure. In addition,
people with pacemakers should:
• Avoid operating alone.
• Properly maintain and inspect to
avoid electrical shock.
SKU 43150
For technical questions, please call 1-800-444-3353.
Page 4
Specifications
Electrical Input
6 AA Batteries (not included)
Earphone Jack
3.5 mm mini-jack Socket
Functions
Battery Check Light; Ferrous
Metal Detector; Tune Adjuster;
One-Touch Auto Tone; Volume
Control
Unpacking
Components & Controls
Earphone Socket (17)
Handle
(3 / 4)
Battery
Cover (20)
Red Tuning
Button (2)
When unpacking, make sure the item
is intact and undamaged. If any parts
are missing or broken, call Harbor Freight
Tools at 1-800-444-3353.
View Meter (8)
Instructions for
putting into use
Upper Leg (25)
Lock
Knob (31)
Read the entire Important
Safety Information
section at the beginning of this
manual including all text under
subheadings therein before set
up or use of this product.
To prevent
serious injury
from accidental
operation:
Turn the Power Switch of the
tool off and remove the
batteries before assembling
or making any adjustments to
the tool.
Lower
Leg (26)
Note: For additional information regarding
the parts listed in the following pages,
refer to the Assembly Diagram near
the end of this manual.
SKU 43150
Adjusting Knobs
(28 / 32)
Search
Coil (27)
Figure 1
For technical questions, please call 1-800-444-3353.
Page 5
around the two Legs. Rotate the Nut
counterclockwise to lock the Legs.
Operating Instructions
Read the entire Important
Safety Information
section at the beginning of this
manual including all text under
subheadings therein before set
up or use of this product.
Tool Set Up
To prevent
serious injury
from accidental
operation:
Turn the Power Switch of the
tool off and remove the
batteries before adjusting tool
or installing accessories.
Lock Nut (31)
Threaded Lock Ring (29)
Upper Leg (25)
Tapered Bushing (30)
Figure 2
Note: When adjusting the length of the
Metal Detector, be careful to keep
the plastic Tapered Bushing (30) in
place with the smaller end toward the
smaller end of the Lock Nut (31).
1.
To attach the two legs, slide the
Threaded Lock Ring (29) over the
end of the Upper Leg (25), making
sure that the tabs inside the Lock
Ring lock into the cut-outs at the end
of the leg. Insert the tapered end of
the Tapered Bushing (30) into the
Lock Nut (31) and lightly thread the
Nut over the Lock Ring (29). Slide the
Lower Leg (26) into the Lock Nut. To
take the slack off the cord, rotate the
Lower Leg, enabling the cord to wind
SKU 43150
2.
To adjust the length of the Legs, turn
the Lock Nut in a clockwise direction,
slide the Lower Leg to the desired
extension length and turn the Nut
counterclockwise to secure the Legs
together.
3.
To adjust the angle of the Search
Coil, loosen the Adjusting Knobs (28,
32) and tilt it. Position the Search
Coil so that it is parallel to the ground
when holding the unit by the Handle
(3, 4).
4.
If needed, re-adjust the length of the
Metal Detector after adjusting the
position of the Search Coil.
Batteries
1.
Make sure the On/Off/Volume control
is set to OFF. Slide the Battery Cover
(20) off of the back of the Control
Box and insert six AA batteries (sold
separately), aligning polarities as
indicated. Replace the Battery Cover.
Note: Use only fresh batteries of the
required size and type. Do not mix
old and new batteries, different types
(standard, alkaline, or rechargeable),
or rechargeable batteries of different
capacities.
Always remove old or weak batteries.
Batteries can leak chemicals that can
destroy electric parts.
If you do not plan to use the detector
for a week or more, remove the
batteries.
Dispose of spent batteries according
to your local, state and federal
regulations.
For technical questions, please call 1-800-444-3353.
Page 6
Note: You can extend battery life by using
earphones, which require less power
than the built-in speaker.
Note: To check the battery power, set
the Mode Switch to BATT TEST. If
the dial on the View Meter does not
fluctuate on the BATT TEST range,
replace batteries. See Figure 3.
Functions and Indicators
VOLUME - Sets the sound level.
TUNE - Sets the sensitivity level of the
unit. NOTE: Set to the lowest setting
when away from any metal objects.
MODE - Sets the unit to two modes:
OPERATE and BATT TEST.
Red Tuning Button - Press this button
and set the TUNE dial to 0 to
properly balance the Detector.
DISCRIMINATION - Adjustment knob for
metal-type identification.
Red Tuning
Button (2)
MODE
Switch
Figure 3
Headphones
1.
2.
Insert headphone (sold separately)
jack into Earphone Socket (17). See
Figure 1.
To protect your hearing, set the
Volume Control dial to OFF before
using the earphones. Then turn
on and adjust the level to the lowest
setting before wearing the earphones.
3.
Do not listen at MAX level. Extended
high volume listening can lead to
permanent hearing loss.
4.
Do not wear headphones while
operating your detector near hightraffic areas. Be safe and pay
attention to traffic.
SKU 43150
View Meter - Registers signal strength
when a metal is detected.
NOTE: The Metal Detector must be
properly balanced before testing
or operation. To balance the Metal
Detector, slide the MODE Switch to
OPERATE and press the Red Tuning
Button (2) on the Handle. Rotate the
TUNE dial until the indicator on the
View Meter (8) reads “0”. Release
the Red Tuning Button.
If the indicator is slightly to the
left or right of the “0,” readjust the
TUNE dial until the Metal Detector is
properly balanced. You will hear a
clear “hum, hum” tone.
IMPORTANT! The above balance
adjustment may have to be made
multiple times during use. This does
not mean the Metal Detector is
malfunctioning.
For technical questions, please call 1-800-444-3353.
Page 7
Before Getting Started
1.
Before beginning an outside search,
you must test the unit with samples of
metal. Use the following:
To find ferrous metals (to
“discriminate” iron), set the
DISCRIMINATION dial to MIN. See
Figure 5.
• an iron nail
• a five-cent coin (nickel)
• a one-cent penny (zinc coin, after
1982)
• a silver quarter
Place the Metal Detector on a
wooden or plastic table with the
Search Coil face up. Make sure the
table is away from TVs, computers,
or any device that can cause
interference. See Figure 4.
Figure 4
NOTE: Be sure to remove any
watches, rings, or other metal objects
on your fingers and hands.
Set Mode Switch to OPERATE and
VOLUME dial to mid-point. The
Metal Detector may sound a tone or
be silent. If not already done, adjust
the balance of the Metal Detector.
(See the “NOTE” under “Functions
And Indicators” on previous page.)
Figure 5
2.
Hold the iron nail sample close to the
Search Coil. The indicator on the
View Meter will swing to the left and
the “hum, hum” tone will be lighter.
3.
Bring the other coins close to the
Search Coil. The indicator will swing
to the right and the “hum, hum”
sound will become louder.
4.
To find non-ferrous metals (such as
nickel), set DISCRIMINATION dial to
midpoint setting. See Figure 6.
Once Detector is balanced, perform a
test of a sample to adjust the controls
to differentiate (“discriminate”)
between ferrous (iron) metals and
non-ferrous (metals.
Figure 6
SKU 43150
For technical questions, please call 1-800-444-3353.
Page 8
5.
Reset the balance of the Metal
Detector.
6.
Bring the nickel coins close to the
Search Coil. The indicator will move
to the left and the sound will get
softer. Bring the silver coins close
to the Search Coil. The indicator
will move to the right and the sound
will get louder. The midpoint is the
discrimination setting for nickel.
7.
a buried metal. By turning the
DISCRIMINATION dial from MIN to
MAX, you can determine the type of a
buried item.
From MIN to MAX, the order of
metals goes:
- Iron
- Nickel
- Gold
- Brass
- Zinc,
- Copper
- Silver (Aluminum)
For easy reference:
For ferrous metals, the indicator
will always move to the left and the
sound will grow softer when the
DISCRIMINATION dial is set to any
location.
For silver, the indicator will move
to the right and the sound will get
louder when the DISCRIMINATION
dial is set to any location.
NOTE: The discrimination position of
aluminum is close to silver.
8.
NOTE: When DISCRIMINATION is
set to MIN, the Metal Detector does
have greater sensitivity as compared
to when it is set at MAX setting.
When DISCRIMINATION is set to
MIN, only ferrous metals will make
the indicator move to the left. All
other samples will make the indicator
move to the right.
When DISCRIMINATION is set to
MAX, only silver-based metals
will make the indicator move to the
right. All other samples will make the
indicator move to the left.
Different metals have their own
discrimination position. This is
important to know, as all metals
appear in the form of alloys and their
composition can be complicated.
Use the above sample test as a
general reference guide to help
determine the composition of
SKU 43150
For technical questions, please call 1-800-444-3353.
Page 9
General Operating Instructions
Once all the proper tests and
adjustments have been made, the
Metal Detector is ready to be used
outdoors.
NOTE: Make sure Metal Detector is
properly balanced before use.
NOTE: Be sure to keep the angle
between the Search Coil and the
Detector’s Lower Leg at about 140°
See Figure 7.
Figure 7
Figure 8
3.
Sweep the Search Coil (27) slowly
back and forth in an arc, keeping it
about 1/2” to 2” from the ground. See
Figure 8, above.
4.
If you hear a beeping noise or see
the needle jump to the right on the
View Meter), you have located a
metal object.
5.
Use DISCRIMINATION dial to
determine what kind of metal it is and
whether you wish to dig out the item.
6.
To prevent accidents, turn off the tool
and remove the batteries after use.
Clean, then store the tool indoors out
of children’s reach.
Tips for Searching in Different
Environments
1.
When first searching, set the Mode
button to OPERATE.
2.
Adjust the VOLUME to the desired
level.
SKU 43150
There are many factors which
influence the sensitivity and accuracy
of detecting objects, including the
angle, depth, size and oxidation
of the target object. Various soil
or seawater conditions, and also
electromagnetic and electrical
interference surrounding the target
can also affect readings. Other metal
detectors in the area will also cause
interference, so when there is more
than one unit in use, be sure they are
at least 10 yards apart. Some ways to
help increase success are:
For technical questions, please call 1-800-444-3353.
Page 10
1.
2.
3.
4.
5.
If there is interference from similar
metal detectors in your searching
area, lower the DISCRIMINATION
and adjust the TUNE setting to stop
the interference. You may also need
to rebalance the Metal Detector.
Maintenance And
Servicing
Procedures not specifically
explained in this manual
must be performed only by a
qualified technician.
If there is interference from electrical
cables, TV, radio, or other electrical
devices in your searching area, lower
the DISCRIMINATION setting.
To prevent
serious injury
from accidental
operation: Turn the Power
Switch of the tool off and
remove the batteries from the
tool before performing any
inspection, maintenance, or
cleaning procedures.
When searching in highly mineralized
areas, the unit may sound even
if there is no metal. Lower the
DISCRIMINATION setting and
increase the distance of the Search
Coil from the ground until the false
signal disappears. You may also
need to rebalance the Metal Detector.
When searching in a trash area, set
the DISCRIMINATION to the middle
setting so that the unit can reject
most invaluable metals such as nails,
bottle caps, cans, and small pieces of
iron.
Do not use damaged
equipment. Have the problem
corrected before further use.
Cleaning and Maintenance
1.
BEFORE EACH USE, inspect the
general condition of the tool. Check
for loose hardware, misalignment or
binding of parts, cracked or broken
parts, damaged electrical wiring, and
any other condition that may affect its
safe operation.
2.
Handle the Metal Detector gently and
carefully. Dropping it can damage
circuit boards and the case, and can
cause the Detector to malfunction.
3.
After Use, wipe external surfaces
of the tool with a damp clean cloth,
then dry. Do not use harsh chemicals,
cleaning solvents, or strong
detergents to clean the detector.
Move all metal digging tools away
from the Metal Detector when
searching.
SKU 43150
For technical questions, please call 1-800-444-3353.
Page 11
Part
1
2
3
4
5
6
7
8
9
10
11
12
13
14
15
16
17
Description
Button Cover
Tuning Button
Left Handle Cover
Right Handle Cover
Screw (ST2.9 x 12)
Nut (M3)
Control Box Lid
View Meter
Speaker Bushing
Speaker
Control Knobs
PCB Board
Lining Board
Bushing
Screw (St2.9 x 12)
Bushing
Earphone Socket
Parts List
Qty
1
1
1
1
1
1
1
1
1
1
3
1
1
1
1
1
1
Part
18
19
20
21
22
23
24
25
26
27
28
29
30
31
32
33
Description
Control Box Base
Screw (M3 x 20)
Battery Cover
Screw (St2.9 x 12)
Screw (M3 x 40)
Screw (M3 x 25)
Nut (M3)
Upper Leg
Lower Leg
Search Coil
Right Adjusting Knob
Threaded Lock Ring
Tapered Bushing
Lock Knob
Left Adjusting Knob
Bushing
Qty
1
1
1
1
1
1
4
1
1
1
1
1
1
1
1
1
PLEASE READ THE FOLLOWING CAREFULLY
The manufacturer and/or distributor has provided the parts list and assembly
diagram in this manual as a reference tool only. Neither the manufacturer or
distributor makes any representation or warranty of any kind to the buyer that
he or she is qualified to make any repairs to the product, or that he or she is
qualified to replace any parts of the product. In fact, the manufacturer and/
or distributor expressly states that all repairs and parts replacements should
be undertaken by certified and licensed technicians, and not by the buyer. The
buyer assumes all risk and liability arising out of his or her repairs to the
original product or replacement parts thereto, or arising out of his or her
installation of replacement parts thereto.
SKU 43150
For technical questions, please call 1-800-444-3353.
Page 12
ASSEMBLY DIAGRAM
Record Product’s Serial Number Here:
Note: If product has no serial number, record month and year of purchase instead.
Note: Some parts are listed and shown for illustration purposes only, and are not
available individually as replacement parts.
SKU 43150
For technical questions, please call 1-800-444-3353.
Page 13