1
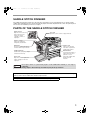
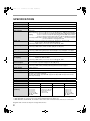
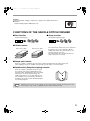
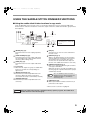
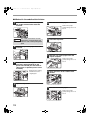
APAN
DSC1
5QSZZ
AR-F14.book 1 ページ
2004年1月15日 木曜日 午後6時10分
MODEL
AR-F14
SADDLE STITCH FINISHER
OPERATION MANUAL
Page
• SADDLE STITCH FINISHER
• PARTS OF THE SADDLE
STITCH FINISHER
• SPECIFICATIONS
• FUNCTIONS OF THE SADDLE
STITCH FINISHER
• USING THE SADDLE STITCH
FINISHER FUNCTIONS
1
1
2
3
5
• USING THE SADDLE STITCH
FINISHER TO MAKE COPIES 6
• REPLACING THE STAPLE CARTRIDGE
AND REMOVING STAPLE JAMS
8
• REMOVING PAPER MISFEEDS 11
• TROUBLESHOOTING
14
• USING THE KEY OPERATOR
PROGRAMS
15
AR-F14.book 1 ページ
2004年1月15日 木曜日 午後6時10分
For users in the USA
This device complies with Part 15 of the FCC rules. Operation is
subject to the following two conditions: (1) This device may not cause
harmful interference, and (2) this device must accept any interference
received, including interference that may cause undesired operation.
WARNING:
FCC Regulations state that any unauthorized changes or modifications to
this equipment not expressly approved by the manufacturer could void the
user's authority to operate this equipment.
Note:
This equipment has been tested and found to comply with the limits for a Class
A digital device, pursuant to part 15 of the FCC Rules. These limits are designed
to provide reasonable protection against harmful interference when the
equipment is operated in a commercial environment. This equipment generates, uses, and can radiate radio frequency energy and, if not installed and
used in accordance with the operation manual, may cause harmful interference to radio communications. Operation of this equipment in a residential area is
likely to cause harmful interference in which case the user will be required to
correct the interference at his own expense.
Warning
This is a Class A product. In a domestic environment this product may cause radio
interference in which case the user may be required to take adequate measures.
This equipment complies with the requirements of Directive 89/336/EEC as amended by
93/68/EEC.
Dieses Gerät entspricht den Anforderungen der EG-Richtlinie 89/336/EWG mit Änderung
93/68/EWG.
Ce matériel répond aux exigences contenues dans la directive 89/336/CEE modifiée par la
directive 93/68/CEE.
Dit apparaat voldoet aan de eisen van de richtlijn 89/336/EEG, gewijzigd door 93/68/EEG.
Dette udstyr overholder kravene i direktiv nr. 89/336/EEC med tillæg nr. 93/68/EEC.
Quest’apparecchio è conforme ai requisiti della direttiva 89/336/EEC come emendata dalla
direttiva 93/68/EEC.
Este equipamento obedece às exigências da directiva 89/336/CEE na sua versão corrigida
pela directiva 93/68/CEE.
Este aparato satisface las exigencias de la Directiva 89/336/CEE, modificada por medio de la
93/68/CEE.
Denna utrustning uppfyller kraven enligt riktlinjen 89/336/EEC så som kompletteras av
93/68/EEC.
Dette produktet oppfyller betingelsene i direktivet 89/336/EEC i endringen 93/68/EEC.
Tämä laite täyttää direktiivin 89/336/EEC vaatimukset, jota on muutettu direktiivillä
93/68/EEC.
The CE mark logo label is affixed on an equipment in case that the directives described in the
above sentence are applicable to the product. (This sentence is not applicable in any country
where the above directives are not required.)
AR-F14.book 1 ページ
2004年1月15日 木曜日 午後6時10分
SADDLE STITCH FINISHER
The saddle stitch finisher features the offset function, which makes it easy to distinguish sets of output, and the
saddle stitch (pamphlet) function, which automatically staples and folds output down the center. An optional punch
unit can also be installed to punch holes in output.
PARTS OF THE SADDLE STITCH FINISHER
Staple section
Open the front cover and
pull out this section to
replace the staple
cartridge or remove a
staple jam.
Top cover
Open this cover to remove a paper misfeed.
Stapler compiler
Paper to be stapled is
temporarily stacked here.
Offset tray
This tray is used for the offset
function and the staple function.
Center cover
Paper moves through
here when output to the
saddle stitch finisher.
Saddle stitch tray
Saddle stitch (Pamphlet) output
is delivered to this tray.
Detach button
Press this button when a
paper misfeed or other
problem occurs to
detach the saddle stitch
finisher from the
machine.
Front cover
Open this cover to replace the
staple cartridge or remove a
staple jam.
Caution
• Do not press down on or place heavy objects on the saddle stitch finisher (or on its trays in
particular).
• During output to the offset tray, the offset tray may move up and down.
Display screens, messages, and key names shown in this manual may differ from the actual screens, messages,
and key names due to modifications made for improvement.
This operation manual is described based on the American spelling standard.
1
AR-F14.book 2 ページ
2004年1月15日 木曜日 午後6時10分
SPECIFICATIONS
Name
Saddle Stitch Finisher
Number of trays
2
Paper output
Face down (when using the offset tray)
Tray types
Upper tray: Offset tray
Tray capacity
Upper tray:
Without stapling 8-1/2" x 11" / A4 size or less (21 lbs.(80 g/m2)): 1000 sheets maximum
8-1/2" x 13" / B4 size or greater (21 lbs.(80 g/m2)): 500 sheets maximum
Stapling
8-1/2" x 11" / A4 size or less (21 lbs. (80 g/m2)): 30 sets and 1000 sheets maximum
8-1/2" x 13" / B4 size or greater (21 lbs. (80 g/m2)): 30 sets and 500 sheets maximum
Lower tray (saddle stitch): Number of pages that can be stapled
10 sets x 6-10 pages
per set, or 20 sets x 1-5 pages per set
Paper size
Upper tray: 11" x 17", 8-1/2" x 14", 8-1/2" x 13", 8-1/2" x 11", 8-1/2" x 11"R,
5-1/2" x 8-1/2", A3, B4, A4, A4R, B5, B5R, A5
Lower tray (saddle stitch): 11" x 17", 8-1/2" x 11"R, A3, B4, A4R
Paper weight
Upper tray: 16 lbs. to 54 lbs. (60 g/m2 to 200 g/m2)
Lower tray (saddle stitch): 16 lbs. to 28lbs. (60 g/m2 to 105 g/m2)
Paper type
Upper tray: plain paper, heavy paper, letterhead paper, recycled paper, color paper
Lower tray (saddle stitch):plain paper, letterhead paper, recycled paper, color paper
Paper full detection
Upper tray / lower tray (saddle stitch): Yes
Offset function
Upper tray only
Allowed paper sizes
for stapling
Upper tray: 11" x 17", 8-1/2" x 14", 8-1/2" x 13", 8-1/2" x 11", 8-1/2" x 11"R,
A3, B4, A4, A4R, B5, B5R
Lower tray (saddle stitch): 11" x 17", 8-1/2" x 11"R, A3, B4, A4R
Number of pages that
can be stapled
8-1/2" x 11", A4 or smaller: 50 pages (21 lbs. (80 g/m2))
8-1/2" x 13", B4 or greater: 25 pages (21 lbs. (80 g/m2))
Stapling positions
Upper tray: 3 positions (top left staple, two left staples, lower left staple)
Lower tray (saddle stitch): 4-23/32"(120 mm) pitch from center of paper
Paper feeding
Center reference
Power supply
From power unit of multifunction machine
Dimensions
28-1/32" (W) x 23-3/4" (D) x 40-3/64" (H)(712 mm (W) x 603 mm (D) x 1017 mm (H))
(two trays or four trays installed)
28-1/32" (W) x 23-3/4" (D) x 36-7/64" (H)(712 mm (W) x 603 mm (D) x 917 mm (H)
(three trays installed)
Weight
Approx. 101.4 lbs. (46 kg)(finisher: 86 lbs. (39 kg), joint: 15.4 lbs. (7 kg))
Name
Punch module
Model*1
Number of holes
Paper sizes for hole
punching
Lower tray: Saddle stitch tray
AR-PN1A
AR-PN1B*2
AR-PN1C*3
AR-PN1D*3
2
3 or 2
4
4
11" x 17",
8-1/2" x 14",
8-1/2" x 13",
8-1/2" x 11",
8-1/2" x 11"R,
A3, B4, A4, A4R,
B5, B5R
3 holes: 11" x 17",
8-1/2" x 11", A3, A4
2 holes: 8-1/2"x14",
8-1/2" x 13",
8-1/2" x 11"R
A3, A4
11" x 17",
8-1/2" x 14",
8-1/2" x 13",
8-1/2" x 11",
8-1/2" x 11"R,
A3, B4, A4, A4R,
B5, B5R
*1 Multiple punch modules cannot be installed together. Some models may not be available in some regions.
*2 With AR-PN1B, two or three holes can be punched depending on the paper size.
*3 With AR-PN1C and AR-PN1D, the number of holes is the same. The hole interval, however, is not the same.
Diagrams and contents are subject to change without notice.
2
AR-F14.book 3 ページ
2004年1月15日 木曜日 午後6時10分
Supplies
The following staple cartridge is required as a supply for the saddle stitch finisher:
● AR-SC2
Staple Cartridge (approx. 5000 staples x 3)
FUNCTIONS OF THE SADDLE STITCH FINISHER
■ Sort function
■ Group function
Collates printed pages
Originals
Groups printed pages by page
Output
Originals
Output
■ Offset function
Offset function "ON"
Offset function "OFF"
The offset function offsets each set of output from
the previous set for easy separation. (On the
saddle stitch finisher, the offset function is only
possible using the offset tray.)
The offset function does not operate when the
staple sort function is selected.
■ Staple sort function
Each set of output is collated by the sort function, stapled, and delivered to the upper (offset) tray.
Three stapling positions are available: top left staple, two left staples, or lower left staple.
■ Saddle stitch (Pamphlet stapling) function
Each set of output is stapled in two places along
the centerline of the paper, folded (with the side
facing up inside), and delivered to the lower (saddle
stitch) tray. In the factory default settings, the
saddle stitch finisher is set to staple and fold sets
after "Pamphlet copy" is performed. If desired, the
"Pamphlet copy" function can be disabled using the
key operator programs.
Note
"Pamphlet copy" is used to copy two originals onto the front side and two originals onto the back side of each
sheet of paper for easy creation of a pamphlet (See the operation manual for copier).
3
AR-F14.book 4 ページ
2004年1月15日 木曜日 午後6時10分
■ Punch function (only when a punch unit is installed)
When an optional punch unit is installed on the
saddle stitch finisher, holes can be punched in the
output. Punched output is delivered to the offset
tray.
The punch function cannot be used in combination
with the saddle stitch (pamphlet stapling) function.
For paper sizes that can be punched, see the
specifications on page 2.
Caution
4
[Example]
Original 1
Punch hole positions
Original 2
Punch hole positions
• The following types of paper cannot be stapled:
Transparency film, heavy paper, label sheets, envelopes, postcards, thin paper
• The following types of paper cannot be punched:
Transparency film, label sheets, envelopes, postcards, thin paper
• Be sure to select the same paper size for the output. Stapling and punching are not possible
when different sizes are mixed together. Note, however, that if the widths are the same, the
"mix size original feeding mode"* function can be used to staple and punch different sizes of
paper (saddle stitch is not possible).
* Stapling and punching are not possible if "mix size original feeding mode" includes sizes
that cannot be stapled (such as 5-1/2" x 8-1/2" and A5).
AR-F14.book 5 ページ
2004年1月15日 木曜日 午後6時10分
USING THE SADDLE STITCH FINISHER FUNCTIONS
■ Using the saddle stitch finisher functions in copy mode
Touch the [OUTPUT] key in the main screen of copy mode to display the screen for selecting saddle stitch
finisher functions. Selections include the sort function, staple sort function, saddle stitch function, group function,
and output tray.
OUTPUT
OFFSET
TRAY
SORT
CENTER
TRAY
STAPLE
SORT
GROUP
OK
SADDLE
STITCH
PUNCH
OFFSET
The displayed menu will vary
depending on the country and
regions.
1
[GROUP] key (p.3)
Select this function to have output grouped by
page.
7
[OK] key
Touch this key to close the screen and return to
the main screen.
2
[STAPLE SORT] key (p.3)
Select this function to have output collated into
sets and stapled. The output is delivered to the
offset tray (without being offset).
8
3
[SORT] key (p.3)
Select this function to have output collated into
sets.
[OFFSET] key (p.3)
When a checkmark appears, the offset function
operates. When the checkmark is removed, the
offset function does not operate. (The offset
function does not operate when the staple sort
function or the saddle stitch function is selected.)
9
[SADDLE STITCH] key (p.3)
Each set of output is stapled along the centerline
of the paper and folded.
When this function is selected, the pamphlet copy
function (page 45 of operation manual for copier) is
automatically selected.
4
Icon display
When the sort, staple sort, group, or saddle stitch
function is selected, the corresponding icon
appears here.
5
[OFFSET TRAY] key (p.1)
Select this key to have output delivered to the
offset tray. (When the staple sort function is
selected, the offset tray is automatically selected.)
6
[CENTER TRAY] key
Select this key to have output delivered to the
center tray.
Note
10
When "AUTOMATIC SADDLE STITCH" is
disabled in the key operator programs, the
"PAMPHLET COPY" is automatically
deselected (p.15).
[PUNCH] key (p.4)
When a punch unit is installed, select this key to
punch holes in the output.
* When a function is selected, it is highlighted.
Caution
When the saddle stitch finisher is disabled in the key operator programs, the saddle stitch
finisher functions cannot be used (p.15).
5
AR-F14.book 6 ページ
2004年1月15日 木曜日 午後6時10分
■ Using the saddle stitch finisher functions in printer mode
To use the staple function in printer mode, select
"Properties" in the Print window. In the "Finishing"
field of the "Main" tab, select "Left", "Right", or "Top "
for "Binding Edge", and "1 Staple" or "2 Staples" for
"Staple".
To use the pamphlet function, select the "Pamphlet
Style" radio button in the "Document Style" field
and then select "Actual size" or "2-UP". In the
"Finishing" field, select "2 Staples" for "Staple".
Caution
PCL printer driver on the Windows XP as an example
I will change this screen to the correct English
screen in the final proof.
Some printers do not have the
pamphlet printing function.
Using the punch function when an optional punch unit is installed
To use the punch function, select the "Punch" checkbox in the "Finishing" field of the "Main" tab shown above.
Note
• To use the above printer function, the peripheral device installation settings must be correctly configured in the
printer driver properties. To configure the peripheral device installation settings, right-click the icon of the
installed printer driver, select "Properties", and then select the "Options" tab.
• The paper selection and combination of functions already selected may prevent some settings from being
selected. For detailed explanations of the settings, see the Help file for the printer driver.
USING THE SADDLE STITCH FINISHER TO MAKE COPIES
■ Orientation of the original when using the saddle stitch finisher function
When using the saddle stitch finisher to staple, make pamphlets, or punch holes, place the original as shown
below. Staple and punch positions vary depending on the staple position setting and the orientation of the original.
Using the RSPF
Place the original face up.
Using the document glass
Place the original face down.
Staple positions (example)
Top left staple
Two left staples
(11" x 17" and 8-1/2" x 14" (A3 and B4) size portrait originals)
Note
6
• When loading letterhead paper in the tray, orient the paper so that
the letterhead is away from you or to the left, as shown at right.
• When the staple sort or punch function is used, the automatic original
image rotation function does not operate.
SHARP
SHARP
lower left staple
AR-F14.book 7 ページ
2004年1月15日 木曜日 午後6時10分
The procedure for using the staple sort function is explained below.
1
Place the original (p.6).
2
Touch the [OUTPUT] key.
7
Using the RSPF
8
Using the document glass
Copying begins after all pages are scanned.
Place the next page on the document glass and
press the [START] key ( ). Repeat until all
pages have been scanned and then touch the
[READ END] key on the panel.
2-SIDED COPY
OUTPUT
PLACE NEXT ORIGINAL. PRESS [START].
WHEN FINISHED, PRESS [READ-END].
READ-END
3
Touch the [STAPLE SORT] key.
OUTPUT
OFFSET
TRAY
SORT
STAPLE
SORT
GROUP
4
If the memory becomes full while the pages are being
scanned, "MEMORY IS FULL. PRESS [START] TO
BEGIN COPYING OR [CA] TO CANCEL." will appear
in the display. To copy only the pages that have been
scanned to that point, press the [START] key ( ). To
cancel the job and clear the scanned pages from
memory, press the [CLEAR ALL] key ( ).
Select the staple position.
Note
top left two lower left
staple staples staple
5
When the [STAPLE
SORT] key is selected,
the offset tray is
automatically selected.
Output to the center tray
is not possible.
Select top left staple, two
staples, or lower left
staple as appropriate for
the original. For one
upper left staple when
the original is a size such
as 11" x 17" or 8-1/2" x
14" (A3 or B4) in the
portrait orientation, select
the lower left staple ( ).
To increase the number of pages that can be
scanned into memory, increase the memory
allocation in the key operator programs or
install more memory. (See "Key operator's
guide".)
Touch the [OK] key.
OK
CENTER
TRAY
SADDLE
STITCH
6
PUNCH
Select the number of copies and other
copy settings, and touch the [START]
key ( ).
7
honbun.fm
8 ページ
2004年1月15日 木曜日 午後8時33分
REPLACING THE STAPLE CARTRIDGE AND REMOVING STAPLE JAMS
A message will appear in the display when the staple cartridge needs replacement or a staple jam occurs.
Follow the procedures below to replace the cartridge or remove the jam.
■ Replacing the staple cartridge
1
Open the front cover.
6
Install the new staple cartridge in the
staple box.
Insert the staple
cartridge into the staple
box and then press
down on the staple box
cover to lock the staple
cartridge.
2
Pull the stapler section toward you.
3
Rotate roller rotating knob A in the
direction of the arrow to move the
staple unit all the way forward.
Caution
Roller
rotating
knob A
4
• Do not remove the seal that holds
the staples before installing the
staple cartridge in the staple box.
• Make sure that the new staple
cartridge is locked securely in the
staple box. Press down on the
staple box cover until you hear a
"click" indicating that the staple
cartridge is locked.
7
Pull the seal that holds the staples
straight out.
8
Push in the staple box.
Rotate the roller rotating
knob A until the triangle
mark and indicator are
aligned as shown in the
illustration.
Staple unit
Remove the empty staple box.
Push until you hear a
"click".
5
Remove the empty staple cartridge.
Press the lock button to
release the lock on the
staple box cover and
remove the staple
cartridge.
Note
8
The staple cartridge cannot be removed if
staples remain in it.
9
Push in the stapler section.
10
Close the front cover.
Caution
Make a test print or copy in staple
sort mode to verify that stapling
takes place correctly.
AR-F14.book 9 ページ
2004年1月15日 木曜日 午後6時10分
■ Removing a staple jam
1
Press the detach button and separate the
saddle stitch finisher from the machine.
6
Remove any misfed paper.
Remove the paper
gently without tearing it.
Caution
2
3
The saddle stitch finisher and the
machine are connected at the rear.
Exercise caution when pulling them
apart.
7
Close the saddle stitch section cover.
8
Pull the stapler section forward.
9
Rotate roller rotating knob A in the
direction of the arrow to move the
staple unit all the way forward.
Open the front cover.
Rotate roller rotating knob C until the
blue indicator appears as shown
below.
Blue
Roller rotating
knob C
4
Remove the paper from the stapler
compiler.
Roller
rotating
knob A
10
5
Rotate the roller rotating
knob A until the triangle
mark and indicator are
aligned as shown in the
illustration.
Staple unit
Remove the staple box.
Open the saddle stitch section cover.
9
AR-F14.book 10 ページ
11
2004年1月15日 木曜日 午後6時10分
Raise the lever on the front edge of
the staple box.
13
Push in the staple box.
Push the staple box all
the way in until you hear
a "click".
If the leading staple is
bent, be sure to cut it off.
If a bent staple is used
for stapling, a staple jam
will result.
12
Replace the front edge lever.
14
Push in the staple unit.
15
Close the front cover.
16
Push the saddle stitch finisher back
onto the machine.
Caution
Print a test job in staple sort mode to
verify that stapling takes place
correctly.
■ Discarding punch waste (when a punch unit is installed)
1
Press the detach button and separate
the saddle stitch finisher from the
machine.
Caution
2
The saddle stitch finisher and the
machine are connected at the rear.
Exercise caution when pulling them
apart.
Gently pull the punch waste
receptacle forward and discard the
punch waste.
Empty the punch waste
receptacle into a
garbage bag or other
container, taking care
not to let punch waste
scatter.
10
3
Replace the punch waste receptacle.
4
Push the saddle stitch finisher back
onto the machine.
AR-F14.book 11 ページ
2004年1月15日 木曜日 午後6時10分
REMOVING PAPER MISFEEDS
When a paper misfeed occurs during copying, a message and picture will appear in the display of the operation
panel as shown below and copying will automatically stop. Follow the procedures below to remove the misfeed.
A MISFEED HAS OCCURRED.
INFORMATION
Note
When a misfeed occurs, you can touch the [INFORMATION] key to display brief instructions for removing the
misfeed.
■ Misfeed in the relay path
1
Grasp the hand hold on the center
cover and open the cover.
2
Remove the misfed paper from the
conveyor unit.
Remove the paper
slowly, taking care not to
tear it.
3
Close the center cover.
11
AR-F14.book 12 ページ
2004年1月15日 木曜日 午後6時10分
■ Misfeed in the saddle stitch finisher
1
Press the detach button and separate
the saddle stitch finisher from the
machine.
Caution
2
3
The saddle stitch finisher and the
machine are connected at the rear.
Exercise caution when pulling them
apart.
Remove the misfed paper.
Remove the paper
gently, taking care not to
tear it.
6
Close the top cover.
7
Remove any misfed paper from the
stapler compiler.
Remove any misfed paper from the
machine.
Remove the paper
gently, taking care not to
tear it.
If there was no misfed paper in step 2,
pull roller rotating knob B on the
punch unit toward you and rotate it.
(Only when an optional punch unit is
installed.)
Roller rotating
knob B
4
5
Rotating roller rotating
knob B releases the
caught paper.
8
Open the cover of the saddle stitch
section.
9
Remove the misfed paper.
Open the top cover.
Remove the paper
gently, taking care not to
tear it.
12
AR-F14.book 13 ページ
2004年1月15日 木曜日 午後6時10分
10
Open the front cover.
11
Rotate roller rotating knob D in the
direction of the arrow.
15
Push the saddle stitch finisher back
onto the machine.
Roller rotating knob D
12
Remove any misfed paper from the
saddle stitch tray.
Remove the paper
gently, taking care not to
tear it.
13
Close the cover of the saddle stitch
section.
14
Close the front cover.
13
AR-F14.book 14 ページ
2004年1月15日 木曜日 午後6時10分
TROUBLESHOOTING (RELATED TO SADDLE STITCH
FINISHER)
If you experience difficulty with the saddle stitch finisher, check the following troubleshooting guide before calling for
service. Many problems can be resolved by the user.
Problem
Stapling position is not correct
(including saddle stitch)
The saddle stitch finisher does not
operate
Stapling does not take place
(including saddle stitch)
Incorrect punch position*1
Punching does not take place*1
"CALL FOR SERVICE.
CODE:F1-53." is displayed.
Cause and solution
Page
The staple function is not set correctly for the desired
staple position.
Check the possible staple positions and adjust appropriately.
3,6,7
The top cover or front cover of the saddle stitch finisher
is open.
Close all covers.
1
A message appears instructing you to remove paper from
the stapler compiler.
Remove all paper that remains in the stapler compiler as
explained in step 4 on p.9.
9
A message appears instructing you to check the staple
unit.
Remove the staple jam.
9
A message appears informing you that staples are
needed.
Replace the staple cartridge. Make sure that the staple box
has been installed.
8-9
Different widths of paper are mixed together.
Stapling of different widths of paper is not possible.
-
The paper is badly curled and is not stapled when output.
Some qualities and types of paper result in bad curling when
output. Remove the paper from the tray or the bypass tray,
turn it around to reverse the top and bottom, and reload it.
-
The punch function is not set for the desired punch
position.
Check the possible punch positions and adjust appropriately.
4
A message appears instructing you to check the punch
unit.
Discard the punch waste.
10
Different widths of paper are mixed together.
Punching of different widths of paper is not possible.
-
The paper is badly curled and is not punched when
output.
Some qualities and types of paper result in bad curling when
output. Remove the paper from the tray or the bypass tray,
turn it around to reverse the top and bottom, and reload it.
-
The cable between the machine and the saddle stitch
finisher is not connected.
Turn off the power of the machine, connect the cable on the
back of the saddle stitch finisher to the connector on the
machine, and then turn on the machine power.
-
*1 When an optional punch unit is installed.
14
AR-F14.book 15 ページ
2004年1月15日 木曜日 午後6時10分
USING THE KEY OPERATOR PROGRAMS
When the saddle stitch finisher is installed on the multifunction machine, the key operator programs indicated below
are added or changed. For information on "USING THE KEY OPERATOR PROGRAMS", see page 2 of the "Key
operator's guide" that comes with the machine.
■ Added programs
The following two programs are added to "DEVICE CONTROL" (page 12 of the "Key operator's guide"):
Disabling of finisher
This program is used to prohibit use of the saddle stitch finisher. The program is also used if the finisher fails.
When use of the finisher is prohibited, the staple function, saddle stitch function, punch function, and output
destination are grayed out.
Saddle stitch position adjust
This program is used to adjust the stapling position
(folding position) when the saddle stitch function is used.
The position can be shifted within a range of ±3.0 mm
from the base position in increments of 0.1 mm. When
"AUTOMATIC SADDLE STITCH" is disabled and
"SADDLE STITCH" is selected in "OUTPUT", the display
does not change to the pamphlet setting screen.
Max. +3 mm
Max. -3 mm
Position when
shifted to the "+"
side
1
Position when
shifted to the "-"
side
2
11
12
Base position
■ Changed programs
The "OUTPUT TRAYS" and "INITIAL STATUS SETTINGS" programs are changed when the saddle stitch
finisher is installed.
Output trays
A combination of output destinations can be
selected for copying, printing, and fax in "OUTPUT
TRAYS" in "DEVICE CONTROL". When the saddle
stitch finisher is installed, the combinations that can
be selected are as shown at right.
Selections
Description
PATTERN 1
Copying: Offset tray
Printing: Center tray
Fax: Center tray
PATTERN 2
Copying: Center tray
Printing: Offset tray
Fax: Center tray
PATTERN 3
Copying: Center tray
Printing: Offset tray
Fax: Offset tray
PATTERN 4
Copying: Offset tray
Printing: Center tray
Fax: Offset tray
Note
If the machine does not have the fax function,
"PATTERN 3" and "PATTERN 4" do not
appear and the tray positions in "PATTERN
1" and "PATTERN 2" change.
Initial status settings
The stapling position when the copy settings are returned to the default settings can be selected. Select the
stapling position for the staple sort function in "OUTPUT" in "INITIAL STATUS SETTINGS" of the "COPY
FUNCTION SETTINGS".
15
Cover4.fm
2 ページ
2004年1月15日 木曜日 午後6時39分
AR-F14
SHARP CORPORATION
Printed on 100% post-consumer recycled paper
PRINTED IN JAPAN
2004C
DSC1
TINSEXXXXQSZZ