1
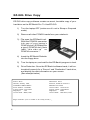
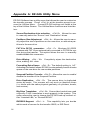
Portable Backup and Disaster Recovery
for your Laptop Computer
USER GUIDE
Table of Contents
EZ-Backit Pro Information
Before You Backup
EZ-GIG Drive Copy
Plug and Play Installation
NovaDisk File Backup
Restore Procedures
Uninstalling NovaDisk
Helpful Tips
Common EZ-Backit Errors
Appendix A: EZ-GIG Utility Menu
Technical Support
Warranty Information
2
3
4
6
7
10
11
12
13
14
15
16
EZ-Backit Pro Information
Thank You for purchasing the EZ-Backit Pro! The EZ-Backit Pro is a
self contained backup solution for your laptop computer. EZ-Backit
Pro was created to make backup easy for laptops, at home or on the
road. The Backit Pro is compatible with most laptop computers. It is
small, portable, easy to use, and can be customized to suit your individual backup needs.
Your EZ-Backit Pro Kit Includes:
The EZ-Backit Drive:
Contains a 2.5” IDE laptop hard drive, with a folding
PCMCIA connector. It is a self-contained, removable
hard drive that requires no additional power outlets. The
EZ-Backit installs as a Plug-and-Play device in most Windows Operating systems. Use EZ-Backit as your removable backup drive.
The Bootable diskette:
Contains the EZ-GIG Software. EZ-GIG is a “drive-todrive” copy utility for complete drive backups. Use this
diskette to copy your ENTIRE hard drive onto EZ-Backit
in one step.
The CD-ROM:
Contains the NovaDisk file-backup program. Once installed, this program can run file-backups with the click
of a Mouse. NovaDisk file-backup sets can also be customized and automated by the user. Use this program to
make quick daily backups of important files onto EZBackit.
We recommend using both EZ-Backit programs for the highest level
of backup protection. When used together, the EZ-Backit software will
provide complete backup against fatal hard drive crashes, and daily
backup for smaller errors.
2
Before You Backup...
Read this Manual FIRST! Make sure you are familiar with all of the
EZ-Backit procedures before you begin.
Organize a regular backup routine! Hard drive backup works best
when it’s done on a regular schedule, so take a moment to come up
with a plan that works best for you. A recommended backup routine
might be:
•
•
Run a Full Backup (using EZ-GIG) at the end of each month.
Perform daily backups (using Novadisk) at the end of each day.
Cleanup the Drive! It’s also a good idea to combine your Backups
with these other important maintenance tasks:
•
Clean up any file-system errors by running Windows
ScanDisk (or a similar disk cleanup utility) on your
internal hard drive before you run backups.
• Check with the laptop manufacturer for any BIOS updates.
Most BIOS updates are available-for-download on the
manufactures’ support website. If you find a BIOS update
for your laptop, it should be installed before running
backup.
3
EZ-GIG Drive Copy
EZ-GIG drive-copy software creates an exact, bootable copy of your
hard drive on the EZ-Backit Pro. To Use EZ-GIG:
1)
Turn the laptop OFF (make sure it’s not in Sleep or Suspend
mode).
2)
Remove all other PCMCIA cards from your notebook.
3) Flip open the EZ-Backit unit.
Slide the PCMCIA connector
into one of your laptop’s
PCMCIA slots (EZ-Backit fits
a type-II PCMCIA slot). Note
label “this side up” on
PCMCIA connector !
4)
Insert the EZ-Backit Diskette
into the floppy drive.
5)
Turn the laptop on, and wait for the EZ-Backit program to load.
6)
Drive Detection: Once the EZ-Backit software loads, it will automatically search for a “Source” and “Destination” hard drive,
and display the disk information on your screen.
(See example below)
Source Drive:
Internal, Primary IDE,
TOSHIBA MK2104MAV
Serial number: 77S50007
Logical C/H/S: 525/128/63
Megabytes:
2167
Access mode: BIOS, CHS
Destination Drive
External, PCMCIA Socket 0
IBM-DCXA-21000
Actual C/H/S: 16383/16/63
Logical C/H/S: 1299/240/63
Megabytes:
10056
Access Mode: IDE direct, LBA
Begin Transfer? (Y/N or CTRL-U for Utility menu) >_
4
EZ-GIG Drive Copy
7)
Review the drive information on the screen before starting a
copy. (Transfer settings may be modified from the utilities
menu - see pg. 14).
8)
Copy: Start the drive copy by pressing “Y” (a status line at
the bottom of the screen will display information about the
transfer-in-progress)
Press <CTRL-Q> to cancel process
Copying partition 1 of 1, 289 of 3754 files transferred, 8% done
9)
Once the EZ-GIG transfer is finished, the status line at the
bottom of the screen will display a completion message.
Elapsed Time = ## minutes ## seconds
Data has been successfully transferred.
Remove floppy diskette, turn computer off and install new drive.
10) Remove the Floppy diskette, and turn the computer off.
EZ-Backit now contains an exact copy of your internal drive!
NOTE: EZ-GIG is a “drive-to-drive” copy. Once you begin a copy, it
will overwrite everything on the Destination Drive. For help with EZGIG settings, error messages and other troubleshooting tips - please
see pgs 12-15
5
Plug and Play Installation
EZ-Backit Pro will install as a “plug-and-play” removable hard drive in
Windows 95/98/ME and Windows 2000. These Operating systems
already contain “built-in” device drivers that will work with EZ-Backit
Pro. No additional driver files are required. The complete installation instructions for each OS are located in the “README.TXT”
file on your EZ-Backit Pro CD-ROM. Depending on your system and
OS, You may have to install the hardware device drivers using the “Add
New Hardware” option inside the Windows Control Panel:
Windows 95 & 98, Windows ME:
During the “Add New Hardware” installation process, the
Wizard should detect the EZ-Backit Pro as a new ATA
device. Windows will install a “Standard IDE/ESDI Hard
Disk Controller” as the device driver.
When installed correclty, you should see this new driver
listed under “Hard Disk Controllers” in the Windows “Device manager” screen.
Windows 2000:
During the “Add New Hardware” installation process, the
Wizard should detect the EZ-Backit Pro as an ATA device. Windows will install a “PCMCIA IDE/ATAPI Controller” as the device driver.
When installed correctly, you should see this new driver
listed under “IDE/ATAPI Controllers” in the Windows 2000
“Device Manger” screen.
Once the device drivers are installed, the EZ-Backit Hard Drive will appear as an additional hard drive in Windows “My Computer” (If you have
already used the EZ-GIG Drive-Copy, you should see that the EZ-Backit
Pro already contains the same files as your internal drive). Under Windows 95/98/ME and 2000, the EZ-Backit is a “hot-swappable” device.
You can insert the EZ-Backit connector while the laptop is powered
on, and Windows will automatically detect the new drive. Remember:
use the Windows “PCMCIA Card Services” (Win95/98/ME) or the “Unplug and Eject Hardware” (Win2000) to stop access to the card before
physically removing it!
6
NovaDisk File-Backup
Installing NovaDisk Software: (for Windows 9X, ME, 2000, or NT)
1) Insert the EZ-Backit Pro CD-ROM
2) Browse to the NovaDISK folder on the CD.
3) Double-click the “setup.exe” icon to start the installation.
Running Novadisk File Backups:
The NovaDisk file-backup program allows the user to choose which files
to backup, and allows automatic scheduling of backup routines. Use
this program to select critical files you must back up on a daily basis.
You may also set NovaDisk to run only Incremental Backups. Incremental Backups will only backup files that have been changed since
the previous backup (unchanged files are ignored). The
The first time you run a backup procedure, N ovaDisk will ask you to name
your backup file. All NovaDisk backup files are assigned the extension
.QIX.
NovaDisk backup files also begin with the “000” prefix (the first backup
will have the prefix “001”, the next backup with the same name will have
a “002” prefix). When you have specified the location and name of the
backup file, press the Save button. NovaDisk will start the backup, and
a progress window will appear.
The progress window is designed to provide some useful feedback on
the progress of the backup. The display will show: files being backed
up, the number of files, percent completed, and how long the backup
has been running. Please note that if you have the “verify” option turned
on, NovaDisk will immediately read-back and verify the contents of the
backup file after it is created.
7
NovaDisk Options
The NovaDisk main program window has a user-friendly interface and
excellent visual guides to help you set up and run a file-backup procedure.
Each NovaDisk function is displayed across the top of the main program
window with a large Icon. The last button is a “Help” button. This button
opens a graphical help window that explains every NovaDisk option.
Main NovaDisk options:
My Backup
Runs a pre-selected backup procedure, which can be customized by
the user. To customize the “My Backup” option: From the main
menu bar select OPTIONS --> MY BACKUP. The “Set my Backup”
window allows the user to select the procedure and run-time settings
to use when the “My Backup” button is clicked.
8
NovaDisk Options
Select Files
Allows the user to manually select the files and settings for a backup
procedure. The “Select Files” window displays a directory-tree with
a list of every file and folder in your system, along with a checkbox
next to each item. Simply check any combination of drives, folders,
or files, and then click the “Save Procedure” button. Give your
procedure a name and click save. The newly created procedure will
now be available as a selection to use for “My Backup.”
Procedure
Use this option to manually run or cancel an existing backup
procedures. You may also use this option to edit the files or run-time
settings for backup procedures you have already created.
Restore
See Page 10
Options
Allows the user to modify NovaDisk settings. Use this option to
modify settings for My Backup, Restore, Encryption, Anti-Virus.
Scheduler
Allows automatic scheduling of backup routines. Once enabled, the
scheduler icon will be visible in the system tray of your Windows
desktop
View Logs
Allows the user to view a catalog of previous backups. The user can
see information about the date, settings, backup procedure, and
location for every backup file Novadisk creates.
Anti-Virus
Enables/Disables Anti-Virus protection during a backup or restore
procedure
Encryption
Allows the user to set a password to protect the backup files. No
encrypted backup files can be restored without the correct password.
9
Restore Procedures
Use EZ-Backit Pro to recover and restore you laptop after system
crashes, virus attacks, data losses, and installation errors. The Restoration Process has 2 stages: First, use EZ-GIG to restore your disk
back to the last full backup. Then use NovaDisk to restore your daily
or weekly backups (up to the point of your last “good” backup)
EZ-GIG restore is accomplished by simply reversing the direction of
the transfer:
1
Connect EZ-Backit Pro, and boot from the EZ-GIG diskette.
2
Reverse the direction of the EZ-GIG transfer. Use the “Switch”
option in the Utilities Menu to manually select the EzBackit Pro
as the “Source Drive,” and verify that the “Destination Drive” is
now set as the Internal drive. (See Appendix A for more details
on switching the source and destination drives).
3
Use EZ-GIG to transfer the entire contents of EZ-Backit Pro back
down onto your Internal Drive. This “reverse-copy” will restore
your laptop’s OS and file system back to the time of your last
Full Backup.
After using EZ-GIG to restore the Full Backup, use NovaDisk to restore the daily or weekly backup files you have run since your last
Full Backup. If you have set Novadisk to run Incremental Backups,
You must restore backup files in the order they were created.
To Restore Backups, start the NovaDisk program, and click the Restore button from the Novadisk Main Menu. Restore will search the
database to locate individual file or group of backup files. Locate the
backup files and select “Restore.” Once you have selected restore,
you will be asked whether you would like to use the backup indexes
that are stored on disk or whether you would like the program to check
the media location for indexes of files related only to the specific media. If you restore a full backup it may contain out-of-date indexes,
You may need to specify the location of your NovaDisk Backups. You
may also manually select certain files to be restored from within a
backup set.
10
Uninstalling NovaDisk
An uninstall utility is provided with NovaDisk. This program provides a onestep removal of your NovaDisk program group and associated files. You
may select two different levels of uninstall: Selective (removes only the
program installation & leaves backup files intact), or Complete (removes the
entire NovaDisk group and all backup files).
To run the uninstall utility, simply click on the uninstaller icon located in the
NovaDisk program group.
EZ-GIG Drive Overlay
If you need to restore your EZ-Backit onto a new, larger drive and your
system locks-up during boot, try installing a Drive Overlay. Some older
computers DO NOT support hard drives larger than 8GB. For this reason,
we have included Drive Overlay software on the EZ-GIG diskette.
EZ DRIVE software from Micro House has been included on the EZ-GIG
diskette:
Creating the EZ DRIVE diskette:
1) Insert the EZ-Backit diskette into the floppy drive. Open the diskette
under My Computer or Windows Explorer.
2) Copy and Paste the file “EZDRIVE.EXE” to your desktop. A new icon
will appear.
3) Double click on the new desktop icon and follow the instructions. You
will need a 1.44MB 3.5” floppy disk. Do not use the EZ-Backit Data Transfer
diskette for this purpose.
Installing EZ Drive Software to your NEW Hard Drive After EZ-GIG
1) Boot your computer with the EZ DRIVE diskette in your floppy drive.
2) From the ‘Main Menu’ choose‘ Advanced Options’.
3) Choose ‘EZ-BIOS setup from the ‘Advanced Options Menu’.
4) Press the ‘Y’ key to install the EZ-BIOS translation fix.
5) Exit EZ DRIVE.
6) Remove floppy diskette from floppy drive.
7) Reboot your computer.
11
Helpful Tips
Tips for EZ-GIG drive copy:
•
Extra devices may confuse EZ-GIG during the drive-detection process. If EZ-GIG cannot locate a second drive, remove all additional devices from your laptop (PCMCIA cards, docking stations,
external CD-ROMs, etc.) and try again.
•
EZ-Backit Pro was designed as a backup utility. It is not a data
recovery program. Use it BEFORE something goes wrong. EZGIG cannot fix corrupted data, and EZ-GIG cannot copy data
from a defective drive.
•
EZ-GIG may have trouble with Drive Overlays, Non-DOS boot
sectors, or password-protected hard drives. If you have any of
these on your drive, uninstall them before attempting EZ-GIG.
•
AN IMPORTANT NOTE ABOUT ANTI-VIRUS PROTECTION:
Some anti-virus programs may generate a false boot-virus warning after being restored from an EZ-Backit copy. For this reason, IT IS STRONGLY RECOMMEND THAT YOU REINSTALL
ANY ANTI-VIRUS SOFTWARE AFTER A FULL-DISK RECOVERY
Tips for NovaDisk file-backups:
12
•
Install the EZ-Backit drivers and the NovaDisk software before
you run the EZ-GIG drive copy. It will save you from reinstalling
them after a crash.
•
Use NovaDisk file-compression to save space on the EZ-Backit
drive.
•
Choose “Backup only files modified since last backup,” in the
NovaDisk Options. This enables NovaDisk’s incremental-backup
features. Daily Incremental backups are much faster, and allow you to restore your disk up to last known good day.
Common Errors
Answers to a few of the common EZ-Backit errors are listed below:
“Only one drive found...”
Remove all additional devices from your laptop (PCMCIA
cards, docking stations, modems, etc.) and try again.
Make sure the EZ-Backit is inserted correctly into the
PCMCIA slot. Try testing the unit in another laptop. Try
to upgrade your laptop’s BIOS version.
“Error Reading/Writing...”
EZ-GIG Read /Write errors are usually caused by bad sectors, a corrupted file, or a corrupted file table. Clean up the
file system using Scandisk or a similar program. If possible, run a diagnostic utility on the drive to check for mechanical errors.
“Error writing license data...”
Check the write-protect tab on the EZ-GIG diskette.
“Destination drive does not contain enough space...”
There is not enough room on the new drive to hold all the
data, or the partition could not be resized after copying to
the new drive.
EZ-GIG can see the EZ-Backit Drive, but it is not visible in Windows...
Check in the Windows ‘Device Manager’ screen to verify
that the EZ-Backit device drivers are installed correctly
(see page 8). Check for conflicts with other hardware devices. Make sure you have a valid partition table (or EZGIG copy) on the EZ-Backit drive. Make sure you have
administrative rights (under Windows 2000 only) to add
new hardware to your laptop.
A Complete list of all EZ-GIG error messages and solutions is available on the Apricorn website: www.apricorn.com
13
Appendix A: EZ-GIG Utility Menu
EZ-GIG Software has a utility menu that allows the user to customize
the transfer process. Press <Ctrl- U> at the transfer prompt to access the Utilities Menu. Current EZ-GIG settings are listed at the
top of the Utilities Screen. The Utilities Menu functions are listed below:
Source/Destination drive selection: <Ctrl-S> Allows the user
to manually select the “Source” and “Destination” drives.
Partitions Size Adjustment: <Ctrl - A> Allows the user to manually adjust the size of partitions on the new drive, or add extra partitions to the new drive.
FAT16 to FAT32 conversion: <Ctrl - C> Windows 95 OSR2
systems with FAT16 are automatically converted to FAT32 file system during the transfer. This option allows the user to manually
enable/disable this conversion.
Drive Wiping: <Ctrl - W>
drive, erasing ALL data.
Completely wipes the destination
Formatting Extra Space: <Ctrl - E> The default setting is “off.”
Activating this feature allows EZ-GIG to automatically format all extra
space on the new drive for use as data partitions.
Suspend Partition Transfer: <Ctrl-P> Allows the user to enable/
disable the transfer of the Suspend Partition.
Drive Duplication: <Ctrl - D> The source drive is duplicated
sector-by-sector. This process will only work on identical drives
(i.e. drives with the same physical geometry of cylinders, heads,
and sectors).
Big Drive Translation: <Ctrl - B> Some older hard drives need
a specific C/H/S translation to work properly in the system. This
option allows the user to change the EZ-GIG look-up method: either “Assisted LBA,” or “Revised ECHS.”
IDE/BIOS Support: <Ctrl - I> This capability lets you decide
which mode of access for the transfer: BIOS, or IDE Direct.
14
Technical Support
Before You Contact Technical Support:
•
Review the Installation & Troubleshooting Section of the
User’s Guide for helpful tips and solutions to the most
common errors.
•
Visit the Apricorn Website: http://www.apricorn.com. The
Support section has complete tech support information,
driver downloads, FAQ’s, warranty information, and the
most up-to-date EZ-Backit support information.
If you need further assistance, please contact our technical support
Dept. Please have the Apricorn part number (from your box or receipt),
laptop model, and a specific description of the error when you contact
us. Apricorn’s Technical Support Specialists are available from 8:00
am to 5:00 pm, Monday through Friday, PST:
Technical Support E-mail:
[email protected]
Technical Support help line:
(858)-513-2000
Warranty Information
Complete Warranty Replacement procedures are available on our
website: http://www.apricorn.com.
Contact the Apricorn Tech Support Dept with the Apricorn part number, a receipt, and a description of the problem you’re experiencing. If
Apricorn finds cause for a return, they will issue a Return Authorization (RMA number) to reference on your return shipment. No shipments
will be accepted without a valid RMA number. Purchaser shall be responsible for any loss or damage to the returned product until it is received by Apricorn. Purchaser should consider obtaining insurance with
respect to shipping the product. It is the customer’s responsibility to
write the RMA number on the exterior of the package and send the
prepaid package to: Apricorn Warranty Returns, Attn RMA#_____,
12191 Kirkham Road, Poway, CA 62064
15
Warranty Information
Three-Year Warranty (Hard Drive and Case)
Apricorn will warrant the EZBackit Pro hard drive and case against
defects in materials and workmanship under normal use for three years.
This warranty does not cover expendable parts.
Disclaimer and Terms of the Warranties:
THE WARRANTY BECOMES EFFECTIVE ON THE DATE OF PURCHASE AND MUST
BE VERIFIED WITH YOUR SALES RECEIPT OR INVOICE DISPLAYING THE DATE OF
PRODUCT PURCHASE.
APRICORN WILL, AT NO ADDITIONAL CHARGE, REPAIR OR REPLACE DEFECTIVE
PARTS WITH NEW PARTS OR SERVICEABLE USED PARTS THAT ARE EQUIVALENT
TO NEW IN PERFORMANCE. ALL EXCHANGED PARTS AND PRODUCTS REPLACED
UNDER THIS WARRANTY WILL BECOME THE PROPERTY OF APRICORN.
THIS WARRANTY DOES NOT EXTEND TO ANY PRODUCT NOT PURCHASED DIRECTLY FROM APRICORN OR TO ANY PRODUCT THAT HAS BEEN DAMAGED
OR RENDERED DEFECTIVE: 1. AS A RESULT OF ACCIDENT, MISUSE, NEGLECT,
ABUSE OR FAILURE AND/OR INABILITY TO FOLLOW THE WRITTEN INSTRUCTIONS PROVIDED IN THIS INSTRUCTION GUIDE; 2. BY THE USE OF
PARTS NOT MANUFACTURED OR SOLD BY APRICORN; 3. BY MODIFICATION OF
THE PRODUCT; OR 4. AS A RESULT OF SERVICE, ALTERATION OR REPAIR BY
ANYONE OTHER THAN APRICORN AND SHALL BE VOID. THIS WARRANTY DOES
NOT COVER NORMAL WEAR AND TEAR.
NO OTHER WARRANTY, EITHER EXPRESS OR IMPLIED, INCLUDING ANY WARRANTY OF MERCHANTABILITY AND FITNESS FOR A PARTICULAR PURPOSE, HAS
BEEN OR WILL BE MADE BY OR ON BEHALF OF APRICORN OR BY OPERATION OF
LAW WITH RESPECT TO THE PRODUCT OR ITS INSTALLATION, USE, OPERATION,
REPLACEMENT OR REPAIR.
APRICORN SHALL NOT BE LIABLE BY VIRTUE OF THIS WARRANTY, OR OTHERWISE, FOR ANY INCIDENTAL, SPECIAL OR CONSEQUENTIAL DAMAGEINCLUDING
ANY LOSS OF DATA RESULTING FROM THE USE OR OPERATION OF THE PRODUCT,
WHETHER OR NOT APRICORN WAS APPRISED OF THE POSSIBILITY OF SUCH
DAMAGES.
16