1
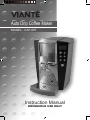
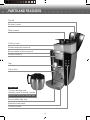
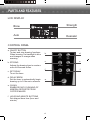
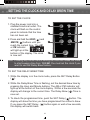
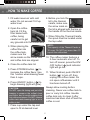
9
Auto Drip Coffee Maker
MODEL : CAF-05T
Instruction Manual
HOUSEHOLD USE ONLY
Vianté is very safety conscious
When using electrical appliances, to reduce the risk of fire, electric shock, and/or injury to person
basic safety precautions should always be followed, including the following:
IMPORTANT SAFEGUARDS
● Read all instructions carefully.
● Do not let cord hang over edge of table or
counter, or touch hot surfaces.
● Do not touch hot surfaces.
● Do not place on or near hot gas or electric
burner, or in a heated oven.
● To protect against electric shock, do not place
cord, plug or coffee maker in water or other
liquid.
● Close supervision is necessary when any
appliance is used by or near children.
● Always plug cord into the wall outlet before
turning on any controls. To disconnect, turn
power control to OFF, then unplug.
● Unplug from outlet when not in use and before
cleaning. Allow to cool before lifting or changing
parts, and before cleaning the appliance.
● Always use cold water to make coffee. Warm
water or other liquids could cause damage to
the coffee maker.
● Do not operate any appliance with a damaged
cord or plug or after the appliance malfunctions
or has been damaged in any manner. Return
appliance to authorized service facility for
examination, repair or adjustment.
● Scalding may occur if the cover is lifted or
removed during the brewing cycle.
● Use only attachments recommended by
manufacturer.
● Coffee maker must be operated on a flat
surface away from the edge of counter to
prevent accidental tipping.
● Do not use this appliance for other than
intended use.
● Do not use outdoors.
IMPORTANT: Never use the coffee tank to carry or pour hot coffee.
Handle coffee tank only when empty or containing cold
water.
SAVE THESE INSTRUCTIONS
HOUSEHOLD USE ONLY
RETURN TO MANUFACTURER OR
AUTHORIZED DEALER
1
SHORT CORD INSTRUCTIONS
A. We do not recommend using an extension cord with this device.
B. If an extension cord is absolutely necessary,
(1) the marked electrical rating of the extension cord should be at least as great as the electrical
rating of the machine,
(2) the longer cord should be arranged so that it will not drape over the countertop or table top
where it can be pulled on by children or tripped over.
C. This machine has a polarized plug (one blade is wider than the other). To reduce the risk of electric
shock, this plug is intended to fit into a polarized outlet only one way.If the plug does not fit fully
into the outlet, reverse the plug. If it still does not fit,contact a qualified electrician. Do not attempt
to modify the plug in any way.
CAUTION: TO REDUCE THE RISK OF FIRE OR ELECTRIC SHOCK,
DO NOT ATTEMPT TO DISASSEMBLE THE MACHINE.
CAUTION: SWITCH OFF THE MACHINE / AND DISCONNECT FROM
POWER SUPPLY BEFORE CHANGING ACCESSORIES
OR APPROACHING PARTS THAT MOVE IN USE.
2
PARTS AND FEATURES
Top lid
Shower head
Filter basket
Coffee tank
Water reservoir reservoir
Removable water reservoir
Water window
Tap
Tap outlet
CAF-05C
10-cup double wall
stainless steel thermal carafe
Thermal Carafe is an optional part
Removable drip tray
Stainless steel rack
Control panel
3
PARTS AND FEATURES
LCD DISPLAY
Brew
Strength
Auto
Descaler
CONTROL PANEL
a. ON/OFF BUTTON
To start and stop brewing functions.
When brewing, the backlight is blue
and changes to orange when
warming.
b. STRONG
Adjusts the brewing time to create a
more full-flavored coffee.
c. SET DELAY
To set the timer.
d. DELAY BREW
Set the timer to automatically begin
brewing up to 24 hours in advance.
b.
d.
c.
e.
f.
f.
a.
e. CLEAN
ENABLES EASY CLEANING OF
MINERAL DEPOSITS FROM
COFFEE MAKER.
f. HOUR AND MINUTE BUTTONS
Set delayed brew time (hour and
minute).
4
PREPARING YOUR COFFEE MAKER FOR USE
˙
˙
˙
˙
˙
˙
Carefully unpack the coffee maker and remove all packaging
materials.
Before making coffee in your coffee maker, thoroughly clean the
carafe, carafe lid and filter basket with warm, soapy water. Rinse and
dry. Do not use harsh or abrasive cleaners.
Wipe the warming plate with a clean, damp cloth. However, do not
immerse the coffee maker in water or other liquid.
Place coffee maker on a flat, level surface away from any edge.
Plug the unit into a 120 volt 60 Hz AC only outlet.
Prior to brewing your first pot of coffee, operate coffee maker once or
twice with water but without ground coffee. This will remove any dust
that may have settled inside the coffee maker that might affect the
flavor of coffee.
IMPORTANT: Use cold water for best results.
To prevent clogging of filter basket, do not use finely
ground coffee. Do NOT use paper filters. Properly
clean gold tone filter after each use.
Caution: Never open the top cover during the brewing cycle, even if
no water is draining from the filter basket, since extremely
hot water/coffee can spill out from the filter basket and cause
injury. If water/coffee is not draining from the filter basket
during the brewing cycle, unplug the unit and wait 10 minutes
before opening the top cover and checking the filter basket.
5
SETTING THE CLOCK AND DELAY BREW TIME
TO SET THE CLOCK:
1. Plug the power cord into a
standard electrical outlet. The
clock will flash on the control
panel to indicate that the time
has not been set.
2. Press and hold the HOUR ( b ) and
MINUTE ( c ) buttons until you
reach the current time. The AM
or PM indicator
will light up at the
bottom of the display. The clock
is now set!
f
g
d
e
b
c
a
Note: Pressing any button before setting the clock will cause the clock
to start keeping time from 12:00 AM. You must set the clock if you
want to use the Delay Brew feature.
TO SET THE DELAY BREW TIME:
1. While the display is in the clock mode, press the SET Delay Button
( d ).
2. While the Delay Brew Time is flashing, set the desired brew time by
pressing the Hour and Minute buttons. The AM or PM indicator will
light up at the bottom of the clock display. Within a few seconds the
display will change to the current time. The Delay Brew ( g ) Time is
now set.
3. To check the programmed time, push the SET Delay ( d )button. The
display will show the time you have programmed the coffee to brew.
If you press the SET Delay ( d ) button again or wait a few seconds,
the display will switch back.
6
HOW TO MAKE COFFEE
8. Before you lock the
lid to the thermal
carafe, make sure
the arrow mark on
the lid is aligned with the line on
the handle of the thermal carafe.
1. Fill water reservoir with cold
water. Do not exceed 10-Cup
water level.
2. Open the coffee
tank lid. Fill the
filter basket with
9. When filling the Thermal Carafe,
coffee, being
the spout must be located under
careful not to get
the tap outlet.
any grounds into the coffee tank.
NOTE:
The capacity of the Thermal Carafe is
10 cups. Do NOT put more than 10
cups in the coffee tank.
3. When placing the
coffee filter into
the coffee tank,
maker sure the
arrow marks on the coffee filter
and coffee tank are aligned.
10. The coffee maker features a
2-hour automatic shut off. To
turn off sooner, press the ON/
OFF button ( a ) and indicator
light will go out.
4. Close the coffee tank lid.
5. Press STRONG button ( f ) to
increase the coffee flavor. Use
11. When finished, push ON/OFF
this function when brewing fewer
button ( a ) to turn off, then
than 4 cups.
unplug the coffee maker. Do
not open coffeemaker until it
6. Press ON/OFF button ( a ) to
has been turned off.
begin brewing (light will glow).
Always allow cooling before
CAUTION:
cleaning. Never use coffee tank to
Do NOT open lid during and just after
brewing to preserve the coffee’s heat
pour or carry hot coffee. Handle
and flavor, and to avoid scalding from
coffee tank only to clean it after
hot coffee and steam. Do NOT remove
machine has been shut off and the
coffee tank while brewing light is on or
coffee is cool.
coffee is hot.
7. Place cup under the tap and
open to fill at desired level.
7
HINTS FOR GREAT TASTING COFFEE
- A clean coffee maker is essential for making great tasting coffee.
Regular cleaning, as specified in “Cleaning your Coffee Maker” is highly
recommended.
- Always use fresh, cold water in your coffee maker.
- Fine grround coffee promotes fuller extraction and provides rich,
full-tasting coffee. Regular grind will require slightly more coffee per
cup to provide the strength of a finer grind.
- Store coffee in a cool, dry place. Once coffee has been opened, keep
it tightly sealed in the refrigerator to maintain freshness.
- Do not re-use coffee grounds since this will greatly impair coffee flavor.
- Reheating coffee is not recommended. Coffee is at its peak flavor
immediately after brewing.
- Small oil droplets on the surface of brewed black coffee are due to the
extraction of oil from the coffee grounds. Oiliness may occur more
frequently if heavily roasted coffee is used. Over extraction may also
cause oiliness, indicating a need to clean your coffee maker.
CLEANING AND MAINTENANCE
The “clean” light will flash to indicate that the coffee maker needs to be
cleaned. The “clean” light will turn off after the clean cycle has been
completed.
8
DECALCIFYING COFFEE MAKER
Minerals (calcium/limestone) found in water will leave deposits in coffee
maker and affect its performance. It’s recommended that you regularly
remove these deposits using a cleaner.
1. Follow package instructions to prepare one batch of Cleaner. Pour the
mixture into the water reservoir.
NOTE: 4 cups or 20 fl. Oz. of undiluted, white household vinegar may be used
as a substitute for the cleaner.
2. Place filter basket into the coffee tank and close the brew basket lid.
3. Press the “Clean” button until the blue light turns on. The cleaning cycle is
automatic.
The entire cycle will take 45-60 minutes to complete. During the cleaning your
coffeemaker will:
a. Slow brew approx. 3 cups of cleaning solution.
b. Pause for 30 minutes (the Clean light will remain on to alert you that the
process is active).
c. After 30 minutes, your coffeemaker will brew the remainder of the
cleaning solution.
d. When complete, the clean light will turn off and your coffeemaker will
turn off.
4. Discard the cleaning solution and rinse the decanter thoroughly with clean
water.
5. Fill the water reservoir with clean, fresh water.
6. Replace the empty coffee tank.
7. Begin brewing and allow the full brew cycle to complete.
8. Repeat steps 4 through 7 one more time to clean the coffeemaker.
Your coffeemaker is now clean and ready to brew the next pot of delicious,
hot coffee.
9
LIMITED WARRANTY
Vianté Home Products Company, hereafter noted as
Vianté, warrants each appliance to be free from defects
in material and workmanship for a period of ONE YEAR.
Our obligation under this warranty is limited to repair at
our factory or authorized service center of any defective
parts unless the parts have been damaged through
misuse or damaged in transit.
In the event of a product replacement or return, all
freight charges must be prepaid. The repaired or
replacement model will be returned at Vianté expense.
This warranty is conditional upon proper use and care
in accordance with instruction manual directions, which
accompany the unit and only the use by the original
purchaser.
For Service: Please call Turnpike Appliance
at 516 486-5700 for the authorized service center
near you.
For more Information, please contact
J.K.Mc Cusker Viante Home Products Company Suffern, NY
845-357-0315 or [email protected]
10