1
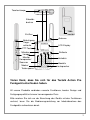
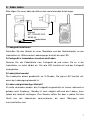
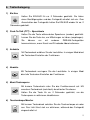
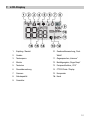
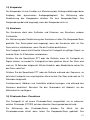
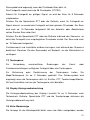
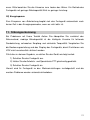
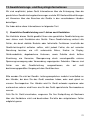
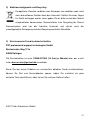
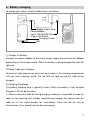
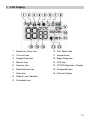
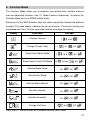
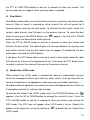
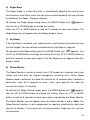
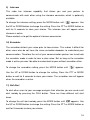
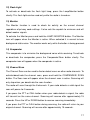
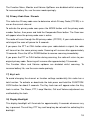
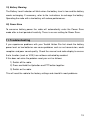
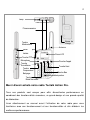
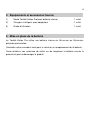
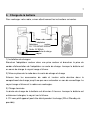
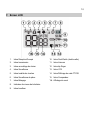
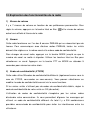
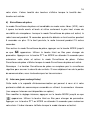
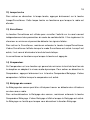
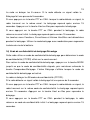
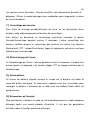
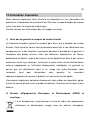
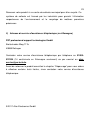
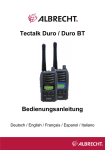
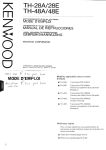
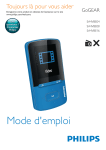
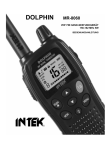
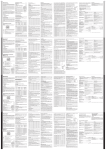
Tectalk
Action Pro
123425657895A24B657C
www.alan-electronics.de
Taschenlampe
Zubehörbuchse
Lade
kontakt
Ein/Aus
Befestigung
Trageschlaufe
Antenne
LCD-Display
PTT-Taste
Mikrofon
Lampe/
Monitor
Kompander/
Scannen
Modus/
Tastensperre
Ruftaste
Aufwärts
Abwärts
Lautsprecher
Vielen Dank, dass Sie sich für das Tectalk Action Pro
Funkgerät entschieden haben.
All unsere Produkte verbinden neueste Funktionen, bestes Design und
Fertigungsqualität mit einem hervorragenden Preis.
Bitte machen Sie sich vor der Benutzung des Geräts mit den Funktionen
vertraut, lesen Sie die Bedienungsanleitung vor Inbetriebnahme des
Funkgeräts aufmerksam durch.
2
1. Inhalt
1.
Inhalt
3
2.
Sicherheitshinweise
3.
Lieferumfang
4.
Akku einsetzen 6
5.
Akku laden
6.
Tastenbelegung 8
5
6
7
1)
Ein/Aus.....................................................................................................8
2)
Push-To-Talk (PTT) – Sprechtaste ...........................................................8
3)
Aufwärts ...................................................................................................8
4)
Abwärts ....................................................................................................8
5)
Menü/Tastensperre ..................................................................................8
6)
Taschenlampe/Monitor .............................................................................8
7)
Ruftaste....................................................................................................9
8)
Kompander/ Scannen ..............................................................................9
7.
LCD-Display
10
8.
Allgemeiner Funkbetrieb 11
9.
Funktionsmenü 12
10.
Funktionen des Funkgeräts
14
1)
Lautstärke ..............................................................................................14
2)
Kanäle....................................................................................................14
3)
Privatcodes (CTCSS).............................................................................14
4)
Zweikanalüberwachung .........................................................................15
5)
Freisprechmodus (VOX) ........................................................................15
6)
Roger Beep ............................................................................................16
7)
Tastenton ...............................................................................................16
8)
Raumüberwachung (Baby-Monitor) .......................................................16
9)
Intercom (für Motorradfahrer).................................................................17
10)
Scrambler...............................................................................................17
3
11)
Rufton.....................................................................................................18
12)
Taschenlampe ........................................................................................18
13)
Monitor ...................................................................................................18
14)
Kompander.............................................................................................19
15)
Kanalscan ..............................................................................................19
16)
Privatcode-Scan / Decodieren ...............................................................19
17)
Tastensperre ..........................................................................................20
18)
Display-Hintergrundbeleuchtung............................................................20
19)
Akku-Warnanzeige .................................................................................20
20)
Energiesparen........................................................................................21
11.
Störungserkennung
21
12.
Gewährleistungs- und Recyclinginformationen
22
1)
Gesetzliche Gewährleistung von 2 Jahren nach Kaufdatum..................22
2)
Elektroschrottgesetz und Recycling .......................................................23
3)
Serviceanschrift und technische Hotline ................................................23
4
2. Sicherheitshinweise
WICHTIG – LESEN SIE DIE ANLEITUNG vor der Inbetriebnahme des
Funkgeräts aufmerksam durch und bewahren Sie die Anleitung für späteres
Nachschlagen auf.
Schließen Sie das Funkgerät KEINESFALLS an einer anderen Spannungsquelle
als dem mitgelieferten Akku an, um Schäden zu vermeiden.
Betreiben Sie das Funkgerät mit Antenne KEINESFALLS dichter als 5 cm an
ungeschützten Körperteilen.
Betreiben Sie das Funkgerät KEINESFALLS in unmittelbarer Nähe einer Mine, in
Bereichen, in den gesprengt wird oder die als „Sprengbereich“ ausgewiesen sind.
Benutzen oder laden Sie das Funkgerät KEINESFALLS in potenziell explosiver
Umgebung.
Legen Sie das Funkgerät KEINESFALLS im Bereich eines Fahrzeug-Airbags ab.
Betreiben Sie das Funkgerät KEINESFALLS in einem Flugzeug.
Betreiben Sie das Funkgerät KEINESFALLS mit beschädigter Antenne.
Versuchen Sie KEINESFALLS, das Funkgerät zu modifizieren.
Laden Sie das Funkgerät STETS bei Zimmertemperatur.
Schalten Sie das Funkgerät STETS aus, wenn die Benutzung von Funkgeräten
oder Handys verboten ist.
Halten Sie die Anschlussbuchse für Zubehör bei Nichtbenutzung STETS
verschlossen.
Benutzen Sie NUR von Alan gelieferte Akkus und Ladegeräte.
Setzen Sie das Funkgerät NICHT Wasser aus, es ist nicht wasserdicht.
Laden und lagern Sie das Funkgerät NICHT in direkter Sonneneinstrahlung.
Laden und lagern Sie das Funkgerät NICHT bei Temperaturen unter –20 °C oder
über +60 °C.
5
3. Lieferumfang
1) Tectalk Action Pro Funkgerät (mit integriertem Akku)
1
2) Smart-Ladegerät mit Netzteil
1
3) Bedienungsanleitung
1
4. Akku einsetzen
DasTectalk Action Pro benutzt einen integrierten Lithium-Ionen- oder LithiumIonen-Polymer-Akku. Bitte wenden Sie sich an Ihren Fachhändler, wenn er
entnommen oder ausgetauscht werden muss. Unbefugtes Austauschen des
Akkus oder Öffnen des Geräts führt zum Verlust Ihrer Garantieansprüche und
kann zu Schäden am Gerät führen.
6
5. Akku laden
Bitte folgen Sie zum Laden des Akkus den nachstehenden Anleitungen.
Netzteilstecker
Netzteil
AC: 100-240 V AC
50/60 Hz
Ladestation
LED
s
1) Ladegerät installieren
Schließen Sie das Netzteil an einer Steckdose und den Netzteilstecker an der
Ladestation an. Während des Ladevorgangs leuchtet die rote LED.
2) Funkgerät in Ladestation einsetzen und Laden
Nehmen Sie alle Zubehörteile vom Funkgerät ab und setzen Sie es in die
Ladestation, es rastet hörbar ein. Die rote LED leuchtet auf und das Funkgerät
wird geladen.
3) Ladezyklus beendet
Der Ladezyklus dauert gewöhnlich ca. 5 Stunden. Die grüne LED leuchtet auf,
wenn der Ladevorgang beendet ist.
4) Laden und gleichzeitiger Betrieb?
Es sollte vermieden werden, das Funkgerät eingeschaltet zu lassen, während es
geladen wird. Empfang / Standby ist zwar möglich während des Ladens, kann
jedoch die Ladezeit verlängern. Zum Senden sollten Sie aber in jedem Fall das
Gerät
aus
der
Ladeschale
herausnehmen,
da
sonst
Störungen
nicht
auszuschließen sind.
7
6. Tastenbelegung
1) Ein/Aus
Halten Sie EIN/AUS für ca. 2 Sekunden gedrückt. Sie hören
einen Bestätigungston und das Funkgerät schaltet sich ein. Zum
Ausschalten des Funkgeräts halten Sie EIN/AUS wieder für ca. 2
Sekunden gedrückt.
2) Push-To-Talk (PTT) – Sprechtaste
Halten Sie die Taste während des Sprechens (senden) gedrückt.
Lassen Sie die Taste los, um Mitteilungen zu hören (empfangen).
Sie
können
nur
mit
anderen
PMR446-Funkgeräten
kommunizieren, wenn Kanal und Privatcode übereinstimmen.
3) Aufwärts
Mit Tastendruck erhöhen Sie die Lautstärke. In einigen Modi dient
die Taste dem Einstellen der Funktionen.
4) Abwärts
Mit Tastendruck verringern Sie die Lautstärke. In einigen Modi
dient die Taste dem Einstellen der Funktionen.
5) Menü/Tastensperre
Mit kurzem Tastendruck rufen Sie das Funktionsmenü auf. Mit
erneutem Tastendruck (mehrfach) durchlaufen Sie dieses.
Halten Sie die Taste für ca. 2 Sekunden gedrückt, um die
Tastensperre zu aktivieren /deaktivieren.
6) Taschenlampe/Monitor
Mit kurzem Tastendruck schalten Sie die Taschenlampe ein oder
aus. Das Licht lässt sich nur aktivieren, während das Funkgerät
eingeschaltet ist.
8
Halten Sie die Taste für ca. 2 Sekunden gedrückt, um die Monitorfunktion zu
aktivieren/deaktivieren. Beim Loslassen der Taste wird die Monitorfunktion
deaktiviert.
7) Ruftaste
Mit Tastendruck übertragen Sie eine Rufmelodie und machen
Dritte auf Ihren Ruf aufmerksam.
8) Kompander/ Scannen
Mit kurzem Tastendruck aktivieren/deaktivieren Sie die
Kompanderfunktion.
Halten Sie die Taste für ca. 2 Sekunden gedrückt, um den Scan
zu aktivieren /deaktivieren.
9
7. LCD-Display
123 456789A3B3CDEDFF3
23 D9D93
1+23 ,!D'898* D!8"#9A3-.8*/
08F"#13
23 8EFD9E6DD3
1123 2DAD9E6D"#D93-39FD"513
23 9F3
123 CDEF(FA9AEF93-AD3CDD613
23 8EFD9F93
123 4DE6D"#79'F93-56713
23 85 D!8"#9A3
123 8838D3B3.E6*893
$23 "899D93
123 :5689D3
%23 &'''868F(F3
16. :898*
)23 "85 *D3
10
8. Allgemeiner Funkbetrieb
Der PMR446-Dienst, welcher von diesem Funkgerät benutzt wird, teilt sich
Kanäle zum Wechselsprechen. Das bedeutet, dass immer nur ein Benutzer
sprechen kann.
Zur Kommunikation mit anderen PMR446-Funkgeräten müssen alle Geräte auf
den gleichen Kanal (8 Kanäle) und den gleichen CTCSS-Code (38 Codes)
eingestellt sein. Ist die von Ihnen gewählte Kombination bereits in Benutzung, so
wählen Sie bitte eine Alternative.
1. Halten Sie Ein/Aus zum Einschalten des Funkgeräts für 2 Sekunden gedrückt.
2. Überprüfen und ggf. ändern Sie Kanal- und Codeeinstellungen (siehe 9.
Funktionsmenü und 10. Funktionen des Funkgeräts).
3. Zum Sprechen halten Sie das Funkgerät aufrecht, ca. 10 cm vom Mund
entfernt und drücken Sie die Sprechtaste PTT. Sprechen Sie langsam und
deutlich in Richtung Funkgerät. Lassen Sie die Sprechtaste los, wenn Sie
fertig sind.
Sie hören Übertragungen von anderen Funkgeräten auf dem gleichen Kanal mit
gleichem Code innerhalb Ihrer Reichweite. Das entsprechende Symbol wird im
Display angezeigt, wenn Sie senden oder empfangen.
11
9. Funktionsmenü
Das
Funktionsmenü
ermöglicht
Ihnen
die
Programmierung
von
Benutzereinstellungen, die Aktivierung von Funktionen sowie die Nutzung
erweiterter Funktionen (siehe 10. Funktionen des Funkgeräts). Zum Aufrufen des
Funktionsmodus drücken Sie kurz Menü. Mit mehrfachem Tastendruck auf Menü
durchlaufen Sie die verschiedenen Funktionen.
Das Display zeigt die entsprechenden Funktionen an. Die aktuelle Einstellung und
das entsprechende Symbol blinken. Mit der Aufwärts- und Abwärtstaste
verändern Sie die Einstellung.
Display
Funktion
Kanal umschalten
Privatcode umschalten
Dual-Watch-Modus wählen
Freisprechmodus wählen
Einstellungen
von
bis
von
bis
von
bis
wählen Sie hoch
oder aus
oder aus
oder niedrig
(VOX)
oder aus
Roger Beep aktivieren
Tastenton aktivieren
wählen Sie ein
oder aus
wählen Sie ein
oder aus
12
Raumüberwachung
wählen Sie ein
oder aus
aktivieren
Intercom aktivieren
Scrambler aktivieren
Rufton umschalten
wählen Sie ein
wählen Sie ein
von
bis
oder aus
oder aus
oder aus
Drücken Sie die Sprechtaste PTT oder warten Sie 5 Sekunden ab, um die
Auswahl zu speichern.
Drücken Sie für 5 Sekunden keine Taste, so begibt sich Ihr Funkgerät
automatisch in den Stand-by-Modus zurück.
13
10. Funktionen des Funkgeräts
1) Lautstärke
Sie haben 7 Lautstärkepegel zur Auswahl. Zum Einstellen der Lautstärke drücken
Sie die Aufwärts- oder Abwärtstaste, der aktuelle Lautstärkepegel
wird im
Display angezeigt.
2) Kanäle
Das Funkgerät arbeitet auf einem der 8 lizenzfreien PMR446-Kanäle. Zur
Kommunikation mit anderen PMR446-Funkgeräten müssen alle Geräte auf dem
gleichen Kanal mit gleichem Privatcode eingeschaltet sein.
Zur Änderung des Funkkanals drücken Sie Menü, bis die gewünschte
Kanalnummer blinkt. Mit der Aufwärts- oder Abwärtstaste wählen Sie den
gewünschten Kanal. Drücken Sie die Sprechtaste PTT oder Menü oder warten
Sie 5 Sekunden, um Ihre Auswahl zu speichern.
3) Privatcodes (CTCSS)
Das Funkgerät kann 38 verschiedene Privatcodes benutzen (auch als CTCSS,
Untercodes oder Unterkanäle bezeichnet). Wählen oder ändern Sie den Code im
Funktionsmenü.
Benutzen die anderen Geräte keine Codes, so stellen Sie den Privatcode Ihres
Geräts auf Off (aus) ein.
Privatcodes hindern die Benutzer anderer Funkgeräte nicht daran, Ihre
Gespräche zu hören. Sie ermöglichen Ihnen, Übertragungen zu ignorieren, die
einen abweichenden Privatcode haben. Ihnen stehen insgesamt 304 mögliche
Kanal-/Privatcodekombinationen zur Verfügung, um Störeinflüsse durch Dritte zu
vermeiden.
Zur Änderung des Privatcodes drücken Sie wiederholt Menü, bis die gewünschte
Nummer des Privatcodes blinkt. Mit der Aufwärts- oder Abwärtstaste wählen Sie
den gewünschten Code. Drücken Sie die Sprechtaste PTT oder Menü oder
14
warten Sie 5 Sekunden, um Ihre Auswahl zu speichern. Das Privatcodesymbol
wird angezeigt, wenn ein Privatcode gewählt ist.
4) Zweikanalüberwachung
Der Dual-Watch-Modus ermöglicht Ihnen die gleichzeitige Überwachung zweier
Kanäle, einem Primär- und einem Dual-Watch-Kanal. Wird auf einem der Kanäle
ein Signal empfangen, so unterbricht das Gerät die Überwachung für 5 Sekunden,
bevor es weiter beide Kanäle überwacht.
Zur Aktivierung der Zweikanalüberwachung wählen Sie zunächst einen Funkkanal
(siehe Kanäle) als den primären Kanal. Zur Auswahl des Dual-Watch-Kanals
drücken Sie Menü, bis
angezeigt wird. Mit der Aufwärts- oder Abwärtstaste
wählen Sie den gewünschten Dual-Watch-Kanal.
Drücken Sie die Sprechtaste PTT oder Menü oder warten Sie 5 Sekunden, um
Ihre Auswahl zu speichern und den Dual-Watch-Modus zu aktivieren.
Das Display schaltet zwischen dem primären und Dual-Watch-Kanal um und das
Dual-Watch-Symbol wird angezeigt. Zur Deaktivierung der Funktion halten Sie die
Scantaste gedrückt.
Drücken Sie die Sprechtaste PTT, während Sie ein Signal im Dual-Watch-Modus
empfangen, so sendet das Funkgerät auf dem derzeitig angezeigten Kanal.
Drücken Sie die Sprechtaste PTT, wenn kein Signal anliegt, so sendet das
Funkgerät auf dem primären Kanal.
5) Freisprechmodus (VOX)
Ist der Freisprechmodus (VOX) gewählt, so sendet das Funkgerät automatisch,
wenn das Mikrofon Ihre Stimme (oder andere Geräusche) erkennt. Die Benutzung
ist mit dem integrierten Mikrofon oder dem entsprechenden Zubehör (optional
erhältlich) möglich.
Um einen versehentlichen Betrieb und Hintergrundgeräusche so weit wie möglich
zu vermeiden, stehen Ihnen 2 Einstellungen der Mikrofonempfindlichkeit zur
Verfügung (hoch und niedrig).
15
Zur Aktivierung des Freisprechmodus (VOX) drücken Sie Menü, bis
angezeigt wird. Mit der Aufwärts- oder Abwärtstaste schalten Sie die
Empfindlichkeit um. Drücken Sie die Sprechtaste PTT oder Menü oder warten Sie
5 Sekunden, um Ihre Auswahl zu speichern und den VOX-Modus zu aktivieren.
Das VOX-Symbol wird angezeigt, wenn der VOX-Modus aktiv ist. Zur
Deaktivierung des Freisprechmodus (VOX) stellen Sie die Empfindlichkeit auf
ein.
6) Roger Beep
Der Bestätigungston „Roger Beep“ ist ein kurzer Ton, der dem Ende Ihrer
Übertragung automatisch angehängt wird, um anderen Benutzern zu vermitteln,
dass Ihre Übertragung beendet ist. Sie können den Bestätigungston aktivieren
oder deaktivieren.
Zur Umstellung des Roger Beep drücken Sie Menü, bis
angezeigt wird. Mit
der Aufwärts- oder Abwärtstaste ändern Sie die Einstellung.
Drücken Sie die Sprechtaste PTT oder Menü oder warten Sie 5 Sekunden, um
Ihre Auswahl zu speichern. Das Roger Beep-Symbol wird angezeigt, wenn der
Bestätigungston aktiv ist.
7) Tastenton
Bei aktiviertem Tastenton gibt Ihr Funkgerät jeweils bei Tastendruck einen
Signalton ab. Sie können den Tastenton aktivieren oder deaktivieren.
Zur Umstellung des Tastentons drücken Sie Menü, bis
angezeigt wird. Mit
der Aufwärts- oder Abwärtstaste ändern Sie die Einstellung. Drücken Sie die
Sprechtaste PTT oder Menü oder warten Sie 5 Sekunden, um Ihre Auswahl zu
speichern. Das Tastentonsymbol wird angezeigt, wenn der Tastenton aktiv ist.
8) Raumüberwachung (Baby-Monitor)
Die Raumüberwachung ist mit dem Freisprechmodus (VOX) vergleichbar,
ignoriert
jedoch
kurze
Geräusche
und
benutzt
nur
die
höchste
16
Mikrofonempfindlichkeit. Bei aktivierter Raumüberwachung sendet das Funkgerät
für 15 Sekunden, wenn es kontinuierlich Geräusche mit mehr als 5 Sekunden
Dauer erkennt. Bleibt das Geräusch bestehen, so überträgt das Funkgerät
weitere 15 Sekunden.
Zur Aktivierung der Raumüberwachung drücken Sie Menü, bis
angezeigt
wird. Mit der Aufwärts- oder Abwärtstaste ändern Sie die Einstellung. Drücken Sie
die Sprechtaste PTT oder Menü oder warten Sie 5 Sekunden, um Ihre Auswahl zu
speichern
und
die
Raumüberwachung
zu
aktivieren.
Das
Raumüberwachungssymbol wird angezeigt, wenn die Raumüberwachung aktiv ist.
Bitte beachten Sie: Die Raumüberwachungsfunktion ist kein Ersatz, die Sicherheit
Ihres Kindes regelmäßig zu überprüfen. Bewegen Sie sich außerhalb der
Funkreichweite, so hören Sie keine Übertragung.
9) Intercom (für Motorradfahrer)
Das Funkgerät kann zum Gegensprechen benutzt werden, wenn Sie und ein
Partner verkabelt sind (Intercom-Headsets optional erhältlich).
Zur Änderung der Gegensprecheinstellung drücken Sie Menü, bis
angezeigt wird. Mit der Aufwärts- oder Abwärtstaste ändern Sie die Einstellung.
Drücken Sie die Sprechtaste PTT oder Menü oder warten Sie 5 Sekunden, um
Ihre Auswahl zu speichern. Das Intercomsymbol wird angezeigt, wenn
Gegensprechen aktiv ist.
Bitte setzen Sie sich mit uns für das optionale Gegensprechzubehör in
Verbindung.
10) Scrambler
Der Scrambler bietet einen gewissen Abhörschutz während Sprachübertragungen.
Er erschwert es anderen Benutzern, die nicht den gleichen Scramblerdecoder
verwenden, ihre Übertragung zu verstehen. Aus diesem Grund muss das Gerät
Ihres Kommunikationspartners den Scramblermodus aktivieren, um Sie klar
verstehen zu können. Bitte beachten Sie, dass Sie während des aktiven
17
Scramblermodus keine anderen Sender ohne aktivierte Scramblerfunktion
verstehen können.
Zur Änderung der Scramblereinstellung drücken Sie Menü, bis
angezeigt
wird. Mit der Aufwärts- oder Abwärtstaste ändern Sie die Einstellung. Drücken Sie
die Sprechtaste PTT oder Menü oder warten Sie 5 Sekunden, um Ihre Auswahl zu
speichern. Das Scramblersymbol wird angezeigt, wenn der Scrambler aktiv ist.
11) Rufton
Um andere Benutzer auf Ihren Ruf aufmerksam zu machen können Sie eine
Ruftonmelodie mit der Ruftaste senden.
Ihnen stehen drei Ruftontöne zur Verfügung.
Zur Änderung der Ruftonmelodie drücken Sie Menü, bis
angezeigt wird. Mit
der Aufwärts- oder Abwärtstaste ändern Sie die Einstellung. Drücken Sie die
Sprechtaste PTT oder Menü oder warten Sie 5 Sekunden, um Ihre Auswahl zu
speichern.
12) Taschenlampe
Zur Aktivierung oder Deaktivierung der Taschenlampe drücken Sie kurz
Licht/Monitor. Die Taschenlampe kann nur benutzt werden, wenn das Funkgerät
eingeschaltet ist.
13) Monitor
Die Monitorfunktion dient der Überwachung des aktuellen Kanals unabhängig von
den Einstellungen des Privatcodes. Hier wird ebenfalls die Rauschsperre auf ein
Minimum eingestellt und schwächere Signale werden erkannt.
Zur Aktivierung der Abhörfunktion halten Sie Licht/Monitor gedrückt. Das
Abhörsymbol wird bei aktivierter Abhörfunktion angezeigt. In diesem Modus hören
Sie im Hintergrund statische Störungen.
Die Monitorfunktion arbeitet nur bei gedrückter Taste.
18
14) Kompander
Der Kompander ist eine Funktion zur Minimierung der Hintergrundstörungen beim
Empfang
über
dynamischen
Audiopegelabgleich.
Zur
Aktivierung
oder
Deaktivierung des Kompanders drücken Sie kurz Kompander/Scan. Das
Kompandersymbol wird angezeigt, wenn der Kompander aktiv ist.
15) Kanalscan
Der Kanalscan dient dem Auffinden und Erkennen von Benutzern anderer
Funkkanäle.
Zur Aktivierung oder Deaktivierung des Kanalscans halten Sie Kompander/Scan
gedrückt. Das Scansymbol wird angezeigt, wenn der Kanalscan aktiv ist. Der
Scan wird nur unterbrochen, wenn Sie die Funktion deaktivieren.
Das Funkgerät scannt alle 8 Kanäle. Erkennt Ihr Funkgerät ein gültiges Signal, so
wird der Scan für 5 Sekunden unterbrochen.
Drücken Sie die Sprechtaste PTT oder die Ruftaste, wenn Ihr Funkgerät ein
Signal erkennt, so sendet Ihr Funkgerät auf dem gleichen Kanal. Der Scan wird
nach ca. 15 Sekunden fortgesetzt. Mit der Aufwärts- oder Abwärtstaste setzen Sie
den Scan sofort fort.
Drücken Sie die Sprechtaste PTT oder die Ruftaste während des Scannens, so
kehrt das Funkgerät zum ursprünglichen Kanal zurück. Der Scan wird nach ca. 15
Sekunden fortgesetzt.
Funktionsmenü, Abhören und Lautstärke erhöhen/verringern sind während des
Scannens deaktiviert. Benutzen Sie den Scanmodus mit Bedacht, um die
Akkulaufzeit zu verlängern.
16) Privatcode-Scan / Decodieren
Das Funkgerät ist mit einem Privatcode-Scan ausgestattet, um zu erkennen,
welcher Privatcode (CTCSS) auf dem aktuellen Kanal gerade benutzt wird.
Zur
Aktivierung
des
Privatcode-Scans
drücken
Sie
Menü,
bis
die
Privatcodenummer blinkt, dann halten Sie Kompander/Scan gedrückt. Das
19
Scansymbol wird angezeigt, wenn der Privatcode-Scan aktiv ist.
Das Funkgerät scannt durch die 38 Privatcodes (CTCSS).
Erkennt Ihr Funkgerät ein gültiges Signal, so wird der Scan für 5 Sekunden
unterbrochen.
Drücken Sie die Sprechtaste PTT oder die Ruftaste, wenn Ihr Funkgerät ein
Signal erkennt, so sendet das Funkgerät auf dem gleichen Privatcode. Der Scan
wird nach ca. 15 Sekunden fortgesetzt. Mit der Aufwärts- oder Abwärtstaste
setzen Sie den Scan sofort fort.
Drücken Sie die Sprechtaste PTT oder die Ruftaste während des Scannens, so
kehrt das Funkgerät zum ursprünglichen Privatcode zurück. Der Scan wird nach
ca. 15 Sekunden fortgesetzt.
Funktionsmenü und Lautstärke erhöhen/verringern sind während des Scannens
deaktiviert. Benutzen Sie den Scanmodus mit Bedacht, um die Akkulaufzeit zu
verlängern.
17) Tastensperre
Zur
Vermeidung
versehentlicher
Änderungen
der
Kanal-
oder
Funktionseinstellungen verfügt das Funkgerät über eine Tastensperre.
Zur
Aktivierung
oder
Deaktivierung
der
Tastensperre
halten
Sie
Mode/Tastensperre für ca. 2 Sekunden gedrückt. Das Schlosssymbol wird
angezeigt, wenn die Tastensperre aktiv ist. Ein/Aus, PTT, Taschenlampe/Monitor,
Ruf und Lautstärke sind von der Tastensperre nicht betroffen.
18) Display-Hintergrundbeleuchtung
Die Hintergrundbeleuchtung des Displays leuchtet für ca. 5 Sekunden nach
Tastendruck. Ruftaste, Sprechtaste PTT und die Taschenlampe aktivieren die
Hintergrundbeleuchtung nicht.
19) Akku-Warnanzeige
Die Anzeige für die Akkukapazität blinkt, wenn der Akku nachgeladen werden
20
muss. Bitte beachten Sie die Hinweise zum Laden des Akkus. Ein Betrieb des
Funkgeräts mit geringer Akkukapazität führt zu geringer Leistung.
20) Energiesparen
Zum Einsparen von Akkuleistung begibt sich das Funkgerät automatisch nach
kurzer Zeit in den Energiesparmodus, wenn es nicht aktiv ist.
11. Störungserkennung
Bei Problemen mit Ihrem Tectalk Action Pro überprüfen Sie zunächst den
Akkuzustand; niedrige Akkukapazität ist die häufigste Ursache für fehlende
Sendeleistung, schwachen Empfang und schlechte Tonqualität. Vergleichen Sie
die Bedienungsanleitung und das Display des Funkgeräts, damit Funktionen wie
VOX nicht versehentlich aktiviert wurden.
Führt dies zu keinem Ergebnis, so stellen Sie das Gerät wie folgt zurück:
1) Schalten Sie das Funkgerät aus.
2) Halten Sie die Aufwärts- und Sprechtaste PTT gleichzeitig gedrückt.
3) Schalten Sie das Funkgerät ein.
Hiermit wird Ihr Funkgerät zu den Werkseinstellungen zurückgestellt und die
meisten Probleme werden automatisch behoben.
21
12. Gewährleistungs- und Recyclinginformationen
Wir sind verpflichtet, jedem Gerät Informationen über die Entsorgung, über die
gesetzlichen Gewährleistungsbestimmungen und die EG Konformitätserklärungen
mit Hinweisen über das Benutzen der Geräte in den verschiedenen Ländern
beizufügen.
Sie finden daher diese Informationen im folgenden Text.
1) Gesetzliche Gewährleistung von 2 Jahren nach Kaufdatum
Der Verkäufer dieses Geräts gewährt Ihnen eine gesetzliche Gewährleistung von
zwei Jahren nach Kaufdatum des Geräts. Diese Gewährleistung umfasst alle
Fehler, die durch defekte Bauteile oder fehlerhafte Funktionen innerhalb der
Gewährleistungsfrist auftreten sollten, nicht jedoch Fehler, die auf normaler
Abnutzung
beruhen,
Gehäusedefekte,
wie
z.B.
abgebrochene
verbrauchte
Antennen,
Akkus,
sowie
Kratzer
Defekte
im
durch
Display,
äußere
Einwirkung, wie Korrosion, Überspannung durch unsachgemäße externe
Spannungsversorgung oder Verwendung ungeeigneten Zubehörs. Ebenso sind
Fehler
von
der
Gewährleistung
ausgeschlossen,
die
auf
nicht
bestimmungsgemäßen Umgang mit dem Gerät beruhen.
Bitte wenden Sie sich bei Gewähr- leistungsansprüchen zunächst unmittelbar an
den Händler, bei dem Sie das Gerät erworben haben, oder auch gleich an
unseren Servicepartner. Der Händler wird Ihr Gerät entweder reparieren oder
austauschen, oder er wird Ihnen eine für das Gerät spezialisierte Serviceadresse
nennen.
Falls Sie Ihr Gerät einschicken, vergessen Sie Ihre Kaufquittung als Nachweis
über das Kaufdatum nicht und beschreiben Sie bitte den aufgetretenen Fehler
möglichst genau.
22
2) Elektroschrottgesetz und Recycling
Europäische Gesetze verbieten das Entsorgen von defekten oder nicht
mehr brauchbaren Geräten über den Hausmüll. Sollten Sie eines Tages
Ihr Gerät entsorgen wollen, dann geben Sie es bitte nur bei den überall
eingerichteten kommunalen Sammelstellen zum Recycling ab. Dieses
Sammelsystem wird von der Industrie finanziert und sichert auch die
umweltgerechte Entsorgung und das Recycling wertvoller Rohstoffe.
3) Serviceanschrift und technische Hotline
PST professional support technologies GmbH
Breitscheider Weg 117a
40885 Ratingen
Die Servicehotline ist unter 01805-012204 (14 Cent p. Minute) bzw. per e-mail
unter [email protected] erreichbar.
Bevor Sie bei einem Problem ein vermeintlich defektes Gerät zurückschicken,
können Sie Zeit und Versandkosten sparen, indem Sie zunächst ein paar
einfache Tests durchführen, oder lassen Sie sich per Hotline helfen.
© 2011 Alan Electronics GmbH
23
Tectalk
Action Pro
123456741829AB26BC9
www.alan-electronics.de
Lamp
Accessory
Jack
Charging
Terminal
Power
Button
Antenna
Neck/Strap
Ring
LCD Display
PTT Button
Microphone
Lamp/
Monitor Button
Compander/
Scan Button
Mode/Lock
Button
Call Button
Up Button
Down Button
Speaker
Thank you for purchasing the Tectalk Action Pro radio.
All our products are built to offer excellent value by combining advanced
features, great design and manufacturing quality.
To ensure you are familiar with the operation and features of your radio and
in order to obtain the best performance, please read this manual carefully
before operation.
2
1. Contents
1.
Contents ......................................................................................................3
2.
Caution ........................................................................................................5
3.
Equipment and Accessories Supplied .........................................................6
4.
Fitting the batteries ......................................................................................6
5.
Battery charging ..........................................................................................7
6.
Radio Controls .............................................................................................8
1)
Power Button ...........................................................................................8
2)
Push-To-Talk(PTT) Button........................................................................8
3)
Up Button .................................................................................................8
4)
Down Button ............................................................................................8
5)
Mode/Lock Button ....................................................................................8
6)
Lamp/Monitor BUTTON ...........................................................................9
7)
Call Button ...............................................................................................9
8)
Compander/ Scan Button.........................................................................9
7.
LCD Display...............................................................................................10
8.
Basic Radio Operation...............................................................................11
9.
Function Mode ...........................................................................................12
10.
Radio Features Explained .........................................................................13
1)
Volume Level .........................................................................................13
2)
Channels ................................................................................................13
3)
Privacy Codes (CTCSS) ........................................................................13
4)
Dual Watch.............................................................................................14
5)
Hands Free (VOX) mode .......................................................................14
6)
Roger Beep ............................................................................................15
7)
Key Beep ...............................................................................................15
8)
Room Monitor ........................................................................................15
9)
Intercom .................................................................................................16
10)
Scrambler...............................................................................................16
3
11)
Call Alert.................................................................................................16
12)
Flash Light .............................................................................................17
13)
Monitor ...................................................................................................17
14)
Compander ............................................................................................17
15)
Channel Scan.........................................................................................17
16)
Privacy Code Scan / Decode .................................................................18
17)
Key Lock ................................................................................................18
18)
Display Backlight....................................................................................18
19)
Battery Warning .....................................................................................19
20)
Power Save............................................................................................19
11.
Troubleshooting .........................................................................................19
12.
Warranty and Recycling Information..........................................................20
1)
2-Year Warranty From Date Of Purchase ..............................................20
2)
WEEE And Recycling.............................................................................21
3)
Service Address And Technical Hotline (for units sold in Germany).......21
4
2. Caution
IMPORTANT - READ ALL INSTRUCTIONS carefully and completely before
operating your radio and retain this manual for future reference.
NEVER connect the radio to a power source other than the supplied battery. This
may damage your product.
NEVER operate your radio with the antenna less than 5cm from exposed parts of
the body.
NEVER use the radio in or near a mining facility or other area which uses
remotely triggered explosives or an area labeled "Blasting Area".
NEVER use or charge your radio in a potentially explosive atmosphere.
DO NOT place your radio in front of a vehicle airbag.
DO NOT operate your radio on board an aircraft.
DO NOT use your radio with a damaged antenna.
DO NOT attempt to modify your radio in any way.
ALWAYS charge your radio at normal room temperature.
ALWAYS switch off your radio where notices restrict the use of two-way radio or
mobile telephones.
ALWAYS replace the accessory jack cover (if applicable) when the jack is not in
use.
ONLY use Alan approved rechargeable batteries with the supplied charger.
AVOID exposing your radio to water. It is not waterproof.
AVOID storing or charging your radio in direct sunlight.
AVOID storing or using your radio where temperatures are below –20 °C or above
+60°C
5
3. Equipment and Accessories Supplied
1) Tectalk Action Pro radio (with internal battery)
1unit
2) Smart Charger with Adaptor
1unit
3) Instruction Manual
1unit
4. Fitting the batteries
The Tectalk Action Pro uses an internal Lithium Ion or Lithium Ion Polymer battery
which has been pre-installed.
For removal or replacement please contact your local dealer.
Unauthorized attempts to remove or replace the battery will void your warranty
and may damage your product.
6
5. Battery charging
To charge your radios, carefully follow these instructions.
Adapter Power Plug
Power Adapter
Input: 100-240VAC 50Hz
Output: 9V 500mA
Charging Cradle
LED
1) Charger Installation
Connect the power adaptor to the mains power supply and connect the adaptor
power plug to the charger cradle. When the battery is being charged the red LED
lights up.
2) Radio Cradling & Charging
Remove all radio accessories and insert your radios in the charging compartment
until you hear a locking sound. The red LED will light up and the radio will be
charged.
3) Charging Completed
The battery charging time is typically 5 hours. When the battery is fully charged
the green LED will be turned on.
4.) Please switch the radio off during charging. However it is possible to keep the
radio on for receiving and standby mode during charging, but please take the
radio out of the stand charger for transmitting! There may be the risk of
interferences if you should transmit during charging.
7
6. Radio Controls
1) Power Button
Press and hold the POWER button for about 2 seconds. You will
hear a confirmation tone to indicate the radio is on. To turn the
radio off, press and hold the POWER button for about 2 seconds.
2) Push-To-Talk(PTT) Button
Press and hold this button to speak (transmit). Release the button
to listen to (receive) messages you can only communicate with
other PMR446 radios when the channel and privacy code
settings are the same as yours.
3) Up Button
Pressing this button will increase the volume. In some modes this
button is used to adjust the function settings.
4) Down Button
Pressing this button will decrease the volume. In some modes
this button is used to adjust the function settings.
5) Mode/Lock Button
Press this button briefly to enter the function mode. Press again
(repeatedly) to step through the function menu. Press and hold
this button for 2 seconds to activate or deactivate the keypad lock.
8
6) Lamp/Monitor BUTTON
Press this button briefly to switch the flash light lamp on or off.
This flash light lamp is working only while the radio is turned on.
Press and hold this button for about 2 seconds to activate the
monitor function. Releasing the button will deactivate the monitor
function.
7) Call Button
Press this button to transmit a call melody and alert other parties
to your call.
8) Compander/ Scan Button
Press this button briefly to activate or deactivate the compander
function.
Press and hold this button for 2 seconds to activate or deactivate
the scanning process.
9
7. LCD Display
1. Receiving / Busy Icon
10. Dual Watch Icon
2. Transmit Icon
11. Intercom Icon
3. Keypad Lock Icon
12. Roger Beep Icon
4. Monitor Icon
13. VOX Icon
5. Keytone Icon
14. CTCSS Code Icon / Display
6. Room Monitor Icon
15. Compander Icon
7. Scan Icon
16. Channel Display
8. Battery Level Indicator
9. Scrambler Icon
10
8. Basic Radio Operation
The PMR446 service which this radio uses shares channels on a 'take turns'
basis. This means only one user is able to speak at a time.
To communicate with other PMR446 radios, all units must be switched to the
same channel (8 choices) and privacy code (38 choices). If the combination you
have selected is already in use please make an alternative selection.
1) Switch on your radio by pressing the Power button for 2 seconds.
2) Check and if necessary change the channel and privacy code settings
(see 9. Function Mode and 10. Radio Features Explained).
3) To speak, hold the radio upright, about 10cm from your mouth and press
the PTT. Speak slowly and clearly towards the radio. Release the PTT
when you have finished speaking. You will hear messages from other
radios within range, with the same channel and privacy code settings.
The appropriate icon will appear in the radio display when you receive or transmit
a message.
11
9. Function Mode
The Function Mode allows you to program user preferences, activate features
and use advanced functions (see 10. Radio Features Explained). To access the
Function Mode press the MODE button briefly.
Each press of the MODE button steps the radio sequentially through the different
functions.The radio display indicates the current function. The present setting and
associated icon flash. Use the up or down button to change the setting.
Display
Functions
Settings
Change Channel
1
to 8
Change Privacy Code
1
to
, off
Select Dual Watch Mode
1
to 8
, off
Select Hands Free(VOX)Mode
Hi
to Low
, off
Activate Roger Beep
On
, Off
Activate Key Beep
On
, Off
Activate Room Monitor
On
, Off
Activate Intercom
On
, Off
Activate Scrambler
On
, Off
Change Call Tone
1
to 3
, Off
Press the PTT button or wait for 5 seconds to store your choice.
12
If you do not press any key for 5 seconds your radio will return to standby
automatically.
10. Radio Features Explained
1) Volume Level
There are 7 volume levels to suit your personal preference. To adjust the volume
level, press the Up or Down button
and the current volume level are shown
in the radio display.
2) Channels
This radio operates on any one of the 8 PMR446 license free channels. To
communicate with other PMR446 radios, all units must be switched to the same
channel and privacy code.
To change the radio channel, press the MODE button until the channel number
flashes. Use the UP or DOWN button to select the desired channel. Press the
PTT or MODE button or wait for 5 seconds to store your choice.
3) Privacy Codes (CTCSS)
This radio is able to use 38 different privacy codes (also known as CTCSS, subcodes or sub-channels). You can select or change the current privacy code via
the Function Menu. If the other units do not use privacy codes set your units
privacy code to Off.
Privacy codes do not prevent other radio users from hearing your conversation.
They allow you to ignore messages that are using a different privacy code. There
are 304 channel/privacy code combinations to help avoid interference from other
users.
To change the privacy code, press the MODE button until the privacy code
number flashes. Use the UP or DOWN button to select the desired code. Press
13
the PTT or FUNCTION button or wait for 5 seconds to store your choice. The
privacy code icon will appear when a privacy code is selected.
4) Dual Watch
Dual Watch mode allows you to monitor two channels, a primary and a dual watch
channel. When a signal is received on either channel the unit will pause for 5
seconds before resuming the dual watch. To activate the dual watch mode, first
select a radio channel (see Channels) as the primary channel. To select the dual
watch channel press the MODE button until
appears. Use the UP or DOWN
button to select the desired dual watch channel.
Press the PTT or MODE button or wait for 5 seconds to store your choice and
activate the dual watch. The radio display will alternate between the primary and
dual watch channels and the dual watch icon will appear. To deactivate the dual
watch press and hold the SCAN button.
If you press the PTT button while receiving a signal in dual watch mode the radio
will transmit on the currently displayed channel. If you press the PTT button when
no signal is present the radio will transmit on the primary channel.
5) Hands Free (VOX) mode
When Hands Free (VOX) mode is selected the radio will automatically transmit
when the microphone detects your voice (or other noise). It can be used with the
internal microphone or an appropriate audio accessory (available separately).
To avoid accidental operation and reduce the effect of background noise there are
2 microphone sensitivity settings.(high and low)
To activate the Hands Free (VOX) mode, press the FUNCTION button until
appears. Use the UP or DOWN button to change the sensitivity level. Press the
PTT or MODE button or wait for 5 seconds to store your choice and activate the
VOX mode. The VOX icon will appear when VOX mode is active. Repeat this
process and change the sensitivity setting to
to deactivate the Hands Free
(VOX) mode.
14
6) Roger Beep
The Roger Beep is a short tone that is automatically added to the end of your
transmissions to tell other users that you have finished speaking. You can activate
or deactivate the Roger
Beep as required.
To change the Roger Beep setting, press the MODE button until
appears.
Use the UP or DOWN button to change the setting.
Press the PTT or MODE button or wait for 5 seconds to store your choice. The
Roger Beep icon will appear when the Roger Beep is active.
7) Key Beep
If the Key Beep is activated, your radio will emit a confirmation tone whenever you
use the keypad. You can activate or deactivate the Key Beep as required.
To change the Key Beep setting, press the MODE button until
appears. Use
the UP or DOWN button to change the setting. Press the PTT or MODE button or
wait for 5 seconds to store your choice. The Key Beep icon will appear when Key
Beep is active.
8) Room Monitor
The Room Monitor is similar to Hands Free (VOX) mode, but it ignores short, brief
noises and uses only the highest microphone sensitivity level. When Room
Monitor mode is activated, the radio will transmit for 15 seconds when it detects a
continuous noise for 5 seconds or more. If the noise persists the radio will
transmit for another 15 seconds.
To activate the Room Monitor mode, press the MODE button until
appears.
Use the UP or DOWN button to change the setting. Press the PTT or MODE
button or wait for 5 seconds to store your choice and activate the Room Monitor.
The Room Monitor icon will appear when the Room Monitor is active. Note: The
Room Monitor function is not a replacement for regularly checking the safety and
security of children. If you move out of communication range you will not hear
transmissions.
15
9) Intercom
This radio has intercom capability that allows you and your partner to
communicate with each other using the intercom connector, which is optionally
available.
To change the intercom setting, press the MODE button until
appears. Use
the UP or DOWN button to change the setting. Press the PTT or MODE button or
wait for 5 seconds to store your choice. The intercom icon will appear when
intercom is active.
Please contact us to get the optional intercom accessories.
10) Scrambler
The scrambler distorts your voice prior to transmission. This makes it difficult for
other users who do not have the same scrambler decoders to understand your
communication. Therefore the unit of your communication partner has to activate
the scrambler mode in order to hear a clear voice. But as long as the scrambler
mode is active you won´t be able to understand anyone without scrambler either.
To change the scrambler setting, press the MODE button until
appears.
Use the UP or DOWN button to change the setting. Press the PTT or MODE
button or wait for 5 seconds to store your choice. The scrambler icon will appear
when the scrambler is active.
11) Call Alert
To alert other users to your message and gain their attention you can send a call
alert melody by pressing the CALL button. There are three different call alert
tones.
To change the call alert melody, press the MODE button until
appears. Use
the UP or DOWN button to change the setting. Press the PTT or MODE button or
wait for 5 seconds to store your choice.
16
12) Flash Light
To activate or deactivate the flash light lamp, press the Lamp/Monitor button
shortly. This flash light can be used only while the radio is turned on.
13) Monitor
The Monitor function is used to check for activity on the current channel
regardless of privacy code settings. It also sets the squelch to minimum and will
detect weaker signals.
To activate the Monitor press and hold the LAMP/ MONITOR button. The Monitor
icon will appear when the Monitor is active. When activated it is normal to hear
background static noise. The monitor works only while the button is being pressed.
14) Compander
This compander is to minimize the background noise while receiving. To activate
or deactivate the compander, press the Compander/Scan button shortly. The
compander icon will appear when the compander is active.
15) Channel Scan
The Channel Scan can be used to find or detect users on other radio channels. To
activate/deactivate the channel scan, press and hold the COMPANDER/ SCAN
button. The Scan icon will appear when the channel scan is active. Scanning will
only stop when you deactivate the scan function.
The radio will scan through the 8 channels. If your radio detects a valid signal the
scan will pause for 5 seconds.
If you press the PTT or CALL button when your radio detects a signal, the radio
will transmit on the same channel. Scanning will resume after approximately 15
seconds. Press the UP or DOWN button to resume scanning immediately.
If you press the PTT or CALL button during scanning, the radio will return to your
original channel. Scanning will resume after approximately 15 seconds.
17
The Function Menu, Monitor and Volume Up/Down are disabled whilst scanning.
To increase battery life, use the scan mode sparingly.
16) Privacy Code Scan / Decode
This radio has Privacy code scan to determine which Privacy Code (CTCSS) is in
use on the current channel.
To activate the privacy code scan press the MODE button until the privacy code
number flashes, then press and hold the Compander/Scan button. The Scan icon
will appear when the privacy code scan is active.
The radio will scan through the 38 privacy codes (CTCSS). If your radio detects a
valid signal the scan will pause for 5 seconds.
If you press the PTT or CALL button when your radio detects a signal, the radio
will transmit on the same privacy code. Scanning will resume after approximately
15 seconds. Press the UP or DOWN button to resume scanning immediately.
If you press the PTT or CALL button during scanning, the radio will return to your
original privacy code. Scanning will resume after approximately 15 seconds.
The Function Menu and Volume up/down are disabled whilst scanning. To
increase battery life, use the scan mode sparingly.
17) Key Lock
To avoid changing the channel or function settings accidentally this radio has a
lock function. To activate or deactivate the lock press and hold the FUNCTION/
LOCK button for about 2 seconds. The Key Lock icon will appear when the Key
Lock is active. The Power, PTT, Lamp/ Monitor, Call and Volume adjustment are
unaffected by the Lock.
18) Display Backlight
This display backlight will illuminate for approximately 5 seconds whenever any
key is pressed. The call key, PTT key and lamp key do not work for activating this
backlight.
18
19) Battery Warning
The Battery Level Indicator will blink when the battery level is low and the battery
needs recharging. If necessary, refer to the instructions to recharge the battery.
Operating the radio with a low battery will reduce performance.
20) Power Save
To conserve battery power the radio will automatically enter the Power Save
mode after a short period of inactivity. There is no user setting for Power Save.
11. Troubleshooting
If you experience problems with your Tectalk Action Pro first check the battery
power level as low batteries can cause problems such as no transmission, weak
reception and poor sound quality. Check the manual and radio display to ensure
that a function (such as VOX) has not been activated by accident.
If this does not solve the problem reset your unit as follows:
1) Switch off the radio.
2) Press and hold the Up button and PTT button together.
3) Switch on the radio.
This will reset the radio to the factory settings and should fix most problems.
19
12. Warranty and Recycling Information
We are legally obliged to include disposal and warranty information as well as EU
declaration of conformity with the use instructions in different countries for every
unit.
Please find this information on the following pages.
1) 2-Year Warranty From Date Of Purchase
The manufacturer/retailer guarantees this product for two years from date of
purchase. This warranty includes all malfunctions caused by defective
components or incorrect functions within the warranty period excluding wear and
tear, such as exhausted batteries, scratches on the display, defective casing,
broken antenna and defects due to external effects such as corrosion, over
voltage through improper external power supply or the use of unsuitable
accessories. Defects due to unintended use are also excluded from the warranty.
Please contact your local dealer for warranty claims. The dealer will repair or
exchange the product or forward it to an authorized service center.
You can also contact our service partner directly. Please include your proof of
purchase with the product and describe the malfunction as clearly as possible.
20
2) WEEE And Recycling
The European laws do not allow any more the disposal of old or
defective electric or electronic devices with the household waste.
Return your product to a municipal collection point for recycling to
dispose of it. This system is financed by the industry and ensures
environmentally responsible disposal and the recycling of valuable raw materials.
3) Service Address And Technical Hotline (for units sold in Germany)
PST professional support technologies GmbH
Breitscheider Weg 117a
D - 40885 Ratingen
Contact our service hotline by phone 01805-012204 (14 cent/minute from
German fixed network) or e-mail at [email protected].
Before returning a product check in chapter “Troubleshooting” for some easy
steps and tests or contact our hotline.
©
2011
Alan Electronics GmbH
21
Tectalk
Action Pro
Manuel de l'utilisateur
www.alan-electronics.de
2
12345
6789A52BBA99C87A5
C7A5 A
BF27A5
DCEBFA5
27BFA2775
AA5
$8A5
4CE75
28%7A555
B72515
DCEBFA56DD55
8B7C4FCA5
DCEBFA5
1234
"E7#A82BA15
DCEBFA55
C342AE75
22!2A55
11111111111
DCEBFA5
CA A77CE8A
75
DCEBFA5244A55
DCEBFA52E5
DCEBFA5295
2E427AE75
Merci d'avoir acheté notre radio Tectalk Action Pro.
Tous nos produits sont conçus pour offrir d'excellentes performances en
combinant des fonctionnalités avancées, un grand design et une grande qualité
de fabrication.
Lisez attentivement ce manuel avant l'utilisation de votre radio pour vous
familiarise avec son fonctionnement et ses fonctionnalités et afin d'obtenir les
meilleures performances.
3
1. Sommaire
1.
Sommaire ....................................................................................................3
2.
Attention ......................................................................................................5
3.
Équipements et accessoires fournis ............................................................6
4.
Mise en place de la batterie.........................................................................6
5.
Charge de la batterie ...................................................................................7
6.
Touches de commande................................................................................8
1)
Touche Marche/arrêt ................................................................................8
2)
Touche messagerie instantanée vocale (MIV) .........................................8
3)
Touche Haut .............................................................................................8
4)
Touche Bas ..............................................................................................8
5)
Touche Mode/Verrouiller ..........................................................................8
6)
Touche Lampe/Surveillance .....................................................................9
7)
Touche d'appel .........................................................................................9
8)
Touche Compandeur/Balayage................................................................9
7.
Ecran LCD .................................................................................................10
8.
Fonctionnement de base de la radio .........................................................11
9.
Mode fonctions ..........................................................................................11
10.
Explication des fonctionnalités de la radio.................................................13
1)
Niveau de volume ..................................................................................13
2)
Canaux...................................................................................................13
3)
Codes de confidentialité (CTCSS) .........................................................13
4)
Dual Watch (double veille) .....................................................................14
5)
Mode mains libres (VOX) .......................................................................14
6)
Bip Roger ...............................................................................................15
7)
Tonalité des touches ..............................................................................15
8)
Surveillance de pièce .............................................................................16
9)
4
Intercom (pour motocyclistes) ................................................................16
10)
Brouilleur ................................................................................................17
11)
Appel d'alerte .........................................................................................17
12)
Lampe torche .........................................................................................18
13)
Surveillance ...........................................................................................18
14)
Compandeur ..........................................................................................18
15)
Balayage des canaux.............................................................................18
16)
Code de confidentialité de balayage/Décodage.....................................19
17)
Verrouillage des touches........................................................................20
18)
Rétroéclairage de l'écran .......................................................................20
19)
Alerte batterie.........................................................................................20
20)
Économiser de l'énergie.........................................................................20
11.
Dépannage ................................................................................................21
12.
Information importante...............................................................................22
1)
Deux ans de garantie à compter de la date d’achat...............................22
2)
Déchets
d'Equipements
Electriques
et
Electroniques
(DEEE)
et
recyclage ..........................................................................................................22
3)
Adresse du service d'assistance téléphonique (en Allemagne) .............23
5
2. Attention
IMPORTANT - A LIRE TOUTES LES INSTRUCTIONS attentivement et
complètement avant d'utiliser la radio et de conserver ce manuel pour toute
référence ultérieure.
NE JAMAIS raccorder la radio à une source d'alimentation autre que la batterie
fournie. Cela pourrait endommager le produit.
NE JAMAIS utiliser la radio avec l'antenne à moins de 5cm des parties exposées
du corps.
NE JAMAIS utiliser la radio dans ou à proximité d'une installation minière ou toute
autre zone qui utilise des explosifs déclenchés à distance ou d'une zone nommée
"zone de dynamitage".
NE JAMAIS utiliser ou recharger la radio dans une atmosphère explosible.
NE PAS placer la radio en face d'un coussin de sécurité gonflable d'un véhicule.
NE PAS faire fonctionner la radio à bord d'un avion.
NE PAS utiliser la radio avec une antenne endommagée.
NE PAS tenter de modifier la radio en aucune façon.
TOUJOURS charger la radio à la température ambiante normale.
TOUJOURS éteindre la radio dans les endroits comportant des avis de restriction
d'utilisation de radios bidirectionnelles ou de téléphones portables.
TOUJOURS fermer le couvercle de la prise accessoire (si possible) lorsque cette
dernière n'est pas utilisée.
Utiliser UNIQUEMENT des batteries rechargeables approuvées par Alan avec le
chargeur fourni.ÉVITER d'exposer la radio à l'eau. L’appareil n’est pas étanche à
l’eau.
ÉVITER de ranger ou de charger la radio sous les rayons directs du soleil.
ÉVITER de ranger ou d'utiliser la radio dans des endroits de température
inférieure à -20°C ou supérieure à +60°C.
6
3. Équipements et accessoires fournis
1)
Radio Tectalk Action Pro(avec batterie interne)
1 unité
2)
Chargeur intelligent avec adaptateur
1 unité
3)
Guide d'utilisation
1 unité
4. Mise en place de la batterie
Le Tectalk Action Pro utilise une batterie interne au lithium-ion ou lithium-ionpolymère préinstallée.
Contactez votre revendeur local pour le retrait ou le remplacement de la batterie.
Toute tentative non autorisée de retirer ou de remplacer la batterie annule la
garantie et peut endommager le produit.
7
5. Charge de la batterie
Pour recharger votre radio, suivez attentivement les instructions suivantes.
6789A5 E5 BC7C5 A5
&2242AE75
242AE75
9ABAE7
5'5())*+) 5,)-).
"C78A5'5/ 5,))35
"CBA5A5BF27A5
Voyan
1) Installation du chargeur
Branchez l'adaptateur secteur dans une prise secteur et branchez la prise du
cordon d'alimentation de l'adaptateur au socle de charge. Lorsque la batterie est
en cours de charge le voyant rouge s'allume.
2) Mise en place de la radio dans le socle de charge et charge
Enlevez tous les accessoires de radio et insérez cette dernière dans le
compartiment de charge jusqu'à ce que vous entendiez un son de verrouillage. Le
voyant rouge s'allume et la radio sera rechargée.
3) Charge terminée
La durée de charge de la batterie est d'environ 5 heures. Lorsque la batterie est
entièrement chargée, le voyant vert s'allume.
4. S'il vous plaît appareil peut être éteint pendant la charge (RX et Standby ets
possible)
8
6. Touches de commande
1) Touche Marche/arrêt
Maintenez enfoncée la touche Marche/arrêt pendant 2 secondes.
Vous entendrez une note de confirmation pour indiquer que la
radio est allumée. Pour éteindre la radio, maintenez enfoncée la
touche Marche/arrêt pendant 2 secondes.
2) Touche messagerie instantanée vocale (MIV)
Appuyez sur cette touche pour parler (transmettre). Relâchez la
touche pour écouter (recevoir) des messages. Vous ne pouvez
communiquer avec d'autres radios PMR446 que lorsque le canal
et les paramètres de code de confidentialité sont les mêmes que les vôtres.
3) Touche Haut
Appuyez sur cette touche pour augmenter le volume. Dans
certains modes cette touche est utilisée pour régler les
paramètres de fonctionnement.
4) Touche Bas
Appuyez sur cette touche pour baisser le volume. Dans certains
modes cette touche est utilisée pour régler les paramètres de
fonctionnement.
5) Touche Mode/Verrouiller
Appuyez brièvement sur cette touche pour entrer dans le mode
de fonctionnement.Appuyez à nouveau (à plusieurs reprises)
pour parcourir le menu fonctions. Maintenez enfoncée cette
9
touche pendant 2 secondes pour activer ou désactiver le verrouillage des
touches.
6) Touche Lampe/Surveillance
Appuyez brièvement sur cette touche pour allumer ou éteindre la
lampe torche. Cette lampe torche ne fonctionne que lorsque la
radio est allumée.
Maintenez enfoncée cette touche pendant environ 2 secondes pour activer la
fonction Surveillance. Relâchez la touche pour désactiver la fonction Surveillance.
7) Touche d'appel
Appuyez sur cette touche pour transmettre une mélodie d'appel
pour alerter les autres personnes de votre appel.
8) Touche Compandeur/Balayage
Appuyez brièvement sur cette touche pour activer ou désactiver la
fonction Compandeur.
Maintenez enfoncée cette touche pendant 2 secondes pour
activer ou désactiver leBalayage.
10
7. Ecran LCD
(05 1B2A534BA48C5BBE445
()05 1B2A5E25:2BF5;CE9A5#A8A<5
*05 1B2A572938998C5
((05 1B2A51A7BC355
605 1B2A5#A77CE82A5E5B2#8A75
(*05 1B2A598453CA755
+05 1B2A5"E7#A82BA15
(605 1B2A5 5=55
,05 1B2A5C2845A95CEBFA95
(+05 1B2A>>8BF2A5E5BCA5D""5
-05 1B2A5"E7#A82BA1A548%BA5
(,05 1B2A5C342AE755
705 1B2A522!2A5
16. >>8BF2A5E5B22
805 18B2AE75A58#A2E5A52592A78A5
/05 1B2A597CE8AE755
8. Fonctionnement de base de la radio
Le service PMR446 que cette radio utilise partage les canaux "à tour de rôle".
Cela signifie qu'un seul utilisateur est en mesure de parler à la fois.
Pour communiquer avec d'autres radios PMR446, toutes les unités doivent être
réglées sur le même canal (8 choix) et le même code confidentiel (38 choix).
Si la combinaison que vous avez choisie est déjà en cours d'utilisation, il faut faire
un autre choix.
Allumez votre radio en appuyant sur la touche Marche/arrêt pendant 2 secondes.
Vérifiez et si nécessaire, changez les paramètres du canal et du code de
confidentialité (voir 9. Mode fonctions et 10. Explication des fonctionnalités de la
radio).
Pour parler, maintenez la radio dans la position verticale, à 10 cm de votre
bouche et appuyez sur la touche PTT. Parlez lentement et clairement en direction
de la radio. Relâchez la touche PTT lorsque vous aurez terminé de parler.
Vous entendrez des messages à partir d'autres radios dans l'étendue de la
portée, avec les mêmes paramètres du canal et du code de confidentialité.
L'icône approprié s'affiche à l'écran de la radio lorsque vous recevez ou
transmettez un message.
9. Mode fonctions
Le mode fonctions vous permet de régler les préférences utilisateur, d'activer des
fonctions et d'utiliser des fonctions avancées (voir 10. Explication des
fonctionnalités de la radio). Pour accéder au Mode Fonctions appuyez brièvement
sur la touche MODE.
Chaque pression sur la touche MODE fait passer la radio dans les différentes
fonctions de façon séquentielle.
L'écran de la radio indique la fonction en cours. Le réglage actuel et l'icône
associé clignotent. Utilisez la touche Haut ou Bas pour changer de paramètre.
12
Afficheur
Fonctions
Paramètres
Changer de canal
de
à
Changer de confidentialité
de
à
ou
(désactivé)
Sélectionner le mode Dual
de
Watch (double veille)
à
ou
(désactivé)
Sélectionner le mode mains choisir
(élevé) ou
libres (VOX)
(désactivé)
Activer le Bip Roger
choisir
(bas) ou
(activé) ou
(désactivé)
Activer la touche Bip
choisir
(activé) ou
(désactivé)
Activer la Surveillance de choisir
(activé) ou
pièce
(désactivé)
Activer Intercom
choisir
(activé) ou
(désactivé)
Activer le brouilleur
choisir
(activé) ou
(désactivé)
Changer la tonalité d'appel
de
à
ou
(désactivé)
Appuyez sur la touche PTT ou attendez 5 secondes pour mémoriser votre choix.
Si vous n'appuyez sur aucune touche pendant 5 secondes, la radio passe
automatiquement en mode veille.
13
10. Explication des fonctionnalités de la radio
1) Niveau de volume
Il y a 7 niveaux de volume en fonction de vos préférences personnelles. Pour
régler le volume, appuyez sur la touche Haut ou Bas
et le niveau de volume
actuel sera affiché à l'écran de la radio.
2) Canaux
Cette radio fonctionne sur l'un des 8 canaux PMR446 qui ne nécessitent pas de
licence. Pour communiquer avec d'autres radios PMR446, toutes les unités
doivent être réglées sur le même canal et le même code de confidentialité.
Pour changer de canal radio, appuyez sur la touche MODE jusqu'à ce que le
numéro de canal se mette à clignoter. Utilisez les touches Haut ou Bas pour
sélectionner un canal. Appuyez sur la touche PTT ou MODE ou attendez 5
secondes pour mémoriser votre choix.
3) Codes de confidentialité (CTCSS)
Cette radio utilise 38 codes de confidentialité différents (également connu sous le
nom de CTCSS, sous-codes ou sous-canaux). Vous pouvez sélectionner ou
modifier le code de confidentialité courant via le menu fonctions.
Si les autres unités n'utilisent pas de codes de confidentialité établis, réglez le
code de confidentialité de votre unité sur Off (désactivé).
L'utilisation de codes de confidentialité n'empêche pas les autres radios
d'entendre votre conversation. Ils vous permettent d'ignorer les messages qui
utilisent un code de confidentialité différent. Au total il y a 304 combinaisons
possibles canaux/code de confidentialité pour éviter les interférences entre les
utilisateurs.
14
Pour changer de code de confidentialité, appuyez sur la touche MODE jusqu'à
ce que le numéro de code de confidentialité se mette à clignoter. Utilisez les
touches Haut ou Bas pour sélectionner un code. Appuyez sur la touche PTT ou
FUNCTION ou attendez 5 secondes pour mémoriser votre choix. L'icône de code
de confidentialité s'affiche quand un code de confidentialité est sélectionné.
4) Dual Watch (double veille)
Le mode Dual Watch vous permet de surveiller deux canaux, un canal primaire et
un canal double veille. Lorsqu'un signal est reçu sur l'un des deux canaux, l'unité
se mettra en pause pendant 5 secondes avant de reprendre la double veille.
Pour activer le mode double veille, sélectionnez d'abord un canal radio (voir
Canaux) comme canal primaire. Pour sélectionner le canal double veille appuyez
sur la touche MODE jusqu'à ce que
apparaisse. Utilisez les touches Haut ou
Bas pour sélectionner le canal double veille.
Appuyez sur la touche PTT ou MODE ou attendez 5 secondes pour mémoriser
votre choix et activer le mode double veille.
L'écran de la radio va alterner entre le canal primaire et le canal double veille ;
l'icône double veille apparaît. Pour désactiver la double veille, maintenez
enfoncée la touche Balayage.
Si vous appuyez sur la touche PTT lors de la réception d'un signal en mode
double veille, la radio transmet sur le canal actuellement affiché. Si vous appuyez
sur la touche PTT lorsqu'aucun signal n'est présent, la radio transmet sur le canal
primaire.
5) Mode mains libres (VOX)
Lorsque le mode mains libres (VOX) est sélectionné, la radio transmet
automatiquement lorsque le microphone détecte votre voix (ou un autre bruit). Ce
15
mode peut être utilisé avec le microphone interne ou un accessoire audio
approprié (disponible séparément).
Pour éviter tout fonctionnement accidentel et réduire les effets du bruit de fond il y
a 2 paramètres de sensibilité du microphone. (Haute et basse)
Pour activer le mode mains libres (VOX), appuyez sur la touche FUNCTION
jusqu'à ce que
apparaisse. Utilisez les touches Haut ou Bas pour changer le
niveau de sensibilité. Appuyez sur la touche PTT ou MODE ou attendez 5
secondes pour mémoriser votre choix et activer le mode VOX. L'icône VOX
s'affiche lorsque le mode VOX est activé. Répétez cette procédure et changez le
paramètre de sensibilité sur
pour désactiver le mode mains libres (VOX).
6) Bip Roger
Le Bip Roger est un bref signal qui est automatiquement ajouté à la fin de vos
transmissions pour informer les autres utilisateurs que vous avez fini de parler.
Vous pouvez activer ou désactiver le bip Roger selon le besoin.
Pour changer la tonalité du bip Roger, appuyez sur la touche MODE jusqu'à ce
que
apparaisse. Utilisez la touche Haut ou Bas pour changer de paramètre.
Appuyez sur la touche PTT ou MODE ou attendez 5 secondes pour mémoriser
votre choix. L'icône Bip Roger s'affiche lorsque le Bip Roger est activé.
7) Tonalité des touches
Si la tonalité des touches est activée, votre radio émettra une tonalité de
confirmation à chaque fois vous utilisez le clavier. Vous pouvez activer ou
désactiver la Tonalité des touches selon le besoin.
Pour modifier la tonalité des touches, appuyez sur la touche MODE jusqu'à ce
que
apparaisse. Utilisez la touche Haut ou Bas pour changer de paramètre.
Appuyez sur la touche PTT ou MODE ou attendez 5 secondes pour mémoriser
16
votre choix. L'icône tonalité des touches s'affiche lorsque la tonalité des
touches est activée.
8) Surveillance de pièce
Le mode Surveillance de pièce est semblable au mode mains libres (VOX), mais
il ignore les bruits courts et brefs et utilise seulement le plus haut niveau de
sensibilité du microphone. Lorsque le mode Surveillance de pièce est activé, la
radio transmet pendant 15 secondes quand elle détecte un bruit continu pendant
5 secondes ou plus. Si le bruit persiste, la radio transmet pendant 15 autres
secondes.
Pour activer le mode Surveillance de pièce, appuyez sur la touche MODE jusqu'à
ce que
apparaisse. Utilisez la touche Haut ou Bas pour changer de
paramètre. Appuyez sur la touche PTT ou MODE ou attendez 5 secondes pour
mémoriser votre choix et activer le mode Surveillance de pièce. L'icône
Surveillance de pièce s'affiche lorsque le mode Surveillance de pièce est activé.
Remarque : La fonction Surveillance de pièce ne remplace pas la surveillance
régulière pour assurer la sécurité des enfants. Si vous déplacez hors de la portée
de communication, vous n'entendrez pas les transmissions.
9) Intercom (pour motocyclistes)
Cette radio a la capacité d'intercommunication qui permet à vous et à votre
partenaire câblé de communiquer ensemble en utilisant le connecteur intercom.
(Les casques Intercom sont disponibles en option).
Pour modifier le réglage intercom, appuyez sur la touche MODE jusqu'à ce que
apparaisse. Utilisez la touche Haut ou Bas pour changer de paramètre.
Appuyez sur la touche PTT ou MODE ou attendez 5 secondes pour mémoriser
votre choix. L'icône intercom s'affiche lorsque le mode intercom est activé.
17
Contactez-vous pour obtenir les accessoires intercom optionnels.
10) Brouilleur
Le brouilleur donne une certaine confidentialité à votre voix lors des
transmissions. Il est donc difficile pour les autres utilisateurs qui n'ont pas les
mêmes
décodeurs
et
paramètres
de
brouilleur
de
comprendre
votre
communication. Par conséquent, l'unité de votre correspondant doit activer le
mode brouilleur afin d'entendre une voix claire. Notez que tant que le mode
brouilleur est actif, vous ne serez pas en mesure de comprendre les autres
postes sans fonction brouilleur activée.
Pour modifier le réglage brouilleur, appuyez sur la touche MODE jusqu'à ce que
apparaisse. Utilisez la touche Haut ou Bas pour changer de paramètre.
Appuyez sur la touche PTT ou MODE ou attendez 5 secondes pour mémoriser
votre choix. L'icône brouilleur s'affiche lorsque le mode brouilleur est activé.
11) Appel d'alerte
Pour attirer l'attention des autres utilisateurs à votre message, vous pouvez
envoyer une mélodie d'appel d'alerte en appuyant sur la touche CALL.
Il y a trois différentes tonalités d'appel d'alerte.
Pour changer la mélodie d'appel d'alerte, appuyez sur la touche MODE jusqu'à ce
que
apparaisse. Utilisez la touche Haut ou Bas pour changer de paramètre.
Appuyez sur la touche PTT ou MODE ou attendez 5 secondes pour mémoriser
votre choix.
18
12) Lampe torche
Pour activer ou désactiver la lampe torche, appuyez brièvement sur la touche
Lampe/Surveillance. Cette lampe torche ne fonctionne que lorsque la radio est
allumée.
13) Surveillance
La fonction Surveillance est utilisée pour surveiller l'activité sur le canal courant
indépendamment des paramètres du code de confidentialité. Il fixe également le
silencieux au minimum et permet de détecter les signaux faibles.
Pour activer la Surveillance, maintenez enfoncée la touche Lampe/Surveillance.
L'icône Surveillance s'affiche lorsque le mode Surveillance est activé. Lorsqu'il est
activé, il est normal d'entendre le bruit de fond statique.
La surveillance ne fonctionne que lorsque la touche est appuyée.
14) Compandeur
Ce Compandeur est une fonction qui permet de minimiser le bruit de fond lors de
la réception en adaptant le niveau audio dynamique. Pour activer ou désactiver le
Compandeur, appuyez brièvement sur la touche Compandeur/Balayage. L'icône
compandeur s'affiche lorsque le compandeur est activé.
15) Balayage des canaux
Le Balayage des canaux peut être utilisé pour trouver ou détecter des utilisateurs
sur des canaux radio.
Pour activer/désactiver le Balayage des canaux, maintenez enfoncée la touche
Compandeur/Balayage. L'icône Balayage s'affiche lorsque le Balayage est activé.
Le Balayage ne s'arrête que lorsque vous désactivez la fonction Balayage.
19
La radio va balayer les 8 canaux. Si la radio détecte un signal valide le
Balayage fait une pause de 5 secondes.
Si vous appuyez sur la touche PTT ou CALL lorsque la radio détecte un signal, la
radio transmet sur le même canal. Le balayage reprend après environ 15
secondes. Appuyez sur la touche Haut ou Bas pour reprendre le balayage.
Si vous appuyez sur la touche PTT ou CALL pendant le balayage, la radio
retourne au canal initial. Le balayage reprend après environ 15 secondes.
Les touches menu Fonctions, Surveillance et Volume Haut/Bas sont désactivées
pendant le balayage. Utilisez le mode balayage avec modération pour augmenter
la durée de vie de la batterie.
16) Code de confidentialité de balayage/Décodage
Cette radio utilise un code de confidentialité de balayage pour déterminer le code
de confidentialité (CTCSS) utilisé sur le canal courant.
Pour activer le code de confidentialité de balayage, appuyez sur la touche MODE
jusqu'à ce que le code de confidentialité clignote, puis maintenez enfoncée la
touche Compandeur/Balayage. L'icône Balayage s'affiche lorsque le code de
confidentialité de balayage est activé.
La radio va balayer les 38 codes de confidentialité (CTCSS).
Si la radio détecte un signal valide le balayage fait une pause de 5 secondes.
Si vous appuyez sur la touche PTT ou CALL lorsque la radio détecte un signal, la
radio transmet sur le même code de confidentialité. Le balayage reprend après
environ 15 secondes. Appuyez sur la touche Haut ou Bas pour reprendre le
balayage.
Si vous appuyez sur la touche PTT ou CALL pendant le balayage, la radio
retourne au code de confidentialité initial. Le balayage reprend après environ 15
secondes.
20
Les touches menu Fonctions, Volume Haut/Bas sont désactivées pendant le
balayage. Utilisez le mode balayage avec modération pour augmenter la durée
de vie de la batterie.
17) Verrouillage des touches
Pour éviter de changer accidentellement de canal ou les paramètres d'une
fonction, cette radio comprend une fonction de verrouillage.
Pour activer ou désactiver le verrouillage, maintenez enfoncée la touche
Fonction/Verrouillage pendant environ 2 secondes. L'icône verrouillage des
touches s'affiche lorsque le verrouillage des touches est activé. Les touches
Marche/arrêt, PTT, Lampe/Surveillance, Appel et réglage du volume ne sont pas
affectées par le verrouillage.
18) Rétroéclairage de l'écran
Le rétroéclairage de l'écran s'allume pendant environ 5 secondes à chaque fois
qu'une touche est appuyée. Les touches Appel, PTT et Lampe n'activent pas le
rétroéclairage.
19) Alerte batterie
Le niveau de batterie clignote lorsque le niveau de la batterie est faible et
nécessite d'être rechargée. Si nécessaire, reportez-vous aux instructions pour
recharger la batterie. L'utilisation de la radio avec une batterie faible réduit les
performances.
20) Économiser de l'énergie
Pour économiser la batterie la radio se met automatiquement en mode économie
d'énergie après une courte période d'inactivité. Il n'ya pas de paramètres
utilisateur pour la fonction économie d'énergie.
21
11. Dépannage
Si vous rencontrez des problèmes avec votre Tectalk Action Fun, vérifiez d'abord
le niveau de la batterie car une batterie faible peut causer des problèmes tels
qu'absence de transmission, réception faible et mauvaise qualité sonore.
Consultez le manuel et l'écran de la radio pour s'assurer qu'une fonction (telle
que VOX) n'a pas été activée par accident.
Si cela ne résout pas le problème réinitialisez votre appareil en suivant la
procédure suivante :
1)
Eteignez la radio.
2)
Maintenez enfoncées en même temps les touches PTT et Haut.
3)
Rallumez la radio.
Cela permet de rétablir les paramètres par défaut de la radio et devrait résoudre
la plupart des problèmes.
22
12. Information importante
Nous sommes légalement tenus d'inclure les dispositions et les informations de
garantie et la déclaration de conformité de l'UE avec le mode d'emploi de chaque
unité, et ce dans la langue de chaque pays.
Veuillez trouvez ces informations dans les pages suivantes.
1) Deux ans de garantie à compter de la date d’achat
Le Fabricant/revendeur garantit ce produit pour deux ans à compter de la date
d’achat. Cette garantie couvre tout dysfonctionnement dû à une défaillance des
composants ou à des fonctions incorrectes pendant la période de la garantie à
l'exception des pièces d’usure, telles que batteries, égratignures de l'écran,
défectuosité du boîtier, rupture de l'antenne et les défaillances dues à des raisons
extérieures telles que corrosion, surtension à cause d'une source d'alimentation
externe inappropriée ou l'utilisation d'accessoires inadéquats. La garantie ne
couvre pas les défaillances dues à un usage non prévu.Contactez votre
revendeur
local
pour
réclamation
sous
garantie.
Le
revendeur
réparera/remplacera ou envoie le produit à un centre de service agréé.
Vous pouvez également contacter directement notre station de réparation agrée.
Incluez la preuve d'achat avec le produit et décrivez l'anomalie de la façon la plus
précise.
2) Déchets
d'Equipements
Electriques
et
Electroniques
(DEEE)
et
recyclage
La loi Européennes ne permet pas la mise au rebus des équipements
électriques et électroniques usagés avec les ordures ménagères.
23
Ramenez votre produit à un centre de collecte municipal pour être recyclé. Ce
système de collecte est financé par les industriels pour garantir l’élimination
respectueuse de l’environnement et le recyclage de matières premières
précieuses.
3) Adresse du service d'assistance téléphonique (en Allemagne)
PST professional support technologies GmbH
Breitscheider Weg 117a
40885 Ratingen
Contactez notre service d'assistance téléphonique par téléphone au 01805012204 (14 cent/minute en Allemagne seulement) ou par courriel au [email protected].
Avant de retourner le produit consultez le chapitre “Dépannage” pour vous aidera
à effectuer certains tests faciles, sinon contactez notre service d'assistance
téléphonique.
© 2011 Alan Electronics GmbH