1
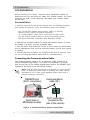
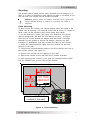
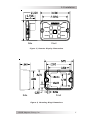
Remote Controls
for MM Series
Inverters
Installation and
Operation Guide
©2006 Magnum Energy Inc.
Disclaimer of Liability
Since the use of this manual and the conditions or methods of
installation, operation, use and maintenance of the MM Series Remote
Control are beyond the control of Magnum Energy Inc., this company
does not assume responsibility and expressly disclaims liability for
loss, damage or expense, whether direct, indirect, consequential or
incidental, arising out of or anyway connected with such installation,
operation, use, or maintenance.
Due to continuous improvements and product updates, the images
shown in this manual may not exactly match the unit purchased.
Restrictions on Use
The MM Series Remote Control shall not be used in connection with
life support systems, life saving or other medical equipment or
devices. Use of this particular equipment is at your own risk.
Contact Information
Magnum Energy, Inc.
1111 80th Street SW - Suite 250
Everett, WA 98203
phone: 425.353.8833
fax: 425.353.8390
web: www.magnumenergy.com
Product Safety Instructions
Read and follow all instructions and safety information contained in this
manual before installing or using this product.
• All electrical work must be performed in accordance with local, state
and federal electrical codes.
• This product is designed for indoor / compartment installation. It
must not be exposed to rain, snow, moisture or liquids of any type.
• Use insulated tools to reduce the chance of electrical shock or
accidental short circuits.
• Always verify proper wiring prior to connecting the remote.
Safety Symbols
To reduce the risk of electrical shock, fire, or other safety hazard, the
following safety symbols have been placed throughout this manual to
indicate dangerous and important safety instructions.
Warning - Indicates a dangerous voltage or condition exists.
Caution - Indicates a critical step necessary for the safe
installation and operation of the unit.
Note - Indicates an important statement.
©2006 Magnum Energy Inc.
i
List of Contents
1.0 Introduction ........................................................................... 1
Remotes Available ......................................................................... 1
Basic Features ............................................................................... 1
2.0 Installation ............................................................................. 2
Mounting ....................................................................................... 3
Flush Mounting .......................................................................... 3
Surface Mounting ...................................................................... 4
3.0 Operation ............................................................................... 6
Start-up ......................................................................................... 6
Factory Default Settings .................................................................. 6
Operation ...................................................................................... 7
ON/OFF Switch .......................................................................... 7
Monitoring the LED Indicators .................................................... 8
MM-R and MM-RC Remotes ..................................................... 8
MM-RC Remote Only ............................................................ 10
4.0 Warranty and Service Information .................................... 11
List of Figures
Figure
Figure
Figure
Figure
Figure
Figure
Figure
1,
2,
3,
4,
5,
6,
7,
MM Remotes ...................................................................... 1
Communications Cable Connections ................................... 2
Flush Mounting .................................................................. 3
Surface Mounting ............................................................... 4
Remote Display Dimensions ............................................... 5
Mounting Ring Dimensions ................................................. 5
LED Indicators and ON/OFF Switch ..................................... 7
List of Tables
Table 1, Inverter and Remote Settings .............................................. 6
ii
©2006 Magnum Energy Inc.
1.0 Introduction
1.0 Introduction
Congratulations on your purchase! The MM Series remote control from
Magnum Energy, Inc. is designed to be simple to install and use, allow
easy control and quick indication of the inverter’s (and charger) status.
Remotes Available
The MM-R and the MM-RC are the two MM remote controls available to
use with the MM Series inverter. The appropriate remote to use
depends on whether your inverter includes the battery charger
feature. For MM Series inverters that do not have the battery charger,
the MM-R is the recommended remote; for MM Series inverters that do
have the battery charger, the MM-RC is the recommended remote.
Depending on your inverter model, you can select one of the following
remotes:
MM-R - Provides three LED indicators for inverter status and includes a
remote ON/OFF switch; comes with 25’ cable. This remote is for MM
Series inverters without the battery charger feature; such as the
MM612 (requires serial number L1-201 or higher) or MM612G models.
MM-RC - Provides six LED indicators for inverter and charger status,
includes a remote ON/OFF switch; comes with 25’ cable. This remote is
for MM Series inverters with the battery charger feature; such as the
MM612AE, MM1212 or MM1212AE models.
MM-RC
MM-R
INVERT
INVERT
AC IN
AC IN
FAULT
ON/OFF
FAULT
BULK
ABSORB
ON/OFF
FLOAT
Figure 1, MM Remotes
Basic Features
• Colored LED’s (Light Emitting Diodes) located on the front panel for
easy viewing of system status.
• RJ11 phone jack connection on remote for easy connection to
inverter.
• Status and information indicators used to determine system performance and operating conditions including: inverter operation, charger
operation and any faults that occur.
• ON/OFF push-button for easy control of inverter and charger
operation.
• Easy installation and included mounting ring to give installers a
choice for mounting.
©2006 Magnum Energy Inc.
1
2.0 Installation
2.0 Installation
Before installing the inverter, read the entire installation section to
determine how you are going to install your remote control. The more
thorough you plan in the beginning, the better your inverter needs
will be met.
Pre-installation
• Carefully remove the MM Series remote from its shipping container
and inspect all contents. Verify the following items are included:
-
The correct MM remote panel display (MM-R or MM-RC)
Mounting Ring (used for surface mounting)
25’ communication cable (RJ11 connectors on each end)
Two #6 Phillips head screws (to secure the display panel)
MM Series Remotes Installation and Operation Guide.
• Determine a suitable location to mount the remote control. It must
be located in a clean, dry and protected place.
• Plan the cable route from the remote to the inverter to ensure there
are no obstructions that can’t be overcome before you do any cutting
or drilling.
• Allow ample room to access the ON/OFF switch and to view the LEDs
for the inverters operational status and for troubleshooting.
Connecting the Communications Cable
The communications cable is 25’, 4-conductor cable (wired like a
normal telephone-type cable). This cable is connected to the RJ11
jack on the rear of the remote display panel and to the REMOTE port
located on the front of the MM Series inverter.
Note: The 25’ cable should be long enough for most applications. If additional cable length is needed, the cable can be
extended up to 50 feet using standard phone cable and a
female-to-female connector.
REMOTE port
(RJ11 connection)
Communications
cable (25')
Front Side of
MM Series Inverter
RJ11 connection
(located on the
rear of the remote)
Figure 2, Communications Cable Connections
2
©2006 Magnum Energy Inc.
2.0 Installation
Mounting
The remote control panel can be flush mounted thru an opening in a
wall; or if there is insufficient room behind the wall or no desire to cut
into the wall, the remote can be surface mounted.
Caution: Always check for hidden electrical wires, pipes and
cables BEFORE drilling or cutting or screwing into walls or
cabinets.
Flush Mounting
To flush mount the remote, the remote display panel will need to be
placed into an opening. This opening must have at least a 2” depth to
allow room for the remote’s rear circuit board and cables.
1. Cut an opening in a wall, see figure 2 to determine the correct
opening dimensions. DO NOT cut the opening too big - to ensure
there are no cracks around the display and that there is enough
material for the screws to secure the display. Remove any wall
insulation (if applicable) that may contact the back of the remote.
2. Route the communications cable from the inverter up into the
opening in the wall.
3. Connect the communications cable to the RJ11 jack at the rear of
the remote control (see figure 2).
4. Position the remote into the opening in the wall.
5. Secure the remote to the wall with the 2 screws provided.
6. After ensuring the inverter is off; plug the communications cable
into the REMOTE port on the front of the inverter.
MIN 2"
MAX 2 1/8"
MIN 1 1/2"
MAX 1 5/8"
CUT THIS
AREA OUT
BULK
INVERT
Communication Cable
(routed in the wall)
ABSORB
AC IN
ON/OFF
FAULT
FLOAT
Figure 3, Flush Mounting
©2006 Magnum Energy Inc.
3
2.0 Installation
Surface Mounting
The remote control can be mounted on the surface of a wall by using
the mounting ring.
Note: The mounting ring has a tabs at the top and bottom
that are made with a thinner material. This allows these tabs
to be cut or broken out to allow the communication cable to
be routed up or down the wall.
1. Using the mounting ring as a template, mark on the wall the
location of the four mounting screws.
2. Drill appropriate sized holes (depending on the screws that will be
used - these are not supplied) in the four screw locations that were
marked.
3. Determine if the communication cable is running up or down the
wall and cut/break the appropriate tab on the mounting ring.
4. Pull the cable through the mounting ring and place the ring with the
removed tab over the communication cable against the wall.
5. Position the mounting ring over the drilled holes and screw the
mounting ring to the wall
6. Connect the communications cable - routed thru the mounting ring
opening - to the RJ11 connector on the rear of the remote display
6. Secure the remote display to the mounting ring with the 2 Phillips
screws provided.
7. After ensuring the inverter is off; route the communications cable
exiting from the mounting ring into the REMOTE port on the front of
the inverter.
Mounting Ring
screws x4
(not supplied)
breakable tab
(allows cable to
be inserted)
BULK
INVERT
Communication Cable
(routed down the wall)
ABSORB
AC IN
ON/OFF
FAULT
FLOAT
Figure 4, Surface Mounting
4
©2006 Magnum Energy Inc.
2.0 Installation
INVERT
BULK
AC IN
ABSORB
ON/OFF
FAULT
Side
FLOAT
Front
Figure 5, Remote Display Dimensions
Side
Front
Figure 6, Mounting Ring Dimensions
©2006 Magnum Energy Inc.
5
3.0 Operation
3.0 Operation
Start-up
After Installing and connecting the MM Series remote control, the
remote should be tested to ensure it is functional.
1. Press the ON/OFF push-button located on the display panel.
Note: The ON/OFF control switch is a push-button switch which
functions by momentary pressing and releasing.
2. After pressing the ON/OFF switch, verify the INVERT indicator
(green LED) is on (solid or blinking) and the status indicator on the
MM Series inverter is also on.
3. Press the ON/OFF switch again to turn the inverter off and verify
the INVERT indicator on the remote and the status indicator on the
inverter both go off.
If the remote passes all the steps, the inverter is ready for use.
If the remote fails any of the steps fails, check all the connections at
both ends of the communications cable and ensure the inverter is
operational. If the FAULT indicator comes on, refer to the Troubleshooting section in the MM Series Inverters, Installation and Operation Guide to help clear the fault condition.
Factory Default Settings
Your MM Series inverter has many functions that have changeable
settings. These settings are preset and loaded by the inverter when
turned on. However, if the MM remote control is connected to the
inverter, the settings from the remote over-ride any default settings
in the inverter. The settings in the remote are saved in the remote’s
non-volatile memory and will be used - even if DC power to the
inverter is lost - as long as the remote is connected. See Table 1 for
the inverter’s default settings and the settings that are changed when
connected to the MM remote.
Table 1, Inverter and Remote Settings
Function
Inverter Settings
Remote Settings
Search Watts
NA (MM612 / MM612G),
5W (all other MM Series)
NA (MM612 / MM612G),
5W (all other MM Series)
Charge Rate
10.0 VDC
400 AmpHrs
(Absorb Time = 120 minutes)
Flooded - Liquid Lead Acid
(Bulk = 14.6 VDC,
Float = 13.4 VDC)
100%
10.0 VDC
400 AmpHrs
(Absorb Time = 120 minutes)
Flooded - Liquid Lead Acid
(Bulk = 14.6 VDC,
Float = 13.4 VDC)
100%
VAC dropout
80VAC
90VAC
LowBatCutOut
Battery AmpHrs
Battery Type
Note: For more information on these settings, refer to the MM
Series Inverters, Installation and Operation Guide.
6
©2006 Magnum Energy Inc.
3.0 Operation
Operation
The MM Series remote controls have an ON/OFF switch that performs
the same function as the ON/OFF switch on the front of the MM Series
inverter. This remote control also has LED indicators to show the
current operating mode of the inverter and charger (MM-RC only) and
to help troubleshoot you system if you have a fault.
INVERT
(green LED)
BULK
(yellow LED)
AC IN
(green LED)
ABSORB
(yellow LED)
ON/OFF
FLOAT
(green LED)
FAULT
(red LED)
ON/OFF
Switch
Figure 7, LED Indicators and ON/OFF Switch
ON/OFF Switch
The ON/OFF Switch is a momentary push-button switch that duplicates
the ON/OFF switch on the inverter. This switch also allows additional
changes to be made while in the Invert or Charge Mode.
When the inverter is first connected to the batteries, the inverter and
remote go through an internal 10 seconds start-up test. After this test
is completed, the ON/OFF switch can be pressed to turn on the
inverter. Once the inverter has been turned on, momentarily pressing
the ON/OFF switch alternately turns the inverter On/Standby and Off.
On models with the search mode function, the ON/OFF switch can be
used to enable or disable the search mode. While in the INVERT
Mode, pressing and holding this switch for three seconds will allow the
search mode to alternate between Disabled (Inverter always on indicated by the INVERT LED always on) and 5W (the inverter is
looking for at least a 5 watt load to turn on and start inverting indicated by the INVERT LED Blinking once a second).
On models with the battery charger feature, this switch can also be
used to disable the charger (Charger Standby) so that all the
incoming power can be used exclusively for the AC loads. To turn the
charger off, press and hold the ON/OFF switch for three seconds (you
must be in the Charge Mode). When this happens, the charging
indicators (BULK, ABSORB and FLOAT) will go off. To turn the charger
back on, press and hold the ON/OFF switch for three seconds again.
When the charger is again enabled, one of the charging indicators will
come on to show the current charge stage.
Warning - When any external AC power is passing through
the inverter and present on the output. Pressing the ON/OFF
switch will not remove this AC power on the inverter’s output.
©2006 Magnum Energy Inc.
7
3.0 Operation
Monitoring the LED Indicators
The remote front panel uses LED indicators to show the status of the
inverter system. These LED indicators automatically switch between
the inverter or charger mode (MM-RC only) as the operation of the
inverter system changes.
The LED status indicators show four modes of system operation:
• INVERT - Invert Mode status
• AC IN - Transfer Mode status
• FAULT - Fault Mode status
• BULK, ABSORB or FLOAT (MM-RC only) - Charge Mode status
Note: To understand more about the operating modes of the
inverter or charger, refer to the MM Series Inverters, Installation and Operation Guide.
MM-R and MM-RC Remotes
The three LED indicators on the left side of both the MM-R and MM-RC
remotes (see figure 7) will show you the operating status of the MM
Series inverter. Monitor these indicators to determine the inverter’s
mode of operation:
INVERT (green) • On (solid)
- and AC IN LED indicator is Off - The inverter is On. It is using
energy from the battery to supply AC power to the loads connected
to the inverter.
- and AC IN LED indicator is On (solid) - The inverter is in Standby.
The external AC power (Utility or generator) connected to the
inverters input is passing through the inverter to power the AC
loads. The inverter will automatically turn on to power the AC loads
if the external AC power is lost or disconnected.
• Blinks On (once every second) - The inverter is in search mode.
The AC load is below 5 watts (Search Watts default setting).
• Off - The inverter is disabled. The inverter is not on or will not come
on if AC power is lost or disconnected.
AC IN (green) • On (solid) - the external AC power (Utility or generator) is
connected to the inverters input and passing through the inverter to
power the AC loads connected to the inverter’s output.
• Blinking On (once every second) - the external AC power is present
but not actively being used. Either 1. The AC input is being qualified
(takes approximately 15 seconds); or 2. The input AC voltage is low.
Ensure the incoming AC voltage is above 90 volts (VAC dropout
setting with the MM remote connected).
• Off - No external AC power is detected on the inverter’s input.
8
©2006 Magnum Energy Inc.
3.0 Operation
FAULT (red) - Under normal operating conditions, the FAULT
indicator will be off. If there is a fault condition, this indicator will
blink differently for each specific fault to help troubleshoot the inverter.
Monitor this indicator for at least 10 seconds and count the number of
blinks that occur every four seconds to determine the particular reason
for the shutdown. Once you have determined and cleared the fault the
inverter can be turned on. To help clear the fault condition, refer to
the Troubleshooting section in the MM Series Inverters, Installation
and Operation Guide.
• Blinks On 1 time every 4 seconds - Low Battery Voltage; the battery
voltage level has dropped below 10.0 VDC (LBCO default setting**).
Your batteries need to be charged, this fault condition will
automatically clear when the battery voltage exceeds 12.5 VDC.
• Blinks On 2 times every 4 seconds - High Battery Voltage; the
battery voltage is above 15.5 VDC. Reduce or turn off the external
charging source to bring the battery voltage down.
• Blinks On 3 times every 4 seconds - Over-temperature condition;
The internal temperature of the inverter has risen above acceptable
limits; caused by loads too great for the inverter to operate
continuously, or by lack of ventilation to the inverter. When the unit
has cooled, it will automatically reset and resume operation.
• Blinks On 4 times every 4 seconds - AC Overload; the inverter has
turned off because the connected loads are larger than inverter’s
output capacity or there is a short on the output wiring. The inverter
can be restarted after the AC loads are reduced or the wiring short
has been removed. To restart the inverter, momentarily press the
ON/OFF button on the inverter or remote.
• Blinks On 5 times every 4 seconds - Internal Fault; the inverter has
turned off because it has detected an internal problem. To clear this
fault, the inverter will need to be reset by: 1. Press and hold the ON/
OFF switch on the inverter for 15 seconds (the status LED must begin
to rapidly flash); or 2. Disconnect all DC power to the inverter for at
least 15 seconds and then reconnect. After resetting the inverter,
momentarily press the inverters ON/OFF switch and verify the fault
has cleared. If the Internal Fault remains, the inverter requires
service at an authorized repair facility.
©2006 Magnum Energy Inc.
9
3.0 Operation
MM-RC Remote Only
The MM-RC provides three additional charging LED indicators to provide
information on the operation of the battery charger. Monitor these
indicators for at least 10 seconds to determine the charger status.
BULK (yellow) • On (solid) - Bulk Charging; the charger is delivering maximum current
to the batteries. The charger will remain in Bulk charge until 14.6 VDC*
is achieved (determined by the Battery Type selection**).
• Blinks On (1 time every 4 seconds) - Charger Back-off; charger
current is reduced. This occurs if: 1. The internal temperature is very
hot (the charger reduces the charge rate to maintain temperature);
or 2. The AC input voltage has fallen below 85 VAC (the charger
reduces the charge rate to help stabilize the incoming AC voltage).
• Off - charger is not in Bulk charge mode.
ABSORB (yellow) • On (solid) - Absorb Charging; the charger is in constant voltage
stage and begins after the bulk voltage has been reached. The DC
charging current will start to taper down in order to maintain the Bulk
voltage setting. The Absorb Charging time is 120 minutes
(determined by the Battery AmpHrs selection**).
• Blinks On (1 time every 4 seconds) - Charger Back-off; charger
current is reduced. This occurs if: 1. The internal temperature is very
hot (the charger reduces the charge rate to maintain temperature);
or 2. The AC input voltage has fallen below 85 VAC (the charger
reduces the charge rate to help stabilize the incoming AC voltage).
• Off - charger is not in Absorption charge mode.
FLOAT (green) • On (solid) - Float Charging; at the end of the Absorb Charging time,
the charger reduces the charge voltage to maintain the batteries at
13.4* VDC (determined by the Battery Type selection**).
• Blinks On (1 time every 4 seconds) - Charger Back-off; charger
current is reduced. This occurs if: 1. The internal temperature is very
hot (the charger reduces the charge rate to maintain temperature);
or 2. The AC input voltage has fallen below 85 VAC (the charger
reduces the charge rate to help stabilize the incoming AC voltage).
• Blinks On (2 times every 4 seconds) - Full Charge; this mode
monitors the battery voltage to determine when to continue charging.
After four hours in the Float Charge mode, the charger turns off and
goes to Full Charge mode. If the battery voltage drops to 12.9 VDC,
the charger will automatically initiate another Float Charge.
• Off - charger is not in Float Charge mode.
* These voltage settings are based on the BTS being disconnected; if
connected, these voltage settings will increase or decrease depending
on temperature around the BTS - this ensures correct charging.
** These settings are preset by the inverter or the connected remote
(see Table 1, Inverter and Remote Settings), but can be changed by
the ME-RC50 remote.
10
©2006 Magnum Energy Inc.
4.0 Warranty and Service Information
4.0 Warranty and Service Information
24 Month Limited Warranty
Magnum Energy, Inc., warrants the MM Series Inverter to be free
from defects in material and workmanship that result in product
failure during normal usage, according to the following terms and
conditions:
1. The limited warranty for the product extends for 24 months
beginning from the product’s original date of purchase.
2. The limited warranty extends to the original purchaser of the
product and is not assignable or transferable to any subsequent
purchaser.
3. During the limited warranty period, Magnum Energy will repair, or
replace at Magnum Energy’s option, any defective parts, or any parts
that will not properly operate for their intended use with factory new
or rebuilt replacement items if such repair or replacement is needed
because of product malfunction or failure during normal usage. The
limited warranty does not cover defects in appearance, cosmetic,
decorative or structural parts or any non-operative parts. Magnum
Energy’s limit of liability under the limited warranty shall be the actual
cash value of the product at the time the original purchaser returns
the product for repair, determined by the price paid by the original
purchaser. Magnum Energy shall not be liable for any other losses or
damages.
4. Upon request from Magnum Energy, the original purchaser must
prove the product’s original date of purchase by a dated bill of sale,
itemized receipt.
5. The original purchaser shall return the product prepaid to Magnum
Energy in Everett, WA. After the completion of service under this
limited warranty, Magnum Energy will return the product prepaid to
the original purchaser via a Magnum-selected non-expedited surface
freight within the contiguous United States and Canada; this excludes
Alaska and Hawaii.
6. If Magnum repairs or replaces a product, its warranty continues for
the remaining portion of the original warranty period or 90 days from
the date of the return shipment to the original purchaser, whichever is
greater. All replaced products and parts removed from repaired
products become the property of Magnum Energy.
7. This limited warranty is voided if:
• the product has been modified without authorization,
• the serial number has been altered or removed,
• the product has been damaged through abuse, neglect,
accident, high voltage or corrosion.
• the product was not installed and operated according to the
owner’s manual.
BEFORE RETURNING ANY UNIT, CONTACT MAGNUM ENERGY FOR
A RETURN MATERIAL AUTHORIZATION (RMA) NUMBER.
©2006 Magnum Energy Inc.
11
Magnum Energy, Inc.
1111 80th Street SW - Suite 250
Everett, WA 98203
phone: 425.353.8833
fax: 425.353.8390
web: www.magnumenergy.com
PN: 64-00012
©2006 Magnum Energy Inc.