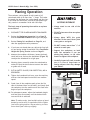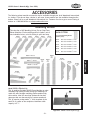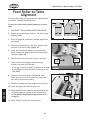
1
BD9:AL&-&' K6G>67A:HE::9EA6C:G$ BDJA9:GL>I=HI6C9 DLC:GHB6CJ6A ;DGBD9:AHB6CJ;68IJG:9H>C8:($%. E]dcZ/(+%,()"()-'Dca^cZIZX]c^XVaHjeedgi/iZX]"hjeedgi5h]de[dm#W^o 8DENG><=IB6G8=!'%%.7NLDD9HID8@>CI:GC6I>DC6A!>C8#G:K>H:96J<JHI!'%%.IG &&(..8G L6GC>C</CDEDGI>DCD;I=>HB6CJ6AB6N7:G:EGD9J8:9>C6CNH=6E:DG;DGBL>I=DJI I=:LG>II:C6EEGDK6AD;LDD9HID8@>CI:GC6I>DC6A!>C8# Eg^ciZY^cIV^lVc Model W1812 Variable Speed Planer/ Moulder With Stand Manual Update Phone #: (360) 734-3482 • Online Tech Support: [email protected] • Web: www.shopfox.biz Improvements to this machine were made since the manual was originally printed, and this manual update covers those changes. Keep this page with your owner's manual in case you ever need to refer to it. New and Updated Parts Added We have added a series of parts to the Model W1812. For increased machine safety, we added a chain guard shown as item 86 in Figure 1. For increased leadscrew stability, we added the collar shown as item 95V2. For improved shipping stability, we added an updated shipping brace system, which is shown as the numbered items in Figure 2. 210-1 211 244 211 207 240V2 Updated on Page 48 210-2 211 86 Updated on Page 47 211 207 95V2 Updated on Page 45 Figure 2. W1812 shipping brace system. Figure 1. W1812 chain guard and collar. REF PART # DESCRIPTION 86 95V2 207 210-1 210-2 211 240V2 244 X1812086 X1812095V2 XPN02 XPB03 XPB12 XPW07 X1812240V2 X1812244 SAFETY GUARD COLLAR V2.10.09 HEX NUT 5/16-18 HEX BOLT 5/16-18 X 1 HEX BOLT 5/16-18 X 1-1/4 FLAT WASHER 5/16 BRACKET V2.10.09 PLASTIC WASHER 5/16 COPYRIGHT © OCTOBER, 2009 BY WOODSTOCK INTERNATIONAL, INC. #12268CR WARNING: NO PORTION OF THIS MANUAL MAY BE REPRODUCED IN ANY SHAPE OR FORM WITHOUT THE WRITTEN APPROVAL OF WOODSTOCK INTERNATIONAL, INC. Printed in Taiwan K_`jdXelXcgifm`[\jZi`k`ZXcjX]\kp`ejkilZk`fejfek_\gifg\ij\klg# fg\iXk`fe#dX`ek\eXeZ\Xe[j\im`Z\f]k_`jdXZ_`e\&\hl`gd\ek% =X`cli\kfi\X[#le[\ijkXe[Xe[]fccfnk_\`ejkilZk`fej^`m\e`ek_`j dXelXcdXpi\jlck`ej\i`fljg\ijfeXc`ealip#`eZcl[`e^XdglkXk`fe# \c\ZkifZlk`fefi[\Xk_% K_\fne\if]k_`jdXZ_`e\&\hl`gd\ek`jjfc\cpi\jgfej`Yc\]fi`kjjX]\ lj\%K_`ji\jgfej`Y`c`kp`eZcl[\jYlk`jefkc`d`k\[kfgifg\i`ejkXccX$ k`fe`eXjX]\\em`ifed\ek#g\ijfee\ckiX`e`e^Xe[ljX^\Xlk_fi`qX$ k`fe#gifg\i`ejg\Zk`feXe[dX`ek\eXeZ\#dXelXcXmX`cXY`c`kpXe[ Zfdgi\_\ej`fe#Xggc`ZXk`fef]jX]\kp[\m`Z\j#YcX[\&Zlkk\i`ek\^i`kp# Xe[k_\ljX^\f]g\ijfeXcgifk\Zk`m\\hl`gd\ek% K_\dXel]XZkli\in`ccefkY\_\c[c`XYc\]fi`ealipfigifg\ikp [XdX^\]ifde\^c`^\eZ\#`dgifg\ikiX`e`e^#dXZ_`e\df[`]`ZXk`fejfi d`jlj\% Jfd\[ljkZi\Xk\[Ypgfn\ijXe[`e^#jXn`e^#^i`e[`e^#[i`cc`e^#Xe[ fk_\iZfejkilZk`feXZk`m`k`\jZfekX`ejZ_\d`ZXcjbefnekfk_\JkXk\f] :Xc`]fie`XkfZXlj\ZXeZ\i#Y`ik_[\]\Zkjfifk_\ii\gif[lZk`m\_Xid% Jfd\\oXdgc\jf]k_\j\Z_\d`ZXcjXi\1 C\X[]ifdc\X[$YXj\[gX`ekj% :ipjkXcc`e\j`c`ZX]ifdYi`Zbj#Z\d\ekXe[fk_\idXjfeipgif[lZkj% 8ij\e`ZXe[Z_ifd`ld]ifdZ_\d`ZXccp$ki\Xk\[cldY\i% Pflii`jb]ifdk_\j\\ogfjli\jmXi`\j#[\g\e[`e^fe_fnf]k\epfl [fk_`jkpg\f]nfib%Kfi\[lZ\pfli\ogfjli\kfk_\j\Z_\d`ZXcj1 Nfib`eXn\ccm\ek`cXk\[Xi\X#Xe[nfibn`k_Xggifm\[jX]\kp\hl`g$ d\ek#jlZ_Xjk_fj\[ljkdXjbjk_XkXi\jg\Z`Xccp[\j`^e\[kf]`ck\i flkd`ZifjZfg`ZgXik`Zc\j% J8=<KP%%%%%%%%%%%%%%%%%%%%%%%%%%%%%%%%%%%%%%%%%%%%%%%Standard Machinery Safety ..................... 6 Additional Safety for Planer/Moulders ....... 8 G8IKJ%%%%%%%%%%%%%%%%%%%%%%%%%%%%%%%%%%%%%%%%%%%%%% +, Headstock ....................................... 45 Headstock Parts List ........................... 46 Main Motor and Cabinet ....................... 47 Parts List......................................... 47 Feed Motor and Controls ...................... 48 Feed Motor and Controls Parts List.......... 49 Label Placement ............................... 50 N8II8EKP%%%%%%%%%%%%%%%%%%%%%%%%%%%%%%%%%%%%%%%% ,* FG<I8K@FEJ D8@EK<E8E:< FG<I8K@FEJ%%%%%%%%%%%%%%%%%%%%%%%%%%%%%%%%%%%%%%% (/ General .......................................... 18 Installing Planing Knives ...................... 19 Installing Moulding Knives .................... 20 Feed Roller Height and Spring Tension ..... 21 Workpiece Inspection ......................... 23 Planing Do's and Don'ts ........................ 24 Planing Operation .............................. 25 Moulding Do's and Don'ts ...................... 26 Moulding Operation ............................ 30 J<IM@:<%%%%%%%%%%%%%%%%%%%%%%%%%%%%%%%%%%%%%%%%%%%% *, General .......................................... 35 Changing Feed Motor Brushes ................ 35 Feed Roller-to-Table Alignment .............. 36 Drive Chain Adjustment ....................... 37 Gib Adjustment ................................. 38 Electrical Safety Instructions................. 39 Wiring Diagram ................................. 40 Electrical Component Locations ............. 41 Troubleshooting................................. 42 J<KLG J<KLG%%%%%%%%%%%%%%%%%%%%%%%%%%%%%%%%%%%%%%%%%%%%%% (' Unpacking ....................................... 10 Inventory ........................................ 10 Machine Placement ............................ 11 Cleaning Machine............................... 11 Lifting and Moving ............................. 12 Mounting to Shop Floor........................ 12 Assembly ......................................... 13 Dust Collection ................................. 16 Test Run.......................................... 17 D8@EK<E8E:<%%%%%%%%%%%%%%%%%%%%%%%%%%%%%%%%%%%% ** General .......................................... 33 Cleaning ......................................... 33 Cleaning Feed Motor ........................... 33 Table and Base.................................. 33 Lubrication ...................................... 34 <C<:KI@:8C <C<:KI@:8C%%%%%%%%%%%%%%%%%%%%%%%%%%%%%%%%%%%%%%%%%0 220V Operation ................................... 9 Extension Cords .................................. 9 Electrical Specifications ........................ 9 8::<JJFI@<J%%%%%%%%%%%%%%%%%%%%%%%%%%%%%%%%%%%%%% *( J8=<KP @EKIF;L:K@FE%%%%%%%%%%%%%%%%%%%%%%%%%%%%%%%%%%%%%) Woodstock Technical Support .................. 2 Controls and Features ........................... 3 Machine Specifications .......................... 4 @EKIF;L:K@FE :fek\ekj J<IM@:< G8IKJ LJ<K?<HL@:B>L@;<G8><C89<CJKFJ<8I:?FLK@E=FID8K@FE=8JK @EKIF;L:K@FE N(/()Fne\ijDXelXcD]^%j`eZ\*&'0 @EKIF;L:K@FE Nff[jkfZbK\Z_e`ZXcJlggfik This machine has been specially designed to provide many years of trouble-free service. Close attention to detail, ruggedly built parts and a rigid quality control program assure safe and reliable operation. Woodstock International, Inc. is committed to customer satisfaction. Our intent with this manual is to include the basic information for safety, setup, operation, maintenance, and service of this product. We stand behind our machines! In the event that questions arise about your machine, please contact Woodstock International Technical Support at (360) 734-3482 or send e-mail to: k\Z_$jlggfik7j_fg]fo. Y`q. Our knowledgeable staff will help you troubleshoot problems and process warranty claims. If you need the latest edition of this manual, you can download it from _kkg1&&nnn.j_fg]fo.Y`q. If you have comments about this manual, please contact us at: Nff[jkfZb@ek\ieXk`feXc#@eZ. 8kke1K\Z_e`ZXc;fZld\ekXk`feDXeX^\i G.F.9fo)*'0 9\cc`e^_Xd#N80/)). <dX`c1dXelXcj7nff[jkfZb`ek.Zfd -2- N(/()Fne\ijDXelXcD]^%j`eZ\*&'0 :fekifcjXe[=\Xkli\j C B E N M F J8=<KP D G O H A P I J Q L K R =`^li\1. W1812 Front and rear view. 8. 9. :. ;. <. =. >. ?. @. A. B. C. D. E. F. G. H. I. Feed Motor Handwheel Scale Headstock Height Handwheel Dovetailed Column Headstock Scale Control Panel Feed Speed Control Dial Emergency Stop Button Cutterhead ON Button -3- Headstock Lock Lever Chip Deflector Lock Pin Cabinet Door Belt Cover Dust Cover w/Port Guide Rail Lock Lever Guide Rail Set Cast Iron Table and Wings Vented Sheet Metal Cabinet @EKIF;L:K@FE N(/()Fne\ijDXelXcD]^%j`eZ\*&'0 DXZ_`e\Jg\Z`]`ZXk`fej B68=>C: HE:8>;>86I>DCH Phone #: (360) 734-3482 • Online Tech Support: [email protected] • Web: www.shopfox.biz BD9:AL&-&'H=DE;DM K6G>67A:HE::9EA6C:G$BDJA9:GL>I=HI6C9 Fm\iXcc;`d\ej`fej Weight .................................................................................................................. 306 lbs. Length ...................................................................................................................... 361⁄4" Width .......................................................................................................................... 22" Height ...................................................................................................................... 341⁄2" Foot Print (Length x Width) ......................................................................................... 21" x 19" J_`gg`e^;`d\ej`fej Total Shipping Weight ................................................................................................. 324 lbs. Box 1 Length x Width x Height ..................................................................... 401⁄8" x 193⁄4" x 221⁄8" Box 1 Weight ........................................................................................................... 185 lbs. Box 2 Length x Width x Height ..................................................................... 227⁄8" x 211⁄4" x 301⁄4" Box 2 Weight ........................................................................................................... 139 lbs. <c\Zki`ZXc Switch ................................................................. Magnetic Switch w/Thermal Overload Protection Switch Voltage ............................................................................................................. 220V Cord Length................................................................................................................ 10 ft. Cord Gauge ............................................................................................................ 14 gauge Recommended Breaker Size...........................................................................................15 amp Plug .............................................................................................................................No Dfkfij :lkk\i_\X[ Type ................................................................................... TEFC Capacitor Start Induction Horsepower .......................................................................................................... 2 HP Voltage ................................................................................................................ 220V Phase ................................................................................................................ Single Amps ................................................................................................................... 12A Speed............................................................................................................ 3450 RPM Cycle ................................................................................................................. 60 Hz Number Of Speeds ...................................................................................................... 1 Power Transfer ...................................................................................... Power Twist V-Belt Bearings ....................................................................................... Shielded and Lubricated =\\[Ifcc\ij Type ......................................................................................................... DC Universal Horsepower ........................................................................................................ 1⁄4 HP Voltage, Amps ............................................................................................. 180VDC, 1.5A Phase ................................................................................................................ Single Motor Speed ....................................................................... 0-55 RPM (w/(Voltage Reduction) Feed Speed ......................................................................................................0-18 FPM Cycle ................................................................................................................. 60 Hz Number Of Speeds ......................................................................................Variable Speed Power Transfer ...............................................................................................Chain Drive -4- DX`eJg\Z`]`ZXk`fej :lkk`e^:XgXZ`k`\j Maximum Planing Width............................................................................................... 7" Maximum Planing Depth ............................................................................................. 1⁄8" Maximum Planing Height ........................................................................................... 71⁄2" Maximum Profile Width ............................................................................................ 63⁄4" Maximum Profile Depth .............................................................................................. 3⁄4" Minimum Stock Thickness ............................................................................................ 1⁄4" Minimum Stock Length ................................................................................................ 9" Be`]\@e]fidXk`fe Number of Knives ....................................................................................................... 2 Knife Type ............................................................................................................. HSS Knife Length ......................................................................................................... 71⁄8" Knife Width ........................................................................................................... 11⁄2" Knife Thickness ........................................................................................................ 1⁄4" Number of Cuts Per Minute ......................................................................................14,000 Number of Cuts Per Inch .........................................................................................64-300 :lkk\i_\X[@e]fidXk`fe Cutterhead Type .................................................................................................. Square Cutterhead Diameter ............................................................................................... 11⁄4" Cutterhead Speed ............................................................................................. 7000 RPM KXYc\@e]fidXk`fe Table Length w/Wings ............................................................................................. 361⁄4" Table Length w/o Wings........................................................................................... 141⁄8" Table Width ............................................................................................................ 10" Table Thickness ....................................................................................................... 7⁄16" Extension Wing Length ............................................................................................... 11" Extension Wing Width ..............................................................................................89⁄16" Floor to Table Height .............................................................................................. 303⁄8" Fk_\i@e]fidXk`fe Number of Dust Ports ................................................................................................... 1 Dust Port Size ........................................................................................................... 4" Measurement Scale Units ........................................................................................ Inches :fejkilZk`feDXk\i`Xcj Cabinet ........................................................................................................... Formed Steel Body Assembly ......................................................................................................... Cast Iron Cutterhead Assembly ......................................................................................................Steel Table & Extension Wing ........................................................................ Precision Ground Cast Iron Paint ............................................................................................................... Powder Coat Infeed and Outfeed Rollers ...........................................................................Rubber Coated Steel Fk_\i Serial Number Location ........................................................................ ID Label on Front of Stand Customer Assembly Time ....................................................................... Approximately 45 Minutes Warranty .................................................................................................................. 2 Year Country of Origin ....................................................................................................... Taiwan =\Xkli\j Heavy-Duty Cast Iron Handwheel with Inch Measurement Scale for Cutterhead Housing Lift Precision-Ground Cast Iron Infeed and Outfeed Extension Wings Dovetailed Way for Cutterhead Housing with Precision Gib Adjustments Pedestal-Mounted Control Switch with Variable Speed Control -5- @EKIF;L:K@FE N(/()Fne\ijDXelXcD]^%j`eZ\*&'0 N(/()Fne\ijDXelXcD]^%j`eZ\*&'0 J8=<KP J8=<KP J8=<KP I<8;D8EL8C9<=FI<FG<I8K@E>D8:?@E<% =8@CLI<KF=FCCFN@EJKIL:K@FEJ9<CFNN@CC I<JLCK@EG<IJFE8C@EALIP% @e[`ZXk\jXe`dd`e\ekcp_XqXi[fljj`klXk`fen_`Z_#`]efkXmf`[\[#N@CC i\jlck`e[\Xk_fij\i`flj`ealip% @e[`ZXk\jXgfk\ek`Xccp_XqXi[fljj`klXk`fen_`Z_#`]efkXmf`[\[#:FLC; i\jlck`e[\Xk_fij\i`flj`ealip% @e[`ZXk\jXgfk\ek`Xccp_XqXi[fljj`klXk`fen_`Z_#`]efkXmf`[\[#D8P i\jlck`ed`efifidf[\iXk\`ealip% EFK@:< K_`jjpdYfc`jlj\[kfXc\ikk_\lj\ikflj\]lc`e]fidXk`feXYflkgifg\i fg\iXk`fef]k_\\hl`gd\ek#Xe[&fiXj`klXk`fek_XkdXpZXlj\[XdX^\ kfk_\dXZ_`e\ip% JkXe[Xi[JX]\kp@ejkilZk`fej JkXe[Xi[DXZ_`e\ipJX]\kp (% I<8;K?IFL>?K?<<EK@I<D8EL8C9<=FI<JK8IK@E>D8:?@E<IP%DXZ_`e\ipgi\j\ekjj\i`flj `ealip_XqXi[jkflekiX`e\[lj\ij% )% 8CN8PJ LJ< 8EJ@ 8GGIFM<; J8=<KP >C8JJ<J N?<E FG<I8K@E> D8:?@E<IP% <m\ip[Xp \p\$ ^cXjj\jfecp_Xm\`dgXZki\j`jkXekc\ej\jÇk_\pXi\EFKjX]\kp^cXjj\j% *% 8CN8PJN<8I8E@FJ?8GGIFM<;I<JG@I8KFIN?<EFG<I8K@E>D8:?@E<IPK?8KGIF;L:<J ;LJK%Nff[[ljk`jXZXiZ`ef^\eXe[ZXeZXlj\ZXeZ\iXe[j\m\i\i\jg`iXkfip`cce\jj\j% +% 8CN8PJ LJ< ?<8I@E> GIFK<:K@FE N?<E FG<I8K@E> D8:?@E<IP% DXZ_`e\ip ef`j\ ZXe ZXlj\ g\idXe\ek_\Xi`e^[XdX^\% ,% N<8IGIFG<I8GG8I<C%;FEFKn\Xicffj\Zcfk_`e^#^cfm\j#e\Zbk`\j#i`e^j#fia\n\cipn_`Z_dXp ^\k ZXl^_k `e dfm`e^ gXikj% N\Xi gifk\Zk`m\ _X`i Zfm\i`e^ kf ZfekX`e cfe^ _X`i Xe[ n\Xi efe$jc`g ]ffkn\Xi% -% E<M<IFG<I8K<D8:?@E<IPN?<EK@I<;#FILE;<IK?<@E=CL<E:<F=;IL>JFI8C:F?FC% 9\d\ekXccpXc\ikXkXcck`d\jn_\eilee`e^dXZ_`e\ip% .% FECP8CCFNKI8@E<;8E;GIFG<ICPJLG<IM@J<;G<IJFEE<CKFFG<I8K<D8:?@E<IP%DXb\ jli\fg\iXk`fe`ejkilZk`fejXi\jX]\Xe[Zc\Xicple[\ijkff[% /% B<<G:?@C;I<E8E;M@J@KFIJ8N8P%B\\gXccZ_`c[i\eXe[m`j`kfijXjX]\[`jkXeZ\]ifdk_\nfib Xi\X% 0% D8B<NFIBJ?FG:?@C;GIFF=%Lj\gX[cfZbj#dXjk\ijn`kZ_\j#Xe[i\dfm\jkXikjn`kZ_b\pj% -6- N(/()Fne\ijDXelXcD]^%j`eZ\*&'0 ('% E<M<IC<8M<N?<ED8:?@E<@JILEE@E>%Kliegfn\iF==Xe[XccfnXccdfm`e^gXikjkfZfd\kf XZfdgc\k\jkfgY\]fi\c\Xm`e^dXZ_`e\leXkk\e[\[% ((% ;FEFKLJ<@E;8E><IFLJ<EM@IFED<EKJ%;FEFKlj\dXZ_`e\ip`e[Xdg#n\kcfZXk`fej#fi n_\i\Xep]cXddXYc\fiefo`flj]ld\jdXp\o`jk% (*% LJ<8>IFLE;<;<OK<EJ@FE:FI;I8K<;=FIK?<D8:?@E<8DG<I8><%Le[\ij`q\[Zfi[jfm\i$ _\XkXe[cfj\gfn\i%I\gcXZ\\ok\ej`feZfi[j`]k_\pY\Zfd\[XdX^\[%;FEFKlj\\ok\ej`feZfi[j ]fi))'MdXZ_`e\ip% (+% 8CN8PJ;@J:FEE<:K=IFDGFN<IJFLI:<9<=FI<J<IM@:@E>D8:?@E<IP%DXb\jli\jn`kZ_`j `eF==gfj`k`feY\]fi\i\Zfee\Zk`e^% (,% D8@EK8@ED8:?@E<IPN@K?:8I<%B\\gYcX[\jj_XigXe[Zc\Xe]fiY\jkXe[jX]\jkg\i]fidXeZ\% =fccfn`ejkilZk`fej]ficlYi`ZXk`e^Xe[Z_Xe^`e^XZZ\jjfi`\j% (-% D8B<JLI<>L8I;J8I<@EGC8:<8E;NFIB:FII<:KCP9<=FI<LJ@E>D8:?@E<IP% (.% I<DFM< 8;ALJK@E> B<PJ 8E; NI<E:?<J% DXb\ X _XY`k f] Z_\Zb`e^ ]fi b\pj Xe[ X[aljk`e^ ni\eZ_\jY\]fi\klie`e^dXZ_`e\ipFE% (/% :?<:B =FI ;8D8><; G8IKJ 9<=FI< LJ@E> D8:?@E<IP% :_\Zb ]fi Y`e[`e^ Xe[ Xc`^ed\ek f] gXikj#Yifb\egXikj#gXikdflek`e^#cffj\Yfckj#Xe[Xepfk_\iZfe[`k`fejk_XkdXpX]]\ZkdXZ_`e\ fg\iXk`fe%I\gX`ifii\gcXZ\[XdX^\[gXikj% (0% LJ<I<:FDD<E;<;8::<JJFI@<J%I\]\ikfk_\`ejkilZk`fedXelXc]fii\Zfdd\e[\[XZZ\jjfi`\j% K_\lj\f]`dgifg\iXZZ\jjfi`\jdXpZXlj\i`jbf]`ealip% )'%;FEFK=FI:<D8:?@E<IP%NfibXkk_\jg\\[]fin_`Z_k_\dXZ_`e\fiXZZ\jjfipnXj[\j`^e\[% )(% J<:LI< NFIBG@<:<% Lj\ ZcXdgj fi X m`j\ kf _fc[ k_\ nfibg`\Z\ n_\e giXZk`ZXc% 8 j\Zli\[ nfibg`\Z\gifk\Zkjpfli_Xe[jXe[]i\\jYfk__Xe[jkffg\iXk\k_\dXZ_`e\% ))% ;FEFKFM<II<8:?%B\\ggifg\i]ffk`e^Xe[YXcXeZ\XkXcck`d\j% )*% D8EPD8:?@E<JN@CC<A<:KK?<NFIBG@<:<KFN8I;K?<FG<I8KFI%BefnXe[Xmf`[Zfe[`$ k`fejk_XkZXlj\k_\nfibg`\Z\kfb`ZbYXZb% )+% 8CN8PJCF:BDF9@C<98J<J@=LJ<; 9<=FI<FG<I8K@E>D8:?@E<IP% ),% 9< 8N8I< K?8K :<IK8@E ;LJK D8P 9< ?8Q8I;FLJ kf k_\ i\jg`iXkfip jpjk\dj f] g\fgc\ Xe[ Xe`dXcj#\jg\Z`Xccp]`e\[ljk%DXb\jli\pflbefnk_\_XqXi[jXjjfZ`Xk\[n`k_k_\kpg\f][ljkpfl n`ccY\\ogfj\[kfXe[XcnXpjn\XiXi\jg`iXkfiXggifm\[]fik_Xkkpg\f][ljk% -7- J8=<KP ()% B<<GNFIB8I<8:C<8E8E;N<CCC@K%:clkk\iXe[[Xibj_X[fnjdXpZXlj\XZZ`[\ekj% N(/()Fne\ijDXelXcD]^%j`eZ\*&'0 8[[`k`feXcJX]\kp]fiGcXe\i&Dflc[\ij J8=<KP I<8;Xe[le[\ijkXe[k_`j \ek`i\dXelXcY\]fi\lj`e^ k_`jdXZ_`e\.J\i`fljg\i$ jfeXc `ealip dXp fZZli `] jX]\kp Xe[ fg\iXk`feXc `e]fidXk`fe `j efk le[\i$ jkff[ Xe[ ]fccfn\[. ;F EFK i`jb pfli jX]\kp Yp efki\X[`e^ LJ<k_`jXe[fk_\idXZ_`e\ipn`k_ZXlk`fe Xe[ i\jg\Zk. 8cnXpj Zfej`[\i jX]\kp ]`ijk# Xj `k Xggc`\j kf pfli `e[`m`[lXc nfib`e^ Zfe[`k`fej.Efc`jkf]jX]\kp^l`[\c`e\jZXe Y\ Zfdgc\k\Ç\m\ip j_fg \em`ifed\ek `j [`]]\i\ek.=X`cli\kf]fccfn^l`[\c`e\jZflc[ i\jlck `e j\i`flj g\ijfeXc `ealip# [XdX^\ kf\hl`gd\ekfigffinfibi\jlckj. 1. INSTRUCTION MANUAL. This machine presents significant safety hazards to untrained users. Read/ understand this entire manual before starting the planer/moulder. 2. REACHING INSIDE PLANER/MOULDER. Never reach inside planer/moulder or remove covers when the planer/moulder is connected to power. 3. INFEED CLEARANCE SAFETY. The infeed roller is designed to pull material into the cutterhead. Always keep hands, clothing, and long hair away from the infeed roller during operation to prevent serious injury. 4. BODY POSITION WHILE OPERATING. The workpiece may kick out during operation. To avoid getting hit, stand to the side of the planer/moulder during the entire operation. 5. PLANING CORRECT MATERIAL. Only plane natural wood stock with this planer/moulder. DO NOT plane MDF, plywood, laminates, or other synthetic products. 6. GRAIN DIRECTION. Cutting across or against the grain is hard on the planer/moulder and may increase the risk of workpiece kick out. Always cut with the grain or at a slight angle with the grain. 7. LOOKING INSIDE PLANER/MOULDER. Wood chips fly around inside the planer/moulder at a high rate of speed. DO NOT look inside the machine or remove any guards or covers during operation. 8. KNIFE CLEARANCE. Before starting the machine, always verify that the moulding knives do not contact any part of the workpiece guide rails, feed roller swing arm, or the table surface.=X`cli\ kfm\i`]pbe`]\Zc\XiXeZ\dXpi\jlck`ej\m\i\`ealipXe[dXZ_`e\[XdX^\ 9. REMOVING JAMMED WORKPIECES. To avoid serious injury, always stop the planer/moulder and disconnect power before removing jammed workpieces. 10. DULL/DAMAGED CUTTERS. The planer/moulder may kick out a workpiece at the operator or give poor finish results if it is operated with dull or damaged blades. 11. UNPLUGGING DURING ADJUSTMENTS. When connected to power, the planer/moulder can be accidentally turned ON. Always disconnect power when servicing or adjusting machine components. 12. WORKPIECE CLEARANCE. Always verify workpiece has enough room to exit the planer before starting. -8- N(/()Fne\ijDXelXcD]^%j`eZ\*&'0 <C<:KI@:8C K_\ dXZ_`e\ dljk Y\ gifg\icp j\k lg Y\]fi\ `k `j jX]\kffg\iXk\.;FEFKZfee\Zkk_`jdXZ_`e\kfk_\ gfn\i jfliZ\ lek`c `ejkilZk\[ kf [f jf `e k_\ K\jk Ilegfik`fef]k_`jdXelXc. -$(,G The Model W1812 is wired for 220V single-phase operation. The power supply circuit used for this machine MUST be grounded and rated for the amperage given below. Never replace a circuit breaker with one of higher amperage without consulting a qualified electrician to ensure compliance with wiring codes. This machine must be connected to a grounded circuit! =`^li\2. 6-15 plug and receptacle. Read Page 39 A plug is not supplied with this machine. See below for the recommended plug type for this machine. @]pflXi\lejli\XYflkk_\n`i`e^Zf[\j`epfliXi\X fipflgcXekfZfee\ZkpflidXZ_`e\kfXj_Xi\[Z`i$ Zl`k#pfldXpZi\Xk\X]`i\fiZ`iZl`kfm\icfX[_XqXi[Ç ZfejlckXhlXc`]`\[\c\Zki`Z`Xekfi\[lZ\k_`ji`jb. <ok\ej`fe:fi[j -$(,I JKFG Before Wiring ;FEFKnfibfepfli\c\Zki`ZXcjpjk\d `] pfl Xi\ lejli\ XYflk \c\Zki`ZXc Zf[\jXe[n`i`e^J\\bXjj`jkXeZ\]ifd X hlXc`]`\[ \c\Zki`Z`Xe. @^efi`e^ k_`j nXie`e^ZXeZXlj\\c\ZkifZlk`fe#]`i\# fidXZ_`e\[XdX^\. We do not recommend using an extension cord; however, if you have no alternative, use the following guidelines: • • • • Use a cord rated for Standard Service (S). Do not use an extension cord longer than 50 feet. Ensure that the cord has a ground wire and pin. Use the gauge size listed below as a minimum. <c\Zki`ZXcJg\Z`]`ZXk`fej Fg\iXk`e^MfckX^\ 8dg;iXn D`e.:`iZl`kJ`q\ I\Zfdd\e[\[Gcl^ <ok\ej`fe:fi[ 220V Operation 12 Amps 15A NEMA 6-15 (not incl.) 14 Gauge -9- <C<:KI@:8C ))'MFg\iXk`fe N(/()Fne\ijDXelXcD]^%j`eZ\*&'0 J<KLG LegXZb`e^ This machine has been carefully packaged for safe transportation. If you notice the machine has been damaged during shipping, please contact your authorized Shop Fox dealer immediately. @em\ekfip J<KLG The following is a description of the main components shipped with the Model W1812. Lay the components out to inventory them. B\\g dXZ_`e\ [`jZfee\Zk\[ ]ifd gfn\ilek`c`ejkilZk\[fk_\in`j\. Efk\1 @]pflZXek]`e[Xe`k\dfek_`jc`jk#Z_\Zbk_\ dflek`e^cfZXk`fefek_\dXZ_`e\fi\oXd`e\k_\ gXZbX^`e^dXk\i`XcjZXi\]lccp%FZZXj`feXccpn\gi\$`ejkXcc Z\ikX`eZfdgfe\ekj]fijX]\ij_`gg`e^% 9fo@em\ekfip=`^li\3) Hkp A. Dust Port ....................................................1 B. Planer/Moulder Head .....................................1 C. Link Belt ....................................................1 D. Cabinet ......................................................1 E. Belt Cover ..................................................1 F. Guide Rail Set ..............................................1 G. Pedestal Switch ............................................1 H. Handwheel w/Knob .......................................1 I. Steel Conduit ...............................................1 J. Hardware Bag ..............................................1 — Hex Bolts 5⁄16"-18 x 3⁄4" (Planer/Moulder Head) ...4 — Flat Washers 5⁄16" (Planer/Moulder Head) ..........4 — Hex Bolts 5⁄16"-18 x 1" (Pedestal Switch) ............3 — Flat Washers 5⁄16" (Pedestal Switch) .................3 — Flange Screws #10-24 x 1⁄2" (Dust Port) .............3 — Hex Bolts 5⁄16"-18 x 3⁄4" (Belt Cover) ................2 — Flat Washers 5⁄16" (Drive Belt Cover) ................4 — Hex Nuts 5⁄16"-18 (Drive Belt Cover) .................2 — Lock Levers 1⁄4"-20 x 3⁄8" (Guide Rail) ...............4 — T-Slot Nuts 1⁄4"-20 (Guide Rail) .......................4 — Feet (Cabinet) ..........................................4 — Hex Nuts 3⁄8" x 16 (Feet) ..............................8 — Hex Bolts 3⁄8" x 16 x 11⁄4" (Feet) .....................4 — Hex Wrenches 3⁄32", 4, 5mm ......................1 EA — Open-End Wrench 12/14mm ..........................1 — Depth Stop Hex Bolt 1⁄4"-20 x 1" ....................1 — Depth Stop Hex Nut 1⁄4"-20 ...........................1 -10- D B C A F G E I H J =`^li\3. Inventory N(/()Fne\ijDXelXcD]^%j`eZ\*&'0 DXZ_`e\GcXZ\d\ek =cffiCfX[1 This machine distributes a heavy load in a small footprint. Some residential floors may require additional bracing to support both machine and operator. Nfib`e^:c\XiXeZ\j1 Consider existing and anticipated needs, size of material to be processed through the machine, and space for auxiliary stands, work tables or other machinery when establishing a location for your planer/moulder. C`^_k`e^1 Lighting should be bright enough to eliminate shadow and prevent eye strain. :c\Xe`e^DXZ_`e\ The table and other unpainted parts of your planer/moulder are coated with a waxy grease that protects them from corrosion during shipment. Clean this grease off with a solvent cleaner or citrus-based degreaser. DO NOT use chlorine-based solvents such as brake parts cleaner or acetone—if you happen to splash some onto a painted surface, you will ruin the finish. ') (+&$) =`^li\4. Minimum working clearances. 8CN8PJ nfib `e n\cc$ m\ek`cXk\[Xi\Xj]Xi]ifd gfjj`Yc\ `^e`k`fe jfliZ\j n_\e lj`e^ jfcm\ekj kf Zc\Xe dXZ_`e\ip. DXep jfcm\ekj Xi\ kfo`Z n_\e `e_Xc\[ fi `e^\jk\[. Lj\ ZXi\ n_\e [`jgfj`e^ f] nXjk\ iX^j Xe[ kfn\cj kf Y\ jli\ k_\p ;F EFK Zi\Xk\ ]`i\ fi \em`ifed\ekXc_XqXi[j. LJ< _\cg\ij fi gfn\i c`]k`e^ \hl`gd\ek kf c`]k k_\ gcXe\i&dflc[\i. Fk_\in`j\# j\i`flj g\i$ jfeXc`ealipdXpfZZli. D8B< pfli j_fg ÈZ_`c[ jX]\.É <ejli\ k_Xk pfli nfibgcXZ\ `j `eXZZ\jj`Yc\ kf Z_`c[i\e Yp Zcfj`e^ Xe[ cfZb`e^Xcc\ekiXeZ\jn_\e pflXi\XnXp.E<M<IXccfn lekiX`e\[ m`j`kfij `e pfli j_fg n_\e Xjj\dYc`e^# X[aljk`e^ fi fg\iXk`e^ \hl`gd\ek. -11- J<KLG E<M<IZc\Xen`k_^Xjfc`e\ fi fk_\i g\kifc\ld$ YXj\[jfcm\ekj.Dfjk_Xm\ cfn ]cXj_ gf`ekj# n_`Z_ dXb\ k_\d \oki\d\cp ]cXddXYc\. 8 i`jb f] \ogcfj`fe Xe[ Ylie`e^ \o`jkj `] k_\j\ gif[lZkj Xi\lj\[.J\i`fljg\ijfeXc `ealip dXp fZZli `] k_`j nXie`e^`j`^efi\[ N(/()Fne\ijDXelXcD]^%j`eZ\*&'0 C`]k`e^Xe[Dfm`e^ The Model W1812 can be moved for short distances if two people lift the ends of the cast iron extension wings and walk the machine to the new location. For ease of mobility, the machine can be placed on a Shop Fox Model D2057 Heavy Duty Mobile Base. For long distance moving, we recommend using a forklift or other mechanical lifting device. Dflek`e^kfJ_fg=cffi J<KLG Although not required, for increased stability you can mount your new machine to the floor. Because this is an optional step and floor materials may vary, floor mounting hardware is not included. We recommend using a precision level on the table surface to make sure that your machine rests flat. 9fck`e^kf:feZi\k\=cffij =`^li\5.Lifting location. Anchor Stud Anchor studs or lag screws and anchors (=`^li\6) are two popular methods for anchoring an object to a concrete floor. We suggest you research the many options and methods for mounting your machine and choose the best that fits your specific application. Lag Screw and Anchor EFK@:< 8eZ_fi jkl[j Xi\ jkife^\i Xe[ dfi\ g\idXe\ek Xck\ieXk`m\j kf cX^ jZi\nj Xe[ XeZ_fij2 _fn\m\i# XeZ_fi jkl[j n`cc jk`Zb flk f] k_\ ]cffi# n_`Z_ dXp ZXlj\ X ki`gg`e^ _XqXi[ cXk\i `] pfl [\Z`[\ kf dfm\ pflidXZ_`e\. -12- =`^li\6. Typical fasteners for mounting to concrete floors. N(/()Fne\ijDXelXcD]^%j`eZ\*&'0 8jj\dYcp KfXjj\dYc\k_\gcXe\i&dflc[\i#[fk_\j\jk\gj1 (. ). With the help of an assistant, lay the stand on its side, then insert the 3⁄8" x 16 x 11⁄4" hex bolts through the rubber feet, then thread on a 3⁄8" x 16 hex nut onto each bolt. Next, thread each bolt into the reinforced holes shown in =`^li\7, and then thread the four remaining 3⁄8" x 16 hex nuts onto each bolt to lock the feet in place. 3 ⁄8" Diameter Reinforced Mounting Hole =`^li\7.Foot installation. Note: For a pre-made heavy-duty mobile base option instead of using the feet, you can place the cabinet directly on the Shop Fox Model D2057 Heavy-Duty Mobile Base equipped with swivel casters and post brakes. Position the stand upright, then adjust the feet so the cabinet sits level on the floor. +. When level, tighten the jam nuts to lock the feet in place. ,. With the help of an assistant, lift the planer/moulder headstock and position it onto the cabinet, as shown in =`^li\8. -. Open the cabinet door, then secure the headstock to the cabinet with four 5⁄16"-18 x 3⁄4" hex bolts and 5⁄16" flat washers. .. Remove the shipping brace shown in =`^li\9. J<KLG *. =`^li\8.Suggested lifting locations. Shipping Brace Brace Mounting Bolts =`^li\9.Shipping brace. -13- N(/()Fne\ijDXelXcD]^%j`eZ\*&'0 .. Place the belt onto the cutterhead pulley with the belt direction arrow pointing the direction of pulley rotation. When installed correctly, the internal belt tangs must be facing against the pulley rotation arrow shown in =`^li\10. Pulley Rotation Arrow Internal Belt Tang =`^li\10.Installing the drive belt (belt cover removed for clarity). Next, while keeping your fingers clear, lift the motor and roll the belt onto the motor pulley as shown in =`^li\11. J<KLG /. =`^li\11.Installing the belt guard. 0. Attach the belt guard to the stand (=`^li\12) with two 5⁄16"-18 x 3⁄4" hex bolts, four 5⁄16" flat washers, and two 5⁄16"-18 hex nuts. ('. Slide the handwheel hub over the shaft (=`^li\12) and tighten the set screw with a 5mm hex wrench. OFF Button Belt Guard =`^li\12.Installing the belt guard and the handwheel. -14- N(/()Fne\ijDXelXcD]^%j`eZ\*&'0 ((. Feed the switch pedestal wiring harnesses into the cabinet through the hole in the cabinetand secure the switch pedestal to the cabinet (=`^li\13)with three 5⁄16"-18 x 3⁄4" hex bolts and 5⁄16" flat washers. (). Plug the harnesses into their respective sockets just below the pedestal mounting. Switch Pedestal Mounting Bracket =`^li\13.Switch pedestal installation. (*. Insert the feed motor wiring harness through the conduit and loom clamps, and then plug it into the motor. J<KLG (+. Fasten the conduit mounting bracket (=`^li\14) to the headstock with two 5⁄16"-18 x 3⁄8" flange screws. Conduit Mounting Bracket Wiring Harness and Loom Clamps =`^li\14.Conduit installation. (,. Install two T-nuts in each table slot (=`^li\15). (-. Position the inner and outer guide rails so the elongated T-nut slots (=`^li\15)are positioned on the infeed table. Slot Inner and outer Rails (.. Insert the lock levers through the guide rails, and then thread them into the T-nuts. (/. Snug the levers in place. =`^li\15.Rail installation. -15- N(/()Fne\ijDXelXcD]^%j`eZ\*&'0 (0. Install the dust hood (=`^li\16)with three #10-24 x 1 ⁄2" flange screws. Dust Hood )'. Install a 4" flexible dust collector suction hose to the dust port, as shown in =`^li\16. ;ljk:fcc\Zk`fe J<KLG I\Zfdd\e[\[:=DXk;ljkGfik1%%%%%%%%%%%%%%%% +'':=D Do not confuse this CFM recommendation with the rating of the dust collector. To determine the CFM at the dust port, you must take into account many variables, including the CFM rating of the dust collector, the length of hose between the dust collector and the machine, the number of branches or Y's, and the amount of other open lines throughout the system. Explaining this calculation is beyond the scope of this manual. If you are unsure of your system, consult an expert or purchase a good dust collection "how-to" book. ;F EFK fg\iXk\ k_`j dXZ_`e\ n`k_flk Xe X[\hlXk\ [ljkZfcc\Zk`fejpjk\d.K_`jdXZ_`e\Zi\Xk\jjlYjkXe$ k`XcXdflekjf]nff[[ljkn_`c\fg\iXk`e^.=X`cli\kf lj\ X [ljk Zfcc\Zk`fe jpjk\d ZXe i\jlck `e j_fik Xe[ cfe^$k\idi\jg`iXkfip`cce\jj. -16- =`^li\16.Installing the dust hood. N(/()Fne\ijDXelXcD]^%j`eZ\*&'0 K\jkIle If, during the test run, you encounter an unusual noise or vibration, stop using the machine immediately, then review KiflYc\j_ffk`e^ on GX^\+) for correction. If you still cannot remedy a problem, contact our Tech Support at (360) 734-3482 for assistance. Kfk\jkilek_\dXZ_`e\#[fk_\j\jk\gj1 Make sure you understand the safety instructions at the beginning of the manual, and verify that the machine is setup properly. ). Ensure all tools and objects used during setup are cleared away from the machine. *. Use the elevation handwheel to raise the planer/ moulder head to provide plenty of room for the safe operation of the feed rollers and the cutterhead. +. Pull out the chip deflector retaining pin (=`^li\17) and remove the chip deflector. ,. Wearing leather gloves, use a 14mm wrench to make sure the knives are tight, and rotate the cutterhead to make sure the knives do not hit the table. -. Reinstall the chip deflector, and connect the machine to the power source. Gifa\Zk`c\j k_ifne ]ifd k_\ dXZ_`e\ Zflc[ ZXlj\ j\i`flj \p\ `ealip. N\Xi jX]\kp ^cXjj\j kf i\[lZ\ k_\ i`jb f] `ealip. J<KLG (. =`^li\17.Removing the chip deflector. .. Push the OFF button in, then turn it clockwise so it pops out (=`^li\(/) to ensure it resets. /. Turn the speed control dial (=`^li\(/) counterclockwise to its slowest setting, then push the ON button and the main motor will start. 0. Turn the speed control dial clockwise to operate and speed up the feed rollers. ('. Press the OFF button to stop the machine. ((. WITHOUT resetting the OFF switch, press the ON button. The machine should not start. — If the machine does not start, the OFF button safety feature is working correctly. — If the machine starts, immediately disconnect the machine from power. The OFF button safety feature is at fault and must be replaced before using this machine. -17- =`^li\(/. Control panel. N(/()Fne\ijDXelXcD]^%j`eZ\*&'0 FG<I8K@FEJ >\e\iXc This machine will perform many types of operations that are beyond the scope of this manual. Many of these operations can be dangerous or deadly if performed incorrectly. The instructions in this section are written with the understanding that the operator has the necessary knowledge and skills to operate this machine. @]XkXep k`d\pflXi\\og\i`\eZ`e^[`]]`Zlck`\jg\i]fid`e^Xep fg\iXk`fe#jkfglj`e^k_\dXZ_`e\ If you are an inexperienced operator, we strongly recommend that you read books or trade articles, or seek training from an experienced planer/moulder operator before performing any unfamiliar operations. 8Yfm\Xcc# pflijX]\kpj_flc[Zfd\]`ijk Headstock Lock Lever Headstock Height Handwheel Cutting Depth Scales Access Cover Lock Pin Before proceeding with this operation section, see =`^li\ 19 to familiarize yourself with the locations and names of the planer/moulder controls. FG<I8K@FEJ Depth Stop I<8; Xe[ le[\ijkXe[ k_`j \ek`i\ `ejkilZk`fe dXelXc Y\]fi\ lj`e^ k_`j dXZ_`e\. J\i`flj g\ijfeXc `ealip dXpfZZli`]jX]\kpXe[fg\iXk`feXc`e]fidXk`fe`jefk le[\ijkff[Xe[]fccfn\[.;FEFKi`jbpflijX]\kpYp efki\X[`e^ 8cnXpj n\Xi jX]\kp ^f^^c\j# i\jg`iXkfi#Xe[_\Xi`e^gifk\Zk`fe n_\e fg\iXk`e^ k_`j dXZ_`e\% @^efi`e^k_`jnXie`e^dXpc\X[kf j\m\i\`ealip% -18- Speed Control Dial Stop Button Cutterhead ON Button =`^li\19.Machine controls. N(/()Fne\ijDXelXcD]^%j`eZ\*&'0 @ejkXcc`e^GcXe`e^Be`m\j Chip Deflector N<8I k_`Zb ^cfm\j Xe[ lj\ \oki\d\ ZXlk`fe n_\e nfib$ `e^ e\Xi Zlkk`e^ jli]XZ\j. GcXe\i be`m\j Xi\ [Xe^\ifljcp j_Xig =X`cli\ kf \o\iZ`j\ ZXi\ n_`c\ nfib`e^ e\Xi be`m\j Zflc[ i\jlck `ej\m\i\`ealip. Kf`ejkXcck_\gcXe`e^be`m\j#[fk_\j\jk\gj1 (. DISCONNECT THE PLANER/MOULDER FROM POWER! ). Pull the pin shown in =`^li\20, and remove the chip deflector. Put on heavy leather gloves, and use a 14mm wrench to remove the knife bolts, washers, and any knives (if installed). +. Remove any dust, wood chips, or pitch from the cutterhead where the planing knife will seat. ,. Place the new planer blade against the cutterhead lip with the beveled side of the blade facing up, as shown in =`^li\21. -. Line up the holes in the planer blade and the cutterhead, and install a 3⁄8"-16 x 1" knife bolt and 3⁄8" flat washer in each of the upper hole positions shown in =`^li\21. Make sure to keep the planer blade seated against the cutterhead lip while tightening the bolts. .. Visually inspect to make sure that the planer blade did not move away from the cutterhead lip (=`^li\ 22) during the tightening process. If so, reinstall the blade until it is correctly seated. /. Rotate the cutterhead and install the other planer blade. 0. Set the depth stop (=`^li\19) to maintain planer blade to table clearance. 10. Adjust the feed rollers and spring tension as outlined in Feed Roller Height and Spring Tension on Page 21. -19- Bevel Side Up Upper Hole Lip =`^li\21.Installing a planer blade. =`^li\22.Planer knives installed. FG<I8K@FEJ *. =`^li\20.Removing the chip deflector. N(/()Fne\ijDXelXcD]^%j`eZ\*&'0 @ejkXcc`e^Dflc[`e^Be`m\j Chip Deflector REMEMBER, moulding knives have many different profiles, before starting the machine, always verify that the moulding knives do not contact any part of the workpiece guide rails, feed roller swing arm, or the table surface. =X`cli\ kf m\i`]p be`]\ Zc\XiXeZ\ dXp i\jlck`ej\m\i\`ealipXe[dXZ_`e\[XdX^\ Kf`ejkXccdflc[`e^be`m\j#[fk_\j\jk\gj1 (. DISCONNECT THE PLANER/MOULDER FROM POWER! FG<I8K@FEJ ). Pull the pin shown in =`^li\23, and remove the chip deflector. *. Put on heavy leather gloves, and use a 14mm wrench to remove the knife bolts, washers, and any knives (if installed). +. Remove any dust, wood chips, and pitch from the cutterhead knife seat and lip (=`^li\24). ,. Place the moulding knife against the cutterhead lip with the beveled side of the blade facing up (=`^li\ 24), and in the inboard position (=`^li\25) leaving only one set of holes (=`^li\25). Should you for any reason need to position moulding knives on the outboard position of the cutterhead, you must leave one set of holes exposed if the at that end also. -. Line up the holes and secure the knife to the cutterhead with the knife bolts and washers (=`^li\ 25). .. Make sure the knife did not move away from the cutterhead lip when tightened, then rotate the cutterhead to the bottom. /. Install the other moulding knife. 0. Set the guide rail alignment for clearance, and set the depth stop to maintain moulding knife to table clearance. 10. Adjust the feed rollers and spring tension as outlined in Feed Roller Height and Spring Tension on Page 21. =`^li\23.Removing the chip deflector. Bevel Side Up Lip =`^li\24.Moulding knife installation. Inboard Side Outboard Side For Clearance Safety, Leave These Holes Exposed If Using Some Larger Moulding Knives =`^li\25.Knives positioned inboard. -20- N(/()Fne\ijDXelXcD]^%j`eZ\*&'0 =\\[Ifcc\i?\`^_kXe[ Jgi`e^K\ej`fe After switching between planing and molding operations, you must re-adjust the feed roller height and spring tension. Feed roller height and spring tension keeps the workpiece feeding into the planer/moulder without chatter or slipping. Rollers that are too high, or spring tension that is too light, can cause the workpiece to chatter and slip. Rollers that are too low, or spring tension that is too heavy, can cause the workpiece to hang on initial feed, cause rapid feed system wear and increase workpiece snipe. The settings below are close to what you will need to use, but some trial-and-error on height and spring tension will be required for best results. KfX[aljkk_\]\\[ifcc\ijgi`e^k\ej`fe#[fk_\j\jk\gj1 D8B< JLI< k_Xk pfli dXZ_`e\ `j legcl^^\[[li`e^XccX[aljkd\ekgifZ\$ [li\j @] k_`j nXie`e^ `j `^efi\[# j\i`$ fljg\ijfeXc`ealipdXpfZZli. (. DISCONNECT THE PLANER/MOULDER FROM POWER! ). Loosen the feed-roller stop jam nuts and rotate the eccentric stops with a 5mm hex wrench until the rollers lower to the required level: Eccentric Stop FG<I8K@FEJ —For planing, lower the roller so it is approximately 1mm below the lowest sweep of the planing knife. Jam Nut —For moulding, lower the roller so it is approximately 3 ⁄16'' below the highest point of the moulding knife profile. Refer to Figure 27 to study and find the highest point of the moulding knife profile when the knife is at the lowest point of its sweep. =`^li\26.Feed roller height adjustment. Narrow Surface Area Traction Highest Point of this Moulding Knife Profile is Here Wide Surface Area Traction Infeed Roller Outfeed Roller Knife at Lowest Point of Sweep Work Path =`^li\27.Feed roller height concept for moulding knife use. -21- Infeed and Outfeed Rollers are Adjusted to Approximately 3 ⁄16'' Below the Highest Resulting Profile. N(/()Fne\ijDXelXcD]^%j`eZ\*&'0 —If a certain moulding knife profile does not allow you to adjust the outfeed roller down far enough for proper roller traction, the eccentric stop must be repositioned to the lower hole. To do this, remove the jam nut (Figure 28), reposition the eccentric stop (Figure 29) in the lower hole, and finger tighten the jam nut. Next rotate the eccentric stop to lower or raise the roller and retighten the jam nut. Jam Nut Lower Hole =`^li\28.Feed roller stop adjustment. FG<I8K@FEJ Eccentric Stop =`^li\29.Eccentric stop. 3. Loosen and back off the four spring tensioner jam nuts (=`^li\30) completely, and unthread the tensioner assemblies until you are sure that they are not touching the springs. +. Thread the tensioners back into the housings until you feel the tensioner just contact the springs. ,. Give each tensioner approximately two full turns to preload the springs and tighten the jam nuts. -. Reinstall the chip deflector. =`^li\30.Feed roller tension adjustment. -22- N(/()Fne\ijDXelXcD]^%j`eZ\*&'0 Nfibg`\Z\@ejg\Zk`fe Before using this planer/moulder, inspect each and every workpiece for the following problems, and be familiar with the hardness of the wood workpiece. Each workpiece must have at least one flat surface to slide along the planer/moulder table. To create a flat surface, pass the workpiece over a jointer (=`^li\ 31). Defects such as twisting, loose knots or severe cracks may make the stock unusable. When possible, square up stock before moulding. Plane equal amounts on each side of the board to reduce the chance of twisting or cupping. Recognize the workpiece density. Planing is more difficult in hard species of wood and may require several shallow cuts to reach the desired thickness. =`^li\32 lists the hardness of many common woods based on shear strength. • Avoid processing a workpiece with a high moisture content. Wood with more than 20% moisture, or wood that has been exposed to rain or snow, will cut poorly and cause unnecessary wear on the knives and motor. • Process ONLY wooden workpieces. Never process particle board, plywood, MDF, laminates, or other synthetic materials. Feed wood in the same direction as the grain. Never feed end-cut or end-grained lumber into the planer/ moulder. =`^li\31.Face joint the concave side of cupped workpiece before milling. TYPE ............. SHEAR (PSI) ?8I; JF=K Black Locust............. 2,480 Sugar Maple ............. 2,330 Pecan Hickory........... 2,080 White Oak ............... 2,000 White Ash................ 1,950 Black Cherry ............ 1,700 American Elm ........... 1,510 Black Walnut ............ 1,410 Red Alder ................ 1,370 Basswood ................ 1,280 Cottonwood ............. 1,160 Western Larch ...........1,150 Tamarack .................1,130 Douglas Fir .............. 1,080 Alaska Cedar ............ 1,050 Sitka Spruce ............. 1,000 Sugar Pine ................. 980 Cypress ..................... 940 Redwood (OG) ............ 930 Red Cedar ................. 860 White Pine................. 850 Balsam Fir ................. 710 =`^li\32.Wood density table. -23- FG<I8K@FEJ Only use clean lumber. Scrape off all glue from joined boards before processing. Remove all dirt, nails, staples, imbedded gravel, etc. from any workpiece you plan on using. Metal or gravel in a workpiece will instantly damage the knives. Portion Removed With Jointer N(/()Fne\ijDXelXcD]^%j`eZ\*&'0 GcXe`e^;fjXe[;fekj There are some common planing mistakes that must be avoided when planing. CORRECT Dlck`gc\9fXi[?XqXi[ Only plane one board at a time (Figure 33). Whether you use guide rails or not, never attempt to plane more than one board at a time side-by-side. If one board is slightly lower that the other, the feed roller will only hold the highest board, while the lower board will be free to slip when the knife contacts it. This hazardous situation can result in one board being ejected from the machine, causing serious injury. Figure 33. Only plane one board at a time. JXZi`]`Z`XcKXYc\Lj\ FG<I8K@FEJ INCORRECT If using a sacrificial table, you must clamp it to the cast iron table (Figure 34) to prevent workpiece ejection. Never stack two boards on top of one another and feed them both into the planer/moulder to compensate for a workpiece that may be too thin. Planing with two loose stacked boards can result in workpiece ejection, causing injury. CORRECT INCORRECT Figure 34. Sacrificial table mounting. -24- N(/()Fne\ijDXelXcD]^%j`eZ\*&'0 GcXe`e^Fg\iXk`fe The maximum cutting depth for soft wood at full cutterhead width is no more than 1⁄8" deep. The harder the wood, the shallower the cutting depth and the slower the feed rate should be. A series of light passes typically results in a smoother finish with less snipe. AVOIDING KICKBACK! The basic steps of operating the machine as a planer are as follows: • Always stand to one side of the machine. (. DISCONNECT THE PLANER/MOULDER FROM POWER! • DO NOT plane more than one piece at a time. 2. 3. 4. Review the Workpiece Inspection list on Page 23 and the AVOIDING KICKBACK warning on this page. Review Planing Do's and Don'ts on Page 24, and take the appropriate safety measures. If you have not already done so, adjust the feed rollers and spring tension as outlined in the Feed Roller Height and Spring Tension section on Page 21. Measure the workpiece thickness, loosen the headstock lock lever, and use the handwheel (Figure 35) to adjust the headstock for a light pass. 6. Wearing gloves, manually rotate the cutterhead to make sure that the knives do not contact the table or guide rails if used. 7. PUT ON SAFETY GLASSES, EAR PROTECTION, AND A RESPIRATOR. 8. 9. • DO NOT remove more than 1⁄8'' of material on each pass. • Support the workpiece on both ends. Get assistance if you are planing long lumber, or use roller stands to support the workpiece. • Carefully inspect all stock to make sure it is free of large knots or foreign objects that may damage your blades. Headstock Height Handwheel Tighten the headstock lock lever, start the machine, and turn the feed speed control dial to a medium speed. Handwheel Scale Stand clear of the workpiece path, place the flat side of the board down on the table, and slowly feed the workpiece into the machine until the feed roller begins to pull the workpiece. 10. For subsequent passes, adjust the headstock height and feed rate as necessary until the desired thickness and finish is achieved. Note: To reduce snipe, feed multiple pieces of stock butted up end-to-end, or experiment with a lighter feed roller spring tension. You can also try to raise one or both feed rollers up slightly. Headstock Height Scale Depth Stop Figure 35. Depth control and scales. -25- FG<I8K@FEJ 5. • Always plane WITH the grain direction of the wood. Never plain cross-grain or end-grain. N(/()Fne\ijDXelXcD]^%j`eZ\*&'0 Dflc[`e^;fjXe[;fekj The Model W1812 will accommodate most moulding knife profiles. However, you still must pay special attention to workpiece support and knife-to-table clearance. Refer to the following examples to avoid common workpiece setup mistakes. REMEMBER, moulding knives have many different profiles, before starting the machine, always verify that the moulding knives do not contact any part of the workpiece guide rails, feed roller swing arm, or the table surface. =X`cli\ kf m\i`]p be`]\ Zc\XiXeZ\ dXp i\jlck`ej\m\i\`ealipXe[dXZ_`e\[XdX^\ <[^\=fid`e^Be`]\:c\XiXeZ\ A wooden sacrificial table clamped to the cast iron table and a three-piece guide system (Figure 36) will prevent tool and table damage by absorbing the full sweep of the knife. Never attempt to use edge forming profile knives without pre-installing a wooden sacrificial table. Often these types of knives sweep lower than the workpiece and will contact the table, causing severe machine damage or personal injury. CORRECT CORRECT Custom 3-Piece Guide Rail System Mounted to the Sacrificial Table Top View INCORRECT G8IKJ Figure 36. Edge forming profile hazards. -26- N(/()Fne\ijDXelXcD]^%j`eZ\*&'0 :ifneDflc[`e^Jlggfik When cutting crown moulding (Figure 37), make a wooden V-track that can be clamped to the table. The V-track must support at least 50% of the workpiece height on both sides. CORRECT Do not use the guide rails that came with your machine for crown moulding support. If you do, the workpiece can dislodge and be ejected from the machine, causing severe injury or damage. INCORRECT Depending on the knife profile and the hardness of the workpiece, to minimize the potential for vibration and chatter marks on the workpiece, install moulding knives closer to column rather than farther away (Figure 38). REMEMBER, moulding knives have many different profiles, before starting the machine, always verify that the moulding knives do not contact any part of the workpiece guide rails, feed roller swing arm, or the table surface. =X`cli\ kf m\i`]p be`]\ Zc\XiXeZ\ dXp i\jlck`ej\m\i\`ealipXe[dXZ_`e\[XdX^\ CORRECT INCORRECT Figure 38. Knife positioning. -27- FG<I8K@FEJ Figure 37. Crown moulding track. Be`]\Gfj`k`fe`e^ N(/()Fne\ijDXelXcD]^%j`eZ\*&'0 J`q\Nfibg`\Z\8ggifgi`Xk\cp Make sure to cut your workpiece to the correct width for the knife being used (Figure 39). To improve knife life and workpiece results when cutting in very hard woods, use a table saw to rabbet out some of the profile before running the workpiece into the planer/moulder. CORRECT Never cut into moulding that is wider than the knife. Otherwise, the knife will overheat, burn the wood, and dull rapidly. INCORRECT FG<I8K@FEJ 8cnXpjLj\>l`[\IX`cjN_\eDflc[`e^ Make sure to use the guide rails (Figure 40), so the moulding profile can be cut with maximum safety and without wander, twisting, or profile misalignment. Figure 39. Correct workpiece sizing. CORRECT Do not attempt to cut moulding without using the guide rails. Otherwise the workpiece could shift and be ejected from the machine and cause severe injury, or the moulding pattern could be inconsistent from one strip of molding to another. INCORRECT Figure 40. Using the guide rails. -28- N(/()Fne\ijDXelXcD]^%j`eZ\*&'0 <[^\Dflc[`e^KXccNfibg`\Z\j When cutting edge profiles on workpieces that are taller than they are wide, you must clamp wooden extension rails to the table so they support at least 75% of the workpiece height on both sides (Figure 41). Never attempt to use the low profile metal guide rails that came with this machine if they do not adequately support the workpiece, such as with tall workpieces. If the workpiece slips out of rails because the rails are too low, the workpiece can be ejected from the machine causing severe injury. CORRECT Figure 41. Correct workpiece support. -29- FG<I8K@FEJ INCORRECT N(/()Fne\ijDXelXcD]^%j`eZ\*&'0 Dflc[`e^Fg\iXk`fe The maximum depth for a moulding cut in soft wood is 3 ⁄4" deep. However, the harder the wood or the more knots it has, the shallower the cut, and the slower the feed rate must be. The basic steps of operating the machine as a moulder are as follows: AVOIDING KICKBACK! • Always stand to one side of the machine. (. DISCONNECT THE PLANER/MOULDER FROM POWER! FG<I8K@FEJ 2. Review the Workpiece Inspection list on Page 23 and the AVOIDING KICKBACK warning on this page. 3. Review Moulding Do's and Don'ts on Page 26, and take the appropriate safety measures. 4. Adjust the guide rails against the sides of the workpiece so the workpiece is guided into the planer blades without binding, then tighten the rail lock levers. 5. If you have not already done so, adjust the feed rollers and spring tension as outlined in the Feed Roller Height and Spring Tension section on Page 21. 6. Loosen the headstock lock lever, and use the handwheel (Figure 42) to adjust the headstock down far enough to make a full pass. 7. Put on heavy leather gloves and rotate the cutterhead manually to verify that the knives do not contact the table or the guide rails. 8. PUT ON SAFETY GLASSES, EAR PROTECTION, AND A RESPIRATOR. 9. Turn the feed speed control dial to a slow speed and start the machine. Finding the best feed rate will be a process of trial-and-error based on finding a balance between the wood type, moulding knife profile, and the quality of finish desired. • Always check and reset outfeed roller height after changing knives. • Always plane WITH the grain direction of the wood. Never plain cross-grain or end-grain. • Do not make a second pass after cutting the initial profile. The first pass has full roller-to-workpiece contact, but on the second pass, both the infeed and outfeed rollers have minimum contact and the workpiece may be ejected. • Use roller stands to support long workpieces. • Carefully inspect all stock to make sure it is free of large knots and foreign objects. Headstock Height Handwheel Handwheel Scale 10. Stand to the side of the table, place the workpiece on the table, and slowly feed it into the machine until the feed roller begins to pull the workpiece. Depth Stop Headstock Height Scale Figure 42. Depth control and scales. -30- N(/()Fne\ijDXelXcD]^%j`eZ\*&'0 8::<JJFI@<J The following planer/moulder accessories may be available through your local Woodstock International Inc. dealer. If you do not have a dealer in your area, these products are also available through online dealers. Please call or e-mail Woodstock International Inc. Customer Service to get a current listing of dealers at: 1-800-840-8420 or at [email protected]. Moulding Knives This selection of HSS Moulding Knives fits our Shop Fox® Planer/Moulders. Each moulding profile includes a set of two indexable knives, so knife setting is quick and easy. D3338 45⁄8" Crown D3337 D3336 41⁄4" Crown 35⁄8" Crown D3335 D3334 D3333 31⁄4" Crown 23⁄4" Crown 21⁄4" Crown For Crown Moulding Knives (Sold in pairs). D3674 Back Cutter for D3333 21⁄4" Crown D3675 Back Cutter for D3334 23⁄4" Crown D3676 Back Cutter for D3335 31⁄4" Crown D3677 Back Cutter for D3336 35⁄8" Crown D3678 Back Cutter for D3337 41⁄4" Crown D3679 Back Cutter for D3338 45⁄8" Crown D3344 D3332 2" Back Out 41⁄4" Base D3326 2" Casing D3331 11⁄2" Back Out D3343 D3342 31⁄4" Base D3341 3" Chair Rail D3339 25⁄8" Chair Rail D3340 21⁄2" Chair Rail D3330 11⁄8" Back Out D3328 31⁄4" Casing D3324 13⁄4" Cove D3329 31⁄2" Casing D3325 13⁄4" Bed Df[\c;**0*Ç<cc`gk`ZXcA`^ This jig enables the Model W1812 Planer/Moulder to make extremely high quality arched casings and mouldings to match the same straight moulding profiles produced by this machine. Ideal for round-top windows and arched doorways that are characteristic of custom woodwork. This jig requires a shop-made 3⁄4" thick template of the same arc or radius as the workpiece. Maximum width capacity is 51⁄2". =`^li\43. Model D3393 elliptical jig. -31- FG<I8K@FEJ 31⁄4" Base D3327 21⁄4" Casing BACK CUTTERS N(/()Fne\ijDXelXcD]^%j`eZ\*&'0 N(.*,Ç;ljk:fcc\Zkfi A perfect dedicated dust collector for a planer/moulder on a job site or in a shop. The motor is 3⁄4 HP, 110V, single-phase; and the flow specifications are 650 CFM with a static pressure of 3.4" H2O. The bag capacity is 2.8 cubic feet with a filtration level down to 30-micron. =`^li\44. W1735 dust collector. N('+0ÇCXi^\;ljk:fcc\Zk`feJ\gXiXkfi Our Dust Collection Separator increases the chip collection capacity of dust collection systems that are rated 800 CFM or greater. Designed to fit securely on top of a standard 30-gallon metal trash can, this molded ABS fitting is engineered to use cyclonic action to drop out larger particles from the dust flow. The fitting features molded inlets and outlets that can be easily connected to standard systems using 4" flexible hose. You'll be amazed at how well it works! FG<I8K@FEJ =`^li\45. W1049 large dust collection separator. Df[\c;)).*ÇJ`e^c\Ifcc\iJkXe[ Large diameter ball bearing roller stand features smooth operation for a variety of processing and work support applications. Heavy pedestal base is stable and secure. Df[\c;)).+Ç,Ifcc\iJkXe[ For greater work stability and support, this 5 roller stand features large diameter, ball bearing rollers mounted on a sturdy adjustable pedestal base. D2273 D2274 =`^li\46. Models D2273 and D2274 Shop Fox roller stands. ;)',.Ç?\Xmp$;lkpJ_fg=foDfY`c\9Xj\ Make your machine mobile with this popular patented mobile base. The unique outrigger type supports increased stability and lower machine height. This heavy duty mobile base is rated for up to a 600 lb. capacity. =`^li\+.. D2057 Shop Fox mobile base. -32- N(/()Fne\ijDXelXcD]^%j`eZ\*&'0 D8@EK<E8E:< >\e\iXc Regular maintenance on your machine will ensure its optimum performance. Make a habit of inspecting your machine each time you use it. Loose mounting bolts. Worn switch, damaged cords, and plugs. Damaged V-belt. Any other unsafe condition. :c\Xe`e^ Frequently vacuum sawdust away from the internal working parts of the machine and motor fan cover. Dust build-up around the motor is a sure way to decrease its lifespan. D8B< JLI< k_Xk pfli dXZ_`e\ `j legcl^^\[ [li`e^ Xcc dX`ek\eXeZ\ gif$ Z\[li\j@]k_`jnXie`e^`j`^efi\[#j\i`$ fljg\ijfeXc`ealipdXpfZZli. Occasionally it will become necessary to clean the internal parts with mineral spirits and a stiff brush. Make sure the internal workings are dry and have been re-lubricated before using the machine again. When using mineral spirits and cleaners, do not allow them to contact the viewing window or it may become etched and cloudy. Remove the chip deflector, and use only warm water with a mild dish soap to clean the window. Do not let water come in contact with metal parts or rust may occur. Every three months, we recommend that the motor dust cover (Figure 48) is removed, and the motor is vacuumed out for maximum motor life. Under heavy-use, increase the cleaning interval. DO NOT blow dust out with compressed air! Motor Dust Cover and Retaining Screws KXYc\Xe[9Xj\ Tables can be kept rust-free with regular applications of products like SLIPIT®. For long term storage you may want to consider products like Boeshield T-9™. Figure 48. Feed motor dust cover. -33- D8@EK<E8E:< :c\Xe`e^=\\[Dfkfi N(/()Fne\ijDXelXcD]^%j`eZ\*&'0 ClYi`ZXk`fe Since all bearings are sealed and permanently lubricated, simply leave them alone until they need to be replaced. However, this machine does need lubrication in other places, such as those shown in Figures 49—51. At a minimum, lubricate these areas every six months, but under heavy use or adverse working conditions, increase lubrication intervals accordingly. One of Four Tensioner Locations KfclYi`ZXk\k_\dXZ_`e\#[fk_\j\jk\gj1 D8@EK<E8E:< (. DISCONNECT THE PLANER/MOULDER FROM POWER! ). Record the height of each tensioner nut (=`^li\ 49), and unthread each feed-roller spring tensioner assembly. *. Clean the spring tensioner assembly with mineral spirits, apply a thin layer of light machine oil or motor oil, and reinstall to the recorded height or spring tension. +. Place the nozzle under the chain housing, and vacuum out all dust. Then brush a coat of light machine oil or motor oil on the drive chains (=`^li\ 50). ,. Clean the column ways and leadscrew with mineral spirits, and brush a coat of light machine oil or motor oil on all cleaned locations (=`^li\51). -. Apply a few drops of light machine oil or motor oil onto the gib at the top, so the oil drains down inside the gib seat, keeping the gib lubricated. .. Apply a few drops of light machine oil or motor oil onto the handwheel scale hub, and work the hub to make sure that it draws the oil down inside. /. =`^li\49.Roller spring tensioner assembly. Drive Chain =`^li\50.Drive chain assembly. Handwheel Scale Hub Leadscrew Column Way Wipe away excess oil with a clean rag. Top of Gib Figure 51. Gib, way, and leadscrew. -34- N(/()Fne\ijDXelXcD]^%j`eZ\*&'0 J<IM@:< >\e\iXc This section covers the most common service adjustments or procedures that may need to be made during the life of your machine. If you require additional machine service information not included in this section, please contact Woodstock International Technical Support at (360) 734-3482 or send an e-mail to: k\Z_$jlggfik7j_fg]fo.Y`q. :_Xe^`e^=\\[Dfkfi 9ilj_\j If the feed motor fails, is noisy, warmer than usual, or appears to run sluggishly, the brushes may need to be replaced. To replace feed motor brushes, do these steps: DISCONNECT THE PLANER/MOULDER FROM POWER! 2. Unscrew the both motor dust cover retaining screws and remove the dust cover Figure 52. 3. Unscrew the brush covers from both sides of the motor, and remove the brushes, shown in Figure 53. 4. Vacuum out carbon dust from the motor and both brush bores. DO NOT blow dust out with compressed air! 5. Insert new brushes into the slots in the motor housing, ensuring that the brush caps are threaded in completely until they stop. 6. Screw the brush caps in place. 7. Reinstall the motor dust cover. 8. Test run the feed motor. Motor Dust Cover and Retaining Screws Figure 52. Feed motor end view. Motor Brush Cap and Spring Brush Bore J<IM@:< 1. D8B< JLI< k_Xk pfli dXZ_`e\ `j legcl^^\[ [li`e^ Xcc j\im`Z\ gifZ\$ [li\j @] k_`j nXie`e^ `j `^efi\[# j\i`$ fljg\ijfeXc`ealipdXpfZZli. Figure 53. One of two feed motor brushes. -35- N(/()Fne\ijDXelXcD]^%j`eZ\*&'0 =\\[Ifcc\i$kf$KXYc\ 8c`^ed\ek The feed rollers must be aligned correctly with the table to maintain a smooth and straight feed. 12 45° Grain Direction KfZ_\Zbk_\]\\[ifcc\i$kf$kXYc\Xc`^ed\ek#[fk_\j\ jk\gj1 11 2 (. DISCONNECT THE PLANER/MOULDER FROM POWER! ). Remove the chip deflector lock pin, and set the chip deflector aside. *. Refer to =`^li\54, and make a wooden gauge block as outlined. +. Place the finished block on the table, directly under one end of the infeed roller (=`^li\55). ,. Lower the cutterhead housing so the infeed roller barely touches the gauge block on the lowest end of the roller (=`^li\55). -. Slide the block over to the other end of the roller. .. Using a set of feeler gauges, measure the gap between the roller and the block. —If the gap is more than 0.005", then proceed to Step 8 and adjust the swing arm lower so the gap is less than 0.005". /. Loosen the cap screw shown in =`^li\56, then rotate the cam nut until the swing arm lowers and the roller just touches the block. 0. Remove the gauge block and retighten the cap screw. 4 2 4 Side View Front View =`^li\54.Gauge block plans. Feed Roller Gauge Block =`^li\55.Gauge block. Cam Nut J<IM@:< ('. Check and adjust the outfeed roller next. ((. When both rollers are adjusted, check and adjust the feed roller height and spring tension as outlined in the Feed Roller Height and Spring Tension section on Page 21. (). When finished, reinstall the chip deflector. Cap Screw Swing Arm =`^li\56.Feed roller adjustment. -36- N(/()Fne\ijDXelXcD]^%j`eZ\*&'0 ;i`m\:_X`e8[aljkd\ek If the drive chain tensioner rubber foot (Figure 57) wears and the drive chain becomes slack after long-term machine use, the chain will have to be readjusted. The chain should not be tight like a V-belt where there is preload on a pulley and shaft. Tensioner Rubber Foot The sprocket shafts on this machine must be free floating with no chain tension against them. The chain should have approximately 3-5mm (Figure 58) of hanging slack to ensure that the shafts are not always tensioned. However, the chain must still be tight enough so it does not skip sprocket teeth. =`^li\57.Drive chain assembly. To adjust the drive chain slack, do these steps: 1. DISCONNECT THE PLANER/MOULDER FROM POWER! 2. Raise the headstock until you have easy access to the chain area. 3. Loosen the tension adjuster jam nut (Figure 59). 4. Use a 4mm hex wrench to adjust the tensioner until there is 3-5mm of hanging slack (Figure 58). 5. Incorrect Correct 3-5mm Slack Tighten the jam nut, and test the operation. Figure 58. Chain adjustment. Chain Tensioner Adjustment J<IM@:< Figure 59. Chain tensioner. -37- N(/()Fne\ijDXelXcD]^%j`eZ\*&'0 >`Y8[aljkd\ek Due to normal wear and break in, the column ways and the headstock gib will eventually have to be readjusted. To adjust the headstock gib, do these steps: 1. DISCONNECT THE PLANER/MOULDER FROM POWER! 2. Clean and lubricate the column leadscrew, gib, and ways. Column Way Gib 3. Loosen the gib jam nuts shown in Figure 60. 4. Using a 4mm hex wrench, adjust the upper and lower gib screws in an alternating fashion until a slight drag is detected in the headstock slide when the handwheel is cranked. 5. Tighten the lock nuts. Hex Wrench Gib Jam Nuts NOTICE J<IM@:< When adjusting gibs, the goal is to remove unnecessary sloppiness or binding from the headstock as it is slid up and down on the column. A loose gib will allow the headstock to vibrate and the knives to chatter. An overly tight gib will prematurely wear the column and leadscrew. -38- Figure 60. Gib locations. N(/()Fne\ijDXelXcD]^%j`eZ\*&'0 <c\Zki`ZXcJX]\kp@ejkilZk`fej These pages are current at the time of printing. However, in the spirit of improvement, we may make changes to the electrical systems of future machines. Study this diagram carefully. If you notice differences between your machine and these wiring diagrams, call Woodstock International Technical Support at (360) 734-3482. (. HL8C@=@<;<C<:KI@:@8E. Due to the inherent hazards of electricity, only a qualified electrician should perform wiring tasks on this machine. If you are not a qualified electrician, get help from one before attempting any kind of wiring job. -. :@I:L@KI<HL@I<D<EKJ. You MUST follow the requirements on GX^\() when connecting your machine to a power source. ). N@I<:FEE<:K@FEJ. All connections must be tight to prevent wires from loosening during machine operation. Double-check all wires disconnected or connected during any wiring task to ensure tight connections. *. DF;@=@:8K@FEJ. Using aftermarket parts or modifying the wiring beyond what is shown in the diagram may lead to unpredictable results, including serious injury or fire. +. DFKFIN@I@E>. The motor wiring shown in these diagrams is current at the time of printing, but it may not match your machine. Always use the wiring diagram inside the motor junction box. .. N@I<&:FDGFE<EK;8D8><. Damaged wires or components increase the risk of serious personal injury, fire, or machine damage. If you notice that any wires or components are damaged while performing a wiring task, replace those wires or components before completing the task. /. J?F:B?8Q8I;. Working on wiring that is connected to a power source is extremely dangerous. Touching electrified parts will result in personal injury including but not limited to severe burns, electrocution, or death. Disconnect the power from the machine before servicing electrical components! 0. <OG<I@<E:@E>;@==@:LCK@<J. If you are experiencing difficulties understanding the information included in this section, contact our Technical Support at (360) 7343482. ,. :8G8:@KFIJ. Some capacitors store an electrical charge for up to five minutes after being disconnected from the power source. To avoid being shocked, wait at least this long before working on capacitors. WIRING DIAGRAM COLOR KEY BLUE WHITE BROWN GREEN GRAY YELLOW YELLOW GREEN PURPLE RED ORANGE PINK -39- LIGHT BLUE BLUE WHITE TURQUOISE J<IM@:< The photos and diagrams included in this section are best viewed in color. You can view these pages in color at www.shopfox.biz. BLACK N(/()Fne\ijDXelXcD]^%j`eZ\*&'0 N`i`e^;`X^iXd Wiring Diagram -$)'Gcl^ 8jI\Zfdd\e[\[ ?fk ?fk WARNING Read Page 39 ACCIDENTAL INJURY HAZARD! Disconnect power supply before adjustments, setup, or maintenance! JKFG Before Wiring >ifle[ DXZ_`e\Gfn\i:fi[ ))'M8: <d\i^\eZp Jg\\[;`Xc Fe9lkkfe Jkfg BDIDG HE::9 :fejfc\Le`k :`iZl`k 9fXi[ *8dg =lj\ ¶ BDIDG A' A& 68>C <gdjcY :fekifcGXe\c Gcl^ :fekifc:fi[ :fejfc\Le`kGfn\i:fi[ DX^e\k`ZJn`kZ_8jj\dYcp C(&( K(&) C)&* K)&+ C*&, K*&- . Gcl^ / I8$)' J<IM@:< 8DG K_\idXc I\cXp (&) *&+ I<J<K J;< Kpg\ :fekXZkfi ,&0- 0/ :fekifcGXe\cGfn\i:fi[ =\\[DfkfiGfn\i:fi[ Gcl^ Le`m\ijXc;: 9ilj_$Jkpc\ =\\[Dfkfi :XgXZ`kfi ))'M8: @e[lZk`fe :lkk\i_\X[ Dfkfi :lkk\i_\X[DfkfiGfn\i:fi[ -40- N(/()Fne\ijDXelXcD]^%j`eZ\*&'0 <c\Zki`ZXc:fdgfe\ekCfZXk`fej ON Switch Feed Speed Dial Emergency Stop Switch Feed Motor Feed Motor Circuit Board Control Panel Read Page 39 JKFG Before Wiring Magnetic Contactor Start Capacitor Thermal Relay =`^li\61.Electrical component locations. -41- J<IM@:< Motor Junction Box N(/()Fne\ijDXelXcD]^%j`eZ\*&'0 KiflYc\j_ffk`e^ This section covers the most common problems and corrections with this type of machine. N8IE@E>;FEFKdXb\XepX[aljkd\ekjlek`cgfn\i`j[`jZfee\Zk\[Xe[ dfm`e^gXikj_Xm\Zfd\kfXZfdgc\k\jkfg GIF9C<D Motor will not start. GFJJ@9C<:8LJ< :FII<:K@M<8:K@FE 1. Emergency Stop button is applied or at fault. 1. Rotate button to reset/replace button. 2. Break or short in wiring; or loose connections. 2. Trace/replace broken or corroded wires; fix loose connections (wiring diagram on Page 40). 3. Power supply switched off/has incorrect voltage. 3. Switch power supply on/verify voltage. 4. Blown fuse tripped circuit breaker at main panel. 4. Repair for short, then reset/replace fuse or breaker. 5. Thermal overload relay in mag switch tripped (main motor only). 5. Allow relay/motor to cool. If necessary, press reset button inside switch. 6. Motor connection wired incorrectly. 6. Wire motor correctly (refer to inside junction box cover or manual wiring diagram on Page 40). 7. Contactor not energized/has poor contacts (main motor only). 7. Test all legs for power, test field coil and replace if at fault (wiring diagram on Page 40). 8. Motor ON switch at fault (main motor only). 8. Replace switch. 9. Plug or receptacle is corroded or mis-wired. 9. Clean/retighten contacts; correct the wiring (wiring diagram on Page 40). 10. Start capacitor has blown (main motor only). 10. Test/replace if at fault. J<IM@:< 11. Circuit board fuse has blown (feed 11. Correct overload cause; replace blown fuse on circuit board. motor only). 12. Motor speed rheostat at fault (feed motor only). 12. Test/replace if at fault. 13. Motor brushes worn/at fault (feed motor only). 13. Replace brush set. 14. Centrifugal switch at fault (main motor only). 14. Adjust/replace centrifugal switch. 15. Motor at fault. 15. Test for shorted windings or bad bearings; repair or replace. Continued on next page -42- N(/()Fne\ijDXelXcD]^%j`eZ\*&'0 GIF9C<D Machine has excessive vibration or noise. Machine stalls or slows when operating. :FII<:K@M<8:K@FE 1. Motor fan rubbing on fan cover. 1. Fix/replace fan cover; replace loose or damaged fan. 2. Machine incorrectly mounted on floor or mobile base. 2. Level/shim base; tighten/adjust mounting hardware or feet. 3. Motor mounting loose. 3. Tighten mounting bolts/nuts; use thread locking fluid. 4. V-belt at fault. 4. Replace V-belt. 5. Headstock gib loose. 5. Clean, re-lubricate, and readjust headstock gib (Page 38). 6. Knives are dull. 6. Re-sharpen/replace knives. 7. Motor brushes worn/at fault (feed motor only). 7. Replace brush set (Page 35). 8. Pulley loose or not in alignment; shaft bent. 8. Replace worn pulley, key, and shaft, and realign. 9. Gearbox at fault (feed motor only). 9. Rebuild gearbox for bad gear(s)/bearing(s). 10. Centrifugal switch out of adjustment; at fault (main motor only). 10. Adjust/replace centrifugal switch. 11. Motor bearings worn or damaged. 11. Replace motor bearings or replace motor. 12. Cutterhead bearings at fault. 12. Replace bearing(s)/realign cutterhead. 1. Too much pressure when feeding workpiece. 1. Reduce pressure when feeding workpiece. 2. Workpiece is warped. 2. Straighten workpiece or use a different one. 3. Rails are incorrectly adjusted. 3. Adjust/calibrate rails. 4. Workpiece material not suitable for machine. 4. Only cut applicable metals with the correct grade and size of blade or bit. 5. Feed rate or cutting speed too fast. 5. Decrease feed rate or cutting speed. 6. Belt slipping. 6. Tension/replace belt; ensure pulleys are aligned. 7. Pulley or sprocket slipping on shaft. 7. Replace pulley and key or set screw. Replace shaft if worn. 8. Motor connection wired incorrectly. 8. Review wiring diagram under motor junction box cover; correct wire connections. 9. Motor brushes at fault (feed motor only). 9. Remove/replace brushes. 10. Circuit board at fault. 10. Inspect circuitry for arcing or burns. Replace if at fault (wiring diagram on Page 40). 11. Motor speed rheostat at fault. 11. Test and replace if at fault. 12. Contactor has poor contacts. 12.Test all legs for continuity and power, test field coil and replace if at fault. 13. Centrifugal switch at fault. 13. Adjust/replace centrifugal switch if available. 14. Motor at fault. 14. Test for shorted windings, bad bearings and repair or replace. 15. Gears in gearbox broken, slipping, or stuck. 15. Replace for broken or slipping gears. 1. Lock lever is tightened. 1. Loosen lock lever knob. 2. Burr, debris, or gunk hindering way 2. De-burr, clean and re-lubricate the handwheel and column slide. leadscrew, ways, and gib. 3. Bushings worn, dry, or damaged. -43- 3. Clean/lubricate/replace shaft and bushings. G8IKJ Handwheel binds or is difficult to move. GFJJ@9C<:8LJ< N(/()Fne\ijDXelXcD]^%j`eZ\*&'0 GIF9C<D Excessive snipe (there is a dip in the end of the board that is uneven with the rest of the cut). Workpiece stops/slows in the middle of the cut. :FII<:K@M<8:K@FE 1. One or both of the feed rollers are 1. Adjust the feed rollers to the correct height (Page set too low. 21). 2. Feed roller springs are applying too much roller pressure. 2. Reduce the feed roller spring tension (Page 21). 3. Workpiece is not supported as it leaves the planer/moulder. 3. Hold the workpiece up slightly as it leaves the outfeed end of the planer/moulder. 1. Taking too heavy of a cut. 1. Raise headstock to take a lighter cut. 2. One or both of the feed rollers are 2. Lower the feed rollers (Page 21) to what is specified in manual. adjusted too high and workpiece slips. 3. Feed roller spring tension is too light. 3. Increase the feed roller spring tension (Page 21). 4. Guide or fence is interfering with the workpiece travel. 4. Adjust guides or fence for adequate support without workpiece interference. 5. Pitch and glue build-up on planer components. 5. Clean internal cutterhead components with a pitch/resin dissolving solvent. 1. Knots or conflicting grain direction in wood. 1. Inspect workpiece for knots and grain direction; only process clean stock (Page 23). 2. Nicked or chipped knife. 2. Replace the affected knife, or have it sharpened. 3. Feeding workpiece too fast. 3. Slow down the feed rate. 4. Taking too deep of a cut. 4. Take a smaller depth of cut. Always reduce cutting depth when surface planing or working with hard woods (Page 23). Chipping (inconsistent pattern). 1. Chips are not being properly expelled from the cutterhead area. 1. Provide a minimum of 400 CFM at the port, and keep dust collector and ducting free of clogs and restrictions. Fuzzy grain. 1. Wood may have high moisture content or surface wetness. 1. Check moisture content and allow to dry if moisture is too high (Page 23). 2. Dull knives. 2. Replace the knives or have them professionally sharpened. 3. Chips are not being properly expelled from the cutterhead area. 3. Provide a minimum of 400 CFM at the port, and keep dust collector and ducting free of clogs and restrictions. Long lines or ridges that run the length of the board. 1. Nicked or chipped knife(s). 1. Replace or sharpen the knives. Uneven knife marks, wavy surface, or chatter marks across the face of the board. 1. Moulding knife is installed at outboard side of cutterhead. 1. Install moulding knife at the inboard side of cutterhead. 2. Feeding workpiece too fast. 2. Slow down the feed rate. 3. Feed roller spring tension is too light. 3. Increase the feed roller spring tension (Page 21). 4. Knives are loose. 4. Remove the knives, clean knife mounting surfaces, and reinstall knives. 5. Headstock is loose. 5. Adjust headstock gib (Page 38), and be sure to use headstock lock lever. 6. Worn cutterhead bearings. 6. Replace cutterhead bearings. 1. Knives are dull. 1. Replace or sharpen the knives. Chipping (consistent pattern). Glossy surface. G8IKJ GFJJ@9C<:8LJ< 2. Feed rate too slow. 2. Increase the feed rate. 3. Cutting depth too shallow. 3. Increase the depth of cut. -44- N(/()Fne\ijDXelXcD]^%j`eZ\*&'0 G8IKJ ?\X[jkfZb + , 0 (' )0 (' (( 0/ /' ( (+ 0) *' )+ (/ 0. -/ (* 0' 0, () -, *) . *+ *, *- */ *0 -) -( *- .( .' . -' -0 +* ) +) +( (, / ,- ), (' -+ ( )/ * ), )* 0* )) )- *. 0- / )( ,0 ** 00 )* (. +' *( )' (- (0 ++ +, -) 0( -* ** -( +. *0 *+ +' *0* ,. *. *+- ). /( /) .) /+ .* /* G8IKJ -45- N(/()Fne\ijDXelXcD]^%j`eZ\*&'0 ?\X[jkfZbGXikjC`jk PART # DESCRIPTION REF PART # DESCRIPTION XPS07M XPN06 XPN05 XPB25 X1812005 X1812006 XPN08 XPSS11 XPN08 XPSS08 X1812011 XPW14 XP51104 XPRP73M XPSS01 X1812016 X1812017 X1812018 X1812019 XPSS02 X1812021 X1812022 X1812023 X1812024 X1812025 X1812026 X1812027 X1812028 XPCAP06 X1812030 X1812031 XPB18 X1812033 XPSS29 X1812035 X1812036 X1812037 X1812038 PHLP HD SCR M4-.7 X 8 HEX NUT 1/2-12 HEX NUT 1/4-20 HEX BOLT 3/8-16 X 1-3/4 KNOB HANDWHEEL HEX NUT 3/8-16 SET SCREW 1/4-20 X 1/4 HEX NUT 3/8-16 SET SCREW 5/16-18 X 1/2 TOP BRACE FLAT WASHER 5/8 THRUST BEARING 51104 ROLL PIN 4 X 30 SET SCREW 5/16-18 X 1 DOVETAILED COLUMN SCALE SCALE COLLAR ELEVATING SCREW SET SCREW 5/16-18 X 3/8 CUTTERHEAD PULLEY ROTATION LABEL COLLAR SPACER BALL BEARING 6206 2RS+NR CUTTERHEAD TABLE LOCK LEVER ASSEMBLY CAP SCREW 1/4-20 X 1 DUST COVER CHIP DEFLECTOR HEX BOLT 3/8-16 X 1 FEED ROLL SPROCKET SET SCREW 10-24 X 1/4 OUTFEED DRIVE AXLE NEEDLE BEARING RUBBER FEED ROLLER OUTFEED SWING ARM 39 40 41 42 43 44 45 46 47 56 57 59 60 61 62 63 64 65 68 69 70 71 72 73 80 81 82 83 84 90 91 92 93 95 96 97 98 99 X1812039 X1812040 X1812041 X1812042 X1812043 X1812044 X1812045 X1812046 X1812047 X1812056 X1812057 XPCAP03 X1812060 X1812061 XPFH12 XPS07 X1812064 X1812065 X1812068 X1812069 XPW02 XPB18 X1812072 X1812073 X1812080 X1812081 XPB24 X1812083 X1812084 X1812090 XPN02 XPFB05 XPW07 X1812095 XPFB17 X1812097 XPS06 XPLW04 SWING ARM AXIS SCREW DRIVEN AXLE HEAD CASTING SWING ARM STOP PIN ROLLER PRESSURE SCREW COMPRESSION SPRING ROLLER PRESSURE PIN INFEED DRIVE AXLE INFEED SWING ARM KNOB 1/4-20 CHIP DEFLECTOR AXIS PIN CAP SCREW 5/16-18 X 1 BALL PLUNGER 3/8-16 X 3/4 ECCENTRIC BUSHING FLAT HD SCR 1/4-20 X 1 PHLP HD SCR 1/4-20 X 3/8 POINTER GIB SCALE ROLLER SCREW PLANER KNIFE SET FLAT WASHER 3/8 HEX BOLT 3/8-16 X 1 INNER RAIL OUTER RAIL WINDOW EXTENSION WING HEX BOLT 3/8-16 X 1-1/4 T-NUT M6-1 LEVER ASSEMBLY M6-1 POINTER HEX NUT 5/16-18 FLANGE BOLT 10-24 X 1/2 FLAT WASHER 5/16 COLLAR FLANGE BOLT 10-24 X 3/8 SCALE HUB PHLP HD SCR 10-24 X 3/8 LOCK WASHER 3/8 G8IKJ REF 1 2 3 4 5 6 7 8 9 10 11 12 13 14 15 16 17 18 19 20 21 22 23 24 25 26 27 28 29 30 31 32 33 34 35 36 37 38 -46- N(/()Fne\ijDXelXcD]^%j`eZ\*&'0 DX`eDfkfiXe[:XY`e\k 213-4 213-1 200 209 229 230 213 216-1 213-2 207 229-1 213-3 211 240 229-2 208 218 217 229-4 229-3 211 216 211 217-3 208 217-1 251 250 217-4 252 253 216-1 217-2 210 221 210 220 REF PART # DESCRIPTION REF PART # DESCRIPTION 200 207 208 209 210 211 213 213-1 213-2 213-3 213-4 216 216-1 217 217-1 217-2 XPSS02 XPN02 XPB07 X1812209 XPN08 XPW07 X1812213 XPC400C X1812213-2 X1812213-3 X1812213-4 X1812216 X1812216-1 X1812217 X1812217-1 X1812217-2 SET SCREW 5/16-18 X 3/8 HEX NUT 5/16-18 HEX BOLT 5/16-18 X 3/4 MOTOR PULLEY HEX NUT 3/8-16 FLAT WASHER 5/16 MOTOR 2HP 220V S CAPACITOR 400M 250V 1-3/4 X 3-3/4 FAN FAN COVER CAPACITOR COVER STRAIN RELIEF STRAIN RELIEF MAGNETIC SWITCH ASSEMBLY MPZ-09 CONTACTOR SDE MA15 220V OL RELAY SDE RA-20 12-18A 217-3 217-4 218 220 221 229 229-1 229-2 229-3 229-4 230 240 250 251 252 253 X1812217-3 X1812217-4 XPS22 X1812220 XPB24 X1812229 X1812229-1 X1812229-2 XPFS19M XPS17M X1812230 X1812240 XPAW0332M XPAW04M XPAW05M XPWR1214 COVER MAIN HOUSING PHLP HD SCR 10-24 x 5/8 RUBBER FOOT HEX BOLT 3/8-16 X 1-1/4 VENTED REAR PANEL LATCH ASSEMBLY SPACER FLANGE SCREW M4-.7 X 4 PHLP HD SCR M4-.7 x 6 LINK BELT 1/2 X 45" BRACKET HEX WRENCH 3/32 HEX WRENCH 4MM HEX WRENCH 5MM COMBO WRENCH 12/14MM G8IKJ -47- N(/()Fne\ijDXelXcD]^%j`eZ\*&'0 =\\[DfkfiXe[:fekifcj 302 302-1 354 380 382 381 353 367 366 302-3 302-2 334 307 383 384 386 301 301 387 388 389 390 391 392 306 338 304 303 394 395 328 393 390 352 355 398 302-4 350 351 358 397 399 356 333 396 374 310 339 385 327 315 376 311 326 315-1 375 311 315-2 309 327 350 312 311 325 377 340 378 310-1 319 342 342-1 379 305 368 322 321 G8IKJ 323 310 311 -48- Note: For wiring harness locations, refer to wiring diagram on Page 40. N(/()Fne\ijDXelXcD]^%j`eZ\*&'0 =\\[DfkfiXe[:fekifcjGXikjC`jk REF PART # DESCRIPTION REF PART # DESCRIPTION 301 302 302-1 302-2 302-3 302-4 303 304 305 306 307 309 310 310-1 311 312 315 315-1 315-2 319 321 322 323 325 326 327 328 333 334 338 339 340 342 342-1 350 351 X1812301 X1812302 X1812302-1 X1812302-2 X1812302-3 X1812302-4 X1812303 X1812304 X1812305 XPS06 XPFH05 X1812309 XPB07 XPB03 XPW07 XPN02 X1812315 X1812315-1 X1812315-2 X1812319 X1812321 X1812322 XPHTEK36 XPB19 X1812326 XPS06 X1812328 X1812333 XPSS29 XPW04M XPN07 X1812340 X1812342 XPHTEK28M XPW06 XPSB159M FEED ROLL SPROCKET FEED MOTOR 1/4 HP 220V FEED MOTOR POWER CORD FEED MOTOR BRUSH SET PLASTIC LOCK SCREW DRIVE GEAR STEEL CONDUIT PLASTIC CONDUIT STAND PHLP HD SCR 10-24 X 3/8 FLAT HD SCR 1/4-20 X 3/4 GROMMET 30MM HEX BOLT 5/16-18 X 3/4 HEX BOLT 5/16-18 X 1 FLAT WASHER 5/16 HEX NUT 5/16-18 MACHINE POWER CORD 220V CUTTERHEAD MOTOR POWER CORD CONTROL PANEL POWER CORD VARIABLE SPEED CONTROL KNOB BOTTOM COLOR STRIPE UPPER COLOR STRIPE TAP SCREW #6 X 3/8 HEX BOLT 1/4-20 X 1/2 PULLEY COVER PHLP HD SCR 10-24 X 3/8 CABLE CLAMPS MOTOR CASE SCREW M5-.8 X 133 SET SCREW 10-24 X 1/4 FLAT WASHER 10MM HEX NUT 10-24 SPEED CONTROL SWITCH CONSOLE UNIT TAP SCREW M4 X 25 FLAT WASHER 1/4 CAP SCREW 1/4-20 X 2 352 353 354 355 356 358 366 367 368 374 375 376 377 378 379 380 381 382 383 384 385 386 387 388 389 390 391 392 393 394 395 396 397 398 399 CHAIN COVER INFEED ROLLER DRIVE CHAIN OUTFEED ROLLER DRIVE CHAIN BALL BEARING 6902-2RS LOCK WASHER 5MM BALL BEARING 608-2RS CHAIN TENSIONER FOOT HEX NUT 5/16-18 CONSOLE UNIT POWER CORD CONTROL BOX CONTROL BOX BRACKET CONTROL PLATE ON SWITCH OFF SWITCH CONTROL CORD PHLP HD SCR M5-.8 X 6 END CAP BRUSH HOUSING THERMOCOUPLE STATOR HOUSING EXT TOOTH WASHER 10MM BALL BEARING 6200-2RS ARMATURE EXT RETAINING RING 16MM BALL BEARING 6203-2RS BALL BEARING 6202-2RS SHIM KEY 5 X 5 X 20 SPACER LOCK WASHER 5MM PHLP HD SCR M5-.8 X 15 COVER CASE GEAR SHAFT ROLL PIN 3 X 10 X1812352 X1812353 X1812354 XP6902-2RS XPLW01M XP608-2RS X1812366 XPN02 X1812368 X1812374 X1812375 X1812376 X1812377 X1812378 X1812379 XPS19M X1812381 X1812382 X1812383 X1812384 XPTLW08M XP6200-2RS X1812387 XPR06M XP6203-2RS XP6202-2RS X1812391 XPK34M X1812393 XPLW01M XPS20M X1812396 X1812397 X1812398 XPRP44M G8IKJ -49- N(/()Fne\ijDXelXcD]^%j`eZ\*&'0 CXY\cGcXZ\d\ek JX]\kp cXY\cj nXie XYflk dXZ_`e\ _XqXi[j Xe[ _fn kf gi\m\ek dXZ_`e\ [XdX^\ fi `ealip. K_\ fne\i f] k_`j dXZ_`e\ DLJK dX`ekX`e k_\ fi`^`eXc cfZXk`fe Xe[ i\X[XY`c`kp f] Xcc cXY\cj fe k_`j dXZ_`e\.@]XepcXY\c`ji\dfm\[fiY\Zfd\jlei\X[XYc\#I<GC8:<k_XkcXY\cY\]fi\Xccfn`e^k_\ dXZ_`e\kf\ek\ij\im`Z\X^X`e.:fekXZkNff[jkfZb@ek\ieXk`feXc#@eZ.Xk(*-').*+$*+/)finnn. j_fg]fokffcj.Zfdkffi[\ie\ncXY\cj. 413 404 407 401 406 409 405 412 402 400 410 G8IKJ 408 REF PART # DESCRIPTION REF PART # DESCRIPTION 400 401 402 404 405 406 D3377 X1812401 X1812402 X1812404 XLABEL-12 XLABEL-04 LOGO SHOP FOX COVER WARNING LABEL ID LABEL COVER WARNING LABEL READ MANUAL LABEL ELECTRICITY LABEL 407 408 409 410 412 413 X1812407 X1812408 PLABEL-63 X1812410 X1812412 X1812413 CUTTERHEAD WARNING LABEL MACHINE NAME LABEL DISCONNECT 220V LABEL MODEL NUMBER LABEL MOTOR DUST LABEL KNIFE CLEARANCE LABEL -50- N(/()Fne\ijDXelXcD]^%j`eZ\*&'0 NXiiXekpI\^`jkiXk`fe Name ___________________________________________________________________________________ Street __________________________________________________________________________________ City _________________________ State ___________________________Zip ________________________ Phone # ______________________ Email___________________________Invoice # ___________________ Model #_________Serial #______________Dealer Name__________________Purchase Date___________ K_\]fccfn`e^`e]fidXk`fe`j^`m\efeXmfclekXipYXj`j%@kn`ccY\lj\[]fidXib\k`e^gligfj\jkf_\cglj [\m\cfgY\kk\igif[lZkjXe[j\im`Z\j%F]Zflij\#Xcc`e]fidXk`fe`jjki`ZkcpZfe]`[\ek`Xc. (. ). CUT ALONG DOTTED LINE *. How did you learn about us? _____ Advertisement _____ Mail Order Catalog _____ Friend _____ Website ____ Local Store ____ Other: How long have you been a woodworker/metalworker? _____ 0-2 Years _____ 2-8 Years ____ 8-20 Years _____ 20+ Years How many of your machines or tools are Shop Fox? _____ 0-2 _____ 3-5 ____ 6-9 _____ 10+ +. Do you think your machine represents a good value? _____ Yes ____ No ,. Would you recommend Shop Fox products to a friend? _____ Yes ____ No -. What is your age group? _____ 20-29 _____ 50-59 .. /. What is your annual household income? _____ $20,000-$29,000 _____ $30,000-$39,000 _____ $50,000-$59,000 _____ $60,000-$69,000 ____ 40-49 ____ 70+ ____ $40,000-$49,000 ____ $70,000+ Which of the following magazines do you subscribe to? ____ ____ ____ ____ ____ ____ ____ ____ ____ ____ 0. _____ 30-39 _____ 60-69 Cabinet Maker Family Handyman Hand Loader Handy Home Shop Machinist Journal of Light Cont. Live Steam Model Airplane News Modeltec Old House Journal ____ ____ ____ ____ ____ ____ ____ ____ ____ ____ Popular Mechanics Popular Science Popular Woodworking Practical Homeowner Precision Shooter Projects in Metal RC Modeler Rifle Shop Notes Shotgun News ____ ____ ____ ____ ____ ____ ____ ____ ____ Today’s Homeowner Wood Wooden Boat Woodshop News Woodsmith Woodwork Woodworker West Woodworker’s Journal Other: Comments:VVVVVVVVVVVVVVVVVVVVVVVVVVVVVVVVVVVVVVVVVVVVVVVVVVVVVVVVVVVVVVVVVV VVVVVVVVVVVVVVVVVVVVVVVVVVVVVVVVVVVVVVVVVVVVVVVVVVVVVVVVVVVVVVVVVVVVVVVVVVVVV VVVVVVVVVVVVVVVVVVVVVVVVVVVVVVVVVVVVVVVVVVVVVVVVVVVVVVVVVVVVVVVVVVVVVVVVVVVVV VVVVVVVVVVVVVVVVVVVVVVVVVVVVVVVVVVVVVVVVVVVVVVVVVVVVVVVVVVVVVVVVVVVVVVVVVVVVV VVVVVVVVVVVVVVVVVVVVVVVVVVVVVVVVVVVVVVVVVVVVVVVVVVVVVVVVVVVVVVVVVVVVVVVVVVVVV FOLD ALONG DOTTED LINE Place Stamp Here NFF;JKF:B@EK<IE8K@FE8C@E:. G.F.9FO)*'0 9<CC@E>?8D#N80/)).$)*'0 FOLD ALONG DOTTED LINE TAPE ALONG EDGES--PLEASE DO NOT STAPLE N8II8EKP N8II8EKP Woodstock International, Inc. warrants all Shop Fox machinery to be free of defects from workmanship and materials for a period of two years from the date of original purchase by the original owner. This warranty does not apply to defects due directly or indirectly to misuse, abuse, negligence or accidents, lack of maintenance, or reimbursement of third party expenses incurred. Woodstock International, Inc. will repair or replace, at its expense and at its option, the Shop Fox machine or machine part, which in normal use has proven to be defective, provided that the original owner returns the product prepaid to a Shop Fox factory service center with proof of their purchase of the product within two years, and provides Woodstock International, Inc. reasonable opportunity to verify the alleged defect through inspection. If it is determined there is no defect, or that the defect resulted from causes not within the scope of Woodstock International Inc.'s warranty, then the original owner must bear the cost of storing and returning the product. This is Woodstock International, Inc.’s sole written warranty and any and all warranties that may be implied by law, including any merchantability or fitness, for any particular purpose, are hereby limited to the duration of this written warranty. We do not warrant that Shop Fox machinery complies with the provisions of any law, acts or electrical codes. We do not reimburse for third party repairs. In no event shall Woodstock International, Inc.’s liability under this limited warranty exceed the purchase price paid for the product, and any legal actions brought against Woodstock International, Inc. shall be tried in the State of Washington, County of Whatcom. We shall in no event be liable for death, injuries to persons or property or for incidental, contingent, special or consequential damages arising from the use of our products. Every effort has been made to ensure that all Shop Fox machinery meets high quality and durability standards. We reserve the right to change specifications at any time because of our commitment to continuously improve the quality of our products. =^\]FjVa^inBVX]^cZhVcYIddah LddYhidX`>ciZgcVi^dcVa!>cX#XVgg^Zhi]djhVcYhd[egdYjXihYZh^\cZY idbZZii]ZcZZYhd[idYVnhlddYldg`ZghVcYbZiValdg`Zgh# 6h`ndjgYZVaZgVWdjii]ZhZ[^cZegdYjXih/