1
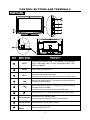
JTM32K212A-T
3415132130000
Dear Customers,
May we take this opportunity to thank you for purchasing this LCD TV. We strongly recommend
that you read the safety and operation instructions throughly before operating your LCD TV.
FOLLOW ALL INSTRUCTIONS AND WARNINGS on your LCD TV and in this manual.
TABLE OF CONTENTS
IMPORTANT SAFETY INSTRUCTIONS
2
PACKAGE CONTENTS
4
CONTROL BUTTONS AND TERMINALS
FRONT PANEL
REAR PANEL
REMOTE CONTROLLER
5
5
6
7
BASIC CONNECTIONS
9
BATTERY INSTALLATION
9
BASIC OPERATION
SWITCHING THE LCD TV ON/OFF
ADJUSTING THE VOLUME
USING MUTE
SELECTING INPUT SOURCE
CHOOSING A TV CHANNEL
10
10
10
10
10
11
USING THE MENUS
CHANNEL SETUP
PICTURE SETUP
SOUND SETUP
TIME SETUP
OPTION SETUP
LOCK SETUP
12
12
13
14
14
15
15
TELETEXT FUNCTION (OPTIONAL)
17
SUPPORTED OPERATING MODES
18
TROUBLESHOOTING
19
SPECIFICATIONS
20
1
IMPORTANT SAFETY INSTRUCTIONS
TO REDUCE THE RISK OF
ELECTRIC SHOCK DO NOT
REMOVE COVER. NO
USER-SERVICEABLE
PARTS INSIDE. REFER
SERVICING TO QUALIFIED
SERVICE PERSONNEL.
CAUTION
RISK OF ELECTRIC
SHOCK DO NOT
OPEN
This symbol indicates
“dangerous voltage”
inside the product that
presents a risk of electric
shock or personal injury.
This symbol indicates
important instructions
accompanying the
product.
Read this Manual
Read this manual throughly before operating the unit.
Keep this manual
Keep this manual for future reference.
Observe all warnings
All warnings on the product and in the manual must be observed closely.
Follow all instructions
All operating instructions in the manual must be followed.
Do not insert liquids or objects
Inserting liquids or objects into the unit could result in fire or an electrical shock. If liquids or objects
should enter the LCD TV, immediately turn off the power switch, disconnect the power plug from the
AC outlet and contact qualified service personnel.
● Do not place the LCD TV near a bathtub, sink or swimming pool, in the bathroom, a wet basement
or similar.
● Do not expose the LCD TV to rain or moisture.
● Do not place flower vases, pots, cups, cosmetics, liquids such as water, etc on or around the LCD TV.
● Do not place metals, combustibles, etc on or around the LCD TV.
● Do not drip or splash liquid of any kind on the LCD TV.
Be particularly careful if there are children present near the unit
● Please ensure that children do not hang on the LCD TV.
Do not subject the LCD TV to any shocks or impact
If the LCD TV should be dropped and/or broken, it could result in an injury, and continued use could
result in fire or electrical shock.
If the glass panel is broken or damaged, immediately turn off the power switch, disconnect the power
plug from the AC power outlet and contact qualified service personnel.
Ensure that the unit is stable
● If the LCD TV is mounted on a wall, please ensure that it is fastened securely.
● Do not place the LCD TV on a bed, sofa, rug or similar surface. Do not place the LCD TV on an unstable cart, stand, or table. The LCD TV may fall, causing serious damage to the LCD TV and/or
may seriously injury someone.
● When the product is on a trolley, it should be moved with caution. Avoid quick stops, and moving
the unit across uneven surfaces that may cause the product and trolley to overturn.
2
IMPORTANT SAFETY INSTRUCTIONS
Do not block any ventilation openings
● The vents and other openings in the cabinet are designed to let hot air escape from the LCD TV.
Do not cover or block these vents and openings since insufficient ventilation can cause overheating. Do not place the LCD TV on a bed, sofa, rug or other similar surface, since this can block
ventilation openings, causing the TV to overheat, which may result in fire.
● Do not cover the LCD TV with cloth, such as curtains, or items such as newspaper, etc.
● This unit is not designed for built-in installation, do not place the product in an enclosed place such
as a bookcase or rack, unless proper ventilation is provided or the manufacturer’s instructions are
followed.
Avoid high temperature environments
The heat may adversely affect the LCD TV and other parts, and could result in serious overheating or risk
of fire.
● Do not place the LCD TV, the remote control and other parts in direct sunlight or near a hot object
such as heater, etc.
● Do not place the LCD TV in a place where the temperature varies widely.
Avoid oils
Do not place the TV near a kitchen or a cooking appliance. Dust saturated with oil may enter into the unit
and damage it.
Power cord protection
Incorrect connection of the power cord could result in fire or electrical shock.
● Do not connect too many appliances to the same mains socket as this could result in fire or electrical
shock.
● The apparatus must be connected to a mains socket outlet with a protective earthing connection.
● The socket outlet for connecting mains plug must be easily accessible and remain readily operable.
● Do not overload wall outlet as this can result in fire or electrical shock.
● Check that the connecting portion of the AC power cord is clean (with no dust), before using. Use a
soft and dry cloth to clean the power plug.
● The AC power cord should be routed so that it is not likely to be walked on or pinched by items
placed upon or against it. Also do not put any heavy objects on the AC power cord.
● Do not touch the AC power cord with a wet hand.
● Pull out the AC power cord by the plug. Do not pull on the power cord.
● Insert the power plug into a power outlet firmly. Avoid using a loose, or damaged outlet.
● Do not pinch, bend, or twist the cable excessively. The core lines may be bared or cut, causing a
short-circuit which may induce fire or electrical shock.
● For your own safety, do not touch any part of the unit, power cord or aerial lead during lightning
storms.
● Do not modify the AC power cord.
● Disconnect the power cord if the LCD TV is not used for a long time.
● Switch off and withdraw the power plug before making or changing connections.
Handling and cleaning the screen surface of display unit
To avoid screen degradation, follow the points mentioned below. Do not push on the screen or scratch
it with hard objects, or throw anything at the screen. The screen may be damaged.
● Be sure to unplug the power cord from outlet before cleaning.
● Do not push on the surface of the screen or scratch it with hard objects, as this may damage it.
● We recommend that the screen surface is touched as little as possible.
● To remove dust from the screen surface, wipe gently with a clean, soft and cotton-free dry cloth.
● Do not use any type of abrasive pad, alkaline/acid cleaner or strong solvent such as alcohol, thinner
or benzene etc, as this may damage the surface.
Cleaning the cabinet
● Be sure to unplug the power cord from the outlet before cleaning.
● Clean the cabinet with a soft cloth.
● Note that material deterioration or screen coating degradation may occur if the display unit is exposed to a volatile solvent, such as alcohol, thinner, benzine or insecticide, or if prolonged contact
is maintained with rubber or vinyl materials.
3
IMPORTANT SAFETY INSTRUCTIONS
Carrying and moving
● Be sure to always carry the LCD TV by two people holding it with two hands, one hand on each side
of the LCD TV. If you carry the unit in a manner other than that specified, it may drop and a serious
injury may be caused.
Servicing
Do not open the cabinet or remove the rear cover of the unit. If any of the following conditions occurs,
unplug the AC power cord from the AC outlet, and contact qualified service personnel.
● When the power cord or plug is damaged.
● When the LCD panel is damaged.
● When liquid is spilled on the unit or when objects have fallen into the unit.
● When the unit has been exposed to rain or water.
● If the unit has been dropped or the cabinet has been damaged in any way.
● If the unit does not work properly even after you have referred to the TROUBLESHOOTING section.
Replacement parts
● If the unit needs replacement parts, make sure that the service personnel use replacement
parts specified by the manufacturer, or those with the same characteristics and performance as the
original parts. The use of non-compliant parts can result in malfunction, fire, an electrical shock and/
or other accidents.
● Upon completion of service or repair work, request the service technician to perform safety checks
to ensure that the unit is in proper operating condition.
Other notices
● Sometimes, the image may have some tiny red, green, blue, white or black spots. This is normal
and does not affect the performance of the LCD TV.
● The advanced technology of this LCD TV gives you detailed pictures. Occasionally, a few nonactive pixels may appear on the screen as a fixed point of blue, green, or red. Please note that this
does not affect the performance of your LCD TV.
● If the unit is used in a cold place, a smear may occur in the picture or the picture may become dark.
This does not indicate a failure. These phenomena improve as the temperature rises.
● In some cases, residual images may remain after the short-term display of still images is displayed.
These will disappear in a few minutes, and the display will return to normal. However, if the unit is
used in high temperatures, it sometimes takes ten minutes or more to return to normal. Please note
that this is not a malfunction.
● LCD panels are made of finely processed glass, so please avoid pushing the panel with your hands
or subjecting it to a strong impact.
● Do not use immediately after moving from a low temperature to a high temperature environment,
as this causes condensation, which may result in fire, electrical shock or other danger.
PACKAGE CONTENTS
Your LCD TV package includes:
1. LCD TV Display
2. Remote Control
3. Power Cord
4. RCA Cable (3 Pin)
5. Operation Manual
Note:
Your product may also include various other accessories depending on region of purchase.
4
CONTROL BUTTONS AND TERMINALS
INPUT
2
+
_
3
4
8
7
5
6
9
Description
Item
Button Name
1
INPUT
To select input sources: DVB-T TV, Analogue TV, Composite1
Video, Composite2 Video, S-Video, Component Video, VGA,
HDMI1 and HDMI2.
2
MENU
Enter or exit from the menu.
3
VOL +/-
Increase or decrease the volume.
Adjust the values of the selected menu item in the OSD menu.
4
CHv
v
When you are watching the TV program, press this button to
increase channel number.
5
CHw
w
When you are watching the TV program, press this button to
decrease channel number.
In the main-menu, press to select lower menu item.
Switch on the LCD TV when at standby mode or vice versa.
6
7
Illuminates red in standby mode.
Power Indicator Illuminates green when the LCD TV is switched on.
8
Remote Sensor
Infrared sensor for the remote control.
9
Main Power
Switch
Switch on/off the LCD TV.
5
CONTROL BUTTONS AND TERMINALS
2 3
1
AC IN
HDMI2 IN
HDMI1 IN
3
4
LINE IN
VGA IN
(D-SUB 15PIN)
Pr
Y AV2
9
8
7
6
5
Pb
R
L
AV OUT VIDEO
R
L
VIDEO
R
L
AV1
R
L
VIDEO
10 11
12
1
AC Input Socket: Connect to an earth 100-240V, 50/60Hz AC outlet with the power cable.
2
HDMI1/2 Input Connectors: Connect it to the HDMI of DVD or other external equipment.
3
LINE IN (VGA Audio) Terminal: Connect it to the audio output terminal of PC.
4
VGA Input Terminal: Connect it to the D-Sub 15 pins analog output connector of the PC with
the VGA cable.
5
YPbPr Component Video Input Terminals: Connect them to the YPbPr component output
terminal of DVD or other external equipment.
6
YPbPr Audio In Terminals: Connect them to the audio output terminal of DVD or other
external equipment with YPbPr mode.
7
AV2 IN Terminals: Connect it to AV output terminals of DVD or other external equipment.
8
AV Out Terminals: Connect them to external display or REC equipment.
9
AV1 IN Terminals: Connect it to AV output terminals of DVD or other external equipment.
10
Coaxial output, connecting to coaxial input of your amplifier.
11 S-VIDEO Terminal: Connect it to S-Video output terminal of DVD or other equipment.
12 RF Input Socket: Connect antenna or cable 75 ohm coaxial to receive TV signal.
6
CONTROL BUTTONS AND TERMINALS
POWER
STEREO
4:3/16:9
2
3
4
RECALL
5
6
7
8
9
TELETEXT
INFO
1. POWER
To switch on the LCD TV when at standby mode
and vice versa.
2. DISPLAY
To display the source and channel informations.
3. STEREO
To select the audio broadcasting at Stereo or Mono.
4. NUMBER BUTTONS
To directly select program number.
5. MENU
To enter the menu, or exit from the menu.
6. t /u
To adjust menu settings.
To increase or decrease the volume.
p /q
To select a menu item.
To select the program in ascending or descending order.
ENTER
Execute a command.
7. VOL-/+ (VOLUME UP/DOWN)
To increase or decrease the volume.
8. PMODE
To select you desired picture mode among Dynamic,
Standard, Mild, User.
9. SOURCE
To select input sources : DVB-T TV, Analogue TV,
Composite1 Video, Composite2 Video, S-Video,
Component Video, VGA, HDMI1 and HDMI2.
7
CONTROL BUTTONS AND TERMINALS
10
POWER
STEREO
4:3/16:9
11
12
RECALL
13
10. MUTE
To switch the sound on or off.
11. 4:3/16:9
To select a display mode.
12. SLEEP
To set the sleep timer.
13. RECALL
To recall to the last TV channel watched.
14. CH-/+ (PROGRAM UP/DOWN)
To select the program in ascending or descending order.
15. SMODE
To select the sound mode.
16. EXIT
To exit the menu.
17. TELETEXT BUTTONS (OPTIONAL)
These buttons are used for certain models
with Teletext functions. For further details,
refer to the “TELETEXT FUNCTION”.
Note: the colour buttons ( RED, GREEN, YELLOW and
CYAN) are used for program edit function. For further
details, refer to the “Program Edit”.
DVB Function buttons
14
15
16
17
TELETEXT
INFO
18
18. TV/RADIO
Press to select TV or Radio mode.
LANG
To show the list of audio language available for the current
channel.
SUBTITLE
To switch the dialogue at the bottom of the screen.
EPG
Press to show the Electronic Program Guide menu.
FAV
This is a hot button for displaying the favourite list
defined by yourself.
INFO
Press to display the information of digital channel .
Note: These are disabled with no silk-screen buttons.
8
BASIC CONNECTION
Insert the batteries while observing the correct (+) and (-) polarities as illustrated below.
+
_
_
+
UM-4(AAA)
-
RO3,1.5VX2
-
+
+
About the batteries
● If the remote control unit fails to work even when it is operated near the LCD TV, please replace
the batteries.
● Use size UM-4 (AAA) batteries.
Note:
● Do not use rechargeable (Ni-Cd) batteries.
● Do not attempt to recharge, short circuit, disassemble, heat or throw the batteries into fire.
● Do not splash the remote control with water or put it on a wet object .
● Do not drop, step on or cause any impact to the remote control unit. This may damage it, resulting
in malfunction.
● Do not mix old and new batteries.
● If the remote control unit is not going to be used for a long time, remove the batteries.
● Strong light such as direct sunlight falling on the remote sensor can cause operational failure.
Avoid placing the remote control in direct sunlight.
Caution
Keep batteries out of children’s reach.
9
BASIC OPERATION
To switch the LCD TV on:
1. Connect the power cord to the LCD TV. Press the main power switch of the LCD TV. Then the
LCD TV switches itself to standby mode and the power indicator on the front of the LCD TV
lights up in red.
2. To switch on the LCD TV from standby:
Press the POWER button on the remote control or the button on the front panel of the LCD
TV, the LCD TV switches on and the power indicator lights up in green.
To switch the LCD TV off:
Press the POWER button on the remote control or the button on the front of the unit again, the
LCD TV switches to standby mode and the power indicator lights up in red.
To switch the LCD TV off completely, press the main power switch of the LCD TV.
Press the VOL+/- or t /u button to increase or decrease the volume.
36
At any time, you can temporarily cut off the sound using the MUTE button.
1. Press the MUTE button and the sound cuts off.
2. Press the MUTE button again or press VOL+/- ort /u button to turn mute off.
1. Press the SOURCE button on the remote control or
press INPUT button on the rear panel of the LCD TV
to display the “ Input Source” menu.
2. Press the p /q button to select the input signal.
3. Press the t /u button to confirm your selection.
Input Source
DTV
TV
AV1
AV2
S-Video
YPbPr
PC
HDMI1
HDMI2
EXIT
10
ENTER
BASIC OPERATION
Use the CHp /CHq button on the front panel, or the CH+/CH-/p /q button on the
remote control.
Press the CHp or CH+ /p button to increase channel number.
Press the CHq or CH-/q button to decrease channel number.
Using 0-9 digital buttons
You can select the channel number directly by pressing 0 to 9 buttons.
Example:
To select 1-digit channel (e.g. Channel 5):
● Press the 5 button.
To select 2-digit channel (e.g. Channel 20):
● Press the 2 button, follow by 0.
11
USING THE MENUS
CHANNEL SETUP
1. Press the MENU button on the remote
controller to display the OSD main menu.
2. Press t /u button to select the CHANNEL menu.
3. Press p /q button to select each item.
4. Press the MENU or EXIT button to exit from the menu.
CHANNEL
Auto Tuning
DTV Manual Tuning
ATV Manual Tuning
Programme Edit
EXIT
MENU
ENTER
Auto Tuning:
This option allows you to tuning the TV and DTV channels stations that can be received automatically.
DTV Manual Tuning:
This option allows you to tuning the DTV channels stations that can be received by manual.
A TV Manual Tuning:
This option allows you to tuning the TV channels stations that can be received by manual.
Programme Edit:
This function allows you to delete, rename, move, skip and FAV for a selected channel.
Deleting Channel
1. In Program Edit, move the p /q button to select a channel which you want to delete.
2. Press the RED button twice to perform the deletion function.
Rename Channel
1. Press the p /q button to select a channel which you want to rename.
2. Press GREEN button to perform the rename function.
3. Press the p /q button to select the character.
4. Press the t /u button to move the cursor position.
Move Channel
1. In Program Edit, move the p /q button to select a channel which you want to moved.
2. Press the YELLOW button to summon the move function.
3. Press the p /q button to select a channel you want to move to.
4. Press the YELLOW button to perform the move function.
Skip Channel
1. Press the p /q button to select a channel which you want to skipped.
2. Press the CYAN button to perform the skip function.
Set FAV Channel
1. Press the p /q button to select a channel which you favorite.
2. Press the FAV button to perform the favorite function.
12
USING THE MENUS
PICTURE SETUP
1. Press the MENU button on the remote
controller to display the OSD main menu.
2. Press t /u button to select the PICTURE menu.
3. Press p /q button to select each item.
4. Press the MENU or EXIT button to exit from the menu.
PICTURE
Picture Mode
Contrast
Brightness
Color
Sharpness
Tint
EXIT
Standard
50
50
50
50
0
MENU
ENTER
Picture Mode:
Select a desired picture mode among Dynamic, Standard,Mild and User.Dynamic, Standard and
Mild are the factory preset picture mode and the parameter of those modes can not be changed. If
you want to adjust any items (e.g. Contrast, Brightness ,Clour and sharpness etc), please select
User, and the settings will be stored in User mode.
C You may select the picture mode directly by pressing the PMODE button on the remote control.
Contrast:
Adjust the color brightness of the image.
Brightness:
Adjust the darkness and lightness of the image.
Color:
Adjust the saturation level of color.
Sharpness:
Adjust the sharpness level of image.
Tint:
Adjust the tone of color when your system is in NTSC.
PICTURE
Colour Temperature
Red
Green
Blue
Aspect Ratio
Noise Reduction
EXIT
MENU
User
........... 50
........... 50
........... 50
16:9
On
ENTER
Color Temperature:
Select a optimum color temperature level(Cool/
Medium/Warm) or Customize by selecting User.
The level of Red, Green and Blue are can be
adjusted separately in user mode.
Aspect Ratio:
Select a display mode.
Noise Reduction:
If the broadcast signal received is weak, you can select
this function to reduce the video noise if the option set
the “On”.
13
USING THE MENUS
SOUND SETUP
1. Press the MENU button on the remote
controller to display the OSD main menu.
2. Press t /u button to select the SOUND menu.
3. Press p /q button to select each item.
4. Press the MENU or EXIT button to exit from the menu.
SOUND
Sound Mode
Treble
Bass
Balance
Auto Volume
Surround Sound
EXIT
Standard
........... 50
........... 50
........... 50
Off
Off
MENU
ENTER
Sound Mode:
Press t /u button to select a sound mode among Standard, Music, Movie Sports and User.
Treble:
Adjusts the level of higher-pitched sounds.
Bass:
Adjusts the level of lower-pitched sounds.
Balance:
Adjusts the sound balance in left and right speakers.
Auto Volume:
If set “On”, it will adjust volume level automatically.
Surround Sound:
Creates a panoramic stereo audio image by producing deep and rich bass tones and clear treble
tones. This enables you to enjoy powerful sound effects like those in a movie theatre when it is
“Surround”.
TIME SETUP
1. Press the MENU button on the remote
controller to display the OSD main menu.
2. Press t /u button to select the TIME menu.
3. Press p /q button to select each item.
4. Press the MENU or EXIT button to exit from the menu.
TIME
Clock
Off Time
On Time
Sleep Timer
Auto Sleep
Time Zone
Off
Off
Off
Off
Victoria GMT+10
Clock:
Set the current time.
Off Time:
Set the TV to standby after the set time has elapsed.
On Time:
Set the TV from standby to on automatically after the set time has elapsed.
Sleep Timer:
Automatically switches the unit to standby after the preset time to elapsed.
Note: You may select the sleep time directly by pressing the SLEEP button repeatedly on the
remote control.
Auto Sleep:
If there is no signal input from VGA /HDMI mode for 1 minute, or no signal input from other video source
for 15 minutes, the LCD TV will switch to standby automatically when the Auto Sleep set the “On”.
Time Zone:
Press t /u button to select a time zone where you are.
14
EXIT
MENU
ENTER
USING THE MENUS
OPTION SETUP
1. Press the MENU button on the remote
controller to display the OSD main menu.
2. Press t /u button to select the OPTION menu.
3. Press p /q button to select each item.
4. Press the MENU or EXIT button to exit from the menu.
OPTION
Language
Audio Language
Subtitle Language
Hearing Impaired
Country
Restore Factory Default
English
English
English
Off
Australia
Language:
Selects your desired language for the OSD menu.
Note: If your unit does not support multi-language, this
item may not be selected by pressingt /u button.
Audio Language (for DTV):
Selects your desired language for the audio.
Note: If your unit does not support multi-language, this item may not be selected by pressing
t /u button.
Subtitle Language (for DTV):
Selects your desired language for the subtitle.
Note: If your unit does not support multi-language, this item may not be selected by pressing
t /u button.
Hearing Impaired (for DTV):
For Hearing Impaired people. The program can be displayed with recorded explanatory captions.
Note: This is valid for the program that has captions.
Country:
This function is disabled in this unit.
Restore Factory Default:
This function allows you to replace the settings with the factory default values.
EXIT
MENU
ENTER
LOCK SETUP
1. Press the MENU button on the remote
controller to display the OSD main menu.
2. Press t /u button to select the LOCK menu.
3. Press p /q button to select each item.
4. Press the MENU or EXIT button to exit from the menu.
LOCK
Lock System
Set Password
Block Program
Parental Guidance
EXIT
15
MENU
Off
No Block
ENTER
USING THE MENUS
Lock System:
Press t /u button to select On or Off.
Note: If the Lock System set the “On”, you will be prompted to input the password when you edit the
program and auto tuning (The factory initial password is “0000”)
Set Password:
It allows you to change the LOCK menu access password.
Please enter password
New
- - - Confirm
1. Enter a new 4-digital number as a code using 0-9.
2. Enter the same 4-digital number to confirm.
- - - -
Block Program:
It allows you to block some program.
Block Program
TV
TV
TV
TV
TV
TV
TV
TV
EXIT
31 S-26
32 S-27
33 S-28
34 X-30
35 S-31
36 S-32
37 S-35
38 S-38
LOCK
MENU
1. Press the p /q button to select a channel which you want to block.
2. Press the GREEN button to perform the block function.
ENTER
Parental Guidance ( for DTV mode only):
Press t /u button to select the different block rating or select no block item to ignore this function.
16
TELETEXT FUNCTION (OPTIONAL)
Teletext is an optional function, therefore only certain models can receive the teletext broadcast.
Teletext is a free service broadcast by most TV stations which gives up-to-the-minute information
on news, weather, television programs, share prices and many other topics.
Display Teletext
1. Select a TV station with teletext signal.
2. Press the TEXT button to enter Teletext signal.
3. Press the TEXT button again to display the TV picture with the Text page.
4. Press the TEXT button to again to display the teletext page superimposed over the TV image.
5. When the mix page is display, press the TEXT button to return to the normal Teletext mode.
6. When the Teletext page is displayed, press the TEXT button to return to the normal TV mode.
Page Selection
1. Enter the page number (three digit) using the number buttons.
If you press the wrong number during input, you must complete the three digit number and then
re-enter the correct page number.
2. The PAGE+/PAGE- button can be used to select the preceding or following page.
HOLD
You can press the HOLD button to hold a page, and press this button again to release the page.
INDEX
Press the INDEX button to enter the main index page directly.
You may enter the main index page number directly using the number buttons.
Enlarging Text
When a page is displayed, you can double the size of the text to make it easier to read.
1. Press the SIZE button to enlarge the top half of the page.
2. Press the SIZE button again to enlarge the bottom half of the page.
3. Press this button once more to return to the normal display.
Reveal mode
You can display concealed teletext information (e.g. Answer to puzzles or riddles etc.) by pressing
this button. Press this button again to remove the information from the display.
SUBPAGE
Some teletext pages may contain several sub-pages which are automatically set in a certain order
by the TV station.
1. You can enter to a certain sub page by pressing the SUBPAGE button directly and select the
page number with the number buttons. Enter the subpage number (e.g. 0003) for the third subpage.
2. Press the SUBPAGE button again to exit the sub page mode.
3. Press the TEXT button to return to the normal TV mode.
COLOR buttons (RED, GREEN, YELLOW, CYAN)
Press these buttons to access directly to the corresponding color pages displayed at the lower
part of the Teletext screen.
17
SUPPORTED OPERATING MODES
COMPONENT VIDEO (YPbPr) INPUT
Mode
Resolution Horizontal Frequency (K Hz)
576i
480i
576p
480p
1080i/50
1080i/60
720p/60
1080p/50
1080p/60
576
480
576
480
1080
1080
720
1080
1080
15.63
15.73
31.26
31.47
28.13
33.75
44.96
56.25
67.50
Vertical Frequency (Hz)
50.00
60.00
50.00
60.00
50.00
60.00
60.00
50.00
60.00
RGB INPUT
Mode
Resolution
Horizontal Frequency (K Hz)
Vertical Frequency (Hz)
VGA
VGA
VGA
SVGA
SVGA
SVGA
XGA
XGA
XGA
SXGA
SXGA
640X480
640X480
640X480
800X600
800X600
800X600
1024X768
1024X768
1024X768
1280X768
1360X768
37.5
37.9
31.5
46.9
47.2
37.9
60.0
56.5
48.4
47.8
47.7
75
72
60
75
72
60
75
70
60
60
60
Mode
Resolution
Horizontal Frequency (K Hz)
Vertical Frequency (Hz)
576p
720X576
1920X1080
1920X1080
1280X720
1920X1080
1920X1080
31.25
28.13
33.75
45.00
56.25
67.50
50.00
50.00
60.00
60.00
50.00
60.00
HDMI INPUT
1080i/50
1080i/60
720p/60
1080p/50
1080p/60
● It is possible that modes which are not listed in the above table above may not be supported.
For an optimal picture, it is recommended to choose a mode listed in the table.
● The incoming display modes that are compatible with WINDOWS are shown in the table above.
● Sometimes, the image may be disrupted due to the frequency standard from the VGA card.
However, this is not an error. You may improve this situation by activating the automatic
adjustment or by manually changing the phase and the clock settings in the menu.
● To extend the service life of the product, we recommend that you use your computer’s power
management function.
18
TROUBLESHOOTING
Before contacting a service technician, perform the following simple checks. If any problem still
persists, unplug the LCD TV and call for serving.
Problem
Possible Solution
● Check that the main plug has been connected to a wall inlet.
No sound
● Check that you have pressed the
button on the front of the TV.
● Check the volume.
● Check the volume.
Normal picture but no sound ● Check whether then MUTE button has been pressed on the remote
control.
● Check the volume.
● If the volume is still too low after setting the volume level to
Sound is too low
maximum, check the volume control on computer sound card or
software program, but also check the volume of the DVD.
● Adjust the color settings.
No picture or black and white ● Check that the broadcasting system selected is correct.
picture
● Check the contrast and brightness of the image.
● Check the video source connected to the TV.
● Make sure that the signal cable is firmly connected to the PC or the
“No signal” message
video sources.
● Make sure that the PC or video sources are switched on.
● Try to identify the electrical appliance that is affecting the set and
Sound and picture
move it further away.
interference
Blurred or snowy picture,
distorted sound
● Check the direction, location and connections of your aerial.
Remote control does not
work
● The battery in the remote control may be exhausted.
● The battery may be improperly installed.
● Check that there is no obstruction between the remote control and
the remote (infrared) sensor.
● Ensure that there is no strong light shining on the remote control’s
infrared sensor.
The LCD TV does not turn on
● Be sure the power cord is plugged in.
The image is too light or too ● Adjust the brightness and Contrast.
dark
On PC mode, horizontal bars
appear to flicker, jitter or
● Adjust the Phase.
shimmer on the image
On PC mode, vertical bars
● Adjust the Manual Clock .
appear to flicker, jitter or
shimmer on the image
On PC mode, image is not
stable and may appear to
vibrate
● Check that the display resolution and frequency from your PC or
video board is a valid mode for your LCD TV.
Control Panelg Displayg Settings.
● If the setting is not correct, use your computer utility program to
change the display settings.
Your monitor supports multiscan display function within the following frequency domain:
Horizontal frequency:30KHz~75KHz
Vertical frequency: 56Hz~75Hz
Maximum refresh rate:1360X768@60Hz
On PC mode, image is not
centred on the screen.
● Adjust the horizontal and vertical position.
19
SPECIFICATIONS
LCD Panel
Size
Display size
Pixel Pitch
View Angle
32” Diagonal
697.685(H) X 392.256 (V) mm
0.51075(H) X 0.51075 (V) mm
176°/176°(H/V)
Frequency
Horizontal
Vertical
Display color
Display Resolution
Maximum Mode
Optimum Mode
Input Source
Sync.
Video Signal
RGB Signal
30~75KHz
56~75Hz
16.7M colors
1360 X 768 @ 60Hz
1280 X 768 @ 60Hz
H/V separate, TTL, P. or N.
1Vp-p @ 75 ohm
0.7 Vp-p @ 75 ohm
TV
Color System
Sound System
Video
Color System
Video Format
PAL
BG, DK, I
PAL/SECAM/NTSC
CVBS, S-VHS, RGB
Power Supply
Input
Power Consumption
Working
Standby
165W
< 3W
Environmental Considerations
Operating Temperature
Operating Humidity
10℃ ~ 40 ℃(50°F ~ 104°F)
10% ~ 80%
AC 100~240V, 50/60Hz
Audio Characteristics
Audio Input
Audio Input (PC)
Frequency
Response
Dimension (WXDXH)mm
Without Stand
With Stand
Weight (Kg)
Net Weight
Gross Weight
RCA Jack (L, R), 0.5Vrms (-9dB)
Ø3.5 Stereo, 0.5Vrms (-9dB)
RF: 100Hz~12KHz (at ± 3dB)
A/V: 100Hz~13KHz (at ± 3dB)
812.9X106X560.9
812.9X245.6X619
15.2
18.2
Note:
● Design and specifications are subject to change without notice.
● Weight and dimensions shown are approximate values only.
20