1
PowerLite® Pro Z8050WNL
Network Operation Guide
Contents
Introduction
2
Using the Connection Screen. . . . . . . . . . . . . . . . . . . . . . . . . . . . . . . . . . 16
Using the Toolbar . . . . . . . . . . . . . . . . . . . . . . . . . . . . . . . . . . . . . . . . . . . . . . . . . . . . . . 18
Making Effective Use of Your Projector . . . . . . . . . . . . . . . . . . . . . . . . . 6
Various Screen Transfers by Network Connection (EasyMP Network
Projection) . . . . . . . . . . . . . . . . . . . . . . . . . . . . . . . . . . . . . . . . . . . . . . . . . . . . . . . . . . . . . . 6
Using the Network Projection function in Windows Vista and Windows 7 . 6
Monitor, Configure, and Control the Projector from a Remote Location . . . 7
EasyMP Network Projection Useful Functions
Projecting Only a PowerPoint Slide Show (Presentation Mode) . . 22
Installing the Software . . . . . . . . . . . . . . . . . . . . . . . . . . . . . . . . . . . . . . . . 8
Projecting Movies from a Computer (Movie Sending Mode) . . . . . 23
Software Supplied. . . . . . . . . . . . . . . . . . . . . . . . . . . . . . . . . . . . . . . . . . . . . . . . . . . . . . . 8
Installing . . . . . . . . . . . . . . . . . . . . . . . . . . . . . . . . . . . . . . . . . . . . . . . . . . . . . . . . . . . . . . . . 8
Supported File Types . . . . . . . . . . . . . . . . . . . . . . . . . . . . . . . . . . . . . . . . . . . . . . . . . . . 23
Playing Back a Movie . . . . . . . . . . . . . . . . . . . . . . . . . . . . . . . . . . . . . . . . . . . . . . . . . . . 23
Using Multi-Screen Display . . . . . . . . . . . . . . . . . . . . . . . . . . . . . . . . . . . 25
Connecting with EasyMP Network Projection
EasyMP Network Projection Summary . . . . . . . . . . . . . . . . . . . . . . . . . 11
Main Functions of the EasyMP Network Projection . . . . . . . . . . . . . . . . . . . . . . 11
Two Connection Modes . . . . . . . . . . . . . . . . . . . . . . . . . . . . . . . . . . . . . . . . . . . . . . . . 11
Advanced Connection Mode . . . . . . . . . . . . . . . . . . . . . . . . . . . . . . . . . . . . . . . . . 11
Quick Connection Mode (Only when the optional Wireless 802.11a/b/g
Module is installed) . . . . . . . . . . . . . . . . . . . . . . . . . . . . . . . . . . . . . . . . . . . . . . . . . . 12
Steps for connecting . . . . . . . . . . . . . . . . . . . . . . . . . . . . . . . . . . . . . . . . . . . . . . . . . . . 12
Preparing to Connect. . . . . . . . . . . . . . . . . . . . . . . . . . . . . . . . . . . . . . . . . 13
Preparing the Computer. . . . . . . . . . . . . . . . . . . . . . . . . . . . . . . . . . . . . . . . . . . . . . . . 13
For Windows. . . . . . . . . . . . . . . . . . . . . . . . . . . . . . . . . . . . . . . . . . . . . . . . . . . . . . . . 13
For Macintosh . . . . . . . . . . . . . . . . . . . . . . . . . . . . . . . . . . . . . . . . . . . . . . . . . . . . . . 13
Connecting to a Projector on a Network and Projecting. . . . . . . . . 14
Operating the Projector . . . . . . . . . . . . . . . . . . . . . . . . . . . . . . . . . . . . . . . . . . . . . . . . 14
Operating the Computer . . . . . . . . . . . . . . . . . . . . . . . . . . . . . . . . . . . . . . . . . . . . . . . 14
Example of Adjusting the Virtual Display . . . . . . . . . . . . . . . . . . . . . . . . . . . . . . . . 26
Procedure Before Using the Multi-screen Display Function. . . . . . . . . . . . . . . 27
Setting the Virtual Display . . . . . . . . . . . . . . . . . . . . . . . . . . . . . . . . . . . . . . . . . . . . . . 27
Enable the virtual display driver (Windows only) . . . . . . . . . . . . . . . . . . . . . . 27
Adjusting the Virtual Display . . . . . . . . . . . . . . . . . . . . . . . . . . . . . . . . . . . . . . . . . 28
Allocating the Image to be Projected . . . . . . . . . . . . . . . . . . . . . . . . . . . . . . . . . . . 31
Projecting the Allocated Images . . . . . . . . . . . . . . . . . . . . . . . . . . . . . . . . . . . . . . . . 32
Connecting to a Projector on a Different Sub-net
Connecting to a Projector on a Different Subnet. . . . . . . . . . . . . . . . 35
Searching by Specifying the IP Address and Projector name (For
Advanced Connection Mode only). . . . . . . . . . . . . . . . . . . . . . . . . . . . . 36
Performing a Search with a Profile. . . . . . . . . . . . . . . . . . . . . . . . . . . . . 37
Making a Profile . . . . . . . . . . . . . . . . . . . . . . . . . . . . . . . . . . . . . . . . . . . . . . . . . . . . . . . . 37
Searching by Specifying a Profile . . . . . . . . . . . . . . . . . . . . . . . . . . . . . . . . . . . . . . . 38
Managing a Profile . . . . . . . . . . . . . . . . . . . . . . . . . . . . . . . . . . . . . . . . . . . . . . . . . . . . . 39
3
Setting the EasyMP Network Projection Operation
Appendix
Using Set options . . . . . . . . . . . . . . . . . . . . . . . . . . . . . . . . . . . . . . . . . . . . 42
Connection Limitations . . . . . . . . . . . . . . . . . . . . . . . . . . . . . . . . . . . . . . . 53
Setting Each Item . . . . . . . . . . . . . . . . . . . . . . . . . . . . . . . . . . . . . . . . . . . . . . . . . . . . . . 42
General settings tab . . . . . . . . . . . . . . . . . . . . . . . . . . . . . . . . . . . . . . . . . . . . . . . . . 42
Adjust performance tab . . . . . . . . . . . . . . . . . . . . . . . . . . . . . . . . . . . . . . . . . . . . . . 43
Audio Output tab . . . . . . . . . . . . . . . . . . . . . . . . . . . . . . . . . . . . . . . . . . . . . . . . . . . . 44
Supported Resolutions . . . . . . . . . . . . . . . . . . . . . . . . . . . . . . . . . . . . . . . . . . . . . . . . . 53
Display Color. . . . . . . . . . . . . . . . . . . . . . . . . . . . . . . . . . . . . . . . . . . . . . . . . . . . . . . . . . . 53
Number of Connections . . . . . . . . . . . . . . . . . . . . . . . . . . . . . . . . . . . . . . . . . . . . . . . . 53
Others . . . . . . . . . . . . . . . . . . . . . . . . . . . . . . . . . . . . . . . . . . . . . . . . . . . . . . . . . . . . . . . . . 53
When Using Windows Vista and Windows 7 . . . . . . . . . . . . . . . . . . . . . . . . . . . . . 54
Limitations when projecting from Windows Photo Gallery . . . . . . . . . . . . 54
Limitations in Windows Aero . . . . . . . . . . . . . . . . . . . . . . . . . . . . . . . . . . . . . . . . . 54
Limitations when projecting from Windows Media Center . . . . . . . . . . . . 54
Using the Network Projector Function to Project Images
Using Network Projector . . . . . . . . . . . . . . . . . . . . . . . . . . . . . . . . . . . . . 46
Using a Computer to Set Up, Monitor and Control
Projectors
Changing Settings Using a Web Browser (Web Control) . . . . . . . . . 48
Displaying Web Control . . . . . . . . . . . . . . . . . . . . . . . . . . . . . . . . . . . . . . . . . . . . . . . . 48
Entering the IP address of the projector. . . . . . . . . . . . . . . . . . . . . . . . . . . . . . . 48
Projector Setup . . . . . . . . . . . . . . . . . . . . . . . . . . . . . . . . . . . . . . . . . . . . . . . . . . . . . . . . 48
Items in the Configuration menu that cannot be set by the web browser
48
Items that can only be set in the Web browser . . . . . . . . . . . . . . . . . . . . . . . . 49
Using the Mail Notification Function to Report Problems . . . . . . . 50
Management Using SNMP . . . . . . . . . . . . . . . . . . . . . . . . . . . . . . . . . . . . 51
Troubleshooting . . . . . . . . . . . . . . . . . . . . . . . . . . . . . . . . . . . . . . . . . . . . . 55
Problems Concerning Network Functions . . . . . . . . . . . . . . . . . . . . . . . . . . . . . . . 56
Cannot connect using EasyMP Network Projection. . . . . . . . . . . . . . . . . . . . 56
When a connection is made using EasyMP Network Projection, the
projected image remains as is, and a connection cannot be made from
another computer.. . . . . . . . . . . . . . . . . . . . . . . . . . . . . . . . . . . . . . . . . . . . . . . . . . . 56
The projector is not found when EasyMP Network Projection is started.56
Cannot connect in Advanced Connection Mode or Wired LAN connection
58
The Slide Show cannot be displayed on the desired display when the
multi-screen display function is being executed. . . . . . . . . . . . . . . . . . . . . . . 58
Applications are no longer displayed from the computer screen when the
multi-screen display function is executed. . . . . . . . . . . . . . . . . . . . . . . . . . . . . 58
The mouse cursor is not displayed on the computer screen. . . . . . . . . . . . 59
When connecting with EasyMP Network Projection the image is not
displayed or the image is slow to appear. . . . . . . . . . . . . . . . . . . . . . . . . . . . . . 59
When a connection is made using EasyMP Network Projection, a
PowerPoint Slide Show cannot be started. . . . . . . . . . . . . . . . . . . . . . . . . . . . . 59
When a connection has been made using EasyMP Network Projection, the
screen will not be refreshed when using an Office application. . . . . . . . . 60
4
Error message when starting up EasyMP Network Projection . . . . . . . . . . 60
Network settings are not restored after cutting the connection to the
computer with EasyMP Network Projection. . . . . . . . . . . . . . . . . . . . . . . . . . . 61
Problems Concerning Monitoring and Control . . . . . . . . . . . . . . . . . . . . . . . . . . 62
Mail is not sent even if a problem occurs in the projector. . . . . . . . . . . . . . 62
Glossary . . . . . . . . . . . . . . . . . . . . . . . . . . . . . . . . . . . . . . . . . . . . . . . . . . . . . 63
General Notes . . . . . . . . . . . . . . . . . . . . . . . . . . . . . . . . . . . . . . . . . . . . . . . 64
Copyright Notice . . . . . . . . . . . . . . . . . . . . . . . . . . . . . . . . . . . . . . . . . . . . . . . . . . . . . . . 64
Trademarks . . . . . . . . . . . . . . . . . . . . . . . . . . . . . . . . . . . . . . . . . . . . . . . . . . . . . . . . . . . . 64
5
Introduction
This chapter provides information on functions that allow you to use your projector more effectively via a network.
Making Effective Use of Your Projector
Making Effective Use of Your Projector
The following functions in EasyMP (Epson Administrative System for
Meeting and Presentation) can help you create varied and effective
meetings and presentations.
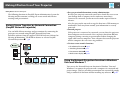
Various Screen Transfers by Network Connection
(EasyMP Network Projection)
You can hold efficient meetings and presentations by connecting the
projector to a network using EasyMP Network Projection.
Install the software from the supplied "EPSON Projector Software for
Meeting & Monitoring" CD-ROM in advance to execute EasyMP
Network Projection. s p.8
6
• Easy preparation/Information security administration
Because you can project materials stored on a shared file server or on
your desktop from a computer in the conference room that is
connected to a network, you do not need to make copies of data in
advance.
Also, because you do not need to copy the data into a USB memory or
notebook PC and carry them around, your information is securely
protected.
• Smooth progress
If the projector is connected to a network, you can share the projector
from computers on the network. You can project data from different
computers during a meeting or presentation without changing the
signal cable between computers. Even a distance between the projector
and the computer does not cause any problems.
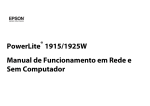
• Various screen transfer functions
• Distribution function s p.11
• Switching function s p.11
• Presentation Mode s p.22
• Multi-screen display s p.25
Using the Network Projection function in Windows
Vista and Windows 7
You can use the Network Projector function in Windows Vista and
Windows 7 to connect the projector and a computer via a network and
project images. This lets you make presentations via a network by simply
using a standard OS function without installing any software. s p.45
Making Effective Use of Your Projector
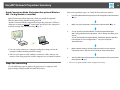
Monitor, Configure, and Control the Projector from a
Remote Location
The following convenient functions collectively manage projectors in
various conference rooms.
• Receive an e-mail notification if a problem occurs s p.50
• Monitor and detect problems from SNMP Manager on the
networks p.51
• Set and control the projector by using a standard computer Web
browser s p.48
7
Installing the Software
8
Installing the Software
You can find the software for using the projector effectively on the
supplied "EPSON Projector Software for Meeting & Monitoring"
CD-ROM. Install the software on the computer you are using.
• When you using the following OS, you must have administrator
authority to install EasyMP Monitor.
• Windows 2000
• Windows NT4.0
• Windows XP
• Windows Vista
• Windows 7
Software Supplied
You can find the following software on the "EPSON Projector Software
for Meeting & Monitoring" CD-ROM.
• EasyMP Network Projection
Software for sending computer screen images to a projector via a
network connection.
• EasyMP Monitor
Software that lists the current status of Epson projectors connected to
the network, and monitors and controls those projectors. You can
collectively manage multiple projectors by using EasyMP Monitor. For
details on using EasyMP Monitor, see the EasyMP Monitor Operation
Guide.
Check the system requirements for each software application from
"Software System Requirements" in the User's Guide.
Installing
Make sure you check the following points before starting installation.
• When you using the following OS, you must have administrator
authority to install EasyMP Network Projection.
• Windows 2000
• Windows 7
• Windows XP
• Windows Vista
• Make sure that you close all running applications before starting
installation.
• Consult the network administrator about the administration of the
network and computers or whether or not applications can be installed
on the computer.
q
• For EMP NS Connection users
The EasyMP Network Projection software that came on your new projector
software CD-ROM provides updated networking features and is
backward-compatible with existing networks running Epson projectors. To
use your new projector on the network, you must uninstall EMP NS
Connection and install EasyMP Network Projection software as described
in this manual.
• For EMP Monitor users
The Easy Management® EasyMP Monitor software that came on your new
projector software CD-ROM provides updated network monitoring
features. To monitor your new projector on the network, you must
uninstall EMP Monitor and install EasyMP Monitor. First save a copy of
your current setting information data file, EMPMonitor.dat, in a separate
folder. This will retain your current registered projector settings. Then
uninstall EMP Monitor and install EasyMP Monitor as described in the
EasyMP Monitor Operation Guide. After installation, replace the new
EMPMonitor.dat file with your saved copy.
Procedure
For Windows
Installing the Software
A Turn on your computer.
B Insert the "EPSON Projector Software for Meeting &
Monitoring" CD-ROM into the computer.
The installer starts automatically.
C Click "Easy Install".
To select software and install it individually, select Custom Install.
To change the language in which the software is displayed, click
Language.
D Check the applications to be installed, and then click
"Install".
E When the License Agreement screen is displayed, click "Yes".
F When the Add-Remove EPSON Virtual Display screen is
displayed, click "OK".
To use Multi-screen display you need to set up EPSON Virtual Display. If you do not want to set it up now, you can do so later.
s p.26
G Click "Exit" to complete the installation.
For Macintosh
EasyMP Monitor is not compatible with Macintosh computers.
A Turn on your computer.
B Insert the "EPSON Projector Software for Meeting &
Monitoring" CD-ROM into the computer.
9
C
D
q
Double-click the "ENPvx.xx_Installer" icon in the EPSON
window.
Installation starts.
Click "Exit" to complete the installation.
• When installation does not start automatically (Windows only)
Select Start - Run, and in the Run dialog box, type the letter for your
CD-ROM drive followed by :\EPsetup.exe and then click OK.
• Uninstalling
For Windows
Select Control Panel - Add-Remove Programs or Add or Remove
Programs and then remove EasyMP Network Projection.
For Macintosh
From Applications, delete the EasyMP Network Projection folder.
10
Connecting with EasyMP Network Projection
This section explains how to connect the computer and the projector via a network, and the procedure for projecting images from your computer's screen
with the projector.
EasyMP Network Projection Summary
EasyMP Network Projection Summary
You can make meetings and presentations by using the following
convenient functions.
11
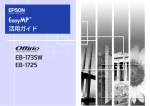
• Switching function
The presenters can take turns and project their own images without
changing cables.
EasyMP Network Projection needs to be installed on each computer to
use this function.
Main Functions of the EasyMP Network Projection
• Presentation Mode s p.22
This function can project a PowerPoint Slide Show running on a
computer. A black screen is projected when the Slide Show is not
playing.
• Multi-screen display s p.25
You can project different images from up to four projectors from one
computer, allowing you to project landscape images such as
spreadsheets as one continuous image.
• Distribution function
The screen being displayed by a remote computer can be
simultaneously displayed by up to four projectors on the same network.
Two Connection Modes
There are two methods of connecting a computer and the projector via a
network by using EasyMP Network Projection.
Advanced Connection Mode
Advanced Connection Mode is an infrastructure connection, and
connects to an existing network system.
When connecting to a network via Wired LAN, connect the projector to
the network hub with a commercially available LAN cable.
If you install the optional Wireless 802.11a/b/g Module in the projector,
you can connect to the network via a wireless LAN access point.
EasyMP Network Projection Summary
Quick Connection Mode (Only when the optional Wireless
802.11a/b/g Module is installed)
Quick Connection Mode only runs when you install the optional
Wireless 802.11a/b/g Module in the projector.
Quick Connection Mode temporarily assigns the projector's SSID to a
computer creating an ad hocg connection, and restores the computer's
network settings after disconnecting. s p.13
12
You need to perform steps 1 to 4 only the first time you connect.
1.
Install EasyMP Network Projection on the computer to be connected.
s p.8
2
Make sure your computer is connected to the network. s p.13
3.
To use "Quick Connection Mode": Install the optional Wireless
802.11a/b/g Module on the projector. (If it is already installed, go to
step 5.)
To use "Advanced Connection Mode": Enable the Wired or Wireless
LAN adapter in "Port Configurations".* See your computer's
documentation.
• You can easily connect to a computer and project images from the
computer without making network settings.
• This lets you connect easily without a connector cable, and you can
connect even if the projector and the computer are at remote locations.
Steps for connecting
Use the following steps to connect the projector to a computer and
project images using EasyMP Network Projection.
4.
Make network settings on the projector and put it into network
connection status. See your User’s Guide for more information.
5.
Start EasyMP Network Projection on the computer and connect with
the projector. s p.14
*
Select access point and the router settings if necessary.
Preparing to Connect
Preparing to Connect
Preparing the Computer
For Windows
Make network settings for the computer by using the utility software
supplied with the LAN adapter. For more information on the utility
software, see the User's Guide supplied with your LAN adapter or
computer.
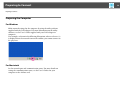
For example, as shown in the following illustration, when a red cross (^)
is displayed over the network icon on the taskbar, you cannot connect to
the projector.
For Macintosh
Set the network port and communication status. For more details on
setting the communication status, see the User’s Guides for your
computer or the AirPort card.
13
Connecting to a Projector on a Network and Projecting
Connecting to a Projector on a Network and Projecting
Operating the Projector
Before connecting, put the projector into connection standby status.
Make sure the projector network settings are complete, and the projector
is connected to network equipment such as a network hub via a
commercially available network cable.
14
Operating the Computer
In the following explanations, unless otherwise noted, Windows screen
shots are used. You see the same screens even when using Macintosh.
Procedure
A
Procedure
A Press the [t] button on the remote control to turn the power
on.
Start EasyMP Network Projection.
For Windows
Select Start - Programs (or All Programs) - EPSON Projector EasyMP Network Projection.
For Macintosh
Double-click the Applications folder of the hard drive volume in
which EasyMP Network Projection is installed, and then double-click the EasyMP Network Projection icon.
B Press the LAN button on the Remote Control.
The following LAN standby screen is displayed.
B
The Connection mode screen opens, select "Advanced
Connection Mode" or "Quick Connection Mode" (only
available when the optional Wireless 802.11a/b/g Module is
installed). Then click "OK".
The projector search results are displayed.
To always connect using the mode you selected, select Set the selected Connection Mode as the default mode for future connections. in the Connection mode screen.
Connecting to a Projector on a Network and Projecting
C Select the projector you want to connect to, and then click
"Connect".
You can select up to four projectors connected to the same network
and project the same images at the same time.
If the projector you want to connect to is not displayed in the search
results, click the Automatic search button. The search takes about
30 seconds.
For details on the connection screen, see "Using the Connection
Screen". s p.16
D When Projector keyword is set to "On" from the projector,
the keyword entry screen is displayed. Enter the keyword
displayed on the LAN standby screen, and then click "OK".
When the connection is complete, the computer screen is projected. The following EasyMP Network Projection toolbar is displayed
on the computer screen. You can use this toolbar to operate the
projector and make settings, and to disconnect the network connection. For details on using the toolbar, see "Using the Toolbar".
s p.18
q
When connecting from another computer, such as when changing
presenters, start EasyMP Network Projection from the computer you want
to connect. The computer that is currently connected is disconnected, and
the projector is then connected with the computer that is trying to connect
now.
15
Using the Connection Screen
16
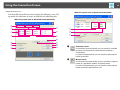
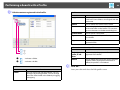
Using the Connection Screen
When the system starts in Quick Connection Mode
Start EasyMP Network Projection to display the following screen. The
operation of each button or item is described in the following table.
When the system starts in Advanced Connection Mode
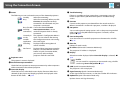
A
Automatic search
In Advanced Connection Mode, you can search for available
projectors on the network system that the computer is
connected to.
In Quick Connection Mode, you can search for the projector
based on the SSID.
B
Manual search
In Advanced Connection Mode, you can search for a projector
based on a specified IP address or Projector name.
In Quick Connection Mode, you can search for the projector
based on the SSID selected from a list.
Using the Connection Screen
C Status
17
G Troubleshooting
The following six icons indicate the status of the detected projectors.
Standby
Select for connecting.
Busy
Select for connecting. When you click
Connect, the computer currently
connected is disconnected and your
computer is connected.
If there is a problem and you cannot have a connection, press this
button to open the EasyMP Network Projection Troubleshooting
screen.
H Connect
Connect to the projector you selected from the search results list.
When a connection is made with a projector, a toolbar is displayed.
Busy (Disable Cannot be selected. Disable
interrupt
interrupt connection is set on
connection) another computer which is already
connected.
I Set options
Currently in
use by
another
application
The projector's Configuration Menu is
open. You can select it after closing
the Configuration menu and running
the search again.
J Save in the profile
Searching
Displayed while running Manual
search or Profile.
Not found.
Displayed when a projector cannot be
found as a result of Manual search or
Profile. In Quick Connection Mode,
you can only select multiple
projectors with the same SSID.
D Projector name
The projector's name is displayed.
E Disable interrupt connection
Check the box to prevent an interrupt connection by other computers
while connected to the selected projector.
F Use multi-display
Check the box to use the Multi-screen display function. When this is
selected, Display layout and Display properties are displayed at the
bottom of the screen. s p.25
You can make general setting options such as the processing method
when starting up EasyMP Network Projection. For details, see Set
options s p.42
Saves the results of a search for projectors on the network as a Profile.
s p.37
K Clear list
Deletes all search results.
L IP address (Advanced Connection Mode only)
The projector's IP address is displayed.
M Display
Select the number displayed (when Use multi-display is selected). s
p.32
N
Profile
You can search for a projector on the network using a Profile
saved using Save in the profile. s p.37
O SSID (Quick Connection Mode only)
The projector's SSID is displayed.
P Signal intensity (Quick Connection Mode only)
As the Signal intensity increases, so does the number of lit Indicators.
Q Update list (Quick Connection Mode only)
Updates Status and Signal intensity.
Using the Connection Screen
Using the Toolbar
The toolbar is displayed on the computer screen after EasyMP Network
Projection starts and a connection is made with the projector. You can
use this toolbar to operate and make settings for the projector.
18
Select target projector
Click to limit the projectors operated from the toolbar when
projecting from multiple projectors using the distribution
function or Multi-screen display. The indication below the
icon shows the projectors that can be controlled.
ALL indicates that all of the connected projectors can be
controlled.
For example, when "1, 3" is displayed, projectors No. 1 and
No. 3 can be controlled.
Click
to display the following screen.
A Select the projector to be controlled.
B Indicates the No. of an allocated projector. This No.
indicates the No. of the projector that you can control
from the toolbar.
C Indicates the status of the projector.
Stop
Stops projection while connected to the projector.
Using the Connection Screen
19
Show
Projector control
Releases Stop or Pause.
While the projector is connected to the network, the
projector's Shutter, Switch PC source and Switch video source
functions can be controlled from the toolbar.
Pause
Pauses projected images while connecting to the projector.
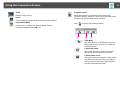
Presentation Mode
Click
to display the following toolbar.
Each time this is clicked, Presentation Mode switches
between enabled/disabled. s p.22
4 A/V Mute
The same function as the [Shutter] button on
the remote control. See your User’s Guide for
more information.
5 Switch PC source
The Source alternates between Computer,
BNC, DVI-D and LAN each time you click.
6 Switch video source
The Source alternates between S-Video, Video
and HDMI each time you click. The projector
will not switch to the S-Video input if there is
no cable connected to the port.
Using the Connection Screen
20
Screen Preview
Switch Toolbar display
Displays the multi-screen preview screen.
The toolbar display is switched as follows. The toolbar display
remains as is until switched again.
Click
to display a preview with the settings you have
made. Click the displays to enlarge each Screen Preview to
full-screen.
Full
Normal
Set options
Transmission performance during the transfer of computer
images can be adjusted. s p.42
Movie Sending Mode
Used to immediately play back a movie file.
Disconnect
Disconnects the connection to the projector.
Signal intensity
This is displayed when the connection is made in Quick
Connection Mode. As the Signal intensity increases, so does
the number of lit indicators.
Simple
21
EasyMP Network Projection Useful Functions
This chapter explains those functions that may be useful in a meeting or presentation, such as the function which allows you to send images to multiple
projectors from a single computer (Multi-Screen Display).
Projecting Only a PowerPoint Slide Show (Presentation Mode)
Projecting Only a PowerPoint Slide Show (Presentation Mode)
In Presentation Mode, the images are only displayed when performing a
PowerPoint Slide Show on a computer. When you stop Slide Show, the
projector displays a black screen. This is useful when you only want to
display the Slide Show.
In addition to PowerPoint, Keynote is compatible with Presentation
Mode for Macintosh.
Procedure
A If necessary, select the projector you want to control.
s p.18
B Click the
button on the toolbar.
Presentation Mode begins.
C Click the
q
button again to exit Presentation Mode.
When the [ ] button is pressed while projecting a PowerPoint slide show,
the next slide is displayed. Press the [ ] button to display the previous
slide.
22
Projecting Movies from a Computer (Movie Sending Mode)
Projecting Movies from a Computer (Movie Sending Mode)
In Movie Sending Mode, movie files can be sent directly to a projector.
As a result, a movie can be projected much more smoothly than when it
is being sent from an application running on a PC.
q
• Movie Sending Mode is valid for one projector only.
It is not possible to apply Movie Sending Mode to more than one projector.
• Depending on the communication method and the available reception, the
image may skip or stall.
Supported File Types
The file types supported by Movie Sending Mode are listed in the
following table.
File Type (Extension)
Video Codec
Recording Quality
.mpg
MPEG-2
Highest frame rate: 30 fps
WMV8
Maximum resolution:
720×576
.mpeg
.wmv
WMV9
Files to which DRM (Digital Rights Management) is applied cannot be
projected.
Playing Back a Movie
Procedure
A Click the
button on the toolbar.
The projector selection screen is displayed.
B
C
23
Select the projector you want to use to playback the movie
and click "OK".
The Movie Sending Mode screen appears.
Click "Select file".
Projecting Movies from a Computer (Movie Sending Mode)
D Select the movie file you want to play back and then click
24
Play
"Open".
Plays back the file.
Pause
Pauses play back.
Stop
Stops play back.
Back
Plays back from the beginning of the file that is playing.
Next
Plays back from the beginning of the next file.
Repeat
The Movie Sending Mode screen reappears. The selected files are
displayed in the Movie file list.
If you perform Select file again, the Movie file list changes after you
make your selection.
E Play and stop the movie files from the Movie Sending Mode
screen.
Play Back Head
Drag & Drop to the point in the file where you want to start
play back.
Repeatedly plays back the file list in order. When there are
multiple files in the list, it is not possible to repeatedly play
back only some of those files.
F
Click "Close" to end Movie Sending Mode.
Using Multi-Screen Display
25
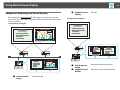
Using Multi-Screen Display
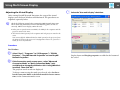
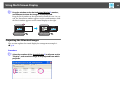
Multi-screen display mode allows you to project different images from multiple projectors that are connected to a single computer.
With Windows, multiple virtual displaygdrivers can be set in the computer, and each image can be projected by the projector. This function is not
available with Windows Vista or Windows 7 due to restrictions in the specifications.
For Macintosh, an external monitor must be connected to the computer to enable the function. While the following explanation refers to virtual display,
for Macintosh the operation relates to the screens displayed on the physically connected monitor.
A Actual monitor image
B Image of virtual display1
C Image of virtual display2
Using Multi-Screen Display
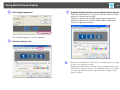
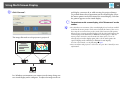
Example of Adjusting the Virtual Display
By arranging the virtual displayg allocation, you can project only the
image that you want to show or project different images from left to right
in a presentation.
Arrangement example 1
26
B Image of virtual
display
Arrangement example 2
A Actual monitor
image
B Image of virtual
display
A Actual monitor
image
PowerPoint file
Excel file
PowerPoint file presenter tools
Slide Show using a PowerPoint file
Using Multi-Screen Display
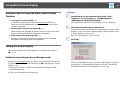
Procedure Before Using the Multi-screen Display
Function
27
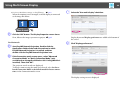
Procedure
A
1. Setting the Virtual Display s p.27
In a Windows environment, enable the virtual displayg driver as
necessary. And, for both Windows and Macintosh, set up the virtual
display arrangement.
2. Allocating the image to be projected s p.31
B
Open the file to be projected, and then move the screen to the virtual
display according to the actual projection arrangement.
3. Projecting the allocated images s p.32
Allocate a virtual display number to a projector that is connected
through the network, and then start projection.
C
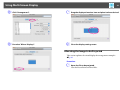
Start Windows on the computer, then select "Start" "Programs" (or "All Programs") - "EPSON Projector" "Add-Remove EPSON Virtual Display".
The Add-Remove EPSON Virtual Display screen is displayed.
Select the virtual display you want to use.
Up to four monitors can be added. In this example, a single virtual
display is to be used. When setting multiple virtual displays, select
as many displays as is necessary.
Any one of the displays can be selected.
Click "OK".
Setting the Virtual Display
This section explains the virtual display for arrangement example 1.
s p.26
Enable the virtual display driver (Windows only)
Enable the virtual displayg driver. Those users listed below do not have
to perform this operation and should skip to s "Adjusting the Virtual
Display" p.28.
• Those users who have enabled virtual displays installing EasyMP
Network Projection.
• Those users with Macintosh computers.
When you click OK, the drivers for the virtual display are enabled.
At this point, it is normal for the display to flicker. Wait for the
Add-Remove EPSON Virtual Display screen to close.
Using Multi-Screen Display
Adjusting the Virtual Display
28
C
Select the "Use multi-display" check box.
After starting EasyMP Network Projection, the setup of the virtual
displays varies between Windows and Macintosh. The procedures are
explained separately below.
q
Check the following points before starting EasyMP Network Projection
when connecting via Wireless LAN. If the following points are not set
correctly, Multi-screen display cannot be used.
• When you use Quick Connection Mode, the SSID for the computer and the
projector must be the same.
• The Wireless LAN system for the computer and each projector must be the
same.
You can modify the SSID and Wireless LAN system for the projector from
the Network menu in the projector's Configuration menu. See your User’s
Guide for more information.
Procedure
For Windows
A Select "Start" - "Programs" (or "All Programs") - "EPSON
Projector" - "EasyMP Network Projection" to start EasyMP
Network Projection.
B If the Connection mode screen opens, select "Advanced
Connection Mode" or "Quick Connection Mode" (only
available when the optional Wireless 802.11a/b/g Module is
installed). Then click "OK".
The projector search results are displayed.
To always connect using the mode you selected, select Set the selected Connection Mode as the default mode for future connections. in the Connection mode screen.
Display layout and Display properties are added at the bottom of
the screen.
Using Multi-Screen Display
D Click "Display properties".
29
F
Drag the displayed monitor icon and place it where desired.
Here, the actual monitor (1) is placed on the left, while the virtual
monitor (3) is placed on the right.
When the computer has multiple display output terminals, the
numbers assigned to the virtual terminals will be sequential to
those of the physical terminals.
The "Display Properties" screen is displayed.
E Click the "Settings" tab.
q
• When an external monitor is connected as a secondary monitor, the image
for that screen cannot be projected.
• Depending on the hardware, the number of the secondary monitor may be
other than "2". When the monitor icon is displayed on the screen, click the
icon and confirm that the monitor type shown under "Display" is other
than "secondary".
Using Multi-Screen Display
• For Screen Resolution settings, see the following.
30
s p.53
C
Select the "Use multi-display" check box.
When the monitor icon is arranged, a virtual display is connected
as the image like below.
1 3
G Click the "OK" button. The Display Properties screen closes.
Display layout and Display preferences are added at the bottom of
the screen.
Next, allocate the images you want to project. s p.31
For Macintosh
A Start EasyMP Network Projection. Double-click the
D
Click "Display preferences".
Applications folder of the hard drive volume in which
EasyMP Network Projection is installed, and then
double-click the EasyMP Network Projection icon.
B If the Connection mode screen opens, select "Advanced
Connection Mode" or "Quick Connection Mode" (only
available when the optional Wireless 802.11a/b/g Module is
installed). Then click "OK".
The projector search results are displayed.
To always connect using the mode you selected, select Set the selected Connection Mode as the default mode for future connections. in the Connection mode screen.
The display setting screen is displayed.
Using Multi-Screen Display
31
E Click "Arrangement".
G
Drag the displayed monitor icon and place it where desired.
F De-select "Mirror Displays".
H
Close the display setting screen.
Allocating the Image to be Projected
This section explains the virtual display for arrangement example 1.
s p.26
Procedure
A
Open the file to be projected.
Start the PowerPoint and Excel files.
Using Multi-Screen Display
B Drag the window to the desired virtual displayg monitor,
and allocate it where the image is to be projected.
Drag the Excel window to the right until it cannot be seen. As a result, the PowerPoint window appears on the actual monitor, while
the Excel window appears on the virtual display on the right.
Projecting the Allocated Images
This section explains the virtual display for arrangement example 1.
s p.26
Procedure
A Select the number of the virtual displayg to allocate on the
"Display", and set which image to be projected from which
projector.
32
Using Multi-Screen Display
33
B Click "Connect".
tual display, you must do so while viewing the projected image.
To perform mouse-based operations on the virtual display, move
the mouse pointer in the direction of the virtual display, such that
the pointer appears on the virtual display.
C
q
The image allocated to each projector is projected.
To terminate multi-screen display, click "Disconnect" on the
toolbar.
• In a Windows environment, if the virtual display driver has been enabled
such that the mouse pointer can be moved outside the limits of the screen,
there may be occasions when you lose track of the location of the pointer.
When you are not using a virtual display, clear the check mark against the
virtual display under Add-Remove EPSON Virtual Display, so that the
mouse pointer cannot be moved outside the limits of the screen. To
subsequently use multi-display again, place a check mark against the
required display under Add-Remove EPSON Virtual Display.
To clear a check mark, see the following. s p.27
• You can adjust each projector's color tone. See your User’s Guide for more
information.
In a Windows environment, you cannot view the image being sent
to a virtual display on the computer. To adjust the image on the vir-
34
Connecting to a Projector on a Different Sub-net
This chapter explains how to connect a computer to a projector on a different sub-net via a Wired LAN or a wireless LAN access point on an existing
network system.
Connecting to a Projector on a Different Subnet
Connecting to a Projector on a Different Subnet
By default, this application only searches for projectors on the same
subnet as the computer. Therefore, even if you perform a search for
projectors on the network, ones on a different subnet will not be found.
You can, however, identify and connect to a projector on a different
subnet as follows:
• In Advanced Connection Mode, specify either an IP address or
Projector Name and perform a search.
The IP Address can be input directly. Also, provided the Projector
name to be connected has been registered on the DNS server, you can
perform a search simply by inputting that Projector name. s p.36
• In Quick Connection Mode, click "Manual Search" on the EasyMP
Network Projection projector selection screen. You can specify the
SSID. When there are a lot of projectors you can narrow the search field
by using SSID.
• Performing a search based on a Profile
Once you have performed a search for a projector on a different subnet,
you can save the search as a Profile with an easy-to-remember name,
and then use that Profile whenever you subsequently want to search for
a projector on a different subnet. s p.37
q
If a search fails to find a projector, the most likely causes are as follows.
Proceed as appropriate, depending on the cause of the failure.
• For both Windows and Macintosh
If there is no wireless LAN signal or if the signal is weak, check whether
there is anything that could be interfering with the signal.
• When the optional Wireless 802.11a/b/g Module is installed in the
projector, and the Macintosh is connected to a Wireless LAN
Check whether AirPort is set to On. Or, check whether an appropriate
access point has been selected.
35
Searching by Specifying the IP Address and Projector name (For Advanced Connection Mode only)
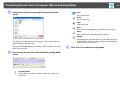
Searching by Specifying the IP Address and Projector name (For Advanced Connection Mode only)
In the following explanations, unless otherwise noted, Windows screen
shots are used.
You see a similar screen even when using Macintosh.
B
36
Enter the IP address or the Projector name for the projector
you want to connect to, and click "OK".
Procedure
A Click "Manual search" on the EasyMP Network Projection
projector selection screen.
The search results are displayed on the EasyMP Network Projection projector selection screen.
Provided the target projector has been identified, select that projector, and then click Connect to establish a connection.
When you will always be using that projector, save the search as a
Profile, so that you do not have to specify the relevant details every
time you perform a search. s p.37
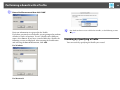
Performing a Search with a Profile
Performing a Search with a Profile
You can save a search for a frequently used projector as a Profile. A
Profile is a file containing all of the information pertaining to a given
projector, such as the Projector name, its IP address, and SSID. By
specifying the profile each time you perform a search, there is no need to
enter the IP Address or Projector name. For example, by creating a group
of Profiles for each place where a projector is setup and managing them
with folders, the target projector can be found quickly.
37
Making a Profile
Profiles are made by saving search results.
For details on how to edit a previously saved Profile, see the following
section. s p.39
Procedure
A
A
B
C
D
Building A
Building B
Building C
When the projector is displayed on the EasyMP Network
Projection projector selection screen, click "Save in the
profile".
E Floor 1
F Floor 2
G Floor 3
Building D
This section explains how to create and edit a Profile.
The Save in the profile screen is displayed.
Performing a Search with a Profile
38
B Enter a Profile name and then click "Add".
Projector information is registered in the Profile.
If you have previously saved a Profile, you are prompted to confirm
whether it can be overwritten. To save a Profile with a different
name, select Save as. If you have created a folder for a Profile, the
following screens are displayed. After entering the Profile name
and selecting the Save in destination, click Add.
For Windows
For Macintosh
q
For details on how to create a folder for a Profile, see the following section.
s p.39
Searching by Specifying a Profile
You can search by specifying the Profile you created.
Performing a Search with a Profile
Procedure
A Click "Profile" on the EasyMP Network Projection projector
selection screen.
If no Profile is registered, you cannot select Profile.
39
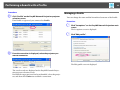
Managing a Profile
You can change the name and the hierarchical structure of the Profile.
Procedure
A
B
Click "Set options" on the EasyMP Network Projection main
screen.
The Set options screen is displayed.
Click "Edit profile".
B From the menu that is displayed, select the projector you
want to connect to.
The Edit profile screen is displayed.
The search results are displayed on the EasyMP Network Projection projector selection screen.
Provided the target projector has been identified, select that projector, and then click Connect to establish a connection.
Performing a Search with a Profile
40
C Edit the contents registered in the Profile.
Profile
Item
Function
Copy
You can copy the Profile. The copied Profile is
saved in the same folder as the original with the
same name.
Delete
You can delete the Profile and the folder.
Rename
You can display the Rename dialog box and
rename the folder or the Profile. You can enter
up to 32 characters in the Rename dialog box.
Create folder
You can create a new folder.
Export
You can Export a Profile, as well as Import and
use a Profile.
Import
Used when you want to read and use an
exported Profile.
Information on selected profile
Item
A
: Indicates a folder.
B
: Indicates a Profile.
D
Profile
Item
Profile
Function
You can display the registered Profile. You can
manage it by creating a folder. You can change
the order of the Profile or the folder by dragging
& dropping.
Function
Projector
name, IP address
You can display the projector information
registered in the Profile.
Delete
You can delete the information for the selected
projector. When all projector information is
deleted, the profile is also deleted.
Click "OK".
Saves your edits and closes the Edit profile screen.
41
Setting the EasyMP Network Projection Operation
You can make setting options such as the processing method when EasyMP Network Projection starts.
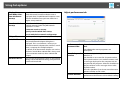
Using Set options
Using Set options
You can make setting options such as the processing method when
EasyMP Network Projection starts.
Import Set options from the EasyMP Network Projection main screen.
42
Setting Each Item
Set each item from the General settings tab and the Adjust performance
tab.
Procedure
A Click "Set options" on the EasyMP Network Projection main
General settings tab
screen.
Use full-screen
video transfer
The Set options screen is displayed.
B Set each of the items.
Confirm the details of the set items in the next step. When you have
made all the necessary settings, click OK to close the Set options
screen.
Windows only (excluding Windows Vista and
Windows 7)
Select this check box when you want to display
Windows Media Player in full screen. However,
clear this check box if the movie does not play back
smoothly.
Encrypt communi- Select to Encrypt and transmit data. Even if data is
intercepted, it cannot be decrypted.
cations
When using Quick Connection Mode, make sure
you always select this checkbox.
Using Set options
43
Display Connection Mode Selection window on
startup
Set whether or not the Quick Connection
Mode/Advanced Connection Mode screen is
displayed when EasyMP Network Projection starts.
Search method on
startup
Select from the following projector search
methods executed when EasyMP Network
Projection is started.
Adjust performance tab
Clear this checkbox once you have settled on a
regular startup method.
Automatic search on startup
Specify search method after startup
Search with the last network configuration
Edit profile
The Edit profile dialog box is displayed.
Switch LAN
Windows only
s p.39
The Switch Network Adapter dialog box is
displayed. This is used when it is necessary to
switch the network adapter to be used for a search
when a computer has multiple adapters.
By default, all of the network adapters are used to
perform a search. When a Wired LAN is always used
as the connection method, select a Wired LAN
adapter.
Restore Defaults
Performance adjustment slider
The performance can be set to Fast, Normal, and
Fine.
Set to Fast when movie projections are
interrupted.
Transfer layered
window
Windows only (excluding Windows Vista and
Windows 7)
Set whether or not to transfer a layered window.
The layered window is in use when contents such
as messages displayed on the computer are not
projected by the projector. Select this checkbox to
project contents such as messages that use the
layered window.
You can reset all adjustment values on the General
settings tab to their default settings, except for Edit
profile and Switch LAN.
Clear this checkbox if you do not want the mouse
pointer to flicker on the screen.
Restore Defaults
You can reset all adjustment values for the Adjust
performance tab functions to their default settings.
Using Set options
q
When you click
displayed.
on the toolbar, only the Adjust performance tab is
Audio Output tab
Because this projector does not support the audio sending function,
settings on the Audio Output tab are disabled.
44
45
Using the Network Projector Function to Project Images
This chapter explains how to project the images from a computer by using Network Projector which is a standard application provided with Windows
Vista and Windows 7.
Using Network Projector
Using Network Projector
"Network Projector" is a standard function in Windows Vista and
Windows 7. You can project images from the computer by detecting the
projector on the network through a function of the OS (without having
to install any special software).
46
B
C
q
Via a network you can project by connecting one computer to one
projector.
Compatible OS
Windows Vista: Home Premium/Business/Enterprise/Ultimate
Windows 7: Professional/Ultimate
This section provides an easy explanation of Network Projector.
Check that the projector and computer are connected to the network,
and carry out the following operations.
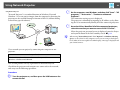
Procedure
A Turn the projector on, and then press the LAN button on the
remote control.
On the computer, start Windows, and then click "Start" - "All
programs" - "Accessories" - "Connect to a Network
Projector".
The connection setting screen is displayed.
The projector is identified by inputting its IP address, or by allowing the OS to automatically identify all of the connected projectors.
Once the OS has identified all of the connected projectors,
select the one that you want to use and click "Connect".
When the projector password screen is displayed, enter the Projector keyword shown in the LAN standby screen. s p.14
When using "Network Projector" from "Options" in Windows Meeting
Space, set the colors for the computer screen you are using to the highest
level (32bit). If it is not capable of a 32bit display, a message is displayed and
you cannot connect.
47
Using a Computer to Set Up, Monitor and Control Projectors
This chapter explains how to use a computer that is connected to the network to change projector settings and to control the projector.
Changing Settings Using a Web Browser (Web Control)
Changing Settings Using a Web Browser (Web Control)
You can set up and control the projector from a computer by using the
Web browser of a computer that is connected to the projector via a
network. Setup and control operations can be performed remotely if this
function is used. In addition, since you can use the computer's keyboard,
entering characters required for setup is easier.
Use Microsoft Internet Explorer 6.0 or later as the Web browser. If using
a Macintosh, you can also use Safari. If, however, you are using Safari
under Mac OS X 10.2.8, some of the Web control radio buttons may not
be displayed properly.
q
If Communication On is set as the Standby Mode setting in the projector’s
Extended menu, setup and control with a Web browser are possible, even
when the projector is in standby mode (when the power is off).
Displaying Web Control
Use the following procedure to display Web Control.
q
If your Web browser is set up to connect via a proxy server, Web Control
cannot be displayed. To use Web Control, you need to make network
connection settings with a device other than a proxy server.
Entering the IP address of the projector
Web Control can be opened by specifying the IP address of the projector
as follows when using Advanced Connection Mode.
Procedure
A Start the Web browser on the computer.
B
48
Enter the IP address of the projector in the address input box
of the Web browser, and press the [Enter] key on the
computer's keyboard.
Web Control is displayed.
When Web Control Password is set in the Network menu from the
projector's Configuration Menu, enter the Password.
Projector Setup
You can set items that are usually set in the projector's Configuration
Menu. The contents set are reflected in the Configuration Menu. There
are also items that can only be set in the Web browser.
Items in the Configuration menu that cannot be set by the
web browser
All items in the Configuration Menu can be set with the exception of the
following items.
• Signal Menu - DVI/HDMI Video Range
• Settings Menu - Keystone - Quick Corner
• Settings Menu - Pointer Shape
• Settings Menu - Test Pattern
• Settings Menu - User Button
• Extended Menu - registering User's Logo
• Extended Menu - Operation - BNC Sync Termination
• Extended Menu - Language
• Extended Menu - Operation - High Altitude Mode
• Extended Menu - Operation - Shutter Timer
Changing Settings Using a Web Browser (Web Control)
• Reset Menu - Reset All
Items that can only be set in the Web browser
The following items can only be set in a Web browser.
• SNMP Community Name
• Monitor Password
49
Using the Mail Notification Function to Report Problems
Using the Mail Notification Function to Report Problems
By setting the Mail Notification function from the projector's
Configuration Menu, notification messages will be sent to the preset
email addresses when a problem or warning occurs with a projector. This
will enable the operator to be notified of problems with projectors even at
locations away from the projectors. See your User’s Guide for more
information.
q
• Up to a maximum of three notification destinations (Addresses) can be
recorded, and notification messages can be sent to all three destinations at
once.
• If a projector develops a critical problem and suddenly stops working, it
may not be able to send a message notifying an operator of the problem.
• If Communication On is set as the Standby Mode setting in the projector’s
Extended menu, monitoring is possible even when the projector is in
standby mode (when the power is off).
50
Management Using SNMP
Management Using SNMP
By setting SNMP from the projector's Configuration Menu, notification
messages are sent to preset IP addresses when a problem or warning
occurs with a projector. This is useful when controlling projectors
collectively at a point distant from them. See your User’s Guide for more
information.
q
• SNMP should be managed by a network administrator or someone who is
familiar with the network.
• To use the SNMP function to monitor the projector, you need to install the
SNMP manager program on your computer.
• The managing function using SNMP cannot be used via Wireless LAN in
Quick Connection Mode.
• Up to two destination IP addresses can be saved.
51
52
Appendix
Connection Limitations
Connection Limitations
When projecting computer images while running EasyMP Network
Projection, the following restrictions apply.
53
Display Color
The number of colors for computer screens that can be projected.
Windows
Supported Resolutions
The following computer screen resolutions can be projected. You cannot
connect to a computer with a resolution greater than UXGAg.
• VGA g(640x480)
• SVGA g(800x600)*
• XGA g(1024x768)*
• SXGA g(1280x960)
• SXGA (1280x1024)*
• SXGA+ (1400x1050)*
• WXGA (1280x768)
• WXGA (1280x800)
• WXGA+ (1440x900)
• UXGA (1600x1200)
* Supported resolutions when multi-screen display function is on.
If a computer with a special screen size is used where the ratio of height
and width is not represented, a screen resolution closest to the width is
selected from the list of 10 above.
In this case, in wide screen the horizontal margins are projected, in
narrow screen the empty vertical margins are black.
Macintosh
16-bit color
About 32,000 colors (16-bit)
32-bit color
About 16.7 million colors (32-bit)
The operational guarantee for multi-screen display is 16-bit and 32-bit
color.
Number of Connections
You can connect up to four projectors to one computer and project
simultaneously.
You cannot connect multiple computers to one projector
simultaneously.
Others
• If the transmission speed of the Wireless LAN is low, the network
might be cut off unexpectedly.
• When videos are played back, they do not play back as smoothly as
when displayed on the computer.
• Applications that use part of DirectX functions may not be displayed
correctly. (Windows only)
• Cannot project full screen MS-DOS prompts. (Windows only)
• There are times when the image on the computer screen and the image
projected by the projector may not match exactly.
Connection Limitations
When Using Windows Vista and Windows 7
Note the following points when using EasyMP Network Projection with
a computer running Windows Vista and Windows 7.
54
• A few minutes after you connect a computer to the projector over a
network with EasyMP Network Projection, the following message is
displayed.
It is recommended that you select Keep the current color scheme, and
don't show this message again. This selection is enabled until the
computer is restarted.
Limitations when projecting from Windows Photo Gallery
Note the following two limitations when launching Windows Photo
Gallery when EasyMP Network Projection is running.
• Slide Shows are played back in simple mode when projecting from
Windows Photo Gallery.
Because the toolbar is not displayed, you cannot make changes while
playing a Theme (effects), regardless of the Windows Experience Index
rating.
Once simple mode has started, you cannot change modes while
Windows Photo Gallery is running even if you close EasyMP Network
Projection. Restart Windows Photo Gallery.
• You cannot play movies.
Limitations in Windows Aero
Note the following two limitations when the window design for your
computer is Windows Aero.
• The layered window is projected regardless of Transfer layered window
setting in Set options in EasyMP Network Projection.
For example, when the Transfer layered window setting for the EasyMP
Network Projection toolbar is disabled, it is not projected even if it is
displayed on the computer screen, however the toolbar is projected.
Limitations when projecting from Windows Media Center
You cannot project images in full screen display using Windows Media
Center. Switch to the window display mode to project the images.
Troubleshooting
Troubleshooting
If any of the following problems occur, refer to the pages given for each
problem.
Problems concerning network functions
"Cannot connect using EasyMP Network Projection" s p.56
"When a connection is made using EasyMP Network Projection, the
projected image remains as is, and a connection cannot be made from
another computer." s p.56
"The projector is not found when EasyMP Network Projection is
started." s p.56
"Cannot connect in Advanced Connection Mode or Wired LAN
connection" s p.58
"The Slide Show cannot be displayed on the desired display when the
multi-screen display function is being executed." s p.58
"Applications are no longer displayed from the computer screen when
the multi-screen display function is executed." s p.58
"The mouse cursor is not displayed on the computer screen." s p.59
"When connecting with EasyMP Network Projection the image is not
displayed or the image is slow to appear." s p.59
"When a connection is made using EasyMP Network Projection, a
PowerPoint Slide Show cannot be started." s p.59
"When a connection has been made using EasyMP Network Projection,
the screen will not be refreshed when using an Office
application." s p.60
"Error message when starting up EasyMP Network Projection" s p.60
"Network settings are not restored after cutting the connection to the
computer with EasyMP Network Projection." s p.61
Problems concerning monitoring and control
55
"Mail is not sent even if a problem
occurs in the projector." s p.62
Troubleshooting
56
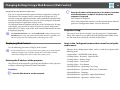
Problems Concerning Network Functions
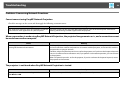
Cannot connect using EasyMP Network Projection
Check the message on the screen and then apply the following countermeasures.
Error Messages
The application version used is not supported. Install the
latest version of the application on your computer.
Remedy
Install the current version of EasyMP Network Projection from the EPSON Projector Software for
Meeting & Monitoring CD-ROM supplied with the projector.
When a connection is made using EasyMP Network Projection, the projected image remains as is, and a connection cannot
be made from another computer.
Check
Did the presenter leave the conference room without
cutting off the network connection?
Remedy
With EasyMP Network Projection, the connection with the computer that was previously connected
can be cut off when another computer tries to connect with the projector, and it connects with the
computer that is trying to connect.
Therefore, when a Projector keyword is not set for the projector, or if you know the Projector keyword,
you can cut off the current connection and, if you perform a connection operation, you can connect
to the projector.
When a Projector keyword is set for the projector, if you do not know the Projector keyword, restart
the projector and reconnect.
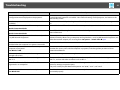
The projector is not found when EasyMP Network Projection is started.
Check
Is the optional Wireless 802.11a/b/g Module connected?
For Wireless LAN
Remedy
Check that the optional Wireless 802.11a/b/g Module is securely connected.
Troubleshooting
57
Check
Is the Network Configuration screen from the
Configuration menu displayed on the projector?
Remedy
When the Network Configuration screen is displayed on the projector, network connection for
EasyMP Network Projection is disabled. Close network settings on the projector, and return to the
LAN standby screen.
Are the computer's LAN card and the built-in LAN function Check that LAN is valid by checking Control Panel - System - Hardware in the device manager and so
available?
on.
Is the SSID the same as that of the access point?
Set an SSID that is different from that of the access point. See your User’s Guide for more information.
Quick Connection Mode
Is the DHCP function for Wired LAN turned On?
Quick Connection Mode
Turn Off the DHCP setting for Wired LAN from the Configuration Menu. See your User’s Guide for
more information.
Was the network adapter used selected correctly with
EasyMP Network Projection?
If the computer has multiple LAN environments, it cannot connect unless the network adapter is
selected correctly. When using a computer running Windows, start EasyMP Network Projection, and
select the network adapter you are using from Set options - Switch LAN. s p.42
For Wireless LAN connection, is the Wireless LAN setting
enabled when the computer is in power save mode?
Enable the Wireless LAN.
Are there any obstacles between the access point and the Sometimes interference prevents the projector from being found in a search. Check for any obstacles
between the access point and the computer or projector, and change their position to lessen
computer or projector?
potential interference.
For Wireless LAN
Is the computer's Wireless LAN electromagnetic wave
strength set to low?
Set the electromagnetic wave strength to maximum.
Does the Wireless LAN conform to 802.11g, 802.11b, or
802.11a?
The optional Wireless 802.11a/b/g Module is only compatible with standards 802.11g, 802.11b, and
802.11a, and not with other standards such as 802.11.
Is the firewall turned off, or has the firewall been
registered as an exception?
When you do not wish to turn off the firewall or register the firewall as an exception, make the
necessary settings to open the ports.
The ports used by EasyMP Network Projection are "3620", "3621", and "3629".
Is the network cable connected correctly?
For Wired LAN
Check that the network cable is connected correctly. Reconnect it if it is not connected or not
connected properly.
Troubleshooting
58
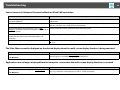
Cannot connect in Advanced Connection Mode or Wired LAN connection
Check
Remedy
Are the SSID settings for the computer, access point, and
projector different?
Set the computer, the access point, and the projector to the same SSID. See your User’s Guide for more
information.
Are the WEP keys set properly?
When selecting WEP from Security, set the access point, the computer, and the projector to the same
WEP key. See your User’s Guide for more information.
Set the projector to allow connections from the access point.
Are the connection denial functions, such as MAC
Addressg restrictions and port restrictions, set correctly at
the access point?
Are the IP address, the Subnet Mask, and the Gateway
Address for the access point and the projector set
correctly?
When not using a DHCP, adjust each setting. See your User’s Guide for more information.
Are the access point and the projector's subnet different? Select Manual search from EasyMP Network Projection, specify the IP address, and connect.
s p.36
The Slide Show cannot be displayed on the desired display when the multi-screen display function is being executed.
Check
Are you using PowerPoint 2002 or an earlier version?
For Windows
Remedy
To set and use two or more virtual displaysg, use PowerPoint 2003 or later, or limit the number of
virtual displays to one before displaying the Slide Show.
Applications are no longer displayed from the computer screen when the multi-screen display function is executed.
Check
Is another application running on the virtual displayg?
For Windows
Remedy
When EPSON Virtual Display is installed, another application sometimes runs on the virtual display. In
this case, set EPSON Virtual Display to "Off" in "Screen properties".
Troubleshooting
59
The mouse cursor is not displayed on the computer screen.
Check
Is EPSON Virtual Display installed?
For Windows
Remedy
The mouse cursor was moved onto the virtual displayg. When the virtual display checkbox is cleared
on the Add-Remove EPSON Virtual Display screen, the mouse pointer returns to the screen display
area.
When connecting with EasyMP Network Projection the image is not displayed or the image is slow to appear.
Check
Remedy
Did you try to play back movies with Media Player or try to Depending on the computer, the movie playback screen in Media Player may not be displayed, and
operate the screen saver preview?
the screen saver preview may not be displayed normally.
Is WEP encryption enabled, or are multiple projectors
connected?
The display speed decreases when WEP encryption is enabled or multiple projectors are connected.
Have you enabled DHCP?
When DHCP is set to On in Advanced Connection Mode, if an available DHCP server is not found, it
takes time to enter LAN standby status.
When a connection is made using EasyMP Network Projection, a PowerPoint Slide Show cannot be started.
Check
Remedy
Was EasyMP Network Projection started while PowerPoint When connecting with EasyMP Network Projection, make sure you close PowerPoint first. Slide Show
might not run if connecting while PowerPoint is running.
was running?
For Windows
Troubleshooting
60
When a connection has been made using EasyMP Network Projection, the screen will not be refreshed when using an
Office application.
Check
Is the mouse moved continuously?
Remedy
When you stop moving the mouse cursor, the screen is updated. If the screen does not update
quickly, stop moving the mouse cursor.
Error message when starting up EasyMP Network Projection
Error Messages
Connection to the projector failed.
Remedy
Try to connect again. If it still does not connect, check the network settings on the computer and the
network settings for the projector.
For details on the network settings to be made on the projector, see your User’s Guide.
The keyword does not match. Re-enter the keyword
displayed on the projector screen.
Check the Projector keyword displayed on the LAN standby screen, and enter the Projector keyword.
The selected projector is busy. Do you want to continue
the connection process?
You tried to connect to a projector that is connected to another computer.
When the Yes button is clicked, it connects to the projector. The connection between the projector
and the other computer is cut off.
When the No button is clicked, it does not connect to the projector.
The connection between the projector and the other computer is maintained.
EasyMP Network Projection initialization failed.
Restart EasyMP Network Projection. If the message still appears, uninstall and then reinstall EasyMP
Network Projection.
s p.8
Connection failed due to keyword mismatch.
When connecting to a projector for which a Projector keyword has been set, the wrong Projector
keyword is entered.
Check the Projector keyword that is displayed on the projector's connection standby screen. After the
connection is disconnected and then reconnected, enter the Projector keyword on the keyword entry
screen that is displayed.
s p.14
Troubleshooting
61
Error Messages
Network adapter information could not be obtained.
Remedy
Check the following:
Is a network adapter installed on the computer?
Is the driver for the network adapter used installed on the computer?
After checking, restart the computer and connect again.
If you still cannot connect, check the following:
Check the network settings on the computer and the network settings on the projector.
For details on the network settings to be made on the projector, see your User’s Guide.
One or more connected projectors do not support
resolutions greater than SXGA. Reduce the screen
resolution and reconnect.
There is a PowerLite 735c projector in the connection destination. Change the computer screen
resolution to SXGA (1280x1024) or less.
One or more projectors are not responding.
You cannot connect to multiple projectors simultaneously. Check the network settings on the
computer and the network settings on the projector.
For details on the network settings to be made on the projector, see your User’s Guide.
Enter the keyword displayed on the projector screen.
Check the Projector keyword displayed on the LAN standby screen, and enter the Projector keyword.
Cannot connect to the projector using this version of
EasyMP Network Connection. Install the latest version of
EasyMP Network Projection.
This message is displayed when connecting to the projector with EMP NS Connection. To connect,
install the current version of EasyMP Network Projection from the EPSON Projector Software for
Meeting & Monitoring CD-ROM supplied with the projector.
Network settings are not restored after cutting the connection to the computer with EasyMP Network Projection.
Check
Are you manually connecting to a Wireless LAN when the Try connecting to the Wireless LAN manually.
computer starts up?
Quick Connection Mode
Remedy
Troubleshooting
62
Problems Concerning Monitoring and Control
Mail is not sent even if a problem occurs in the projector.
Check
Is the optional Wireless 802.11a/b/g Module connected?
Remedy
Check that the optional Wireless 802.11a/b/g Module is securely connected.
For Wireless LAN
Is the network connect setting correct?
Check the projector's network settings. See your User’s Guide for more information.
Is Standby Mode set to Communication On?
To use the Mail Notification function when the projector is in standby, set Communication On in
Standby Mode from the Configuration Menu. See your User’s Guide for more information.
Did a fatal abnormality occur and the projector come to a When the projector comes to a sudden stop, mail cannot be sent.
sudden stop?
If, after checking the projector, the abnormal state continues, contact Epson. See your User’s Guide for
more information.
Is power being supplied to the projector?
Check that your electrical outlet or power source is functioning correctly.
Is the network cable connected correctly?
Check that the network cable is connected correctly. Reconnect it if it is not connected or not
connected properly.
For Wired LAN
Glossary
63
Glossary
This section briefly explains the difficult terms that are not explained in the text of this guide. For details, refer to other commercially available publications.
MAC Address
An abbreviation of Media Access Control. The MAC Address is an ID number unique to each network adapter. A unique number
is assigned to each network adapter, and data is transmitted between network adapters based on this identification.
SVGA
A type of video signal with a resolution of 800 (horizontal) ^ 600 (vertical) dots that is used by IBM PC/AT-compatible computers.
SXGA
A type of video signal with a resolution of 1,280 (horizontal) ^ 1,024 (vertical) dots that is used by IBM PC/AT-compatible
computers.
UXGA
A type of video signal with a resolution of 1,600 (horizontal) ^ 1,200 (vertical) dots that is used by IBM PC/AT-compatible
computers.
VGA
A type of video signal with a resolution of 640 (horizontal) ^ 480 (vertical) dots that is used by IBM PC/AT-compatible computers.
XGA
A type of video signal with a resolution of 1,024 (horizontal) ^ 768 (vertical) dots that is used by IBM PC/AT-compatible
computers.
Ad hoc
A method of Wireless LAN connection that communicates with wireless LAN clients without using an access point. It is not
possible to communicate with two or more devices simultaneously.
Virtual Display
The screen for one computer is output to multiple displays. A large virtual screen can be created by using multiple displays.
General Notes
General Notes
64
PowerLite is a registered trademark of Epson America, Inc.
Macintosh and Mac are trademarks of Apple Inc.
Copyright Notice
All rights reserved. No part of this publication may be reproduced, stored
in a retrieval system, or transmitted in any form or by any means,
electronic, mechanical, photocopying, recording, or otherwise, without
the prior written permission of Seiko Epson Corporation. No patent
liability is assumed with respect to the use of the information contained
herein. Neither is any liability assumed for damages resulting from the
use of the information contained herein.
Neither Seiko Epson Corporation nor its affiliates shall be liable to the
purchaser of this product or third parties for damages, losses, costs, or
expenses incurred by the purchaser or third parties as a result of:
accident, misuse, or abuse of this product or unauthorized modifications,
repairs, or alterations to this product, or (excluding the U.S.) failure to
strictly comply with Seiko Epson Corporation's operating and
maintenance instructions.
Seiko Epson Corporation shall not be liable against any damages or
problems arising from the use of any options or any consumable
products other than those designated as Original Epson Products or
Epson Approved Products by Seiko Epson Corporation.
The contents of this guide may be changed or updated without further
notice.
Illustrations in this guide and the actual projector may differ.
Trademarks
Epson and EasyMP are registered trademarks and Epson Exceed Your Vision
is a registered logomark of Seiko Epson Corporation.
Microsoft, Windows, Windows NT, Windows Vista, Windows 7, PowerPoint,
and Windows logo are trademarks or registered trademarks of Microsoft
Corporation in the United States and/or other countries.
This product includes RSA® BSAFE™ Cryptographic software from RSA
Security Inc. RSA is a registered trademark of RSA Security Inc. BSAFE RSA
Security Inc. is a registered trade mark in the United States and other
countries.
This product includes NetNucleus® WPA Cryptographic software from
TOSHIBA INFORMATION SYSTEMS CORPORATION. NetNucleus is a
registered trademark of TOSHIBA INFORMATION SYSTEMS CORPORATION
in Japan.
WPA™, WPA2™ and Wi-Fi Protected Setup™ are registered trademarks of
Wi-Fi Alliance.
Other product names used herein are also for identification purposes only
and may be trademarks of their respective owners. Epson disclaims any and
all rights in those marks.
Software Copyright:
This product uses free software as well as software to which this company
holds the rights.
The following is information on the free software used by this product.
General Notes
1. LGPL
(1)
This company uses free software for this product under the terms of
the GNU LESSER General Public License Version 2, June 1991
(henceforth "LGPL") or later versions.
You can see the full text of the LGPL on the following Web sites.
[LGPL] http://www.gnu.org/licenses/lgpl.html
This company, under the terms of the LGPL, discloses the source code
for the free software used in this product based on the LGPL. Contact
the support personnel as provided in the Epson Projector Contact list
to reproduce, modify, and/or distribute the free software concerned.
Please follow the conditions of the LGPL when reproducing,
modifying, and/or distributing the free software concerned. Also, the
free software concerned is offered "as is" with no guarantee or
warranty what so ever. The term guarantee includes, but is not
limited to, appropriate commercialization, business potential,
purpose of use, and does not infringe on third person rights
(including, but not limited to, patent rights, copyrights, and trade
secrets).
(2)
Furthermore, as stated in (1), there is no guarantee for free software
that is included in this product to which the LGPL applies because of
the characteristics of the free software that has already used in this
product; any problems in this product (including problems that
originate with the free software concerned) do not influence the
conditions of the guarantee (written guarantee) issued by this
company.
(3)
Under the terms of the LGPL, the source code as well as authorship
for the free software used in this product is disclosed as stated in (1).
2. Other free software
As well as the free software used under the terms of the LGPL, this
company also uses the following free software for this product.
65
Hereafter, each author, the conditions, and so on are described in the
original. Furthermore, there is no guarantee for free software because of
the characteristics of the free software that has already been used in this
product; any problems in this product (including problems that originate
with the free software concerned) do not influence the conditions of the
guarantee (written guarantee) issued by this company.
(1)
libpng
CopyrightZ 1998-2004 Glenn Randers-Pehrson
CopyrightZ 1996-1997 Andreas Dilger
CopyrightZ 1995-1996 Guy Eric Schalnat, Group 42, Inc.
(2)
zlib
CopyrightZ 1995-2003 Jean-loup Gailly and Mark Adler
ZSEIKO EPSON CORPORATION 2009. All rights reserved.
General Notes
66
GNU LESSER GENERAL PUBLIC LICENSE
Version 2.1, February 1999
Copyright© 1991, 1999 Free Software Foundation, Inc. 51 Franklin Street,
Fifth Floor, Boston, MA 02110-1301 USA Everyone is permitted to copy and
distribute verbatim copies of this license document, but changing it is not
allowed.
[This is the first released version of the Lesser GPL. It also counts as the
successor of the GNU Library Public License, version 2, hence the version
number 2.1.]
Preamble
The licenses for most software are designed to take away your freedom to
share and change it. By contrast, the GNU General Public Licenses are
intended to guarantee your freedom to share and change free software--to
make sure the software is free for all its users.
This license, the Lesser General Public License, applies to some specially
designated software packages--typically libraries--of the Free Software
Foundation and other authors who decide to use it. You can use it too, but
we suggest you first think carefully about whether this license or the
ordinary General Public License is the better strategy to use in any
particular case, based on the explanations below.
When we speak of free software, we are referring to freedom of use, not
price. Our General Public Licenses are designed to make sure that you have
the freedom to distribute copies of free software (and charge for this service
if you wish); that you receive source code or can get it if you want it; that you
can change the software and use pieces of it in new free programs; and that
you are informed that you can do these things.
To protect your rights, we need to make restrictions that forbid distributors
to deny you these rights or to ask you to surrender these rights. These
restrictions translate to certain responsibilities for you if you distribute
copies of the library or if you modify it.
For example, if you distribute copies of the library, whether gratis or for a
fee, you must give the recipients all the rights that we gave you. You must
make sure that they, too, receive or can get the source code. If you link other
code with the library, you must provide complete object files to the
recipients, so that they can relink them with the library after making
changes to the library and recompiling it. And you must show them these
terms so they know their rights.
We protect your rights with a two-step method: (1) we copyright the library,
and (2) we offer you this license, which gives you legal permission to copy,
distribute and/or modify the library.
To protect each distributor, we want to make it very clear that there is no
warranty for the free library. Also, if the library is modified by someone else
and passed on, the recipients should know that what they have is not the
original version, so that the original author's reputation will not be affected
by problems that might be introduced by others.
Finally, software patents pose a constant threat to the existence of any free
program. We wish to make sure that a company cannot effectively restrict
the users of a free program by obtaining a restrictive license from a patent
holder. Therefore, we insist that any patent license obtained for a version of
the library must be consistent with the full freedom of use specified in this
license.
Most GNU software, including some libraries, is covered by the ordinary
GNU General Public License. This license, the GNU Lesser General Public
License, applies to certain designated libraries, and is quite different from
the ordinary General Public License. We use this license for certain libraries
in order to permit linking those libraries into non-free programs.
When a program is linked with a library, whether statically or using a shared
library, the combination of the two is legally speaking a combined work, a
derivative of the original library. The ordinary General Public License
therefore permits such linking only if the entire combination fits its criteria
of freedom. The Lesser General Public License permits more lax criteria for
linking other code with the library.
General Notes
We call this license the "Lesser" General Public License because it does Less
to protect the user's freedom than the ordinary General Public License. It
also provides other free software developers Less of an advantage over
competing non-free programs. These disadvantages are the reason we use
the ordinary General Public License for many libraries. However, the Lesser
license provides advantages in certain special circumstances.
For example, on rare occasions, there may be a special need to encourage
the widest possible use of a certain library, so that it becomes a de-facto
standard. To achieve this, non-free programs must be allowed to use the
library. A more frequent case is that a free library does the same job as
widely used non-free libraries. In this case, there is little to gain by limiting
the free library to free software only, so we use the Lesser General Public
License.
In other cases, permission to use a particular library in non-free programs
enables a greater number of people to use a large body of free software. For
example, permission to use the GNU C Library in non-free programs enables
many more people to use the whole GNU operating system, as well as its
variant, the GNU/Linux operating system.
Although the Lesser General Public License is Less protective of the users'
freedom, it does ensure that the user of a program that is linked with the
Library has the freedom and the wherewithal to run that program using a
modified version of the Library.
The precise terms and conditions for copying, distribution and modification
follow. Pay close attention to the difference between a "work based on the
library" and a "work that uses the library". The former contains code derived
from the library, whereas the latter must be combined with the library in
order to run.
67
General Notes
GNU LESSER GENERAL PUBLIC LICENSE TERMS AND CONDITIONS FOR
COPYING, DISTRIBUTION AND MODIFICATION
0.
68
1.
This License Agreement applies to any software library or other
program which contains a notice placed by the copyright holder or
other authorized party saying it may be distributed under the terms of
this Lesser General Public License (also called "this License"). Each
licensee is addressed as "you".
A "library" means a collection of software functions and/or data
prepared so as to be conveniently linked with application programs
(which use some of those functions and data) to form executables.
The "Library", below, refers to any such software library or work which
has been distributed under these terms. A "work based on the Library"
means either the Library or any derivative work under copyright law:
that is to say, a work containing the Library or a portion of it, either
verbatim or with modifications and/or translated straightforwardly
into another language. (Hereinafter, translation is included without
limitation in the term "modification".)
"Source code" for a work means the preferred form of the work for
making modifications to it. For a library, complete source code means
all the source code for all modules it contains, plus any associated
interface definition files, plus the scripts used to control compilation
and installation of the library.
Activities other than copying, distribution and modification are not
covered by this License; they are outside its scope. The act of running
a program using the Library is not restricted, and output from such a
program is covered only if its contents constitute a work based on the
Library (independent of the use of the Library in a tool for writing it).
Whether that is true depends on what the Library does and what the
program that uses the Library does.
You may copy and distribute verbatim copies of the Library's complete
source code as you receive it, in any medium, provided that you
conspicuously and appropriately publish on each copy an appropriate
copyright notice and disclaimer of warranty; keep intact all the notices
that refer to this License and to the absence of any warranty; and
distribute a copy of this License along with the Library.
You may charge a fee for the physical act of transferring a copy, and
you may at your option offer warranty protection in exchange for a fee.
2.
You may modify your copy or copies of the Library or any portion of it,
thus forming a work based on the Library, and copy and distribute
such modifications or work under the terms of Section 1 above,
provided that you also meet all of these conditions:
a)
The modified work must itself be a software library.
b)
You must cause the files modified to carry prominent notices
stating that you changed the files and the date of any change.
c)
You must cause the whole of the work to be licensed at no charge
to all third parties under the terms of this License.
d)
If a facility in the modified Library refers to a function or a table of
data to be supplied by an application program that uses the
facility, other than as an argument passed when the facility is
invoked, then you must make a good faith effort to ensure that, in
the event an application does not supply such function or table,
the facility still operates, and performs whatever part of its
purpose remains meaningful.
(For example, a function in a library to compute square roots has a
purpose that is entirely well-defined independent of the
application. Therefore, Subsection 2d requires that any
application-supplied function or table used by this function must
be optional: if the application does not supply it, the square root
function must still compute square roots.)
General Notes
These requirements apply to the modified work as a whole. If
identifiable sections of that work are not derived from the Library, and
can be reasonably considered independent and separate works in
themselves, then this License, and its terms, do not apply to those
sections when you distribute them as separate works. But when you
distribute the same sections as part of a whole which is a work based
on the Library, the distribution of the whole must be on the terms of
this License, whose permissions for other licensees extend to the
entire whole, and thus to each and every part regardless of who wrote
it.
Thus, it is not the intent of this section to claim rights or contest your
rights to work written entirely by you; rather, the intent is to exercise
the right to control the distribution of derivative or collective works
based on the Library.
In addition, mere aggregation of another work not based on the
Library with the Library (or with a work based on the Library) on a
volume of a storage or distribution medium does not bring the other
work under the scope of this License.
3.
You may opt to apply the terms of the ordinary GNU General Public
License instead of this License to a given copy of the Library. To do this,
you must alter all the notices that refer to this License, so that they
refer to the ordinary GNU General Public License, version 2, instead of
to this License. (If a newer version than version 2 of the ordinary GNU
General Public License has appeared, then you can specify that version
instead if you wish.) Do not make any other change in these notices.
Once this change is made in a given copy, it is irreversible for that copy,
so the ordinary GNU General Public License applies to all subsequent
copies and derivative works made from that copy.
This option is useful when you wish to copy part of the code of the
Library into a program that is not a library.
69
4.
You may copy and distribute the Library (or a portion or derivative of it,
under Section 2) in object code or executable form under the terms of
Sections 1 and 2 above provided that you accompany it with the
complete corresponding machine-readable source code, which must
be distributed under the terms of Sections 1 and 2 above on a medium
customarily used for software interchange.
If distribution of object code is made by offering access to copy from a
designated place, then offering equivalent access to copy the source
code from the same place satisfies the requirement to distribute the
source code, even though third parties are not compelled to copy the
source along with the object code.
5.
A program that contains no derivative of any portion of the Library, but
is designed to work with the Library by being compiled or linked with
it, is called a "work that uses the Library". Such a work, in isolation, is
not a derivative work of the Library, and therefore falls outside the
scope of this License.
However, linking a "work that uses the Library" with the Library creates
an executable that is a derivative of the Library (because it contains
portions of the Library), rather than a "work that uses the library". The
executable is therefore covered by this License. Section 6 states terms
for distribution of such executables.
When a "work that uses the Library" uses material from a header file
that is part of the Library, the object code for the work may be a
derivative work of the Library even though the source code is not.
Whether this is true is especially significant if the work can be linked
without the Library, or if the work is itself a library. The threshold for
this to be true is not precisely defined by law.
If such an object file uses only numerical parameters, data structure
layouts and accessors, and small macros and small inline functions (ten
lines or less in length), then the use of the object file is unrestricted,
regardless of whether it is legally a derivative work. (Executables
containing this object code plus portions of the Library will still fall
under Section 6.)
General Notes
6.
70
Otherwise, if the work is a derivative of the Library, you may distribute
the object code for the work under the terms of Section 6. Any
executables containing that work also fall under Section 6, whether or
not they are linked directly with the Library itself.
c)
Accompany the work with a written offer, valid for at least three
years, to give the same user the materials specified in Subsection
6a, above, for a charge no more than the cost of performing this
distribution.
As an exception to the Sections above, you may also combine or link a
"work that uses the Library" with the Library to produce a work
containing portions of the Library, and distribute that work under
terms of your choice, provided that the terms permit modification of
the work for the customer's own use and reverse engineering for
debugging such modifications.
d)
If distribution of the work is made by offering access to copy from
a designated place, offer equivalent access to copy the above
specified materials from the same place.
e)
Verify that the user has already received a copy of these materials
or that you have already sent this user a copy.
For an executable, the required form of the "work that uses the Library"
must include any data and utility programs needed for reproducing
the executable from it. However, as a special exception, the materials
to be distributed need not include anything that is normally
distributed (in either source or binary form) with the major
components (compiler, kernel, and so on) of the operating system on
which the executable runs, unless that component itself accompanies
the executable.
You must give prominent notice with each copy of the work that the
Library is used in it and that the Library and its use are covered by this
License. You must supply a copy of this License. If the work during
execution displays copyright notices, you must include the copyright
notice for the Library among them, as well as a reference directing the
user to the copy of this License. Also, you must do one of these things:
a)
b)
Accompany the work with the complete corresponding
machine-readable source code for the Library including whatever
changes were used in the work (which must be distributed under
Sections 1 and 2 above); and, if the work is an executable linked
with the Library, with the complete machine-readable "work that
uses the Library", as object code and/or source code, so that the
user can modify the Library and then relink to produce a modified
executable containing the modified Library. (It is understood that
the user who changes the contents of definitions files in the
Library will not necessarily be able to recompile the application to
use the modified definitions.)
Use a suitable shared library mechanism for linking with the
Library. A suitable mechanism is one that (1) uses at run time a
copy of the library already present on the user's computer system,
rather than copying library functions into the executable, and (2)
will operate properly with a modified version of the library, if the
user installs one, as long as the modified version is
interface-compatible with the version that the work was made
with.
It may happen that this requirement contradicts the license
restrictions of other proprietary libraries that do not normally
accompany the operating system. Such a contradiction means you
cannot use both them and the Library together in an executable that
you distribute.
7.
You may place library facilities that are a work based on the Library
side-by-side in a single library together with other library facilities not
covered by this License, and distribute such a combined library,
provided that the separate distribution of the work based on the
Library and of the other library facilities is otherwise permitted, and
provided that you do these two things:
a)
Accompany the combined library with a copy of the same work
based on the Library, uncombined with any other library facilities.
This must be distributed under the terms of the Sections above.
b)
Give prominent notice with the combined library of the fact that
part of it is a work based on the Library, and explaining where to
find the accompanying uncombined form of the same work.
General Notes
8.
9.
You may not copy, modify, sublicense, link with, or distribute the
Library except as expressly provided under this License. Any attempt
otherwise to copy, modify, sublicense, link with, or distribute the
Library is void, and will automatically terminate your rights under this
License. However, parties who have received copies, or rights, from
you under this License will not have their licenses terminated so long
as such parties remain in full compliance.
You are not required to accept this License, since you have not signed
it. However, nothing else grants you permission to modify or distribute
the Library or its derivative works. These actions are prohibited by law
if you do not accept this License. Therefore, by modifying or
distributing the Library (or any work based on the Library), you
indicate your acceptance of this License to do so, and all its terms and
conditions for copying, distributing or modifying the Library or works
based on it.
71
If any portion of this section is held invalid or unenforceable under any
particular circumstance, the balance of the section is intended to
apply, and the section as a whole is intended to apply in other
circumstances.
It is not the purpose of this section to induce you to infringe any
patents or other property right claims or to contest validity of any such
claims; this section has the sole purpose of protecting the integrity of
the free software distribution system which is implemented by public
license practices. Many people have made generous contributions to
the wide range of software distributed through that system in reliance
on consistent application of that system; it is up to the author/donor to
decide if he or she is willing to distribute software through any other
system and a licensee cannot impose that choice.
This section is intended to make thoroughly clear what is believed to
be a consequence of the rest of this License.
10. Each time you redistribute the Library (or any work based on the
Library), the recipient automatically receives a license from the original
licensor to copy, distribute, link with or modify the Library subject to
these terms and conditions. You may not impose any further
restrictions on the recipients' exercise of the rights granted herein. You
are not responsible for enforcing compliance by third parties with this
License.
12. If the distribution and/or use of the Library is restricted in certain
countries either by patents or by copyrighted interfaces, the original
copyright holder who places the Library under this License may add an
explicit geographical distribution limitation excluding those countries,
so that distribution is permitted only in or among countries not thus
excluded. In such case, this License incorporates the limitation as if
written in the body of this License.
11. If, as a consequence of a court judgment or allegation of patent
infringement or for any other reason (not limited to patent issues),
conditions are imposed on you (whether by court order, agreement or
otherwise) that contradict the conditions of this License, they do not
excuse you from the conditions of this License. If you cannot distribute
so as to satisfy simultaneously your obligations under this License and
any other pertinent obligations, then as a consequence you may not
distribute the Library at all. For example, if a patent license would not
permit royalty-free redistribution of the Library by all those who
receive copies directly or indirectly through you, then the only way
you could satisfy both it and this License would be to refrain entirely
from distribution of the Library.
13. The Free Software Foundation may publish revised and/or new
versions of the Lesser General Public License from time to time. Such
new versions will be similar in spirit to the present version, but may
differ in detail to address new problems or concerns.
Each version is given a distinguishing version number. If the Library
specifies a version number of this License which applies to it and "any
later version", you have the option of following the terms and
conditions either of that version or of any later version published by
the Free Software Foundation. If the Library does not specify a license
version number, you may choose any version ever published by the
Free Software Foundation.
General Notes
72
14. If you wish to incorporate parts of the Library into other free programs
whose distribution conditions are incompatible with these, write to
the author to ask for permission. For software which is copyrighted by
the Free Software Foundation, write to the Free Software Foundation;
we sometimes make exceptions for this. Our decision will be guided by
the two goals of preserving the free status of all derivatives of our free
software and of promoting the sharing and reuse of software
generally.
NO WARRANTY
15. BECAUSE THE LIBRARY IS LICENSED FREE OF CHARGE, THERE IS NO
WARRANTY FOR THE LIBRARY, TO THE EXTENT PERMITTED BY
APPLICABLE LAW. EXCEPT WHEN OTHERWISE STATED IN WRITING THE
COPYRIGHT HOLDERS AND/OR OTHER PARTIES PROVIDE THE LIBRARY
"AS IS" WITHOUT WARRANTY OF ANY KIND, EITHER EXPRESSED OR
IMPLIED, INCLUDING, BUT NOT LIMITED TO, THE IMPLIED WARRANTIES
OF MERCHANTABILITY AND FITNESS FOR A PARTICULAR PURPOSE.
THE ENTIRE RISK AS TO THE QUALITY AND PERFORMANCE OF THE
LIBRARY IS WITH YOU. SHOULD THE LIBRARY PROVE DEFECTIVE, YOU
ASSUME THE COST OF ALL NECESSARY SERVICING, REPAIR OR
CORRECTION.
16. IN NO EVENT UNLESS REQUIRED BY APPLICABLE LAW OR AGREED TO
IN WRITING WILL ANY COPYRIGHT HOLDER, OR ANY OTHER PARTY
WHO MAY MODIFY AND/OR REDISTRIBUTE THE LIBRARY AS
PERMITTED ABOVE, BE LIABLE TO YOU FOR DAMAGES, INCLUDING
ANY GENERAL, SPECIAL, INCIDENTAL OR CONSEQUENTIAL DAMAGES
ARISING OUT OF THE USE OR INABILITY TO USE THE LIBRARY
(INCLUDING BUT NOT LIMITED TO LOSS OF DATA OR DATA BEING
RENDERED INACCURATE OR LOSSES SUSTAINED BY YOU OR THIRD
PARTIES OR A FAILURE OF THE LIBRARY TO OPERATE WITH ANY OTHER
SOFTWARE), EVEN IF SUCH HOLDER OR OTHER PARTY HAS BEEN
ADVISED OF THE POSSIBILITY OF SUCH DAMAGES.
How to Apply These Terms to Your New Libraries
If you develop a new library, and you want it to be of the greatest possible
use to the public, we recommend making it free software that everyone can
redistribute and change. You can do so by permitting redistribution under
these terms (or, alternatively, under the terms of the ordinary General
Public License).
To apply these terms, attach the following notices to the library. It is safest
to attach them to the start of each source file to most effectively convey the
exclusion of warranty; and each file should have at least the "copyright" line
and a pointer to where the full notice is found.
<one line to give the library's name and a brief idea of what it does.>
Copyright© <year> <name of author>
This library is free software; you can redistribute it and/or modify it
under the terms of the GNU Lesser General Public License as published
by the Free Software Foundation; either version 2.1 of the License, or
(at your option) any later version.
This library is distributed in the hope that it will be useful, but
WITHOUT ANY WARRANTY; without even the implied warranty of
MERCHANTABILITY or FITNESS FOR A PARTICULAR PURPOSE. See the
GNU Lesser General Public License for more details.
You should have received a copy of the GNU Lesser General Public
License along with this library; if not, write to the Free Software
Foundation, Inc., 51 Franklin Street, Fifth Floor, Boston, MA 02110-1301
USA
Also add information on how to contact you by electronic and paper mail.
You should also get your employer (if you work as a programmer) or your
school, if any, to sign a "copyright disclaimer" for the library, if necessary.
Here is a sample; alter the names:
Yoyodyne, Inc., hereby disclaims all copyright interest in the library
`Frob' (a library for tweaking knobs) written by James Random Hacker.
<signature of Ty Coon>, 1 April 1990 Ty Coon, President of Vice
END OF TERMS AND CONDITIONS
That's all there is to it!
General Notes
For embedded multimedia software:
This product contains embedded multimedia software licensed from
Ingenient Technologies, Inc. (http://www.ingenient.com).
Copyright© 2000-2007 Ingenient Technologies, Inc. All rights reserved.
For MPEG-4 ASP:
With respect to a Licensee offering MPEG-4 Video Decoders and/or
Encoders the following notice shall be given: THIS PRODUCT IS
LICENSED UNDER THE MPEG-4 VISUAL PATENT PORTFOLIO
LICENSE FOR THE PERSONAL AND NON-COMMERCIAL USE OF
A CONSUMER FOR (i) ENCODING VIDEO IN COMPLIANCE
WITH THE MPEG-4 VISUAL STANDARD ("MPEG-4 VIDEO")
AND/OR (ii) DECODING MPEG-4 VIDEO THAT WAS ENCODED
BY A CONSUMER ENGAGED IN A PERSONAL AND
NON-COMMERCIAL ACTIVITY AND/OR WAS OBTAINED FROM
A VIDEO PROVIDER LICENSED BY MPEG LA TO PROVIDE
MPEG-4 VIDEO. NO LICENSE IS GRANTED OR SHALL BE IMPLIED
FOR ANY OTHER USE. ADDITIONAL INFORMATION
INCLUDING THAT RELATING TO PROMOTIONAL, INTERNAL
AND COMMERCIAL USES AND LICENSING MAY BE OBTAINED
FROM MPEG LA,LLC. SEE HTTP://WWW.MPEGLA.COM.
For MPEG-4 AVC:
THIS PRODUCT IS LICENSED UNDER THE AVC PATENT
PORTFOLIO LICENSE FOR THE PERSONAL AND
NONCOMMERCIAL USE OF A CONSUMER TO (i) ENCODE VIDEO
IN COMPLIANCE WITH THE AVC STANDARD ("AVC VIDEO")
AND/OR (ii) DECODE AVC VIDEO THAT WAS ENCODED BY A
CONSUMER ENGAGED IN A PERSONAL AND
NON-COMMERCIAL ACTIVITY AND/OR WAS OBTAINED FROM
A VIDEO PROVIDER LICENSED TO PROVIDE AVC VIDEO. NO
LICENSE IS GRANTED OR SHALL BE IMPLIED FOR ANY OTHER
USE. ADDITIONAL INFORMATION MAY BE OBTAINED FROM
MPEG LA, L.L.C. SEE HTTP://WWW.MPEGLA.COM
73
For WMV/WMA (Microsoft):
This product is protected by certain intellectual property rights of
Microsoft.
Use or distribution of such technology outside of this product is
prohibited without a license from Microsoft.
CPD-27726R1