1
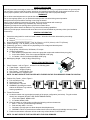
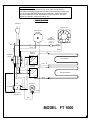
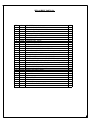
FASTRAC™ HORIZONTAL CONVEYOR TOASTER OWNERS/SERVICE MANUAL ! WARNING Improper installation, operation, service, or maintenance can cause property damage and/or result in personal injury. Read this manual thoroughly before installing, operating, or servicing this equipment. TABLE OF CONTENTS General Information............................................................................................................... page 2 Installation ............................................................................................................................. page 2 Operation............................................................................................................................... page 3 Cleaning ................................................................................................................................ page 3 Troubleshooting..................................................................................................................... page 4 Wiring Diagram...................................................................................................................... page 5 Replacement Parts List ......................................................................................................... page 6 Exploded View....................................................................................................................... page 7 Warranty Information............................................................................................................. page 8 APW Wyott Foodservice Equipment Company 729 Third Avenue ∙ Dallas, TX 75226 (214) 421-7366 ∙ FAX (214) 565-0976 P/N 67192 1 SAFETY PRECAUTIONS APW Wyott toasters are designed, built, and sold for commercial use. If they are positioned where the general public can use them, make sure that all cautions, warnings, and operating instructions are clearly posted near each unit to insure proper operation, and to reduce the chance of personal injury and/or equipment damage. WARNINGS Do not allow untrained personnel to operate the toaster. Do not use toppings (butter, etc.) on product because product is inverted during normal operation. Always disconnect power before cleaning or servicing the toaster. Never clean the toaster by immersing it in water. Do not clean the toaster with a water jet. Operating the toaster without legs invalidates any warranty claims. Neglecting to keep the fan opening clean could result in toaster failure. Operating the toaster without the Reflector Tray reduces the toasting capabilities. Failure to provide proper clearances will cause the unit to fail and invalidate any warranty claims (see installation instructions). GENERAL INFORMATION I. II. III. IV. V. VI. Consult the rating label for model and serial number. Write this information below before proceeding: A. Model # _____________________ B. Serial # _____________________ Overall Dimensions w/Wire Feeder – 14.6” H (371mm) x 16.2” W (411mm) x 26.5” D (674mm) Product Opening - 1.50” H (38mm) x 10.50” W (267mm) Productivity (per hour) - results will vary depending on line voltage and bread dryness. Electrical Requirements A. Single phase, 208-240 volts, 3330 watts, 15.9 amps. B. Cordset configuration 1. Each toaster is equipped with a three-wire grounded cordset and standard three-prong plug. 2. In the United States, a four foot cordset with NEMA 6-20P plug. 3. In Canada, a six foot cordset with NEMA 6-20P plug. Net/Shipping Weight – 48lb.(21.8kg) /56lb.(25.5kg) INSTALLATION INSTRUCTIONS I. C Check Contents - refer to Figure 1, account for the following parts: A. Toast Drawer - shipped in place B B. Reflector Tray - shipped in place A C. Wire Feeder - inside Reflector Tray figure 1 D. Instruction Manual - shipped loose NOTE: DO NOT OPERATE THE TOASTER WITH THE REFLECTOR TRAY REMOVED FROM ITS POSITION II. Position Wire Feeder - refer to Figure 2 A. Pull out Reflector Tray B. Rotate Wire Feeder C. Slide Reflector Tray back D. WARNING: Operating the toaster without the Reflector Tray reduces toasting capabilities. figure 2 IV. Toaster Placement A. Locate the toaster near a grounded receptacle of the proper configuration (see below). Plug the cordset directly into receptacle (DO NOT USE AN EXTENSION CORD). 1. In the United States, NEMA 6-20R. 2. In Canada, NEMA 6-20R. B. Place the toaster on a flat surface providing the following minimum clearances: 1. Base = one inch (provided with legs installed). 2. Side and back walls = one inch 3. Overhead = Enough space to allow adequate heat displacement. 4. WARNING: Failure to provide these clearances will cause unit failure and invalidate warranty claims. C. Position toaster where customers will not contact any surface labeled “CAUTION HOT”. NOTE: DO NOT OPERATE THE TOASTER WITH THE LEGS REMOVED. 2 OPERATION INSTRUCTIONS I. PREPARATION A. Clean the toaster thoroughly before first use (See cleaning instructions). B. Controls Familiarity 1. Main Power Switch - four (4) position rotary switch a) Full Power: rotary switch turned RIGHT ( 3 o’clock). ( HIGH ) b) Power Off: rotary switch turned to TOP or BOTTOM. (12 and 6 o’clock) ( OFF ) c) Standby Power: rotary switch turned LEFT (9 o’clock). ( STANDBY ) 2. Conveyor Speed Control: Set knob to the five (5) position for warm-up. C. Temperature Settings: Set both Top and Bottom heat knobs to 12 (max.) for warm up. One (1) is the minimum heat setting. Power to the heating elements is off when the knobs are in the OFF ( 0 ) position. D. Warm-up time: Allow fifteen (15) minutes. II. NORMAL USE A. Loading Product 1. Place product on the Wire Feeder. The conveyor will automatically draw product through the toaster at a speed determined by conveyor speed control. B. Toasting Darkness: determined by conveyor speed. 1. Darkest toasting - set conveyor speed control to one (1). 2. Lightest toasting - set conveyor speed control to ten (10). 3. Other factors affecting toasting darkness. a) Product moistness - moister product requires slower speeds b) Sugar content in product - product with more sugar requires slower speeds c) Product Temperature - cooler product requires slower speeds 4. For best results, use day old bread stored at room temperature. C. The conveyor belt, drive motor, and shaft bearings do not require lubrication. CLEANING INSTRUCTIONS NEVER CLEAN THE TOASTER BY IMMERSING IT IN WATER. DO NOT CLEAN WITH A WATER JET. I. DAILY CLEANING A. With the toaster ELEMENTS OFF and cool, turn the toaster ON and set conveyor speed to four (4). B. Using a plastic abrasive pad, wipe the conveyor belt in a back and forth motion (side-to-side) motion to remove baked-on product. Wipe clean the conveyor belt in the same manner with a hot, damp cloth. C. Turn OFF the toaster. D. Slide the reflector/crumb tray out of the toaster by pulling forward. Dispose of crumbs and wash the tray in hot, soapy water. Dry the tray and place it back into the toaster. E. Remove the bottom toast drawer from the toaster by sliding it out and lifting up. Dispose of crumbs and wash the drawer in hot, soapy water. Wipe crumbs from inside the toaster with a hot, damp cloth. Dry the drawer and place it back into the toaster. F. Wipe the exterior surfaces of the toaster with a hot, damp cloth. II. PERIODIC CLEANING A. Conveyor Belt 1. Remove the conveyor belt from the toaster. 2. Use needle-nose pliers to bend a link to the inside until the hook clears the link above. 3. Repeat on the other side. 4. Pull the loosened links together and slide through the center-of-belt link. 5. Clean the belt thoroughly (See item 2 under “daily cleaning”). 6. Install the conveyor belt by reversing the order of steps noted above (See item 1). NOTE: DO NOT INSTALL BELT BACKWARDS OR UPSIDE DOWN. ALIGN LINKS ACROSS SHAFT SPROCKET TEETH. B. Cooling Intake Fan 1. Unplug and lay the toaster on its side. 2. Brush dirt and debris from the fan opening and fan guard. 3. WARNING: Neglecting to keep the fan-opening clean could result in toaster failure. 3 TROUBLESHOOTING I. Always ask and check the following: A. Is the unit connected to a live power source? B. Check the circuit breaker. C. Is power switch on? D. Is the unit operating on proper voltage? (see rating label) E. Is power cord damaged? If YES, replace ONLY with an IDENTICAL power cord. II. If problems exist after checking the above, check the chart below. III. If any service is needed (italicized items), call an APW Wyott authorized service agency. All service should be performed by an APW Wyott authorized service agency. THE PROBLEM Won’t toast... Toasts unevenly... Product sticks to conveyor or slide.. THE CAUSE a. Toaster cold. b. Wrong power switch position. c. Wrong conveyor speed setting. d. Only part of product surface is toasted. e. Product located too far to side of conveyor. f. Butter or butter substitute used on product. g. Conveyor surface has baked-on oil residue. h. Very moist or doughy product. i. Product not defrosted or thawed. No power... j. k. l. m. No power to receptacle. Toaster unplugged. Loose connections. Power switch. Won’t heat... n. o. p. q. r. Loose connections. Faulty power switch. Burnt out element. Speed control setting. Very moist product. s. Product too cold. t. Toaster cavity temperature being quenched. No power. Conveyor links are binding. Drive chain too loose or too tight. Loose or bad connection between speed control and conveyor motor. Conveyor motor burnt out. Speed control burnt out. Lighter toast under peak loads... Conveyor won’t move... u. v. w. x. y. z. THE SOLUTION a. Allow five (5) minutes for warm up. b. Position power switch to full power. c. Reduce conveyor speed. d. Reduce conveyor speed. e. Place product on conveyor between end links. f. Discontinue use of butter or butter substitute. g. Follow daily cleaning methods to remove & prevent residue. h. Use different source or day-old product. i. Defrost/thaw product. j. Check circuit breaker. k. Plug in toaster. l. Check connections. m. Check that switch is on & operational. n. Check connections. o. Replace power switch. p. Replace element. q. Reduce speed control setting. r. Use different source or day old product. s. Allow product to warm to room temperature. t. Add 1” or more spacing between product. u. Check circuit breaker. v. Check conveyor for bent links. w. Adjust drive chain. x. Check for loose or bad connection. y. Replace conveyor motor. z. Replace speed control. 4 IMPORTANT NOTICE: The information contained in this section of the manual is intended for individuals possessing backgrounds of electrical and mechanical experience, such as an authorized APW Wyott service technician. APW or the seller cannot be responsible for the interpretation of this information, nor can it assume any liability in connection with its use. WIRING DIAGRAM CORDSET COOLING FAN DRIVE MOTOR WHITE FAN CONTROL THERMOSTAT (CLOSE ON TEMPERATURE RISE) G BLACK 12 13 BLACK BLUE BLACK P L1 L2 2 L1 I I TOP ELEMENT 7 L2 BLUE I 2 4 5 BLUE 4 _ H2 H1 BLUE INFINITE CONTROL P L1 L2 I 6 BLUE 10 BOTTOM ELEMENT I H1 3 1 _ H2 BLUE 11 RHEOSTAT 3 OFF 9 I BLUE 5 8 INFINITE CONTROL TERMINAL BLOCK B STANDBY A 5 BLUE OFF HIGH 7 BLUE BLACK 4-POSITION MAIN SWITCH BLUE MODEL FT 1000 5 REPLACEMENT PARTS LIST ITEM 1 2 3 4 5 6 7 8 9 10 11 12 13 14 15 16 17 18 19 20 21 22 23 24 25 26 27 28 P/N 34236 34237 38254 83956 38278 38129 38131 54095 54096 58188 89490 82903 PS0029 83248 83222 69104 69103 83261 83260 83277 83267 38125 85143 85284 85288 88705 89111 38247 85287 69154 DESCRIPTION QTY TERMINAL BLOCK END MTG 1 TERMINAL BLOCK (6) .250 MALE 3 IDLER SHAFT ASSY 1 DRIVE SHAFT ASSY 2 CRUMB TRAY/REFLECTOR ASSY 1 TOAST DRAWER 1 WIRE FEEDER 1 ELEMENT 208V 1625W 2 ELEMENT 240V 1625W 2 LABEL, CONTROL PANEL 1 SWITCH, MAIN ROTARY 1 #25 DRIVE CHAIN, ¼" PITCH, 65 PITCHES 1 WIRE BELT, 3 SEGMENT, 3.07' OF 82920 (82 LINKS) 1 BEARING SHAFT 2 RHEOSTAT 208/240V TERM. 1 INFINITE CONTROL 208V 15AMP CURVE "B" 2 INFINITE CONTROL 240V 15AMP CURVE "B" 2 DRIVEN SPROCKET, #25B12 TOOTH X 3/8" BORE (1/4" PITCH) 1 DRIVE SPROCKET, #25B18 TOOTH X 5/16" BORE (1/4" PITCH) 1 POWER CORD 208-240V, 20 AMP PLUG 1 LEG 1" CHROMED PLASTIC 4 BEARING, FLANGED, POLYMER 2 MOTOR, 230V 60HZ, 9RPM 1 COOLING FAN 1 FAN CORD 1 KNOB 4 STRAIN RELIEF 1 WIRE GUARD 1 FAN GUARD 1 FAN CONTROL THERMOSTAT 1 6 EXPLODED VIEW 1 13 2 23 4 3 22 12 27 8 21 7 28 5 11 26 6 24 9 14 10 15 20 19 18 25 16 17 7 WARRANTY POLICY APW Wyott warrants to the original owner/user that all commercial cooking equipment shall be free of defects in material and workmanship under normal use and service for a period of one year from the original date of purchase. Warranty service will be provided on the customer’s premises for the FASTRAC models. This warranty includes parts, standard straight time labor charges, approved travel time charges and approved mileage, and excludes all other charges. This warranty does not cover any cost associated with installation or calibration, or any damages resulting from accident, alteration, misuse, abuse, negligence, wrong voltage, flood, fire, acts of God, improper installation, failure to properly maintain or failure to operate strictly in accordance with instructions and does not apply if the serial number or model number has been removed or altered. This warranty is valid only when (1) the equipment is purchased and retained for use within the United States or Canada; (2) the repair of defects is performed by APW Wyott or by an APW Wyott authorized service agency; and (3) all replacement parts are approved APW Wyott parts. This is the only warranty made in connection with the sale of the equipment as specified above and all other expressed, statutory and implied warranties, including without limitation, all implied warranties of merchantability are expressly denied. In no event shall the user be entitled to recover incidental or consequential damages, including but not limited to, damages for inconvenience, rental or replacement equipment, loss of profits, or other commercial loss (all to the extent permitted by law). WARRANTY PROCEDURE If warranty service is needed on your FASTRAC, follow these steps: 1. Identify the model and serial number from the rating label on your toaster. 2. Consult the enclosed directory, find the service agency nearest you, call the number listed or the 24-hour toll free service hot line, 1-800-733-2203. If there is not a service agency listed for your area, the parts distributor will provide service for your toaster. 3. To order parts consult the enclosed directory. The parts distributor is listed at the beginning of each state listing. The parts distributors have a complete stock of parts for your toaster. PN 67192 REV-02/2001 8