1
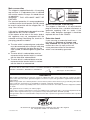
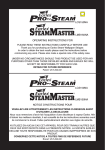
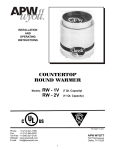
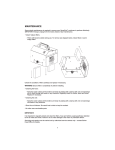
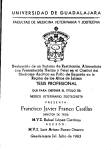
OPERATING INSTRUCTIONS
Model PWS
PLEASE READ THESE INSTRUCTIONS CAREFULLY BEFORE USE
Thank you for purchasing an Earlex Steam Wallpaper Stripper.
In order to obtain the best results please read the instructions before commencing any work.
Please also make a special note of the safety rules.
EARLEX LTD. WILL ACCEPT NO RESPONSIBILITY FOR THE USE OF THIS
PRODUCT IF USED FOR ANY OTHER PURPOSES THAN THOSE DETAILED
HEREIN.
RETAIN FOR FUTURE REFERENCE
Safety Rules
l
l
l
l
l
l
l
l
l
l
l
l
Keep away from children and animals.
Do not pull by the mains lead or the
steam hose.
Be careful of overhead dripping, when
using on overhead areas tilt the steam
plate away from the face and body, and
regularly empty the steamplate of any
collected condensation.
Do not leave unattended.
Do not point the steam plate at anyone.
Do not allow water or steam to enter light
switches or sockets.
Always use and store upright.
Always visually check that the hose and
steam plate inlet are not blocked before
attempting to use.
Do not strain, kink or trap the hose under
heavy objects.
Use only 4lb pressure cap as supplied. It
is also a safety valve. NEVER BLOCK
OFF THIS OUTLET.
NEVER remove the filler cap when unit is
boiling - switch off and wait for 5 minutes.
l
l
l
l
l
l
l
l
l
Main Features
Weak plaster can normally be detected by
tapping a few areas of the wall. A hollow
sound indicates that you should proceed
only with extreme care - stopping
immediately if you hear a cracking sound or
plaster starts to break loose.
This is a professional, fast-action steam
wallpaper stripper. It has many added
features;
l
Each tank is individually pressure tested.
l
Storage for the hose and the mains lead.
l
Neon mains On/Off switch,
l
Cooler running steam hose.
Always disconnect power supply when
filling the machine or when not in use.
Do not use any caustic cleaners on the
tank.
Do not allow to boil dry.
Do not overfill the reservoir. DO NOT
USE ADDITIVES.
Never detach the hose whilst the unit is
switched on.
The tank becomes hot in use. Do not
touch. Only move with the carrying frame.
Steam is produced at 100˚C. Wear
protective clothing and gloves when
operating this stripper.
DO NOT USE THIS STRIPPER FOR
ANY OTHER PURPOSES THAN
DETAILED IN THESE INSTRUCTIONS.
Under no cirumstances should you
attempt to repair a unit unless qualified
and authorised to do so.
Always use genuine Earlex replacement
parts.
The steam stripper is safe for drywall/plaster
board surfaces but whatever the material, it
is always wise to check a small area before
starting work properly.
Protect your home!
The heat generated by the boiler unit can
mark carpets, soft furnishings, table tops,
cabinets etc.
Dust sheets or newspapers are not
suitable heat protectors for delicate
surfaces.
Caution!
Check the state of your plaster before
starting work.
Steam can loosen weak, porous or poorly
bonded plaster - which also loosens readily
if cracked, holed or if steam plate is held in
one position for too long after the paper is
soaked.
2
Preparation
To achieve fastest paper removal always
gently score the areas to be stripped. With
heavily embossed, vinyl coated or painted
papers this is essential. Either use a
proprietary perforator tool or alternatively
score the paper with the edge of a wall
scraper in a criss-cross pattern with 150mm
(6 inch) spacing.
MAX
MIN
Connect the mains lead from the unit to the
socket and switch on. The mains switch on
the unit has a neon and will light when the
unit is on. It will take between 10 and 20
minutes for the unit to start producing steam
depending on the temperature of the water
used. DO NOT LEAVE UNATTENDED.
Once steam is being produced at the steam
plate you are ready to commence operation.
Prior to the steam being produced a small
amount of bubbling will occur at the steam
plate. WARNING: Beware of hot water
discharge prior to steam emission. When
the steam has been produced, lift the steam
plate above the level of the tank outlet to
allow condensed steam to run back down
the hose and into the tank.
If you are right handed hold the steam plate
in your left hand and place flat against the
wall where you wish to commence
removing.
Leave the plate against the wall for
approximately 10 seconds. If you are left
handed you may find it easier to operate
with the other hand.
Move the steam plate to the section
immediately next to where you have just
been working and use a wallpaper scraper
to remove the section that has just been
steamed. By working in this way you should
be able to remove paper continually. You
may have to leave the plate against the wall
for longer periods with some papers or resteam if not completely removed.
As with all decorating work be sure to
protect carpets and furniture with covers.
Operation
STEAM IS HOT! The unit is designed for
safe, fast removal of wallpaper but you must
o
be aware that steam is produced at 100 C
so be careful, wear protective clothing and
protect your hands with heat resistant
gloves or mitts.
Place the unit on a flat surface near to the
area to be stripped. Remove the steam
plate.
FULLY UNCOIL the hose and mains lead.
Connect the thread on the steam plate to
the end of the hose. This only needs to be
hand tight DO NOT OVERTIGHTEN.
If the steam plate is fitted with a metal swivel
joint, tighten hose nut to thread using two
spanners. The
plate
can
remain
permanently attached to the hose
thererafter.
To fill the unit, remove the filler cap and fill to
the maximum water level as shown on the
glass panel at the end of the tank. This must
be clean water, preferably hot.
- DO NOT USE ADDITIVES
- DO NOT OVERFILL.
3
The unit will operate for approximately
1hour before requiring refilling. The water
level is shown through the glass level
indicator and should not be allowed to fall
below minimum. Switch the unit off when
this level has been reached.
If you require further use of the steamer,
ensure unit is switched off and has stopped
boiling. Wait for 5 minutes. Slowly unscrew
the cap, any remaining trapped steam will
be released from beneath cap.
Caution - steam is very hot -wear a glove
and keep face clear. Refill to the level
indicator as before and follow above
instructions.
YOU MUST NEVER ALLOW THE UNIT TO
BOIL DRY.
There is a safety thermal cut-out device
fitted to the unit. If the unit is allowed to boil
dry this will operate and prevent further use.
Switch the unit off and allow it to cool for at
least 5 minutes, refill with water and then
switch on again - the thermal cut-out should
automatically re-set. If this has not re-set
allow a further cooling period.
When you have finished using the unit allow
any remaining water to cool and then empty
the unit. We recommend flushing the tank
out with clean water before storing. NEVER
LEAVE WATER IN THE UNIT WHILST
BEING STORED.
Storage
The hose, steam plate and mains cable can
all be stored in the pocket on the side of the
unit.
Radiator Cap
To fit - screw onto the filler neck hand tight.
Do not overtighten.
To remove - ensure unit is switched off and
has stopped boiling. Wait for 5 minutes.
Slowly unscrew the cap, any remaining
trapped steam will be released from the
anti-discharge valve. Caution - steam is
very hot - wear a glove and keep face
clear. Refill to the level indicator as before
and follow above instructions.
STEAM IS DANGEROUS.
4
Other Uses
l
The stripper can also be used to:
®
l Remove Artex .
l Lift stuck down vinyl tiles.
l
Sterilise soil.
Kill garden weeds.
TROUBLE SHOOTING
Unit Fails to Boil
Unit keeps cutting out
l The thermal cut-out has operated. Switch
l Check that water is above minimum
off, allow to cool, refill with water then
level.
switch on again.
l Check that the extension lead is rated at
13 amps minimum and fully unwound.
l Check the fuse in the plug.
l If using an extension lead - check that the
l Check that no additives have been used.
thermal re-set button on the extension
lead has not tripped out.
Steam escaping from Pressure Cap
l Check for blockages in hose or steam
Check that the extension lead is rated at a
plate.
minimum of 13 amps.
l Clean seating around cap area.
If the unit still will not operate return the unit
to the dealer or authorised agent to check
the thermal fuse link and element. ONLY
QUALIFIED ELECTRICIANS SHOULD
UNDERTAKE THIS WORK.
Descaling
We recommend that the tank is cleaned
every three months using proprietary
descaling products, used as per the
manufacturers instructions.
IF YOU REQUIRE ANY FURTHER ASSISTANCE PLEASE CALL OUR
HELPLINE ON 01483 454666
5
Spare Parts
The full range of spare parts is available from Earlex. Despatch is available same day by
first class post to Companies with credit facilities or for payment by credit card.
PART NO. DESCRIPTION
PS
PS
PS
PS
PS
PS
PS
PS
PS
PS
PS
PS
PS
PS
PS
PS
PS
PS
PS
PS
PS
PS
PS
PS
PS
PS
PS
PS
PS
PS
PS
PS
PS
PS
PS
PS
PS
PS
0004
0008/A
0019
0020
0021
0022
0023
0027
0028
0032
0036
0037
0038
0042
0047
0048
0049
0053
0055
0077
0112
0117
0118
0123
0124
0127
0128
0134
0136
0137
0138
0139
0140
0176
0184
0188
0283
0296
QTY
PS 0303
/0315
PS 0302
PS 2005
PS 2009
PS 2010
PS 2012
PS 2018
PS 2039
PS 2042
Tube Connector-external....................... 4
Steam Tank Anodised ........................... 1
Thermal Fuse ....................................... 1
Sealing Ring for Element ......................1
Stud...................................................... 2
Hexagon Nut......... ................... ........... 6
Shakeproof Washer............. ................. 4
Cable Assembly-Switch to Cut-out........ 1
Cable Assembly-Switch to Element...... 1
Element Cover........... ................... ...... 1
C/sk Screw - Tank to Frame.................. 1
Lever Type Cap......... .......................... 1
Steam Hose Assembly......................... 1
Elbow-Steam Outlet.............................. 1
Steamplate Assembly (not shown)..... 1
Steam Plate..... ............ ................... ... 1
Adaptor-for Hose...................... ........... 1
Circlip......................................... .......... 1
Taper Nuts..............................................4
Insulating Sleeve.................................. 3
Mains Switch USA ............................... 1
‘O’ Ring Tank Seal................................. 1
Gasket Tank Window........... ................ 1
Thermostat.............................................1
Tank Cover............................................ 1
Thin lock nut......................................... 6
Protective cap M6................................. 3
Stainless Steam Pipe........................... 1
Glass Window............. ......................... 1
Glass Retaining Plate. ......................... 1
Level Indicator Ball............................... 1
Screw for Retaining Plate.................... 6
Screw for Tank Joint............................. 3
Instruction Book USA (not shown) .......1
Steamplate label USA (not shown) .......1
Steam Plate Label Euro (not shown) ... 1
Switch and Cover...................................1
Short Earth Stud................................... 1
PS 0284
PS 0287
PS 0306
PS 3037
Pressure Cap Assembly with Chain...... 1
Switch UK.............................................. 1
Nylon Cap Ring .....................................4
Washer Cover Fixing .............................4
Label Instruction USA (not shown)....... 1
Tube tank moulding punched................ 1
Label instruction Euro (not shown) ....... 1
Handle Screw ....................................... 2
Steam Plate Assembly with swivel joint
(not shown) ........................................... 1
Cap Warning Label Euro (not shown) .. 1
Instruction Booklet Euro
French/Dutch/German........................... 1
Cap Fitting Euro Models (not shown).....1
Foot Moulding ...................................... 4
Elements
PS 0016 Heating Element
PS 0088 Heating Element
230V/240V
PS 0093 Heating Element
PS 0094 Heating Element
PS 0156 Heating Element
2750W x 230V
2200W/2400W
2900W x 230V
1500W x 120V
1760W x 110V
Tank Covers
PS 2030 Tank Cover Black
PS 2043 Tank Cover Orange
Cable Assemblies
PS 0029 Cable Assy UK
PS 0075 Cable Assy Europe
PS 0109 Cable Assy USA
PS 0155 Cable Assy 110V
PS 0213 Cable Assy Australia
Handles
PS 2031
PS 2044
6
Handle for tank cover Black
Handle for tank cover Orange
7
PS0028
PS0029 UK
PS0128
PS0302
PS0127
PS2005
PS0036
PS2009
PS0027
PS0032
PS0022
PS0296
PS0023
PS0021
PS0016 2750W x 230V
PS0316
PS0005
PS0055
PS0038
PS0202
PS2030 BLACK
PS2043 ORANGE
PS2012
PS0062
PS2031 BLACK
PS2044 ORANGE
PS2039
PS0020
PS0008/A
PS0049
PS0019
PS0117
PS0042
PS0123
PS0036
PS0140
PS0053
PS0200
PS0048
PS0118
PS0136
PS0139
PS0137
PS0138
PS0303/0315
PS0134
Mains connection
The stripper is supplied fitted with a 13 amp plug
top and fuse. If a replacement fuse is required
this must be rated at 13 amps. If in doubt consult
an electrician.
WARNING - THIS APPLIANCE MUST BE
EARTHED.
For your total protection it is recommended that
a residual current circuit breaker (RCCB) should
be used in conjunction with the stripper; Min. 15
amp - Max. 20 amp.
Mains connection 110V UK only
The stripper is fitted with a 16 amp industrial
plug for insertion into a suitable transformer or
generator supplying 110V a.c. outlet. If this
mains cable becomes damaged it should be
replaced with our Pt No. PS0155.
If this mains cable becomes damaged it must be
replaced with our Part No. PS0029.
As the colours of the wires in the mains lead of
this appliance may not correspond with the
coloured markings identifying the terminals in
your plug, proceed as follows:
l
l
l
Extension Leads
If you are using an extension lead it must
be rated at a minimum of 13 amps and
fully unwound. Do not operate with a lead
rated at less than 13 amps as this will
cause premature failure of the element
which is not covered by guarantee.
The wire which is coloured green and yellow
must be connected to the terminal inthe plug
which is marked with the letter E or by the
earth symbol, or coloured green or green and
yellow.
The wire which is coloured blue must be
connected to the terminal which is marked
with the letter N or coloured black.
The wire which is coloured brown must be
connected to the terminal which is marked
with the letter L or coloured red.
EC Declaration of Conformity
We declare that the units: PWS conform to: 73/23/EEC, BSEN60335-1, BSEN60335-2-15 & 89/336/EEC,
EN55014-1, EN55014-2, EN61000-3-2, EN61000-3-3
Tim Hopper -Technical Director
GUARANTEE
This product is guaranteed for a period of 2 years for ordinary use and 1 year for hire purposes or where the unit is
lent to other users. The tank is guaranteed against corrosion for 3 years. The guarantee is against faulty materials or
workmanship.
Whilst every possible care is taken by Earlex to ensure that our products leave the factory in good working order, Earlex
cannot under any circumstances accept liability for problems or damage caused by their
subsequent use. It is the responsibility of the user to ensure that surfaces to be treated, cleaned or stripped are suitable
for steam.
This guarantee does not affect your statutory rights.
In the event of a fault occuring please contact our helpline before returning the unit to our Service Department at the
address below together with a copy of your purchase receipt. All repairs will be dealt with speedily.
If the guarantee card is not returned within 14 days from the date of purchase the guarantee is limited to date of product
manufacture.
Earlex Ltd.,
Moorfield Road, Slyfield Industrial Estate, Guildford, Surrey GU1 1RU. England.
Tel: +44 (0)1483 454666 Fax: 01483 454548
PS2048 01/05
© 2005 Earlex Ltd.
8