1
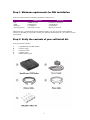
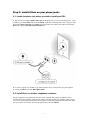
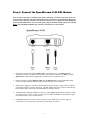
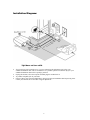
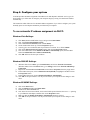
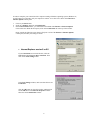
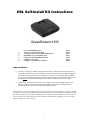
DSL Self-install Kit Instructions
SpeedStream 4100
1.
2.
3.
4.
5.
6.
Cover and installation notes
Verify your system requirements
Verify the contents of your DSL Self-Install kit
Install filters on your telephone jacks
Connect the SpeedStream DSL modem
Configure your system
Configure your connection and email
Page 1
Page 2
Page 2
Page 3
Page 4
Page 6
Page 9
Important Notes:
•
In order to provide you with the best possible connectivity, your DSL circuit must "train" for at
least 10 days when first activated. During this period you must leave the DSL modem plugged in,
turned on and connected at all times. You do not need to leave your computer turned on during
this period- just the DSL modem. For best results, please plug in your DSL modem and turn it on
the day before your scheduled installation date, and leave it turned on for at least 10 days.
•
Please follow all instructions carefully. Some computer or network configurations may cause
software windows to appear that are not depicted in this guide. Please read and follow the
instructions on those screens to continue the installation process.
Your Internet Service Provider (ISP) assumes no responsibility for any personal injury or property damage
which may result from your installation of DSL Equipment as discussed in this Guide. Your ISP specifically
disclaims any liability for such injury or damage. By proceeding with this installation, you assume all risk
of personal injury or property damage. Please consult the documentation provided by your PC vendor to
identify any impacts to your warranty.
1
Step 1. Minimum requirements for DSL installation
Your system must meet these minimum requirements for DSL service:
CPU
RAM
HD Space
Operating System
Windows/Dos
300MHz or better
128 Megabytes
1.0 Gigabytes
Win 95/NT or newer
Macintosh
PowerPC G3 or better*
256 Megabytes
2.0 Gigabytes
MacOS 7.6 or newer
*Macintosh users: your Macintosh must be Ethernet-capable. You may also need an AAUI Ethernet
Transceiver depending on your model. Consult your computer's documentation or your vendor for system
specifications.
Step 2. Verify the contents of your self-install kit.
Your self-install kit includes:
A.
B.
C.
D.
E.
(1) SpeedStream 4100 DSL modem
(1) Power supply
(1) Ethernet Cable
(1) Phone Cable
(4) DSL Splitter Filters
2
Step 3. Install filters on your phone jacks
3-1. Locate the phone jack where you wish to install your DSL.
A. Plug one end of a supplied Splitter Filter (E) into the phone jack, as shown in the image below. There
should be a port labeled DSL and one labeled Phone on the other end of the splitter filter. Plug one end of
the supplied Phone Cable (D) into the DSL port on the splitter filter and the other end into port labeled
DSL on the supplied SpeedStream DSL Modem (A).
B. If you have a phone, fax machine or any other telephony device at this location, plug the telephone
device into the Phone port of the DSL Splitter Filter.
3-2. Install filters for all other telephones or devices.
All other equipment on the phone line must have filters installed. This applies to equipment such as
telephone answering machines, Caller ID units, analog computer modems, fax machines, alarm systems,
etc. Use one of the supplied splitter filters for each piece of equipment plugged into the phone line. Make
sure you connect each of these devices to the splitter filter port labeled Phone.
3
Step 4. Connect the SpeedStream 4100 DSL Modem
Note: In order to provide you with the best possible connectivity, your DSL circuit must "train" for
at least 10 days when first activated. During this period you must leave the DSL modem plugged in,
turned on, and connected at all times. You do not need to leave your computer turned on during this
period- just the DSL modem. For best results, please plug in your DSL modem and turn it on the day
before your scheduled installation date, and leave it turned on for at least 10 days.
1.
Ensure that one end of the supplied phone cable is connected securely to the DSL port on the
SpeedStream modem. The other end of the phone cable should be connected to a DSL port on the
splitter filter, which should be plugged into your phone jack, as outlined in step 3-1.
2.
Plug one end of the supplied Ethernet Cable into the Ethernet port on the SpeedStream modem.
Connect the other end of the Ethernet cable to the Ethernet port on your computer.
3.
Plug the power supply into the DSL modem and into an electrical outlet or surge protector. Push the
power button (unless it is already depressed). The DSL Modem will begin a self-test routine; during
this period the lights on the front of the DSL Modem will flash on and off.
4.
The Power light should turn solid green right away, and the DSL light should turn solid green within
two minutes (if your circuit is active- see notes in step 5.) While the Modem is starting up, the lights
may blink erratically- this is normal behavior.
5.
If the Power light does not turn on, check your power cable. Make sure your power supply is
connected to a live electrical outlet, and that your connections are secured.
4
Installation Diagram:
light does not turn solid:
•
•
•
•
Your circuit may not be turned on yet, if you are connecting the equipment on or before your
scheduled installation date. This is not indicative of a problem- please wait until the day after your
scheduled installation date before reporting a problem.
Unplug the modem, reboot the computer and then plug the modem back in.
Try another telephone jack in your home.
If none of these steps cause the LINK light to turn green and your installation date has passed, please
contact your Internet Service Provider’s support department.
5
Step 5. Configure your system
Your ISP provides automatic assignment of IP addresses for both Dynamic and Static service types. In
most instances you will be able to configure your computer simply by setting it to obtain an IP address
automatically.
The instructions which follow are for automatic address assignment. If you wish to configure your system
manually please see the help documentation provided with your computer.
To use automatic IP address assignment via DHCP:
Windows Vista Settings:
a)
b)
c)
d)
e)
f)
g)
Click Start (button with Windows Logo), and go to the Control Panel
Next, click Network and Sharing Center.
Next to Local Area Connection, click on View Status.
On the window that comes up, Click the Properties option.
You may get a new window that asks for permission to continue. If so, click Continue.
Click on the Internet Protocol Version 4 option, then click the Properties button.
Now click radial button for the Obtain an IP address automatically option, then the radial
button for Obtain DNS server address automatically.
h) Click OK and close all other open windows.
Windows 2000/XP Settings:
i)
(Windows XP) Click on Start, go to Control Panels, and click on Network Connections.
(Windows 2000) Click on the Start button, go to Settings, and click on Network and Dial-up
Connections.
j) Right-click on the Local Area Connection icon and choose Properties from the pop-up menu.
k) In the window that opens, click on Internet Protocol(TCP/IP) to highlight it and then click on
the Properties button.
l) In the window that opens, choose Obtain an IP Address Automatically.
m) Click OK on all open windows. You may need to restart your computer for the changes to take
effect.
Windows 95/98/ME Settings:
a)
b)
c)
d)
e)
f)
Click on the Start button.
Click on Settings and then on Control Panel.
Double-click on the Network icon.
Once in the Network Control Panel, click on the TCP/IP protocol that has the arrow "->" pointing
to your Ethernet card adapter, and then click on the Properties button.
Make sure that the Obtain an IP Address Automatically button is selected.
Click OK on all open windows. You may need to restart your computer for the changes to take
effect.
6
Note: your Macintosh must be Ethernet-capable. You may also need an AAUI Ethernet Transceiver
depending on your model. Consult your computer's documentation or your vendor for system specifications.
Mac OS X:
a)
b)
c)
d)
e)
f)
g)
Click on the Apple Menu.
Click on System Preferences, and then on Network.
From the Location drop-down box, choose Automatic.
From the Show drop-down box, choose Built-in Ethernet.
Click the TCP/IP tab.
From the Configure Drop-down box, choose Using DHCP.
Close the window. When prompted, save your changes.
Mac OS 9 and below:
a)
b)
c)
d)
e)
Click on the Apple Menu.
Click on Control Panels, and then on TCP/IP.
From the Connect drop-down box, choose Ethernet.
From the Configure drop-down box, choose Using DHCP Server.
Close the window. When prompted, save your changes.
6. Configuring your computer to connect via DSL
After you have installed your DSL Modem and Ethernet card and entered the correct network settings, you
may need to make one more set of changes in order to be connected via DSL.
If you have followed steps 1 through 6 of this manual then you should not need to do anything else to
complete your connection. If you have followed these steps and are having problems connecting, browsing
the web or sending and receiving email, please call the technical support department for your ISP for
assistance.
7
In order to complete your connection with a computer running a Windows Operating System (Windows 95,
98, ME, 2000) you will need to tell your computer to connect via a LAN. This is done via the Internet or
Internet Options control panel.
1.
2.
3.
Click on your Start button.
Scroll up to Settings, and click on Control Panel.
In the Control Panel window, you will find an Icon labeled either Internet or Internet Options.
Click on this Icon. When the Icon opens, click on the Connections tab at the top of the window.
Please consult the following screen shots to find your version of the Internet or Internet Options
control panel, and edit your settings to match:
•
Internet Explorer version 5 or 5.5
If your Connections screen looks like this, Click the
Radio Button labeled Never dial a connection. Then
Click on the LAN Settings button.
In the LAN Settings window, make sure that all boxes are
Unchecked.
Click the OK button to close this window, and then click
On the OK button in the Internet Properties window.
Then close the Control Panel window.
8
Configure your email client
Most email clients do not need any special setup in order to function over your DSL connection. One
exception to this is Microsoft Outlook Express. If you use a mail client other than Outlook Express, try
sending and receiving your email. If the program prompts you to dial up, consult the program's help files to
determine how to connect over a LAN. If you do use Outlook Express, please consult the directions on the
next page.
Configuring Outlook Express 5, 6, or Vista Mail:
•
•
•
•
•
•
•
•
Open Outlook Express (or Vista Mail).
Click on the Tools pull-down menu, and select Accounts.
Click on the Mail tab.
Click on your account to highlight it, and then click the Properties button.
Click on the Connection tab.
Check the box labeled Always connect
to this account using:
Click on the drop-down box and select
Local Area Connection.
Click on the OK button to close this window.
If you have more than one email account configured
In Outlook Express, repeat this procedure for each
Email account. When you have finished configuring
All of your email accounts, click on the Close button in the
Internet Accounts box.
9