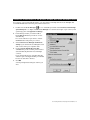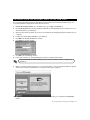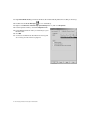
1
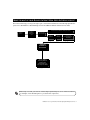
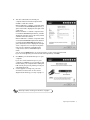
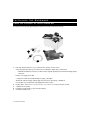
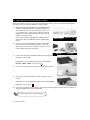
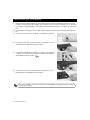
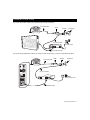
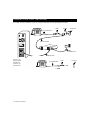
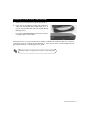
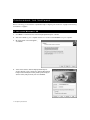
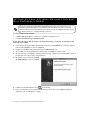
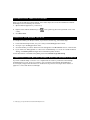
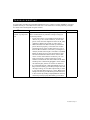
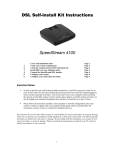
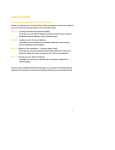
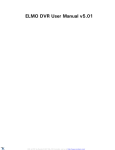
INSTALLATION
GUIDE
Make the most of your Business Internet High Speed Enterprise service! . . . . . . . . . . . . . . . . . . . 1
Minimum hardware requirements. . . . . . . . . . . . . . . . . . . . . . . . . . . . . . . . . . . . . . . . . . . . . . . . . . . . . . . .2
Quick start procedures . . . . . . . . . . . . . . . . . . . . . . . . . . . . . . . . . . . . . . . . . . . . . . . . . . . . . . . . . . . . . . . . .2
Beginning the Installation . . . . . . . . . . . . . . . . . . . . . . . . . . . . . . . . . . . . . . . . . . . . . . . . . . . . . . . . . . 4
Installing the Hardware . . . . . . . . . . . . . . . . . . . . . . . . . . . . . . . . . . . . . . . . . . . . . . . . . . . . . . . . . . . . 6
Check the contents of your Starter Kit . . . . . . . . . . . . . . . . . . . . . . . . . . . . . . . . . . . . . . . . . . . . . . . . . . . . .6
Connecting a filter to every phone . . . . . . . . . . . . . . . . . . . . . . . . . . . . . . . . . . . . . . . . . . . . . . . . . . . . . . .7
If a wall jack is to be shared by modem and phone (optional) . . . . . . . . . . . . . . . . . . . . . . . . . . . . . . . . . .7
If you are Using the Ethernet cable . . . . . . . . . . . . . . . . . . . . . . . . . . . . . . . . . . . . . . . . . . . . . . . . . . . . . . .8
If you are using the USB cable . . . . . . . . . . . . . . . . . . . . . . . . . . . . . . . . . . . . . . . . . . . . . . . . . . . . . . . . . . .9
Checking your setup . . . . . . . . . . . . . . . . . . . . . . . . . . . . . . . . . . . . . . . . . . . . . . . . . . . . . . . . . . . . . . . . .11
Configuring the Software. . . . . . . . . . . . . . . . . . . . . . . . . . . . . . . . . . . . . . . . . . . . . . . . . . . . . . . . . . 14
If you have Windows XP. . . . . . . . . . . . . . . . . . . . . . . . . . . . . . . . . . . . . . . . . . . . . . . . . . . . . . . . . . . . . . .14
Connecting to and Disconnecting from the Internet with Windows XP. . . . . . . . . . . . . . . . . . . . . . . . . .15
If you do not have Windows XP . . . . . . . . . . . . . . . . . . . . . . . . . . . . . . . . . . . . . . . . . . . . . . . . . . . . . . . . .16
Configuring the Access Manager . . . . . . . . . . . . . . . . . . . . . . . . . . . . . . . . . . . . . . . . . . . . . . . . . . . . . . . .17
Connecting and disconnecting from the Internet. . . . . . . . . . . . . . . . . . . . . . . . . . . . . . . . . . . . . . 18
Switching from the USB cable to the Ethernet cable . . . . . . . . . . . . . . . . . . . . . . . . . . . . . . . . . . . . . . . . .20
Switching from the Ethernet cable to the USB cable . . . . . . . . . . . . . . . . . . . . . . . . . . . . . . . . . . . . . . . . .21
Troubleshooting . . . . . . . . . . . . . . . . . . . . . . . . . . . . . . . . . . . . . . . . . . . . . . . . . . . . . . . . . . . . . . . . . 23
Setting up your optional Business Internet Dial Enterprise Hours . . . . . . . . . . . . . . . . . . . . . . . . 28
Troubleshooting . . . . . . . . . . . . . . . . . . . . . . . . . . . . . . . . . . . . . . . . . . . . . . . . . . . . . . . . . . . . . . . . . 31
Terms and Conditions . . . . . . . . . . . . . . . . . . . . . . . . . . . . . . . . . . . . . . . . . . . . . . . . . . . . . . Appendix I
NX-E-041 Windows
Installation Guide
© 1997-2004 Bell Canada
All rights reserved
Printed in Canada
The software and services described in this document are furnished under license and service agreements.
Your service provider reserves the right to revise this document and the software, and to make changes to the content of the document and software, without
notice. This document may not be copied in whole or in part without the written consent of your service provider.
Microsoft Internet Explorer, Microsoft Outlook Express, and Windows are registered trademarks of Microsoft Corporation. All other brand names and product
names are trademarks or registered trademarks of their respective companies
MAKE THE MOST OF YOUR BUSINESS INTERNET HIGH SPEED ENTERPRISE SERVICE!
Below are all the steps you will go through to get connected with the Business Internet High Speed Enterprise service. Remember to take advantage of all of the additional features that the service offers!
Service technician will come install your servi ce
Order our
servi ce!
Receive a
We lcome
Letter in the
mail
Receive your
kit in the Mail
Install the
hardware
Install the
software
Connecting and
Disconnecti ng from
the Internet
page 4
page 14
page 18
SURF THE
INTERNET at
HIGH SPEED!
Use the Global
Roaming Dialer to
connect to the
Internet when you
are away from work!
page 28
Please keep note that your Business Internet High Speed Enterprise service will be activated
by midnight on the due date given to you at the time of purchase.
Make the most of your Business Internet High Speed Enterprise service! 1
MINIMUM
HARDWARE REQUIREMENTS
For the Business Internet High Speed Enterprise software to work reliably and efficiently, your computer
must meet or exceed the minimum requirements specified in the table below:
Processor
System
Memory
Hard drive
Display
Network
CD-ROM drive
Windows
133 MHz Pentium or equivalent processor
Windows XP*/Me/98/2000**/NT 4.0**
64 MB RAM
80 MB free
256 colours with 800x600 resolution
Ethernet card installed and functioning or available
USB port
Required
* If you have Windows XP, the minimum requirements are greater than those listed here. Please see the
following:
Processor: 300 MHz single CPU for Home edition, or single or dual for Professional edition
Memory: 128 MB RAM
** If you have Windows 2000 or NT, you must have the latest service pack installed.
You may need your Windows CD to perform some of the software configurations in this guide.
QUICK
START PROCEDURES
Check the contents of your Starter Kit
To see a list of the equipment you should have, consult Check the contents of your Starter Kit on page 6.
Install the software
1.
2.
3.
Turn on your computer. Exit all programs and disable any virus protection software.
Insert the Business Internet CD into your CD ROM drive.
Follow the instructions to install the software.
Install the hardware
4.
5.
Connect the modem and install the phone filters on every phone with the same telephone number as
your Business Internet High Speed Enterprise service. Do not install filters on your modem.
Check your setup. Please refer to Checking your setup on page 11 for an illustration of the proper
hardware setup.
Connecting and Disconnecting from the Internet
6.
7.
Double-click the Access Manager icon on the desktop.
Double-click the Business Internet High Speed icon in the Profiles window, then click Connect in the
Access Manager window to connect to the Business Internet High Speed Enterprise service.
If you have Windows XP, double-click the Business Internet High Speed Enterprise icon on the
Desktop, then click Connect . Then click the Internet Explorer icon.
2 Make the most of your Business Internet High Speed Enterprise service!
8.
To disconnect, click the File menu in Internet Explorer, then click Exit . To disconnect from the Internet,
right-click the Access Manager icon at the bottom right of your screen, then click Disconnect .
If you have Windows XP, double-click the connection icon in the lower right hand corner of the screen,
then click Disconnect .
Make the most of your Business Internet High Speed Enterprise service! 3
BEGINNING
BEFORE
YOU
THE
INSTALLATION
BEGIN
For the Business Internet High Speed Enterprise software to work reliably and efficiently, your
computer must meet or exceed the minimum hardware requirements specified on page 2.
Before you begin, have the following information ready in order to install the software. You can find this information on the first page of this guide.
•
your Business Internet High Speed Enterprise
• username
• password
The Business Internet High Speed Enterprise software is not designed to support Internet
access over a Local Area Network (LAN). Configuring the Business Internet High Speed Enterprise software may cause conflicts with your existing network service.
STARTING
THE
INSTALLATION
1.
Exit any applications or programs, and disable any virus protection software before installing the software. For instructions, see the manual that came with your virus protection software.
2.
Insert the Business Internet High Speed Enterprise CD into your CD-ROM drive. Wait a few seconds. The
installation program usually starts automatically. If it doesn’t, double-click the My Computer icon on
your desktop, and then double-click the Bell icon.
3.
You will be asked to agree to the Business Internet High Speed Enterprise Terms and Conditions. Click
Accept if you agree.
4 Beginning the Installation
4.
Tests are conducted to ensure that your
computer meets the minimum requirements
needed to install the software.
When a hardware or software component meets
or exceeds the recommended requirements, a
green check mark is displayed to the right of the
component.
When a hardware or software component does
not meet the minimum requirements, a red X is
displayed to the right of the component, and the
software cannot be installed.
When a hardware or software component meets
or exceeds the minimum requirements but does
not meet the recommended requirements, a
yellow exclamation mark is displayed to the right
of the component. You can improve the performance of the software by upgrading these
components to the recommended requirements.
You can click the Details button for more information on each of the tests performed.
If you see a message that your machine meets the requirement, click Next .
5.
Click Next if you have an Ethernet port on your
computer.
If you do not have an Ethernet port on your
computer, click USB. If you choose USB, you will
need to restart your computer after installing the
USB software, and you may need to provide your
original Windows CD.
A screen appears showing how your wires
should be connected. You can also see this
diagram under Checking your setup on page 11.
6.
Please proceed to Installing the Hardware on page 6.
Beginning the Installation 5
INSTALLING
CHECK
HARDWARE
THE
THE CONTENTS OF YOUR
STARTER KIT
Your Business Internet High Speed Enterprise Starter kit should contain the following:
1c
1b
1a
1e
2
3
4
1c
5
1d
1.
DSL high speed modem box, if you ordered one from Bell, should contain:
a. DSL high speed modem (your modem may look different, depending on the brand)
• Note: BC and Alberta customers’ modems will be shipped separately from their Internet High Speed
Starter kit.
b. DC power supply with cable
c. Telephone cable with standard telephone plugs, called RJ-11
d. Ethernet cable with plugs slightly larger than the phone cable plugs, called RJ-45
2.
3.
4.
5.
e. USB cable only included with the Speedstream 5200 modem
Desktop filters. (Additional filters (including wall filters) can be ordered online at www.proformagms.com/bell)
1 Telephone line splitter
Installation Guide (what you are currently reading)
Software Installation CD
6 Installing the Hardware
Leave your computer on while you perform the following steps.
CONNECTING
A FILTER TO EVERY PHONE
You must now install a filter on every phone with the same telephone number as your Business
Internet High Speed Enterprise service.
If you require additional filters or wall filters for wall mounted phones, you can order them
online at http://www.proformagms.com/bell
Repeat this process for every desktop phone on the same line as your Business Internet High Speed
Enterprise service:
1.
Unplug the telephone cable from the wall jack, and plug a
desktop filter into the wall jack.
2.
Plug the telephone cable you unplugged from the wall jack
into the filter.
IF
1.
A WALL JACK IS TO BE SHARED BY MODEM AND PHONE
(OPTIONAL)
First plug the phone cable from the modem into the splitter.
From modem
2.
Then plug the filter (from the phone) into the splitter.
From phone
If you are using the Ethernet cable, proceed to If you are Using the Ethernet cable on page 8.
If you are using the USB cable, proceed to If you are using the USB cable on page 9.
Installing the Hardware 7
IF
YOU ARE
USING
THE
ETHERNET
CABLE
Please follow these instructions if you are using the Ethernet cable. If you are using the USB cable, please
proceed to If you are using the USB cable on the next page.
1.
2.
3.
Make sure that the Efficient Networks SpeedStream 5200
modem has adequate ventilation. Place the modem on an
even, hard surface at least one foot away from your monitor, computer case, or other electronic devices including
speakers. The modem will need to be within 6 feet (or 2
meters) of your phone jack.
Your modem should be supplied with an Ethernet cable,
and a phone cable. The Ethernet cable has slightly larger
plugs.
Phone cable
Ethernet cable
Laptop
Desktop
Connect one of end of the Ethernet cable into the largest
jack on the back of your desktop computer or into the
largest jack on the back of your laptop computer, or to the
media coupler attached to your laptop.
Connect the other end of the Ethernet cable into the largest jack on
the back of your modem.
Depending on your modem brand, the jack will be labeled
Ethernet, 10Base T, ENET, or this symbol
.
4.
Connect one end of the phone cable to your telephone wall jack.
5.
Connect the other end of the phone cable to the back of your
modem.
Depending on your modem brand, the jack will be labeled ADSL,
DSL, Line, or this symbol
6.
.
Connect your modem’s power supply to the modem, and then plug the other end into a power bar. A
surge protected power bar is recommended.
Proceed to Checking your setup on page 11.
8 Installing the Hardware
IF
1.
2.
YOU ARE USING THE
USB
CABLE
The USB software installation program will start.
Follow the instructions in the SpeedStream program to install the USB software.
If you have Windows 98, you will need your Windows CD to complete the installation.
3.
When you see the window telling you to connect the modem, connect the Efficient Networks SpeedStream 5200 modem as described in Connecting the USB modem on the next page.
Installing the Hardware 9
CONNECTING
THE
USB
MODEM
1.
Make sure that the Efficient Networks SpeedStream 5200 modem has adequate ventilation. Place the
modem on a hard, level surface at least one foot away from your monitor, computer case, or other electronic devices including speakers. The modem will need to be within 6 feet (or 2 meters) of your phone
jack.
2.
Connect the power supply to the modem, and then plug the other end into a surge protected power
bar.
Connect one end of the phone cable to your telephone wall jack.
3.
4.
Connect the other end of the phone cable to the DSL port on the
Efficient Networks SpeedStream 5200 modem.
5.
Connect the USB cable to the USB port on the back of your desktop
computer, or on the side of your laptop computer. The USB port
will be labeled with the symbol
.
6.
Connect the other end of the USB cable to the USB port on your
Efficient Networks SpeedStream 5200 modem.
You are now asked to restart your computer. Click Finished to restart and proceed to Checking
your setup on page 11.
10 Installing the Hardware
CHECKING
YOUR SETUP
If you have the Alcatel modem, the overall wiring should look like this:
RJ11 PHONE CABLE
FILTER
SPLITTER
PHONE JACK
RJ11 PHONE CABLE
DC POWER SUPPLY
RJ45 ETHERNET CABLE
If you have the SpeedStream modem, the setup should look like this if you are using the Ethernet cable:
FILTER
RJ11 PHONE CABLE
SPLITTER
PHONE JACK
RJ11 PHONE CABLE
DC POWER SUPPLY
RJ45 ETHERNET CABLE
Installing the Hardware 11
CHECKING
YOUR SETUP
(CONTINUED)
Your setup should look like this if you are using the USB cable with the SpeedStream modem:
FILTER
SPLITTER
PHONE JACK
RJ11 PHONE CABLE
RJ11 PHONE CABLE
DC POWER SUPPLY
USB CABLE
All other rooms
with phones that
have the same
number as your
internet service:
12 Installing the Hardware
RJ11 PHONE CABLE
FILTER
PHONE JACK
CHECKING
YOUR SETUP
(CONTINUED)
1.
Make sure your modem and computer are turned on.
2.
If you have the SpeedStream modem with an Ethernet
cable, wait until the pwr, dsl, and enet lights are on. If
you are using the USB cable, wait until the pwr, dsl and
usb lights are on.
If you have an Alcatel modem, wait until there are two
solid green lights on the modem.
If the lights are not on, turn the modem and computer off. Make sure that all the cables are connected
securely, then turn the computer and modem back on. If this does not work, contact the Help Desk. The
appropriate number is on the first page of this guide.
Please proceed to Configuring the Software on the next page.
Installing the Hardware 13
CONFIGURING
THE
SOFTWARE
Before continuing, you should have completed the steps in Beginning the Installation on page 4 and Installing
the Hardware on page 6.
IF
YOU HAVE
WINDOWS XP
1.
Click Next to install the Business Internet High Speed Enterprise software.
2.
After the installation, your computer restarts. Do not remove the CD-ROM from your computer.
3.
On the Finished screen that appears,
click Finish.
4.
The Connect Business Internet High Speed Enterprise
window appears. Type your Business Internet High Speed
Enterprise username (followed by the @ symbol and your
domain name) and password, then click Connect.
14 Configuring the Software
5.
6.
Click the Extras button to install the iPass Global Roaming dialer and the VPN Remote Access Client. Refer
to Setting up your optional Business Internet Dial Enterprise Hours on page 28 for instructions on how to
use iPass Global Roaming. Refer to Installing the VPN Remote Access Client (optional) below for instructions on how to use the VPN software.
After you have installed the extra software, click Finish to end the software installation. Please proceed
to Connecting to and Disconnecting from the Internet with Windows XP on page 15 below.
INSTALLING
THE
VPN REMOTE ACCESS CLIENT (OPTIONAL)
1.
If you wish to install the VPN Remote Access Client software, exit all applications or programs, make
sure you are not connected to the internet, and disable any virus protection software before installing
the software.
2.
In the Extras screen, click IP VPN Remote Access Service.
3.
Follow the instructions on the screen, clicking Next or Yes at each step. A progress bar will show the VPN
Remote Access Client software being installed on your computer. You may be asked for your original
Windows CD-ROM during this process.
4.
On the last screen, click Finish. Your computer will restart.
5.
Click Close and then Finish to end the software installation.
CONNECTING
TO AND
DISCONNECTING
FROM THE
INTERNET
WITH
W I N D O W S XP
1.
To connect to the Internet, double-click the Business Internet High Speed Enterprise icon on the
Desktop, then click Connect. Then click the Internet Explorer icon.
2.
When you are ready to disconnect from the Business Internet High Speed Enterprise service, double-click
the Business Internet High Speed Enterprise icon on the Desktop, then click Disconnect.
The installation and configuration of your Business Internet High Speed Enterprise software is
now complete!
Configuring the Software 15
IF
YOU DO NOT HAVE
WINDOWS XP
1.
Click Next to install the Business Internet High Speed Enterprise software.
2.
After the installation, your computer restarts. If you have Windows 98 or Me, your computer will restart
twice.
3.
Click the Extras button to install the iPass Global Roaming dialer and the VPN Remote Access Client. Refer
to Setting up your optional Business Internet Dial Enterprise Hours on page 28 for instructions on how to
use iPass Global Roaming. Refer to Installing the VPN Remote Access Client (optional) below for instructions on how to use the VPN software.
If you decide not to install the extra software, click Finish to end the software installation. Please proceed
to Configuring the Access Manager on page 17.
4.
INSTALLING
THE
VPN REMOTE ACCESS CLIENT (OPTIONAL)
1.
If you wish to install the VPN Remote Access Client software, exit all applications or programs, make
sure you are not connected to the internet, and disable any virus protection software before installing
the software.
2.
In the Extras screen, click IP VPN Remote Access Service.
3.
Follow the instructions on the screen, clicking Next or Yes at each step. A progress bar will show the VPN
Remote Access Client software being installed on your computer. You may be asked for your original
Windows CD-ROM during this process.
4.
On the last screen, click Finish. Your computer will restart.
5.
Click Close and then Finish to end the software installation. Please proceed to Configuring the Access
Manager on page 17.
16 Configuring the Software
CONFIGURING
THE
ACCESS MANAGER
When your computer has restarted, you will see a message informing you that it is setting up your new
software. It should only take a few minutes to configure the software.
1.
2.
3.
Double-click the Access Manager icon on the desktop.
Double-click the Create New Profile icon in the Access Manager window.
Follow the instructions to create a new profile, and input the following info when prompted:
• For the name of the profile: type Business Internet High Speed Enterprise.
• In the User Name box: type your username followed by the @ symbol followed by your domain
name: username@domain (for example: [email protected]).
• In the Password box: type your password. The password field is UPPER CASE/lower case sensitive.
• You can find this information on the first page of this guide.
4.
5.
You may need to select the device you are
connecting with: either Ethernet or USB.
After you have created your profile, you will see a
Business Internet High Speed icon in the Access
Manager window. Double-click this icon, then
click Connect. Double-click the Internet
Explorer icon on the Desktop.
The installation and configuration of your Business Internet High Speed Enterprise software is
now complete! For help on using the software, refer to Connecting and disconnecting from the
Internet on page 18.
Configuring the Software 17
CONNECTING
AND DISCONNECTING FROM THE
INTERNET
You must install the Access Manager to connect and disconnect from the Business Internet High
Speed Enterprise service. To install the Access Manager follow the instructions in Beginning the
Installation on page 4.
If you have Windows XP, you will not use the Access Manager. Please refer to Connecting
automatically to the Business Internet High Speed Enterprise service on page 19.
CONNECTING
•
TO THE
INTERNET
Double-click the Access Manager icon
on the desktop. Double-click the Business Internet High
Speed Enterprise icon in the Profiles window, then click Connect in the Access Manager window to
connect to the Business Internet High Speed Enterprise service.
OR
•
You can also start the Access Manager by clicking Start, then Programs, then Business Internet High
Speed, then clicking Access Manager. Double-click the Business Internet High Speed Enterprise icon
in the Profiles window, then click Connect in the Access Manager window.
•
After the Access Manager connects, it starts Internet Explorer.
DISCONNECTING
•
FROM THE
INTERNET
In Internet Explorer, click the File menu, then click Exit. To disconnect from the Internet, right-click the
Access Manager icon at the bottom right of your screen, then click Disconnect. You can also doubleclick the Access Manager icon on the Desktop, double-click the Business Internet High Speed Enterprise icon, then click Disconnect. Click Exit to close the Access Manager.
C ONFIGURING
THE
A CCESS M ANAGER
TO DISCONNECT AFTER A SET AMOUNT OF TIME
This is helpful from a security perspective if you happen to forget you are connected or do not want
anyone else to use your account.
1.
Double-click the Access Manager icon on the Desktop, then double-click the Business Internet High
Speed Enterprise icon. Right-click the Access Manager icon at the bottom right of your screen (in the
system tray), then click Profile Properties.
2.
Click the TCP tab. Click the checkbox next to Idle Timeout, and select a time in the box to the right.
3.
Click OK. The next time you connect, you will be automatically disconnected if you are not using the
Internet after the time you specified. When you want to re-connect, click Connect in the Access Manager
window.
18 Connecting and disconnecting from the Internet
C ONNECTING AUTOMATICALLY TO
THE
BUSINESS INTERNET H IGH S PEED ENTERPRISE SERVICE
If you want to connect automatically (that is, you don’t want to manually start the Access Manager and
click the Connect button each time), follow these instructions.
1.
Double-click the Access Manager
icon on the desktop. Double-click the Business Internet High
Speed Enterprise icon. Right-click the Access Manager icon at the bottom right of your screen (in the
system tray), then click Application Settings.
2.
In the Settings window, click the checkbox
beside Auto-Connect if you want to connect
automatically.
Do not check this box if you want to click the
Connect button every time you connect.
3.
Check Launch Access Manager at Windows
Startup if you want the Access Manager to start
and connect when your computer starts.
4.
Uncheck Launch Default Browser after
connection if you do not want your browser to
start automatically after the Access Manager
connects.
3
2
If you want the browser to start automatically,
check this option and type the URL you want the
browser to start with in the box.
5.
Click OK.
You may change these settings as often as you
wish.
4
Connecting and disconnecting from the Internet 19
SWITCHING
FROM THE
USB
CABLE TO THE
ETHERNET
CABLE
If you are using the Efficient Networks SpeedStream 5200 modem with a USB cable and you wish to use
the Ethernet cable instead, please follow these instructions.
1.
Connect the Ethernet cable to the computer, as shown in Installing the Hardware on page 6.
2.
Click the icon
3.
When a message appears saying it is OK to unplug the USB device, unplug the USB cable from your
computer.
4.
If you have Windows XP, you’re done. Windows XP will automatically detect which cable you are using.
5.
Double-click the Access Manager
6.
Right click the Business Internet High Speed Enterprise icon, then click Properties.
in the lower left corner of your screen, then click Stop Ethernet USB Adapter.
icon on the desktop.
7.
In the Properties window, click the Configuration tab.
8.
In the Adapter pull-down menu, click the entry for your
Ethernet card.
9.
Click OK.
10. If you want to remove the USB software, follow the instructions under Removing the Business Internet
High Speed Enterprise software from the computer on page 26.
11. Connect to the Internet as described in Connecting and disconnecting from the Internet on page 18.
20 Connecting and disconnecting from the Internet
SWITCHING
FROM THE
ETHERNET
CABLE TO THE
USB
CABLE
If you are using the Efficient Networks SpeedStream 5200 modem with the Ethernet cable and you wish
to use the USB cable instead, please follow these instructions.
1.
Download the USB software. In your Web browser, go to http://en.bellnet.ca.
2.
Click the Downloads link, and download the USB driver for the SpeedStream 5200 modem. Choose to
download the file to your Desktop.
3.
When the download is finished, disconnect from the Internet and unplug the Ethernet cable from your
computer.
4.
5.
6.
Double-click the file drv_4.2.2.122 on your Desktop.
Click OK in the WinZip Self-Extractor window.
Click Unzip in the next window.
7.
8.
Click OK in the final WinZip window.
Follow the instructions in the SpeedStream program to install the USB software.
If you have Windows 98 First Edition, you will need your Windows CD to complete the
installation.
9.
When you see the window telling you to connect the modem, connect your Efficient Networks SpeedStream 5200 modem as described in Connecting the USB modem on page 10.
10. If you do not have Windows XP, you will now be asked to restart your computer. Click Finished to
restart.
Connecting and disconnecting from the Internet 21
11. If you have Windows XP, you’re done. Windows XP will automatically detect which cable you are using.
12. Double-click the Access Manager
icon on the desktop.
13. Right click the Business Internet High Speed Enterprise icon, then click Properties.
14. In the Properties window, click the Configuration tab.
15. In the Adapter pull-down menu, click the entry for your
Ethernet card.
16. Click OK.
17. Connect to the Internet as described in Connecting and
disconnecting from the Internet on page 18.
22 Connecting and disconnecting from the Internet
TROUBLESHOOTING
As a subscriber of the Business Internet High Speed Enterprise service, support for the Business Internet High
Speed Enterprise software is always available. Business Internet High Speed Enterprise Services do not
provide support for software other than the Internet Explorer software and the Access Manager that are
included with the Business Internet High Speed Enterprise service. Most problems are easy to solve. Here are
the solutions to some of the most common problems you might encounter.
PROBLEM
SUGGESTED ACTION
REFERENCE
My Internet
connection is too slow
If you are using the USB cable, try using the Ethernet cable
instead if you have an Ethernet card.
Follow the instructions under Switching from the USB cable to
the Ethernet cable on page 20.
Switching from
the USB cable to
the Ethernet
cable on
page 20
Where can I get the USB
software?
1.
2.
If you are using
the USB cable
on page 9
3.
In your Web browser, go to http://en.bellnet.ca.
Click the Downloads link, then download the USB driver
for the Efficient Networks SpeedStream 5200 modem.
Follow the instructions under If you are using the USB
cable on page 9.
How do I remove the
USB software?
Follow the instruction under Removing the Business Internet
High Speed Enterprise software from the computer on
page 26.
Removing the
Business Internet High Speed
Enterprise software from the
computer on
page 26
The power light on my
Efficient Networks
SpeedStream 5200
modem is blinking red
The power light will blink red for a few minutes after the
power supply is connected.
Checking your
setup on
page 11
You don’t have enough
free hard drive space to
install the Business
Internet High Speed
Enterprise software
Delete any files you don’t need, but do not delete files if you
don’t know what they are for. Empty the Recycle Bin or
Trash. Try to install the Business Internet High Speed Enterprise software again.
Beginning the
Installation on
page 4
Your computer crashed
while using the browser
(computer will not
respond to mouse)
Low disk space: Make sure that you have sufficient free disk
space on your computer. Empty the Recycle Bin or Trash.
You may need to delete some files from your hard drive.
Corrupt cache: To clear the cache with Internet Explorer,
select Internet Options in the Tools menu. Click the General tab, then click the Delete Files button. Click OK, then
click OK again.
Troubleshooting 23
PROBLEM
SUGGESTED ACTION
You cannot browse the
Internet
Make sure that the cable is connected securely to the Efficient Networks SpeedStream 5200 modem, and that you are
using the right kind of cable.
If you are using the Ethernet cable, turn the Efficient Networks SpeedStream 5200 modem off, then back on.
You see a message
about a network error
Exit the browser software, then restart your computer and
try connecting again.
Follow the instructions under Your computer crashed while
using the browser (computer will not respond to mouse) on
page 23.
The browser does not
start when doubleclicked.
Look for the Internet Explorer icon on the taskbar at the bottom of the screen. If you see it, click it once. To prevent this
from happening in the future, click Exit from the browser
File menu when you’re finished rather than simply minimizing the browser window.
You see a message
about there being more
than three network
adapters in your system.
1.
Click
2.
3.
Double-click the Network icon.
Click an unused network adapter in the list, then click
Remove.
Repeat the above step until you have only two network
adapters installed.
Click OK, and restart your computer if prompted. This
procedure does not remove the software from your
computer; it just prevents the adapter from appearing in
the Network control panel.
4.
5.
REFERENCE
Installing the
Hardware on
page 6
, click Settings, then click Control Panel.
You see a message saying “PPP Negotiate Timeout”.
Ensure that your Efficient Networks SpeedStream 5200
modem is connected and turned on.
Installing the
Hardware on
page 6
You see a message saying “Authentication
failed”.
Check your Business Internet High Speed Enterprise Login ID
and password in the Access Manager. Make sure that you
have entered them in lower case.
Connecting and
disconnecting
from the Internet on page 18
24 Troubleshooting
PROBLEM
SUGGESTED ACTION
You see a message saying “Failed to Bind to
Tap Driver”.
Windows 98/Me:
You see a message
about being unable to
initiate the PPPoE session.
Windows 98/Me:
1. In the Access Manager window, double-click the Business Internet High Speed Enterprise icon.
2. Right-click the Access Manager icon in the taskbar, and
click Profile Properties.
3. Click the Configuration tab.
4. Make sure that your Ethernet card is selected in the pulldown menu, then click OK.
Windows NT/2000:
•
Please consult your system administrator for assistance.
You see a message saying that the DHCP client could not obtain an
IP address.
Click No.
1.
, click Settings, then click Control Panel.
2.
3.
Double-click the Network icon.
Double-click Network TeleSystems P.P.P.o.E Adapter
(NTSP3) in the list.
4. Click the Bindings tab. Make sure that TCP/IP ->
Network TeleSystems P.P.P.o.E Adapter (NTSP3) is
checked.
Windows NT/2000:
•
Please consult your system administrator for assistance.
In order to make the startup process faster, please do the
following:
1.
2.
3.
4.
5.
6.
You see a message
about Insufficient
Administrative Privilege
or you cannot start the
Access Manager.
Click
REFERENCE
In the Network control panel, click the Protocols tab,
then double-click the TCP/IP protocol.
In the Adapter pull-down menu, select the adapter for
your network interface card.
Click the IP Address tab, then click Specify an IP
address.
Type 192.168.1.1 in the IP address box.
Type 255.255.255.0 in the Subnet mask box.
Click Apply, then click OK, then click OK again.
You must log in to Windows NT/2000 as the Administrator in
order to install and use the Access Manager.
Please refer to
your Windows
NT manual for
further information about
your network
interface card.
Please refer to
your Windows
NT/2000 manual for further
information.
Troubleshooting 25
PROBLEM
You see a message
about locating NTSPPPoEx in the registry.
SUGGESTED ACTION
REFERENCE
Uninstall Access Manager. Disable any anti-virus programs
that may be running, then reinstall the Access Manager from
the Business Internet High Speed Enterprise CD-ROM.
Beginning the
Installation on
page 4
REMOVING THE BUSINESS INTERNET HIGH SPEED ENTERPRISE SOFTWARE FROM THE COMPUTER
To remove the Business Internet High Speed Enterprise software from your computer, follow these steps:
Removing the USB software
a. Click
, click Settings, then click Control Panel.
b. Double-click Add/Remove Programs (Change/Remove with Windows 2000), then click Efficient
Networks SpeedStream DSL.
c. Click the Add/Remove button, then follow the instructions to remove the software.
d. When the computer restarts, unplug the USB cable from the computer.
Internet Explorer
a. Click
, click Settings, then click Control Panel.
b. Double-click Add/Remove Programs, then click Microsoft Internet Explorer X and Internet Tools
where X is the version number.
c. Click the Add/Remove button, and follow the instructions.
Access Manager
a. Click
, click Programs, click Business Internet High Speed Enterprise, then click Uninstall
Access Manager.
b. Click Yes, and follow the instructions. When you are asked to remove shared files, click Yes to All.
If you have Windows XP
• Click
, then click Connect To, then click Show all connections. Delete the connections
you no longer want to use.
•
OTHER
•
•
•
•
TROUBLESHOOTING RESOURCES
As part of your Business Internet High Speed Enterprise membership, the Help section of the Business
Internet High Speed Enterprise Web site (http://en.bellnet.ca) is a great resource for up-to-date information about your account and how to use the Business Internet High Speed Enterprise software. At
any time you are connected to the Internet, click the Help button on any Business Internet High Speed
Enterprise page. You will be linked to the latest news and tips about your Business Internet High Speed
Enterprise software, including information about available upgrades, and billing information.
If you need help using the Internet Explorer software, you can consult its built-in help by clicking the
Help menu, then by clicking Internet Explorer Help.
You can get help for the Access Manager by double-clicking the Access Manager icon, then clicking the
Help button. You do not have to be online to do this.
If you receive an error message on your screen, please write it down before contacting our support services. Also, if the error occurred while following the instructions in this guide, note the page and step
26 Troubleshooting
•
you were at. This information will help the technical support agent’s give you the assistance you need
as quickly as possible.
If you cannot send email to our support services, please have your personal Business Internet account
information in front of you, then call the Business Internet Technical Support Line. The appropriate
number for your region is on the first page of this guide.
Troubleshooting 27
SETTING UP YOUR OPTIONAL BUSINESS INTERNET
DIAL ENTERPRISE HOURS
As part of your Business Internet High Speed Enterprise service your receive 20 hours of
Business Internet Dial Enterprise service FREE each month! When you want to access the
Business Internet service while away from the office, you can use a dialup connection. Follow
the directions below to configure a dialup connection.
You will need the following items.
•
•
A regular dial-up modem to connect your computer to a telephone line.
Your Business Internet Login ID and password.
Ensure that your regular dial-up modem is installed. If necessary, consult the documentation that
came with your modem.
1.
2.
Insert the Business Internet High Speed Enterprise CD into your CD-ROM drive. In Windows Explorer,
right-click the CD-ROM icon, then click Explore.
Double-click the iPass folder, then double-click the iPassConnect icon.
3.
The installation of the Global Roaming software starts. Click Next on the first screen.
4.
On the next screen, click Next to install the Global Roaming software in the recommended location. A
progress bar shows the progress of the installation.
5.
On the last screen, uncheck the Launch
Global Roaming box, then click Finish.
6.
Double-click the Global Roaming icon
7.
If this is the first time you have used Global Roaming, you will see a license agreement. Read the
agreement, then click Accept if you agree.
on the desktop.
28 Setting up your optional Business Internet Dial Enterprise Hours
8.
In the Global Roaming window, click your
country in the Country pull-down menu.
9. Click your city in the City pull-down menu.
10. Click the number you want to dial from the list
that appears in the Phone Book section of the
window.
11. If you need to use dialing prefixes or codes to
turn off Call Waiting™ or to access an outside line
before dialing, click Dial Properties and type
them in the Dial Properties window.
12. Click Connect to connect to the Business Internet
Dial Enterprise service. A User Info window will
appear. Type your Business Internet Dial Enterprise
username and password in the boxes provided. If
your domain is not bellnet.ca, ask your account
administrator for your domain, and type it in the
Domain box. Click OK.
If you need more help using the Global Roaming
software, click the Help button in the main window.
13. Click the Options menu, then click Update Phonebook. If you are going to be dialing into the Business
Internet service from other cities, make sure that you update the phonebook before you travel.
14. Double-click the Internet Explorer icon on your desktop. Internet Explorer will start and display your
Business Internet Dial Enterprise home page.
You must always dial with Global Roaming first, then start Internet Explorer.
Setting up your optional Business Internet Dial Enterprise Hours 29
DISCONNECTING
FROM THE
INTERNET
When you are finished exploring the Internet, follow these steps to disconnect from the Business Internet
Dial Enterprise service and exit your software:
1.
Quit the Internet applications you are using.
2.
Right-click the small Global Roaming icon
screen).
3.
Click Disconnect.
CHANGING
THE
NUMBER
in the system tray (the lower right-hand corner of the
YOU DIAL
To change the number you dial (for instance, if you move to another city), follow these steps.
1.
2.
3.
4.
In the Global Roaming window, click your country in the Country pull-down menu.
Click your city in the City pull-down menu.
Click the number you want to dial from the list that appears in the Phone Book section of the window.
If you need to use dialing prefixes or codes to turn off Call Waiting™ or to access an outside line before
dialing, click Dial Properties and type them in the Dial Properties window.
For the latest release of Global Roaming dialer, please visit www.bell.ca/globalroaming
CONNECTING
TO YOUR
BUSINESS INTERNET HIGH SPEED ENTERPRISE SERVICE
If you have created a dialup connection on a computer that was used for your Business Internet High
Speed Enterprise account, and you now want to use your Business Internet High Speed Enterprise
account again, simply follow the instructions under Connecting and disconnecting from the Internet on
page 18 to connect with the Access Manager.
30 Setting up your optional Business Internet Dial Enterprise Hours
TROUBLESHOOTING
7
As a subscriber of the Business Internet Dial Enterprise service, support is always available to you. Most
problems are easy to solve. Here are the solutions to some of the most common problems you might
encounter while installing and using the software.
PROBLEM
There is no dial tone
present on your phone
line
SUGGESTED ACTION
REFERENCE
If your connection software tells you that your phone line
does not have a dial tone, here are some tips to help you
resolve the problem:
•
Pick up the receiver of your telephone and listen for a
dial tone. If you do not hear a dial tone, another telephone on the same line might be off the hook. Or, there
might be something wrong with your phone line.
•
Make sure that the modem is turned on, and that the
phone cables are properly connected to the modem
and the phone line. Most modems have two ports on
the back. One should be connected to your telephone
wall jack, and the other may be connected to a standard
telephone. Dial tone errors may result if the two lines
are reversed. External modems will also have a cable
which connects the modem to the back of your computer, and a power cord which reaches from the
modem to the electrical wall outlet. Make sure all cables
and the power cord are firmly plugged in. If the modem
has external lights, at least one of them should be on.
•
If you have Call Answer or Message Manager service on
the phone line used by your modem, and you have new
messages waiting, most modems require that you listen
to your messages before trying to connect. Often these
extra phone services provide warnings and notifications
to the customer by sending a slightly different dial tone,
which may not be properly detected by your modem.
Troubleshooting 31
PROBLEM
You can’t connect to the
Business Internet Dial
Enterprise service
SUGGESTED ACTION
•
•
•
•
•
Check for a dial tone on your phone line. For more
information, please consult There is no dial tone present
on your phone line above.
Your modem may need to be reset for it to initialize
properly. If you have an external modem, you can reset
it simply by turning it off and then on again. If you have
an internal modem, you will need to shut down your
computer and restart it again. Once your modem has
been reset, try connecting again.
Verify that any required software for your modem has
been installed properly. If you are not sure about
whether your modem includes special software, look in
the user guide that came with your modem. If you are
not sure whether the software is present on your computer, reinstall the software according to the manufacturer’s instructions.
Make sure that no other programs are currently using
your modem, such as fax software waiting for an
incoming fax.
Check to see that your modem is configured correctly.
See There is no dial tone present on your phone line on
page 31.
The browser is unable to
connect to the network
Clear the browser’s cache:
•
Try reloading the page using the Reload or Refresh button on the browser toolbar.
•
If this does not work after a couple of tries, quit the
browser, disconnect from the Business Internet Dial
Enterprise service, and check that your name server
addresses in the TCP/IP Control Panel are correct.
Note: These are generic errors. Do not assume that the Business Internet Dial Enterprise service is unavailable.
Your browser does not
start when doubleclicked
This might mean that your browser has already been
started. Give your computer some time (about 20 seconds)
before clicking the browser icon again. Look for your
browser icon on the taskbar at the bottom of the screen. If
you see it, click it once. To prevent this from happening in
the future, click Exit from your browser’s File menu when
you’re finished rather than simply minimizing the window.
It may also be that your browser shortcut has been configured to start minimized. To correct this problem, right-click
the browser shortcut on your desktop and click Properties.
In the Properties window, click the Shortcut tab, and ensure
that Normal window is selected in the Run pop-up menu.
32 Troubleshooting
REFERENCE
OTHER
TROUBLESHOOTING
RESOURCES
REMOVING THE GLOBAL ROAMING SOFTWARE
1.
2.
3.
4.
Click Start, click Settings, then click Control Panel. In Windows XP, click Start then click Control
Panel.
Double-click Add/Remove Programs, then click Global Roaming.
Click the Add/Remove button (in Windows XP click Change/Remove), and follow the instructions to
remove the Global Roaming software.
To remove the Global Roaming software, click Global Roaming in the Add/Remove Programs window,
then click Add/Remove, then follow the instructions.
IF NONE OF THE RESOURCES ABOVE HAVE ANSWERED YOUR QUESTION OR PROBLEM
Don’t worry, we’re here to help you. Our support services are staffed by friendly experts who will be happy
to answer your questions.
If you receive an error message on your screen, please write it down before contacting our support
services. Also, if the error occurred while following the instructions in this guide, note the page and step
you were at. This information will help our support services give you the assistance you need as quickly
as possible.
If you cannot send e-mail to Member Services, please have your personal Business Internet Dial Enterprise account information in front of you, then call the Business Internet Technical Support Line. The
number is on the first page of this guide.
Please remember that our support services are only equipped to answer questions related to the
Business Internet Dial Enterprise software described in this guide.
Troubleshooting 33