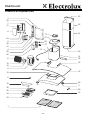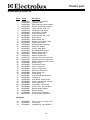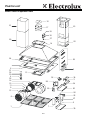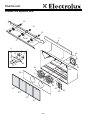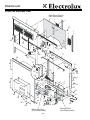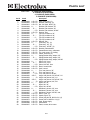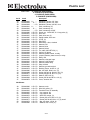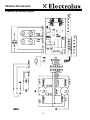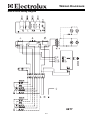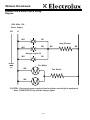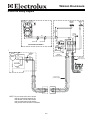
1
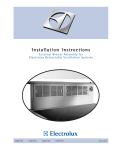
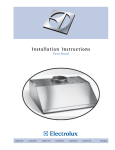
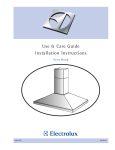
Technical Service Manual
Pro and Designer Series Ventilation
2007 ALL RIGHTS RESERVED
Basic Operation
Section 1
Basic Operation
of
Ventilation
Products
1-1
Basic Operation
Section 1 - Basic Information .................................. 1-1
Component Teardown E30DD75ESS .......................... 3-16
Table of Contents ............................................................ 1-2
Safe Servicing Practices .................................................. 1-3
Basic Operation E36WC45FSS ...................................... 1-4
Care and Cleaning .......................................................... 1-4
Basic Operation E40PV100FS ........................................ 1-5
Heat Sensing Thermostat .............................................. 1-5
Care and Cleaning .......................................................... 1-5
Basic Operation E488WV120S ........................................ 1-6
Care and Cleaning .......................................................... 1-6
Basic Operation E30DD75ESS ........................................ 1-7
Care and Cleaning .......................................................... 1-7
Specifications E36WC45FSS .......................................... 1-8
Specifications E40PV100FS ............................................ 1-9
Specifications E488WV120S............................................ 1-10
Specifications E30DD75ESS .......................................... 1-11
Grease Filter Removal .................................................. 3-16
Snorkel Switch Removal .............................................. 3-16
Blower Control Potentiometer Removal........................ 3-16
Motor Mounting Box Removal ...................................... 3-17
Drive Motor Assembly Removal.................................... 3-17
Electrical Component Removal .................................... 3-18
Component Teardown Remote Blower Assembly ...... 3-19
Blower Motor Removal ............................................ 3-19
Capacitor Removal .................................................. 3-19
Section 4 - Parts Lists and Exploded Views .......... 4-1
E36WC45FSS Exploded View ........................................
E36WC45FSS Parts List ................................................
E40PV100FS Exploded View ..........................................
E40PV100FS Parts List ..................................................
E488WV120S Exploded View ..........................................
E488WV120S Parts List ..................................................
E30DD75E Exploded View ..............................................
E30DD75E, E36DD75E, E46DD75E & E48DD75E ........
Parts List ..........................................................................
Section 2 - Troubleshooting .................................... 2-1
E36WC45FSS, E40PV100FS,
E488WV120S Troubleshooting Chart .............................. 2-2
E30DD75ESS Troubleshooting Chart .............................. 2-4
Section 3 - Component Teardown .......................... 3-1
Warnings And Cautions .............................................. 3-2
Component Teardown E36WC45FSS ........................ 3-3
Grease Filter Removal ............................................ 3-3
Halogen Lamp Bulb Removal .................................. 3-3
Lamp Receptacle Removal ...................................... 3-3
Push Button Control Switch Removal ...................... 3-4
Heat Sentry Thermostat Removal............................ 3-4
Accessing Electrical Components ............................ 3-5
Flue Removal .......................................................... 3-5
Printed Circuit Control Board Removal .................... 3-5
Transformer Removal .............................................. 3-6
Power Cord Removal .............................................. 3-6
Capacitor Removal .................................................. 3-6
Blower Motor Removal ............................................ 3-7
Canopy Removal .................................................... 3-8
Component Teardown E40PV100FS .......................... 3-9
Grease Filter Removal ............................................ 3-9
Lamp Removal ........................................................ 3-9
Lamp Receptacle Removal ...................................... 3-9
Heat Sentry Thermostat Removal............................ 3-10
Transformer, Circuit Board and Fuse Removal........ 3-10
Capacitor Removal .................................................. 3-11
Control Switch Assembly Removal .......................... 3-11
Bottom Panel Removal ............................................ 3-12
Blower Motor Removal ............................................ 3-12
Component Teardown E488WV120S.......................... 3-13
Grease Filter Removal ............................................ 3-13
Bulb and Lamp Trim Removal.................................. 3-13
Control Assembly Removal ...................................... 3-13
Grime Shield Removal ............................................ 3-14
Control Panel Inner Support Removal .................... 3-14
Lamp Receptacle Removal ...................................... 3-14
Blower Motor Removal ............................................ 3-15
4-2
4-3
4-2
4-3
4-4
4-5
4-6
4-7
Section 5 - Wiring Diagrams .................................... 5-1
E36WC45FSS ................................................................
E40PV100FS ..................................................................
E488WV120S & E48WV12EPS ......................................
E30DD75E, E36DD75E, E46DD75E & E48DD75E ........
1-2
5-2
5-3
5-4
5-5
Basic Operation
Safe Servicing Practices
Avoid personal injury and/or property damage by observing important Safe Servicing Practices.
Following are some limited examples of safe practices:
1. DO NOT attempt a product repair if you have any doubts as to your ability to complete the repair in a safe and
satisfactory manner.
2. Always Use The Correct Replacement Parts as indicated in the parts documentation. Substitutions may defeat
compliance with Safety Standards Set For Home Appliances. Do not exceed maximum recommended wattage
on halogen bulb replacements. Doing so could blow fuses and/or damage transformers.
3. Before servicing or moving an appliance:
• Remove power cord from the electrical outlet, trip circuit breaker to the OFF position, or remove fuse.
• Turn off gas supply.
• Turn off water supply.
4. Never interfere with the proper operation of any safety device.
5. Use ONLY REPLACEMENT PARTS CATALOGED FOR THIS APPLIANCE. Substitutions may defeat compliance with Safety Standards Set For Home Appliances.
6. GROUNDING: The standard color coding for safety ground wires is GREEN, or GREEN with YELLOW
STRIPES. Ground leads are not to be used as current carrying conductors. It is EXTREMELY important that the
service technician reestablish all safety grounds prior to completion of service. Failure to do so will create a hazard.
7. Prior to returning the product to service, ensure that:
• All electrical connections are correct and secure.
• All electrical leads are properly dressed and secured away from sharp edges, high-temperature components,
and moving parts.
• All non-insulated electrical terminals, connectors, heaters, etc. are adequately spaced away from all metal parts
and panels.
• All safety grounds (both internal and external) are correctly and securely connected.
• All panels are properly and securely reassembled
1-3
Basic Operation
Basic Operation - E36WC45FSS
ICON
All functions of the E36WC45FSS are controlled by a
five button control panel located on the front edge of the
hood. (See Figure 1-1)
Light
LED
Indicators
Fan Speed
The 2-level light switch, located on the far left of the
control panel controls the operation of the halogen
lights.
(Off)
1. Press button once to turn lights ON.
2. Press again for a brighter light setting.
3. Press a third time to turn lights OFF.
Light
Switch
The #1 fan speed switch turns the blower ON to lowest
operating speed and the LED above the switch will illuminate. Press and hold for approximately 2 seconds to
turn off fan.
(Timer 10 Min)
Blower Speed
Switches
1, 2, 3, 4
Figure 1-1. Control Panel Layout
The #2 switch turns the blower on to medium-low operating speed and the LED above switch will illuminate.
Pressing this switch a second time will set a timer which
keeps the blower operating at this speed for 10 minutes.
The LED will blink during this time and the blower will
shut off automatically.
The #3 and #4 switches operate in the same manner as
the #2 switch described above. The #3 switch sets the
fan speed to medium high while the #4 switch sets the
fan speed to high.
After every 30 hours of operation, the LED above switch
#1 will illuminate RED and blink for 30 seconds after
turning off the blower. This is a reminder to clean the
grease filters. The light is reset by depressing the switch
for 2 seconds.
Care and Cleaning
Grease filters should be cleaned frequently, at a minimum of every 30 hours of usage. They can be washed
in warm water with a mild detergent or placed in the
dishwasher.
Lift Tab and Tilt Downward
The grease filters are released from their installation
position by lifting the filter latches and tilting downward.
(See Figure 1-2)
Figure 1-2. Filter Removal
1-4
Basic Operation
Basic Operation - E40PV100FS
Fan On / Off
Fan Speed
Control
Light Control
All functions of the E40PV100FS are controlled by slide
controls located under the front edge of the hood.
(See Figure 1-3)
The blower on/off switch turns blower on to the operating speed set by the blower speed control.
The blower speed control features a range of 3 speeds,
low, medium, and high. The pilot lamp will illuminate
whenever blower is switched on.
Off
FAN
On
Lo
FAN SPEED
Hi
Off
Pilot Light
Figure 1-3. Control Panel Layout
Heat Sensing Thermostat™
The Heat Sensing Thermostat™ overrides all user control switches and may start blower even if the hood is
turned OFF. The Heat Sensing Thermostat™ may also
increase blower speed if the user’s selected operating
speed is insufficient. When this occurs, it is impossible
to turn blower OFF using the control panel switch. The
blower will only shut off when the thermostat senses a
cool enough temperature. If the blower must be
stopped, the power must be shut off at the main electrical panel.
Care and Cleaning
Filter
Grease filters should be cleaned frequently, at a minimum of every 30 hours of usage. They can be washed
in warm water with a mild detergent or placed in the
dishwasher.
The grease filters are released from their installation
position by lifting the filter latches and tilting downward.
(See Figure 1-4)
Lift Tab
Figure 1-4. Filter Removal
1-5
LIGHT
On
Basic Operation
Basic Operation - E488WV120S
All functions of the E488WV120S are controlled by two
dial controls located under the front edge of the hood.
(See Figure 1-5)
The lighting control dial acts as a dimmer, offering infinite adjustment of lighting level.
The blower dial control also offers infinite control of
blower speed, going from highest to lowest as the dial is
rotated clockwise.
Fan Control
Light Control
Care and Cleaning
Figure 1-5. Control Panel Layout
Grease filters should be cleaned frequently, at a minimum of every 30 hours of usage. They can be washed
in warm water with a mild detergent or placed in the
dishwasher.
The filters are spring-tensioned and are released from
their installation position by pushing back and pulling
down. (See Figure 1-6)
Pull Towards Rear
Grab Here
Figure 1-6. Grease Filter Removal
1-6
Basic Operation
Basic Operation - E30DD75ESS
Snorkel Switch
The chimney is raised and lowered by depressing the
snorkel switch. When the chimney is down, depressing
the switch sends voltage to the upper limit switch
mounted on the motor. (See Figure 1-7)
The drive motor assembly has an upper limit and a
lower limit switch mounted on the drive motor housing.
As the motor rotates, a cam on the motor activates
these switches to control up and down movement of
chimney. The motor only turns one way. Once movement is started, it cannot be reversed until the full cycle
is complete.
Fan Control
The blower motor will start automatically when the chimney is raised. The blower motor speed is controlled by
the control switch.
Figure 1-7. Control Panel Layout
Care and Cleaning
Grease filters should be cleaned frequently, at a minimum of every 30 hours of usage. They can be washed
in warm water with a mild detergent or placed in the
dishwasher.
The filters are spring-tensioned and are released from
their installation position by pulling down and then out.
(See Figure 1-8)
Pull Down and Out
Figure 1-8. Filter Removal
1-7
Basic Operation
36" RANGE HOOD E36WC45FSS
Nominal Width
Installation Type
Air Discharge
Air Delivery
Blower Type
Control
Fan Speed
Halogen Light
Washable Stainless Steel Filter
Exhaust Duct
Diameter of Duct
36"
Wall Mount
Vertical
400 CFM
Centrifugal
Electronic
4
2
Yes
External
6"
ACCESSORIES
35-7/16" Flue Extension - EXWC45
Charcoal Filter - CF40E
Optional
Optional
SPECIFICATIONS
Electrical – 120 V AC / 60 Hz / 15 or 20 Amp
Power Cord Location
(Within Flue Adjacent to Bottom of Air Outlet
Product Weight
Shipping Weight
Sones Rating
UPC (0-12505-)
Required
Enters Flue
Top at Right
58 Lbs.
68 Lbs.
9.0
55799-6
Electrical
outlet
Power
cord
337/16"
max.
Figure 1-9. Electrical Connection
115/8"
NOTE: Always consult local and/or national electric codes. Check
local building codes for installation requirements, as they may vary per
locale. Refer to Product Installation Guide for detailed instructions on
the web at electroluxusa.com.
115/16"
Dimensions from
base of hood to
ceiling, and include
clearance required
for installation.
2915/16" min.
481/2" max.
223/4"
( min. height
with one
cover)
3"
357/8"
195/8"
Figure 1-10. Overall Dimensions
1-8
Basic Operation
40" RANGE HOOD EPV40PV100FS
Nominal Width
Installation Type
Intelligent Heat Sensor
Air Discharge
Air Delivery
Blower Type
Controls
Fan Speeds
Halogen Lights
Washable Stainless Steel Filters
Exhaust Duct
Diameter of Duct
ACCESSORIES
32-11/16" Flue Extension - EXPV100s
40"
Peninsula / Island
Yes
Vertical
1,000 CFM
Dual Centrifugal
Standard Slide
3
4
Yes
External
8"
97/16"
5"min.
201/2"max.
Dimensions from
base of hood to
ceiling, and include
clearance required
for installation.
33" min.
419/16"max.
16 9/16"
2"
11"
Optional
393/8"
SPECIFICATIONS
Electrical – 120 V AC / 60 Hz / 15 or 20 Amp
Power Supply Location
(Within Flue Adjacent to Bottom of Air Outlet)
Product Weight
Shipping Weight
Sones Rating
UPC (0-12505-)
123/4"
Required
Enters Flue
Top at Left
90 Lbs.
108.1 Lbs.
11.5
55798-9
279/16"
Figure 1-11. Overall Dimensions
NOTE: Always consult local and/or national electric codes. Check
local building codes for installation requirements, as they may vary per
locale. Refer to Product Installation Guide for detailed instructions on
the web at electroluxusa.com.
1-9
Basic Operation
18" CANOPY RANGE HOODS
Size
Installation Type
Air Discharge
Air Delivery
Blower Type
Controls
Infinite-Speed Blower
Dual Halogen Lights
Dishwasher Safe Aluminum Filters
Exhaust Duct
Diameter of Duct
E488WV120S
48”
Wall Mounted
Vertical or Horiz.
1200 CFM
Dual Centrifugal
Dial
Yes
Yes
Yes
External
10"
E368WV60ES
36”
Wall Mounted
Vertical or Horiz.
600 CFM
Centrifugal
Dial
Yes
Yes
Yes
External
10"
E308WV60ES
30"
Wall Mounted
Vertical or Horiz.
600 CFM
Centrifugal
Dial
Yes
Yes
Yes
External
10"
18"
48"
11-7/8"
18"
36"
11-7/8"
18"
30"
11-7/8"
Required
103 Lbs.
108 Lbs.
55611-1
Required
64 Lbs.
67 Lbs.
55710-1
Required
55 Lbs.
58 Lbs.
55711-1
SPECIFICATIONS
Cutout Dimensions –
Height
Width
Depth
Electrical –
120 V AC / 60 Hz / 15 or 20 Amps
Product Weight
Shipping Weight
UPC (0-12505-)
NOTE: Always consult local and / or national electric codes. Refer to Product Installation
Guide for detailed installation instructions on the web at www.electroluxusa.com.
E488WV120S
117/8"
18"
48"
26 7/8"
117/8"
18"
Dimensions
Vent Model
A
26 7/8"
E368WV60ES 36"
E308WV60ES 30"
Figure 1-12. Overall Dimensions
1-10
A
Basic Operation
DOWNDRAFT
Size
Installation Type
Air Discharge
Air Delivery
Intake Area
Controls
Infinite-Speed Blower
Dishwasher Safe Aluminum Filters
Exhaust Duct
Diameter of Duct
E48DD75ESS
48”
Counterto
Mounted
Down
1600 CFM
10”
Dial
Yes
Yes
External
3-1/4”
E46DD75ESS
46”
Countertop
Mounted
Down
1600 CFM
10”
Dial
Yes
Yes
External
3-1/4”
E36DD75ESS
36”
Countertop
Mounted
Down
1600 CFM
10”
Dial
Yes
Yes
External
3-1/4”
E30DD75ESS
30"
Countertop
Mounted
Down
1600 CFM
10"
Dial
Yes
Yes
External
3-1/4"
Required
69 Lbs.
53953-4
Required
69 Lbs.
53952-7
Required
55 Lbs.
53951-0
Required
48 Lbs.
53950-3
SPECIFICATIONS
Electrical – 120 V AC / 60 Hz / 15 or 20 Amps
Shipping Weight
UPC (0-12505-)
NOTE: Always consult local and / or national electric codes. Refer to Product Installation Guide
for detailed installation instructions on the web at www.electroluxusa.com.
*48"
10"
* E46DD75ESS = 46"
E36DD75ESS = 36"
E30DD75ESS = 30"
Figure 1-13. Overall Dimensions
1-11
Basic Operation
Notes
1-12
Troubleshooting
Section 2
Troubleshooting
Ventilation
Products
2-1
Troubleshooting
This Troubleshooting section is divided into two parts.
Pages 2-2 & 2-3 will pertain to Models #E36WC45FSS, #E36WV100FS, #E40PV100FS and the #E488WV120S.
Pages 2-4 & 2-5 will pertain to the Model #E30DD75ESS only.
Model Number
Problem or Fault
Check or Repair
E36WC45FSS
E36WV100FS
E40PV100FS
E488WV120S
Unit will not start and lights will not
light.
1. Check wall outlet or power connection.
2. Check power at breaker box
E36WC45FSS
E36WV100FS
E40PV100FS
E488WV120S
Customer complains of poor exhaust
performance.
1. Check for obstruction in duct, blower, dampers,
wall or roof cap, intake vents.
2. Filters dirty.
3. Dirty grease filters and/or charcoal filter, if
equipped, blocking air flow.
4. Size of duct, dampers and/or exhaust jacks
smaller than recommended.
5. Hood mounted more than 30 inches from cook
top (against manufacturers installation instructions). Hood must be 24 – 30 inches from
cooktop.
E36WC45FSS
E36WV100FS
E40PV100FS
E488WV120S
Stops and restarts; will not run contin- 1. Hood motor is overheating and thermal cutout
uously.
is activating. Hood restarts when motor cools.
Check for:
a. Plugged filters.
b. Intake vents restricted.
c. Bad motor bearings– causing overheating
(See motor replacement).
E36WC45FSS
. Stops and restarts; will not run contin- 1. Consumer unwittingly pressing fan buttons long
uously.
enough to activate 10-minute timer, setting control for 10 minute limit.
E36WC45FSS
One halogen bulb fails to light.
1. Replace with Type JC, 12 Volt, 20 Watt Max,
G-4 Base halogen bulb. See Component
Teardown section for details.
E36WV100FS
E40PV100FS
One halogen bulb fails to light.
1. Replace with type MR1, 12 Volt, 20 Watt Max.
See Component Teardown section for details.
E488WV120S
One halogen bulb fails to light.
1. Use suction cup, part number 530444873, supplied with the hood, to remove and replace
bulbs. See Component Teardown section for
details.
E36WC45FSS
All halogen bulbs fail to light.
1. Check fuse and replace if open.
2. Check transformer.
3. Check for intermittent switch operation. See
Component Teardown section for details.
E36WV100FS
E40PV100FS
All halogen bulbs fail to light.
1. Check fuse and replace if open.
2. Check transformer.
See Component Teardown section for details.
2-2
Troubleshooting
Model Number
Problem or Fault
Check or Repair
E488WV120S
All halogen bulbs fail to light.
1. Check the dimmer switch and replace if bad.
See Component Teardown section for details.
E36WC45FSS
E36WV100FS
E40PV100FS
E488WV120S
Fan doesn't start and lights don't
work (Unit dead)
1. Intermittent switch operation. Replace switch
board or switch assembly (for switch assembly
removal see Component Teardown section for
details.
2. Motor thermal protection is open. Replace
motor (see Component Teardown section for
details).
3. Vent obstruction or other cause of motor overheating.
E36WC45FSS
E36WV100FS
E40PV100FS
E488WV120S
Motor hums but doesn't start
1. Check for and secure loose connections
between switch and control board. If no loose
connections, replace control board.
See Component Teardown section for details.
E36WC45FSS
E36WV100FS
E40PV100FS
E488WV120S
Motor does not have multiple speeds
1. Check for and secure loose connections
between switch and control board. If no loose
connections, replace control board.
See Component Teardown section for details.
E36WC45FSS
E36WV100FS
E40PV100FS
E488WV120S
Excessive vibration
1. Check for damaged or deformed fan blade and
replace as necessary.. See Component
Teardown section for details.
E36WC45FSS
Red light blinking above blower speed 1. After every 30 hours of operation, the LED
switch
above the “blower speed 1 switch” will blink for
30 seconds after turning off the blower. This is
a reminder to clean the grease filters. Once the
grease filters are cleaned and installed, press
and hold the “light switch” button for approximately 2 seconds to stop the blinking and reset
the 30 hour timer.
E36WC45FSS
Delay off timer fails to turn off blower
after 10 minutes +/- 10%
E36WC45FSS
Filter maintenance LED does not flash 1. Defective microchip. Replace control board.
after 30 working hours of operation
See Component Teardown section for details.
+/- 10%
2-3
1. Defective microchip. Replace control board.
See Component Teardown section for details.
Troubleshooting
Model Number
Problem or Fault
Check or Repair
E30DD75ESS
Customer complains of 1. Check for obstruction in duct, blower,
poor exhaust performdampers, wall or roof cap, and intake vents.
ance.
2. Dirty Grease filters.
3. Size of duct, dampers and/or exhaust jacks smaller than
recommended
E30DD75ESS
Entire unit inoperative.
1. Power supply to hood is turned off or open.
a. Check household circuit breaker or fuse.
b. Unit unplugged underneath countertop.
2. No voltage to snorkel switch.
a. Check incoming voltage at terminal block.
b. Check black wire from terminal block to switch com
tab for good connection.
3. Bad snorkel switch
a. To confirm a bad snorkel switch, jump across black
and blue wires to raise the chimney and across
black and red wires to lower chimney.
4. a. Bad relay
The relay is a coil activated single pole double throw
NC relay (when unit is powered up, the NC Relay
opens). The relay has tabs marked N, L, COM, and
NC. There is a white wire on the tab coming from
the neutral bar. A red wire comes from the snorkel
switch to the L tab. A black wire on the COM tab
from L1 on the terminal block, and a red wire on the
NC tab from the speed control.
b. Relay current flow
When the snorkel switch is depressed, the red wire
sends 120 VAC to activate the relay coil and close
the relay contacts. The relay contacts close and
send 120 VAC to the speed control switch. The
speed control switch sends 120 VAC to the pot,
which sends voltage (120 to 8 VAC) to control speed
of blower.
5. Bad Motor
a. To test for a bad motor, remove two black wires from
com tabs on upper/lower limit switches and touch one
of them to L1 on terminal block, completing the circuit, motor should run.
b. The drive motor assembly has an upper limit and a
lower limit switch mounted on the drive motor housing. As the motor rotates, a cam on the motor activates these switches to control the up and down
movement of the vent.
2-4
Troubleshooting
Model Number
Problem or Fault
Check or Repair
E30DD75ESS
Chimney doesn’t raise
1. Loose wire connections.
a. Check snorkel switch and motor connections.
2. Bad upper limit switch.
a. Check switch for continuity Limit switch is a single
pole, double throw switch with tabs marked COM,
NO, and NC. The double black wire on the COM tab
jumps to the lower limit switch and to the chimney
drive motor. The double red wire on the NO tab from
the snorkel switch jumps to the lower limit switch.
The blue wire on the NC tab jumps to the lower limit
switch.
E30DD75ESS
Chimney doesn’t lower
1. Loose wire connections.
a. Check snorkel switch and motor connections
2. Bad lower limit switch.
a. Check switch for continuity. Limit switch is a single
pole, double throw switch with tabs marked COM,
NO, and NC. There is a black wire on the COM. tab
that jumps to the upper limit switch. The double blue
wire on the NO tab from the snorkel switch jumps to
the upper limit switch. The red wire on the NC tab
jumps to the upper limit switch.
E30DD75ESS
Chimney raises and
then goes back down.
1. Check snorkel switch for continuity and correct wiring.
E30DD75ESS
Chimney doesn’t raise
or lower smoothly
1. Set screws on motor shaft loose.
2-5
Troubleshooting
Notes
2-6
Component Teardown
Section 3
Component Teardown
of
Ventilation
Products
3-1
Component Teardown
COMPONENT TEARDOWN
This section explains how to access and remove components from Electrolux ventilation products, and has been
arranged in such a way as to simulate which components would need to be removed first in order to gain access
to other components. When following a component removal procedure, it may be necessary to reference another
component removal procedure listed earlier in this section.
IMPORTANT NOTE: Before continuing, please take note of the WARNINGS and CAUTIONS below.
-
IF IT IS NECESSARY TO REMOVE A VENTILATION UNIT FROM ITS INSTALLATION, USE PROPER
LIFTING TECHNIQUES AS UNITS ARE HEAVY AND COULD FALL RESULTING IN SERIOUS INJURY OR
DEATH. PULLING A UNIT FROM ITS INSTALLATION SHOULD ONLY BE PERFORMED BY A TRAINED
AUTHORIZED SERVICE TECHNICIAN OR INSTALLER.
-
TO AVOID ELECTRIC SHOCK, POWER TO A VENTILATION UNIT MUST BE DISCONNECTED WHENEVER ACCESSING AND/OR REMOVING COMPONENTS POWERED BY ELECTRICITY OR COMPONENTS
NEAR OTHER ELECTRICAL COMPONENTS.
Caution
-
Metal edges may be sharp. Use caution and wear appropriate safety equipment when servicing ventilation units to avoid personal injury.
3-2
Component Teardown
Component Teardown - E36WC45FSS
Filter
Grease Filter Removal
The filters are held in place by tabs that slide into slots
cut in the vent hood frame. Remove the filters by lifting
up the latch tab to retract the spring loaded tabs, then
pulling the filter down and away from the vent hood until
the rear filter tabs are free from the slots.
(See Figure 3-1)
Latch Tab
Halogen Lamp Bulb Removal
CAUTION: If the halogen lamps were in use prior to
service, allow bulbs to cool before handling or use
protective gloves. Do not touch replacement bulb
with bare hands. Oil from skin will cause early failure of bulb. Always use a protective cloth when
handling halogen bulbs.
Figure 3-1. Grease Filter Removal
To remove the halogen lamp bulbs:
1. With small flat-bladed screwdriver, insert into slot
and pry bulb cover and retaining ring off vent hood
frame. (See Figure 3-2)
2. Pull bulb sideways out of lamp receptacle and
remove from unit. Do not rotate bulb when
removing from receptacle.
Insert screwdriver
at slot, then pry out.
3. Replace with Type JC, 12 Volt, 20 Watt Max, G-4
Base halogen bulb.
Figure 3-2 Bulb Cover Removal
Lamp Receptacle Removal
Press Spring Clip Here
The lamp receptacles are secured to the vent hood
frame by two spring clips.
To remove the halogen lamp receptacles, remove the
grease filters first: (See Figure 3-3)
1. Disconnect electrical leads for lamp receptacle
at quick disconnect.
2. Reach inside vent hood compartment and press in
both ends of spring clip while pushing receptacle
through vent hood frame.
3. The receptacle may pass through the vent hood
frame by turning the receptacle until the receptacle
flange lines up with the slot provided in the vent
hood frame.
Electrical Connection
Figure 3-3. Lamp Receptacle Removal
3-3
Component Teardown
Push Button Control Switch Removal
The push button control switch is located on the front of
the unit under the glass canopy. The control switch
assembly is mounted to the switch support bracket and
secured with screws. The support bracket is then
mounted on the inside the vent hood compartment and
secured in position with screws.
Switch Support
Bracket
To remove the push button control switch, the filters
and the heat sentry must be removed, then:
(See Figure 3-4)
Screws
1. Extract screws securing switch support bracket to
vent hood frame. Carefully pull mounting bracket
and switch assembly into vent hood compartment.
Figure 3-4. Heat Sentry Thermostat Removal
Screw
2. Extract screws securing switch assembly to support
bracket.
Clear
Tabs
Clear Plastic Cover
Screw
Clear
Tabs
3. With small flat bladed screwdriver, pry clear plastic
cover from top of switch assembly. The clear plastic cover is secured by four plastic tabs to the switch
assembly. (See Figure 3-5)
4. Extract screws from the top of the switch assembly.
The switch assembly can now be separated.
Screw
Screw
5. The ribbon cable is removed from the circuit board
by grasping the connector from both sides and carefully disconnecting ribbon cable from circuit board.
(See Figure 3-6)
Figure 3-5. Control Switch Disassembly
Ribbon
Cable
Heat Sentry Thermostat Removal
Circuit
Board
The heat sentry thermostat is located on the front right
of the vent hood behind the grease filters. The heat
sentry thermostat mounts in a tab and is secured in
position with screws.
Grab Here
To remove the heat sentry thermostat, the filters must
be removed, then: (See Figure 3-7)
Figure 3-6. Ribbon Cable Removal
1. Extract screws from heat sentry mounting tab.
Screws
2. Push heat sentry out of tab opening. From rear of
heat sentry, disconnect wire leads.
Electrical
Connections
Heat Sentry
Figure 3-7. Heat Sentry Thermostat Removal
3-4
Component Teardown
Accessing the Electrical Components
Flue Mounting
Bracket
NOTE: Electrical shock hazard. Refer to WARNING at
beginning of section
Flue Removal
In order to access electrical components, such as the
transformer, control board, power cord, and fuse, the
lower flue must be raised off the glass canopy and temporarily secured in place. The upper and lower flue
assembly may need to be removed to access the power
cord in some installations.
3.9 x 9.5 mm
Mounting Screws
To remove the flue: (See Figure 3-8)
Figure 3-8. Flue Removal
1. Extract screws securing flue to mounting bracket
from both sides of upper flue.
2. Carefully lift flue assembly off glass canopy and
remove from unit.
Fuse Removal
The fuse assembly is located inside an electrical box
that is fastened to the electrical system mounting plate.
Extract
screws
Control Box
To replace the fuse:
1. Disconnect power from unit.
2. Raise lower decorative flue and temporarily secure
in place.
3. Extract screws from control box cover and remove
cover from unit. (See Figure 3-9)
4. Unscrew cap from fuse holder and remove the fuse.
Figure 3-9. Fuse Removal
5. Replace fuse with the same size and amperage
(5 x 20mm, 4 amp, 125 volt).
Printed Circuit Control Board Removal
The control board is located inside the control box that
is fastened to the electrical system mounting plate.
To remove the printed circuit control board:
1. Disconnect power from unit.
2. Raise lower decorative flue and temporarily secure
in place.
3. Extract screws from control box cover and remove
cover from unit. (See Figure 3-9)
4. Disconnect electrical connections from control
board. Remove control board from control box.
3-5
Component Teardown
Transformer Removal
Screw
The transformer is located on the righthand side of the
electrical system mounting plate.
Transformer
To remove the transformer:
1. Disconnect power from unit.
2. Raise lower decorative flue and temporarily secure
in place. Remove if needed. (See Figure 3-8)
Electrical
Connections
3. Extract screws from transformer terminal cover and
remove cover from unit. (See Figure 3-10)
Terminal Cover
4. Disconnect electrical connections from transformer
terminal.
Transformer
Bracket
Screws
5. Extract screws from transformer, then pull transformer out from under the transformer bracket.
Figure 3-10. Transformer Removal
Power Cord Removal
The power cord is connected to the terminal box located
on the upper righthand side of the electrical system
mounting plate.
Electrical Box
With Capacitor
Power Cord
To remove the power cord:
1. Disconnect power from unit.
Wire Stop
2. Raise lower decorative flue and temporarily secure
in place. Remove if needed. (See Figure 3-8)
3. Extract screws from terminal box cover and remove
cover from unit.
Terminal Box
4. Extract screws from wire stop and remove from unit.
(See Figure 3-11)
Control Box
5. Disconnect electrical connections from power cord
at terminal box. Remove power cord from unit.
Figure 3-11. Power Cord Removal
Capacitor Removal
The capacitor is located in an electrical box mounted on
the top of the electrical mounting bracket.
(See Figure 3-11)
To remove the capacitor:
1. Disconnect power from unit.
2. Raise lower decorative flue and temporarily secure
in place. Remove if needed. (See Figure 3-8)
3. Extract screws from control box cover and remove.
4. Disconnect electrical connections from capacitor to
control box.
5. Extract screws from electrical box cover. Lift front
edge of cover to open and remove capacitor.
3-6
Component Teardown
Blower Motor Removal
3.9 x 9.5mm
Mounting
Screws
For most installations, it will be necessary to remove the
ventilation unit from its installation position. Prepare a
flat surface to set the unit down after removing it from
the wall mounts. Supports must be provided so the unit
does not rest upon the glass canopy or remove canopy
from the unit.
To remove the blower motor:
1. Disconnect power from product.
2. Remove lower and upper flues. (See Figure 3-8)
3. Extract screws securing the electrical mounting
plate to the blower assembly. (See Figure 3-12)
Figure 3-12. Electrical Mounting Plate Removal
4. Rest electrical plate upon a protective layer between
it and the canopy glass. (See Figure 3-13)
4.8 x 38mm
Mounting
Screws
5. Extract the two screws that secure the hood to wall
mounting plate. DO NOT remove the two screws
that secure the mounting plate to wall.
(See Figure 3-13)
Blower
Cover
6. Lift and remove the hood from the wall mount and
place on a flat surface. Be sure to support the hood
from underneath so that it does not sit with its
weight resting directly on the glass.
Protective Layer
7. Extract remaining screws from blower cover.
Remove blower cover from blower housing as far as
the wiring harness will allow.
Figure 3-13. Hood Removal
Screws
Compression Nut
8. Remove two wing nuts and serrated washers on
outside of blower housing. Push screws through the
rubber bushings and remove from unit.
Screws
9. Find wire harness quick disconnect for the blower
motor inside the blower housing and disconnect. It
may be necessary to move blower assembly
towards blower cover to access the wiring harness.
Electrical
Connection
Screws
10. Disconnect ground wire from electrical mounting
plate.
11. To gain access to blower, remove the five screws
from blower housing and separate halves.
(See Figure 3-14)
Figure 3-14. Blower Housing Separation
12. With a 13mm socket or wrench, remove compression nut from motor shaft. Slide blower off motor
shaft.
Torx Head
Bolts
13. With a T-20 Torx head bit, extract the three (3) bolts
securing the blower motor to the blower housing.
Remove motor and wire harness from blower housing. (See Figure 3-15)
Figure 3-15. Hood Removal
3-7
Component Teardown
Canopy Removal
The glass canopy rests atop the vent hood frame and is
secured in position with canopy brackets and screws.
The screws have plastic bushings to prevent breakage
of glass when securing in position.
IMPORTANT NOTE: Do not overtighten canopy
screws. Tighten screws until snug only.
Screws
To remove the glass canopy:
1. Raise lower decorative flue and temporarily secure
in place. Remove if needed. (See Figure 3-8)
Glass Canopy
2. Extract screws from each canopy bracket on both
sides of the blower housing. Lift canopy brackets
with screw assemblies off of canopy.
(See Figure 3-16)
Figure 3-16. Canopy Removal
3. Lift canopy up and off of vent hood frame.
3-8
Component Teardown
Component Teardown - E36PV100FS
Filter
Grease Filter Removal
The filters are held in place by tabs that slide into slots
cut in vent hood frame. Remove filters by lifting up the
latch tab to retract the spring loaded tabs, then pulling
the filter down and away from the vent hood until the
rear filter tabs are free from the slots. (See Figure 3-17)
Lift Tab
Lamp Removal
The lamps are halogen bulbs (Type MR16, 12V, 20W).
Using a higher wattage bulb will cause the fuse to open.
Figure 3-17 Bulb Cover Removal
To change the halogen bulb:
1. With fingers, loosen the ring nut by turning it counterclockwise. (See Figure 3-18)
Off
2. Remove the bulb by pulling downward. Do not
rotate bulb.
FAN
On
Lo
FAN SPEED
Hi
Off
LIGHT
On
Ring Nut
Rotate Ring
Counterclockwise
Lamp Receptacle Removal
The lamp receptacle is secured to the bottom of the
vent hood with screws that pass through the vent hood
and fasten into the receptacle.
Figure 3-18. Lamp Ring Nut Removal
To remove the lamp receptacle, the filters and halogen
bulb must be removed, then:
1. Extract screws securing the receptacle housing to
the vent frame. (See Figure 3-19)
Bulb Sockets
2. Feed lamp receptacle and wire lead out to filter
opening. From the backside of the lamp receptacle
housing, extract screws securing the ceramic insulator and reflector to the receptacle housing.
(See Figure 3-20)
Screws
Figure 3-19. Lamp Ring Nut Removal
Screws
Figure 3-20. Lamp Receptacle Removal
3-9
Component Teardown
Heat Sentry Thermostat Removal
The heat sentry thermostat is located in left rear corner
of vent hood, and is held in position by a spring clip spot
welded to the bottom panel.
Heat Sentry
To remove the heat sentry thermostat, the filters must
be removed, then:
Spring Clamp
1. Reach inside the vent hood compartment and disconnect the two wire leads attached to the heat sentry thermostat.
Figure 3-21. Heat Sentry Removal
2. Pull heat sentry thermostat out from under spring
clip. (See Figure 3-21)
Screws
Transformer, Circuit Board and Fuse Removal
The transformer, printed circuit board and fuses are
mounted upon a bracket that is located on the left side
of vent hood behind the bottom panel. Screws secure
the bracket to the vent hood frame.
Mounting
Bracket
Off
LIGHT
On
To remove the mounting bracket, the filters, the left rear
halogen bulb and receptacle must be removed, and the
heat sentry disconnected from wire harness, then:
1. Reach inside vent hood and remove wires from
retaining clamps on left side of unit.
Figure 3-22. Mounting Bracket Removal
2. Extract screws securing the bracket to the vent
hood frame. (See Figure 3-22)
Circuit Board
Electrical Box
3. Carefully pull mounting bracket out from under the
bottom panel. Some elements of the wire harness
will need to be adjusted to allow access to components on the mounting bracket.
Fuse Box
To remove the transformer, (See Figure 3-23)
Screws
1. Extract screws securing the terminal cover to transformer bracket and remove cover.
2. Using a flat-bladed screwdriver, loosen setscrews
from wire terminal and remove wire leads.
Screws
Transformer
3. Using a 9/32” socket or wrench, remove nuts and
washers from both ends of transformer. Slide transformer to the left out from under bracket.
Nut
To remove the circuit board, (See Figure 3-23)
Nut
Figure 3-23. Transformer, Circuit Board & Fuse
Removal
1. Extract the screws securing the electrical box cover
to electrical box. Lift cover from front to open.
2. Disconnect wire leads from circuit board.
To remove the fuses,
1. Extract screws securing the fuse box cover to fuse
box. Lift cover from front to open.
2. Remove fuse holder from box. Remove fuse holder
cap to access the fuse. Use only a 5 x 20mm,
4Amp, 125V fuse.
3-10
Component Teardown
Capacitor Removal
Bracket Mounting Holes
The capacitor and wiring junction are located in an electrical box mounted on a bracket on the right side of the
bottom panel.
To remove the mounting bracket and access the electrical box, the filters must be removed, then:
1. Reach inside vent hood and remove wires from
retaining clamps on right side of unit.
2. Extract the screws securing bracket to the vent
hood frame. (See Figure 3-24)
Cover
Screw
Holes
3. Carefully pull mounting bracket out from under the
bottom panel. Turn mounting bracket to access the
electrical box.
Capacitors
Cover
Screw
Holes
Figure 3-24. Bottom Panel Removal
4. Extract the four screws securing cover to electrical
box.
5. Using a small flat bladed screwdriver, loosen
setscrews securing wire leads to wire junction.
Remove capacitors with soldered on wire leads.
Control Switch Assembly
Bottom Panel
The control switch assembly is located along the left
bottom side of the vent hood. The assembly is held in
place by the switch assembly cover that is accessible
only by removing the left side screws of the bottom
panel. The bottom panel does not have to be completely removed to access the switch assembly.
Control Switch Cover
To remove the control switch assembly, the filters must
be removed, then:
Push
Here
Screw
1. Starting on left side of unit, extract screws from bottom panel until the bottom panel can be pulled away
from the unit frame, and the screw on control switch
cover can be accessed.
(See Figure 3-25)
Figure 3-25. Control Switch Cover Removal
2. Extract screw from control switch cover. Slide cover
off switch assembly and remove from unit.
3. With thumb, press in retaining clip at end of switch
assembly and push through bottom panel. A slot
has been provided in the bottom panel to allowing
the control switch assembly to pass through the bottom panel.
4. Extract screws securing the two halves of the switch
assembly. The two halves are then separated by
sliding the top section off of two retaining clips molded onto the bottom section.
5. When replacing the control switch assembly, the
wire leads will need to be disconnected from the
transformer, circuit board and wiring junction.
3-11
Component Teardown
Bottom Panel Removal
Screws
To remove the bottom panel the filters must be removed
first. Then, remove the lamps and lamp receptacles, the
mounting brackets on both sides of the unit, and the
control switch assembly. Now, extract the screws securing the bottom panel to the vent hood frame and remove
from unit. (See Figure 3-26)
Screws
Off
FAN
On
Lo
FAN SPEED
Hi
Off
LIGHT
On
The bottom panel is the stainless steel panel to which
the control panel, lamp receptacles, blower motor control and heat sentry mount to. The panel is secured to
the vent hood frame with screws along the outer edges.
Removing the bottom panel will make accessing the
blower motor assemblies easier.
Figure 3-26. Bottom Panel Removal
Blower Motor Removal
There are two blower motor assemblies for model
E36WV100FS & E36PV100FS vent hoods. The two
assemblies are mounted back to back with screws
securing the blower housings together. The assembly is
then mounted as one unit to the lower hood/blower
bracket with screws.
Remove to
Separate
Screws
Screws
To remove the blower motor assemblies, it is recommended to remove the vent hood from its installation
position. The filters must be removed to access the
blower motor assemblies. Removal of the bottom panel
will make accessing the components much easier.
1. Using a 9/32” extended socket, remove ground wire
attached to lower hood/blower bracket.
2. Disconnect wire leads of motor being replaced from
the wiring junction inside the electrical box.
3. From inside vent hood compartment, extract the
four screws from the corners of the blower motor
assembly that are securing the blower assemblies
to the lower hood/blower bracket. (See Figure 3-27)
Figure 3-27. Blower Housing Removal
T-25 Torx Bolts
4 Places
4. The two units are separated by removing screws
from inside the blower housings.
Screw B
5. Extract screws (A), securing the filter support to the
blower assembly and repeat on opposite side.
(See Figure 3-28)
6. Separate the two halves of a single blower assembly by removing screws (B).
7. Remove the blower wheel by using a 15mm wrench
or socket, and removing the compression nut from
the blower shaft. Slide blower wheel off shaft.
8. With a T-25 Torx head bit, extract bolts securing the
blower motor to the blower housing. Remove motor
and wire harness from unit.
Screw A
Compression Nut
Figure 3-28. Blower Motor Removal
3-12
Component Teardown
Component Teardown - E488WV120S
Grease Filter Removal
The four grease filters are held in place by springs spot
welded to the filter frames. To remove the grease filters,
grab the ring at the front of the filter and pull towards the
rear of the unit until the front edge clears the vent hood
frame, then pull down and out. (See Figure 3-29)
Pull Towards Rear
Bulb and Lamp Trim Removal
Grab Here
To remove a bulb, simply press the suction cup
(Part number 5304448673 included with vent hood) onto
the face of the bulb and unscrew in a counter-clockwise
direction.
The lamp trim is removed by first removing the bulb,
then grab onto the face of the lamp trim and pull assembly out from panel.
Figure 3-29. Filter Removal
Control Cover
Screw
Control Assembly Removal
The control assembly consists of the cover, fan speed
control and the light dimmer switch. The cover is
mounted with screws to the control assembly panel.
The light switch is secured to the cover by brass nuts,
while the fan speed control mounts on a bracket with
two threaded studs and secured by locknuts.
Brass Nuts
Knobs
To remove the control assembly: (See Figure 3-30)
Figure 3-30. Bulb Cover Removal
1. Pull knobs from fan and light switches.
2. Using a 9/16” socket or wrench, remove brass nuts
from light control.
3. Extract screws from both sides of control cover.
4. Disconnect electrical leads at quick disconnect.
5. Using an 11/32” socket or wrench, remove nuts and
washers securing the fan control to the mounting
bracket inside control cover.
3-13
Component Teardown
Grime Shield Removal
The grime shield is a stainless steel panel that protects
the interior of the vent hood from accumulating grease
and cooking residue. The grime shield is secured in
position with screws along the outer edges.
To remove the grime shield, the filters must be removed
first: (See Figure 3-31)
Screws
1. Extract screws from grime shield.
2. Carefully remove the grime shield from unit, using
care not to damage the edge trim on the sharp
edges of the vent hood frame.
Screws
Figure 3-31. Grime Shield Removal
Control Panel Assembly Inner Support Removal
Removal of the inner support arms will allow the control
panel assembly to be moved forward and allow easier
access to the lamp receptacles, wiring harness and
blower motors.
Inner Support Arm
To remove the inner support arms, use an 11/32”
extended socket and remove the nuts and washers from
each support arm that secure support arms to the
threaded studs welded to the top of the vent hood.
(See Figure 3-32)
Note: The inner support arms are only removed from
the top panel of the unit. The screws at the other end of
the support arms are not accessible unless the control
panel assembly is removed from the unit.
Lamp Receptacle Removal
Nuts
Figure 3-32. Inner Support Arm Removal
Illustration A
Illustration B
The lamp receptacles are mounted to brackets spot
welded behind the control assembly panel. A metal
clamp is secured by a screw to the back of the receptacle which must be removed to access the electrical
leads.
Screws
To remove the lamp receptacles, the filters and grime
shield must be removed, and the inner support arms
removed from the inside upper panel:
Screw
Figure 3-33. Lamp Receptacle Removal
1. Using a small flat bladed screwdriver, extract the
screw from the retaining clamp on the back of the
lamp receptacle. (See Figure 3-33 Illustration A )
2. Using a phillips head screwdriver, extract the screws
securing the wire leads to the receptacles. Remove
receptacle from mounting bracket.
(See Figure 3-33 Illustration B )
3-14
Component Teardown
Blower Motor
Control Assembly Panel
The blower motors are mounted to an air box in the
inside compartment of the vent hood. Two brackets on
each side of the blower motor secure the motors in position.
To remove the blower motors, the filters and grime
shield must be removed, and the inner support arms
removed from the inside upper panel:
Screws
1. Disconnect wire leads of blower motors at quick disconnect.
Retaining Brackets
2. Extract the screws from each retaining bracket.
Remove blower motors from unit. (See Figure 3-34)
3-15
Figure 3-34. Blower Motor Removal
Component Teardown
Component Teardown - E30DD75ESS
Grease Filter Removal
The grease filter assemblies are located in the chimney assembly and are secured in place by spring
clips. The filters are visible only when the vent is in
the up position.
To remove the filters, (See Figure 3-35):
Pull Down and Out
1. With chimney in the up position, push down on the
filter frame while pulling the filter out away from
the downdraft.
Figure 3-35. Filter Removal
Snorkel Switch Removal
The snorkel switch is located on the top cap weldment, and controls the up and down movement of the
vent assembly.
Electrical Connections
Snorkel
Switch
To remove the snorkel switch, (See Figure 3-36):
1. Raise the vent assembly.
2. From the underside of the top cap weldment,
extract the screws securing the top cap weldment
to the sleeve assembly.
3. Disconnect wire leads of snorkel switch at quick
disconnects.
Screw
4. From the underside of top cap weldment, push
snorkel switch through top cap weldment.
Top Cap Weldment
Figure 3-36. Snorkel Switch Removal
Blower Control Potentiometer Removal
The potentiometer is mounted to the front face of the
sleeve assembly, and is visible only when the vent is
in the raised position.
Potentiometer
To remove the blower control potentiometer, remove
the top cap weldment, then (See Figure 3-37):
1. Remove control knob.
2. Using a needlenose pliers, reach under potentiometer mounting bracket and remove tinerman
palnuts from control knob bezel, then lift bezel
from unit.
Electrical
Connections
Knob
3. With a 10mm socket, remove nut and washer from
potentiometer.
Tinerman Palnuts
Bezel
4. Carefully extract potentiometer out from under
bracket. Disconnect electrical leads at quick disconnects.
Figure 3-37. Blower Control Potentiometer
Removal
3-16
Component Teardown
Motor Mounting Box Removal
Access Panel Screws
The drive motor assembly is located behind the front
access panel and is secured with screws to the underside of the motor mounting box.
Motor
Mounting Box
To remove the motor mounting box, (See Figure 3-38):
1. Extract the access panel mounting screws, then
remove panel.
Screws
Screws
2. Extract screws from the top of the motor mounting
box that secures the drive motor assembly to the
underside of the mounting box.
Drive Motor
Mtg. Screws
3. Extract screws from each end of motor mounting
box. The motor mounting box can now be moved
aside to access the components of the drive motor
assembly.
Access Panel Screws
Figure 3-38. Motor Mounting Box Removal
Drive Motor Assembly Removal
The drive motor assembly consists of the drive motor
and two micro-switches that control the vertical movement of the vent.
Setscrews
To remove the drive motor assembly, remove the
motor mounting box first, then (See Figure 3-39):
Drive
Arm
1. With 1/8” allen wrench, extract setscrews securing
drive arm to drive motor shaft. Slide motor
assembly off of drive arm.
2. Disconnect electrical leads from micro-switches.
NOTE: The micro-switch electrical connections must
be hooked up in the proper order. Take note or tag wire
leads before disconnecting to assure correct location for
re-assembly. (See Figure 3-40)
Figure 3-39. Drive Motor Removal
Blue
Black
Red
Blue
Red
Black
Figure 3-40. Electrical Connections
3-17
Component Teardown
Electrical Component Removal
AC Phase Control
Access Panel Screw
NOTE: Electrical shock hazard. Refer to WARNING
at beginning of section.
The electrical components are located behind the
small access panel on the lower right hand corner of
the unit. The components consist of the AC phase
control, relay and strip terminal.
Blower
Output
Power
Input
To remove the electrical components,
(See Figure 3-41):
Ground
1. Extract the screws from the small access panel
and remove from unit.
2. To remove the strip terminal, use a small flatbladed screwdriver and loosen setscrews securing all
wire connections. Remove wire leads from strip
terminal. Then, extract screws securing the strip
terminal to the unit frame.
Strip
Terminal
Relay
3. To remove the relay, disconnect all wire leads from
relay. Extract the screws securing the relay to the
unit frame.
Access Panel Screw
Figure 3-41. Electrical Component Removal
4. To remove the AC phase control, remove wirenuts
from wire leads that run from the strip terminal to
the AC phase control. Extract screws securing the
AC phase control to the unit frame.
5. To remove the powercord, use a small flatbladed
screwdriver and loosen setscrews securing the
powercord wire leads to the right side of the strip
terminal. Use an 11/32” socket or wrench to
remove nut from ground wire. Remove plastic nut
of strain relief from the right side of the unit frame,
and remove powercord from unit.
3-18
Component Teardown
Component Teardown - Remote
Blower Assembly
Blower Motor Removal
The blower motor is mounted with bolts to the motor
mounting bracket. The mounting bracket is secured
with screws that pass through the unit frame and fasten into the motor mounting bracket.
Motor Mounting
Bracket
Bolts 4x
Screws
To remove the blower motor, (See Figure 3-42):
Blower Motor
1. Extract screws from outside edge of remote blower assembly cover. Remove cover from unit.
2. Cut cable ties securing the wire lead to the motor
mounting bracket and capacitor. Disconnect wire
leads at wire nuts.
Screws
L2
N2
GND
3. Extract screws from each side of the motor mounting bracket.
3. With 10mm socket or wrench, extract the bolts
securing the blower motor assembly to motor
mounting bracket.
Figure 3-42. Blower Motor Removal
4. The blower motor is separated from the blower
assembly by using a T-25 Torx head bit and
extracting the bolts on the blower motor flange.
Capacitor Removal
NOTE: Electrical shock hazard. Refer to WARNING
at beginning of section.
Nut
The capacitor is located in the lower left hand corner
of the blower box assembly and is secured in position
by a 1/2” nut on the underside of the motor mounting
bracket.
Capacitor
To remove the capacitor, the top cover must be
removed first, (See Figure 3-43):
Rubber
Boot
L2
N2
GND
1. Cut cable tie securing the wire lead to capacitor.
2. Remove rubber cover from capacitor and disconnect wire leads.
3. With 1/2” socket, reach under motor mounting
bracket and remove nut securing the capacitor in
position. Remove capacitor from unit.
Figure 3-43. Capacitor Removal
3-19
Component Teardown
Notes
3-20
Parts List
Section 4
Parts Lists
and
Exploded Views
of
Ventilation
Products
4-1
Parts List
E36WC45FSS Exploded View
23
3
32
7
22
31
8
17
37
24
2
30
41
4
21
28
27
13
20
25
26
14
38
11
39
12
10
9
16
19
6
40
18
5
36
35
34
29
15
33
1
4-2
Parts List
E36WC45FSS Parts List
Ref #
1.
2.
3.
4.
5.
6.
7.
8.
9.
10.
11.
12.
13.
14.
15.
16.
17.
18.
19.
20.
21.
22.
23.
24.
25.
26.
27.
28.
29.
30.
31.
32.
33.
34.
35.
36.
37.
38.
39.
40.
41.
Part #
5304455733
5304454900
5304454949
5304454950
5304454951
5304455734
5304454953
5304454954
5304454955
5304454956
5304454957
5304454958
5304454959
5304454960
5304454970
5304454973
5304454974
5304454975
5304454976
5304454977
5304455735
5304455736
5304454981
5304454982
5304454983
5304454985
5304454986
5304454987
5304454988
5304454989
5304454991
5304454992
5304454993
5304454952
5304454994
5304454995
5304454996
5304454997
5304454998
5304454999
5304455000
Description
Filter, grease, aluminum
Capacitor, motor
Plate, mounting, electric system
Bracket, transformer, protector
Lamp, halogen, 20 W, 12 V
Thermostat, Heat Sentry
Control Box, PC board
Cover, electrical box
Housing, blower fan, scroll
Motor, blower
Blower Wheel, fan
Washer, motor mount, rubber
Power Cord, electric
Housing, blower assembly
Panel, filter support
Canopy, hood, glass
Discharge Collar, damper
Bracket, switch support
Gasket, canopy seal
Gasket, chimney seal
Chimney, duct cover, lower flue
Chimney, duct cover, upper flue
Bracket, chimney mount, top flue
Clamp, wiring
Terminal Box, wiring
Cover, terminal box
Clamp, wiring junction
Wire Stop, terminal box
Clamp, power cord
Electrical Box
Control Board, printed circuit
Transformer
Push Button, control switch
Control, switch board, with trim
Cover, switch box
Control Box, switch board
Cover, blower, duct connector
Bracket, blower support
Bracket, canopy
Housing, lamp receptacle
Cover, terminal, transformer
Not Shown:
42.
43.
44.
5304455332
5304455333
5304455001
Fuse, 5 x 20 mm, 4 Amp, 125 V
Fuse Holder
Installation Kit, mtg. hardware
4-3
Parts List
E40PV100FS Exploded View
12
21
23
17
19
18
37
20
22
14
24
39
6
31
32
33
4
35
16
10
11
9
15
5
13
36
38
3
28
34
29
30
26
25
8
27
2
7
1
30
4-4
Parts List
E40PV100FS Parts List
Ref #
1.
2.
3.
4.
5.
6.
7.
8.
9.
10.
11.
12.
13.
14.
15.
16.
17.
18.
19.
20.
21.
22.
23.
24.
25.
26.
27.
28.
29.
30.
31.
32.
33.
34.
35.
36.
37.
38.
39.
Part #
5304455953
5304454900
5304454950
5304455738
5304455739
5304455740
5304454954
5304455741
5304455954
5304455031
5304454958
5304455955
5304455956
5304455957
5304455747
5304455748
5304455958
5304455749
5304455018
5304455959
5304455960
5304455961
5304455962
5304455963
5304454982
5304455754
5304455947
5304454989
5304455948
5304455964
5304455965
5304455756
5304455757
5304455011
5304455049
5304455009
5304455949
5304455950
5304455968
Description
Filter, grease, aluminum
Capacitor, motor
Bracket, transformer, protector
Lamp, halogen
Cover, switch assembly
Thermostat, Heat Sentry
Cover, electrical box
Grille, filter support
Motor, blower
Blower Wheel, fan
Washer, motor mount, rubber
Damper, flap
Bracket, hood/blower, lower
Bracket, hood, upper
Housing, blower, right side
Housing, blower, left side
Discharge Collar, damper
Wiring Box
Cover, wiring box
Chimney, duct cover, lower flue
Chimney, duct cover, upper flue
Frame, support, lower
Frame, support, upper
Trim, hood, bottom
Clamp, wiring
Clamp, wiring, junction
Electrical Box, capacitor
Electrical Box
Control Board, printed circuit
Bracket, support
Reflector, lamp
Insulator, ceramic, lamp housing
Housing, lamp receptacle
Transformer
Ring Nut, lamp retainer
Fuse box
Bushing, wiring box
Cover, terminal, transformer
Switch Assembly, controls
Not Shown:
40.
41.
42.
43.
5304455332
5304455333
5304455966
5304455967
Fuse, 5 x 20 mm, 4 Amp, 125 V
Fuse Holder
Installation Kit, damper
Installation Kit, mtg. hardware
4-5
Parts List
E488WV120S Exploded View
16
2
16
5
16
41
3
8
5
2
17
6
24
11
10
22
12
34
13
22
4
14
15
9
4
1
22
22
34
22
22
18
7
7
22
22
21
42
40
21
21
21
4-6
43
Parts List
E488WV120S Parts List
Ref #
1.
2.
3.
4.
5.
6.
7.
8.
9.
10.
11.
12.
13.
14.
15.
16.
17.
18.
21.
22.
24.
34.
40.
41.
42.
43.
Part #
5304453511
5304453500
5304452410
5304452450
5304452463
5304453507
5304452416
5304452460
5304453501
5304453508
5304452424
5304452425
5304452426
5304452427
5304452428
5304452429
5304448674
5304452457
5304452449
5304453502
5304446015
5304452454
5304453510
5304446279
5304446290
5304446289
Description
Damper Assembly
Trim, Edge
Bullnose Assembly, 48"
Nut, Hex, 3/8-24, Brass
Trim, Lamp
Control Box Assembly, Complete
Fan Motor Assembly, EBM
Front, Grime Shield, 48"
Knob, Light
Control Box
Control, Speed, 8 amp
Switch, Dimmer, Light
Knob, Fan
Insert, Knob, Fan
Insert, Knob, Light
Holder, Lamp
Lamp, Halogen
Shield, Grime, 48"
Filter, 11.88" x 15.18"
Screw, Phil TRS, No.8 x 3/8
Nut, Hex Keps, No.8-32
Screw, No.8 x .375"
Block, Terminal
Bushing, Heyco, SB-875-11
Nut, Hex keps, No.4-40, Zinc
Screw, Phil Pan Hd, No.4-40 x .625
Not Shown:
44.
5304453512
Harness, Light Liner
4-7
Parts List
E30DD75E Exploded View
Rear Panel Sleeve
(Not Replaceable)
2
6
1
8
7
33
5
8
1
2
3
4 9
3
46
10
12
13
11
14
25
46
15
30
18
24
16
3
17
23
22
31
44
22
36
23
32
35
35
19
20
24 25
33
3
34 44
44
44
45
44
44
3
37
21
44
44
44
28
44
25
29
44
47
44
44
41
27
44 38
41
40
44
44
Motor Mtg. Box
(Not Replaceable)
4-8
42
39 43
26
Electrical Box
(Not Replaceable)
Parts List
Model Index:
Ref #
1.
2.
3.
4.
4.
4.
5.
6.
6.
6.
6.
7.
8.
8.
8.
9.
10.
11.
12.
13.
13.
13.
14.
14.
14.
15.
16.
17.
17.
17.
18.
18.
19.
19.
20.
20.
20.
21.
21.
21.
22.
23.
24.
25.
26.
27.
28.
A E30DD75E (E30DD75ESS)
B E36DD75E (E36DD75ESS)
C E46DD75E (E46DD75ESS)
D E48DD75E (E48DD75ESS)
Part #
5304446252
5304446223
5304446015
5304446264
5304446265
5304446266
5304446220
5304446230
5304446232
5304446233
5304446231
5304446292
5304446258
5304446260
5304446259
5304446234
5304446247
5304446275
5304446291
5304446218
5304446219
5304446221
5304446239
5304446240
5304446238
5304446293
5304446294
5304446268
5304446269
5304446270
5304446256
5304446254
5304446255
5304446253
5304446244
5304446245
5304446246
5304446224
5304446226
5304446227
5304446262
5304446249
5304446287
5304446272
5304446261
5304446288
5304446237
Description
A B
A B
A B
A - B
- A B
A - B
- - A B
A - B
- A B
A B
A B
A B
A - B
- A - B
- A B
A B
A - B
- AB
- AB
- A - B
- A - B
- A B
A B
A B
A B
A B
A B
A B
C
C
C
C
C
C
C
C
C
C
C
C
C
C
C
C
C
C
C
C
C
C
C
C
C
C
C
C
D
D
D
D
D
D
D
D
D
D
D
D
D
D
D
D
D
D
D
D
D
D
D
D
D
D
D
D
Slide, raise vent, (2)
Bracket, slide mtg., (2)
Nut, hex keps, #8-32, (9)
Bracket, filter retainer, 30"
Bracket, filter retainer, 36"
Bracket, filter retainer, 46"/48"
Support, filter
Top Cap, weldment, 30"
Top Cap, weldment, 36"
Top Cap, weldment, 46"
Top Cap, weldment, 48"
Damper, flap
Filter Assy., 30", (2)
Filter Assy., 36", (2)
Filter Assy., 46"/48", (2)
Bracket, potentiometer
Potentiometer Assy., w/harness
Tie, push mount, (3), locking
Palnut, tinerman, (2)
Spring Bracket Assy, w/tape, 30"
Spring Bracket Assy, w/tape, 36"
Spring Bracket Assy, w/tape, 46"/48"
Sleeve, 30", front
Sleeve, 36", front
Sleeve, 46"/48", front
Bezel, control knob
Knob, control
Trim, rear plenum, 30"
Trim, rear plenum, 36"
Trim, rear plenum, 46"/48"
Angle, rear plenum, 30"/36"/46", LH
Angle, rear plenum, 48", LH
Angle, rear plenum, 30"/36"/46", RH
Angle, rear plenum, 48", RH
Wiper, felt, 30"
Wiper, felt, 36"
Wiper, felt, 46"/48"
Weldment, plenum, 30", rear
Weldment, plenum, 36", rear
Weldment, plenum, 46"/48", rear
Roller, nylon, (2)
Spacer, nylon, (4)
Screw, phil pan hd, #8-32 x 3/4, (2)
Screw, phil hd, #8-32 x 1/4, (8)
Cord, power supply
Strain Relief
Panel, access, drive motor
4-9
Parts List
E30DD75E Exploded View
Rear Panel Sleeve
(Not Replaceable)
2
6
1
8
7
33
5
8
1
2
3
4 9
3
46
10
12
13
11
14
25
46
15
30
18
24
16
3
17
23
22
31
44
22
36
23
32
35
35
19
20
24 25
33
3
34 44
44
44
45
44
44
3
37
21
44
44
44
28
44
25
29
44
47
44
44
41
27
44 38
41
40
44
44
Motor Mtg. Box
(Not Replaceable)
4-10
42
39 43
26
Electrical Box
(Not Replaceable)
Parts List
Model Index:
Ref #
29.
29.
29.
30.
30.
30.
31.
32.
33.
34.
35.
36.
37.
37.
37.
37.
37.
38.
38.
38.
39.
39.
39.
39.
40.
40.
41.
42.
43.
44.
45.
46.
47.
A E30DD75E (E30DD75ESS)
B E36DD75E (E36DD75ESS)
C E46DD75E (E46DD75ESS)
D E48DD75E (E48DD75ESS)
Part #
5304446225
5304446228
5304446229
5304446241
5304446242
5304446243
5304446280
5304446251
5304446267
5304446285
5304446283
5304446250
5304446263
5304446295
5304446298
5304446302
5304446282
5304446248
5304446303
5304446304
5304446257
5304446300
5304446301
5304446297
5304446933
5304446299
5304446279
5304446290
5304446289
5304446271
5304446273
5304446284
5304446979
Description
A - B
- A - B
- A B
A B
A B
A B
A B
A B
A B
A B
A B
A B
A B
A B
A B
A B
A B
A B
A B
A B
A B
A B
A B
A B
A B
A B
AB
A B
A B
C
C
C
C
C
C
C
C
C
C
C
C
C
C
C
C
C
C
C
C
C
C
C
C
C
C
C
C
C
D
D
D
D
D
D
D
D
D
D
D
D
D
D
D
D
D
D
D
D
D
D
D
D
D
D
D
D
D
Weldment, plenum, 30", front
Weldment, plenum, 36", front
Weldment, plenum, 46"/48", front
Seal, countertop, 30"
Seal, countertop, 36"
Seal, countertop, 46"/48"
Screw, set, 1/4-28 UNF, X 1/4 cup point, (2)
Drive Arm
Stud, drive arm, (2)
Spring washer, drive arm
C-Clip, (2)
Raise Arm
Motor Assy., drive, w/switch
Harness, red
Harness, blue
Harness, black
Tie, cable, 4054 RT 350, (1)
Control, AC phase
Harness, phase control, to relay
Jumper Harness, phase control, to relay
Relay, 10A
Harness, relay-pwr input
Harness, relay-neutral
Harness, switch-relay
Strip, terminal
Harness, ground terminal
Bushing, heyco, sb-875-11, (2)
Nut, hex keps, #4-40, zinc, (3)
Screw, phil pan hd, #4-40 x .625, (3)
Screw, phil pan hd, #8 x 1/4, (34)
Washer, SAE, #10, (4)
Screw, phil flat hd, #8-32 x 1/4, (2)
Cover, electrical box
A
A
A
A
A
A
A
A
A
A
C
C
C
C
C
C
C
C
C
C
D
D
D
D
D
D
D
D
D
D
Harness, main
Wire Nut, yellow, (3).
Transition Duct, kit assembly
• Leg, support, LH
• Leg, support, RH
• Wire Nut, orange, (3)
• Screw, phil trs hd, #10 x 1/2, (2)
• Screw, phil flat hd, #14 x 1/2, (4), wood
• Nut, hex keps, 1/4-20, (2)
• Washer, flat, 1/4-20, (2)
Not Shown:
48.
49.
50.
51.
52.
53.
54.
55.
56.
57.
5304446296
5304446281
5304446222
5304446235
5304446236
5304446276
5304446274
5304446277
5304446278
5304446286
B
B
B
B
B
B
B
B
B
B
4-11
Parts List
Notes
4-12
Wiring Diagrams
Section 5
Wiring Diagrams
of
Ventilation
Products
5-1
Wiring Diagrams
E36WC45FSS Wiring Diagram
5-2
Wiring Diagrams
E40PV100FS Wiring Diagram
8877
5-3
Wiring Diagrams
E488WV120S & E48WV12EPS Wiring
Diagram
120V, 60Hz, 15A
Power Supply
GR
N
BK
WH
Lamp Dimmer
BK
WH
BK
BK
Halogen Lights (3)
WH
BK
Fan Motor
WH
Fan Switch
WH
CAUTION: Disconnect power supply at fuse box before servicing this equipment.
Note: E48WV12EPS Only has two halogen lights.
5-4
Wiring Diagrams
E30DD75E Wiring Diagram
UPPER
LIMIT SWITCH
REMOTE
POT
SNORKEL
SWITCH
RED
BLK
BLUE
ORNG
BLK
LOWER
LIMIT SWITCH
Chassis
Ground
Stud
RED
GRN
RED
GRN
BLK
SPEED
CONTROL
WHT
SLEEVE DRIVE ASSEMBLY
RELAY
BLK
WIRE TIE
WHT
WIRE TIE
RED
WHT
BLUE
BLK
SLIM RV
JUNCTION BOX
BRN
GRN
WHT
BLK
TERMINAL
BLOCK
BLU
BLOWER
MOTOR
GRN
WHT
BLK
ORNG
BLK
BLK
BLK
3-Wire Conduit
(Installer Supplied)
WHT
GRN/YEL
BLK
GRN
CAPACITOR
WHT
GRN/YEL
BLK
WHT
GRN
BLK
WHT
GRN
GRN
WHT
BLK
3-Wire Conduit
(Installer Supplied)
GRN
WHT
BLK
GRN
WHT
BLK
NOTE: Do not connect the vent to power
until the connection between the
male blower cord and the female
vent cord has been made and the
vent junction box has been re-installed.
5-5
GRN
WHT
BLK
GRN
WHT
BLK
Wiring Diagrams
Notes
5-6