1
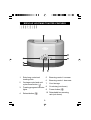
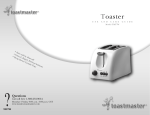
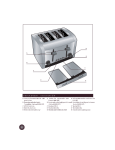
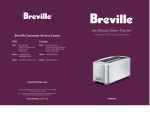
Breville Cordless Kettle
2-Slice Electronic Motorised Toaster
Instructions for Use
Your Breville Lightning Toaster has extra wide, motorised toasting slots,
toast reheat and defrost facility, plus electronic variable browning control
and detachable bun warming rack.
PLEASE RETAIN THESE INSTRUCTIONS FOR FUTURE REFERENCE.
These instructions relate to the Breville Lightning Toaster PT33.
CONGRATULATIONS
Lightning Toaster
Congratulations on the purchase of your Breville
Lightning 2-Slice, Electronic Motorised Toaster.
Please read all instructions carefully.
2
BREVILLE LIGHTNING TOASTER - FEATURES
1
2
3
9
4
8
7
6
5
1
Extra long, motorised
toasting slots
5
Browning control - increase
6
Browning control - decrease
2
Carriage control and midcycle cancel button ( )
7
Cord storage
3
4
8 Crumb tray (not shown)
Toasting progress indicator
9 Frozen button ( )
lights
10 Detachable bun warming
Reheat button ( )
rack (not shown)
3
BEFORE USING YOUR LIGHTNING TOASTER
1 Carefully unpack your toaster,
removing all packaging and any
labels.
2 Make sure that your electricity
supply is the same as the one
shown on the underside of your
toaster.
3 Position your toaster on a dry,
level and secure surface away
from the edge. Position away
from sources of heat and out of
the reach of children.
4 Ensure that the power supply
cord doesn’t overhang the edge of
the worktop.
5 Ensure correct fitting of the crumb
tray.
4
OPERATING YOUR BREVILLE LIGHTNING TOASTER
1 Insert the plug into a suitable
mains supply socket and turn the
power on.
5 If you should find that the bread is
not dark enough you may wish to
toast the bread again. Turn the
browning control to a lower
setting and keep a careful eye on
the toaster to ensure that the
toast does not burn. Never leave
the toaster unattended.
2 Place the desired number of
bread slices, muffins, or bagels
into the bread slots. Never force
bread into the toasting slots.
3 Select the desired browning
setting, from 1 (lightest), to 9
(darkest). When using the
toaster for the first time, we
suggest you toast on setting 4.
6 Remove the toast from the
toasting slots, taking care not to
touch any hot surfaces.
7 In the unlikely event that bread or
crumpets become jammed in the
toasting slots, switch the toaster
off at the power outlet, remove
the plug and allow the toaster to
cool fully before carefully easing
out the bread. Take care not to
damage the elements.
Varying types of bread and
personal preference may require
a different browning setting, e.g.
raisin toast and white lighttextured breads may require a
lower setting, whilst heavier rye
breads may require a darker
setting.
WARNING!
Always take care around hot surfaces.
Always use the toaster with the crumb
tray(s) fitted.
Never force bread into the toasting
slots. Never toast buttered bread.
Never attempt to extract jammed
toast, muffins, bagels or other items
with a knife or any other object, as
contact with live elements may result
in an electric shock. Allow the
appliance to cool down, unplug and
carefully remove the item.
4 Press the carriage control button
and the bread will automatically
be lowered into the toasting slots
and will be toasted. The toaster
automatically turns off when the
desired toast colour is achieved
and raises the toast out of the
toasting slots. The toasting
process can be stopped at any
time by pressing the carriage
control/mid-cycle cancel button.
5
OPERATING YOUR BREVILLE LIGHTNING
TOASTER
TOASTING FROZEN BREAD
MID-CYCLE CANCEL
To toast frozen bread,
place the bread into the
toasting slots and select
the desired browning
setting.
Press the carriage control button,
then press the frozen button.
The toaster automatically lowers the
bread into the slots, toasts the
frozen bread and then raises the
toast at the end of the toasting
cycle. The toasting cycle can be
stopped at any time by pressing the
carriage control button.
TIP:The frozen toast cycle can be
selected as the frozen bread is
automatically lowered into the
toasting slots.
The mid-cycle cancel
button can be pressed at
any point during the
toasting cycle, to cancel
the operation of the
toaster.
BUN WARMING RACK
The bun warming rack can be placed
on top of the toaster and used to
heat rolls, buns, croissants or
bagels. Place them on the bun
warmer and press the carriage
control button. Ensure that the
toaster is set to a low setting.
REHEATING TOAST
To re-heat toast, place the
toast into the toasting
slots. Press the carriage
control button then press
the reheat button. The toaster
automatically lowers the toast into
the slots and re-heats the toast. The
toast is raised at the end of the
reheat cycle. The reheat cycle can
be stopped at any time by pressing
the carriage control button.
TIP:The reheat toast cycle can be
selected as the toast is
automatically lowered into the
toasting slots.
6
CARE AND CLEANING
1 Always turn the power off, remove the
plug and allow the toaster to cool fully
before cleaning.
2 To remove any crumbs from the
toaster, slide out the crumb tray(s)
from under the toaster, empty, wipe
over with a barely damp cloth and dry
with a soft clean cloth. Replace before
using again.
3 Wipe over the outside of the toaster
with a barely damp cloth.
Do not immerse the main unit,
cord set or plug in water or liquid
of any kind.
4 To clean the interior of the toaster,
turn the toaster upside down while
unplugged and gently shake any
crumbs free.
DO NOT USE steel wool, scouring
pads or other abrasive cleaners.
CAUTION!
The crumb tray should be cleaned
regularly. Do not allow breadcrumbs to
accumulate in the bottom of the toaster.
7
IMPORTANT INSTRUCTIONS
Please read these instructions before operating this appliance and retain for future use.
ALWAYS
✔ Always ensure hands are dry before
handling the plug or switching on the
toaster.
✔ Always use the toaster on a secure,
dry level surface.
✔ Always allow adequate air space
above and on all sides for air
circulation. Do not allow the appliance
to touch curtains, wallcoverings,
clothing, dishtowels or other
flammable materials during use. Do
not use under cupboards or curtains.
✔ Caution is required on surfaces
where heat may cause a problem –
an insulated heat pad is
recommended.
✔ Always use the toaster with the crumb
tray in place.
✔ Always regularly clean the crumb tray.
Do not allow crumbs to build up.
✔ Always unplug from the socket when
not in use and before cleaning.
✔ Always allow the toaster to cool before
cleaning and storing.
✔ Always carry out regular checks of the
supply cord to ensure no damage is
evident. Should there be any signs
that the cord is damaged in the
slightest degree, the entire appliance
should be returned to the Customer
Service Department.
✔ Always return the toaster after a
malfunction, or if it has been
damaged in any manner to the
Customer Service Department for
examination, repair or adjustment as
special purpose tools are required.
Caution: This appliance
generates heat during use.
Proper precautions must be
taken to prevent the risk of
burns, scalds, fires or other
damage to persons or property
caused by touching the exterior
whilst in use or during cooling.
8
NEVER
✘ Never touch hot surfaces.
✘ Never use this appliance outdoors.
✘ Never use this appliance for other
than intended use. This appliance
is for household use only.
✘ Never allow children to use this
appliance. Close supervision is
necessary when the appliance is
near children.
✘ Never leave appliance unattended
when in use as bread may burn.
✘ Never let cord hang over the edge of
a table or counter, touch hot
surfaces or become knotted.
✘ Never place this appliance on or
near a hot gas or electric burner or
where it could touch a heated oven
or microwave oven.
✘ Never use this appliance with any
foodstuff containing sugar or
products containing jam or
preserves.
✘ Never immerse any part of
thetoaster, or cordset and plug in
water or any other liquid to protect
against electrical hazards.
✘ Never use harsh, abrasive or
caustic cleaners to clean this
appliance.
✘ Never operate the appliance with a
damaged cord or plug, after an
appliance malfunction or if it has
been damaged in any manner.
Warning: Never attempt to extract
jammed toast, muffins, bagels or
any other item with a knife or any
other object, as contact with live
elements could result in an electric
shock. Allow the appliance to cool,
unplug and carefully remove the
bread.
CONNECTION TO THE MAINS SUPPLY
When using electrical appliances, basic safety precautions should
always be followed.
WARNING: THIS APPLIANCE MUST BE EARTHED
If this appliance is fitted with a rewirable BS1363, 13 amp plug, the fuse should
be rated at 13 amps and be ASTA approved to BS1362. However if the plug is
unsuitable, it should be dismantled and removed from the supply cord and an
appropriate plug fitted as detailed below.
If this appliance is fitted with a moulded BS1363 13 amp plug, the fuse should
be rated at 13 amps and be ASTA approved to BS1362. If the fuse in a nonrewirable plug needs to be changed, the fuse cover must be refitted. The
appliance must not be used without the fuse cover fitted.
In the event of the plug being unsuitable, it should be changed and an appropriate
plug fitted as detailed below. If you remove the plug it must not be connected
to a 13 amp socket and the plug must be disposed of immediately.
As the colours of the wires in the mains lead of this appliance may not
correspond with the coloured markings identifying the terminals in your plug,
proceed as follows:
The wires of the mains lead are coloured in accordance with the following code:
GREEN & YELLOW = EARTH
BLUE = NEUTRAL
The wire which is coloured GREEN &
YELLOW must be connected to the
terminal in your plug which is marked
with an E or by the EARTH SYMBOL
or coloured GREEN or GREEN &
YELLOW.
BROWN = LIVE
GREEN & YELLOW
(earth)
E
L
13 AMP FUSE
BLUE
(neutral)
N
BROWN
(live)
The wire coloured BLUE is the
NEUTRAL and must be connected to
the terminal in your plug which is
marked N or coloured BLACK.
The wire coloured BROWN is the LIVE and must be connected to the terminal
in your plug which is marked L or coloured RED.
If any other plug is used, a 13 amp fuse must be fitted either in the plug or adaptor
or at the distributor board.
9
AFTER SALES SERVICE
These appliances are built to the very highest of standards. There are no user
serviceable parts. Follow these steps if the unit fails to operate:
1. Check instructions have been followed correctly.
2. Check fuse has not blown.
3. Check mains supply is functional.
If the appliance will still not operate, return the appliance to the place it was
purchased for a replacement.
To return the appliance to Bush Customer Service Department, follow the steps
below:
1. Pack it carefully, preferably in the original carton. Ensure unit is clean.
2. Enclose your name and address and quote the model number PT33 on all
correspondence.
3. Give the reason why you are returning it.
4. If within the guarantee period, state when and where it was purchased and
include proof of purchase (e.g. till receipt)
5. Send it to our Customer Service Department at the address below:
Customer Service Department
Pulse Home Products Limited
Vine Mill, Middleton Road,
Royton,
Oldham
OL2 5LN, UK.
Telephone: 0161 621 6900 Fax: 0161 626 0391
e-mail: [email protected]
10
GUARANTEE
This product is guaranteed for a period of 1 year from the date of purchase
against mechanical and electrical defects.
This guarantee is only valid if the appliance is used solely for domestic purposes
in accordance with the instructions provided, that it is not connected to an
unsuitable electricity supply, dismantled or interfered with in any way or
damaged through misuse. Under this guarantee we undertake to repair or
replace free of charge any parts found to be defective.
Nothing in this guarantee or the instructions relating to the product excludes,
restricts or otherwise affects your statutory rights.
In line with our policy of continuous development, we reserve the right to change
this product, packaging and documentation without notice.
This product is manufactured to comply with the radio interference requirements
of EEC directive 93/68 EEC.
Vine Mill, Middleton Road, Royton, Oldham, OL2 5LN, UK.
www.breville.co.uk
Breville is a registered trademark of Pulse Home Products Limited
© Pulse Home Products Limited
92275
UKO-REV1-SEP04-PDF