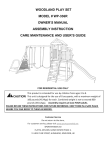
1
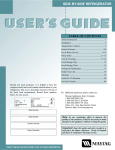
Models JTB1986-2688
Refrigerator
Guide
E/i%I-AIR
Introduction
....................
Safety Instructions
Installation
1
...............
Instructions
2
..........
3
Features at a Glance ..............
4
Temperature
5
Controls
.............
Energy Saving Tips ...............
h_terior Designs
Adjustable
6
...............
Features
•
7-i l
.
.
. ,
.
.
, ,
,
7-9
J/
Specialized Storage
Jce Service .....................
........
1O-11
12
Food Storage Tips ...............
13
Food Storage Chart ..............
14
Main taining Your Refrigerator
Care and Cleaning
Refrigerator
Cleaning
..............
Chart
Before You Call .................
Warranty
................
.....
_
15
16
.......
17
18
Back Page
o • o • • • • o • o • • • o • • o _o
o_,_._ _ "°_ • o • • o ! ;o*o
Introduction
Models:
Congratulations on the purchase of a Jenn-Air refrigerator!
We appreciate your purchase
decision and feel confident you
will be happy with this appliance for years to come. For best
results, we suggest reading this
guide carefully. You will find
instructions on the proper operation and maintenance of your
refrigerator. Additionally food
storage information has been
included for you.
Should you ever need our future assistance with your
refrigerator, a complete model and serial number recorded
in the spaces below will be extremely helpful. These numbers are found on a data plate inside the refrigerator compartment on the upper left side.
Model Number
Serial Number
Revision Number
JTB1986-2688
Please keep your sales slip or cancelled check. Should any
warranty service be required, proof of original date of purchase is needed. For additional questions, please contact
us:
Jenn-Air
403 West Fourth Street North
Newton, Iowa 50208
(515) 791-8911
(Mon.-Fri., 8am-5pm Central Time)
Internet: http://www.jennair.com
In our continuing effort to improve the quality of our
refrigerators, it may be necessary to make changes to
the appliance without revising this guide.
Important
WARNING
Safety
Instructions2
_ When using your appliance, always follow basic precautions,
the following:
including
• Use the refrigerator only for its intended purpose.
• To prevent possibility of hazard due to electrical shock,
never plug the refrigerator into a receptacle which has
not been grounded adequately and in accordance with
the local and national electrical codes. See _ warning
and the grounding instructions below,
Important:
Child entrapment and suffocation are
not problems of the past. Junked or abandoned
refrigerators are still dangerous.., even if they will
sit for "just a few days." If you are getting rid of
your old refrigerator, please follow the instructions
below to help prevent accidents.
• Unplug the refrigerator before cleaning or replacing a
light bulb.
• In case of power failure, minimize door openings. If the
power failure is of a long duration, protect the food by
placing blocks of dry ice on top of the packages or check
with a local frozen foods locker about temporary storage. Frozen foods which have thawed completely should
not be refrozen.
• Take off the doors.
• Leave the shelves in place so that children may not
easily climb inside.
• Any electrical service cord that becomes frayed or damaged should be immediately repaired or replaced. Never
unplug your appliance by pulling on the power cord.
• Your refrigerator should not be operated in the presence
of explosive fumes.
• Children should not climb, hang or stand on the shelves
of this refrigerator,
if
I
I
__ WARNING _ This appliance is designed to operate on a normal 115 volt, 15 amp, 60 cycle
line. There should be a separate, grounded circuit serving this appliance only. Do not use an extension cord. Do not use any device that will alter the electrical performance of this appliance.
This appliance is equipped with a three-pronged grounding plug for
your protection against possible electrical shock hazards. It must be
plugged into a grounding receptacle. Where a standard two-prong
wall receptacle is encountered, it is the personal responsibility and
obligation of the customer to have it replaced with a properly
grounded three-prong wall receptacle. Do not under any circumstances, cut or remove the third (ground) prong from the power cord.
Do not use an adapter plug.
Save These Instructions
Installation
Instructions
Your new refrigerator was packed carefully for shipment. Remove and discard shelf packing clips (if used) located just above each shelf where they hook onto the frame. To
remove plastic clips wiggle the clips sideways and pull straight out.
Location
of Your
R e f ri g e ra t o r
Leveling
is Important
Toenhance
itsappearance
andtomaintain
efficient
perfor-
• Allow for a free flow of air through the front base grille,
mance, your refrigerator should be level.
• Install the refrigerator where the room temperature will
not go below 55° E With temperatures below 55°, the
refrigerator will not run frequently enough to maintain
proper temperature in the freezer,
For refrigerators with 4 fixed wheels (models JTBI986,
JTB2186):
• Adjust the leveling screws beneath each front comer at
the base of the cabinet. Turn these leveling screws clockwise to raise a cabinet comer and counterclockwise to
lower a cabinet comer (see fig. 3).
• Allow a minimum 1/2" clearance on the sides, top and
back for ease of installation. If refrigerator is placed
with the door hinge side against a wall, you may want to
allow additional space so the door can be opened wider,
• Use caution when installing the unit on vinyl or hardwood floors so as not to mark or otherwise damage the
flooring. A piece of plywood, a rug or other material
should be used to protect the floor while positioning the
unit.
• If the floor is not level and it is necessary to raise the rear
of the cabinet, we suggest roiling the rear wheels onto a
piece of plywood or other shim material.
For all other models:
• Grasp both ends of the base grille and pull straight out to
remove (see fig. 1).
• Adjust the wheels with a screwdriver or a 1/4" socket
(see fig. 2).
• To prevent the refrigerator from rolling, use the leveling/lock screws. (see fig. 3). To lock the cabinet in place,
turn down both levering screws
]----
Fig. 1
TURN CLOCKWISE TO
RAISE CABINET CORNER
I
- __s
B
TURN
COUNTER-CLOCKWISE
TO LOWER CABINET
CORNER
Fig. 2
Fig. 3
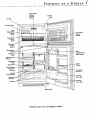
Features
Twin Fresh
Climate
Control
Ice Bin
System
at a Glance
TM
Freezer
Light
Ice Cube Trays
Twin
Freezer
Shelf
Drop Down
Freezer
Basket
Freezer
Shelf
Freezer
Basket
Refrigerator
Compartment
With Keeper
Shelf
Drawer
Rack
Egg Caddy
Tender
Sealed Glass
Cantilever
Shelves
Tall Bottle
Sealed
Crisper
Retainer
Shelf
Lift Off
Door Bins
Humidity
Controls
Crispers
1lit Out
Door Bins
Base Grille
Features may vary according to model.
Temperature
Controls
Your refiigerator has Twin Fresh TM climate control for provision of optimal fresh and frozen food temperatures.
To adjust the controls, move the slide to the left or right as desired,
Twin Fresh TM Climate
Control
Settings
Adjusting
the Twin
Climate
Controls
Fresh
• The refrigerator control has settings from 1 (warmest) to
9 (coldest). Initially set this control on 5.
* 24 hours after adding food, you may decide that one
or both compartments should be colder or warmer. If
• The freezer control has settings from 1 (warmest) to 9
(coldest). Initially set this control on 5.
so, adjust the control(s) as indicated in the table
below.
• Let the refrigerator run at least 8-12 hours before adding
food.
° Except when starting the refrigerator, do not change
either control more than one number at a time.
• Allow 24 hours for temperatures to stabilize before
resetting.
TM
• Changing either control will have some effect on the
temperature of the other compartment.
i
i
TWIN
iii
Refrigerator
Refrigerator
FRESH
i
TM
:CLIMATE
i
i
CONTROL
GUIDE
too Warm
Slide the refrigerator
control to next higher setting.
too Cold
Slide the refrigerator
control to next lower setting.
Freezer too Warm
Slide the freezer control to next higher setting.
Freezer too Cold
Slide the freezer control to next lower setting.
Turn refrigerator
Off
Slide freezer control to OFE
NOTE: Sliding the freezer control to OFF stops cooling in BOTH compartments. It does not shut off
power to the refrigerator.
No
Defrosting
Your refrigerator is designed to defrost automatically.
NOTE: During the automatic defrost cycle, you may notice
a red glow/reflection in the vents on the back wall
of the freezer compartment and you may hear the
sound of water droplets coming into contact with
the defrost heater. This is normal during the
defrost cycle.
0
Warm
Cabinet
Surfaces
At times, the front of the refrigerator cabinet may be warm
to the touch. This is a normal occurrence that helps prevent
moisture from condensing on the cabinet. The condition
will be more noticeable when you first start the refrigerator, during hot weather and after excessive or lengthy door
openings.
Energy
Saving
Tips
• Locate the refrigerator away from heat producing appliances such as the range or dishwasher, heat vents and
direct sunlight.
• Level the refrigerator and do not block ventilation
around the front grille.
• Keep the freezer full to near capacity so less cold air will
escape during door openings. When the freezer is less
than two-thirds full, place milk cartons half full of water
in the freezer.
• Let hot dishes cool slightly before putting into the
refrigerator or freezer.
• Cover liquids.
• Wipe moisture from the outside of containers before
placing them into the refrigerator.
• Avoid opening the doors too often.
.f
7Interior
Designs
Adjustable
Refrigerator
Features
Shelves
The Tempered Glass Cantilever Shelves can be positioned to suit your individual needs. In some models, these
shelves are sealed to contain any spills which might occur.
To remove a shelf:
• slightly lift up the rear of the shelf
• pull the shelf straight out
To lock the shelf into another position:
• tilt up the front edge of the shelf
, insert the hooks into the desired frame openings
• let the shelf settle into place
• be sure the shelf is securely locked at the rear
Slide-out shelves (certain models) can easily be pulled forward for access to foods placed at the rear.
To slide out:
• grasp the front of the shelf and pull forward
• push in the shelf to return to the original position
_k WARNING -- Never attempt to adjust a shelf that is loaded with food (except in the case
of the Elevator Shelf).
TM
ElevatoF _ Shelf
The fresh food compartment may be equipped with an
Elevator Shelf. This shelf has a spill retainer edge for easy
cleanup. It also has the convenient slide out feature that allows
easy access to items stored at the rear of the shelf.
This shelf can be adjusted up or down without having to be
unloaded of its contents. To adjust an Elevator Shelf,
unfold the recessed crank handle so it is at a right angle to
the shelf front. Crank to the right (clockwise) to raise the
height of the shelf, and the left (counterclockwise) to lower
the height of the shelf.
TM
TM
To remove the Elevator shelf for occasional cleaning:
• Completely unload the shelf.
TM
press both locks inwards. Lift slightly and tilt the
frame assembly to allow the rear guides to clear the
vertical rails.
• To reinstall, tilt the flame assembly while depressing
both locks, reposition the rear guide behind the vertical rails. When the shelf is level, release the locks
allowing the shelf to latch in the correct position.
VERTICAL RAILS
REARGUIDES
LOCKS
• Grasp the shelf front and pull forward until it stops.
• Press the stops from below (both sides) upward and continue pulling the shelf forward, clear of the frame.
• To reinstall, align the shelf to the frame and push it all
the way back. (There is no need to depress the stops for
reinstallation).
In ordinary use, the Elevator shelf with the frame assembly does NOT require removal. Though unlikely,
and not recommended, the correct removal procedure is as
follows:
TM
• Unload the shelf completely.
• While supporting the shelf and frame from the front,
FRAMEASSEMBLY
OUT SHELF
_,+....+++,..._.***+
.
++,
,.¢
+ ++.+++++++++
The Multi Can Rack (certain models) suspends from one
of the cantilever shelves. It hooks over the wires found in
the framework under the shelf. The sloped design allows
for cans to roll forward as one is removed.
Freezer Shelves
Your new refrigerator has one of three types of shelving
alternatives in the freezer compartment. These are
described below.
The Adjustable Freezer Shelf can be adjusted up or down
or removed to accommodate various sized packages.
To remove the shelf:
• lift the end up about 3 inches
• pull the right end bars out of the cups in the side wall
To replace the shelf:
• reposition the removable support plugs on the left side
wall to the desired level
• reverse the removal procedure
++.+_+.++¢++**+
The Expandable-width Freezer Shelf adjusts sideways to
open up a full-height space for tall packages, such as pizza.
The leg on the right side of the shelf slides to make this
adjustment.
The shelf can also adjust to two heights.
To adjust the shelf height:
• remove the shelf from the freezer
• slide the leg out of the channels
• reinsert the leg in the alternate height position
• return the shelf to the freezer, inserting the left end into
the liner cups.
*, *
¢+ ¢+ *
* _. *+ *
The Twin Expandable Freezer Shelf allows for increased
freezer storage capacity by adding another shelf. To
accommodate for varying frozen food loads, the height of
the shelves can be adjusted. The lower shelf has expandable width capabilities (as described above) so an area for
taller items can be created.
¢
*. O O ¢
¢+
+ ++
+++
.+
. +++*
8
Interior
Designs
Door Shelves
The Lift Off Bins are roomy enough to handle gallonplus sized containers. They are adjustable and can be easily removed.
To remove:
• lift the shelf front up until it clears the retainers on the
door liner.
• pull the bin straight out
To replace:
• reverse the above procedure.
A Shelf Tender is located in one refrigerator door bin (certain models have two tenders). Shelf tenders secure bottles
and other containers in their upright position and are easily adjusted by sliding sideways. Certain models have a
shelf tender on one freezer door shelf also.
_:
The Tall Bottle Retainer (certain models) is designed to
prevent tall bottles from tipping forward. It is easily
adjusted by sliding from side to side.
//
4
Specialized
Storage
Areas
Specialized Storage Areas
Depending on the model you have chosen, your refrigerator has either a Dell Storage Drawer or an AdjustiTemp Drawer. These drawers are designed to provide a
short term storage area for fresh meats, cheeses and luncheon meats.
For models with the Adjusti-Temp Drawer, a control is
located on the shelf front above the drawer. Simply slide
the control knob left or right to achieve the desired internal temperature of the drawer,
To remove this drawer for cleaning:
• pull the drawer out until it stops
• lift the drawer up slightly and pull it out
To replace the drawer:
• reverse above
procedure.
This drawer can be positioned as desired on either the left
or right side of the refrigerator cabinet.
• for optimal cheese storage, slide the control to the
left
• for optimal meat storage, slide the control to the
right
For best results, keep this drawer closed tightly at all
times.
COOL
The Crispers are ideal for storage of fruit and vegetables.
There is a humidity control located on the glass shelf above
each of the crisper drawers.
For optimal fruit storage, slide the crisper control
to the left to provide lower humidity conditions in
To remove a crisper drawer for cleaning:
• pull out the crisper until it stops
• tilt the drawer front up and pull it out
To replace a crisper drawer:
the drawer.
• align the drawer in the tracks
control to the right to provide higher humidity
For
optimalin vegetable
conditions
the drawer.storage, slide the crisper
• liftbest
the results,
drawer front
slide in tightly closed.
For
keep and
the crispers
LOW
The Sealed Crisper Shelf (certain models) or the Tempered Glass Crisper Shelf also serve as the lower refrigerator
shelf.
To remove the crisper shelf:
To replace the crisper shelf:
• lift the front edge of the shelf
• set the rear bars on the support
• pull the shelf straight out
• push the shelf back until the front edge can be lowered
into place.
j/
To use the roomy Dairy Compartment, simply raise
the cover. Depending on which model you have chosen,
this compartment may come equipped with a Tender to
secure compartment contents in place or a Butter Dish.
If your model has the tender, simply slide it from side to
side for desired placement.
The Egg Caddy (style may vary) holds a "dozen-plus"
eggs. It can be removed to be washed or carried to a work
area.
:_
.!
!
The Tilt Out Refrigerator Door Bins (certain models) are
ideal for storing awkward containers such as liter bottles
and bagged items. By tilting the bins outward, space is
opened up to conveniently load or retrieve contents.
The Slide Out Freezer Basket (certain models) is found in
the main freezer compartment. It is a convenient storage
area, providing easy access to items stored in the rear of the
_
freezer. Slide the basket out to reach or store frozen foods.
To remove the basket:
__11___
_M_k__-JV_
_
.-_
_1 Jv it ,it Iltl xx it[ ,,_.l[,, \\,[L\ at_Ik_i_l_llHk_
• pull the basket out until it stops
• lift and pull the basket out
To replace the basket, reverse the removal procedure.
i:!]
........
_
///l
-
II_ _ \\ \\ \\ \\\\ \\ \\ \\
on the lower shelf of the freezer door. This area provides
space for frozen food items that tend to shift or slide (such
as bagged vegetables).
ro own
I
"_[_' ...................
_"_
'_II
.......
,H,,
_ _ 7" _ :ttl
,
z
Ice
Ice Cube Trays
The freezer compartment of your refrigerator is equipped
with ice cube trays andan ice storage bin. To release the ice
cubes from a tray, hold the tray upside down over the bin
and twist both ends.
Depending on the model you havechosen, the ice bin either
slides into rails under an ice cube tray rack or stacks neatly
on top of the ice trays.
Automatic Ice Maker (optional)
Your refrigerator is automatic ice maker ready. The number
for the ice maker kit you need appears on the data plate (see
page 1).
• After your refrigerator has been hooked up to the water
supply, move the wire lever arm into the down position,
This will start its operation. The ice maker will fill with
water when the freezer reaches the proper temperature.
• It may be 8 to 12 hours before the ice maker furnishes any
usable ice cubes. The first one or two batches will probably contain undersized and irregular cubes because of air
in the supply line.
Service
• The initial batch may also contain impurities from the new
water supply piping. Therefore, all cubes from the first
two or three batches should be discarded.
• When the ice cubes are ejected it is normal for several
cubes to bejoined together at the ends. They can easily be
broken apart. The ice maker will continue to make ice
until the supply of ice cubes raises the wire lever arm,
shutting the ice maker off.
• Certain sounds may accompany the various cycles of the
ice maker. The motor may have a slight hum, the cubes
will rattle as they fall into an empty storage pan and the
water valve may click or "buzz" occasionally.
• If the ice is not used frequently, the ice cubes will become
cloudy, shrink, stick together and taste stale. Empty the
ice storage bin periodically and wash it in lukewarm
water. Be sure to dry the bin before replacing it.
• To remove the ice bin, pull it forward, away from the ice
maker.To avoid the ice maker dumping ice while the bin
is removed, turn the ice maker off by lifting the wire
lever.
• To replace the ice bin, reverse the above procedure. Turn
the ice maker on by lowering the wire lever arm.
• Beverage and foods should not be placed in the ice storage
bin for quick chilling. These items can block the wire lever
arm, causing the ice maker to malfunction.
• Turn off (arm up) the ice maker when the water supply is
to be shut off for several hours.
For Your Safety
Do not place fingers or hands on the automatic ice making mechanism while the refrigerator is plugged in. This
will help protect you from possible injury'. It will also prevent interference with moving parts of the ejector mechanism and the beating element that releases the cubes.
Under certain rare circumstances, ice cubes may be discolored, usually appearing with a green-bluish hue. The
cause of this unusual discoloration can be a combination
of factors such as certain characteristics of local waters,
household plumbing and the accumulation of copper salts
in an inactive water supply line which feeds the ice maker.
Continued consumption of such discolored ice cubes may
be injurious to health. If such discoloration is observed,
discard the ice cubes and contact your dealer to purchase
and install a water line filter.
JFoo
o St0.,rage
Fresh
Food
Tips
,
Storage
.... ..... ........
Frozen
Food
•.... ...........
Storage
• The fresh food compartment of a refrigerator should be
kept between 34°F and 40°F with an optimum temperature of 37°F. To check the temperature, place an
appliance thermometer in a glass of water and place in
the center of the refrigerator. Check after 24 hours. If
the temperature is above 40°F adjust the controls as
explained on page ,5.
• The freezer compartment of a refrigerator should be
kept at 0°F or lower. To check the temperature, place
an appliance thermometer between the frozen packages and check after 24 hours. If the temperature is
above 0°F, adjust the control as described on page .5.
• A freezer operates more efficiently when it is at least
two-thirds full.
• Avoid overcrowding the refrigerator shelves. This
reduces the circulation of air around the food and
results in uneven cooling.
Packaging Foods for Freezing
Fruits and Vegetables
• To minimize dehydration and quality deterioration use
aluminum foil, freezer wrap, freezer bags or airtight
containers. Force as much air out of the packages as
• Storage in the crisper drawers traps moisture to help
preserve the fruit and vegetable quality for longer time
periods. (Refer to page 10).
possible and be sure they are tightly sealed. Trapped air
can cause the food to dry out, change color and develop an off-flavor (freezer burn).
• Sort fruits and vegetables before storage and use
bruised or soft items first. Discard those showing signs
• Overwrap fresh meats and poultrywith suitable freezer
wrap prior to freezing.
of decay.
• Always wrap odorous foods such as onions and cabbage
so the odor does not transfer to other foods.
• Do not refreeze
• While vegetables need a certain amount of moisture to
remain fresh, too much moisture can shorten storage
times (especially lettuce). Drain vegetables well before
storing.
• Avoid adding too much warm food to the freezer at one
time. This overloads the freezer, slows the rate offreezing and can raise the temperature of frozen foods.
• Leave space between the packages so cold air can circulate freely, allowing food to freeze as quickly as pos-
Meat and Cheese
Loading
meat that has completely thawed.
the Freezer
sible.
• Raw meat and poultry should be wrapped securely so
leakage and contamination of other foods or surfaces
does not occur,
• Avoid storing hard-to-freeze foods such as ice cream
and orange juice on the freezer door shelves. These
foods are best stored in the freezer interior where the
• Occasionally mold will develop on the surface of hard
cheeses (Swiss, Cheddar, Parmesan). Cut off at least an
inch around and below the moldy area. Keep your knife
or instrument out of the mold itself. The remaining
cheese will be safe and flavorful to eat. Do NOT try to
save individual cheese slices, soft cheese, cottage
cheese, cream, sour cream or yogurt when mold
appears.
temperature varies less with door openings.
Refer to the Food Storage Chart on page 14 for
approximate storage times.
Dairy
Food
• Most dairy foods such as milk, yogurt, sour cream and
cottage cheese have freshness dates on their cartons for
appropriate length of storage. Store these foods in the
original carton and refrigerate immediately after purchasing and each use.
_,
.....
Food
Storage
Chart
Food Storage Chart
(Storage times are approximate and may vary depending on type of packaging, storage
temperature, and the quality of the food when purchased. )
Eggs in the shell,
Leftover yolks or whites
3 weeks
2-4 days
_ ===_._
Not recommended
9-12 months
_-
--
Refrigerate small ends down.
For each cup of yolks to be frozem add 1 tsp. sugar for use in
sweet, or 1 tsp. salt for non-sweet dishes.
_
_
Apples
Bananas
I month
2-4 days
8 months (cooked)
6 months (whole/peeled)
May also store unripe or hard apples at 60-70°F.
Ripen at room temperature before refrigerating. Bananas & avo-
Pears, plums, avocados
3-4 days
Not recommended
cados darken when refrigerated.
Berries, cherries, apricots
Grapes
Citrus ti'uits
2-3 days
3-5 days
I-2 weeks
6 months
1 month (whole)
Not recommended
May also store at 60-70°E If refrigerated, store uncovered.
t'lneaPinea
les,_d
scut
les
[ 2-3 da s
I 6-12 months
___o-__rnontns
Will not ripen after purchase. Use quickly.
_
_
__
Asparagus
Brussels sprouts, broccoli,
cauliflower, green peas, lima
beans, green onions, peppers
1-2 days
3-5 days
8-10 months
8-10 months
Don't wash before refrigerating. Store in crisper.
Wrap odorous foods. Leave peas in pods.
Cabbage, celery
Carrots, parsnips, beets, &
turnips
1-2 weeks
7-i0 days
10-12 months
8_10 months
Wrap odorous foods & refrigerate in crisperr.
Remove tops. Wrap odorous foods & refrigerate in the crisper.
Lettuce
7-10 days
Chicken and Turkey, whole
Chicken and Turkey, pieces
Fish
1-2 days
1-2 days
1-2 days
Bacon
7 days
1 month
Beef or lamb, ground
1-2 days
3-4 months
Fresh meats can be kept in original packaging for refrigeration.
Beef or lamb, roast & steak
Ham, fully cooked, whole
half
slices
3-5 days
7 days
5 days
3 days
6-9 months
1-2 months
1-2 months
1-2 months
Place in the Meat and Cheese Drawer. When freezing longer
than 2 weeks, overwrap with freezer wrap.
Luncheon meat
3-5 days
1-2 months
Unopened, vacuum-packed luncheon meat may be kept up to 2
Pork, roast
3-5 days
4-6 months
weeks in the Meat and Cheese Drawer.
Pork, chops
3-5 days
4 months
Sausage, ground
1-2 days
1-2 months
Sausage, smoked
7 days
1-2 months
Veal
3-5 days
4-6 months
Frankfnrters
7 days
1 month
iillmlllm l
Sources:
United States Department
I Not recommended
12 months
9 months
2-6 months
of Agriculture;
]
Keep in original packaging for refrigeration. Place in the Meat
and Cheese Drawen When freezing longer than 2 weeks, overwrap with freezer wrap.
Processed meats should be tightly wrapped and stored in the
Meat and Cheese Drawer.
Food Marketing
Institute;
Cooperative
Extension
Service, lowa State University
JiMaintaining
Your
Refrigerator
Vacations
Moving
If you will be gone for a month or less, leave the controls
at the usual settings,
During longer absences:
When moving, follow steps a-d under Vacations. In addition, remove and carefully pack any items that are easily
removable. Ship the refrigerator in an upright position with
a) remove all food,
b) shut off the ice maker (if installed) and the valve where
you tapped into the water line to supply the refrigerator,
the doors taped shut.
c) disconnect the refrigerator from the electrical outlet,
d) clean and dry the refrigerator thoroughly,
e) leave the doors open to prevent odors.
Replacing a Light Bulb
_k CAUTION:
Disconnect the power cord before
protection
against possible broken glass.
Always
use a standard
40 or 60 watt
appliance
replacing
light bulb(s). Wear gloves as
bulb.
Refrigerator
Freezer
There are two light bulbs located under the top of the
refrigerator compartment, on either side of the Twin
Fresh TM control housing.
The freezer light is located on the back wall, near the upper
right corner.
To remove the bulb cover:
• Carefully grasp the lightbulb by reaching behind the
bulb cover,
• Unscrew the lightbulb and replace,
• Grasp the top and bottom of the bulb cover. Press in the
areas of the attachment tabs, applying enough pressure
to unhook the tabs. At the same time, pivot the cover
down and remove.
• Unscrew the ligbtbulb and replace.
• Replace the bulb cover by pivoting it back into place and
snapping the tabs into the appropriate slots.
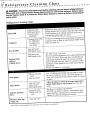
Care
Refer to the chart on the following page for specific refrigerator cleaning guidelines.
Disconnect
ing.
the power cord before clean-
Cleaning Under the Refrigerator
Your refrigerator can be rolled out for cleaning the floor
underneath. Raise the locking feet if engaged (see page 3).
Pull the refrigerator straight out from the walk
and Cleaning
Clean TM
Condenser
NO
[0
commercial-duty
A clean condenser means more efficient refrigerator operation. Thanks to the unique design of the condenser in your
new refrigerator, there's no longer a need for routine condenser cleaning in normal home usage surroundings.
Some operating environments may be particularly dusty or
greasy. In these situations, the condenser can be periodically cleaned to insure maximum efficiency.
/Refrigerator
Cleaning
Chart
CAUTION: Disconnect the power cord before cleaning• Do not touch refrigerated surfaces with wet or damp hands• Damp objects stick to cold metal surfaces. Before cleaning the freezer, allow it to warm up. Allow glass shelves to warm up before immersing in
warm water•
Refrigerator
Cleaning
Base grille
Condenser
Chart
Soap and water
Remove the base grille by grasping the ends and
Mild liquid sprays
Vacuum cleaner
attachment
pulling straight out. To replace, align the clips with the
round openings in the cabinet and push each end in
until the base grille snaps into place.
Cleaning Brush (Part
No. 20001017)
Available from
your dealer.
No need for cleaning unless environment is particularly greasy, dusty or there is significant pet traffic in the
home (see page 16).
Soap and water
Mild liquid sprays
Door handles
Soap and water
Mild liquid sprays
Dry with a clean, soft cloth.
Do not wipe the refrigerator with a soiled dishwashing
cloth or wet towel. These may leave residue that can
scratch and weaken the paint. Do not use scouring
pads, powdered cleansers, bleach or cleaners containing bleach. These products can scratch and erode the
paint finish.
Do not wax plastic or vinyl parts.
Door gasket
Baking soda and
water
Soap and water
Use 1-2 tablespoons baking soda per quart of water.
Be sure to wring out excess water from sponge or
cloth when cleaning around controls, lights, or electrical parts.
Glass shelves
Soap and water
Glass cleaner
Mild liquid sprays
Allow the glass to warm up to room temperature
before immersing in warm water• Never use hot
water.
Soap and water
Baking soda and
water
See above for baking soda solution.
DO NOT use abrasive cleaners, concentrated detergents, bleaches, cleaning waxes, solvents or polish
cleaners to clean the refrigerator interior.
Painted metal
surfaces:
Cabinet, doors
Interior and door
liner
Drawers, bins, egg
cradle, etc.
*Brand
names
of cleaning
Soap and water
agents
are trademarks
of the respective
manufacturers,
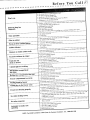
Before
•
•
•
•
•
Won't run
................
.....................................
Runs too long/too
frequently
You Call
the temperature control turned to "Off"
the power cord not plugged in
no power at the electrical outlet
the circuit breaker tripped or the house fuse blox_l
refrigerator is in automatic defrost
; ;LL';'r;;;i_;'rl,
........ t;r__rTl_i2U(n'd'G
....,
Gi_;,
&'i;;,
_;q_
i;;;E;.....
odnEg"
_];_;"
•
•
•
•
e• provide hi•re stable temperatures
prolonged door openings
the base grille blocked
too many door openings
the door not sealing (due to a package or a container holding door open)
Noisy operation
• the cabinet not level
• a weak floor
Odor in cabinet
• odor producing foods should be covered or wrapped
• the interior needs cleauing
...........
..........................................
Warm air from cabinet bottom
A'
.70r......
T_ITL.........................
,;i2"G'd;;i;i'£;EE...............
• the cabinet not level
• a weak floor
Cabinet vibrates
.........................................
...........
Moisture on inside cabinet walls
;";: ;E;'_E'gh'_
;&id';;aE"'_il"G_'Z';
,
o ,......
r ,_ _ r _
o p;oiJ,_'Li'"op'nG""
e
•or
e
• door not closed properly
• food not wrapped properly
• hot, humid weather
Excessive moisture in crisper
........................................................
77 .......
=t::rT'i''a'O';'a';a
p;';';';
...................................
Foods dry out
:
(fresh or frozen)
tthee crisper
ckagesnot tightly closed
e
r e l
• ternperatnre control set too cold
Cabinet light not working
• the bulb burnedout
Refrigerator compartment
too warm
• the refrigerator control set too warm
• prolonged door openings
Refrigerator compartment too cold
• the refrigerator control set too cold
Freezer compartment too warm
- the freezer control set too warm
• prolonged door openings
Sizzling sound in freezer
• a normal sound caused by defrost water dripping on defrost mechanism
Visible
glow
in the freezer
o e l
• no power at the outlet
vents
• the appearance of a red glow or reflection is normal during the defrost cycle
Freezer not freezing properly
• products wifl) high sugar content may not harden completely wben frozen (ice
cream coneelrtrated juice, etc.)
• adjust freezer control to a colder setting
Ice cubes sticking in tray
• trays may be coated with residue fihn from minerals in the water. \Vipe tray's with
_negar-soaked cloth until clean. If residue is heav?._clean trays each time the
refrigerator is cleaned.
......................................
Ice cubes evaporate
: ;;_d :a]; mov_(,g'o_'e; t_,;•i_ et2;s
This is nornlal.
Automatic ice maker not
operating
•
•
•
•
NOTE: For further
assistance
the
the
the
the
;ruses"
sl,,qnkage
e;pae;_ll>,
i_i'fl,"_i;_;t_r{;;_g;
stop arm in OFF (up) position
water supply turned off
water pressure too low
freezer too warm
contact Jenn-Air
Customer Assistance:
U.S. 1-800-688-1100
Refrigerator
Warranty
Full One Year Warranty
For one (1) year from the date of original retail purchase, any part which fails in normal home use will be repaired or replaced free
of charge.
Ice Maker - when purchased with the refrigerator and installed by the dealer the ice maker will be considered part of the refrigerator for warranty purposes.
Limited Warranty -- Major Refrigeration Components
Second thru Fifth Year:
After the first year from the date of original retail purchase, through the fifth year, Maytag Appliances will repair or replace,
at it's option, free of charge for parts and labor, any part of the sealed refrigeration system (consisting of the compressor,
evaporator, condenser, drier and connecting tubing) and the cabinet liner (exclusive of the door liner) which fail in normal
home use. Mileage and transportation charges, if required, shall be the responsibility of the owner.
Limited Warranty -- Other Parts:
Second Year:
Parts other than major refrigeration components which fail in normal home use during the second year following the date of
original retail purchase will be repaired or provided free of charge for the part itself, with the owner paying all other costs,
including labor, mileage and transportation.
Please note: The full warranty and the limited warranties apply when the refrigerator is located in the United States or Canada.
Refrigerators located elsewhere are covered by the limited warranties only including parts that fail during the first year.
LIMITATIONS OF LIABILITY
The warrantor shall not be liable for any incidental or consequential damages, including food loss. Some states do not allow the
exclusion or limitation of consequential damages, so the above limitation or exclusion may not apply to you.
The specific warranties expressed above are the ONLY warranties provided by the manufacturer. This warranty gives you
specific legal rights, and yon may also have other rights that vary from state to state. The specific warranties expressed
above are the ONLY warranties provided by the manufacturer.
To Receive Warranty Service
To locate an authorized service company in your area contact the Jenn-Air dealer from whom your appliance was purchased; or call
Maytag Appliances Sales Company, Jenn-Air Customer Assistance at the number listed below. Should you not receive satisfactory warranty service, please write:
Maytag Appliances Sales Company
Attn: CAIR TM Center
P.O. Box 2370
Cleveland, TN 37320-2370
U.S. and CANADA
1-800o688-1100
U.S. customers using TTY for deaf, hearing impaired or speech impaired,call
1-800-688-2080.
NOTE: When writing about an unsolved service problem, please include the following information:
(a) Your name, address and telephone number;
(b) Model number, serial number, and revision number (found on the top front interior of the refrigerator compartment);
(c) Name and address of your dealer and the date the appliance was bought;
(d) A clear description of the problem you are having;
(e) Proof of Purchase (sales receipt).
What Is Not Covered By These Warranties:
1. Conditions and damages resulting from any of the following:
a. Improperinstallation,delivery,or maintenance.
h. Any repair, modification, alteration or adjustment not
authorized by the manufactureror an authorized servicer,
c. Misuse, abuse, accidents, or unreasonable use.
d. Incorrect electric current, voltage or supply.
e. Improper setting of any control,
2. Warranties are void if the original serial numbers have been
removed, altered, or cannot be readily determined,
3. Light bulbs,
4. Products purchased for commercial or industrial use.
5. The cost of service or service call to :
a. Correct installation errors.
b. Instruct the user on proper use of the product.
c. Transport the appliance to the servicer.
6. Consequential or incidental damages sustainedby any person as
a result of any breach of these warranties.
Some states do not allow the exclusionor limitation of
consequentialor incidentaldamages, so the above
exclusionmay not apply.
User's Guides, service manuals and parts catalogs are available from MaytagAppliances Sales Company,Maytag Customer Assistance.
Jenn-Air
Form No. A-0299
* 403 West
Part No. 111028-1
Fourth
Street
North
• P.O. Box 39
• Newton,
Iowa
50208
kitho U.S.A.