1
Note to Administrator
Note to Administrator
This manual is intended to provide administrators with additional
information about the security functions of this printer. Read this
manual as well as "Software Guide".
This manual is intended to provide administrators with additional
information about the security functions of this printer. Read this
manual as well as "Software Guide".
This manual and its contents should be kept by, and restricted to,
administrators.
This manual and its contents should be kept by, and restricted to,
administrators.
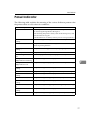
Password
Password
When you log on to this printer, you will be prompted to enter the
user name and password or access code for your account. We
strongly recommend you to change the factory default user name
and create a password or an access code immediately to prevent
information leakage and unauthorized operations by others.
You will be prompted to enter your login password or access code
when performing the following operations:
You will be prompted to enter your login password or access code
when performing the following operations:
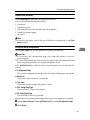
❒ Logging on to Administrator mode in Web Image Monitor
❒ Logging on to Administrator mode in Web Image Monitor
❒ Changing printer settings for an administrator using Smart
❒ Changing printer settings for an administrator using Smart
Organizing Monitor
Organizing Monitor
To use the default account, enter "admin" as the user name, and
leave the password blank when using Web Image Monitor. When
using Smart Organizing monitor, enter "admin" as the access code.
To use the default account, enter "admin" as the user name, and
leave the password blank when using Web Image Monitor. When
using Smart Organizing monitor, enter "admin" as the access code.
To Change password for Web Image Monitor and Smart Organizing
Monitor, you need to log on as an Administrator, and then make the
necessary settings.
To Change password for Web Image Monitor and Smart Organizing
Monitor, you need to log on as an Administrator, and then make the
necessary settings.
For details about setting a password, see Web Image Monitor or
Smart Organizing Monitor Help.
For details about setting a password, see Web Image Monitor or
Smart Organizing Monitor Help.
Note to Administrator
Note to Administrator
This manual is intended to provide administrators with additional
information about the security functions of this printer. Read this
manual as well as "Software Guide".
This manual is intended to provide administrators with additional
information about the security functions of this printer. Read this
manual as well as "Software Guide".
This manual and its contents should be kept by, and restricted to,
administrators.
This manual and its contents should be kept by, and restricted to,
administrators.
Password
Password
When you log on to this printer, you will be prompted to enter the
user name and password or access code for your account. We
strongly recommend you to change the factory default user name
and create a password or an access code immediately to prevent
information leakage and unauthorized operations by others.
You will be prompted to enter your login password or access code
when performing the following operations:
You will be prompted to enter your login password or access code
when performing the following operations:
❒ Logging on to Administrator mode in Web Image Monitor
❒ Logging on to Administrator mode in Web Image Monitor
❒ Changing printer settings for an administrator using Smart
❒ Changing printer settings for an administrator using Smart
Organizing Monitor
Organizing Monitor
To use the default account, enter "admin" as the user name, and
leave the password blank when using Web Image Monitor. When
using Smart Organizing monitor, enter "admin" as the access code.
To use the default account, enter "admin" as the user name, and
leave the password blank when using Web Image Monitor. When
using Smart Organizing monitor, enter "admin" as the access code.
To Change password for Web Image Monitor and Smart Organizing
Monitor, you need to log on as an Administrator, and then make the
necessary settings.
To Change password for Web Image Monitor and Smart Organizing
Monitor, you need to log on as an Administrator, and then make the
necessary settings.
For details about setting a password, see Web Image Monitor or
Smart Organizing Monitor Help.
For details about setting a password, see Web Image Monitor or
Smart Organizing Monitor Help.
Passwordpera.p65
1
11/14/06, 1:43 PM
Note to Administrator
Note to Administrator
This manual is intended to provide administrators with additional
information about the security functions of this printer. Read this
manual as well as "Software Guide".
This manual is intended to provide administrators with additional
information about the security functions of this printer. Read this
manual as well as "Software Guide".
This manual and its contents should be kept by, and restricted to,
administrators.
This manual and its contents should be kept by, and restricted to,
administrators.
Password
Password
When you log on to this printer, you will be prompted to enter the
user name and password or access code for your account. We
strongly recommend you to change the factory default user name
and create a password or an access code immediately to prevent
information leakage and unauthorized operations by others.
You will be prompted to enter your login password or access code
when performing the following operations:
You will be prompted to enter your login password or access code
when performing the following operations:
❒ Logging on to Administrator mode in Web Image Monitor
❒ Logging on to Administrator mode in Web Image Monitor
❒ Changing printer settings for an administrator using Smart
❒ Changing printer settings for an administrator using Smart
Organizing Monitor
Organizing Monitor
To use the default account, enter "admin" as the user name, and
leave the password blank when using Web Image Monitor. When
using Smart Organizing monitor, enter "admin" as the access code.
To use the default account, enter "admin" as the user name, and
leave the password blank when using Web Image Monitor. When
using Smart Organizing monitor, enter "admin" as the access code.
To Change password for Web Image Monitor and Smart Organizing
Monitor, you need to log on as an Administrator, and then make the
necessary settings.
To Change password for Web Image Monitor and Smart Organizing
Monitor, you need to log on as an Administrator, and then make the
necessary settings.
For details about setting a password, see Web Image Monitor or
Smart Organizing Monitor Help.
For details about setting a password, see Web Image Monitor or
Smart Organizing Monitor Help.
Note to Administrator
Note to Administrator
This manual is intended to provide administrators with additional
information about the security functions of this printer. Read this
manual as well as "Software Guide".
This manual is intended to provide administrators with additional
information about the security functions of this printer. Read this
manual as well as "Software Guide".
This manual and its contents should be kept by, and restricted to,
administrators.
This manual and its contents should be kept by, and restricted to,
administrators.
Password
Password
When you log on to this printer, you will be prompted to enter the
user name and password or access code for your account. We
strongly recommend you to change the factory default user name
and create a password or an access code immediately to prevent
information leakage and unauthorized operations by others.
You will be prompted to enter your login password or access code
when performing the following operations:
You will be prompted to enter your login password or access code
when performing the following operations:
❒ Logging on to Administrator mode in Web Image Monitor
❒ Logging on to Administrator mode in Web Image Monitor
❒ Changing printer settings for an administrator using Smart
❒ Changing printer settings for an administrator using Smart
Organizing Monitor
Organizing Monitor
To use the default account, enter "admin" as the user name, and
leave the password blank when using Web Image Monitor. When
using Smart Organizing monitor, enter "admin" as the access code.
To use the default account, enter "admin" as the user name, and
leave the password blank when using Web Image Monitor. When
using Smart Organizing monitor, enter "admin" as the access code.
To Change password for Web Image Monitor and Smart Organizing
Monitor, you need to log on as an Administrator, and then make the
necessary settings.
To Change password for Web Image Monitor and Smart Organizing
Monitor, you need to log on as an Administrator, and then make the
necessary settings.
For details about setting a password, see Web Image Monitor or
Smart Organizing Monitor Help.
For details about setting a password, see Web Image Monitor or
Smart Organizing Monitor Help.
Copyright © 2006
Printed in China
GB EN AE XX XX XX XX XX XX XX XX XX XX XX XX XX
G165-8616
Passwordpera.p65
2
11/14/06, 1:43 PM
Notes for Users
These notes provide additional information on using this product,
and errata for the descriptions in Operating Instructions Hardware
Guide and Safety Information.
Operating Instructions Hardware Guide
Safety Information
Positions of WARNING and CAUTION labels
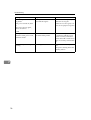
Errors
Do not touch labelled gray areas. The areas can get very hot.
Correction
Do not touch labelled gray areas. The areas can get very hot.
Do not touch labelled gray areas. The areas can get very hot.
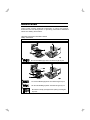
Be careful not to trap your fingers when opening or closing the
top cover.
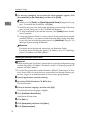
Operating Instructions Hardware Guide
2. Installing the Printer and Options > Installing the Printer > Unpacking
8. Removing Misfed Paper > When Paper is Jammed > When Paper
Jams inside the Fusing Unit
9. Appendix > If the Printer is Not Going to Be Used for a Long Time
> Preparing the Printer For a Long Period of Inactivity
9. Appendix > If the Printer is Not Going to Be Used for a Long Time
> Using the Printer Again after it has been Inactive for a Long Period
Errors
Carefully lift the blue fusing unit levers.
Correction
The procedure above is not necessary.
2. Installing the Printer and Options > Installing the Printer > Unpacking
5. Replacing Consumables > Replacing the Print Cartridge
6. Cleaning the Printer > Cleaning the Toner Density Sensor >
Preparing the Printer For a Long Period of Inactivity
Errors
Close the top cover with both hands carefully.
Correction
Close the top cover with both hands carefully. Be careful not to trap your
fingers.
Copyright © 2007
Printed in China
GB GB EN USA G165-7510
PerP1GBSafety_Preface1 Page 1 Friday, June 15, 2007 5:52 PM
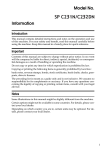
Model No.
Information
Introduction
This manual contains detailed instructions and notes on the operation and use
of this machine. For your safety and benefit, read this manual carefully before
using the machine. Keep this manual in a handy place for quick reference.
Important
Contents of this manual are subject to change without prior notice. In no event
will the company be liable for direct, indirect, special, incidental, or consequential damages as a result of handling or operating the machine.
Do not copy or print any item for which reproduction is prohibited by law.
Copying or printing the following items is generally prohibited by local law:
bank notes, revenue stamps, bonds, stock certificates, bank drafts, checks, passports, driver's licenses.
The preceding list is meant as a guide only and is not inclusive. We assume no
responsibility for its completeness or accuracy. If you have any questions concerning the legality of copying or printing certain items, consult with your legal
advisor.
Notes
Some illustrations in this manual might be slightly different from the machine.
Certain options might not be available in some countries. For details, please contact your local dealer.
Depending on which country you are in, certain units may be optional. For details, please contact your local dealer.
1
PerP1GBSafety_Preface1 Page 2 Friday, June 15, 2007 5:52 PM
Laser Safety:
This machine is considered class 1 laser device, safe for office/ EDP use. The machine contains 6.2 milliwatt, 770 - 795 nanometer wavelength, AlGaAs laser diodes. Direct (or indirect reflected) eye contact with the laser beam might cause
serious eye damage. Safety precautions and interlock mechanisms have been designed to prevent any possible laser beam exposure to the operator.
The following label is attached on rear side of the printer.
Caution:
Use of controls or adjustments or performance of procedures other than those
specified in this manual might result in hazardous radiation exposure.
For good print quality, the supplier recommends that you use genuine toner,
maintenance kits and parts from the supplier.
The supplier shall not be responsible for any damage or expense that might result from the use of consumables (toner, maintenance kits and parts) other than
genuine consumables from the supplier with your office products.
Power Source
220-240 V, 50/60 Hz, 6 A or more
Please be sure to connect the power cable to a power source as above.
2
PerP1GBSafety_Preface1 Page 3 Friday, June 15, 2007 5:52 PM
Safety Information
When using your printer, the following safety precautions should always be followed.
In this manual, the following important symbols are used:
Indicates a potentially hazardous situation which, if instructions are not followed, could result
in death or serious injury.
Indicates a potentially hazardous situation which, if instructions are not followed, may result
in minor or moderate injury or damage to property.
R WARNING:
• The supplied power cord is for use with this equipment only. Do not
use with other appliances. Doing so may result in fire, electric shock,
or injury.
• Keep the machine away from flammable liquids, gases, and aerosols.
A fire or an electric shock might occur.
• The wall outlet shall be installed near the machine and shall be easily
accessible.
• Connect the machine only to the power source described in this manual. Connect the power cord directly into a wall outlet and do not use
an extension cord. Do not damage, break or make any modifications
to the power cord. Do not place heavy objects on it. Do not pull it hard
nor bend it more than necessary. These actions could cause an electric shock or fire.
• Do not incinerate used toner or toner containers. Toner dust might ignite when exposed to an open flame. Dispose of used toner containers
in accordance with local regulations.
• Do not store toner, used toner, or toner containers in a place with an
open flame. The toner might ignite and cause burns of a fire.
• Do not incinerate spilled toner or used toner. Toner dust might ignite
when exposed to an open flame.
• Wait at least 30 minutes after disconnecting the power plug before removing the Transfer Unit.
• Do not attempt any maintenance or troubleshooting other than that
mentioned in this manual. This machine contains a laser beam generator and direct exposure to laser beams can cause permanent eye
damage.
3
PerP1GBSafety_Preface1 Page 4 Friday, June 15, 2007 5:52 PM
R CAUTION:
• Keep the machine away from humidity and dust. Otherwise a fire or an electric shock might occur. Do not place the machine on an unstable or tilted
surface. If it topples over, an injury might occur.
• Keep the machine in an area that is within optimum environmental conditions. Operating the machine in an environment that is outside the recommended ranges of humidity and temperature can cause an electrical fire
hazard. Keep the area around the socket free of dust. Accumulated dust
can become an electrical fire hazard.
• Make sure the room where you are using the machine is well ventilated and
spacious. Good ventilation is especially important when the machine is
used heavily.
• Keep toner (used or unused) and toner containers out of reach of children.
• If toner or used toner is inhaled, gargle with plenty of water and move into
a fresh air environment. Consult a doctor if necessary.
• If toner or used toner gets into your eyes, flush thoroughly with eyewash or
water. Consult a doctor if necessary.
• If toner or used toner is swallowed, dilute by drinking a large amount of water. Consult a doctor if necessary.
• Avoid getting toner on your clothes or skin when removing a paper jam or
replacing toner. If your skin comes into contact with toner, wash the affected
area thoroughly with soap and water.
• If toner gets on your clothing, wash with cold water. Hot water will set the
toner into the fabric and may make removing the stain impossible.
• The inside of this printer becomes very hot. Do not touch parts labelled “v”
(indicating a hot surface).
• The fusing section of this machine might be very hot. Caution should be taken when removing misfed paper.
• When you disconnect the power plug from the wall outlet, always pull the
plug (not the cable).
• It is dangerous to handle the plug with wet hands. Doing this may result in
receiving an electric shock.
4
PerP1GBSafety_Preface1 Page 5 Friday, June 15, 2007 5:52 PM
R CAUTION:
• Before moving the machine, unplug the power cord from the wall outlet. If
the cord is unplugged abruptly, it could become damaged. Damaged plugs
or cords can cause an electrical or fire hazard.
• Unplug the power cord from the wall outlet before you move the machine.
While moving the machine, you should take care that the power cord will
not be damaged under the machine.
• Do not connect the Ethernet port of the machine to a network that may supply excess voltage, such as a telephone line. Doing so may result in fire or
electric shock.
• The printer weighs approximately 23 kg (50.6 lb.). When moving the printer,
use the inset grips on both sides, and lift slowly in pairs. The printer will
break or cause injury if dropped.
• When moving the printer after use, do not take out any of the toners, nor the
waste toner bottle to prevent toner spill inside the machine.
• Lifting the paper feed unit carelessly or dropping it may cause injury.
• Do not pull out the paper tray forcefully. If you do, the tray might fall and
cause an injury.
• Before installing the memory unit, turn off the printer's power switch and unplug the power cable. After installing the memory unit, be sure to close the
memory unit cover, and then turn the machine back on. Do not turn on the
machine before closing the memory unit cover.
• Our products are engineered to meet high standards of quality and functionality, and we recommend that you use only the expendable supplies available at an authorized dealer.
Note
❒ When you use this machine for a long time in a confined space without good
ventilation, you may detect an odd smell. To keep the workplace comfortable,
we recommend that you keep it well ventilated.
5
PerP1GBSafety_Preface1 Page 6 Friday, June 15, 2007 5:52 PM
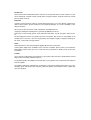
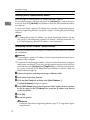
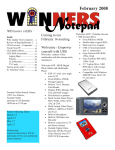
Positions of RWARNING and RCAUTION
labels
This machine has labels for RWARNING and RCAUTION at the positions
shown below. For safety, please follow the instructions and handle the machine
as indicated.
ASH075S
Do not incinerate used toner or toner containers. Toner dust might ignite when exposed
to an open flame. Dispose of used toner containers in according with local regulations.
Keep toner (used or unused) and toner containers out of reach of children.
Do not touch labelled gray areas.
The areas can get very hot.
Do not incinerate used toner or toner containers. Toner dust might ignite when exposed
to an open flame. Dispose of used toner containers in according with local regulations.
Keep toner (used or unused) and toner containers out of reach of children.
6
PerP1GBSafety_Preface1 Page 7 Friday, June 15, 2007 5:52 PM
User Information on Electrical & Electronic
Equipment
Users in the EU, Switzerland and Norway
Our Products contain high quality components and are designed to facilitate recycling.
Our products or product packaging are marked with the symbol below.
The symbol indicates that the product must not be treated as municipal waste.
It must be disposed of separately via the appropriate return and collection systems available. By following these instructions you ensure that this product is
treated correctly and help to reduce potential impacts on the environment and
human health, which could otherwise result from inappropriate handling. Recycling of products helps to conserve natural resources and protect the environment.
For more detailed information on collection and recycling systems for this product, please contact the shop where you purchased it, your local dealer or
sales/service representatives.
All Other Users
If you wish to discard this product, please contact your local authorities, the
shop where you bought this product, your local dealer or sales/service representatives.
7
PerP1GBSafety_Preface1 Page 8 Friday, June 15, 2007 5:52 PM
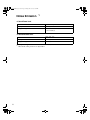
Noise Emission
*1
❖ Sound Power Level
Main unit only
Stand-by
43 dB (A)
During Printing
Monochrome: 63 dB (A)
Color: 64 dB (A)
❖ Sound Pressure Level
*2
Main unit only
Stand-by
35 dB (A)
During Printing
57 dB (A)
*1
*2
8
The preceding measurements made in accordance with ISO7779 are actual values.
Measured at the position of a bystander.
PerP1GBSafety_Preface1 Page 9 Friday, June 15, 2007 5:52 PM
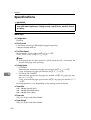
ENERGY STAR Program
Important
❒ The SP C221N model printer is not compliant with ENERGY STAR Program.
ENERGY STAR® Program Requirements for Imaging Equipment
The ENERGY STAR® Program Requirements for Imaging Equipment encourage energy conservation by promoting energy efficient computers and other office equipment.
The program backs the development and dissemination of products that feature energy saving
functions.
It is an open program in which manufacturers participate voluntarily.
Targeted products are computers, monitors, printers, facsimiles, copiers, scanners, and multifunction devices. Energy Star standards and logos are internationally uniform.
❖ Low-power Mode (Energy Saver mode)
This printer automatically lowers its power consumption 15 minutes after the
last operation has been completed. Use Smart Organizing Monitor, to exit
Low-power (Energy Saver) mode. For more information about how to configure Energy Saver mode, see “Using Smart Organizing Monitor”, Software
Guide as a HTML file on the CD-ROM.
❖ Specifications
Low-power Mode (Energy
Saver mode)
Power Consumption
15 W or less
Default Time
15 minutes
Recovery Time
51 seconds or less
❖ Recycled Paper
We recommend you to use environmentally friendly recycled paper. Please
contact your sales representative for recommended paper.
9
PerP1GBSafety_Preface1 Page 10 Friday, June 15, 2007 5:52 PM
Others
Symbols
In accordance with IEC 60417, this machine uses the following symbols for the
main power switch:
• a means POWER ON.
• b means POWER OFF.
10
PerP1GBSafety_Preface1 Page 11 Friday, June 15, 2007 5:52 PM
MEMO
11
PerP1GBSafety_Preface1 Page 12 Friday, June 15, 2007 5:52 PM
❖ Authorized Representative
Ricoh Europe PLC
66 Chiltern Street London W1U 4AG U.K.
❖ Manufacturer
Ricoh Co., Ltd.
3-6 Nakamagome 1-chome, Ohta-ku, Tokyo, 143-8555 Japan
GB
12
Copyright © 2007
Printed in China
GB
G165-8602
/$#&$
Per_GB_pera-tonercart-M8128600.fm Page 1 Friday, August 10, 2007 10:57 AM
Print Cartridge SP C220 Series
(Code: M802)
For Machine Code: G165/G166/G167/G181/G183/G184
MAINTENANCE GUIDE
R WARNING:
• Do not incinerate used toner or toner containers. Toner dust might ignite when
exposed to an open flame. Dispose of used toner containers in accordance with
local regulations.
• Do not store toner, used toner, or toner containers in a place with an open
flame. The toner might ignite and cause burns or a fire.
R CAUTION:
• Keep toner (used or unused) and toner containers out of reach of children.
• If toner or used toner is inhaled, gargle with plenty of water and move into a fresh
air environment. Consult a doctor if necessary.
• Avoid getting toner on your clothes or skin when removing a paper jam or replacing
toner. If your skin comes into contact with toner, wash the affected area thoroughly
with soap and water.
• If toner gets on your clothing, wash with cold water. Hot water will set the toner into
the fabric and may make removing the stain impossible.
• If toner or used toner gets into your eyes, flush immediately with large amounts of
water. Consult a doctor if necessary.
• If toner or used toner is swallowed, dilute by drinking a large amount of water. Consult
a doctor if necessary.
❖ Disposal of used print cartridges
Wrap the used print cartridge in its cover, and place it inside a box for collection.
Comply with the Recycle Program, which involves used print cartridges being
collected for recycling.
For details about Recycle Program, ask your local sales or service representative.
Note
❒ The illustrations are examples only. They may not represent the actual machine
you are using.
1
Per_GB_pera-tonercart-M8128600.fm Page 2 Friday, August 10, 2007 10:57 AM
R VORSICHT:
• Resttonerbehälter und Tonerkartuschen nicht verbrennen. Bei Kontakt mit
offenen Flammen kann sich Tonerstaub entzünden. Entsorgen Sie die gebrauchten Tonerbehälter gemäß den örtlichen Bestimmungen.
• Lagern Sie Toner, gebrauchten Toner oder Tonerbehälter nicht in der Nähe
von offenem Feuer. Der Toner kann sich entzünden und Verbrennungen
oder einen Brand verursachen.
R ACHTUNG:
• Bewahren Sie den Toner (neu oder gebraucht) und Tonerbehälter außerhalb der
Reichweite von Kindern.
• Wenn Sie Toner oder gebrauchten Toner einatmen, gurgeln Sie mit viel Wasser
und gehen Sie an die frische Luft. Suchen Sie gegebenenfalls einen Arzt auf.
• Achten Sie darauf, dass kein Toner auf Ihre Kleidung oder Haut gelangt, wenn Sie
einen Papierstau beheben oder Toner auswechseln. Wenn Ihre Haut mit Toner in
Kontakt kommt, waschen Sie den betroffenen Bereich gründlich mit Wasser und
Seife.
• Wenn Toner auf Ihre Kleidung gelangt, waschen Sie diese mit kaltem Wasser. Mit
heißem Wasser wird der Toner im Stoff fixiert und es ist unter Umständen nicht
mehr möglich, den Fleck zu entfernen.
• Wenn Sie Toner oder gebrauchten Toner in die Augen bekommen, spülen Sie
diese sofort mit viel Wasser aus. Suchen Sie gegebenenfalls einen Arzt auf.
• Wenn Sie unbeabsichtigt Toner oder gebrauchten Toner verschlucken, verdünnen
Sie ihn, indem Sie viel Wasser trinken. Suchen Sie gegebenenfalls einen Arzt auf.
❖ Entsorgen von gebrauchten Druckkartuschen
Stecken Sie die gebrauchte Druckkartusche in ihren Beutel und legen Sie sie dann
in einen Sammelkarton.
Geben Sie diesen dann bei einem Unternehmen ab, das am Recyclingprogramm für
Druckkartuschen teilnimmt.
Nähere Einzelheiten zum Recyclingprogramm erfahren Sie von Ihrem Vertrieb
oder Kundendienst.
Hinweis
❒ Die Abbildungen dienen nur als Beispiel. Sie entsprechen möglicherweise nicht
genau dem von Ihnen verwendeten Gerät.
2
Per_GB_pera-tonercart-M8128600.fm Page 3 Friday, August 10, 2007 10:57 AM
Print Cartridge SP C220 Series
R AVERTISSEMENT :
• Ne brûlez pas de toner usagé ni les cartouches de toner. La poudre de toner
peut s’enflammer si elle est exposée à une flamme nue. Veillez au respect de
la réglementation en vigueur lors de la mise au rebut des cartouches de toner.
• Ne stockez pas du toner, du toner usagé ou des cartouches de toner dans un
endroit exposé à une flamme nue. Le toner peut prendre feu et provoquer des
brûlures ou un incendie.
R ATTENTION :
• Maintenez le toner (même le toner usagé) et les cartouches de toner hors de portée
des enfants.
• Si vous inhalez du toner ou du toner usagé, gargarisez-vous avec une grande
quantité d’eau et allez dans un endroit où vous pouvez respirer de l’air frais. Consultez un médecin si nécessaire.
• Évitez de renverser du toner sur vos vêtements ou sur votre peau lorsque vous résolvez un incident papier ou lors du remplacement des cartouches de toner. Si
votre peau entre en contact avec du toner, lavez soigneusement la zone affectée
avec de l’eau et du savon.
• Si vous renversez du toner sur vos vêtements, lavez-les avec de l’eau froide. L’eau
chaude fixera le toner dans le tissu et vous risquez de ne plus pouvoir enlever la tache.
• Si du toner ou du toner usagé est projeté dans vos yeux, rincez-les immédiatement
avec une grande quantité d’eau. Consultez un médecin si nécessaire.
• Si vous avalez du toner ou du toner usagé, diluez-le en buvant une grande quantité
d’eau. Consultez un médecin si nécessaire.
❖ Mise au rebut des cartouches d’encre
Enveloppez la cartouche d’encre dans son emballage et placez-la dans une boîte
de collecte.
Respectez le programme de recyclage des cartouches d'encre usagées collectées
pour être recyclées.
Pour plus d’informations sur le programme de recyclage, contactez votre
revendeur ou le SAV.
Remarque
❒ Les illustrations sont uniquement utilisées à titre d'exemple. Elles peuvent ne
pas représenter la machine utilisée.
3
Per_GB_pera-tonercart-M8128600.fm Page 4 Friday, August 10, 2007 10:57 AM
R ATTENZIONE:
• Non bruciare il toner usato o i contenitori del toner. La polvere di toner potrebbe incendiarsi se esposta a fiamme libere. Smaltire i contenitori di toner
usato conformemente alle disposizioni locali in vigore.
• Non conservare il toner, il toner usato o i contenitori di toner in locali in cui
sono presenti fiamme libere. Il toner potrebbe incendiarsi e causare ustioni
o incendi.
R AVVERTIMENTO:
• Tenere il toner (usato o non usato) ed i contenitori di toner lontano dalla portata dei
bambini.
• In caso di inalazione di toner o toner usato, praticare gargarismi con abbondante
acqua e recarsi all’aria aperta. Se necessario, rivolgersi a un medico.
• Durante la sostituzione del toner o la rimozione della carta inceppata, fare in modo
che il toner non entri in contatto con la pelle o con i vestiti. Se il toner dovesse venire
a contatto con la pelle, lavare accuratamente con acqua e sapone la zona interessata.
• In caso di contatto del toner con i vestiti, lavarli in acqua fredda. L’acqua calda, infatti, avrebbe l’effetto di fissare il toner nel tessuto, rendendo impossibile la rimozione della macchia.
• Se il toner, nuovo o usato, dovesse venire a contatto con gli occhi, sciacquarli immediatamente con abbondante acqua. Se necessario, rivolgersi a un medico.
• In caso di ingestione di toner (nuovo o usato), diluirlo assumendo abbondante acqua. Se necessario, rivolgersi a un medico.
❖ Smaltimento di cartucce di stampa usate
Avvolgere la cartuccia di stampa usata nella relativa confezione e riporla in un
apposito contenitore di raccolta.
Aderire al programma di riciclaggio, che prevede la raccolta delle cartucce di
stampa usate per il riciclaggio.
Per informazioni sul programma di riciclaggio, rivolgersi al proprio addetto alle
vendite o all'assistenza tecnica.
Nota
❒ Le illustrazioni sono a solo scopo esemplificativo. Potrebbero non riprodurre
esattamente il dispositivo in uso.
4
Per_GB_pera-tonercart-M8128600.fm Page 5 Friday, August 10, 2007 10:57 AM
Print Cartridge SP C220 Series
R ADVERTENCIA:
• No queme el tóner ni los contenedores de tóner usados. El polvo del tóner
puede arder si se expone al fuego. Deseche los cartuchos de tóner usado de
acuerdo con la normativa local.
• No almacene tóner, tóner usado ni recipientes de tóner en un lugar expuesto
al fuego. El tóner puede arder y provocar quemaduras o un incendio.
R PRECAUCIÓN:
• Mantenga el tóner (esté o no usado) y los cartuchos y contenedores de tóner fuera
del alcance de los niños.
• Si inhala tóner o tóner usado, haga gárgaras con agua abundante y vaya a un lugar
con aire fresco. Consulte a un médico si es necesario.
• Al eliminar un atasco de papel o cambiar el tóner, evite que éste entre en contacto
con la ropa o la piel. En este último caso, lave a fondo la zona afectada con agua
y jabón.
• Si le cae tóner en la ropa, lávela con agua fría. El agua caliente fija el tóner en el
tejido y hace imposible su eliminación.
• Si le entra tóner o tóner usado en los ojos, láveselos inmediatamente con agua en
abundancia. Consulte a un médico si es necesario.
• Si ingiere tóner o tóner usado, dilúyalo bebiendo agua en abundancia. Consulte a
un médico si es necesario.
❖ Eliminación de los cartuchos de impresión usados
Envuelva el cartucho de impresión usado con su envoltorio y métalo en la caja
para su recogida.
Cumpla el programa de reciclaje que incluye la recogida de los cartuchos de
impresión usados.
Para obtener información más detallada sobre este programa de reciclaje,
póngase en contacto con su distribuidor o con el servicio técnico.
Nota
❒ Las ilustraciones son sólo a modo de ejemplo. Podrían no corresponderse con
las del equipo que está utilizando.
5
Per_GB_pera-tonercart-M8128600.fm Page 6 Friday, August 10, 2007 10:57 AM
R WAARSCHUWING:
• Voorkom dat verbruikte toner of tonercassettes worden verbrand. Tonerstof
kan vlam vatten bij blootstelling aan open vuur. Voer gebruikte toner af volgens de plaatselijke regelgeving.
• Bewaar toner, gebruikte toner of tonercassettes niet in een plaats met open
vuur. De toner zou in de brand kunnen vliegen en verbrandingen of een
brand kunnen veroorzaken.
R VOORZICHTIG:
• Houd toner (gebruikt of niet gebruikt) en tonercartridges buiten het bereik van kinderen.
• Indien toner of gebruikte toner wordt ingeademd, gorgel dan met voldoende water
en ga naar een omgeving met frisse lucht. Raadpleeg indien nodig een arts.
• Voorkom bij het verwijderen van vastgelopen papier of bij het vervangen van toner,
dat toner op uw kleding of huid kan komen. Indien uw huid met toner in contact komt, spoel het betreffende gedeelte dan grondig uit met zeep en water.
• Indien toner op uw kleding kan komen, spoel dit dan met koud water uit. Warm water zal ervoor zorgen dat de toner zich in de stof hecht, waardoor het verwijderen
van de vlek onmogelijk zou kunnen worden.
• Indien toner of gebruikte toner in uw ogen komt, spoel deze dan onmiddellijk uit met
grote hoeveelheden water. Raadpleeg indien nodig een arts.
• Indien toner of gebruikte toner wordt ingeslikt, verdun deze dan door zeer veel water te drinken. Raadpleeg indien nodig een arts.
❖ Opruimen van gebruikte printercartridges
Wikkel een gebruikte tonercartridge in zijn verpakking en leg het in een doos
zodat het verzameld kan worden.
Houdt u zich aan het recyclingprogramma. Verzamel gebruikte tonercartridges om
deze te recyclen.
Voor meer details over het recyclingprogramma, raadpleeg uw verkooppunt.
Opmerking
❒ De afbeeldingen zijn slechts voorbeelden. De afbeeldingen kunnen afwijken
van het product dat u gebruikt.
6
Per_GB_pera-tonercart-M8128600.fm Page 7 Friday, August 10, 2007 10:57 AM
Print Cartridge SP C220 Series
R AVISO:
• Não queime o toner usado nem as embalagens de toner. O pó de toner
poderá inflamar-se quando exposto a uma chama. Proceda à deposição das
embalagens de toner usado em conformidade com os regulamentos locais.
• Não armazene o toner, o toner usado nem as embalagens de toner em locais
de forma a ficarem expostos a uma chama. O toner poderá inflamar-se e provocar queimaduras ou um incêndio.
R CUIDADO:
• Mantenha o toner (usado ou por usar) e as embalagens de toner fora do alcance
das crianças.
• Se inalar toner ou toner usado, gargareje com água em abundância e vá para um
local com ar fresco. Se necessário, consulte um médico.
• Quando retirar papel encravado ou substituir o toner, evite que o toner entre em
contacto com o vestuário ou com a pele. Se o toner entrar em contacto com a pele,
lave bem a área afectada com água e sabão.
• Se o toner entrar em contacto com o vestuário, lave-o com água fria. A água
quente fixa o toner ao tecido e pode impossibilitar a remoção da nódoa.
• Se o toner ou o toner usado entrarem em contacto com os olhos, lave-os imediata
e abundantemente com água. Se necessário, consulte um médico.
• Se engolir toner ou toner usado, beba muita água. Se necessário, consulte um
médico.
❖ Deposição de cartuchos de impressão usados
Coloque o cartucho de impressão usado no seu invólucro e coloque-o dentro de
uma caixa para recolha.
Cumpra o Programa de reciclagem referente à recolha de cartuchos de impressão
para reciclagem.
Para mais detalhes acerca do Programa de Reciclagem, contacte o seu
revendedor ou a assistência técnica.
Nota
❒ As ilustrações servem apenas como exemplo. Podem não representar exactamente a máquina que está a utilizar.
7
Per_GB_pera-tonercart-M8128600.fm Page 8 Friday, August 10, 2007 10:57 AM
Läs i den svenska maskinvaruhandboken eller användarhandboken och handboken med säkerhetsinformation som medföljer skrivaren om du behöver installationsinstruktioner på svenska.
Illustrationerna utgör endast exempel. Det kan hända att de inte motsvarar den
faktiska maskin du använder.
Se i den danske Vejledning til hardware eller Brugervejledning og Sikkerhedsinformationer, som leveres med printeren som installationsvejledninger på dansk.
Illustrationerne er kun eksempler. De viser muligvis ikke den maskine, du anvender.
Se i den norske maskinvareveiledningen, brukerveiledningen eller veiledningen
for sikkerhetsinformasjon som følger med skriveren, hvis du vil ha installasjonsinstruksjoner på norsk.
Illustrasjonene er kun eksempler. De representerer ikke nødvendigvis maskinen
du bruker.
Tulostimen asennusohjeet löytyvät tulostimen mukana tulleesta suomenkielisestä laite- tai käyttöoppaasta ja turvallisuustietoja sisältävästä oppaasta.
Kuvat ovat vain esimerkkejä. Ne eivät välttämättä kuvaa käyttämääsi laitetta.
Az ábrák csak szemléltetési célt szolgálnak. Nem feltétlen felelnek meg az éppen
használt készülék kialakításának.
Инструкции по установке см. в Руководстве к программе или в поставляемых с
принтером Инструкции пользователя и Руководстве по технике безопасности на
русском языке.
Изображения даны для иллюстрации описания. На иллюстрациях не обязательно
изображено именно ваше устройство.
8
Per_GB_pera-tonercart-M8128600.fm Page 9 Friday, August 10, 2007 10:57 AM
Print Cartridge SP C220 Series
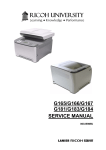
ASH100S
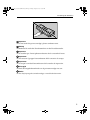
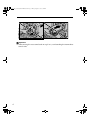
Important
❒ Do not touch the print cartridge's photo conductor unit.
Wichtig
❒ Berühren Sie nicht die Fotoleitereinheit in der Druckkartusche.
Important
❒ Ne touchez pas l’unité photoconductrice de la cartouche d’encre.
Importante
❒ Non toccare il gruppo fotoconduttore della cartuccia di stampa.
Importante
❒ No toque la unidad fotoconductora del cartucho de impresión.
Belangrijk
❒ Raak de fotogeleidereenheid van de printercartridge niet aan.
Waåne
❒ Nie dotykaj zespoâu ãwiatâoczuâego w module drukowania.
9
Per_GB_pera-tonercart-M8128600.fm Page 10 Friday, August 10, 2007 10:57 AM
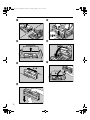
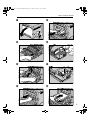
A
E
ASH204S
ASH009S
F
B
ASH010S
ASH006S
G
C
ASH007S
D
ASH008S
10
ASH205S
Per_GB_pera-tonercart-M8128600.fm Page 11 Friday, August 10, 2007 10:57 AM
MEMO
Print Cartridge SP C220 Series
11
Per_GB_pera-tonercart-M8128600.fm Page 12 Friday, August 10, 2007 10:57 AM
Copyright © 2007
Printed in Japan
GB-GR-FR-IT-SP-DU-PT-SW-DA-NO-FI-PL-CS-HU-RU
M812-8600
12
Per_GB_pera-WasteToner-M8048601.fm Page 1 Friday, August 10, 2007 3:49 PM
Waste Toner Bottle SP C220
(Code: M804)
For Machine Code: G165/G166/G167/G181/G183/G184
MAINTENANCE GUIDE
R WARNING:
• Do not incinerate spilled toner or used toner. Toner dust might ignite
when exposed to an open flame.
• Do not incinerate used toner or toner containers. Toner dust might ignite when exposed to an open flame. Dispose of used toner containers
in accordance with local regulations.
• Wait at least 30 minutes after disconnecting the power plug before removing the transfer unit.
R CAUTION:
• The inside of this printer becomes very hot. Do not touch parts labelled “v”
(indicating a hot surface).
• Keep toner (used or unused) and toner containers out of reach of children.
Note
❒ The illustrations are examples only. They may not represent the actual machine
you are using.
1
Per_GB_pera-WasteToner-M8048601.fm Page 2 Friday, August 10, 2007 3:49 PM
Eine deutsche Installationsanleitung finden Sie im Hardwarehandbuch bzw. im
Benutzerhandbuch, die Sie zusammen mit dem Drucker erhalten haben.
Die Abbildungen dienen nur als Beispiel. Sie entsprechen möglicherweise nicht
genau dem von Ihnen verwendeten Gerät.
Pour en savoir plus sur les instructions d'installation en français, reportez-vous
au Guide de matériel, au Manuel d'utilisation livrés avec l'imprimante.
Les illustrations sont uniquement utilisées à titre d'exemple. Elles peuvent ne
pas représenter la machine utilisée.
Per istruzioni sull'installazione in italiano, consultare la Guida all'hardware o la
Guida per l'utente fornite con la stampante.
Le illustrazioni sono a solo scopo esemplificativo. Potrebbero non riprodurre
esattamente il dispositivo in uso.
Consulte las instrucciones de instalación en español en el Manual de hardware
o el Manual de usuario incluidos en la impresora.
Las ilustraciones son sólo a modo de ejemplo. Podrían no corresponderse con las
del equipo que está utilizando.
Zie voor aanwijzingen over de installatie de hardwaregids of de gebruikershandleiding die bij de printer zijn meegeleverd.
De afbeeldingen zijn slechts voorbeelden. De afbeeldingen kunnen afwijken van
het product dat u gebruikt.
Consulte o Guia do Hardware ou o Guia do Utilizador em Português entregues
com a impressora para ficar a conhecer as instruções em Português.
As ilustrações servem apenas como exemplo. Podem não representar exactamente a máquina que está a utilizar.
Läs i den svenska maskinvaruhandboken eller användarhandboken som medföljer skrivaren om du behöver installationsinstruktioner på svenska.
Illustrationerna utgör endast exempel. Det kan hända att de inte motsvarar den
faktiska maskin du använder.
Se i den danske Vejledning til hardware eller Brugervejledning, som leveres med
printeren som installationsvejledninger på dansk.
Illustrationerne er kun eksempler. De viser muligvis ikke den maskine, du anvender.
Se i den norske maskinvareveiledningen eller brukerveiledningen som følger
med skriveren, hvis du vil ha installasjonsinstruksjoner på norsk.
Illustrasjonene er kun eksempler. De representerer ikke nødvendigvis maskinen
du bruker.
Tulostimen asennusohjeet löytyvät tulostimen mukana tulleesta suomenkielisestä laite- tai käyttöoppaasta.
Kuvat ovat vain esimerkkejä. Ne eivät välttämättä kuvaa käyttämääsi laitetta.
2
Per_GB_pera-WasteToner-M8048601.fm Page 3 Friday, August 10, 2007 3:49 PM
Waste Toner Bottle SP C220
Zajrzyj do polskiej instrukcji obsługi sprzętu lub do podręcznika użytkownika, który
został dołączony do drukarki, w celu uzyskania instrukcji o instalacji w języku polskim.
Ilustracje wyłącznie przykładowe. Mogą nie przedstawiać rzeczywistej maszyny posiadanej przez użytkownika.
Üzembe helyezési tudnivalókkal kapcsolatban tekintse meg a készülék tartozékát képező
Hardverhasználati vagy Felhasználói útmutatót.
Az ábrák csak szemléltetési célt szolgálnak. Nem feltétlen felelnek meg az éppen
használt készülék kialakításának.
Инструкции по установке см. в Руководстве к программе или в поставляемой с
принтером Инструкции пользователя на русском языке.
Изображения даны для иллюстрации описания. На иллюстрациях не обязательно
изображено именно ваше устройство.
3
Per_GB_pera-WasteToner-M8048601.fm Page 4 Friday, August 10, 2007 3:49 PM
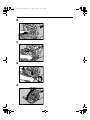
ASH203S
Important
❒ When moving the waste toner bottle in step 5 or 8, avoid touching the intermediate
transfer unit.
4
Per_GB_pera-WasteToner-M8048601.fm Page 5 Friday, August 10, 2007 3:49 PM
Waste Toner Bottle SP C220
A
E
ASH011S
B
ASH041S
F
ASH012S
C
ASH043S
G
ASH101S
ASH013S
H
D
a
ASH044S
5
Per_GB_pera-WasteToner-M8048601.fm Page 6 Friday, August 10, 2007 3:49 PM
I
ASH015S
J
ASH020S
K
ASH016S
L
6
ASH017S
Per_GB_pera-WasteToner-M8048601.fm Page 7 Friday, August 10, 2007 3:49 PM
MEMO
Waste Toner Bottle SP C220
7
Per_GB_pera-WasteToner-M8048601.fm Page 8 Friday, August 10, 2007 3:49 PM
Copyright © 2007
Printed in China
GB-GR-FR-IT-SP-DU-PT-SW-DA-NO-FI-PL-CS-HU-RU-CH-TA
M804-8601
8
Operating Instructions
Hardware Guide
1
Guide to the Printer
2
Installing the Printer and Options
3
Connecting the Printer
4
Paper and Other Media
5
Replacing Consumables
6
Cleaning the Printer
7
Troubleshooting
8
Removing Misfed Paper
9
Appendix
Read this manual carefully before you use this machine and keep it handy for future reference. For safe and correct use, be sure to read “Safety
Information” before using the machine.
Introduction
This manual contains detailed instructions and notes on the operation and use of this machine. For your
safety and benefit, read this manual carefully before using the machine. Keep this manual in a handy
place for quick reference.
Important
Contents of this manual are subject to change without prior notice. In no event will the company be liable for direct, indirect, special, incidental, or consequential damages as a result of handling or operating the machine.
Do not copy or print any item for which reproduction is prohibited by law.
Copying or printing the following items is generally prohibited by local law:
bank notes, revenue stamps, bonds, stock certificates, bank drafts, checks, passports, driver's licenses.
The preceding list is meant as a guide only and is not inclusive. We assume no responsibility for its
completeness or accuracy. If you have any questions concerning the legality of copying or printing certain items, consult with your legal advisor.
Notes:
Some illustrations in this manual might be slightly different from the machine.
Certain options might not be available in some countries. For details, please contact your local dealer.
Depending on which country you are in, certain units may be optional. For details, please contact your
local dealer.
Caution:
Use of controls or adjustments or performance of procedures other than those specified in this manual
might result in hazardous radiation exposure.
For good print quality, the supplier recommends that you use genuine toner, maintenance kits and parts
from the supplier.
The supplier shall not be responsible for any damage or expense that might result from the use of consumables (toner, maintenance kits and parts) other than genuine consumables from the supplier with
your office products.
Positions of RWARNING and RCAUTION
labels
This machine has labels for RWARNING and RCAUTION at the positions
shown below. For safety, please follow the instructions and handle the machine
as indicated.
ASH075S
Do not incinerate used toner or toner containers. Toner dust might ignite when
exposed to an open flame. Disposal should take place at an authorized dealer or
an appropriate collection site.
Keep toner (used or unused) and toner containers out of reach of children.
Do not touch labelled gray areas.
The areas can get very hot.
Do not incinerate spilled toner or used toner. Toner dust is flammable and might
ignite when exposed to an open flame. Disposal should take place at an authorized dealer or an appropriate collection site.
Keep toner (used or unused) and toner containers out of reach of children.
i
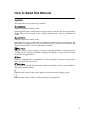
How to Read This Manual
Symbols
This manual uses the following symbols:
Indicates important safety notes.
Ignoring these notes could result in serious injury or death. Be sure to read these
notes. They can be found in the “Safety Information” section of Hardware
Guide.
Indicates important safety notes.
Ignoring these notes could result in moderate or minor injury, or damage to the
machine or to property. Be sure to read these notes. They can be found in the
“Safety Information” section of Hardware Guide.
Indicates points to pay attention to when using the machine, and explanations
of likely causes of paper misfeeds, damage to originals, or loss of data. Be sure
to read these explanations.
Indicates supplementary explanations of the machine’s functions, and instructions on resolving user errors.
This symbol is located at the end of sections. It indicates where you can find further relevant information.
[]
Indicates the names of keys that appear on the machine’s display panel.
{}
Indicates the names of keys on the machine’s control panel.
iii
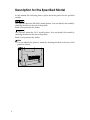
Description for the Specified Model
In this manual, the following items explain about the printer for the specified
models:
This explains about the 220–240 V model printer. You can identify the model by
checking the label on the rear of the printer.
Read if you purchase this model.
This explains about the 120 V model printer. You can identify the model by
checking the label on the rear of the printer.
Read if you purchase this model.
Note
❒ If you do not know your model, check the model code on the printer's nameplate.
ASH074S
iv
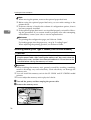
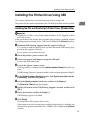
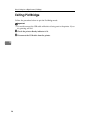
Installing the Operating Instructions
The CD-ROM provided with the printer contains an HTML Operating Instructions Manual in HTML version. Follow this instructions to install it.
Important
❒ System Requirements :
• Windows 2000/XP/Vista, or Windows Server 2003/2003 R2.
• 800 × 600 or higher monitor resolution.
❒ Web Browsers :
• Microsoft Internet Explorer 5.5 SP2 or higher
• Firefox 1.0 or higher
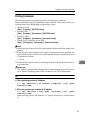
A Quit all applications currently running.
B Insert the CD-ROM into the CD-ROM drive.
The installer starts.
Auto Run may not work under certain operating system setting. If this is the
case, launch “Setup.exe” on the CD-ROM root directory.
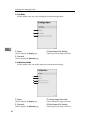
C Select an interface language, and then click [OK].
D Click [Install Manuals].
E Follow the instructions on the screen to complete the installation.
F Click [Finish] when the installation is completed.
G Click [Exit].
Note
❒ Auto Run may not work under certain operating system setting. If this is
the case, copy all data on the CD-ROM root directory to your hard disk
drive, and then launch “Setup.exe” to start the installation.
❒ To uninstall the Operating Instructions Manual, select [Programs] in the
[Start] menu, select your printer driver, and then click [uninstall]. You can
uninstall each Manual Guide separately.
❒ If you are using an incompatible Web browser and the simpler version of
the Operating Instructions Manual does not display correctly, open the
folder “MANUAL \ LANG \ (language) \ (manual name) \ unv \” on the
CD-ROM, and then double-click on “index.htm”.
v
TABLE OF CONTENTS
Positions of RWARNING and RCAUTION labels ...............................................i
Manuals for This Printer........................................................................................ii
How to Read This Manual ....................................................................................iii
Symbols .................................................................................................................... iii
Description for the Specified Model....................................................................iv
Installing the Operating Instructions ...................................................................v
1. Guide to the Printer
Exterior: Front View...............................................................................................1
Exterior: Rear View ................................................................................................2
Inside.......................................................................................................................3
Control Panel..........................................................................................................4
2. Installing the Printer and Options
Installing the Printer ..............................................................................................5
Where to Put the Printer.............................................................................................5
Unpacking ..................................................................................................................7
Turning the Power On ..............................................................................................13
Installing Options.................................................................................................14
Attaching Paper Feed Unit TK1010 .........................................................................14
Attaching Memory Unit Type F 256MB (DDR-SDRAM Module) ..............................16
3. Connecting the Printer
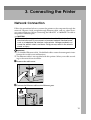
Network Connection ............................................................................................19
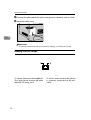
Reading the LED Lamps ..........................................................................................20
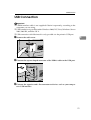
USB Connection...................................................................................................21
4. Paper and Other Media
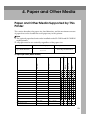
Paper and Other Media Supported by This Printer...........................................23
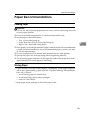
Paper Recommendations....................................................................................25
Loading Paper..........................................................................................................25
Storing Paper ...........................................................................................................25
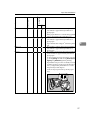
Types of Paper and Other Media .............................................................................26
Paper Not Supported by This Printer .......................................................................31
Print Area .................................................................................................................32
Loading Paper ......................................................................................................34
Loading Paper in Tray 1...........................................................................................34
Loading Paper in the Optional Paper Feed Unit ......................................................46
Loading Paper in the Bypass Tray ...........................................................................48
5. Replacing Consumables
Replacing the Print Cartridge .............................................................................51
Replacing the Waste Toner Bottle......................................................................56
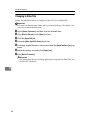
vi
6. Cleaning the Printer
Cautions to Take When Cleaning .......................................................................63
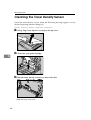
Cleaning the Toner Density Sensor ...................................................................64
Cleaning the Friction Pad and the Paper Feed Roller ......................................66
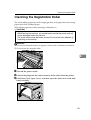
Cleaning the Registration Roller ........................................................................69
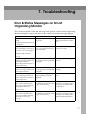
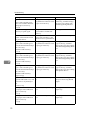
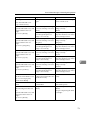
7. Troubleshooting
Error & Status Messages on Smart Organizing Monitor..................................71
Panel Indicator .....................................................................................................77
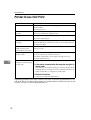
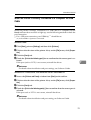
Printer Does Not Print .........................................................................................78
When the Printer is Directly Connected to a Computer via USB Cable ...................79
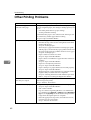
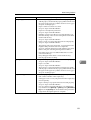
Other Printing Problems .....................................................................................82
Additional Troubleshooting ................................................................................88
8. Removing Misfed Paper
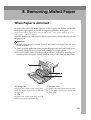
When Paper is Jammed.......................................................................................89
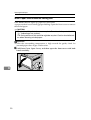
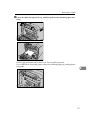
When Paper Jams inside the Fusing Unit ................................................................90
When Paper Jams Inside the Tray...........................................................................92
When Paper Jams inside the Transfer Unit .............................................................94
9. Appendix
If the Printer is Not Going to Be Used for a Long Time....................................95
Preparing the Printer For a Long Period of Inactivity ...............................................95
Using the Printer Again after it has been Inactive for a Long Period .......................98
Moving and Transporting the Printer............................................................... 100
Moving the Printer ..................................................................................................101
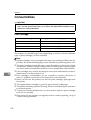
Consumables ..................................................................................................... 102
Print Cartridge ........................................................................................................102
Waste Toner Bottle ................................................................................................103
Specifications..................................................................................................... 104
Main Unit ................................................................................................................104
Options...................................................................................................................107
INDEX....................................................................................................... 108
vii
viii
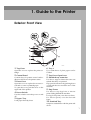
1. Guide to the Printer
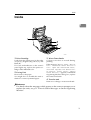
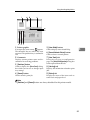
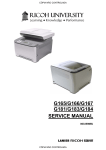
Exterior: Front View
ASH022S
1. Top Cover
6. Tray 1
Open this cover to replace the print cartridge.
Up to 250 sheets of plain paper can be
loaded.
2. Control Panel
7. Top Cover Open Lever
8. Standard tray extension
Contains keys for printer control and indicators that shows the printer status.
3. Front Cover
Open this cover to replace the waste toner bottle or remove jammed paper.
To open this cover, pull the lever on the
right side of the printer.
4. Power Switch
Use this switch to turn the power on and
off.
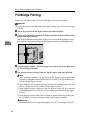
5. Bypass Tray
Load paper sheet by sheet.
Use this to support sheets that come out
curled after they are printed.
Flip open the extension by pushing down
on the end that is toward the rear of the
machine.
9. Stop Fences
Use these to stop legal-size or A4-size
prints falling behind the machine.
For legal-size prints, raise the rear fence.
For A4-size prints, raise the forward
fence.
10. Standard Tray
Output is stacked here with the print side
down.
1
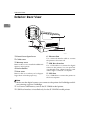
Guide to the Printer
Exterior: Rear View
1
ASH023S
1. Front Cover Open Lever
2. Cable cover
3. Memory cover
Remove this cover to install the additional
memory unit (option).
4. Power Socket
5. Rear cover
Remove this cover when you load paper
larger than A4 in the paper tray.
6. Ethernet Port
Use a network interface cable to connect
the printer to the network.
7. USB Host Interface
Use a USB cable to connect the digital
camera to the printer. You can print images directly from a digital camera, without having to connect to a computer.
8. USB Port
Use a USB cable to connect the printer to
the host computer.
Note
❒ Make sure the digital camera you connect to the printer for PictBridge and direct printing supports PictBridge.
❒ You cannot add memory unit to the SP C220N model printer.
❒ USB Host Interface is installed only for the SP C222DN model printer.
2
Inside
Inside
1
ASH024S
1. Print Cartridge
3. Waste Toner Bottle
Loads from the printer rear, in the order
of cyan (C), magenta (M), yellow (Y), and
black (K).
If a toner end indicator on the control
panel lights up, replace the print cartridge of the indicated color.
Collects toner that is wasted during
printing.
If the message “Waste Toner Bottle
Full. The Waste Toner Bottle is
full. Open the indicated cover,
and then replace the Waste Toner Bottle. Front Cover: [Waste
Toner Bottle].” appears on the Smart
Organizing Monitor dialog box, replace
the waste toner bottle.
2. Fusing Unit
Fuses toner to the paper.
You might have to handle this unit to
check for or remove jammed paper.
4. Transfer unit
Removes to change a waste toner bottle.
Reference
For details about the messages which appear on the screen to prompt you to
replace the units, see p.71 “Error & Status Messages on Smart Organizing
Monitor”.
3
Guide to the Printer
Control Panel
1
ASH021S
1. Alert Indicator
4. {Job Reset} key
Lights up whenever a printer error occurs. Use Smart Organizing Monitor to
check the error.
Press this key to cancel a job that is printing out.
You can also use this key to print a test
page. To print the test page, turn the
printer off and then, while pressing and
holding this key down, turn the printer
back on, keeping the key pressed until
the Alert indicator flashes once. The test
page will then print out.
2. Ready Indicator
Lights up when the printer is ready to receive data from a computer. Flashes
when the printer is warming up or receiving data.
3. {Stop/Start} key
If you press this key, the printer stops receiving data, and printing is not possible.
Press the {Stop/Start} key again to return
to the ready condition.
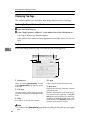
You can also use this key to print the configuration page. To print the configuration page, turn the printer off and then,
while pressing and holding this key
down, turn the printer back on, keeping
the key pressed until the Ready indicator
flashes once. The configuration page will
then print out.
5. Load Paper Indicator
Lights up when a paper tray is empty or
unattached.
6. Replace Print Cartridge Indicator
The indicator under each toner icon
flashes when there is little toner remaining. The indicator remains lit when there
is no toner left.
LED color corresponds to Toner color.
Note
❒ To print the configuration page using the {Stop/Start} key is not available for
the SP C220N model printer.
Reference
For printing the configuration page, see Software Guide.
4
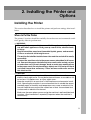
2. Installing the Printer and
Options
Installing the Printer
This section describes how to install the printer and perform settings after installation.
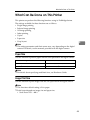
Where to Put the Printer
The printer’s location should be carefully chosen because environmental conditions greatly affect its performance.
R WARNING:
• The supplied power cord is for use with this equipment only. Do not
use with other appliances. Doing so may result in fire, electric shock,
or injury.
• Keep the machine away from flammable liquids, gases, and aerosols.
A fire or an electric shock might occur.
• The wall outlet shall be installed near the machine and shall be easily
accessible.
• Connect the machine only to the power source described in this manual. Connect the power cord directly into a wall outlet and do not use
an extension cord. Do not damage, break or make any modifications
to the power cord. Do not place heavy objects on it. Do not pull it hard
nor bend it more than necessary. These actions could cause an electric shock or fire.
R CAUTION:
• Keep the machine away from humidity and dust. Otherwise a fire or an
electric shock might occur. Do not place the machine on an unstable or tilted surface. If it topples over, an injury might occur.
• Keep the machine in an area that is within optimum environmental conditions. Operating the machine in an environment that is outside the recommended ranges of humidity and temperature can cause an electrical fire
hazard. Keep the area around the socket free of dust. Accumulated dust
can become an electrical fire hazard.
• Make sure the room where you are using the machine is well ventilated and
spacious. Good ventilation is especially important when the machine is
used heavily.
5
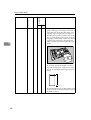
Installing the Printer and Options
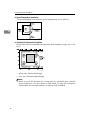
❖ Space Required for Installation
The recommended (or minimum) space requirements are as follows:
2
ASH200S
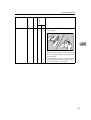
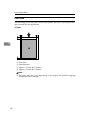
❖ Optimum Environmental Conditions
Permissible and recommended temperature and humidity ranges are as follows:
ASH201S
• White area: Permissible Range
• Gray area: Recommended Range
Note
❒ When you use this machine for a long time in a confined space without
good ventilation, you may detect an odd smell. To keep the workplace
comfortable, we recommend that you keep it well ventilated.
6
Installing the Printer
❖ Environments to Avoid
Important
❒ Areas exposed to direct sunlight or strong light
❒
❒
❒
❒
❒
❒
Dusty areas
Areas with corrosive gases
Areas that are excessively cold, hot, or humid
Locations near air conditioners or humidifiers
Locations near other electronic equipment
Locations subject to frequent strong vibration
2
❖ Power Source
Connect the power cable to a power source of the following specification:
• 220 - 240 V, 50/60 Hz, 6 A or more
• 120 V, 60 Hz, 11 A or more
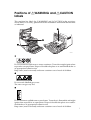
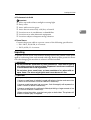
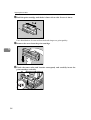
Unpacking
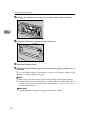
To protect it from shock and vibration during transit, this printer comes packaged in cushioning foam and secured with tape. Remove these protective materials after bringing the machine to where it will be installed.
R WARNING:
• Do not incinerate used toner or toner containers. Toner dust might ignite when exposed to an open flame. Dispose of used toner containers
in accordance with local regulations.
• Do not store toner, used toner, or toner containers in a place with an
open flame. The toner might ignite and cause burns of a fire.
R CAUTION:
• Keep toner (used or unused) and toner containers out of reach of children.
• If toner or used toner is inhaled, gargle with plenty of water and move into
a fresh air environment. Consult a doctor if necessary.
• If toner or used toner gets into your eyes, flush thoroughly with eyewash or
water. Consult a doctor if necessary.
• If toner or used toner is swallowed, dilute by drinking a large amount of water. Consult a doctor if necessary.
• When moving the printer, use the inset grips on both sides. The printer will
break or cause injury if dropped.
7
Installing the Printer and Options
❒
❒
❒
❒
❒
2
❒
❒
Important
Removed tape is dirty. Be careful not to let it touch your hands or clothes.
Leave the tape holding the paper feed tray and cover in place while moving
the printer.
Lower the machine slowly and carefully to prevent trapping your hands.
Do not grip on the tray area when lifting the printer.
Do not allow paper clips, staples, or other small metallic objects to fall inside
the machine.
Keep the uncovered print cartridge away from direct sunlight.
Do not touch the print cartridge's photo conductor.
ASH100S
A Remove the plastic bag.
B Lift the printer with two people by using the inset grips on both sides of
the printer.
ASH051S
8
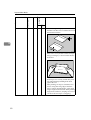
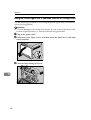
Installing the Printer
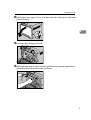
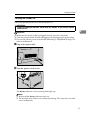
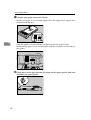
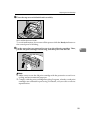
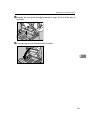
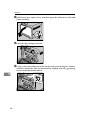
C Pull Front Cover Open Lever, and then open the front cover with both
hands carefully.
2
ASH107S
D Lower the blue fusing unit lever.
ASH108S
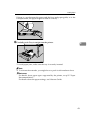
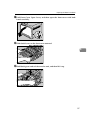
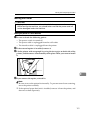
E Hold each tape near its joint, and then pull both tapes gently upward to remove them from the printer at the same time.
ASH109S
9
Installing the Printer and Options
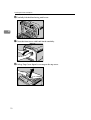
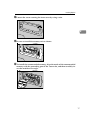
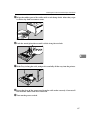
F Carefully lift the blue fusing unit levers.
2
ASH049S
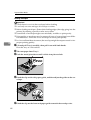
G Close the front cover with both hands carefully.
ASH111S
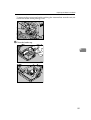
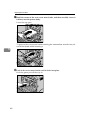
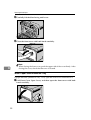
H Pull up Top Cover Open Lever to open the top cover.
ASH112S
10
Installing the Printer
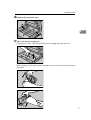
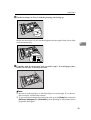
I Remove the protection tape.
2
ASH110S
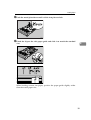
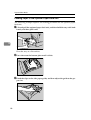
J Take each print cartridge out.
Gripping its center, carefully pull the print cartridge upward and out.
ASH005S
When taking out the black print cartridge, be sure to remove the protection
sheet also.
ASH087S
ASH088S
11
Installing the Printer and Options
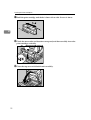
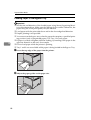
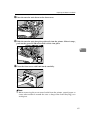
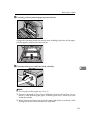
K Hold the print cartridge and shake it from side to side five or six times.
2
ASH113S
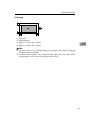
L Check the toner color and location correspond, and then carefully insert the
print cartridge vertically.
ASH009S
M Close the top cover with both hands carefully.
ASH010S
12
Installing the Printer
Turning the Power On
Follow the procedure below to turn the power on.
R WARNING:
• Plug and unplug the power cable with dry hands, or an electric shock
could occur.
2
Important
❒ Make sure the power cable is plugged securely into the wall outlet.
❒ Turn the power switch off when plugging and unplugging the power plug.
❒ Do not turn off the power switch until initializing is completed. Doing so results in malfunction.
A Plug in the power cable.
ASH071S
B Turn the power switch to On.
ASH072S
The Ready indicator on the control panel lights up.
Note
❒ Wait until the Ready indicator turns on.
❒ The machine may make a noise while initializing. This noise does not indicate a malfunction.
13
Installing the Printer and Options
Installing Options
This section describes how to install options.
By installing options, you can improve the printer performance and have an expanded variety of features to use. For the specifications of each option, see p.104
“Specifications”.
2
Attaching Paper Feed Unit TK1010
When installing multiple options, install Paper Feed Unit TK1010 first.
R CAUTION:
• The printer weighs approximately 23 kg (50.6 lb.). When moving the printer,
use the inset grips on both sides, and lift slowly in pairs. The printer will
break or cause injury if dropped.
• Lifting the paper feed unit carelessly or dropping may cause injury.
• It is dangerous to handle the plug with wet hands. Doing this may result in
receiving an electric shock.
• Before moving the machine, unplug the power cord from the wall outlet. If
the cord is unplugged abruptly, it could become damaged. Damaged plugs
or cords can cause an electrical or fire hazard.
Important
❒ Tray 1 is required to print using the optional paper feed unit. Without Tray 1,
paper jams will occur.
❒ The optional paper feed unit can be installed on the SP C221N and SP
C222DN model printers.
❒ Certain options might not be available in some countries. For details, contact
your local dealer.
❒ The printer should always be lifted by two people.
❒ Do not grip on the tray area when lifting the printer.
A Check the package contains Paper Feed Unit TK1010.
ASH001S
14
Installing Options
B Turn off the printer's power switch, and then unplug the printer's power
cord from the wall outlet.
C Remove the adhesive tape from the optional paper feed unit.
2
ASH025S
D Lift the printer using the inset grips on both sides of the printer.
ASH051S
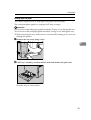
E There are three upright pins on the optional paper feed unit. Align them
with the holes on the underside of the printer, and then carefully lower the
printer.
ASH003S
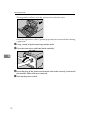
F After installing the option, print the configuration page to confirm the installation.
15
Installing the Printer and Options
Note
❒ When moving the printer, remove the optional paper feed unit.
❒ Before using the optional paper feed unit, you can make settings in the
printer driver.
❒ If the new device is listed in the column of configuration options, then it
has been properly installed.
❒ If the optional paper feed unit is not installed properly, reinstall it following this procedure. If you cannot install it properly even after attempting
reinstallation, contact your sales or service representative.
2
Reference
For printing the configuration page, see Software Guide.
For loading paper into the paper tray, see p.34 “Loading Paper”.
When adjusting the printing position, see Software Guide.
Attaching Memory Unit Type F 256MB (DDR-SDRAM Module)
R CAUTION:
• Before installing the memory unit, turn off the printer's power switch and unplug the power cable. After installing the memory unit, be sure to close the
memory unit cover, and then turn the machine back on. Do not turn on the
machine before closing the memory unit cover.
Important
❒ Before touching the memory unit, ground yourself by touching something
metal to discharge any static electricity. Static electricity can damage the
memory unit.
❒ You can install the memory unit in the SP C221N and SP C222DN model
printers.
❒ Do not subject the memory unit to physical shocks.
A Turn off the power, and then unplug the power cable.
B Remove the memory cover.
ASH026S
16
Installing Options
C Loosen the screw securing the inner cover by using a coin.
2
ASH027S
D Be sure to install the memory unit as shown.
ASH028S
E To install the recommended memory, align the notch of the recommended
memory with the protruding part of the vacant slot, and then carefully insert the module at an angle.
ASH029S
17
Installing the Printer and Options
F Keeping the module at an angle, press it down until it clicks into place.
2
ASH030S
G Attach the inner cover, and then fasten the screw.
ASH031S
H Attach the memory cover.
I After installing the option, print the configuration page to confirm the installation.
If it is installed properly, the memory capacity will appear under “Total
Memory” on the configuration page.
Note
❒ Before using the new memory unit, make settings in the printer driver.
❒ If the memory unit is not properly installed, repeat this procedure. If you
cannot install it properly even after reinstallation, contact your sales or
service representative.
Reference
For printing the configuration page, see Software Guide.
18
3. Connecting the Printer
Network Connection
Follow the procedure below to connect the printer to the computer through the
network. Prepare a hub, straight-through Ethernet cable, and any other necessary network devices before connecting the 10BASE-T or 100BASE-TX cable to
the printer's Ethernet port.
R CAUTION:
• Connect only an approved network interface board to this printer. A voltage
over load can occur if you connect an incorrect network interface board,
such as a telephone line interface, to the printer. Voltage overloads can
cause fire, electric shock, and burns. Doing so may result in fire, electric
shock, or injury.
Important
❒ Use shielded Ethernet cable. Unshielded cables create electromagnetic interference that could cause malfunctions.
❒ The Ethernet cable is not supplied with this printer. Select your cable according to the network environment.
A Remove the cable cover.
ASH090S
B Connect the Ethernet cable to the Ethernet port.
ASH052S
19
Connecting the Printer
C Connect the other end of the cable to the printer's network, such as a hub.
D Attach the cable cover.
3
ASH091S
Reference
For details about network environment settings, see Software Guide.
Reading the LED Lamps
AQC070S
1. Yellow: comes on when 100BASETX is being used. It comes off when
10BASE-T is being used.
20
2. Green: comes on when the printer
is properly connected to the network.
USB Connection
USB Connection
Important
❒ USB2.0 interface cable is not supplied. Obtain it separately, according to the
computer you are using.
❒ USB connection is possible under Windows 2000/XP/Vista, Windows Server
2003/2003 R2, and Mac OS X.
❒ USB connection with Macintosh is only possible via the printer's USB port.
A Remove the cable cover.
3
ASH090S
B Connect the square-shaped connector of the USB2.0 cable to the USB port.
ASH053S
C Connect the opposite end's flat connector to devices such as your computer's USB interface.
21
Connecting the Printer
D Attach the cable cover.
3
ASH091S
Reference
For details about settings for USB connection printing, see Software Guide.
22
4. Paper and Other Media
Paper and Other Media Supported by This
Printer
This section describes the paper size, feed direction, and the maximum amount
of paper that can be loaded into each paper tray in this printer.
Note
❒ The optional paper feed unit can be installed on the SP C221N and SP C222DN
model printers.
❒ All paper must be set vertically, regardless of the paper size.
In this manual
On the display
Paper feed direction
A4
K ↑ (Feed direction)
8
1/
2
Short-edge feed direction
× 11
182 × 257
7.17 ” × 10.12 ”
A5
148 × 210
5.83 ” × 8.26 ”
A6
105 × 148
4.13 ” × 5.63 ”
Legal
216 × 356
8.5 ” × 14 ”
Letter
216 × 279
8.5 ” × 11 ”
Executive
184 × 276
7.25 ” × 10.5 ”
F/GL
203 × 330
8 ” × 13 ”
Foolscap
216 × 330
8.5 ” × 13 ”
Folio
210 × 330
8.25 ” × 13 ”
Com10 Env
104.8 × 241.3
4.25” × 9.5”
C5 Env
162 × 229
6.38” × 9.02”
C6 Env
114 × 162
4.49” × 6.38”
DL Env
110 × 220
4.33” × 8.66”
Monarch Env
98.4 × 190.5
3.875” × 7.5”
16K
195 × 267
7.68 ” × 10.5 ”
Custom Paper Size
-
-
Duplex
B5
Bypass Tray
8.26 ” × 11.69 ”
(Tray 2)
210 × 297
Paper Feed Unit TK1010
Size (inch)
A4
Standard Input Tray 1
Size (mm)
❖ Input Paper Sizes (Metric version)
23
Paper and Other Media
•
Select a size using Smart Organizing Monitor.
•
Set a size as a custom size using Smart Organizing Monitor.
The following sizes are supported:
Tray 1: approximately 90 - 216 mm in width, and 148 - 356 mm in length.
Bypass Tray: approximately 90 - 216 mm in width, and 148 - 356 mm in
length.
•
Select a size using the printer driver.
•
Set a size as a custom size using the printer driver.
The following sizes are supported:
Tray 1: approximately 90 - 216 mm in width, and 148 - 356 mm in length.
Bypass Tray: approximately 90 - 216 mm in width, and 148 - 356 mm in
length.
4
•
The size is not supported.
❖ Paper weight and number of sheets to be set
Supported paper weight
Maximum number of
sheets (plain paper)
Tray 1
60 - 160 g/m2 (16 - 42 lb.)
250 (80 g/m2, 20 lb.)
Bypass Tray
60 - 160 g/m2 (16 - 42 lb.)
1
Paper Feed Unit (Tray 2)
60 - 105 g/m2 (16 - 28 lb.)
500 (80 g/m2, 20 lb.)
Check that the top of the stack is not higher than the limit mark inside the
tray.
24
Paper Recommendations
Paper Recommendations
Loading Paper
Important
❒ Do not use ink-jet printer paper because it may stick to the fusing unit and
cause a paper misfeed.
❒ Do not load OHP transparencies. Load translucent media only.
❒ Set the paper as described below
• Tray 1: Print side facing up
• Paper Feed Unit (Tray 2): Print side facing up
• Bypass Tray: Print side facing down
❒ Print quality cannot be guaranteed if paper other than the ones recommended
is used. For more information about recommended paper, contact your sales
or service representative.
❒ Do not use paper that has already been printed onto by other printers.
❒ Specify the paper size and type using Smart Organizing Monitor.
❒ The remaining paper indicator on the right front side of the paper tray shows
approximately how much paper is remaining.
4
Storing Paper
• Paper should always be stored properly. Improperly stored paper might result in poor print quality, paper misfeeds, or printer damage. Recommendations are as follows:
• Avoid storing paper in humid areas.
• Avoid exposing paper to direct sunlight.
• Store on a flat surface.
• Keep paper in the package in which the paper came.
25
Paper and Other Media
Types of Paper and Other Media
This section provides information about the type of paper supported by this
printer and cautions for use.
Setting the paper type
Use the printer driver or Smart Organizing Monitor to specify the paper type
you want to use.
❖ Printer driver
On the printer driver screen, click the [Paper] tab, and then select a paper type
under [Paper Type:].
4
❖ Smart Organizing Monitor
In the Smart Organizing Monitor dialog box, click the [User Tools] tab, and
then click the [Printer Configuration] button.
In the dialog box that appears, click the [Paper Input] tab, and then select the
paper type from the [Paper Type:] list for [Tray 1] and/or [Tray 2].
Note
Tray 2
60-75
Tray 1 Enabled paper
feeding tray
Thickness (g/m2)
Thin Paper
Duplex
Paper Type
Types of paper
(60-75g/m2)
Plain Paper
Plain Paper
75-90
90-105
(90-105g/m2)
Recycled Paper
Color Paper
Preprinted Paper
Prepunched Paper
Thick Paper
75-90
75-90
75-90
75-90
105-160
(105-160g/m2)
Letterhead
26
75-90
• Default
• The number of sheets that can be printed in
one minute is approximately half that of
plain paper.
• If the paper thickness is outside the specified
range, select Thin Paper, Plain Paper (90-105
g/m2) or Thick Paper.
• The number of sheets that can be printed in
one minute is approximately half that of
plain paper.
• Paper that has a thickness outside the specified range cannot be printed.
Cardstock
Label Paper
Envelope
105-160
Note
Tray 2
105-160
Tray 1 Enabled paper
feeding tray
Thickness (g/m2)
Bond Paper
Duplex
Paper Type
Paper Recommendations
• The number of sheets that can be printed in
one minute is approximately half that of
plain paper.
• If the paper thickness is outside the specified
range, select Plain Paper (90-105 g/m2).
• The number of sheets that can be printed in
one minute is approximately half that of
plain paper.
4
• Paper thicker than 160g/m2 cannot be printed.
• The number of sheets that can be printed in
one minute is approximately half that of
plain paper.
• The number of envelopes that can be printed
in one minute is approximately half that of
plain paper.
• To prevent the envelopes becoming creased,
go to the [Setup] tab and select [Rotate by 180
degrees] for [Orientation:] when printing.
• If printed envelopes come out badly creased,
load the envelopes in the opposite direction.
Also, configure the printer driver to rotate
the print object 180 degrees.
• Load envelopes print side up in the paper
tray.
ASH120S
27
Note
Tray 2
Tray 1 Enabled paper
feeding tray
Duplex
Thickness (g/m2)
Paper Type
Paper and Other Media
• The loading orientation of envelopes depends on the type of envelope. To load envelopes that open along the short edge, open
out their flaps and place the envelopes so
that their flaps point toward the back of the
tray. To load envelopes that open along the
long edge, fold their flaps under (as if closed)
and place the envelopes so that their flap
edges are flush against the right side paper
guide.
4
ASH124S
• To correctly specify the length of an envelope whose flap opens along its short edge,
be sure to include the open flap when measuring.
ASH125S
• Environmental factors can degrade the print
quality on both recommend and non-recommended envelopes.
28
Note
Tray 2
Tray 1 Enabled paper
feeding tray
Duplex
Thickness (g/m2)
Paper Type
Paper Recommendations
• Fan envelopes, and then align their edges before loading.
4
ASH121S
• When fanning envelopes, make sure they are
not stuck together. If they are stuck together,
separate them.
• When fanning envelopes, make sure the envelope flaps are not stuck together. If they
are stuck together, separate them.
29
Note
Tray 2
Tray 1 Enabled paper
feeding tray
Duplex
Thickness (g/m2)
Paper Type
Paper and Other Media
• Before loading envelopes, flatten them out so
that their curl does not exceed that shown in
the illustration below.
4
ASH122S
If the curl is severe, flatten out the envelopes
using your fingers, as shown in the illustration below.
ASH123S
• If envelopes are severely curled after printing, flatten them by bending them back
against the curl.
• After printing, envelopes sometimes have
creases along their long edges and toner
smear on their unprinted sides. Their print
images might also be blurred. When printing
large, black-solid areas, striping can occur as
a result of the envelopes overlapping.
30
Paper Recommendations
Paper Not Supported by This Printer
Avoid using the following paper as they are not supported by this printer.
• Paper meant for an ink-jet printer
• Bent, folded, or creased paper
• Curled or twisted paper
• Torn paper
• Wrinkled paper
• Damp paper
• Paper that is dry enough to emit static electricity
• Paper that has already been printed onto, except a preprinted letterhead.
Malfunctions are especially likely when using paper printed on by other than
a laser printer (e.g. monochrome and color copiers, ink-jet printers, etc.)
• Special paper, such as thermal paper, aluminum foil, carbon paper and conductive paper
• Paper whose weight is heavier or lighter than the limitation
• Paper with windows, holes, perforations, cutouts, or embossing
• Adhesive label paper on which glue or base paper is exposed
• Paper with clips or staples
4
31
Paper and Other Media
Print Area
The following shows the print area for this printer. Be sure to set the print margins correctly by the application.
❖ Paper
4
A
B
C
D
Print area
Feed direction
Approx. 4.2 mm (0.17 inches)
Approx. 4.2 mm (0.17 inches)
Note
❒ The print area may vary depending on the paper size, printer language
and printer driver settings.
32
Paper Recommendations
❖ Envelope
A
B
C
D
Print area
Feed direction
Approx. 4.2 mm (0.17 inches)
Approx. 4.2 mm (0.17 inches)
4
Note
❒ The print area may vary depending on the paper size, printer language
and printer driver settings.
❒ For better print quality, we recommend the right, left, top, and bottom
print margins to be at least 15 mm (0.6 inches) each.
33
Paper and Other Media
Loading Paper
This describes how to load paper into the paper tray and bypass tray.
R CAUTION:
• Do not pull out the paper tray forcefully. If you do, the tray might fall and
cause an injury.
Loading Paper in Tray 1
The following example explains loading procedure for the standard paper tray
(Tray 1). The same procedure can be used for the optional paper feed unit.
4
Important
❒ Make sure paper is not stacked above the limit mark inside the tray. Misfeeds
might occur.
❒ After loading paper in the tray, specify the paper type and size using Smart
Organizing Monitor.
❒ Do not mix different types of paper in the same paper tray.
❒ Do not move the side paper guides forcefully. Doing so can damage the tray.
❒ Do not move the end paper guide forcefully. Doing so can damage the tray.
❒ When inserting the tray, make sure it is not slanted. Inserting it at a slant can
damage the printer.
A Lift and pull Tray 1 carefully, and then pull it out with both hands.
ASH032S
Place the tray on a flat surface.
34
Loading Paper
B Push the metal plate down until it clicks into place to lock.
ASH033S
C Pinch the clip on the side paper guide and slide it to match the standard
4
size.
ASH034S
ASH093S
When loading custom size paper, position the paper guide slightly wider
than the actual paper size.
35
Paper and Other Media
D Pinch the front end paper guide and slide it inward to mach the standard
size.
ASH036S
4
ASH126S
When loading custom size paper, position the paper guide slightly wider
than the actual paper size.
E Load the new paper stack print side up.
Make sure paper is not stacked higher than the upper limit (upper line)
marked inside the tray.
ASH035S
36
Loading Paper
Slide the guides inward, until they are flush against the paper's sides.
Make sure the paper is not stacked higher than the projection on the side paper guides.
ASH094S
4
F Check there are no gaps between the paper and the paper guides; both side
and front end paper guides.
ASH084S
If there is a gap between the paper and the front end paper guide, as in the
example below, the paper might not feed in correctly.
ASH085S
37
Paper and Other Media
G Carefully push Tray 1 straight into the printer.
ASH037S
To avoid paper jams, make sure the tray is securely inserted.
4
Note
❒ The upper limit differs depending on paper type; thin paper or thick paper. Check the label inside the tray to confirm the upper limit.
Reference
For details about paper types supported by the printer, see p.25 “Paper
Recommendations”.
For details about the paper settings, see Software Guide.
38
Loading Paper
Loading legal size paper
This section explains how to load Legal size paper into the printer.
The same procedure applies to A4 paper (297 mm) or larger.
Important
❒ Do not move the side paper guides forcefully. Doing so can damage the tray.
❒ Do not move the end paper guide forcefully. Doing so can damage the tray.
❒ When inserting the tray, make sure it is not slanted. Inserting it at a slant can
damage the printer.
A Remove the rear cover using a coin.
4
ASH070S
B Pull Tray 1 carefully, and then hold it with both hands and pull it out.
ASH032S
Place the tray on a flat surface.
39
Paper and Other Media
C Push the metal plate down until it clicks into place to lock.
ASH033S
D Pinch the extender in the "PUSH" direction, and then pull out the extender
4
until it stops (you will hear a click).
ASH095S
After extension, make sure the arrows on the extender and tray are aligned.
ASH096S
40
Loading Paper
E Pinch the clip on the side paper guide, and then slide it to match the standard size.
ASH115S
4
ASH093S
F Pinch the front end paper guide and slide it inward to match the legal paper
size.
ASH117S
ASH126S
41
Paper and Other Media
G Load the new paper stack print side up.
Make sure paper is not stacked higher than the upper limit (upper line)
marked inside the tray.
ASH116S
4
Slide the guides inward until they are flush against the paper's sides.
Make sure the paper is not stacked higher than the projection on the side paper guides.
ASH094S
H Check there are no gaps between the paper and the paper guides; both side
and front end paper guides.
ASH118S
42
Loading Paper
If there is a gap between the paper and the front end paper guide, as in the
example below, the paper might not feed in correctly.
ASH119S
I Carefully push Tray 1 straight into the printer.
4
ASH037S
To avoid paper jams, make sure the tray is securely inserted.
Note
❒ To reinsert the extender, you might have to push it with moderate force.
Reference
For details about paper types supported by the printer, see p.25 “Paper
Recommendations”.
For details about the paper settings, see Software Guide.
43
Paper and Other Media
Loading envelopes
Important
❒ Check there is no air in the envelopes before loading.
❒ Load only one size and type of envelope at a time.
❒ Before loading envelopes, flatten their leading edges (the edge going into the
printer) by running a pencil or ruler across them.
❒ Some kinds of envelope might cause misfeeds, wrinkles or print poorly.
❒ Print quality on envelopes may be uneven if parts of an envelope have different thicknesses. Print one or two envelopes to check print quality.
❒ In a hot and humid environment, the envelope might be output creased or improper printing quality.
4
A Lift and pull Tray 1 carefully, then pull it out with both hands.
Place the tray on a flat surface.
B Take out paper from Tray 1.
C Push the metal plate down until it clicks into place to lock.
ASH033S
D Pinch the clip on the side paper guide, and then adjust the guides to the envelope.
ASH034S
E Pinch the clip on the front end paper guide to match the envelope size.
44
Loading Paper
F Set the envelopes in Tray 1 with the printing side facing up.
ASH124S
Make sure envelopes are not stacked higher than the upper limit (lower line)
mark inside the tray.
4
ASH055S
G Carefully slide the paper tray back in until it stops. To avoid paper jams,
make sure the tray is securely inserted.
ASH056S
Note
❒ Be sure to load envelopes so that their flaps are on the right. If you do not,
the envelopes will become creased.
❒ To prevent the envelopes becoming creased, go to the [Setup] tab and select
[Rotate by 180 degrees] for [Orientation:] when printing in the printer driver
properties dialog box.
45
Paper and Other Media
Loading Paper in the Optional Paper Feed Unit
The following example explains the loading procedure for the optional paper
feed unit.
A Lift and pull the optional paper feed unit, and then hold the tray with both
hands, and then pull it out.
4
ASH076S
Place the tray on a flat surface.
B Press down on the bottom plate until it clicks.
ASH077S
C Pinch the clips on the side paper guide, and then adjust the guide to the paper size.
ASH078S
46
Loading Paper
D Pinch the clip on the end paper guide and align the arrow with the paper
size.
ASH097S
E Load the new paper stack print side up.
4
Make sure paper is not stacked higher than the upper limit (upper line)
marked inside the tray.
ASH080S
F Lift and slide the tray, then push it all the way in. Push the tray firmly to
avoid a paper jam.
ASH081S
47
Paper and Other Media
Loading Paper in the Bypass Tray
Important
❒ Set the size and direction of the loaded paper using Smart Organizing Monitor or the printer driver. Make sure the settings do not conflict. Otherwise, the
paper may jam or the print quality may be affected.
❒ Load paper with the print side down and in the short-edge feed direction.
❒ Duplex printing is not possible.
❒ You cannot use the bypass tray to feed in paper that requires a specified printing position (such as preprinted paper). Use Tray 1 for such paper.
❒ If paper is curled, straighten it before loading, by bending it the paper in the
opposite direction to the curl, for example.
❒ Do not load paper while the printer is printing.
❒ Tray 1 and 2 are unavailable while paper is being loaded in the Bypass Tray.
4
A Insert the top edge of the paper into the printer.
ASH057S
B Adjust the paper guides to the paper size.
ASH058S
48
Loading Paper
C Support the paper with your hands, and insert it carefully until it stops.
ASH060S
D Start Smart Organizing Monitor or the printer driver and specify the paper
4
size.
E Start printing.
Reference
For details about specifying the paper sizes, see Software Guide.
49
Paper and Other Media
4
50
5. Replacing Consumables
Replacing the Print Cartridge
R WARNING:
• Do not incinerate used toner or toner containers. Toner dust might ignite when exposed to an open flame. Dispose used toner containers in
accordance with local regulations.
• Do not store toner, used toner, or toner containers in a place with an
open flame. The toner might ignite and cause burns of a fire.
R CAUTION:
• Keep toner (used or unused) and toner containers out of reach of children.
• If toner or used toner is inhaled, gargle with plenty of water and move into
a fresh air environment. Consult a doctor if necessary.
• Avoid getting toner on your clothes or skin when removing a paper jam or
replacing toner. If your skin comes into contact with toner, wash the affected
area thoroughly with soap and water.
• If toner gets on your clothing, wash with cold water. Hot water will set the
toner into the fabric and may make removing the stain impossible.
• If toner or used toner gets into your eyes, flush thoroughly with eyewash or
water. Consult a doctor if necessary.
• If toner or used toner is swallowed, dilute by drinking a large amount of water. Consult a doctor if necessary.
Important
❒ Store print cartridges in a cool dark place.
❒ Actual printable numbers vary depending on image volume and density,
number of pages printed at a time, paper type and size, and environmental
conditions such as temperature and humidity. Toner quality degrades over
time. Early replacement of the print cartridge might be necessary. Therefore,
we recommend you always keep a new print cartridge ready.
❒ For good print quality, the supplier recommends that you use genuine toner
from the supplier.
❒ The supplier shall not be responsible for any damage or expense that might
result from the use of parts other than genuine parts from the supplier with
your office products.
51
Replacing Consumables
❖ When to replace the print cartridge
If the Alert indicator or any of the toner indicators on the control panel light up,
or the message “No Toner. The following toner has run out. Open the
indicated cover, and then replace the Toner Cartridge. Top Cover
: [Black/Yellow/Magenta/Cyan]” appears on the Smart Organizing Moni-
tor dialog box, replace the indicated print cartridge.
• If cyan, magenta, or yellow toner runs out, you can print in black and white
using black toner. Change the color mode setting to Black and White using
the printer driver.
• If black toner runs out, you cannot print in black and white or color until
the black print cartridge is replaced.
Important
❒ Do not allow paper clips, staples, or other small metallic objects to fall inside
the machine.
❒ Do not expose the print cartridge without its cover to direct sunlight for a
long time.
❒ Do not touch the print cartridge's photo conductor unit.
5
ASH100S
❒ When removing print cartridges, be careful not to touch the Laser Scanning
Unit on the underside of the upper cover (the white area in the illustration below).
ASH106S
52
Replacing the Print Cartridge
A Pull up Top Cover Open Lever to open the top cover.
ASH004S
From the rear, the print cartridges are installed in the order of cyan (C), magenta (M), yellow (Y), and black (K).
B Gripping its center, carefully pull the print cartridge upward and out.
5
ASH005S
• Do not shake the removed print cartridge. Remaining toner may leak.
• Place the old print cartridge on paper or some other material to avoid dirtying your workspace.
• Color is labeled on each print cartridge.
C Take the new print cartridge out of the box, and then take it out of the plastic bag.
ASH006S
53
Replacing Consumables
D Hold the print cartridge and shake it from side to side five or six times.
ASH007S
Even distribution of toner within the bottle improves print quality.
E Remove the cover from the print cartridge.
5
ASH008S
F Check the toner color and location correspond, and carefully insert the
print cartridge vertically.
ASH009S
54
Replacing the Print Cartridge
G Close the top cover with both hands carefully.
ASH010S
Wait while the toner loads.
To avoid malfunction, do not turn off the power while the Ready indicator on
the control panel is blinking.
H Put the cover that you removed in step 4 on the old print cartridge. Then,
5
put the old print cartridge into the bag, and then put it into the box.
ASH061S
Note
❒ Make sure to cover the old print cartridge with the protective cover for recycling and environmental purposes.
❒ Comply with the print cartridge Recycling Program, whereby used print
cartridges are collected for processing. For details, ask your sales or service
representative.
55
Replacing Consumables
Replacing the Waste Toner Bottle
R WARNING:
• Do not incinerate spilled toner or used toner. Toner dust might ignite
when exposed to an open flame.
• Wait at least 30 minutes after disconnecting the power plug before removing the transfer unit.
• Do not incinerate used toner or toner containers. Toner dust might ignite when exposed to an open flame. Dispose used toner containers in
accordance with local regulations.
R CAUTION:
• The inside of this printer becomes very hot. Do not touch parts labelled “v”
(indicating a hot surface).
• Keep toner (used or unused) and toner containers out of reach of children.
5
❖ When to replace the waste toner bottle
If the Alert indicator lights up and the message “Waste Toner Bottle
Full. The Waste Toner Bottle is full. Open the indicated cover,
and then replace the Waste Toner Bottle. Front Cover : [Waste
Toner Bottle].” appears on the Smart Organizing Monitor dialog box, re-
place the waste toner bottle.
Important
❒ Waste toner bottles cannot be reused.
❒
❒
❒
❒
Purchasing and storing extra waste toner bottles are recommended.
When removing the waste toner bottle, make sure not to tilt it.
Keep the waste toner bottle horizontal as you take it out.
Make sure the transfer unit is installed. If the transfer unit is not installed, install it before turning the power on.
❒ Cooperate with the waste toner bottle Recycling Program, whereby used
waste toner bottles are collected for recycling.
56
Replacing the Waste Toner Bottle
A Pull Front Cover Open Lever, and then open the front cover with both
hands carefully.
ASH011S
B Slide both levers on the front cover outward.
5
ASH012S
C Hold both green ends of the transfer unit, and then lift it up.
ASH013S
57
Replacing Consumables
D Hold the center of the waste toner bottle, and then carefully pull it out horizontally.
ASH040S
E Pull the waste toner bottle halfway out, grab the bottle, and then pull it
straight out.
5
ASH082S
ASH041S
58
Replacing the Waste Toner Bottle
To prevent the waste toner bottle touching the intermediate transfer unit, do
not lift the bottle while pulling it out.
ASH042S
F Close the bottle cap.
5
ASH043S
ASH101S
59
Replacing Consumables
G Hold the center of the new waste toner bottle, and then carefully insert it
halfway into the printer body.
Leave the cap open.
ASH044S
To prevent the waste toner bottle touching the intermediate transfer unit, do
not lift the bottle while inserting it.
5
ASH045S
H Push in the waste toner bottle until it clicks into place.
Push the green part all the way in.
ASH015S
60
Replacing the Waste Toner Bottle
I Place the transfer unit down on the front cover.
ASH020S
J Slide the transfer unit along the guide rails into the printer. When it stops,
push on the green PUSH mark until it clicks into place.
5
ASH016S
K Close the front cover with both hands carefully.
ASH067S
Note
❒ Before removing the waste toner bottle from the printer, spread paper or
some other material around the area to keep toner from dirtying your
workspace.
61
Replacing Consumables
5
62
6. Cleaning the Printer
Cautions to Take When Cleaning
R WARNING:
• Do not attempt any maintenance or troubleshooting other than that
mentioned in this manual. This machine contains a laser beam generator and direct exposure to laser beams can cause permanent eye
damage.
R CAUTION:
• The inside of this printer becomes very hot. Do not touch parts labelled “v”
(indicating a hot surface).
Clean the printer periodically to maintain fine printing.
Dry wipe the exterior with a soft cloth. If dry wiping is not enough, wipe with a
soft, wet cloth that is wrung out well. If you still cannot remove the stain or
grime, use a neutral detergent, and then wipe over with a well-wrung wet cloth,
dry wipe, and let it dry.
Important
❒ To avoid deformation, discoloration, or cracking, do not use volatile chemicals, such as benzine and thinner, or spray insecticide on the printer.
❒ If there is dust or grime inside the printer, wipe with a clean, dry cloth.
❒ You must disconnect the plug from the wall outlet at least once a year. Clean
away any dust and grime from the plug and outlet before reconnecting. Accumulated dust and grime pose a fire hazard.
❒ Do not allow paper clips, staples, or other small metallic objects to fall inside
the machine.
63
Cleaning the Printer
Cleaning the Toner Density Sensor
Clean the toner density sensor when the following message appears on the
Smart Organizing Monitor dialog box.
“Toner Density Sensor requires cleaning.”
A Pull up Top Cover Open Lever to open the top cover.
ASH004S
B Lift out the cyan print cartridge.
6
ASH105S
C Slide the toner density sensor lever once to the left.
ASH062S
Slide the lever only once.
64
Cleaning the Toner Density Sensor
D Reattach the cyan print cartridge removed in step 2. Push it all the way in
carefully.
ASH063S
E Close the top cover with both hands carefully.
6
ASH010S
65
Cleaning the Printer
Cleaning the Friction Pad and the Paper
Feed Roller
If the friction pad or paper feed roller is dirty, a multi-feed or misfeed might occur. In this case, clean the friction pad and paper feed roller as follows:
R CAUTION:
• Unplug the power cord from the wall outlet before you move the machine.
While moving the machine, you should take care that the power cord will
not be damaged under the machine.
Important
❒ Do not use chemical cleaner or organic solvent such as thinner or benzene.
A Turn off the power switch.
B Pull out the plug from the socket. Remove all the cables from the printer.
C Lift and pull Tray 1 carefully, and then pull it out with both hands.
6
ASH032S
Place the tray on a flat surface. When there is paper in the tray, remove paper.
D Wipe the friction pad with a damp cloth.
ASH064S
66
Cleaning the Friction Pad and the Paper Feed Roller
E Wipe the rubber part of the roller with a soft damp cloth. After that, wipe
it with a dry cloth to remove water.
ASH065S
F Push the metal plate down until it clicks into place to lock.
6
ASH033S
G Slide Tray 1 along the rails, and push it carefully all the way into the printer.
ASH037S
H Insert the plug of the power cord into the wall socket securely. Connect all
the interface cables that were removed.
I Turn on the power switch.
67
Cleaning the Printer
Note
❒ If misfeeds or multi-feeds of paper occur after cleaning the friction pad,
contact your sales or service representative.
❒ If the optional paper feed unit is installed, clean its friction pad in the same
way as the main friction pad.
❒ Follow the same procedure to clean the paper feed roller of the optional paper feed unit.
6
68
Cleaning the Registration Roller
Cleaning the Registration Roller
The surrounding registration roller might get dirty with paper dust when using
paper other than standard paper.
Wipe off the paper dust when printing is affected by it.
R CAUTION:
• Unplug the power cord from the wall outlet before you move the machine.
While moving the machine, you should take care that the power cord will
not be damaged under the machine.
• The inside of this printer becomes very hot. Do not touch parts labelled “v”
(indicating a hot surface).
Important
❒ Do not use chemical cleaner or organic solvent such as thinners or benzene.
❒ Do not touch the transfer roller.
6
ASH098S
A Turn off the power switch.
B Pull out the plug from the socket. Remove all the cables from the printer.
C Pull Front Cover Open Lever, and then open the front cover with both
hands carefully.
ASH011S
69
Cleaning the Printer
The registration roller is set in the position shown by the arrow.
ASH066S
Clean the registration roller if printed paper becomes smeared after clearing
a paper jam.
D Using a cloth, wipe the metal registration roller.
E Close the front cover with both hands carefully.
6
ASH067S
F Insert the plug of the power cord into the wall socket securely. Connect all
the interface cables that were removed.
G Turn on the power switch.
70
7. Troubleshooting
Error & Status Messages on Smart
Organizing Monitor
This section explains what the message that appear on the Smart Organizing
Monitor dialog box mean and what to do when a particular message appears.
Message
Explanation
Recommended Action
Print overrun error has occurred.
The print data could not be
processed.
Print the job again from a
higher performance computer.
The indicated paper input
tray is not installed correctly,
or not installed.
Install the indicated paper input tray correctly.
The printer received a request
for a paper size not supported
by duplex
Select simplex or change paper size.
The selected paper type
(name) is not supported to use
with Duplex function.
The printer received a request
for a paper type not supported
by duplex
Select simplex or change paper type.
Bypass Tray is not supported
to use with Duplex function.
When using the bypass tray,
duplex printing cannot be
specified.
Select simplex or change input
tray.
The paper size setting in the
tray differs from that of actual
paper size in the tray.
Load paper of the selected size
in the tray, and then change
the paper size setting with
printer driver.
The paper size setting in the
tray differs from that of actual
paper size in the tray.
Load paper of the selected size
in the tray, and then change
the paper size setting with
Smart Organizing Monitor.
A higher specification PC may
be required.
Tray Not Detected
The selected paper source tray
is not set, or is not set properly.
Check the indicated tray.
[Tray 2]
The selected paper size
(name) is not supported to use
with Duplex function.
Please change the function or
change Input Tray.
Please change the function or
change Input Tray.
Paper Size Mismatch
Paper of the selected paper
size is not loaded in the indicated paper source tray.
[Bypass Tray]
Paper Size Mismatch
Paper of the selected paper
size is not loaded in the indicated paper source tray.
[Tray 1]
71
Troubleshooting
Message
Explanation
Recommended Action
Paper Size Mismatch
The paper size setting in the
tray differs from that of actual
paper size in the tray.
Load paper of the selected size
in the tray, and then change
the paper size setting with
Smart Organizing Monitor.
Paper of the selected paper
size is not loaded in the indicated paper source tray.
[Tray 2]
Misfeed recovery print failed. The print data could not be re- Print again.
covered due to insufficient
Please try to print again.
memory.
Cannot use collate function.
Set the collate function from
the printer driver.
The computer does not have a Use the DDST driver to print.
print control module, or the
job does not use a print driver.
Paper Type Mismatch
The paper type setting in the
tray differs from that of actual
Paper of the selected type is
not loaded in the indicated pa- paper type in the tray.
per source tray.
Check the indicated tray.
Load paper of the selected
type in the tray, and then
change the paper type setting
with Smart Organizing Monitor.
[Tray 1]
The paper type setting in the
tray differs from that of actual
Paper of the selected type is
not loaded in the indicated pa- paper type in the tray.
per source tray.
Paper Type Mismatch
7
Check the indicated tray.
Load paper of the selected
type in the tray, and then
change the paper type setting
with Smart Organizing Monitor.
[Tray 2]
The paper type setting in the
tray differs from that of actual
Paper of the selected type is
not loaded in the indicated pa- paper type in the tray.
per source tray.
Paper Type Mismatch
Load paper of the selected
type in the tray, and then
change the paper type setting
with printer driver.
Check the indicated tray.
[Bypass Tray]
Paper Misfeed
Open the indicated cover, and
then remove any misfed paper.
There is a misfeed in the print- Remove the misfed paper.
er.
See p.89 “Removing Misfed
Paper”
[Front Cover]
No Paper
Load paper in the indicated
paper source tray.
The indicated tray is out of pa- Load paper into the indicated
per.
paper tray.
[Tray 1]
No Paper
Load paper in the indicated
paper source tray.
[Tray 2]
72
The indicated tray is out of pa- Load paper into the indicated
per.
paper tray.
Error & Status Messages on Smart Organizing Monitor
Message
Explanation
Recommended Action
Cover Open
The top cover or front cover is
open.
Open and then close the top
cover or front cover.
The indicated print cartridge
is not set correctly, or not set.
Set the indicated print cartridge correctly.
(Black)
(Black)
The error message appears
even though the print cartridge is set correctly.
Using a dry cloth, carefully
wipe the interface area on the
print cartridge surface.
The indicated print cartridge
is not set correctly, or not set.
Set the indicated print cartridge correctly.
(Magenta)
(Magenta)
The error message appears
even though the print cartridge is set correctly.
Using a dry cloth, carefully
wipe the interface area on the
print cartridge surface.
The indicated print cartridge
is not set correctly, or not set.
Set the indicated print cartridge correctly.
(Cyan)
(Cyan)
The error message appears
even though the print cartridge is set correctly.
Using a dry cloth, carefully
wipe the interface area on the
print cartridge surface.
The indicated print cartridge
is not set correctly, or not set.
Set the indicated print cartridge correctly.
(Yellow)
(Yellow)
The error message appears
even though the print cartridge is set correctly.
Using a dry cloth, carefully
wipe the interface area on the
print cartridge surface.
There is no waste toner bottle,
or the waste toner bottle is not
installed correctly.
Set the waste toner bottle correctly.
Controller FW download
failed.
Controller FW could not be
downloaded.
Wait for a while and do not
turn off the power.
No Toner
The printer is out of toner
(Black).
Replace the print cartridge
(Black).
Close the indicated cover.
[Top or Front Cover]
Unit Not Detected
Open the indicated cover, and
then check the Toner Cartridge.
Top Cover : [Black]
Unit Not Detected
Open the indicated cover, and
then check the Toner cartridge.
Top Cover : [Magenta]
Unit Not Detected
Open the indicated cover, and
then check the Toner cartridge.
Top Cover : [Cyan]
Unit Not Detected
Open the indicated cover, and
then check the Toner Cartridge.
Top Cover : [Yellow]
Unit Not Detected
The Waste Toner Bottle is not
set, or is not set properly.
7
[Waste Toner Bottle]
The following toner has run
out.
Open the indicated cover, and
then replace the Toner Cartridge.
See p.51 “Replacing the Print
Cartridge”
Top Cover : [Black]
73
Troubleshooting
Message
Explanation
Recommended Action
No Toner
The printer is out of toner
(Magenta).
Replace the print cartridge
(Magenta).
The following toner has run
out.
See p.51 “Replacing the Print
Cartridge”
Open the indicated cover, and
then replace the Toner Cartridge.
Top Cover : [Magenta]
No Toner
The following toner has run
out.
The printer is out of toner (Cy- Replace the print cartridge
an).
(Cyan).
See p.51 “Replacing the Print
Cartridge”
Open the indicated cover, and
then replace the Toner Cartridge.
Top Cover : [Cyan]
No Toner
The following toner has run
out.
The printer is out of toner
(Yellow).
Replace the print cartridge
(Yellow).
See p.51 “Replacing the Print
Cartridge”
Open the indicated cover, and
then replace the Toner Cartridge.
Top Cover : [Yellow]
7
Waste Toner Bottle Full
It is time to replace the waste
The Waste Toner Bottle is full. toner box
Replace the waste toner box
with a new one.
Open the indicated cover, and
then replace the Waste Toner
Bottle.
See p.56 “Replacing the Waste
Toner Bottle”.
Front Cover : [Waste Toner
Bottle]
Tray Not Detected
The selected paper source tray
is not set, or is not set properly.
The indicated paper input
tray is not installed correctly,
or not installed.
Install the indicated paper input tray correctly.
There is a problem with the
controller's ROM.
Turn off the main power, and
then turn it on again.
Check the indicated tray.
[Tray 1]
Functional problem within
the printer.
Turn power switch off, then
on.
If the error appears again,
please call service.
SC828
74
If the error occurs again, contact your service representative.
Error & Status Messages on Smart Organizing Monitor
Message
Explanation
Recommended Action
Functional problem within
the printer.
There is an abnormality in the
NVRAM on the controller.
Turn off the main power, and
then turn it on again.
If the error occurs again, contact service people to repair it.
Turn power switch off, then
on.
If the error appears again,
please call service.
SC824
Functional problem within
the printer.
There is an abnormality in the
memory on the controller.
Turn power switch off, then
on.
Turn off the main power, and
then turn it on again.
If the error occurs again, contact your service representative.
If the error appears again,
please call service.
SC827
DIMM memory check error
has occurred.
Functional problem within
the printer.
There is an abnormality in the
optional memory on the controller.
Turn off the main power, and
then turn it on again.
There is an abnormality in the
USB interface.
Turn off the main power, and
then turn it on again.
Turn power switch off, then
on.
If the error occurs again, contact service people to repair it.
If the error occurs again, contact service people to repair it.
7
If the error appears again,
please call service.
SC857
Functional problem within
the printer.
There is an abnormality in the
network interface.
Turn power switch off, then
on.
Turn off the main power, and
then turn it on again.
If the error occurs again, contact service people to repair it.
If the error appears again,
please call service.
SC823
Functional problem within
the printer.
Call service people.
Call service people to repair it.
Turn power switch off, then
on.
If the error appears again,
please call service.
SC819
75
Troubleshooting
Message
Explanation
Recommended Action
Functional problem within
the printer.
It is impossible to communicate with the engine.
Turn off the main power, and
then turn it on again.
If the error occurs again, contact service people to repair it.
Turn power switch off, then
on.
If the error appears again,
please call service.
SC670
No Response from I/O Device No information has been reCheck the cable, power cord, ceived from the printer.
and main switch.
Toner Density Sensor requires
cleaning.
Color registration failed.
Check the main power switch
is turned on and the power
cord is securely connected.
Check the USB or network cables are securely connected also.
Clean the toner density sensor.
See p.64 “Cleaning the Toner
Density Sensor”
7
76
Panel Indicator
Panel Indicator
The following table explains the meaning of the various Indicator patterns that
the printer alerts to users about its conditions.
Indicator patterns
All indicators are lit.
Cause
There are problems with the printer. Check the printer status on
the Smart Organizing Monitor dialog box.
After checking the printer's status, turn off the main power, and
then turn it back on again.
If all the indicators are still lit, contact your service representative.
The Alert indicator is
flashing.
Printer's settings are being returned to their factory-set defaults.
The Alert indicator is lit.
The printer cannot be used normally. Confirm the error using
Smart Organizing Monitor.
The Ready indicator is
flashing.
The printer is receiving print data or preparing to print.
The Ready indicator is lit.
The printer is ready for use.
The Load Paper indicator
is lit.
There is no paper in the tray. Load paper in the tray.
The Replace Print CarThe print cartridge is almost empty.
tridge indicator is flashing.
The Replace Print Cartridge indicator is lit.
The print cartridge is empty. Replace the indicated print cartridge.
The Toner K indicator is
flashing.
The print cartridge is almost empty.
7
The Toner K indicator is lit. The print cartridge is empty. Replace the black print cartridge.
The Toner C indicator is
flashing.
The print cartridge is almost empty.
The Toner C indicator is lit. The print cartridge is empty. Replace the cyan print cartridge.
The Toner M indicator is
flashing.
The print cartridge is almost empty.
The Toner M indicator is
lit.
The print cartridge is empty. Replace the magenta print cartridge.
The Toner Y indicator is
flashing.
The print cartridge is almost empty.
The Toner Y indicator is lit. The print cartridge is empty. Replace the yellow print cartridge.
77
Troubleshooting
Printer Does Not Print
Possible Cause
Is the power on?
Solutions
Confirm that the cable is securely plugged into the power outlet
and the printer.
Turn the power on.
Does the Alert indicator
stay red?
If so, check the error message on the Smart Organizing Monitor
dialog box and take the required action.
Is paper loaded?
Load paper into the paper tray or the bypass tray.
See p.34 “Loading Paper”.
Can you print a configura- If you cannot print a configuration page, it probably indicates a
tion page?
printer malfunction. Contact your sales or service representative.
See Software Guide.
Is the interface cable connected securely to the
printer and the computer?
Connect the interface cable securely. If it has a fastener, fasten it
securely as well.
Are you using the correct
interface cable?
The type of interface cable you should use depends on the computer you use. Be sure to use the correct one.
If the cable is damaged or worn, replace it with a new one.
See p.104 “Specifications”.
Is the Ready indicator
blinking or lit after starting
the print job?
7
If not blinking or lit, the data is not being sent to the printer.
❖ If the printer is connected to the computer using the interface cable
Check the port connection setting is correct. For details about
checking the port connection, see p.79 “When the Printer is Directly Connected to a Computer via USB Cable”.
❖ Network Connection
Contact your network administrator.
If printing still does not start, contact your sales or service representative. Consult with the store where the printer was purchased for information about the
location of sales or service representatives.
78
Printer Does Not Print
When the Printer is Directly Connected to a Computer via USB
Cable
Windows
When the printer is directly connected via a USB cable to a computer but the
Ready indicator does not flash or light up, use the following method to check the
port connection:
• For a USB port connection, port USB00 (n) *1 should be set.
*1
(n) is the number of printers connected.
Windows 2000
A Click [Start], point to [Settings] and then click [Printers].
B Click to select the icon of the printer. Next, on the [File] menu, click [Properties].
C Click the [Ports] tab.
D Check the [Print to the following port] box to confirm that the correct port is selected.
If the port (such as LPT1) is not correct, reinstall the driver.
7
Reference
For details about installation and port settings, see Software Guide.
Windows XP Professional, and Windows Server 2003/2003 R2
A Access the [Printers and Faxes] window from [Start] on the taskbar.
B Click to select the icon of the printer. Next, on the [File] menu, click [Properties].
C Click the [Ports] tab.
D Check the [Print to the following port(s).] box to confirm that the correct port is
selected.
If the port such as LPT1 is not correct, reinstall the driver.
Reference
For details about installation and port setting, see Software Guide.
79
Troubleshooting
Windows XP Home Edition
A Access the [Control Panel] window from [Start] on the taskbar.
B Click [Printers and Other Hardware].
C Click [Printers and Faxes].
D Click to select the icon of the printer. Next, on the [File] menu, click [Properties].
E Click the [Ports] tab.
F Check the [Print to the following port(s).] box to confirm that the correct port is
selected.
If the port such as LPT1 is not correct, reinstall the driver.
Reference
For details about installation and port setting, see Software Guide.
Windows Vista
A Click [Control Panel] on the [Start] menu, and then click [Printer] in the “Hardware and Sound”.
7
B Click to select the icon of the printer. Next, on the [File] menu, click [Properties].
C Click the [Ports] tab.
D Check the [Print to the following port(s).] box to confirm that the correct port is
selected.
If the port such as LPT1 is not correct, reinstall the driver.
Reference
For details about installation and port setting, see Software Guide.
Mac OS X
When the printer is connected to Mac OS X and the Ready indicator does not
flash or light up, try the following procedures to check the port connection.
• Use [About This Mac] to check the USB information.
• Use the printer browser to check if the printer is displayed.
80
Printer Does Not Print
Using [About This Mac]
A Click Apple Menu, and then select [About This Mac].
B Click [More Info].
C Under [Contents], for [Hardware], select [USB].
Using the printer browser
A In the menu bar, click [Go], select [Application], and then select [Utilities].
B Double click [Printer Setup Utility].
C Click [Add].
The printer browser starts.
Confirm the printer is displayed on the browser. If it is not, reinstall the driver.
7
81
Troubleshooting
Other Printing Problems
Status
Toner smears appear on the
print side of the page.
Possible Causes, Descriptions, and Solutions
The paper setting may not be correct. For example, although
you are using thick paper, the setting for thick paper may not
be set.
• Check the printer driver's paper settings.
See the printer driver Help.
Confirm that the paper is not curled or bent. Envelopes can
be curled easily. Flatten paper before loading.
See p.23 “Paper and Other Media”.
Paper jams occur frequently.
• Number of paper set in the tray exceeds the limit. Confirm that the top of the stack is not higher than the limit
mark inside the tray.
See p.34 “Loading Paper”.
• There may be a gap between the front end paper guide
and the paper, or between the paper guide both side and
the paper in the paper tray. Make sure there are no gaps.
See p.34 “Loading Paper”.
• Paper is either too thick or too thin.
See p.23 “Paper and Other Media”.
• Paper is bent or wrinkled. Use paper that has no bents or
wrinkles.
See p.23 “Paper and Other Media”.
7
• Paper has already been printed on.
See p.23 “Paper and Other Media”.
• Paper is damp. Use paper that has been stored properly.
See p.23 “Paper and Other Media”.
• The friction pad, or paper feed roller or registration roller
might be dirty. Clean the relevant component.
See p.66 “Cleaning the Friction Pad and the Paper Feed
Roller”, and p.69 “Cleaning the Registration Roller”.
Prints fall behind the machine
when they are output.
Raise the appropriate stop fence (forward fence for A4, rear
fence for legal size prints).
See p.1 “Exterior: Front View”.
Prints do not stack properly.
• Paper is damp. Use paper that has been stored properly.
See p.23 “Paper and Other Media”.
• Pull out the extender.
• Log on to Smart Organizing Monitor as an Administrator, and then select [Mode 2] or [Mode 3] in the [Anti-humidity:] list on the [System] tab. Note that the first print takes
longer than subsequent prints to complete.
• Raise the appropriate stop fence (forward fence for A4,
rear fence for legal size prints).
See p.1 “Exterior: Front View”.
82
Other Printing Problems
Status
Possible Causes, Descriptions, and Solutions
Multiple pages are fed at once.
• There may be a gap between the front end paper guide
and the paper, or between the paper guide both side and
the paper in the paper tray. Make sure there are no gaps.
See p.34 “Loading Paper”.
• Paper is either too thick or too thin.
See p.23 “Paper and Other Media”.
• Paper has already been printed on.
See p.23 “Paper and Other Media”.
• Number of paper set in the tray exceeds the limit. Confirm that the top of the stack is not higher than the limit
mark inside the tray.
See p.23 “Paper and Other Media”.
• Paper is static. Use paper that has been stored properly.
See p.23 “Paper and Other Media”.
• The friction pad, paper feed roller, or registration roller
might be dirty. Clean the relevant component.
See p.66 “Cleaning the Friction Pad and the Paper Feed
Roller” and p.69 “Cleaning the Registration Roller”.
• Check that paper was not added while there was still
some left in the tray.
Only add paper when there is none left in the tray.
• Fan the paper before loading.
Paper gets wrinkles.
• Paper is damp. Use paper that has been stored properly.
See p.23 “Paper and Other Media”.
7
• Paper is too thin.
See p.23 “Paper and Other Media”.
• There may be a gap between the front end paper guide
and the paper, or between the paper guide both side and
the paper in the paper tray. Make sure there are no gaps.
See p.34 “Loading Paper”.
The printed paper is curled.
• Load the paper upside down in the paper tray.
• Pull out the extender of the output tray.
• If the paper curl is severe, take prints from the output tray
more frequently.
• Paper is damp. Use paper that has been stored properly.
See p.23 “Paper and Other Media”.
• Log on to Smart Organizing Monitor as an Administrator, and then select [Mode 2] or [Mode 3] in the [Anti-humidity:] list on the [System] tab. Note that the first print takes
longer than subsequent prints to complete.
83
Troubleshooting
Status
Images are not printed in the
right position
Possible Causes, Descriptions, and Solutions
Adjust the printing position from Smart Organizing Monitor.
See Software Guide.
ASH102S
Images are printed diagonally
to the pages
Adjust the front end paper guide and both side paper guides
to match the paper size.
See p.34 “Loading Paper”.
ASH103S
Vertical line appear.
The intermediate transfer belt is dirty.
Follow the procedure below to clean the belt:
7
A Open the top cover while the power is on.
B Remove all print cartridges from the printer.
C Close the top cover with both hands carefully.
The printer enters cleaning mode automatically.
D When cleaning finishes, open the top cover and reinsert
ASH104S
all the print cartridges.
If this procedure does not resolve the problem, contact your
service representative.
Horizontal lines appear on the
printed paper.
• Impact can cause lines to appear on printed paper and
other malfunctions.
Protect the printer from impact at all times, especially
while it is printing.
• If lines appear on prints, turn the printer off, wait a few
moments, and then turn it back on again. Then, perform
the print job again.
Paper is not fed from the selected tray.
When you are using the Windows operating system, the
printer driver settings override those set using the control
panel. Set the desired input tray using the printer driver.
See the printer driver Help.
A printed image is different
from the image on the computer's display.
84
When you use some functions, such as enlargement and reduction, the layout of the image might be different from that
displayed in the computer display.
Other Printing Problems
Status
Possible Causes, Descriptions, and Solutions
It takes too much time to resume
printing.
• The data is so large or complex that it takes time to process it. If the Ready indicator is blinking, the data is being
processed. Just wait until it resumes.
• The printer was in the Energy Saver mode. To resume
from the Energy Saver mode, the printer has to warm up,
and this takes time until printing starts. To disable the Energy Saver mode, select [Off] for [Energy Saver Mode 2:] using Smart Organizing Monitor.
It takes too much time to complete the print job.
• Photographs and other data intensive pages take a long
time for the printer to process, so simply wait when printing such data.
Changing the settings with printer driver may help to
speed up printing.
See the printer driver Help.
• The data is so large or complex that takes time to process.
If the Ready indicator is blinking, the data is being processed. Just wait until it resumes.
• If the Ready indicator on the control panel is flashing, the
printer is warming up. Wait for a while.
Images are cut off, or excess
pages are printed.
If you are using paper smaller than the paper size selected in
the application, use the same size paper as that selected in the
application. If you cannot load paper of the correct size, use
the reduction function to reduce the image, and then print.
7
See the printer driver Help.
The color of the printout is different from the color on the
computer's display.
• The colors made using color toner are different from
colors displayed on the display in its production system.
The color of the printout is different from the color specified.
If a specific color is missing, turn the power switch off and
on. If this does not solve the problem, contact your sales or
service representative.
Photo images are coarse.
Some applications lower the resolution for making prints.
Color documents are printed in
black and white.
• The printer driver is not set up for color printing.
See the printer driver Help.
• Color gradation might appear differently if [On] is selected for [Toner Saving] on the [Print Quality] tab in the printer
driver's dialog box.
See the printer driver Help.
• Some applications print color files in black and white.
Fine dot pattern does not print.
Change the [Dithering:] setting in the printer driver's dialog
box.
See the printer driver Help.
Solid areas, lines or text are
Select [K (Black)] for [Gray Reproduction (Text/Line Art):] in the
shiny or glossy when created as printer driver's dialog box.
a mixture of cyan, magenta, yel- See the printer driver Help.
low.
85
Troubleshooting
Status
Black gradation is not natural.
Possible Causes, Descriptions, and Solutions
Select [CMY + K] for [Gray Reproduction (Text/Line Art):] in the
printer driver's dialog box.
See the printer driver Help.
Solid lines are printed as broken
lines.
Change the [Dithering:] setting in the printer driver's dialog
box.
See the printer driver Help.
A color is missing or partially
blurred.
• Paper is damp. Use paper that has been stored properly.
See p.23 “Paper and Other Media”.
• Toner is almost depleted. If a toner indicator lights or
flashes, or if an error message appears on the Smart Organizing Monitor dialog box, replace the print cartridge
of the color indicated.
See p.51 “Replacing the Print Cartridge”.
• Condensation may have collected. If rapid change in temperature or humidity occurs, use this printer only after it
has acclimatized.
Color shift occurs.
Log on to Smart Organizing Monitor as an Administrator,
and then click [Adjust] for [Color Registration] on the [Maintenance] tab.
The whole printout is blurred.
• Paper is damp. Use paper that has been stored properly.
See p.23 “Paper and Other Media”.
• Log on to Smart Organizing Monitor as an Administrator, and then select [Mode 1], [Mode 2], or [Mode 3] in the
[Anti-humidity:] list on the [System] tab. Note that if you select [Mode 2] or [Mode 3], the first print takes longer than
subsequent prints to complete.
7
• If you select [Toner Saving] on the [Print Quality] tab in the
printer properties dialog box, printing is generally less
dense.
See the printer driver Help.
• Toner is almost depleted. If a toner indicator lights or
flashes, or if an error message appears on the Smart Organizing Monitor dialog box, replace the print cartridge
of the color indicated.
See p.51 “Replacing the Print Cartridge”.
• Condensation may have collected. If rapid change in temperature or humidity occurs, use this printer only after it
has acclimatized.
White streaks or color streaks
appear.
86
• Toner is almost depleted. If a toner indicator lights or
flashes, or if an error message appears on the Smart Organizing Monitor dialog box, replace the print cartridge
of the color indicated.
See p.51 “Replacing the Print Cartridge”.
Other Printing Problems
Status
Possible Causes, Descriptions, and Solutions
The backs of printed sheets are
blemished.
• When removing a jammed sheet, the inside of the printer
may have become dirtied. Print several sheets until they
come out clean.
• If document size is larger than paper size, e.g. A4 document on B5 paper, the back of the next printed sheet may
be dirtied.
If rubbed with your finger, it
smears out.
The setting of the paper may not be correct. For example, although thick paper is used, the setting for thick paper may
not be set.
• Check the paper settings of this printer.
See p.26 “Types of Paper and Other Media”.
• Check the paper settings of the printer driver.
See the printer driver Help.
The toner has run out and print- When the toner runs out, pressing the {Stop/Start} key allows
ing has stopped.
you to print a few more pages, but the print quality of those
pages cannot be guaranteed.
The toner is powdery and comes
away from the paper, or the
printed image has a matt appearance.
Check if the fusing unit lever is lowered or the grey knobs are
positioned as in the image below.
ASH129S
7
If the problem cannot be solved, contact your sales or service representative.
87
Troubleshooting
Additional Troubleshooting
Problems
Solutions
Strange noise is heard.
If a supply was recently replaced or an option attached in the
area the strange noise is coming from, check the supply or
option is properly attached. If the strange noise persists, contact your sales or service representative.
No e-mail is received when an
Alert occurs, and after resolving
an Alert.
• Confirm [Auto E-mail Notification:] is set to [On] using Web
Image Monitor or Smart Organizing Monitor. See Software Guide.
• When the power is turned off before the e-mail is transmitted, the e-mail will not be received.
• Check the e-mail address set for the destination. If the email was sent but not received, it is possible the destination was incorrect. Also check error mail information
from the e-mail server.
The setting for [Auto E-mail Notifi- After changing the setting, turn the main unit's power off
cation:] on Web Image Monitor and then back on again.
or Smart Organizing Monitor
was changed from [Off] to [On],
but e-mail is not arriving.
When no date information is in- Make the setting for obtaining time information from the
cluded in sent e-mail, the mail
SMTP server. For details, see Software Guide.
server has a malfunction.
7
Note
❒ If the printer is still not operating satisfactorily, contact your sales or service
representative. Consult with the store where the printer was purchased for
information about the location of sales or service representatives.
88
8. Removing Misfed Paper
When Paper is Jammed
If a paper jam occurs, the Alert indicator on the control panel flashes and the following message appears on the Smart Organizing Monitor dialog box:
“Paper Misfeed. Open the indicated cover, and then remove any misfed paper. [Front Cover]”
Open the front cover, and check the following locations (in the order shown) for
the paper jam.
Important
❒ Misfed paper may be covered in toner. Be careful not to get toner on your
hands or clothes.
❒ Toner on prints made after removing misfed paper may be loose (inadequately fused). Make a few test prints until smudges no longer appear.
❒ Do not forcefully remove misfed paper, it will tear. Torn pieces remaining inside the printer will cause further misfeeds and possibly damage the printer.
ASH073S
1. Fusing Unit
3. Transfer Unit
If a paper jam occurs in the fusing unit,
see p.90 “When Paper Jams inside the
Fusing Unit”.
If a paper jam occurs in the transfer unit,
see p.94 “When Paper Jams inside the
Transfer Unit”.
2. Tray
If a paper jam occurs in the tray, see p.92
“When Paper Jams Inside the Tray”.
89
Removing Misfed Paper
When Paper Jams inside the Fusing Unit
If the Alert indicator lights up, paper may be misfed:
A paper misfeed occurs during paper feeding. Open the front cover to remove
the misfed paper.
R CAUTION:
• The inside of this printer becomes very hot. Do not touch the parts labelled
“v” (indicating a hot surface).
• The fusing section of this machine might be very hot. Caution should be taken when removing misfed paper.
Important
❒ Since the surrounding temperature is high around the guide, check for
jammed paper when it gets a little cooler.
A Pull Front Cover Open Lever, and then open the front cover with both
hands carefully.
8
ASH011S
90
When Paper is Jammed
B Lower the blue fusing unit lever, and then pull out the jammed paper carefully.
ASH046S
ASH047S
Pull the paper downward to remove it. Do not pull it upward.
If it is difficult to locate the paper, check for jammed paper by pulling down
the guide.
8
ASH048S
91
Removing Misfed Paper
C Carefully lift the blue fusing unit levers.
ASH049S
D Close the front cover with both hands carefully.
ASH067S
Note
❒ When closing the front cover, push the upper side of the cover firmly. After
closing the cover, check that the error is cleared.
8
When Paper Jams Inside the Tray
If paper becomes jammed in Tray 1 or 2, open the front cover and remove it.
A Pull Front Cover Open Lever, and then open the front cover with both
hands carefully.
ASH011S
92
When Paper is Jammed
B Carefully pull the jammed paper upward and out.
ASH068S
If paper has jammed inside the transfer unit, holding both sides of the paper,
pull the paper carefully forward and out.
ASH069S
C Close the front cover with both hands carefully.
8
ASH067S
Note
❒ Do not pull out the paper tray (Tray 1).
❒ If paper is jammed in Tray 2 but is difficult to locate, pull out Tray 2 to remove it. After removing the paper, carefully push Tray 2 all the way back
inside the printer.
❒ When closing the front cover, push the upper side of the cover firmly. After
closing the cover, check that the error is cleared.
93
Removing Misfed Paper
When Paper Jams inside the Transfer Unit
If a paper misfeed occurs inside the transfer unit.
A paper jam occurs when duplex printing is performed.
A Pull Front Cover Open Lever, and then open the front cover with both
hands carefully.
ASH011S
B Carefully remove misfed paper under the transfer unit.
8
ASH050S
If you cannot find the misfed paper, look inside the printer.
C Close the front cover with both hands carefully.
ASH067S
94
Note
❒ When closing the front cover, push the upper side of the cover firmly. After
closing the cover, check that the error is cleared.
9. Appendix
If the Printer is Not Going to Be Used for a
Long Time
If the printer is going to be inactive for a long time, follow the procedure shown
here.
R WARNING:
• Plug and unplug the power cable with dry hands, or an electric shock
could occur.
R CAUTION:
• The inside of this printer becomes very hot. Do not touch parts labelled “v”
(indicating a hot surface).
• Unplug the power cord from the wall outlet before you move the machine.
While moving the machine, you should take care that the power cord will
not be damaged under the machine.
Preparing the Printer For a Long Period of Inactivity
Use this procedure to prepare the printer for a long period of inactivity with its
power switch turned to off.
Note that not using the following procedure could result in unusual noises when
use of this printer is resumed.
Important
❒ Do not switch off the printer during printing.
A Turn off the power switch.
B Pull out the plug from the socket.
95
Appendix
C Pull Front Cover Open Lever, and then open the front cover with both
hands carefully.
ASH011S
D Lower the blue fusing unit lever.
ASH046S
E Using a coin, turn both gray knobs on the fusing unit 90 degrees counterclockwise (until the slots are horizontally aligned with the
shown in the illustration below).
9
ASH127S
96
marking
If the Printer is Not Going to Be Used for a Long Time
F Carefully lift the blue fusing unit levers.
ASH049S
G Close the front cover with both hands carefully.
ASH111S
Note
❒ This step is not necessary if the printer's power switch is on but the printer
has been inactive for a long time.
9
97
Appendix
Using the Printer Again after it has been Inactive for a Long Period
Use the following procedure to start using the printer again after it has been inactive for a long period.
Important
❒ To avoid damage to the fusing unit's knobs, be sure to turn both knobs back
to their original positions, as shown in the following procedure.
A Plug in the power cable.
B Pull Front Cover Open Lever, and then open the front cover with both
hands carefully.
ASH011S
C Lower the blue fusing unit lever.
9
ASH046S
98
If the Printer is Not Going to Be Used for a Long Time
D Using a coin, turn both gray knobs on the fusing unit 90 degrees clockwise
(until the slots are vertically aligned with the
tration below).
marking shown in the illus-
ASH128S
E Carefully lift the blue fusing unit levers.
ASH049S
F Close the front cover with both hands carefully.
9
ASH111S
G Turn the power switch to On.
99
Appendix
Moving and Transporting the Printer
R CAUTION:
• The printer weighs approximately 23 kg (50.6 lb.). When moving the printer,
use the inset grips on both sides, and lift slowly in pairs. The printer will
break or cause injury if dropped.
• Unplug the power cord from the wall outlet before you move the machine.
While moving the machine, you should take care that the power cord will
not be damaged under the machine.
• When you disconnect the power plug from the wall outlet, always pull the
plug (not the cable).
• When moving the printer after use, do not take out any of the toners, nor
the waste toner bottle to prevent toner spill inside the machine.
Repack the printer in its original packing materials for transporting.
Important
❒ Be sure to disconnect all cables from the printer before transporting it.
❒ The printer is a precision piece of machinery. Be sure to handle it carefully
when moving it.
❒ If the optional paper feed unit is installed, remove it from the printer, and
then move them separately.
❒ Do not grip on the tray area when lifting the printer.
Note
❒ The printer weighs approximately 23 kg (50.6 lb.).
9
100
Moving and Transporting the Printer
Moving the Printer
R CAUTION:
• Unplug the power cord from the wall outlet before you move the machine.
While moving the machine, you should take care that the power cord will
not be damaged under the machine.
Moving the printer in a short distance
A Be sure to check the following points:
• The power switch is turned off.
• The power cable is unplugged from the wall outlet.
• The interface cable is unplugged from the printer.
B If the external option is installed, remove it.
C Lift the printer with two people by using the inset grips on both side of the
printer, and then move it horizontally to the place where you want to install
it.
9
ASH051S
D If you remove the option, reinstall it.
Note
❒ Be sure to move the printer horizontally. To prevent toner from scattering,
move the printer carefully.
❒ If the optional paper feed unit is installed, remove it from the printer, and
then move them separately.
101
Appendix
Consumables
R CAUTION:
• Our products are engineered to meet high standards of quality and functionality, and we recommend that you use only the expendable supplies available at an authorized dealer.
Print Cartridge
Print cartridge
Average printable number of pages per cartridge *1
Black
2,000 pages
Cyan
2,000 pages
Magenta
2,000 pages
Yellow
2,000 pages
*1
A4/letter 5% test chart, printing continuously in monochrome/color only.
The number of printable pages varies depending on which of the two different
types of print cartridge you have installed.
Note
❒ If print cartridges are not changed when necessary, printing will become impossible. We recommend keeping a stock of bottles or purchasing them soon.
❒ The actual number of printable pages varies depending on the image volume
and density, number of pages to be printed at a time, paper type and paper
size used, and environmental conditions such as temperature and humidity.
❒ Print cartridges may need to be changed sooner than indicated above due to
deterioration over the period of use.
❒ Print cartridges (consumables) are not covered by warranty. However, if
there is a problem, contact the store where they were purchased.
❒ When you first use this printer, use the four print cartridges packaged with
the printer.
❒ The supplied print cartridge is good for approximately 1,000 pages.
❒ This printer routinely performs cleaning and uses toner during this operation
to maintain quality.
❒ To prevent a leaning malfunction, you may need to replace a print cartridge
even if it is not empty.
❒ If the toner has run out but you urgently need to continue printing, see p.82
“Other Printing Problems”.
9
102
Consumables
Waste Toner Bottle
Name
Waste Toner Bottle SP C220
*1
Average printable number of pages *1
25,000 pages
A4/letter 5% test chart, 3 pages / job, printing in 50% monochrome/color.
Note
❒ The actual number of printable pages varies depending on the image volume
and density, number of pages to be printed at a time, paper type and paper
size used, and environmental conditions such as temperature and humidity.
❒ If the waste toner bottles are not changed when necessary, printing will become impossible. We recommend keeping a stock of bottles or purchasing
them soon.
9
103
Appendix
Specifications
R WARNING:
• The supplied power cord is for use with this equipment only. Do not
use with other appliances. Doing so may result in fire, electric shock,
or injury.
Main Unit
❖ Configuration
Desktop
❖ Print Process
Laser beam scanning & Electrophotographic printing
4 drums tandem method
❖ First Print Speed
Monochrome: 14 sec or less (A4K/8 1/2 × 11K)
Color: 14 sec or less (A4K/8 1/2 × 11K)
Note
❒ If the printer has not been used for a while, there may be a short delay before the first page starts printing.
❖ Printing Speed
• SP C220N:
Monochrome: maximum 16 pages per minute (A4K/8 1/2 × 11K)
Color: maximum 16 pages per minute (A4K/8 1/2 × 11K)
• SP C221N/SP C222DN:
Monochrome: maximum 20 pages per minute (A4K), 21 pages per minutes (8 1/2 × 11K)
Color: maximum 20 pages per minute (A4K), 21 pages per minutes (8 1/2
× 11K)
Printing speed may vary depending on the setting up environment.
9
❖ Resolution
600 × 600 dpi Speed (1bit)
600 × 600 dpi Standard (2bits)
600 × 600 dpi Fine (4bits)
❖ Paper size
See p.23 “Paper and Other Media”
❖ Paper Weight
See p.23 “Paper and Other Media”
104
Specifications
❖ Media Type
See p.23 “Paper and Other Media”
❖ Paper Output Capacity
Standard 150 sheets (80 g/m2, 20 lb.)
❖ Paper Input Capacity
• SP C220N:
Standard Paper Tray
250 sheets *1
Bypass Tray
1 *1
*1 : Paper weight: 80 g/m2 (20 lb. bond)
• SP C221N/SP C222DN:
Standard Paper Tray
250 sheets *1
Bypass Tray
1 *1
Optional Paper Feed Units
500 sheets *1
*1 : Paper weight: 80 g/m2 (20 lb. bond)
❖ Power Source
•
220-240 V, 6A or more, 50/60 Hz
•
120 V, 11 A or more, 60 Hz
❖ Power Consumption
Printing
1300 W or less (No power is used during
power off.)
Energy Saver
15 W or less
9
❖ Warm-up Time
Less than 51 seconds (23 °C, 71.6 F) *1
*1
When no error is occurred.
❖ Dimensions
Width
Printer only (tray not
extended)
Depth
Height
400 mm (15.8 inches) 450 mm (17.8 inches) 320 mm (12.8 inches)
❖ Weight
Approximately 23 kg (50.6 lb.) (print cartridges included)
105
Appendix
❖ Noise Emission *1
Sound Power Level
Mainframe only
Stand-by
43 dB (A)
During Printing
Monochrome: 63 dB (A)
Color: 64 dB (A)
Sound Pressure Level *2
Mainframe only
Stand-by
35 dB (A)
During Printing
57 dB (A)
*1 : The preceding measurements made in accordance with ISO7779 are actual
values.
*2 : Measured at the position of a bystander.
❖ Memory
• SP C220N:
Standard 64M
• SP C221N/SP C222DN:
Standard 128 MB, up to 320 MB (with the optional memory unit)
❖ Interface
• Ethernet (10/100 Base-TX)
• USB2.0
It requires a USB computer port and cable that support USB 2.0.
• USB Host (1.1)
9
Note
❒ USB Host (1.1) is only available for the SP C222DN model printer.
❖ Printer Language
• SP C220N:
DDST
• SP C221N/SP C222DN:
PJL, PCL 5c/6, PostScript Level 3, PictBridge
Note
❒ PictBridge is only available for the SP C222DN model printer.
106
❖ Fonts
• SP C221N/SP C222DN:
PCL
41 Symbolset, 35 Intellifonts, 10 TrueType fonts, 1 bitmap font.
PostScript 3
80 fonts
Specifications
Options
Paper Feed Unit TK1010
❖ Paper size
A4K and Letter (81/2 × 11 inches) K
❖ Dimensions (W × D × H)
400 × 450 × 127 mm (15.8 × 17.8 × 5 inches)
❖ Paper weight
60 - 105 g/m2, (16 - 28 lb.)
❖ Weight
Less than 4 kg (8.8 lb.)
Memory Unit Type F 256MB
❖ Module Type
DDR-DIMM (Double Data Rate Dual Inline Memory Module)
❖ Memory Type
DDR-SDRAM (Double Data Rate Synchronous Dynamic RAM)
❖ Number of Pins
100
9
107
INDEX
A
Additional troubleshooting, 88
Appendix, 100
Attaching Memory Unit Type F 256MB
(DDR-SDRAM Module), 16
Attaching Paper Feed Unit TK1010, 14
C
Cleaning the friction pad, 66
Cleaning the paper feed roller, 66
Cleaning the printer, 63
Cleaning the registration roller, 69
Cleaning the toner density sensor, 64
Connecting the printer
network connection, 19
USB connection, 21
Consumables, 102
E
Ethernet, 19
Ethernet port, 19
F
Friction pad, 66
G
Guide to the printer
control panel, 4
exterior, 1
exterior - rear view, 2
inside, 3
H
How to read this manual, iii
I
Install the operating instructions, v
L
Loading paper, 25
optional paper feed unit, 34, 46
tray 1, 34
M
Memory Unit Type F 256MB, 16, 107
Moving and transporting the printer, 100
N
Network, 19
O
Options, 107
Other printing problems, 82
P
Paper and other media, 23
Paper feed roller, 66
Paper Feed Unit TK1010, 14, 107
Paper not supported, 31
Paper recommendations, 25
Print area, 32
Print cartridge, 51, 102
Printer does not print, 78
R
Registration roller, 69
Remove misfed paper
fusing unit, 90
optional paper feed unit, 92
transfer unit, 94
tray 1, 92
tray 2, 92
Removing misfed paper, 89
Replacing consumables, 51
Replacing the print cartridge, 51
Replacing the waste toner bottle, 56
S
Setting the paper type, 26
Specifications, 104
Specifying standard size paper
optional paper feed unit, 34
tray 1, 34
Storing paper, 25
T
Toner density sensor, 64
Types of paper, 26
108
U
USB port, 21
W
Waste toner bottle, 56, 103
109
110
GB
GB
EN
USA
G165-8606
In accordance with IEC 60417, this machine uses the following symbols for the main power switch:
a means POWER ON.
b means POWER OFF.
Trademarks
Microsoft, Windows, Windows Server, and Windows Vista are registered trademarks of Microsoft Corporation in the United States and/or other countries.
Adobe® and PostScript® are registered trademarks of Adobe Systems Incorporated.
PCL® is a registered trademark of Hewlett-Packard Company.
Apple, AppleTalk, EtherTalk, Macintosh, Mac OS, and True Type are trademarks of Apple Computer,
Inc., registered in the U.S. and other countries.
PictBridge is a trademark.
Other product names used herein are for identification purposes only and might be trademarks of their
respective companies. We disclaim any and all rights to those marks.
The proper names of the Windows operating systems are as follows:
The product names of Windows® 2000 are as follows:
Microsoft® Windows® 2000 Professional
Microsoft® Windows® 2000 Server
Microsoft® Windows® 2000 Advanced Server
The product names of Windows® XP are as follows:
Microsoft® Windows® XP Professional
Microsoft® Windows® XP Home Edition
The product names of Windows Vista™ are as follows:
Microsoft® Windows Vista™ Ultimate
Microsoft® Windows Vista™ Enterprise
Microsoft® Windows Vista™ Business
Microsoft® Windows Vista™ Home Premium
Microsoft® Windows Vista™ Home Basic
The product names of Windows Server® 2003 are as follows:
Microsoft® Windows Server® 2003 Standard Edition
Microsoft® Windows Server® 2003 Enterprise Edition
Microsoft® Windows Server® 2003 Web Edition
The product names of Windows Server 2003 R2 are as follows:
Microsoft® Windows Server® 2003 R2 Standard Edition
Microsoft® Windows Server® 2003 R2 Enterprise Edition
Note
❒ PostScript 3 in this manual stands for "Adobe PostScript 3 Emulation".
Copyright © 2007
Operating Instructions Hardware Guide
GB GB
EN USA G165-8606
Operating Instructions
Software Guide
1
Preparing for Printing
2
Setting Up the Printer Driver
3
Other Print Operations
4
Direct Printing from a Digital Camera (PictBridge)
5
Monitoring and Configuring the Printer
6
Using a Print Server
7
Special Operations under Windows
8
Mac OS Configuration
9
Appendix
Read this manual carefully before you use this machine and keep it handy for future reference. For safe and correct use, be sure to read “Safety
Information” before using the machine.
Introduction
This manual contains detailed instructions and notes on the operation and use of this machine. For your
safety and benefit, read this manual carefully before using the machine. Keep this manual in a handy
place for quick reference.
Important
Contents of this manual are subject to change without prior notice. In no event will the company be liable for
direct, indirect, special, incidental, or consequential damages as a result of handling or operating the machine.
Do not copy or print any item for which reproduction is prohibited by law.
Copying or printing the following items is generally prohibited by local law:
bank notes, revenue stamps, bonds, stock certificates, bank drafts, checks, passports, driver's licenses.
The preceding list is meant as a guide only and is not inclusive. We assume no responsibility for its completeness or accuracy. If you have any questions concerning the legality of copying or printing certain
items, consult with your legal advisor.
Caution:
Use of controls or adjustments or performance of procedures other than those specified in this manual
might result in hazardous radiation exposure.
Trademarks
Microsoft, Windows, Windows NT are registered trademarks of Microsoft Corporation in the United
States and/or other countries.
Adobe®, PostScript®, Acrobat®, PageMaker® and Adobe Type Manager are registered trademarks of
Adobe Systems Incorporated.
PCL® is a registered trademark of Hewlett-Packard Company.
Citrix® and MetaFrame® are registered trademarks of Citrix Systems, Inc
NetWare are registered trademarks of Novell, Inc.
Apple, AppleTalk, EtherTalk, Macintosh, Mac OS and TrueType are trademarks of Apple Computer,
Inc., registered in the U.S. and other countries.
Netscape and Netscape Navigator are registered trademarks of Netscape Communications Corporation.
PictBridge is a trademark.
Other product names used herein are for identification purposes only and might be trademarks of their
respective companies. We disclaim any and all rights in those marks.
The proper names of the Windows operating systems are as follows:
• The product name of Windows 98 is Microsoft® Windows® 98.
•
•
•
•
•
•
The product name of Windows Me is Microsoft® Windows® Millennium Edition (Windows Me).
The product names of Windows 2000 are as follows:
Microsoft® Windows® 2000 Advanced Server
Microsoft® Windows® 2000 Server
Microsoft® Windows® 2000 Professional
The product names of Windows XP are as follows:
Microsoft® Windows® XP Professional
Microsoft® Windows® XP Home Edition
The product names of Windows Server 2003 are as follows:
Microsoft® Windows Server® 2003 Standard Edition
Microsoft® Windows Server® 2003 Enterprise Edition
Microsoft® Windows Server® 2003 Web Edition
The product names of Windows NT 4.0 are as follows:
Microsoft® Windows NT® Server 4.0
Microsoft® Windows NT® Workstation 4.0
Note
❒ PostScript 3 in this manual stands for "Adobe PostScript 3 Emulation".
Notes:
Some illustrations in this manual might be slightly different from the machine.
Certain options might not be available in some countries. For details, please contact your local dealer.
Depending on which country you are in, certain units may be optional. For details, please contact your local dealer.
Manuals for This Printer
For particular functions, see the relevant parts of the manual.
❖ Safety Information
Provides information on safe usage of this machine. To avoid injury and prevent damage to the machine, be sure to read this.
❖ Quick Installation Guide
Contains procedures for removing the printer from its box and connecting it
to a computer.
❖ Hardware Guide
Contains information about paper and procedures such as installing options,
replacing consumables, responding to error messages, and resolving jams.
❖ Software Guide (This manual)
Contains procedures for using this machine in a network environment and
utilizing the software.
i
Description for the Specified Model
In this manual, the following items explain about the printer for the specified
models:
This explains about the 220–240 V model printer. You can identify the model by
checking the label on the rear of the printer.
Read if you purchase this model.
This explains about the 120 V model printer. You can identify the model by
checking the label on the rear of the printer.
Read if you purchase this model.
Note
❒ You can identify the printer's model by checking the label on the rear of the
printer as shown.
ASH074S
ii
How to Read This Manual
Symbols
This manual uses the following symbols:
Indicates important safety notes.
Ignoring these notes could result in serious injury or death. Be sure to read these
notes. They can be found in the “Safety Information” section of About This Printer.
Indicates important safety notes.
Ignoring these notes could result in moderate or minor injury, or damage to the
machine or to property. Be sure to read these notes. They can be found in the
“Safety Information” section of About This Printer.
Indicates points to pay attention to when using the machine, and explanations
of likely causes of paper misfeeds, damage to originals, or loss of data. Be sure
to read these explanations.
Indicates supplementary explanations of the printer’s functions, and instructions on resolving user errors.
This symbol is located at the end of sections. It indicates where you can find further relevant information.
[]
Indicates the names of keys that appear on the printer’s display panel.
{}
Indicates the names of keys on the printer’s control panel.
iii
TABLE OF CONTENTS
Manuals for This Printer.........................................................................................i
Description for the Specified Model.....................................................................ii
How to Read This Manual ....................................................................................iii
Symbols .................................................................................................................... iii
1. Preparing for Printing
Confirming the Connection Method.....................................................................1
Network Connection...................................................................................................1
Local Connection .......................................................................................................2
Selecting the Installation Method.........................................................................3
Installing the Printer Driver under a Network Environment...............................4
Windows 98 SE/Me....................................................................................................4
Windows 2000/XP or Windows Server 2003 .............................................................8
Installing the Printer Driver to Use As a Windows Network Printer..........................14
Installing the Printer Driver Using USB .............................................................15
Installing the PCL and PostScript 3 Printer Driver (Windows Me) ...........................15
Installing the PCL Printer Driver (Windows 2000, XP and Windows Server 2003) .....16
Installing the PostScript 3 Printer Driver (Windows 2000) .......................................18
Installing the PostScript 3 Printer Driver (Windows XP and Windows Server 2003)...19
Troubleshooting USB ...............................................................................................20
If a Message Appears during Installation ..........................................................21
Making Option Settings for the Printer ..............................................................22
Conditions for Bidirectional Communication ............................................................ 22
If Bidirectional Communication Is Disabled..............................................................23
2. Setting Up the Printer Driver
PCL - Accessing the Printer Properties.............................................................25
Windows 98 SE/Me - Making Printer Settings .........................................................25
Windows 2000 - Making Printer Settings .................................................................26
Windows XP and Windows Server 2003 - Making Printer Settings .........................28
PostScript 3 - Setting Up for Printing ................................................................30
Windows 98 SE/Me - Accessing the Printer Properties ...........................................30
Windows 2000 - Accessing the Printer Properties ...................................................31
Windows XP, Windows Server 2003 - Making Printer Settings ...............................33
3. Other Print Operations
iv
Form Feed.............................................................................................................35
Performing Form Feed .............................................................................................35
Canceling a Print Job ...............................................................................................35
Canceling a Print Job ..........................................................................................36
Canceling a Print Job Using the Control Panel ........................................................36
Windows - Canceling a Print Job from the Computer .............................................. 36
Collate ...................................................................................................................37
Cover.....................................................................................................................38
Watermark ............................................................................................................39
Manual Duplex...................................................................................................... 40
Memory Capacity and Paper Size.......................................................................41
4. Direct Printing from a Digital Camera (PictBridge)
What Is PictBridge? .............................................................................................43
PictBridge Printing ..............................................................................................44
What Can Be Done on This Printer ....................................................................45
Paper Size................................................................................................................45
Image Print Size.......................................................................................................45
Exiting PictBridge ................................................................................................46
When PictBridge Printing Does Not Work.........................................................47
5. Monitoring and Configuring the Printer
Using Web Image Monitor...................................................................................49
Displaying Top Page ................................................................................................50
Displaying the Printer Status....................................................................................51
About Menu and Mode.............................................................................................51
Access in the Administrator Mode............................................................................53
Configuring the Printer Settings ...............................................................................53
Changing the Login Information ...............................................................................56
Displaying Web Image Monitor Help........................................................................56
Using Smart Organizing Monitor........................................................................57
Installing Smart Organizing Monitor .........................................................................57
Displaying the Smart Organizing Monitor Dialog Box .............................................. 58
Displaying the Printer Status....................................................................................58
Displaying the Printer Information ............................................................................60
Printer Configuration ................................................................................................62
Printer Status Notification by E-Mail..................................................................65
Mail Authentication...................................................................................................66
SNMP.....................................................................................................................67
Reading the Configuration Page ........................................................................68
6. Using a Print Server
Preparing Print Server.........................................................................................71
7. Special Operations under Windows
Printing Files Directly from Windows ................................................................73
Setup........................................................................................................................73
Using a Host Name Instead of an IPv4 Address......................................................73
Printing Commands..................................................................................................75
v
8. Mac OS Configuration
Mac OS X ..............................................................................................................77
Installing the PostScript 3 Printer Driver ..................................................................77
Setting Up the PPD File ........................................................................................... 77
Setting Up Options ...................................................................................................78
Mac OS X - Setting Up for Printing .......................................................................... 78
Mac OS X - Canceling a Print Job from the Computer ............................................79
Using USB Interface.................................................................................................79
Changing to EtherTalk .............................................................................................80
Configuring the Printer........................................................................................81
Using PostScript 3 ...............................................................................................82
Using Smart Organizing Monitor........................................................................85
Installing Smart Organizing Monitor .........................................................................85
Displaying the Smart Organizing Monitor Dialog Box .............................................. 85
Displaying the Printer Status....................................................................................86
Displaying the Printer Information ............................................................................86
Printer Configuration ................................................................................................88
9. Appendix
Software and Utilities Included on the CD-ROM ...............................................91
Printer Drivers for this Printer...................................................................................91
Smart Organizing Monitor ........................................................................................ 92
TCP/IP Port Type P9100..........................................................................................92
Cautions to Take When Using in a Network......................................................93
Using DHCP.............................................................................................................93
Using Adobe PageMaker Version 6.0, 6.5, or 7.0 ..............................................94
When Using Windows Terminal Service/MetaFrame........................................95
Operating Environment ............................................................................................95
Supported Printer Drivers.........................................................................................95
Limitations ................................................................................................................95
INDEX......................................................................................................... 97
vi
1. Preparing for Printing
Confirming the Connection Method
This printer supports network and local connection.
Before installing the printer driver, check how the printer is connected. Follow
the driver installation procedure that is appropriate to the connection method.
Network Connection
This printer can be used as a Windows printing port or network printer.
Using this printer as the Windows printing port
Network connections can be established via Ethernet.
ASH100S
❖ Operating system
Windows 98 SE/Me/2000/XP, and Windows Server 2003
❖ Connection method
Ethernet (10baseT/100baseTX)
❖ Available ports
TCP/IP Port Type P9100 (Windows 98 SE/Me)
Standard TCP/IP (Windows 2000/XP and Windows Server 2003)
Reference
For details about how to use this printer as the Windows printing port, see p.4
“Installing the Printer Driver under a Network Environment”.
1
Preparing for Printing
Using as a network printer
This printer can be used as the Windows network printer, the NetWare print
server, or the NetWare remote printer.
1
ASH110S
Reference
For details about how to use this printer as a Windows network printer, see
p.14 “Installing the Printer Driver to Use As a Windows Network Printer”.
Local Connection
Local connections can be established via USB connections.
Reference
For details about how to install the printer driver, see p.15 “Installing the
Printer Driver Using USB”.
2
Selecting the Installation Method
Selecting the Installation Method
Use the following tables to find the appropriate installation method.
In the table for the printer driver you want to install, select the printer connection method and operating system of your computer. Then, you can find on
which page the appropriate installation method is described.
1
❖ PCL 5c or PCL 6 printer driver
Connection method
Operating system
See
Network
Windows 98 SE/Me
p.4 “Windows 98 SE/Me”
Windows 2000/XP and Win- p.8 “Windows 2000/XP or
dows Server 2003
Windows Server 2003”
Shared printer
Windows 2000/XP and Win- p.14 “Installing the Printer
dows Server 2003
Driver to Use As a Windows
Network Printer”
USB
Windows Me
p.15 “Installing the PCL and
PostScript 3 Printer Driver
(Windows Me)”
Windows 2000/XP and Win- p.16 “Installing the PCL
dows Server 2003
Printer Driver (Windows
2000, XP and Windows Server 2003)”
❖ PostScript 3 printer driver
Connection method
Operating system
See
Network
Windows 98 SE/Me
p.4 “Windows 98 SE/Me”
Windows 2000/XP and Win- p.8 “Windows 2000/XP or
dows Server 2003
Windows Server 2003”
Shared printer
Windows 2000/XP and Win- p.14 “Installing the Printer
dows Server 2003
Driver to Use As a Windows
Network Printer”
USB
Windows Me
p.15 “Installing the PCL and
PostScript 3 Printer Driver
(Windows Me)”
Windows 2000/XP and Win- p.16 “Installing the PCL
dows Server 2003
Printer Driver (Windows
2000, XP and Windows Server 2003)”
3
Preparing for Printing
Installing the Printer Driver under a
Network Environment
1
This section explains how to install the printer driver for using this printer in a
network environment.
Install TCP/IP Port Type P9100 to use this printer via TCP/IP port under Windows 98 SE/Me.
Windows 98 SE/Me
This section explains how to install the printer driver under Windows 98 SE/Me
in a network environment.
The following three steps are required for Windows 98 SE/Me:
A Installing the printer driver
B Installing TCP/IP Port Type P9100
C Configuring TCP/IP Port Type P9100
Note
❒ If TCP/IP Port Type P9100 is already installed and you are installing the PostScript 3 printer driver, TCP/IP Port Type P9100 can be automatically configured during the printer driver installation.
Reference
For details about installing the PCL Printer driver, see p.4 “Installing the PCL
printer driver”.
For details about installing the PostScript 3 printer driver, see p.5 “Installing
the PostScript 3 printer driver”.
For details about installing TCP/IP Port Type P9100, see p.6 “Installing
TCP/IP Port Type P9100”.
For details about configuring TCP/IP Port Type P9100, see p.7 “Configuring
TCP/IP Port Type P9100”.
Installing the PCL printer driver
A Quit all applications currently running.
B Insert the CD-ROM into the CD-ROM drive.
The installer starts.
C Select an interface language, and then click [OK].
The default interface language is English.
D Click [PCL 5c Printer Driver] or [PCL 6 Printer Driver].
4
The software license agreement appears.
Installing the Printer Driver under a Network Environment
E After reading the agreement, click [I accept the agreement.], and then click
[Next >].
F In the [Method to install printer driver] dialog box, click [Add a new printer].
1
Add Printer Wizard appears.
G Click [Next >].
H Select the printer model you want to use, and then click [Next >].
If necessary, click [Configure port] to make port settings.
I Click [Finish].
The printer driver is automatically installed via port LPT1.
Change the port settings to use TCP/IP Port Type P9100.
For details about changing the port settings to use TCP/IP Port Type P9100,
see "Configuring TCP/IP Port Type P9100".
Note
❒ Auto Run may not work with certain operating system settings. If this happens, launch “Setup.exe” on the CD-ROM root directory.
❒ To stop installation of the selected software, click [Cancel] before installation is complete.
❒ A message appears if there is a newer version of the printer driver already
installed. To install the printer driver, use [Add Printer]. See p.21 “If a Message Appears during Installation”.
Reference
For details about changing the port settings to use TCP/IP Port Type
P9100, see p.7 “Configuring TCP/IP Port Type P9100”.
Installing the PostScript 3 printer driver
A Quit all applications currently running.
B On the [Start] menu, point to [Settings], and then click [Printers].
The [Printer] windows appears.
C Double-click the Add Printer icon.
Add Printer Wizard starts.
D Click [Next >].
E Click [Local Printer], and then click [Next >].
A dialog box for selecting the printer manufacturer and model name appears.
F Click [Have Disk].
The [Install From Disk] dialog box appears.
5
Preparing for Printing
G Insert the CD-ROM into the CD-ROM drive.
If the [Printer Drivers and Utilities] dialog box appears, click [Cancel].
H In the [Install From Disk] dialog box, click [Browse].
I Specify the location where the INF file is located, and then click [OK].
1
If the CD-ROM drive is D, the INF file is stored in D:\DRIVERS\PS\WIN9X_ME\(Language)\DISK1\*.inf.
J In the [Install From Disk] dialog box, check the location of the INF file is displayed in the [Copy manufacturer's files from] box, and then click [OK].
K Select the printer you want to use, and then click [Next >].
L Select [TCP/IP Port Type P9100] from the list of available ports, and then click [Next >].
If necessary, click [Configure Port] to make port settings.
M Change the printer name if you want, and then click [Next >].
Select the [Yes] check box to configure the printer as default.
N Specify whether or not to print a test page, and then click [Finish].
O Restart the computer.
P In the [Printers] window, click the icon of the printer you want to use. On
the [File] menu, click [Properties].
Q Click the [Details] tab, and then click [Port Settings…].
The [TCP/IP Port Type P9100 Configuration] dialog box appears.
R Configure the port setting, and then click [OK].
Note
❒ Auto Run may not work with certain operating system settings. If this happens, launch “Setup.exe” on the CD-ROM root directory.
❒ The printer driver with the selected language will be installed.
❒ To stop installation of the printer driver, click [Cancel] before installation is
complete.
Installing TCP/IP Port Type P9100
Follow the procedure below to install TCP/IP Port Type P9100 on the computer.
A Quit all applications currently running.
B Insert the CD-ROM into the CD-ROM drive.
The installer starts.
6
C Click [Browse This CD-ROM].
D Right-click "Monitor.inf" in PORT, and then click [Install].
Installing the Printer Driver under a Network Environment
E If the [Copying Files...] dialog box appears, click [Browse...], navigate to the
[Port] folder, and then click [OK].
F Restart the computer.
1
Configuring TCP/IP Port Type P9100
Follow the procedure below to change the port settings to use TCP/IP Port Type
P9100 after the installation of the printer driver.
Important
❒ Before installing TCP/IP Port Type P9100, you need to check the printer's IP
address. You can check it using the test page. For details about printing the
test page, see p.12 “Checking a printer's IP address and MAC address”.
A In the [Printers] window, click the icon of the printer you want to use. On
the [File] menu, click [Properties].
B Click the [Details] tab, and then click [Add Port].
C Select [Other], click [TCP/IP Port Type P9100], and then click [OK].
Add TCP/IP Port Type P9100 Wizard starts.
D Click [Next >].
E Enter the printer's IP address that is printed on the test page, and then click [Next >].
F Click [Finish].
Note
❒ When entering the IP address, enter the port name in the [Port Name:] box,
if necessary.
Configuring the port settings
A In the [Printers] window, click the icon of the printer you want to use. On
the [File] menu, click [Properties].
B Click the [Details] tab, and then click [Port Settings…].
The [TCP/IP Port Type P9100 Configuration] dialog box appears.
• You can select either Raw or LPR port to print.
• You can change the IP address of the port.
Note
❒ If the IP address of the machine is changed, you must change the port settings also.
• Both Raw and LPR support SNMP.
Important
❒ Do not change the port number, timeout setting, and queue name.
7
Preparing for Printing
Windows 2000/XP or Windows Server 2003
This section explains how to install the printer driver under Windows 2000/XP
or Windows Server 2003 in a network environment.
The following tables briefly describe the operation flow for each printer driver
installation:
1
❖ PCL printer driver
Status
First Step
Second Step
See
Network printer
Follow the instructions on the screen.
search has succeeded.
p.9 “Installing the
PCL printer driver”.
Network printer
search has failed.
• For details about
printing the test
page or the configuration page, see
p.12 “Checking a
printer's IP address and MAC
address”.
Print the test page or
the configuration
page to check the
printer's IP address.
• If the printer's IP
address is appropriate
⇒Change the port
settings.
• For details about
changing the port
settings, see p.13
“Reconfiguring
the port settings”.
• If the printer's IP
address is not appropriate
⇒Reconfigure the
printer's IP address.
• For details about
reconfiguring the
printer's IP address, when using
network connection, see p.12
“Reconfiguring a
printer's IP address - network
connection”.
• For details about
reconfiguring the
printer's IP address, when using
local connection,
see p.13 “Reconfiguring a printer's
IP address - local
connection”.
8
Installing the Printer Driver under a Network Environment
❖ PostScript 3 printer driver
First Step
Second Step
See
Print the test page or the configuration page to check the
printer's IP address.
Install the printer driver using
Standard TCP/IP port, and
then set the printer's IP address.
For details about printing the
test page or the configuration
page, see p.12 “Checking a
printer's IP address and MAC
address”.
1
❖ Changing the printer's IP address
If the IP address that is printed on the test page or the configuration page is not
appropriate, you can change it using Smart Organizing Monitor. For details,
see p.12 “Reconfiguring a printer's IP address - network connection” and p.13
“Reconfiguring a printer's IP address - local connection”.
Installing the PCL printer driver
Important
❒ To install this printer driver under Windows 2000/XP Professional or Windows Server 2003, you must have an account that has Manage Printers permission. Log on as an Administrators or Power Users group member.
A Quit all applications currently running.
B Insert the CD-ROM into the CD-ROM drive.
The installer starts.
C Select an interface language, and then click [OK].
The default interface language is English.
D Click [PCL 5c Printer Driver] or [PCL 6 Printer Driver].
The software license agreement appears.
E After reading the agreement, click [I accept the agreement.], and then click
[Next >].
F In the [Method to install printer driver] dialog box, click [Add a new printer], select
the [Search for network printers.] check box, and then click [Next >].
If the search fails, the printer driver is installed via port LPT1. When the installation is complete, check the printer's IP address, and then make any necessary changes to the IP address settings.
G Select the printer you want to use from the list of found printers, and then
click [Next >].
A dialog box for selecting the printer driver appears.
H Select the printer driver you want to use, and then click [Finish].
9
Preparing for Printing
I If a message prompting you to restart the client computer appears, click
[Yes, restart now.] or [No, restart later.], and then click [Finish].
Note
❒ When you click [Finish], the [Digital Signature Not Found] dialog box may appear. To continue the installation, click [Yes].
1
❒ Auto Run may not work with certain operating system settings. If this happens, launch “Setup.exe” on the CD-ROM root directory.
❒ To stop installation of the selected software, click [Cancel] before installation is complete.
❒ A message appears if there is a newer version of the printer driver already
installed. If there is, you cannot install the printer driver using Auto Run.
If you still want to install the printer driver, use [Add Printer]. See p.21 “If a
Message Appears during Installation”.
Reference
For details about the network connection, see Hardware Guide.
For details about checking the printer's IP address, see p.12 “Checking a
printer's IP address and MAC address” .
Installing the PostScript 3 printer driver
Important
❒ Before installing the PostScript 3 printer driver, print the configuration page
to check the printer's IP address. For details, see p.12 “Checking a printer's IP
address and MAC address”.
❒ To install this printer driver under Windows 2000/XP Professional or Windows Server 2003, you must have an account that has Manage Printers permission. Log on as an Administrators or Power Users group member.
A Quit all applications currently running.
B Insert the CD-ROM into the CD-ROM drive.
The installer starts.
C Select an interface language, and then click [OK].
The default interface language is English.
D Click [PostScript 3 Printer Driver].
Add Printer Wizard starts.
E Click [Next >].
F Click [Local printer], and then click [Next >].
G Click [Create a new port:].
10
Installing the Printer Driver under a Network Environment
H Click [Standard TCP/IP Port], and then click [Next >].
The [Add Standard TCP/IP Printer Port Wizard] dialog box appears.
I Enter the printer's IPv4 address in the [Port Name] box, and then click [OK].
1
The IPv4 address you enter here is the address you have checked on the configuration page.
The [Add Standard TCP/IP Printer Port Wizard] dialog box appears.
J Click [Finish].
K Check that the name of the printer whose driver you want to install is selected, and then click [Next >].
L Change the printer name if you want, and then click [Next >].
Select the [Yes] check box to configure the printer as default.
M Specify whether or not to share the printer, and then click [Next >].
N Specify whether or not to print a test page, and then click [Next >].
O Click [Finish].
The printer driver installation starts.
Note
❒ When you click [Finish], the [Digital Signature Not Found] dialog box may appear. To continue the installation, click [Yes].
❒ Auto Run may not work with certain operating system settings. If this happens, launch “Setup.exe” on the CD-ROM root directory.
❒ The printer driver with the selected language will be installed.
❒ To stop installation of the selected software, click [Cancel] before installation is complete.
Reference
For details about checking the printer's IP address, see p.12 “Checking a
printer's IP address and MAC address”.
11
Preparing for Printing
Checking a printer's IP address and MAC address
Print test page to check a printer's IP address and MAC address.
To print the test page, while pressing down the {Job Reset} key, turn on the power switch. Keep the {Job Reset} key held down until the Alert and Ready indicators light up.
If you want to check a printer's IP address only, print the configuration page using Smart Organizing Monitor. For details, see p.61 “Printing the printer configurations”.
1
Note
❒ To change the printer's IP address, use Smart Organizing Monitor. For details, see p.12 “Reconfiguring a printer's IP address - network connection” or
p.13 “Reconfiguring a printer's IP address - local connection”.
Reconfiguring a printer's IP address - network connection
Follow the procedure below to change a IP address of the printer that is connected via Ethernet.
Important
❒ To reconfigure a printer's IP address, Smart Organizing Monitor must be installed on the computer.
❒ To perform the following procedure, you must return the printer's settings to
their factory-set defaults. To do this, turn the printer's power switch off, press
and hold down the {Job Reset} and {Stop/Start} keys, and then turn the printer's power switch back ON. Keep both keys held down until the Alert and
Ready indicators light up.
A Connect the printer and computer using an Ethernet cable.
B Start Smart Organizing Monitor.
C Click the [User Tools] tab, and then click [Enter IP Address...].
The [Enter IP Address] dialog box appears.
D In the [*MAC Address:] box, enter the printer's MAC address that was printed
on the test page. In the [*IP Address:] box, enter the IP address you want to
set for the printer.
E Click [OK].
F Restart the printer.
Reference
For details about Smart Organizing Monitor, see p.57 “Using Smart Organizing Monitor”.
12
Installing the Printer Driver under a Network Environment
Reconfiguring a printer's IP address - local connection
Follow the procedure below to change the printer's IP address to the appropriate
one, using Smart Organizing Monitor, when connecting it via USB.
1
Important
❒ To reconfigure the printer's IP address, Smart Organizing Monitor must be
installed on the computer.
A Connect the printer and computer using a USB cable.
B Start Smart Organizing Monitor.
C Open the [Printer Configuration] dialog box, and then click the [Network 1] tab.
In the [TCP/IP] area, in the [IP Address:] box, enter the IP address you want to
set for the printer.
D Click [OK].
Reference
For details about Smart Organizing Monitor, see p.57 “Using Smart Organizing Monitor” and Smart Organizing Monitor Help.
Reconfiguring the port settings
A Open the [Printers] window from the [Start] menu.
B Click the icon of the printer you want to use. On the [File] menu, click [Properties].
The printer properties appears.
C Click the [Ports] tab, and then click [Add Port].
D Click [Standard TCP/IP Port], and then click [New Port...].
Add Standard TCP/IP Printer Port Wizard appears.
E Click [Next >]
F Enter the printer's IP address that is printed on the test page, and then click
[Next >].
G Click [Finish].
Reference
For details about printing the test page, see p.12 “Checking a printer's IP
address and MAC address”.
13
Preparing for Printing
Installing the Printer Driver to Use As a Windows Network Printer
This section explains how to install the printer driver for using this printer as a
Windows network printer.
1
A Open the print server folder.
B Drag the shared printer icon from the print server folder, and then drop it
to the [Printers] folder of your computer.
14
Installing the Printer Driver Using USB
Installing the Printer Driver Using USB
This section explains how to install the printer drivers using USB.
The printer drivers can be installed from the CD-ROM provided with this printer.
1
Installing the PCL and PostScript 3 Printer Driver (Windows Me)
Important
❒ Installation via USB is not possible under Windows 98 SE. Upgrade to Windows Me or later.
If the printer driver has already been installed, plug and play is enabled, and the
icon of the printer connected to the “USB” port is added to the [Printers] window.
A Download USB Printing Support from the supplier's Web site.
Use a search to find the model name, and then download USB Printing Support from the supplier's Web site.
Save it where you can locate it easily.
B Check the printer's power switch is off.
C Connect the printer and computer using the USB cable.
Connect the USB cable firmly.
D Turn on the printer's power switch.
The Plug and Play is enabled, and the [Add New Hardware Wizard] dialog box appears.
If USB Printing Support is already installed on the computer proceed to Step 10.
E In the [Add New Hardware Wizard] dialog box, click [Specify the location of the driver (Advanced)], and then click [Next >].
F Select the [Specify a location:] check box, and then click [Browse...].
The [Browse for Folder] dialog box appears.
G Specify the location where USB Printing Support is located, and then click
[OK >].
H Check the location, and then click [Next >].
USB Printing Support is installed.
I Click [Finish].
The installation of the printer driver starts.
If the printer driver has already been installed, plug and play is enabled, and
the icon of the printer connected to the “USB001” port is added to the [Printers]
window.
15
Preparing for Printing
J Insert the CD-ROM into the CD-ROM drive.
When Auto Run starts, click [Exit].
K In the [Copying Files...] dialog box, click [Browse].
L Specify the location where the printer driver is located, and then click [OK >].
1
If the CD-ROM drive is D, the source files of the printer driver are stored in
the following location:
• PCL 5c
D:\DRIVERS\PCL5C\WIN9X_ME\(Language)\DISK1
• PCL 6
D:\DRIVERS\PCL6\WIN9X_ME\(Language)\DISK1
• PostScript 3
D:\DRIVERS\PS\WIN9X_ME\(Language)\DISK1
M Check the location, and then click [OK >].
Installation is complete. If installation is successful, the icon of the printer
connected to the “USB001” port is added to the [Printers] window.
Note
❒ The number after “USB” varies depending on the number of printers connected.
❒ It is not necessary to reinstall USB Printing Support when connecting a different printer via USB interface when USB Printing Support is installed.
❒ After installing USB Printing Support, if the printer driver is not installed,
follow the plug-and-play instructions of the printer.
Installing the PCL Printer Driver (Windows 2000, XP and Windows
Server 2003)
Important
❒ To install this printer driver under Windows 2000/XP Professional or Windows Server 2003, you must have an account that has Manage Printers permission. For this, log on as an Administrators or Power Users group member.
Note
❒ If the printer driver is already installed, plug and play is enabled and the
printer connected to the USB port is automatically added to the [Printers] window.
❒ When USB is first used, the plug and play function starts and the [New Hardware Found], [Device Driver Wizard], or [Add New Hardware Wizard] dialog box appears, depending on the operating system.
16
A Quit all applications currently running.
B Check the printer's power switch is off.
Installing the Printer Driver Using USB
C Insert the CD-ROM into the CD-ROM drive.
The installer starts.
D Click [PCL 5c Printer Driver] or [PCL 6 Printer Driver].
1
The Printer Driver installer starts.
The software license agreement appears.
E After reading the agreement, click [I accept the agreement.], and then click
[Next >].
F In the [Method to install printer driver] dialog box, select the [Connect a printer using a USB cable.] check box, and then click [Next >].
G Select the printer you want to connect via USB, and then click [Next >].
A message appears, asking you to check that the USB cable is not connected
and the printer's power switch is turned to OFF.
H Check the USB cable and the printer status, and then click [Next >].
I When the [<Auto-detect USB Port>] dialog box appears, connect the printer to the
computer using a USB cable, and then turn the printer's power switch to ON.
USB auto detection begins.
J If a message appears informing you that the installation was successfully
completed, click [Finish].
K If a message appears informing you to restart the computer, click [Yes, restart now.] or [No, restart later.], and then click [Finish].
Note
❒ To disable Auto Run, press the {Shift} key when inserting the CD-ROM
into the drive and keep it pressed until the computer finishes reading from
the CD-ROM.
❒ The number after “USB” varies depending on the number of printers connected.
❒ A confirmation message appears if the printer connection has failed. Check
the USB cable is connected and the printer's power is turned on, and then
click [Retry].
❒ To stop USB auto detection, click [Stop Auto-detecting].
17
Preparing for Printing
Installing the PostScript 3 Printer Driver (Windows 2000)
Important
❒ To install this printer driver under Windows 2000, you must have an account
that has Manage Printers permission. Log on as an administrator or Power
Users group member.
If the printer driver has already been installed, plug and play is enabled, and the
icon of the printer connected to the “USB” port is added to the [Printers] window.
If the printer driver is not installed, follow the plug-and-play instructions of the
printer to install it from the CD-ROM provided.
1
A Check the printer's power switch is off.
B Connect the printer and computer using the USB cable.
Connect the USB cable firmly.
C Turn on the printer's power switch.
The Plug and Play is enabled and the [Found New Hardware Wizard] dialog box
appears, and USB Printing Support is installed automatically.
D In the [Found New Hardware Wizard] dialog box, click [Search for a suitable driver
for my device (recommended)], and then click [Next >].
E Select the [Specify location] check box, and then click [Next >].
F Insert the CD-ROM into the CD-ROM drive.
When Auto Run starts, click [Exit].
G Specify the location where the source files of the printer driver is stored.
If the CD-ROM drive is D, the source files of the PostScript printer driver are
stored in the following location:
D:\DRIVES\PS3\WIN2K_XP\(Language)\DISK1
H Check the printer driver location, and then click [OK].
I Click [Next >].
J Click [Finish].
If the printer driver has already been installed, plug and play is enabled, and
the icon of the printer connected to the “USB001” port is added to the [Printers]
window.
18
Note
❒ To disable Auto Run, press the {Shift} key when inserting the CD-ROM
into the drive and keep it pressed until the computer finishes reading from
the CD-ROM.
❒ The number after “USB” varies depending on the number of printers connected.
Installing the Printer Driver Using USB
Installing the PostScript 3 Printer Driver (Windows XP and
Windows Server 2003)
1
Important
❒ To install this printer driver under Windows XP or Windows Server 2003, you
must have an account that has Manage Printers permission. Log on as an administrator or Power Users group member.
If the printer driver has already been installed, plug and play is enabled, and the
icon of the printer connected to the “USB” port is added to the [Printers] window.
If the printer driver is not installed, follow the plug-and-play instructions of the
printer to install it from the CD-ROM provided.
A Check the printer's power switch is off.
B Connect the printer and computer using the USB cable.
Connect the USB cable firmly.
C Turn on the printer's power switch.
The Plug and Play is enabled and the [Found New Hardware Wizard] dialog box
appears, and USB Printing Support is installed automatically.
D In the [Found New Hardware Wizard] dialog box, click [Install from a list or specific
location (Advanced)], and then click [Next >].
E Select the [Specify location] check box, and then click [Next >].
F Insert the CD-ROM into the CD-ROM drive.
When Auto Run starts, click [Exit].
G Specify the location where the source files of the printer driver is stored.
If the CD-ROM drive is D, the source files of the PostScript printer driver are
stored in the following location:
D:\DRIVES\PS3\WIN2K_XP\(Language)\DISK1
H Check the printer driver location, and then click [OK].
I Click [Next >].
J Click [Finish].
If the printer driver has already been installed, plug and play is enabled, and the icon
of the printer connected to the “USB001” port is added to the [Printers] window.
Note
❒ To disable Auto Run, press the {Shift} key when inserting the CD-ROM
into the drive and keep it pressed until the computer finishes reading from
the CD-ROM.
❒ The number after “USB” varies depending on the number of printers connected.
19
Preparing for Printing
Troubleshooting USB
Problem
1
Solutions
The printer is not recognized auto- Turn off the power of the printer, reconnect the USB cable,
matically.
and then turn it on again.
Windows has already configured
the USB settings.
Open Windows' Device Manager, and then, under [Universal Serial Bus controllers], remove any conflicting devices.
Conflicting devices have a [!] or [?] icon by them. Take
care not to accidentally remove required devices. For details, see Windows Help.
When using Windows 2000/XP or Windows Server 2003,
an erroneous device is displayed under [USB Controller] in
the [Device Manager] dialog box.
Windows ME and the printer cannot be connected.
Download USB Printing Support from the supplier's website.
Search the model name you use on the supplier's website,
and download USB Printing Support.
20
If a Message Appears during Installation
If a Message Appears during Installation
When a message that shows the number 58 or 34 appears during the installation,
the printer driver can not be installed using Auto Run. Please use [Add Printer] or
[Install Printer] to install the printer driver.
1
For Windows 98 SE/Me and Windows 2000
A On the [Start] menu, point to [Settings], and then click [Printers].
B Double-click the Add Printer icon.
C Follow the instructions in Add Printer Wizard.
For Windows XP Professional and Windows Server 2003:
A On the [Start] menu, click [Printers and Faxes].
B Click [Add a printer].
C Follow the instructions in Add Printer Wizard.
For Windows XP Home Editions:
A On the [Start] menu, click [Control Panel].
B Click [Printers and Other Hardware].
C Click [Printers and Faxes].
D Click [Install Printer].
E Follow the instructions in Add Printer Wizard.
21
Preparing for Printing
Making Option Settings for the Printer
Make option settings for the printer using the printer driver when bidirectional
communication is disabled.
1
Reference
For details about making option settings for the printer, see p.23 “If Bidirectional Communication Is Disabled”.
Conditions for Bidirectional Communication
Bidirectional communication allows information about paper settings to be automatically sent from the printer. You can check printer status from your computer.
• Bidirectional communication is supported by Windows 98 SE/Me/2000/XP,
and Windows Server 2003.
To support bidirectional communication, the following conditions must be met:
❖ When connected with the network
The printer must be connected via standard TCP/IP port, and the default
name has not been changed.
❖ When connected with USB
The printer must be connected to the computer's USB port using the USB interface cable.
The computer must support bidirectional communication.
Note
❒ The PostScript printer driver does not support bidirectional communications.
❒ The PCL printer drivers support bidirectional communications. You can update printer status manually.
22
Making Option Settings for the Printer
If Bidirectional Communication Is Disabled
Set up option settings when bidirectional communications are disabled.
1
Important
❒ Under Windows 2000/XP and Windows Server 2003, Manage Printers permission is required to change the printer properties in the [Printers] folder.
Log on as an Administrators or Power Users group member.
A On the [Start] menu, point to [Settings], and then click [Printers].
The [Printers] window appears.
B Click the icon of the printer you want to use.
C On the [File] menu, click [Properties].
D Click the [Accessories] tab.
If you are using the PostScript 3 printer driver, click the [Device Settings] tab.
E Select options installed from the [Options] area, and then make the necessary settings.
F Select the total amount of the memory in [Total Memory:], when the optional
SDRAM module is added.
G
Under [Paper Size Settings], click and highlight the tray to be used, select the
appropriate size , and then click [Update].
H Click [OK] to close the printer properties dialog box.
23
Preparing for Printing
1
24
2. Setting Up the Printer Driver
PCL - Accessing the Printer Properties
This section explains about accessing the printer properties and make the printer
settings.
Windows 98 SE/Me - Making Printer Settings
There are two methods for making printer settings.
Making the printer default settings- the [Printer] Window
To make the printer default settings, open the printer properties dialog box from
the [Printers] window.
Important
❒ You cannot change the printer default settings for each user. Settings made in
the printer properties dialog box are applied to all users.
A On the [Start] menu, point to [Settings], and then click [Printers].
The [Printers] window appears.
B Click the icon of the printer you want to use.
C On the [File] menu, click [Properties].
D Make the necessary settings, and then click [OK].
Note
❒ With some applications, the printer driver settings are not used, and the
application's own default settings are applied.
Reference
For details about settings, see the printer driver Help.
Making printer settings from an application
You can make printer settings for a specific application.
To make printer settings for a specific application, open the printer properties
dialog box from that application. The following explains how to make settings
for the WordPad application provided with Windows 98 SE/Me.
A On the [File] menu, click [Print].
The [Print] dialog box appears.
25
Setting Up the Printer Driver
B Select the printer you want to use in the [Name] list, and then click [Properties].
The printer properties dialog box appears.
C Make the necessary settings, and then click [OK].
D Click [OK] to start printing.
Note
❒ The procedure to open the printer properties dialog box may vary depending on the application. For details, see the manuals provided with the application you use.
❒ With some applications, the printer driver settings are not used, and the
application's own default settings are applied.
❒ Any settings you make in the procedure above are valid for the current application only.
❒ General users can change the properties displayed in the [Print] dialog box
of an application. Settings made here are used as defaults when printing
from this application.
2
Reference
For details about settings, see the printer driver Help.
Windows 2000 - Making Printer Settings
Making the printer default settings- the [Printer] window
Important
❒ To change the printer default settings including option configuration settings,
log on using an account that has Manage Printers permission. Members of the
Administrators and Power Users groups have Manage Printers permission
by default.
❒ You cannot change the printer default settings for each user. Settings made in
the printer properties dialog box are applied to all users.
A On the [Start] menu, point to [Settings], and then click [Printers].
The [Printers] window appears.
B Click the icon of the printer you want to use.
C On the [File] menu, click [Properties].
The printer properties dialog box appears.
26
PCL - Accessing the Printer Properties
D Make the necessary settings, and then click [OK].
Note
❒ Settings you make here are used as the default settings for all applications.
❒ Do not make a setting for [Form to Tray Assignment].
Reference
For details about settings, see the printer driver Help.
2
Making printer default settings - Printing Preferences
Important
❒ You cannot change the printer default settings for each user. Settings made in
the printer properties dialog box are applied to all users.
A On the [Start] menu, point to [Settings], and then click [Printers].
The [Printers] window appears.
B Click the icon of the printer you want to use.
C On the [File] menu, click [Printing Preferences...].
The [Printing Preferences] dialog box appears.
D Make the necessary settings, and then click [OK].
Note
❒ Settings you make here are used as the default settings for all applications.
Reference
For details about settings, see the printer driver Help.
Making printer settings from an application
You can make printer settings for a specific application.
To make printer settings for a specific application, open the [Printing Preferences]
dialog box from that application. The following explains how to make settings
for the WordPad application provided with Windows 2000.
A On the [File] menu, click [Print...].
The [Print] dialog box appears.
B Select the printer you want to use in the [Select Printer] list.
27
Setting Up the Printer Driver
C Make the necessary settings, and then click [Apply] to start printing.
Note
❒ The procedure to open the [Printing Preferences] dialog box may vary depending on the application. For details, see the manuals provided with the
application you use.
❒ Any settings you make in the procedure above are valid for the current application only.
❒ General users can change the properties displayed in the [Print] dialog box
of an application. Settings made here are used as defaults when printing
from this application.
2
Reference
For details about settings, see the printer driver Help.
Windows XP and Windows Server 2003 - Making Printer Settings
Making the printer default settings - the [Printers and Faxes] window
Important
❒ To change the printer default settings including option configuration settings,
log on using an account that has Manage Printers permission. Members of the
Administrators and Power Users groups have Manage Printers permission
by default.
❒ You cannot change the printer default settings for each user. Settings made in
the printer properties dialog box are applied to all users.
A On the [Start] menu, click [Printers and Faxes].
The [Printers and Faxes] window appears.
B Click the icon of the printer you want to use.
C On the [File] menu, click [Properties].
The printer properties dialog box appears.
D Make the necessary settings, and then click [OK].
Note
❒ Settings you make here are used as the default settings for all applications.
❒ Do not make a setting for [Form to Tray Assignment].
Reference
For details about settings, see the printer driver Help.
28
PCL - Accessing the Printer Properties
Making printer default settings - Printing Preferences
Important
❒ You cannot change the printer default settings for each user. Settings made in
the printer properties dialog box are applied to all users.
A On the [Start] menu, click [Printers and Faxes].
2
The [Printers and Faxes] window appears.
B Click the icon of the printer you want to use.
C On the [File] menu, click [Printing Preferences...].
The [Printing Preferences] dialog box appears.
D Make the necessary settings, and then click [OK].
Note
❒ Settings you make here are used as the default settings for all applications.
Reference
For details about settings, see the printer driver Help.
Making printer settings from an application
You can make printer settings for a specific application.
To make printer settings for a specific application, open the [Printing Preferences]
dialog box from that application. The following explains how to make settings
for the WordPad application provided with Windows XP.
A On the [File] menu, click [Print...].
The [Print] dialog box appears.
B Select the printer you want to use in the [Select Printer] list, and then click
[Preferences].
C Make the necessary settings, and then click [OK] to start printing.
Note
❒ The procedure to open the [Printing Preferences] dialog box may vary depending on the application. For details, see the manuals provided with the
application you use.
❒ Any settings you make in the procedure above are valid for the current application only.
❒ General users can change the properties displayed in the [Print] dialog box
of an application. Settings made here are used as defaults when printing
from this application.
Reference
For details about settings, see the printer driver Help.
29
Setting Up the Printer Driver
PostScript 3 - Setting Up for Printing
Windows 98 SE/Me - Accessing the Printer Properties
There are two methods to open the printer properties dialog box.
2
Making printer default settings
To make the printer default settings, open the printer properties dialog box from
the [Printers] window.
Important
❒ You cannot change the printer default settings for each user. Settings made in
the printer properties dialog box are applied to all users.
A On the [Start] menu, point to [Settings], and then click [Printers].
The [Printers] window appears.
B Click the icon of the printer you want to use.
C On the [File] menu, click [Properties].
The printer properties dialog box appears.
D Make the necessary settings, and then click [OK].
E Click [OK].
Note
❒ With some applications, the printer driver settings are not used, and the
application's own default settings are applied.
Reference
For details about settings, see the printer driver Help.
Making printer settings from an application
You can make printer settings for a specific application.
To make printer settings for a specific application, open the printer properties
dialog box from that application. The following explains how to make settings
for the WordPad application provided with Windows 98 SE/Me.
A On the [File] menu, click [Print].
The [Print] dialog box appears.
B Select the printer you want to use in the [Name] list, and then click [Properties].
The printer properties dialog box appears.
30
PostScript 3 - Setting Up for Printing
C Make the necessary settings, and then click [OK].
D Click [OK] to start printing.
Note
❒ The procedure to open the printer properties dialog box may vary depending on the application. For details, see the manuals provided with the application you use.
❒ With some applications, the printer driver settings are not used, and the
application's own default settings are applied.
❒ Any settings you make in the procedure above are valid for the current application only.
❒ General users can change the properties displayed in the [Print] dialog box
of an application. Settings made here are used as defaults when printing
from this application.
2
Reference
For details about settings, see the printer driver Help.
Windows 2000 - Accessing the Printer Properties
Making printer default settings - The printer properties
Important
❒ To change the printer default settings including option configuration settings, log
on using an account that has Manage Printers permission. Members of the Administrators and Power Users groups have Manage Printers permission by default.
❒ You cannot change the printer default settings for each user. Settings made in
the printer properties dialog box are applied to all users.
A On the [Start] menu, point to [Settings], and then click [Printers].
The [Printers] window appears.
B Click the icon of the printer you want to use.
C On the [File] menu, click [Properties].
The printer properties dialog box appears.
D Make the necessary settings, and then click [OK].
Note
❒ Settings you make here are used as the default settings for all applications.
❒ Do not make a setting for [Form to Tray Assignment].
Reference
For details about settings, see the printer driver Help.
31
Setting Up the Printer Driver
Making printer default settings - Printing Preferences
Important
❒ You cannot change the printer default settings for each user. Settings made in
the printer properties dialog box are applied to all users.
A On the [Start] menu, point to [Settings], and then click [Printers].
2
The [Printers] window appears.
B Click the icon of the printer you want to use.
C On the [File] menu, click [Printing Preferences...].
The [Printing Preferences] dialog box appears.
D Make the necessary settings, and then click [OK].
Note
❒ Settings you make here are used as the default settings for all applications.
Reference
For details about settings, see the printer driver Help.
Making printer settings from an application
You can make printer settings for a specific application.
To make printer settings for a specific application, open the [Printing Preferences]
dialog box from that application. The following explains how to make settings
for the WordPad application provided with Windows 2000.
A On the [File] menu, click [Print...].
The [Print] dialog box appears.
B Select the printer you want to use in the [Select Printer] list.
C Make the necessary settings, and then click [Print] to start printing.
Note
❒ The procedure to open the [Printing Preferences] dialog box may vary depending on the application. For details, see the manuals provided with the
application you use.
❒ Any settings you make in the procedure above are valid for the current application only.
❒ General users can change the properties displayed in the [Print] dialog box
of an application. Settings made here are used as defaults when printing
from this application.
Reference
For details about settings, see the printer driver Help.
32
PostScript 3 - Setting Up for Printing
Windows XP, Windows Server 2003 - Making Printer Settings
Making the printer default settings - [Printers and Faxes] window
Important
❒ To change the printer default settings including option configuration settings, log
on using an account that has Manage Printers permission. Members of the Administrators and Power Users groups have Manage Printers permission by default.
❒ You cannot change the printer default settings for each user. Settings made in
the printer properties dialog box are applied to all users.
2
A On the [Start] menu, click [Printers and Faxes].
The [Printers and Faxes] window appears.
B Click the icon of the printer you want to use.
C On the [File] menu, click [Properties].
The printer properties dialog box appears.
D Make the necessary settings, and then click [OK].
Note
❒ Settings you make here are used as the default settings for all applications.
❒ Do not make a setting for [Form to Tray Assignment].
Reference
For details about settings, see the printer driver Help.
Making printer default settings - Printing Preferences
Important
❒ You cannot change the printer default settings for each user. Settings made in
the printer properties dialog box are applied to all users.
A On the [Start] menu, click [Printers and Faxes].
The [Printers and Faxes] window appears.
B Click the icon of the printer you want to use.
C On the [File] menu, click [Printing Preferences...].
The [Printing Preferences] dialog box appears.
D Make the necessary settings, and then click [OK].
Note
❒ Settings you make here are used as the default settings for all applications.
Reference
For details about settings, see the printer driver Help.
33
Setting Up the Printer Driver
Making printer settings from an application
You can make printer settings for a specific application.
To make printer settings for a specific application, open the [Printing Preferences]
dialog box from that application. The following explains how to make settings
for the WordPad application provided with Windows XP.
A On the [File] menu, click [Print...].
2
The [Print] dialog box appears.
B Select the printer you want to use in the [Select Printer] list.
C Make the necessary settings, and then click [Print] to start printing.
Note
❒ The procedure to open the [Printing Preferences] dialog box may vary depending on the application. For details, see the manuals provided with the
application you use.
❒ Any settings you make in the procedure above are valid for the current application only.
❒ General users can change the properties displayed in the [Print] dialog box
of an application. Settings made here are used as defaults when printing
from this application.
Reference
For details about settings, see the printer driver Help.
34
3. Other Print Operations
Form Feed
Use the form feed function to continue printing when a problem such as a paper
size error occurred.
This function can be performed using the control panel.
Important
❒ The tray cannot be changed if the following function is set:
• Duplex Print to a tray that does not support duplex printing
• Cover Sheet
Note
❒ If form feed is selected for a tray with the following settings, you can change
the tray by canceling the settings:
• Duplex Print
Performing Form Feed
Follow the procedure below to perform form feed.
A If the Smart Organizing Monitor dialog box with a caution message appears, press the {Stop/Start} button.
The printer prints using the selected tray.
Note
❒ If you want to print after adding paper to the tray, load the correct paper,
and then click the {Stop/Start} button.
❒ If a tray with a smaller paper size is selected, the print job may be cut short,
or other problems may occur.
Canceling a Print Job
Follow the procedure below to cancel a print job that is related to the printer error occurred.
A If the Smart Organizing Monitor dialog box appears with a caution message.
B Press the {Job Reset} key.
35
Other Print Operations
Canceling a Print Job
This section gives instruction to stop printing from the control panel or computer.
Canceling a Print Job Using the Control Panel
You can cancel a print job using the control panel, if transferring print jobs is not
completed.
A Press the {Job Reset} key.
3
Windows - Canceling a Print Job from the Computer
You can cancel a print job from the computer if the transferring print job is not
completed.
A Double-click the printer icon on the Windows task tray.
A window appears, showing all print jobs currently queued for printing.
Check the current status of the job you want to cancel.
B Select the name of the job you want to cancel.
C On the [Document] menu, click [Cancel Printing].
Note
❒ In Windows XP and Windows Server 2003, click [Cancel] on the [Document]
menu.
❒ In Windows 98 SE/Me and Windows 2000, you can also open the print job
queue window by double-clicking the printer icon in the [Printers] window
(the [Printers and Faxes] window under Windows XP and Windows Server
2003).
❒ You cannot stop printing data that has already been processed. For this
reason, printing may continue for a few pages after you cancel printing.
❒ A print job containing a large volume of data may take considerable time
to stop.
36
Collate
Collate
Use the Collate function to print documents into page-ordered sets.
❖ Collate
Output can be assembled as sets in sequential order.
3
Note
❒ If Auto Continue occurs on the first set, the Collate will be canceled.
❒ If a form feed occurs on the first set, the Collate will be canceled.
Reference
For details about printing method, see the printer driver Help.
37
Other Print Operations
Cover
Use the Cover function to insert cover sheets using paper in a specified tray.
Note
❒ The cover sheet's size and orientation must be the same as those of the body
paper.
Reference
For details about printing methods, see the printer driver Help.
3
38
Watermark
Watermark
Use the Watermark function to print watermark text.
Note
❒ If the watermark size is larger than the paper size, watermarks cannot be
printed properly.
Reference
For details about the setting method, see the printer driver Help.
3
39
Other Print Operations
Manual Duplex
Use the manual duplex printing function to print on both sides of sheets.
Important
❒ This function is only available for the SP C221N model printer.
❒ This function is only available for PCL5c and PCL6.
❒ For Mac OS X, this function is not available.
❒ When printing on the other side of sheets, reload the paper into Tray 1.
3
Note
❒ If you select [Auto Tray Select] when performing duplex printing, the printer
searches for an appropriate tray for the first page only. All subsequent pages
will be printed using that tray.
❒ When you print a document whose page count is an odd number, a blank
page is printed first. This blank page is the last page of the document. When
you start printing on the other side of sheets, include the sheet containing this
blank page in the bundle of paper.
When a print job that contains an even number of pages is completed, a dialog
box prompting you to reload the paper appears on Smart Organizing Monitor.
Follow the instructions on the screen to start printing on the other side of sheets.
40
Memory Capacity and Paper Size
Memory Capacity and Paper Size
Additional memory apart from standard memory may also be required depending on the paper size and data type.
❖ Memory Capacity
128 MB(Standard)
❖ Resolution
600 dpi Speed (1bit)
600 dpi Standard (2bits)
600 dpi Fine (4bits)
3
❖ Paper Size
Letter (8.5" × 11"), A4 (210 × 297 mm), B5 JIS (182 × 257 mm), B6 JIS(128 × 182
mm), A5 (148 × 210 mm), A6 (105 × 148 mm), Legal (8.5" × 14"), Executive
(7.25" × 10.5"), 5.5" × 8.5", Com10 Env. (4.125" × 9.5"), Monarch Env. (3.875" ×
7.5"), DL Env. (110 × 220 mm), C6 Env. (114 × 162 mm), C5 Env. (162 × 229
mm), 8" × 13", 8.5" × 13", 8.25" × 13", 16K (195 × 267 mm), Custom Paper Size
Note
❒ When printing from bypass tray, duplex printing will not be supported regardless of the memory capacity, and only one-side will be printed.
❒ To print an A3, 11 " × 17 ", B4, or 8K size document, you must first select the
[Enable Large Papers] check box on the [Advanced Options] tab in the printer
driver's properties dialog box. The document is reduced to fit the specified
paper size, and then printed.
Reference
For details about the paper size, see Hardware Guide.
41
Other Print Operations
3
42
4. Direct Printing from a Digital
Camera (PictBridge)
What Is PictBridge?
Important
❒ This function is only available for the SP C222DN model printer.
You can connect a PictBridge-compatible digital camera to this printer using a
USB cable. This allows you to print photographs taken using the digital camera
directly by operating the digital camera.
ASH109S
Note
❒ Check your digital camera is PictBridge-compatible.
❒ Up to 999 images can be sent from the digital camera to the printer during one
print transaction. If an attempt is made to send more images, an error message is sent to the camera and printing fails.
❒ Since printing conditions are specified on the digital camera, specifiable parameters depend on the digital camera. For details, see the manuals provided
with the digital camera.
❒ This function is compatible with USB 1.1.
43
Direct Printing from a Digital Camera (PictBridge)
PictBridge Printing
Follow the procedure below to start PictBridge printing on this printer.
Important
❒ Do not disconnect the USB cable while data is being sent. If you do, printing
will fail.
A Check the printer and the digital camera are both turned on.
B Connect a USB cable between the USB host interface board installed on the
printer and digital camera.
The Ready indicator on the printer flashes for several seconds and then stays lit.
This indicates the printer recognizes the digital camera as a PictBridge device.
4
ASH108S
C On your digital camera, select the images you want to print, and then specify the printing conditions.
D The printer receives settings from the digital camera and starts printing.
Note
❒ Since printing conditions are specified on the digital camera, specifiable
parameters depend on the digital camera. For details, see the manuals provided with the digital camera.
❒ Some digital cameras require settings for manual PictBridge operation. For
details, see the manual provided with the digital camera.
❒ Some digital cameras require to turn the power switch off for a manual
PictBridge operation. For details, see the manual provided with the digital
camera.
❒ Some digital cameras need to be switched off when connecting to the printer. For details, see the manual provided with the digital camera.
Reference
For details about how to stop printing data, see p.35 “Canceling a Print Job”.
44
What Can Be Done on This Printer
What Can Be Done on This Printer
This printer can perform the following functions using its PictBridge feature.
The settings available for these functions are as follows:
• Single image printing
• Selected image printing
• All image printing
• Index printing
• Copies
• Paper size
• N-up layout
4
Note
❒ The setting parameters and their names may vary depending on the digital
camera. For details, see the manuals provided with the digital camera.
Paper Size
Use this function to print on paper with the size specified on the digital camera.
Paper size name
Actual size
A4
210 × 297 mm (8.3 × 11.7 in)
Letter (8 1/2” × 11”)
215.9 × 279.4 mm (8 1/2 × 11 in)
Note
❒ For details about specifying undefined sizes, see Hardware Guide.
Image Print Size
Use this function to print images with the size specified on the digital camera.
Note
❒ This functions default setting is fit to paper.
❒ Scale factor depends on image size and paper size.
• Scale Factor: 25% - 400%.
45
Direct Printing from a Digital Camera (PictBridge)
Exiting PictBridge
Follow the procedure below to quit the PictBridge mode.
Important
❒ Do not disconnect the USB cable while data is being sent to the printer. If you
do, printing will fail.
A Check the printers Ready indicator is lit.
B Disconnect the USB cable from the printer.
4
46
When PictBridge Printing Does Not Work
When PictBridge Printing Does Not Work
This section explains likely causes and possible solutions for problems that can
occur when PictBridge printing.
Problem
PictBridge is not available.
Cause
There is a problem with the
USB connection or the PictBridge settings.
Solution
Use the following procedure
to check the connection and
settings:
A Disconnect and then recon-
nect the USB cable.
B Check the PictBridge set-
tings are enabled.
C Disconnect the USB cable,
4
and then turn off the printer. Turn the printer back
on. When the printer has
fully booted up, reconnect
the USB cable.
When two or more digital
cameras are connected, the
second and subsequent cameras are not recognized.
You have connected multiple
digital cameras.
Printing is disabled.
The number of originals exceeds the maximum number
of pages that can be printed at
a time.
Printing is disabled.
There is no paper of the speci- There is no paper of the specified size remaining.
fied size remaining.
Connect one digital camera
only.
Do not connect multiple cameras.
The maximum specifiable
print quantity at a time is 999.
Respecify the quantity to 999
or less, and then retry printing.
If you have to use paper that is
not of the specified size, perform Form Feed. To cancel
printing, perform Job Cancel.
Printing is disabled.
The paper size setting for this
tray cannot be printed on the
printer.
Select the paper size setting
that can be printed on the
printer.
47
Direct Printing from a Digital Camera (PictBridge)
4
48
5. Monitoring and Configuring
the Printer
Using Web Image Monitor
Using Web Image Monitor, you can check the printer status and change settings.
❖ Available operations
The following operations can be remotely performed using Web Image Monitor from a client computer:
• Display printer status and supply information
• Displaying the counter information
• Making settings for paper loaded into each input tray
• Making input tray settings
• Printing a list of printer configuration
• Making network protocol settings
❖ Configuring the printer
To perform the operations from Web Image Monitor, TCP/IP is required. After the printer is configured to use TCP/IP, operations from Web Image Monitor become available.
❖ Recommended Web browser
• Windows:
Internet Explorer 5.5 SP2 or higher
Firefox 1.0 or higher
• Mac OS X:
Firefox 1.0 or higher
Safari 1.0, 1.2, 2.0 or higher
❒
❒
❒
❒
❒
❒
❒
❒
Note
If the previous versions of the Web browser above are used or JavaScript and
cookies are not enabled with the Web browser used, display and operation
problems may occur.
If you are using a proxy server, change the Web browser settings. Contact
your network administrator for information about the settings.
The previous page may not appear even after the back button of the Web
browser is clicked. If this happens, click the refresh button of the Web browser.
Updating the printer information is not automatically performed. Click [Refresh] in the main area to update the printer information.
We recommend using Web Image Monitor in the same network.
You cannot access the printer from outside the firewall.
When using the printer under DHCP, the IPv4 address may be automatically
changed by the DHCP server settings.
If the HTTP port is disabled, connection to the printer using the printer's URL
cannot be established.
49
Monitoring and Configuring the Printer
Displaying Top Page
This section explains how to display Web Image Monitor and its Top Page.
Displaying Top Page of Web Image Monitor
A Start your Web browser.
B Enter “http://(printer's address)/” in the address bar of the Web browser.
Top Page of Web Image Monitor appears.
If the printer's host name has been registered on the DNS server, you can enter it.
Top Page
Every Web Image Monitor page is divided into the following areas:
5
ASH102S
1. Menu area
4. Login
When you select [Configuration], content
of the [Configuration] page appears on the
main area.
Click to log on in administrator mode.
2. Tab area
Contains menus for the Status and Counter modes and tabs for switching between
them.
3. Help
Use Help to view help file contents.
50
5. Main area
Displays the contents of the item selected
in the menu area.
Machine information in the main area is
not automatically updated. Click [Refresh] at the upper right in the main area
to update the machine information. Click
the Web browser's [Refresh] button to refresh the entire browser screen.
Note
❒ Contents of the [Configuration] page differ according to the mode you are logged
into.
Using Web Image Monitor
Displaying the Printer Status
Top page of Web Image Monitor contains two tabs: the [Status] tab and [Counter] tab.
❖ [Status] tab
You can check the status of monitored printers.
• Displays the general information of the printer, such as the model name,
location and the status.
• Toner
Displays the levels of remaining toner.
• Others
Displays the status of the consumables.
• Input Tray
Displays the input tray status and paper settings.
❖ [Counter] tab
You can check the total number of pages printed to date.
The following counter information is displayed.
• Total
• Black&White
• Full Color
• Two Sided Print
5
About Menu and Mode
There are two modes available with Web Image Monitor: user mode and administrator mode.
The available menus on the [Configuration] page differ depending on the mode
you are logging on.
51
Monitoring and Configuring the Printer
❖ User Mode
In this mode, users can view settings but cannot change them.
5
ASH103S
1. Paper
3. Help Source File Setting
Click to display the [Paper] page.
Click to specify the Help source file.
2. Network
Click to display the [Network] page.
❖ Administrator Mode
In this mode, users can make input tray and network settings.
ASH104S
52
1. Paper
3. Change Login Password
Click to display the [Paper] page.
Click to change the login password.
2. Network
4. Help Source File Setting
Click to display the [Network] page.
Click to specify the Help source file.
Using Web Image Monitor
Access in the Administrator Mode
Follow the procedure below to access Web Image Monitor in the administrator
mode.
Note
❒ When you access Web Image Monitor in the administrator mode, "Administrator" appears under [Login].
Log on
A On Top Page, click [Login].
The dialog box for entering the user name and password appears.
B Enter the user name and password, and then click [OK].
Note
❒ For details about the login user name and password, consult your network
administrator.
5
Log off
Click [Logout] to log off.
Note
❒ When log on and made the settings, always click [Logout].
Configuring the Printer Settings
From the [Configuration] page, two menus are available to configure the settings.
Important
❒ To make printer settings, you must access Web Image Monitor in administrator mode. If you access Web Image Monitor in user mode, you can view the
printer settings, but you cannot change them.
❖ Paper
Displays the [Paper] page.
On the [Paper] page, following operations are possible:
• Setting the paper size and type on each tray
• Changing the tray priority
• Printing lists of configuration of the printer
53
Monitoring and Configuring the Printer
❖ Network
Displays the [Network] page.
On the [Network] page, following operations are possible:
• Checking the information of the printer
• Interface settings
• Protocol settings
• Resetting to factory-set defaults
Changing the paper settings
On the [Paper] page, you can change paper size and other paper settings.
• Tray 1: Size
You can specify the paper size for Tray 1.
The following sizes are available:
A4, B5 JIS, A5, B6 JIS, A6, 8 1/2 x 14, 8 1/2 x 11, 5 1/2 x 8 1/2, 7 1/4 x 10 1/2,
8 x 13, 8 1/2 x 13, 8 1/4 x 13, 4 1/8 x 9 1/2, 3 7/8 x 7 1/2, C5 Env, C6 Env, DL
Env, 16K, Custom Paper Size, Any Size
• Tray 1: Type
You can specify the paper type for Tray 1.
The following paper types are available:
Thin Paper, Plain Paper, Plain Paper 2, Recycled Paper, Color Paper, Letterhead, Preprinted Paper, Prepunched Paper, Labels, Bond Paper, Cardstock,
Thick Paper, Envelope, Any Type
• Tray 2: Size
You can specify the paper size for tray 2.
The following sizes are available:
A4, 8 1/2 x 11
• Tray 2: Type
You can specify the paper type for tray 2.
The following paper types are available:
Thin Paper, Plain Paper, Plain Paper 2, Recycled Paper, Color Paper, Letterhead, Preprinted Paper, Prepunched Paper
• Tray Priority
Select the tray used for the priority paper source.
5
Note
❒ Tray 2 is available only when the optional paper feed unit is attached to the
printer
54
Using Web Image Monitor
Printing the printer configurations
On the [Paper] page, you can print lists of printer information.
Important
❒ To use this function, the printer must be monitored from Web Image Monitor.
In the [List/Test Print] list, select the item you want to print. You can print the following:
❖ Configuration Page
The current configurations and general information of this printer is printed.
❖ Menu List
The machine's function menus are printed.
❖ Test Page
Network information such as Subnet address and Gateway address is printed.
5
❖ PCL Configuration/Font Page
The installed PCL font list is printed.
❖ PS Configuration/Font Page
The installed PS font list is printed.
Making the network related settings
You can set configurations about network connection and communication.
Important
❒ To make the settings about TCP/IP protocol, set TCP/IP “Active” in Interface.
The following operations are possible on the [Network] menu:
• Checking the information about the printer such as Device Name and Active
Protocol.
• Interface settings such as setting the timeout and making protocol to active.
• TCP/IP port settings
• SMTP Settings
• SNMP Settings
• IPX Settings
• AppleTalk Settings
55
Monitoring and Configuring the Printer
Changing the Login Information
On the [Change Login Password] page, you can change the administrator's login
password.
A On the [Configuration] page, click [Change Login Password].
The [Change Login Password] page appears.
B Enter the new password in the [New Login Password] box, and then enter the
same password in the [Confirm Login Password] box.
C Click [OK].
Displaying Web Image Monitor Help
To use Help for the first time, you need to install its source file from the CDROM provided with this printer.
5
Note
❒ By clicking [Help] in the header area, the contents of Help appear.
❒ By clicking “?”, the Help icon in the main area, Help for the setting items in
the main area appears.
Installing Help
A On the [Configuration] page, click [Help Source File Setting].
The [Help Source File Setting] page appears.
B Specify the location of the Help source file, and then click [OK].
56
Using Smart Organizing Monitor
Using Smart Organizing Monitor
Smart Organizing Monitor allows you to make printer settings, such as input
tray and network-related settings, from your client computer.
You can also use Smart Organizing Monitor to check printer status.
The following operations are possible with Smart Organizing Monitor:
• Displaying printer status or settings
• Checking locations where errors have occurred and error recovery methods
• Displaying the printer status and supply information
• Printing a list of printer configurations
• Reconfiguring the printer's IP address
• Making settings for paper loaded into each input tray
• Making input tray settings
• Changing the factory-set default settings
• Making system, access code and language settings
• Making network protocol settings
• Making printer settings
5
Reference
The Smart Organizing Monitor functions you can use under Windows operating systems are also available under Mac OS. For details, see p.85 “Using
Smart Organizing Monitor”.
For details about reconfiguring the printer's IP address, see p.12 “Reconfiguring a printer's IP address - network connection”.
Installing Smart Organizing Monitor
Important
❒ To install Smart Organizing Monitor under Windows 2000/XP Professional
or Windows Server 2003, log on as an Administrators or Power Users group
member.
Smart Organizing Monitor is automatically installed with the printer driver
when installing it, or by clicking [Smart Organizing Monitor] in the [Printer Drivers
and Utilities] dialog box, which appears when inserting the CD-ROM provided
with this printer.
57
Monitoring and Configuring the Printer
Displaying the Smart Organizing Monitor Dialog Box
Methods of displaying the Smart Organizing Monitor dialog box differ depending on how it was installed.
❖ If you installed Smart Organizing Monitor by clicking [Smart Organizing Monitor] in
the [Printer Drivers and Utilities] dialog box:
On the [Start] menu, point to [Programs], and then point to [Smart Organizing
Monitor].
❖ If you installed Smart Organizing Monitor with the printer driver:
In the printing preferences dialog box, click [Printer Status Monitor...]. Or, [Accessories], [Advanced Options] or [Paper Size Settings] tab in the printer's properties dialog box, click [Printer Status Monitor...].
Note
❒ To automatically display the Smart Organizing Monitor dialog box when errors occur, in the printer driver's properties dialog box, on the [Advanced Options] tab, select the [Display Smart Organizing Monitor automatically] check box.
5
Displaying the Printer Status
In the Smart Organizing Monitor dialog box, you can check the status of monitored printers. The printer status is displayed using graphics and comments.
Note
❒ If Smart Organizing Monitor is monitoring multiple printers, the [Printer Driver
Selection] dialog box appears. Select the printer driver used by the target
printer, and then click [OK]. To check the status of a network printer, click
[Search Network Printer].
58
Using Smart Organizing Monitor
ASH107S
1. Printer graphic
5. [User Guide] button
If an input tray error occurs,
appears.
This identifies the tray where the error
occurred. The problem tray is outlined in
red.
Click to display error related Help.
2. Comments
7. [User Tools] tab
Displays current printer status and instructions for resolving problems.
3. [Continue] button
Click to display the [Form Feed] dialog
box which you can use to change input
tray settings.
4. [Cancel] button
Click to cancel a print job.
5
6. [Search Network Printer] button
Click to select a network printer.
Prints the test page or configuration
page. The [Printer Configuration] dialog box
can be opened from this tab.
8. [Job Log] tab
Displays the information related to print
jobs.
9. [Status] tab
Display the status of the items such as
toner levels and paper level.
Note
❒ [Continue] and [Cancel] button are always disabled for this printer model.
59
Monitoring and Configuring the Printer
Displaying the Printer Information
The lower half of the Smart Organizing Monitor dialog box contains the following three tabs: [Status], [Job Log], and [User Tools]. You can use these tabs to display information about a monitored printer, such as its status, job history, and
configuration.
Displaying the printer status
The left side of the [Status] tab shows the printer name and tree. Click an item in
the tree to display information relating to it.
❖ Toner
Displays the following messages to indicate remaining toner levels for each
color of toner: Level 1 to 5, “Almost Empty” and “Empty”.
Graphics also indicate remaining toner levels.
5
❖ Input Tray
You can check the following information about the input trays.
• Input Tray
Displays the installed input trays.
• Status
Displays the input tray status, "Out of Paper" or "Status OK".
• Paper Size
Displays the size of the paper loaded into each input tray.
• Paper Type
Displays the type of the paper loaded into each input tray.
❖ Supplies
Displays the name of consumables and uses graphics to indicate their statuses.
❖ System
Displays the system information about the printer, such as the model name,
system version, and memory size.
❖ Counter
Displays information about the counters.
❖ Network
Displays network-related information about the printer, such as its name,
comments, IP address, and subnet mask.
Reference
For details about each item in the Smart Organizing Monitor dialog box, see
Smart Organizing Monitor Help.
60
You can print information that appears on the [Status] tab. For details see p.61
“Printing the printer configurations”.
Using Smart Organizing Monitor
Displaying the job history
On the [Job Log] tab, print jobs are displayed in the list.
You can check the following information:
• User name
• Document name
• The date and time when the print job was requested
• Number of printed pages
• Job status
Note
❒ Normally, the names used to log on to Windows are displayed in the [User
Name] column.
Printing the printer configurations
5
On the [User Tools] tab, you can print lists of printer information.
Important
❒ You can print the configuration page only when the printer is not busy
processing jobs.
❒ To print information about the printer, the printer must be monitored from
Smart Organizing Monitor via a supported printer driver.
In the [List/Test Print] list, select the item you want to print. You can print the following:
❖ Configuration Page
The current configurations and general information of the printer are printed.
❖ Menu List
The printer's function menus are printed.
❖ Test Page
Print the test page to check the printer's status.
❖ PCL Config./Font Page
The installed PCL font list is printed.
❖ PS Config./Font Page
The installed PS font list is printed.
The procedure for printing the configuration page is described as an example.
A On the [User Tools] tab, in the [List/Test Print] list, select [Configuration Page].
B Click [Print].
61
Monitoring and Configuring the Printer
C Click [Yes].
The configuration page is printed.
Reference
For details about the items displayed on the configuration page, see p.68
“Reading the Configuration Page”.
Printer Configuration
You can use the [Printer Configuration] dialog box to change the current printer settings. To display the [Printer Configuration] dialog box and change printer settings,
on the [User Tools] tab, click [Printer Configuration].
Important
❒ The [Printer Configuration] is disabled when the printer is not in the ready state
or power save mode.
5
You can use the [Printer Configuration] dialog box to change the settings of
• printers,
• input trays,
• paper loaded in input trays,
• network protocol, and
• factory-set defaults.
Reference
For details about each item you can specify on the [Printer Configuration] dialog
box, see Smart Organizing Monitor Help.
About menu and mode
There are two modes you can use to access the [Printer Configuration] dialog box:
administrator mode and general users mode.
Available tabs in the [Printer Configuration] dialog box differ depending on the
mode you are in.
❖ Administrator
In the [Access Code] dialog box, enter an access code.
All tabs in the [Printer Configuration] dialog box are available.
❖ General users
Only the [Paper Input] tab is available.
62
Using Smart Organizing Monitor
Changing the paper settings
On the [Paper Input] tab, you can change paper size and other paper settings.
• Tray 1: Size
The following sizes are available:
A4 (210 x 297 mm), B5 JIS (182 x 257 mm), A5 (148 x 210 mm), B6 JIS (128 x 182
mm), A6 (105 x 148 mm), 8 1/2 x 14, 8 1/2 x 11, 5 1/2 x 8 1/2, 7 1/4 x 10 1/2,
8 x 13, 8 1/2 x 13, 8 1/4 x 13, 4 1/8 x 9 1/2, 3 7/8 x 7 1/2, C5 Env, C6 Env, DL
Env, 16K, Custom Paper Size, Any Size
• Tray 1: Type
The following paper types are available:
Thin Paper, Plain Paper, Plain Paper 2, Recycled Paper, Color Paper, Letterhead, Preprinted Paper, Prepunched Paper, Labels, Bond Paper, Cardstock,
Thick Paper, Envelope, Any Type
• Custom Paper Size
You can make the custom paper size settings, when [Custom Paper Size] is selected.
• Unit:
You can specify the unit of measurement in "mm" or "inch".
• Horizontal:
You can specify the horizontal width between 90 and 216 mm.
• Vertical:
You can specify the vertical length between 148 and 356 mm.
• Tray 2: Size
You can specify the paper size for tray 2.
The following sizes are available:
A4 (210 x 297 mm), 8 1/2 x 11
• Tray 2: Type
You can specify the paper type for tray 2.
The following paper types are available:
Thin Paper, Plain Paper, Plain Paper 2, Recycled Paper, Color Paper, Letterhead, Preprinted Paper, Prepunched Paper
• Tray Priority
Select the priority tray from the [Default Tray:] list, when the optional paper
feed unit is attached to the printer.
5
Note
❒ The paper settings are not available for the bypass tray.
❒ Tray 2 is available only when the optional paper feed unit is attached to the
printer.
63
Monitoring and Configuring the Printer
Adjusting registrations
On the [Maintenance] tab, you can adjust color registration and print starting positions.
Normally, you do not have to adjust registrations. However, adjustments could
be useful in some cases, especially when you want to print in the correct position. Under [Registration: Tray 2 Paper] and [Registration: Bypass Tray], you can adjust
the print image position printed on the sheet fed from each tray. To check the adjustment result, use [Print Test Sheet].
Also, you can updated the firmware by clicking [Printer Firmware Update].
The latest version of the firmware can be downloaded form the supplier's website.
Setting basic functions
On the [System] tab, you can set basic functions required to use the printer. The
printer can be used on factory-set defaults, but the configuration can be changed
depending on the condition of the user. The changed condition holds even if the
printer is turned off.
The access code can be changed on this tab.
5
Making network-related settings
On the [Network 1], [Network 2] and [Network 3] tabs, you can set configurations
about network connection and communication.
The following operations are possible on these tabs:
• Checking the machine name, active protocol, and other printer information
• Making interface settings, including timeout period and protocol settings
• Checking or making TCP/IP settings
• Checking or making IPX and SMTP settings
• Checking or making SNMP and AppleTalk settings
Settings conditions for printing
On the [Printer] tab, you can set conditions for printing.
In the [PCL] area, you can specify the conditions such as Orientation and font settings.
In the [PS] area, you can specify Resolution and Color Profile.
64
Printer Status Notification by E-Mail
Printer Status Notification by E-Mail
Whenever a toner cartridge becomes empty or paper is jammed, an e-mail alert
is issued to the registered addresses to notify the printer status.
For this notification, you can make the e-mail notification settings.
You can be notified of the following events:
• Service call
• Toner cartridge is empty
• Toner cartridge is nearly empty
• Waste toner bottle is full
• Waste toner bottle is nearly full
• Paper has jammed
• Open door is detected
• Paper tray is empty
Also you can see the information of the printer, such as Machine name, serial
number and total counter.
5
A Open a Web browser, and then enter “http://(printer's address)/” in the address bar.
Top Page of Web Image Monitor appears.
B Click [Login].
The window for entering the login user name and password appears.
C Enter the user name and password, and then click [OK].
For details about the login user name and password, consult your network
administrator.
D In the menu area, click [Configuration].
E Click [Network].
The [Network] page appears.
F Set [Auto E-mail Notification] to [On].
G Make the necessary settings:
• Items in the SNMP Setting column: Configure the SMTP server. Check
your mailing environment, and then specify the necessary items. You can
also perform mail authentication for the SMTP server.
H Click [OK].
Note
❒ You can set [Auto E-mail Notification] to [On] using Smart Organizing Monitor.
65
Monitoring and Configuring the Printer
Mail Authentication
You can configure mail authentication to prevent illegal use of the mail server.
When mail is sent to the SMTP server, authentication is performed using the
SMTP AUTH protocol by prompting the mail originator to enter the user name
and password.
Follow the procedure below to specify SMTP authentication.
A In the menu area, click [Configuration].
B Click [Network] in the [Configuration] page.
C Make the following settings:
•
•
•
•
5
SMTP Authentication: Enable or disable SMTP authentication.
E-mail Address: Enter the e-mail address.
User Name: Enter the SMTP account name.
Password: To set or change the password for SMTP AUTH.
D Click [OK].
E Click [Logout].
F Quit Web Image Monitor.
66
SNMP
SNMP
You can use the SNMP manager to obtain information about the printer.
The SNMP agent operating on UDP and IPX is built into the Ethernet board that
is installed in this printer.
Important
❒ If you change the printer's community name, use Web Image Monitor or
Smart Organizing Monitor to change the computer's settings accordingly.
Note
❒ Only PCL printer supports the Host IPX Address.
The default community names is [private]. You can use these community names
to obtain MIB information.
5
67
Monitoring and Configuring the Printer
Reading the Configuration Page
Settings made on the [Printer Configuration] dialog box are printed.
❖ Product Name
Displays the product name.
❖ Reference
Displays the following information about the printer.
• Product ID
• Model Number
• Firmware Version
• Engine Version
❖ Print Language
Displays the version number of the printer language.
5
❖ Memory
Displays the total memory of SDRAM installed on the printer.
❖ Options
Displays the installed options.
❖ Paper Input
Displays the paper size and type settings.
• Tray Priority
• Tray Paper Size
• Bypass Paper Size
• Tray Paper Type
❖ Duplex
Displays the Duplex settings
❖ Print Quality
Displays the settings related to the print quality.
• Resolution
• Toner Saving
68
Reading the Configuration Page
❖ System
Displays the settings made under [System] menu.
• Print PS Errors
• USB Timeout
• Network Timeout
• I/O Buffer
• Auto Continue
• Sub Paper Size
❖ PCL Menu
Displays settings made under [Printer] tab in [Printer Configuration] dialog box.
• Paper Size
• Orientation
• Form Lines
• Font Source
• Font Number
• Point Size
• Font Pitch
• Symbol Set
• Courier Font
• Ext. A4 Width
• Append CR To LF
5
❖ PS Menu
Displays settings made under [Printer] tab in [Printer Configuration] dialog box.
• Color Setting
• Color Profile
❖ Network Setup
Displays the network related settings.
• IP Address
• Subnet Mask
• Gateway Address
• MAC Address
❖ Error Log
Displays the error logs.
• Fatal Error
• Normal Error
69
Monitoring and Configuring the Printer
❖ Counter List
Displays the counter information.
• Page Counter
• Jam Counter
Note
❒ Configuration page can be printed using the keys on the control panel. For
details see "Hardware Guide".
❒ The printed items and the contents might be different depending how it was
printed.
Reference
For details about printing printer configuration using Web Image Monitor,
see p.55 “Printing the printer configurations”.
For details about printing printer configuration using Smart Organizing
Monitor, see p.88 “Printer Configuration”.
5
70
6. Using a Print Server
Preparing Print Server
This section explains how to configure the printer as a Windows network printer. The printer is configured to enabling network clients to use it.
Important
❒ Under Windows 2000, Windows XP Professional, or Windows Server 2003, to
change printer properties in the [Printer] folder, you need Printer Management access authentication. Log on to the file server as an Administrators or
member of the PowerUsers group.
A Open the [Printers] window from the [Start] menu.
The [Printers] window appears.
Under Windows XP or Windows Server 2003, the [Printers and Faxes] window
appears.
B Click the icon of the printer you want to use. On the [File] menu, click [Properties].
The printer properties appears.
C On the [Sharing] tab, click [Shared as:].
D To share the printer with users using a different version of Windows, click
[Additional Drivers...].
If you have installed an alternative driver by selecting [Shared as:] during the
printer driver installation, this step can be ignored.
E Click [OK], and then close the printer properties.
71
Using a Print Server
6
72
7. Special Operations under
Windows
Printing Files Directly from Windows
You can print files directly using Windows commands.
❖ Windows 98 SE/Me
You can print files directly using "ftp" command.
❖ Windows 2000/XP, Windows Server 2003
You can print files directly using "lpr" or "ftp" command.
Setup
Follow the procedure below to make network environment settings.
A Enable TCP/IP using Smart Organizing Monitor, and then set up the printer’s network environment about TCP/IP including IP addresses.
TCP/IP of the printer is set as default.
B Install a TCP/IP in Windows to set up the network environment.
Consult the network administrator for the local setting information.
C To print under Windows 2000/XP or Windows Server 2003, install “Printing
service for UNIX” as the network application.
Reference
For details about setting up IPv4 address, see Hardware Guide.
For details about setting the IPv4 address of the printer using DHCP, see
p.93 “Using DHCP”.
This completes the setup for specifying a printer using an IPv4 address
when printing. When using a host name to specify a printer, proceed to
p.73 “Using a Host Name Instead of an IPv4 Address” and continue the
setup.
Using a Host Name Instead of an IPv4 Address
When a host name is defined, you can specify a printer by host name instead of
IPv4 address. The host names vary depending on the network environment.
When using DNS
Use the host name set to the data file on the DNS server.
73
Special Operations under Windows
When setting the IPv4 address of a printer using DHCP
Use the printer name on the configuration page as the host name.
In other cases
Add the IPv4 address and host name of the network printer to the hosts file on
the computer used for printing. Methods of addition vary depending on operating systems.
Windows 98 SE/Me
A Copy
\WINDOWS\HOSTS.SAM to the same directory and name it
“HOSTS” with no extension.
B Open the “\WINDOWS\HOSTS” file created using memo pad files, for
instance.
C Add an IP address and host name to the hosts file using the following for-
mat:
192.168.15.16 host # NP
“192.168.15.16” is the IPv4 address, “host” is the printer's host name, and
“#NP” is replaced by comments. Insert a space or tab between “192.168.15.16”
and “host”, between “host” and “#NP” respectively, using one line for this
format.
7
D Save the file.
Windows 2000/XP, Windows Server 2003
A Open the hosts file using memo pad files, for instance.
The hosts file is in the following folder:
\WINNT\SYSTEM32\DRIVERS\ETC\HOSTS
“\WINNT” is the directory of the installation destination for Windows
2000/XP, and Windows Server 2003
B Add an IPv4 address and host name to the hosts file using the following
format:
192.168.15.16 host # NP
“192.168.15.16” is the IPv4 address, “host” is the printer's host name, and
“#NP” is replaced by comments. Insert a space or tab between “192.168.15.16”
and “host”, between “host” and “#NP” respectively, using one line for this
format.
C Save the file.
74
Printing Files Directly from Windows
Printing Commands
The following explains printing operations using the lpr commands.
Enter commands using the command prompt window. The location of the command prompt varies depending on operating systems:
• Windows 98 SE
[Start] - [Programs] - [MS-DOS Prompt]
• Windows Me
[Start] - [Programs] - [Accessories] - [MS-DOS Prompt]
• Windows 2000
[Start] - [Programs] - [Accessories] - [Command Prompt]
• Windows XP, Windows Server 2003
[Start] - [All Programs] - [Accessories] - [Command Prompt]
Note
❒ Match the data format of the file to be printed with the emulation mode of the
printer.
❒ If the message “print requests full” appears, no print jobs can be accepted. Try
again when sessions end. For each command, the amount of possible sessions
is indicated as follows:
• lpr: 10
❒ Enter the file name in a format including the path from the directory executing commands.
7
Reference
The “option” specified in a command is an intrinsic printer option and its syntax is similar to printing from UNIX. For details, see UNIX Supplement.
lpr
❖ When specifying a printer by IP address
c:> lpr -Sprinter's IP address [-Poption] [-ol] \pass
name\file name
❖ When using a host name instead of an IP address
c:> lpr -Sprinter's host name [-Poption] [-ol] \pass
name\file name
When printing a binary file, add the “-ol” option (lowercase O, and lowercase
L).
75
Special Operations under Windows
ftp
Use the “put” or “mput” command according to the number of files to be printed.
❖ When one file is printed
ftp> put \pass name\file name [option]
❖ When multiple files are printed
ftp> mput \pass name\file name [\pass name\file name...]
[option]
A Formulate the printer's IP address or the host name of the hosts file printer
as an argument and use the “ftp” command.
% ftp printer's IP address
B Enter the user name and password, and then press the {OK} key.
For details about the user name and password, consult your network administrator.
User:
Password:
C When printing a binary file, set the file mode to binary.
7
ftp> bin
When printing a binary file in ASCII mode, print may not come out correctly.
D Specify files to be printed.
The following shows the examples of printing a PostScript file named “file 1”
in the “C:\PRINT” directory and printing file 1 and file 2.
ftp> put C:\PRINT\file1 filetype=RPS
ftp> mput C:\PRINT\file1 C:\PRINT\file2
E Quit ftp.
ftp> bye
Note
❒ “=”, “,”, “_”, and “;”cannot be used for file names. File names will be read
as option strings.
❒ For “mput” command, option can not be defined.
❒ For “mput” command, “*” and “?” can be used as wild cards in file names.
❒ When printing a binary file in ASCII mode, print may not come out correctly.
76
8. Mac OS Configuration
Mac OS X
This section explains how to configure a Mac OS X to use EtherTalk and USB.
Important
❒ The procedures and functions described below are available only for Mac OS
10.2.8, 10.3.9, and any higher versions of 10.4.
Installing the PostScript 3 Printer Driver
A Insert the CD-ROM into the CD-ROM drive.
B Double-click the CD-ROM icon.
C Double-click the [Mac OS X] folder.
D Double-click the [PPD Installer] folder.
E Double-click the package file icon.
F Follow the instructions on the screen.
Setting Up the PPD File
A Start Printer Setup Utility.
B Click [Add].
• Mac OS X 10.4 or higher
Click [More Printers...]. Then select the zone from the second pop-up menu.
• Other Mac OS X
Click [AppleTalk] on the first pop-up menu.
If the zone is set, select the zone from the second pop-up menu.
C Select the printer, and then select its manufacturer from the [Printer Model:]
pop-up menu.
Under Mac OS X 10.4 or higher, manufacturer from the [Print Using] pop-up
menu.
A list of printer types appears.
D Select the PPD file for the model you are using, and then click [Add].
E Quit Printer Setup Utility.
77
Mac OS Configuration
Setting Up Options
A Start System Preferences.
B Click [Print & Fax].
C In the [Printer] list, click the name of the printer you want to use, and then
click [Printer Setup...].
D Select the option you want to set up, and then select an appropriate setting
for it.
E Click [Apply Changes].
Note
❒ If the option you want to select is not displayed, PPD files may not be set
up correctly. To complete the setup, check the name of the PPD file displayed in the dialog box.
Mac OS X - Setting Up for Printing
Making paper settings from an application
A Open the file you want to print.
B On the [File] menu, click [Page Setup].
C Check that the printer you want to use is displayed in [Printer:], and then se-
8
lect the paper size you want to use in [Paper Size:].
If the printer you want to use is not displayed in [Printer:], select the printer
you want to use.
D Configure the settings, and then click [OK].
Reference
The [Page Setup] dialog box varies depending on the application you use.
For details, see the manuals provided with the Mac OS X.
Setting up for printing from an application
A Open the file you want to print.
B On the [File] menu, click [Print].
C Check that the printer is selected in the [Printer] list, and then make the
printer settings.
78
D Configure the settings, and then click [OK].
Mac OS X
Mac OS X - Canceling a Print Job from the Computer
A Start Print Center.
B Select the name of the job you want to cancel.
C Click the Pause icon, and then click the Trash icon.
Note
❒ If the printer is shared by multiple computers, be careful not to cancel a
print job of other user.
❒ You cannot stop printing data that has already been processed. For this
reason, printing may continue for a few pages after you cancel printing.
❒ To stop a large data size print job may takes a while.
Using USB Interface
Follow the procedure below to setup USB connection.
A Start Printer Setup Utility.
B Click [Add].
• Mac OS X 10.4 or higher
Click a printer that has “USB” indicated in the “Connection” column.
• Other Mac OS X
Click [USB] on the pop-up menu.
The connected printer appears.
8
C Select the printer, and then select its manufacturer from the [Printer Model:]
pop-up menu.
Under Mac OS X 10.4 or higher, select the manufacturer from the [Print Using]
pop-up menu.
A list of printer types appears.
D Select the connected printer from the list of printer models, and then click
[Add].
E Quit Printer Setup Utility.
Note
❒ USB 2.0 can be used only with Mac OS X 10.3.3 or higher.
79
Mac OS Configuration
Changing to EtherTalk
Follow the procedure below to configure a Mac OS X to use EtherTalk.
Important
❒ You need an administrator name and a password (phrase). For details, consult your network administrator
A Open [System Preference], and then click the Network icon.
B Click [Built-in Ethernet] in the [Show:] list box.
C Click the [AppleTalk] tab.
D Select the [Make AppleTalk Active] check box.
E To change AppleTalk zones, select a name from the [AppleTalk Zone:] pop-up
menu.
F When the settings are made, click [Apply Now].
G Quit [System Preference].
Reference
For information about installing applications required for EtherTalk, see
the Mac OS X manuals.
8
80
Configuring the Printer
Configuring the Printer
Use Web Image Monitor to enable AppleTalk. (The default is active.)
Note
❒ AppleTalk is set to "active" by default.
8
81
Mac OS Configuration
Using PostScript 3
Use the PostScript 3 driver to print files.
You can use the following functions if [Printer Features] is selected in the [Print]
dialog:
❖ Paper Type
Use this function to select the paper type.
In the [Feature Sets] list, select [Paper Type], and then, in the [Media Type] list, select the paper type you want to use for printing.
❖ Print Quality
Use this function to select the print quality.
In the [Feature Sets] list, select [Imaging] , and then, in the [Print Quality] list, select the print quality.
You can select Standard, High Quality, or Best Quality.
❖ Color Profile
Use this function to select the color profile pattern.
In the [Feature Sets] list, select [Imaging] , and then, in the [Color Profile] list, select the color profile pattern.
You can select Off, Solid Color, Presentation, or Photographic.
❖ CMYK Simulation Profile
Use this function to simulate the color tone of the printing ink.
In the [Feature Sets] list, select [Imaging] , and then, in the [CMYK Simulation Profile] list, select the printing ink standard.
You can select the printing ink standard from Off, US OffsetPrint, Euroscale,
or PaletteColor.
8
❖ Black Text Over Print
Use this function to specify whether or not to print black over other colors.
To enable black text over print, in the [Feature Sets] list, select [Imaging]. Then,
set [Black Over Print] to [On].
❖ Dithering
Use this function to specify the rendering mode.
In the [Feature Sets] list, select [Dithering], and then, in the [Dithering] list, select
the rendering mode.
You can select Automatic, Photographic, or Text.
❖ Color / Black and White
Use this function to specify whether the document is printed in color or black
and white.
In the [Feature Sets] list, select [Toner], and then, in the [Color/ Black and White]
list, select the toner color.
You can select Automatic, Color, or Black and White.
82
Using PostScript 3
❖ Gray Reproduction
Use this function to select the black color mode for text and line art.
In the [Feature Sets] list, select [Toner], and then, in the [Gray Reproduction] list,
select the black color mode.
You can select Black by K or CMY+K.
❖ Toner Saving
Use this function to reduce the amount of toner used when printing.
To reduce toner consumption, in the [Feature Sets] list, select [Toner]. Then set
[Toner Saving] to [On].
❖ Print Blank Pages
Use this function to print blank pages.
To print blank pages, in the [Feature Sets] list, select [Toner]. Then set [Print
Blank Pages] to [On].
❖ Front Cover
Use this function to print a front cover.
In the [Feature Sets] list, select [Cover] , and then, in the [Front Cover] list, select
the front cover setting.
You can select Off, Leave Blank, One Side, or Both Sides.
❖ Front Cover Input
Use this function to select the input tray for printing the front cover.
In the [Feature Sets] list, select [Cover] , and then, in the [Front Cover Input] list,
select the input tray.
❖ Watermark Type
Use this function to select the watermark style.
In the [Feature Sets] list, select [Watermark Text] , and then select the watermark
type in the list.
You can select Outlined, Solid, or Transparent Text.
8
❖ Watermark Text
Use this function to select the watermark text.
In the [Feature Sets] list, select [Watermark Text], and then select the watermark
text in the list.
You can select the following text:
• CONFIDENTIAL
• TOP SECRET
• COPY
• DRAFT
• FINAL
• FILE COPY
• PROOF
83
Mac OS Configuration
❖ Watermark Font Size (Points)
Use this function to select the watermark font size.
In the [Feature Sets] list, select [Watermark Text], and then, select the watermark
font size in the list.
❖ Watermark Font Typeface
Use this function to select the watermark font typeface.
In the [Feature Sets] list, select [Watermark Text], and then, select the watermark
typeface.
❖ Watermark Font Shading
Use this function to select the watermark font shading.
In the [Feature Sets] list, select [Watermark Text], and then, select the watermark
font shading in the list.
❖ Watermark Position
Use this function to select the watermark position.
In the [Feature Sets] list, select [Watermark Location]. Then, in the [Watermark Position (Horizontal)] and [Watermark Position (Vertical)] lists, select the horizontal
and vertical positions, respectively.
❖ Watermark Angle
Use this function to select the watermark angle.
In the [Feature Sets] list, select [Watermark Location], and then , select the watermark angle in the list.
❖ Watermark
Use this function to select which page(s) to print the watermark on.
In the [Feature Sets] list, select [Watermark Location], and then, in the [Watermark]
list, select which page(s) you want to print the watermark on.
You can select Off, First Page Only, or All Pages.
8
84
Using Smart Organizing Monitor
Using Smart Organizing Monitor
This section explains about using Smart Organizing Monitor under Mac OS X.
Using Smart Organizing Monitor, you can check the printer status and change
printer settings from your client computer.
The following operations are possible with Smart Organizing Monitor:
• Displaying printer status or settings
• Printing a list of printer configurations
• Making settings for paper loaded into each input tray
• Making input tray settings
• Changing factory-set default settings
• Making network protocol settings
• Making printer settings
• Displaying the printer status and supply information
• IPX Settings
• SMTP Settings
• SNMP Settings
• AppleTalk Settings
Installing Smart Organizing Monitor
Follow the procedure below to install Smart Organizing Monitor under Mac OS X.
8
A Insert the CD-ROM into the CD-ROM drive.
B Double-click the CD-ROM icon.
C Double-click the [Mac OS X] folder.
D Double-click the [Utility] folder.
E Double-click the package file icon.
F Follow the instructions on the screen.
Displaying the Smart Organizing Monitor Dialog Box
To display the Smart Organizing Monitor dialog box, double-click [Smart Organizing Monitor] in the Applications folder.
85
Mac OS Configuration
Displaying the Printer Status
In the Smart Organizing Monitor dialog box, you can check the status of monitored printers. The printer status is displayed using graphics and comments.
Note
❒ If Smart Organizing Monitor is monitoring multiple printers, the [Printer Driver
Selection] dialog box appears. Select the printer driver used by the target
printer, and then click [OK]. To check the status of a network printer, click
[Search Network Printer].
Displaying the Printer Information
There are two tabs that you can obtain the information of the printer, [Status] and
[User Tools]. On each tab, you can display the information about monitored
printer, such as status and printer configuration.
Displaying the printer status
The left side of the [Status] tab displays the printer name and tree. Click an item
in the tree to display information relating to it.
❖ Toner
Displays the remaining amount of each toner. The following are used to indicate the remaining amount: Level 1 to 5, “Almost Empty” and “Empty”. A
graphic also indicates each toner’s status.
8
❖ Input Tray
You can check the following information about the input trays.
• Input Tray
Displays the installed input trays.
• Status
Displays the input tray status using a graphic.
• Paper Size
Displays the size of the paper loaded into each input tray.
• Paper Type
Displays the type of the paper loaded into each input tray.
❖ Supplies
Displays the consumable names and status. The graphics also indicate the
consumables status.
❖ System
Displays the system information about the printer, such as the model name,
system version, and memory size.
86
Using Smart Organizing Monitor
❖ Counter
Displays information about the counters.
❖ Network
Displays the network-related information about the printer, such as the machine name, comments for the machine, IP address, and subnet mask.
Reference
For details about what you can perform on each tab in the Smart Organizing
Monitor dialog box, see Smart Organizing Monitor Help.
Printing the printer configurations
On the [User Tools] tab, you can print lists of printer information.
Important
❒ You can print the configuration page only when the printer is not busy
processing jobs.
❒ To use this function, the printer must be monitored from Smart Organizing
Monitor via a supported printer driver.
In the [List/Test Print] list, select the item you want to print. You can print the following:
❖ Configuration Page
The current configurations and general information of the printer are printed.
❖ Menu List
The machine's function menus are printed.
8
❖ Test Page
Test page can be printed when you want to confirm the printer status.
❖ PS Configuration/Font Page
The installed PS font list is printed.
Use the printed configuration page to check the information such as general information and printer configuration.
The procedure for printing the configuration page is described as an example.
A On the [User Tools] tab, in the [List/Test Print] list, select [Configuration Page].
B Click [Print].
The configuration page is printed.
87
Mac OS Configuration
Printer Configuration
Clicking [Printer Configuration] on the [User Tools] tab enables you to change the
printer settings in the [Printer Configuration] dialog box.
On the tabs in the [Printer Configuration] dialog box, the following operations are
possible:
• Making settings for paper loaded into each input tray
• Making input tray settings
• Changing factory-set default settings
• Making network protocol settings
• Making printer settings
Reference
For details about each item you can specify on the [Printer Configuration] dialog
box, see Smart Organizing Monitor Help.
About menu and mode
There are two modes you can use to access the [Printer Configuration] dialog box:
for administrator mode and general users mode.
Available tabs in the [Printer Configuration] dialog box differ depending on the
mode you are in.
❖ Administrator
In the [Access Code] dialog box, enter an access code.
All tabs in the [Printer Configuration] dialog box are available.
8
❖ General users
Only the [Paper Input] tab is available.
Changing the paper settings
On the [Paper Input] tab, you can change paper size and other paper settings.
Note
❒ The paper settings are not available for the bypass tray.
• Tray 1: Size
The following sizes are available:
A4 (210 x 297 mm), B5 JIS (182 x 257 mm), A5 (148 x 210 mm), B6 JIS (128 x 182
mm), A6 (105 x 148 mm), 8 1/2 x 14, 8 1/2 x 11, 5 1/2 x 8 1/2, 7 1/4 x 10 1/2,
8 x 13, 8 1/2 x 13, 8 1/4 x 13, 4 1/8 x 9 1/2, 3 7/8 x 7 1/2, C5 Env, C6 Env, DL
Env, 16K, Custom Paper Size, Any Size
88
Using Smart Organizing Monitor
• Tray 1: Type
The following paper types are available:
Thin Paper, Plain Paper, Plain Paper 2, Recycled Paper, Color Paper, Letterhead, Preprinted Paper, Prepunched Paper, Labels, Bond Paper, Cardstock,
Thick Paper, Envelope, Any Type
• Custom Paper Size
You can make the custom paper size settings, when [Custom Paper Size] is selected.
• Unit:
You can specify the unit of measurement in "mm" or "inch".
• Horizontal:
You can specify the horizontal width between 90 and 216 mm.
• Vertical:
You can specify the vertical length between 148 and 356 mm.
• Tray 2: Size
The following sizes are available:
A4 (210 x 297 mm), 8 1/2 x 11
• Tray 2: Type
The following paper types are available:
Thin Paper, Plain Paper, Plain Paper 2, Recycled Paper, Color Paper, Letterhead, Preprinted Paper, Prepunched Paper
Note
❒ Tray 2 is available only when the optional paper feed unit is attached to the
printer
8
Adjusting registrations
On the [Maintenance] tab, you can adjust color registration and print starting positions.
Normally, you do not have to adjust registrations. However, adjustments could
be useful in some cases, especially when you want to print in the correct position. Under [Registration: Tray 2 Paper] and [Registration: Bypass Tray], you can adjust
the print image position printed on the sheet fed from each tray. To check the adjustment result, use [Print Test Sheet].
Also, you can updated the firmware by clicking [Printer Firmware Update].
The latest version of the firmware can be downloaded form the supplier's website.
Setting basic functions
On the [System] tab, you can set basic functions required to use the printer. The
printer can be used on factory-set defaults, but the configuration can be changed
depending on the condition of the user. The changed condition holds even if the
printer is turned off.
The access code can be changed on this tab.
89
Mac OS Configuration
Making network-related settings
On the [Network 1], [Network 2] and [Network 3] tabs, you can set configurations
about network connection and communication.
The following operations are possible on these tabs:
• Checking the device name, active protocol, and other printer information
• Making interface settings, including timeout period and protocol settings
• Checking or making TCP/IP settings
• Checking or making IPX and SMTP settings
• Checking or making SNMP and AppleTalk settings
Settings conditions for printing
On the [Printer] tab, you can set conditions for printing.
In the [PCL] area, you can specify the conditions such as Orientation and font settings.
In the [PS] area, you can specify Resolution and Color Profile.
8
90
9. Appendix
Software and Utilities Included on the CD-ROM
The following software and utility are included in the CD-ROMs that come with
the printer.
❖ Smart Organizing Monitor
Allows users and system administrators to check and configure the printer
from a client computer.
❖ TCP/IP Port Type P9100
For Windows 98 SE/Me users to print via TCP/IP port.
Viewing the contents of the CD-ROM
Follow the procedure below to view the contents of the CD-ROM.
A Insert the CD-ROM into the CD-ROM drive.
The installer starts.
B Click [Browse This CD-ROM].
Explorer starts and displays the contents of the CD-ROM.
Printer Drivers for this Printer
Printing requires installing a printer driver appropriate to your operating system. The following driver is included on the CD-ROM provided with this printer.
❖ PCL 5c/ 6 printer driver
This printer driver allows the computer to communicate with the printer via
a printer language.
The following operating system is supported.
• Windows 98 SE/Me, Windows 2000/XP, and Windows Server 2003
91
Appendix
❖ PostScript 3 Printer Drivers and PPD files
PostScript 3 printer driver and the PPD files are included on the CD-ROM
provided with this printer. PostScript 3 printer driver allow the computer to
communicate with the printer using a printer language. PPD files allow the
printer driver to enable specific printer functions.
The following operating system is supported.
• Windows 98 SE/Me, Windows 2000/XP, Windows Server 2003, and Mac
OS X
Note
❒ The PostScript 3 printer driver and PPD files are included on the CD-ROM
labeled “Printer Drivers and Utilities”.
❖ PPD files
PPD files are included on the CD-ROM provided with this printer. PPD files
allow the printer driver to enable specific printer functions.
Smart Organizing Monitor
You can use Smart Organizing Monitor, to check and configure the printer from
a client computer.
❖ File path
UTILITY
❖ Available functions
Smart Organizing Monitor enables you to check the printer settings as well as
configuring them from your client computer.
Reference
For information about using Smart Organizing Monitor, see p.57 “Using
Smart Organizing Monitor”.
9
TCP/IP Port Type P9100
Using TCP/IP Port Type P9100, you can print via TCP/IP using TCP/IP Port
Type P9100 under Windows 98 SE/ Me.
❖ File Path
PORT
92
Cautions to Take When Using in a Network
Cautions to Take When Using in a Network
Using DHCP
You can use the printer in a DHCP environment.
• Supported DHCP servers are those which are included with Windows 2000
Server, and Windows Server 2003.
• DHCP relay-agent is not supported. If you use DHCP relay-agent on a network via ISDN, it will result in increased line charges. This is because your
computer connects to the ISDN line whenever a packet is transferred from the
printer.
• If there is more than one DHCP server, use the same setting for all servers.
The printer operates using data from the DHCP server that responds first.
Using AutoNet
If the printer IPv4 address is not assigned by a DHCP server automatically, a
temporary IPv4 address starting with 169.254, which is not used on the network,
can be automatically selected by the printer.
If an AutoNet address is set as the printer's IP address, it changes every time you
turn on the printer. Configure the TCP/IP settings according to your network
environment.
You must change this setting to “on” to use AutoNet.
Note
❒ The IP address assigned by the DHCP server is given priority over that selected by AutoNet.
9
❒ You can confirm the current IPv4 address on the configuration page.
❒ The printer cannot communicate with devices that do not have the AutoNet
function. However, this printer can communicate with Macintosh computers
running Mac OS X 10.2.3. or higher.
93
Appendix
Using Adobe PageMaker Version 6.0, 6.5, or 7.0
Under Windows 98 SE/Me/2000/XP, or Windows Server 2003 with Adobe
PageMaker, you need to copy PPD files to the PageMaker folder.
PPD files have the ".ppd" extension in the folder “DRIVERS\PS\WIN9X_ME
\(Language)\DISK1\” on the CD-ROM.
The “WIN9X_ME” folder inside the “PS” folder is for Windows 98 SE/Me. Use
the folder at this level that is appropriate for the operating system you are currently using.
The third folder “(Language)” may be substituted by an appropriate language
name.
Copy the ".ppd" file to the PageMaker folder.
• For PageMaker 6.0 default installation
The directory is “C:\PM6\RSRC\PPD4”.
• For PageMaker 6.5 default installation
The directory is “C:\PM65\RSRC\USENGLISH\PPD4”.
The “USENGLISH” may vary depending on your language selection.
• For PageMaker 7.0 default installation
The directory is “C:\PM7\RSRC\USENGLISH\PPD4”.
The “USENGLISH” may vary depending on your language selection.
Note
❒ If the driver is not set correctly after copying the “.ppd” file, printing may not
be performed properly.
❒ When using PageMaker, the optional features that can be selected by the
printer driver will not be active. The following procedure describes how to
activate the optional printer features.
A On the [File] menu, click [Print].
The [Print Document] dialog box appears.
B Make the necessary settings in the [Features] box.
9
94
When Using Windows Terminal Service/ MetaFrame
When Using Windows Terminal Service/
MetaFrame
The following explains how to use Windows Terminal Service and MetaFrame.
Operating Environment
The following operating systems and MetaFrame versions are supported.
❖ Windows 2000 Server/Advanced Server
• MetaFrame XP 1.0 SP1/SP2/SP3/SP4/FR1/FR2/FR3
• MetaFrame Presentation Server 3.0
• Citrix Presentation Server 4.0
❖ Windows Server 2003
• MetaFrame XP 1.0 FR3
• MetaFrame Presentation Server 3.0
• Citrix Presentation Server 4.0
Supported Printer Drivers
❖ When Windows Terminal Service is operating
• PCL printer driver
• PostScript 3
9
Limitations
The following limitations apply to the Windows Terminal Service environment.
These limitations are built in Windows Terminal Service or MetaFrame.
❖ MetaFrame's [Auto-creating client printers]
Using [Auto-creating client printers], you can select a logical printer created by
copying the client's local printer data to the MetaFrame server. We strongly
recommend testing this function in your network environment before using
it for your work.
• The settings for optional equipment will not be stored in the server after
the equipment is disconnected. The settings for optional equipment will be
restored to its defaults each time the client computer logs on to the server.
• When printing a large number of bitmap images or using the server in a
WAN environment over dial-up lines such as ISDN, printing may not be
possible or errors may occur, depending on data transfer rates.
95
Appendix
• When using MetaFrame XP 1.0 or higher versions, we recommend making
settings in [Client Printer bandwidth] under [Citrix Management Console] according to the environment.
• If a print error occurs on the MetaFrame XP 1.0 SP1/FR1 and the print job
or a printer created in [Auto-creating client printers] cannot be deleted, we recommend making settings in [Delete unfinished print jobs] in the registry. For
details, see the Readme file provided with MetaFrame.
• If a print error occurs on the MetaFrame XP 1.0 FR2 and the print job or a
printer created in [Auto-creating client printers] cannot be deleted, we recommend making settings in [Delete unfinished print jobs at logout] of Citrix Management Console.
❖ MetaFrame's [Printer driver replication]
Using [Printer driver replication], you can distribute printer drivers across all
servers in a server farm. We strongly recommend testing this function in your
network environment before using it for your work.
• If the printer drivers are not properly copied, install them directly onto
each server.
9
96
INDEX
D
DHCP server, 74, 93
Direct printing
digital camera, 43
Displaying the printer status
Smart Organizing Monitor, 58, 86
Web Image Monitor, 51
Display Smart Organizing Monitor
automatically, 35
DNS server, 73
100baseTX, 1
10baseT, 1
A
Access code, 62, 88
Accessing the printer properties, 31
Adding the IPv4 address
Windows 2000, 74
Windows Server 2003, 74
Windows XP, 74
Adjusting registrations, 64, 89
Administrator mode, 51, 53
log off, 53
log on, 53
Adobe PageMaker, 94
AppleTalk, 55, 64, 81, 90
AutoNet, 93
Auto Run, 21
B
E
E-Mail notification, 65
Ethernet, 1
EtherTalk, 77, 80
F
Form Feed, 35
Form feed, 35
H
Bidirectional communication, 22, 23
conditions, 22
C
Canceling a job
control panel, 35, 36
Windows, 36
CD-ROM, 91
Change Login Password, 56
Collate, 37
Command
ftp, 73
lpr, 73
Configuration page, 68
administrator mode, 51
network, 53
Paper, 53
Smart Organizing Monitor, 61, 87
user mode, 51
Web Image Monitor, 55
Connection method, 1
local connection, 1, 2
network connection, 1
Counter tab, 51
Cover, 38
Custom Paper Size, 63, 88
Help Source File Setting, 56
Host name, 73, 74
I
Installation method
PCL 5c printer driver, 3
PCL 6 printer driver, 3
PostScript 3 printer driver, 3
Installing
network environment, 4, 8
PCL printer driver, 4, 9
PostScript 3 printer driver, 5, 10
TCP/IP Port Type P9100, 6, 7
USB, 15
Windows 2000, 8
Windows 98 SE, 4
Windows 98 SE/Me, 4, 5, 6
Windows Me, 4
Windows Server 2003, 8
Windows XP, 8
IPv4 address, 73
adding, 74
IPX, 55, 64, 67, 90
97
J
Job Log tab, 60, 61
L
Limitations
MetaFrame, 95
Windows Terminal Service, 95
Login information
change, 56
M
Mac OS X, 77
canceling a print job, 79
option setting, 78
paper settings from an application, 78
setting up for printing, 78
USB, 77, 79
Mail authentication, 66
Making option settings, 22
Manual duplex, 40
Memory capacity, 41
Menu List, 61, 87
MetaFrame, 95
limitations, 95
operating environment, 95
N
NetWare print server, 2
Network environment
setup, 73
P
Paper size, 41
PCL, 64, 90
PCL 5c printer driver, 91
PCL 6 printer driver, 91
PCL Configuration/Font Page, 61
PCL menu, 68
PCL printer driver, 9
PictBridge, 43, 47
exiting, 46
feature, 45
printing, 44
PictBridge Feature
image print size, 45
paper size, 45
Port settings, 7
98
PostScript 3
printer properties, 33
PostScript 3 printer driver, 10, 82, 91
Windows 98 SE, 30
Windows Me, 30
PPD files, 91
setting up, 77
Printer Configuration, 68
administrator, 62, 88
general users, 62, 88
menu and mode, 62, 88
Printer configuration, 61, 62, 87, 88
Printer drivers, 91
Printer Drivers and Utilities, 9, 10
Printer Driver Selection, 58
Printer Firmware Update, 64, 89
Printer information, 60, 86
Printer properties
PCL printer drivers, 25
PostScript 3 printer driver, 30
Windows 2000, 26
Windows 98 SE, 25, 30
Windows Me, 25, 30
Windows Server 2003, 28
Windows XP, 28
Printer settings
application, 25, 27, 29
PCL printer drivers, 25
PostScript 3 printer driver, 30
Printers and Faxes window, 28
Printer window, 25, 26
Printing Preferences, 27, 29
Printer Setup Utility, 77
Printer's IP address
checking, 12
reconfiguring, 12, 13
Printer status, 60, 86
Printer tab, 64, 90
Printing commands, 75
ftp, 76
lpr, 75
Printing files directly from Windows, 73
Print server, 14, 71
PS, 64, 90
PS Configuration/Font Page, 61, 87
PS menu, 68
R
Reconfiguring the printer's IP address
local connection, 13
network connection, 12
Resolution, 41
S
Shared printer, 14
Smart Organizing Monitor, 57, 85, 91
displaying, 58, 85
file path, 92
install, 57, 85
Mac OS X, 85
Maintenance tab, 64, 89
Network1 tab, 64, 90
Network2 tab, 64, 90
Network3 tab, 64, 90
paper settings, 63, 88
System tab, 64, 89
SMTP, 55, 64, 90
SMTP authentication, 66
SNMP, 55, 64, 67, 90
Software and utilities, 91
Standard TCP/IP, 1
Status tab, 51, 60, 86
W
Watermark, 39
Web Image Monitor, 49
List/Test Print, 55
login information, 56
network settings, 55
paper settings, 54
printer settings, 53
Top Page, 50
user mode, 51
Web Image Monitor Help, 56
download, 56
Windows 2000, 8
Windows 98 SE/Me, 7
Windows network printer, 2, 14
Windows printing port, 1
Windows Server 2003, 8
printer properties, 33
Windows Terminal Service, 95
limitations, 95
supported printer drivers, 95
Windows XP, 8
printer properties, 33
T
TCP/IP, 55, 64, 90
TCP/IP Port Type P9100, 1, 91
configuring, 7
file path, 92
installing, 6
TCP/IP Port Type P9100 Configuration, 7
Test Page, 61, 87
Top Page, 50
Tray Priority, 54
Troubleshooting
PictBridge, 47
USB, 20
U
UDP, 67
User Tools tab, 60, 61, 86, 87
Printer Configuration, 62, 88
99
100
GB
GB
G167-8612
Copyright © 2006
Operating Instructions Software Guide
G167-8612
GB GB
Gel
Software Installation Guide for Network Connection
Software Installation Guide for Network Connection
English
This manual briefly describes the procedure for installation of the printer
driver under the network environment. If you use this printer using the
USB cable, see “Software Guide” for the installation of the printer driver.
English
Specifying the Printer’s IP Address
Connect the printer and computer using an Ethernet cable, and then
This manual briefly describes the procedure for installation of the printer
driver under the network environment. If you use this printer using the
USB cable, see “Software Guide” for the installation of the printer driver.
turn the printer’s power switch on.
For correct use, please be sure to read “Quick Installation Guide” and complete the settings
described in the guide.
described in the guide.
The following four steps are required to use this printer.
The following four steps are required to use this printer.
1. Printing a test page
1. Printing a test page
2. Installing Smart Organizing Monitor
2. Installing Smart Organizing Monitor
3. Specifying the printer’s IP address
ASH322S
3. Specifying the printer’s IP address
4. Installing the printer driver
On the [Start] menu, point to [Programs]>[Smart Organizing
Monitor for PCL/DDST] > [Smart Organizing Monitor for PCL/DDST
Note:
Status], to start Smart Organizing Monitor.
• For details about the installation of the printer driver, see “Software Guide”.
Connect the printer and computer using an Ethernet cable, and then
turn the printer’s power switch on.
For correct use, please be sure to read “Quick Installation Guide” and complete the settings
4. Installing the printer driver
Specifying the Printer’s IP Address
On the [Start] menu, point to [Programs]>[Smart Organizing
Monitor for PCL/DDST] > [Smart Organizing Monitor for PCL/DDST
Status], to start Smart Organizing Monitor.
Note:
• For details about the installation of the printer driver, see “Software Guide”.
Note:
ASH322S
Note:
• In a Windows Vista environment, select [Run as Administrator]
• In a Windows Vista environment, select [Run as Administrator]
to start Smart Organizing Monitor.
Printing a Test Page
While pressing down the [Job Reset] key, turn the printer's power switch on,
to start Smart Organizing Monitor.
Printing a Test Page
Click [IP Address...], and then enter the printer’s MAC address that was
Click [IP Address...], and then enter the printer’s MAC address that was
printed on the test page. (ex: 00-11-22-aa-bb-cc) in the [MAC Address]
printed on the test page. (ex: 00-11-22-aa-bb-cc) in the [MAC Address]
box.
While pressing down the [Job Reset] key, turn the printer's power switch on,
and then keep the key pressed until the Alert indicator start to flash.
and then keep the key pressed until the Alert indicator start to flash.
In the [IP Address] box, enter the IP address you want to set for the
Check the printer’s MAC address from the printed test page.
printer.
In the [IP Address] box, enter the IP address you want to set for the
Check the printer’s MAC address from the printed test page.
Click [OK] twice, and then click [Close].
Installing Smart Organizing Monitor
box.
printer.
Click [OK] twice, and then click [Close].
Installing Smart Organizing Monitor
Installing the Printer Driver
Quit all applications currently running.
Installing the Printer Driver
Quit all applications currently running.
Insert the CD-ROM into the CD-ROM drive.
On the [Printer Drivers and Utilities] dialog box, click the name of the
printer driver you want to install.
Insert the CD-ROM into the CD-ROM drive.
printer driver you want to install.
Select an interface language, and then click [OK].
After reading the agreement, click [I accept the agreement.], and then
Select an interface language, and then click [OK].
After reading the agreement, click [I accept the agreement.], and then
click [Next >].
On the [Printer Drivers and Utilities] dialog box, click the name of the
click [Next >].
Click [Smart Organizing Monitor].
Click [Smart Organizing Monitor].
Click [Add a new printer], select the [Search for network printers.] check
Select a language for Smart Organizing Monitor installer, and then click
box, and then click [Next >].
[OK].
Click [Add a new printer], select the [Search for network printers.] check
Select a language for Smart Organizing Monitor installer, and then click
box, and then click [Next >].
[OK].
When the list of found printers appears, click this printer, and then
When the list of found printers appears, click this printer, and then
Click [Next >].
click [Next >].
Click [Next >].
click [Next >].
After reading the agreement, click [Yes].
If necessary, double-click the printer to display and configure its
After reading the agreement, click [Yes].
If necessary, double-click the printer to display and configure its
settings, and then click [Continue].
Click [Next>] twice.
settings, and then click [Continue].
Click [Next>] twice.
If a message appears informing you that the installation was
Click [Finish].
successfully completed, click [Finish].
Note:
If a message appears informing you that the installation was
Click [Finish].
successfully completed, click [Finish].
Note:
• If the IP address setting or the printer search fails, please
• If the IP address setting or the printer search fails, please
make sure the printer is connected to the same network
make sure the printer is connected to the same network
segment as the PC.
segment as the PC.
Additional Information for Software Installation
Guide for Network Connection
This supplement provides you with additional information for setting up the
printer in a Windows network environment.
If your environment is using DHCP, be sure to read this supplement as well as
Software Installation Guide for Network Connection before installing the printer
drivers.
When Installing the Drivers in a DHCP Environment
Note the following before installing the printer drivers in a DHCP environment:
❒ Make sure the network cable is properly connected to the printer before you
print the test page.
❒ Omit the procedure in "3. Specify the Printer’s IP Address", Software
Installation Guide for Network Connection. This procedure is not necessary
because the printer is automatically recognized by its IP address when its main
power is switched to ON.
❒ Using Web Image Monitor, change the automatically specified IP address to
the IP address printed on the test page.
For details about Web Image Monitor, see Software Guide on the supplied CDROM and Notes to Administrator that is provided with the printer.
Copyright © 2007
Printed in China
GB GB EN USA G165-7509
G1657509
Using Smart Organizing Monitor
under the Macintosh Environment
The following explains the items that are displayed on the Smart Organizing
Monitor when using it under the Macintosh environment.
Device Settings
Important
❒ Depending on your machine model, functions you can use may vary.
Smart Organizing Monitor
Shows device status information.
❖ [User Guide]
Displays the user’s guide.
❖ [Search Network Printer]
Displays supported network printers that can be monitored.
Status tab
Displays details about selected items in the tree.
❖ Displayed content of tree-selected items
Tree-selected items
Displayed content
Toner
Remaining toner levels.
Input Tray
Status of paper trays and the size and
type of paper set in each.
Supplies
Status of waste toner.
System
System information: Model Name, System Version, Memory Size, PCL 5c, PCL
XL, PS3, and PictBridge.
Counter
Status such as Total, Black & White, and
Full Color.
Network
Printer details: Device Name, Comment, IP Address, Subnet Mask, and
MAC Address.
1
Using Smart Organizing Monitor under the Macintosh Environment
User Tools tab
Displays the test print setting and allows you to select whether to open the [Printer
Configuration] dialog box.
❖ List/Test Print
Select the item for test print.
• [Print]
Select the item for test print.
❖ [Printer Configuration]
Opens the [Printer Configuration] dialog box. If [Use] is selected for [Access Code]
in [System] tab, the tabs you can see/set may vary depending on the access
code settings.
❖ [IP Address]
If you cannot obtain the IP address after the test printing, press this button to
set the IP address manually.
Note
❒ For details about test printing, see the printer operating instructions.
2
Printer Configuration
Printer Configuration
Paper Input Tab
Make paper settings such as size and type for each paper tray.
Tray 1
❖ Paper Size
In the [Paper Size] list, select the size of paper loaded in the input tray.
If you select [Custom Paper Size], specify the size in [Custom Paper Size].
❖ Paper Type
In the [Paper Type] list, select the paper type.
❖ Custom Paper Size
Enter the custom paper size when [Custom Paper Size] is selected.
• Unit
Select which units (inch or mm) to use for entering lengths in the [Horizontal]
and [Vertical] boxes.
• Horizontal and Vertical
Enter the custom paper size when [Custom Paper Size] is selected.
In the units selected earlier (inch or mm), enter the length of the paper's
short and long edges in the [Horizontal] and [Vertical] boxes respectively.
Note
❒ Available paper sizes vary depending on the paper tray. For details about setting the paper size, see the printer operating instructions.
Reference
For details about setting the paper size, see the printer operating instructions.
Tray 2
❖ Paper Size
In the [Paper Size] list, select the size of paper loaded in the input tray.
❖ Paper Type
In the [Paper Type] list, select the paper type.
3
Using Smart Organizing Monitor under the Macintosh Environment
Tray Priority
❖ Default Tray
Select the tray used for the priority paper source.
"Tray Priority" is the tray selected immediately after the printer is turned on,
and when Auto Select is chosen as the paper source for a job.
Bypass Tray
❖ Paper Size
In the [Paper Size] list, select the size of paper loaded in the input tray.
When [Custom Paper Size] is selected, specify the size in [Custom Paper Size].
❖ Paper Type
In the [Paper Type] list, select the paper type.
❖ Custom Paper Size
• Unit
Select which units (inch or mm) to use for entering lengths in the [Horizontal] and [Vertical] boxes.
• Horizontal and Vertical
Enter the custom paper size when [Custom Paper Size] is selected. In the
units selected earlier (inch or mm), enter the length of the paper's short and
long edges in the [Horizontal] and [Vertical] boxes respectively.
Note
❒ Available paper sizes vary depending on the paper tray. For details about setting the paper size, see the printer operating instructions.
4
Printer Configuration
Maintenance Tab
Make settings for adjusting printing position and color registration, and updating the printer's firmware.
Registration: Tray 2 Paper
Adjust the position of Tray 2 if it is installed.
❖ [Print Test Sheet]
Click this button to check the printing position using a test print.
❖ Adjustment
• Horizontal
Adjust the horizontal print position if needed.
• Vertical
Adjust the vertical print position if needed.
Registration: Bypass Tray
Adjust the position of the bypass tray.
❖ [Print Test Sheet]
Click this button to check the printing position using a test print.
❖ Adjustment
• Vertical
Adjust the vertical print position if needed.
Color Registration
❖ [Adjust]
Press to adjust the color registration.
[Printer Firmware Update]
Press to update the printer firmware.
5
Using Smart Organizing Monitor under the Macintosh Environment
System Tab
Make system, access code, and language settings.
System
❖ Auto Continue
Select how the printer responds if it does not have a paper tray that contains
the paper size and type specified by a job.
• Off
The printer stops operation until the correct paper is loaded.
• On
After 60 seconds, the printer begins printing regardless of the size and type
of paper loaded in the tray.
❖ Copies
Select a number of print copies (1 to 999).
❖ Sub Paper Size
Select whether or not to enable A4/Letter switching.
Note
❒ This function is effective for A4 and Letter-size only.
❖ 2 Sided Print
Prints on both sides of sheets.
• Off
Disables Duplex printing.
• Short Edge Bind
Prints output so that you can open it to the top when bound along the top
like a calendar.
• Long Edge Bind
Prints output so that you can open it to the left when bound along the left
edge like a book.
Note
❒ If you are using a printer that does not support automatic duplex printing,
perform normal single-sided printing, and then turn the copies over to
print on the other side.
❖ Blank Pages
Select whether or not to print on blank pages.
6
Printer Configuration
❖ Energy Saver Mode 1
When this function is enabled, less electricity is used.
❖ Energy Saver Mode 2
When this function is enabled, less electricity is used than under Energy Saver
1.
❖ Energy Saver Mode 2 Timer
When [Energy Saver Mode 2] mode is enabled, you can select a timeout period.
❖ B&W Page Detect
When this function is enabled, all pages are individually counted and detected as black and white or color.
Note
❒ Grayscale pages of indexed colors are counted as black and white pages.
❒ Grayscale pages of sampled colors, for example RGB, are counted as color
pages.
❖ Auto E-mail Notification
Select whether or not to send e-mail notification of machine status or errors.
❖ Print Error Page
Prints an error report if an error occurs during print data processing.
❖ Device Comment
Enter a note about the machine, using up to 32 alphanumeric characters.
❖ [Restore Factory Defaults]
Resets all settings to their default values.
Access Code
Select whether or not to use the access code.
If you select [Use], the tabs you can see/set may vary depending on the access
code settings. If you select [Do not Use], the access code setting screen does not
appear before the [Printer Configuration] dialog box. [Do not Use] is set as the factory default. Change it to [Use] if you want access code control.
❖ [Change Access Code...]
If you selected [Use] for [Access Code], press this button to change the access
code.
Language
Select the language you want to use.
7
Using Smart Organizing Monitor under the Macintosh Environment
Network 1 Tab
Use this page to enter administrative information related to the network.
Information
Displays the device name and comment, MAC address, and the active protocol
of the machine.
Interface
❖ I/O Timeout (USB)
Select the USB timeout from the drop down list. The printer waits before ending a print job if more data is not received through USB. When the specified
period elapses, data reception through other interfaces is possible.
❖ I/O Timeout (Network)
Select the network timeout from the drop down list. If EOF (*) is not received
by the network printer, the printer remains waiting. When the specified period elapses, data reception through other interfaces is possible.
(*)End Of File: a code placed by a computer after a file's last byte of data.
❖ TCP/IP
Select whether TCP/IP is [Active] or [Inactive].
❖ Netware
Select whether Netware is [Active] or [Inactive].
❖ AppleTalk
Select whether AppleTalk is [Active] or [Inactive].
❖ Ethernet Speed
Select the Ethernet communication speed. For normal use, select [Auto Select].
This allows the device to select the optimum speed. If communication with
the device fails, select [10Mbps Half D.], [10Mbps Full D.], [100Mbps Half D.], or
[100Mbps Full D.].
❖ USB Speed
Select the USB communication speed. For normal use, select [Auto Select]. This
allows the device to select the optimum speed. If communication with the device fails, select [Full Speed].
8
Printer Configuration
TCP/IP
❖ IP Address
This device's network IP address. Enter it in the following format:
"xxx.xxx.xxx.xxx" (replace "x" with the appropriate numbers, for example:
"123.123.123.123").
❖ Subnet Mask
Specify the part of the IP address used as the subnet mask. Enter it in the following format: "xxx.xxx.xxx.xxx" (replace "x" with the appropriate numbers,
for example: "123.123.123.123").
❖ Default Gateway Address
Enter the default gateway address. The default gateway address is the IP address of the host or router used as the gateway when communicating (printing or exchanging information) with a computer on another network.
❖ DHCP/BOOTP
Select [On] to automatically configure the network settings using the DHCP/BOOTP server.
Select [Off] to configure the network settings manually.
If DHCP/BOOTP is active, all TCP/IP settings are obtained automatically
from the DHCP/BOOTP server.
❖ DNS Server IP Address
Enter the DNS Server IP address in the following format: "xxx.xxx.xxx.xxx"
(replacing "x" with the appropriate numbers, for example: "123.123.123.123").
❖ DNS Domain Name
Enter the domain name, using up to 32 alphanumeric characters.
9
Using Smart Organizing Monitor under the Macintosh Environment
Network 2 Tab
Use this page to enter administrative information related to the network.
NetWare
❖ Frame Type
In the list, select the frame type you want to use. The default setting is [Auto
Select], which detects the frame type automatically. To specify particular
frame type, select it from the drop down list here.
❖ Logon Mode
Select whether to specify the file server or the NDS tree when logging on using NetWare.
• File Server Mode
Connects to the file server specified in the [File Server Name] box.
• NDS Mode
Connects to the server within the NDS tree specified in the [NDS Tree Name]
box.
❖ File Server Name
Enter the file server name using up to 47 characters.
❖ NDS Tree Name
Enter the name of the NDS tree you want to log on to when using NDS mode.
You can use up to 48 characters.
❖ NDS Context Name
Enter the context of the print server when using NDS mode. You can use up
to 127 characters. Object names must be input from the lowest level and separated by a period.
For example: if you want to create the file server in NETWORK under DS, enter "NETWORK.DS".
10
Printer Configuration
SMTP
❖ SMTP Authentication
Select whether to log on to the SMTP server using SMTP AUTH for sending
e-mail.
❖ Port Number
Enter the port number used for sending e-mail to the SMTP server. Enter a
value between 1 and 65535.
❖ SMTP Server Name
Enter the IP address or host name of the SMTP server using up to 64 characters.
Note
❒ When the SMTP server host name is specified, a DNS server must be set up
so the IP address can be obtained from the host name (forward lookup).
❖ User Name
Enter the SMTP account name to be used when [SMTP Authentication] is set to
[On].
Use up to 32 alphanumeric characters.
❖ Password
Enter the SMTP account password to be used when [SMTP Authentication] is set
to [On].
Use up to 32 alphanumeric characters.
❖ E-mail Address
Enter the e-mail address used for e-mail notification.
Use up to 64 alphanumeric characters.
11
Using Smart Organizing Monitor under the Macintosh Environment
Network 3 Tab
SNMP
❖ Community Name
Enter the name of the community to which the network interface board belongs. You can use up to 15 alphanumeric characters. Only requests from
hosts whose community name matches the name you set here will be accepted.
❖ Manager IP Address
Enter the host computer's IP address.
To accept requests from any host, set the address to "0.0.0.0".
❖ Manager IPX Address
Enter the host computer's IPX address. The IPX address consists of the network number and the physical address. Enter the network number to which
the host is connected and the MAC address of the host's network interface
board, separated by a colon (:).
To accept requests from any host, set the MAC address to "00:00:00:00:00:00".
AppleTalk
❖ Printer Name
Enter the name of the printer to be displayed on Chooser, using up to 32 alphanumeric characters. You cannot use symbols such as "*", ":", "=", and "@",
and characters equivalent to ASCII "0xc5".
The name of the printer displayed on the active Macintosh Chooser appears
in parentheses. Normally, this is the name specified under the [Selected Printer
Name] box, but if multiple machines of the same name are configured, it may
be another name.
Printer Name is not displayed if the PostScript Unit is not installed.
❖ Zone Name
Enter the name of the zone to which the interface board belongs. To specify
the default zone, enter "*". You can use up to 32 alphanumeric characters.
The name of the zone that the active interface board currently belongs to appears in parentheses.
❖ Type Name
Displays the printer type.
12
Printer Configuration
Printer Tab
Displays the printer settings.
PCL
❖ Orientation
Specifies the default page orientation.
• Portrait
Prints the document so that the paper's shorter sides are horizontal.
• Landscape
Prints the document so that the paper's longer sides are horizontal.
Note
❒ Some applications may override this setting.
❖ Form Lines
Specifies the number of lines (5 to 128) per page.
60 is default for Letter-size paper, 64 is default for A4.
❖ Font Number
Specifies the default font from the list.
❖ Point Size
Specifies the default font size (4 to 999.75) from the list.
❖ Font Pitch
Specifies the pitch of the default font, if the font is a fixed pitch font selected
from the list.
❖ Symbol Set
Specifies the default symbol set from the list.
❖ Courier Font
Select [Regular] or [Dark] from the list.
❖ Ext. A4 Width
Widens the printable area of A4 sheets by reducing side margin width.
❖ Append CR to LF
Specify whether or not to append a CR code to each LF code to print text more
clearly.
❖ Resolution
Displays the available resolution. Higher resolutions produce better print
quality but require more time to print.
13
Using Smart Organizing Monitor under the Macintosh Environment
PS
❖ Resolution
Displays the available resolution. Higher resolutions produce better print
quality but require more time to print.
❖ Color Profile
Select the color profile.
• Solid Color
Reproduces color-accurate colorimetric images.
• Presentation
Enhances basic colors for text and graphics. This setting is ideal for printing tables, graphs, and presentation materials that contain color.
• Photographic
Enhances mid-tone colors similar to those in photographs.
14
Appendix
Appendix
Trademarks
• Ethernet is a registered trademark of Xerox Corporation, Inc.
• Apple, AppleTalk, Macintosh, and Mac are registered trademarks of Apple
Computer, Inc. in the United States and other countries.
• NetWare and NDS are registered trademarks of Novell, Inc.
• Other product names used herein are for identification purposes only and
might be trademarks of their respective companies. We disclaim any and all
rights to those marks.
GB
GB
EN
Copyright © 2007
USA
G167-8614
15