1
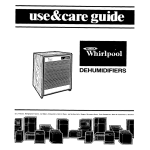
MODULAR COOKTOPS
Models
RCBBOOXL (3 Cooktop
RC8300XL (2 Cooktop
Modules)
Modules)
Control
Panel
Grill Module
Reflector
Bowl
Number
Plug-In
Surface
Unit
Model RC83OOXL (Modules can be placed
Surface
Unit
Model and Serlal
Plate (Not Shown)
in ony position.)
Module
Control
Plug-In Surface
One-Piece
Chrome
Reflector
Bowl
.
Grill Module
(Packed
Separately]
If you have a question,
mation
Number
Copy
Your Model
or need
service,
and Serial Numbers
Here
Model
Complete
Copy this information
in these spaces
your warranty
and the sales slip together
place.
See the “Cooklng
Model and Serial
Plate (Not Shown)
have this infor-
ready:
Model
and Serial Numbers. (Remove
the right front module
to see the plate on the
right inside wall of your cooktop.)
2. Purchase
or installation
date from i/our sales slip
1.
Panel
Module
Keep this book,
in a handy
Gulde”for
~
Number
___~Senol Number
Purchase/lnstallatlon
Dale
~~-~_____
important
ServlCe
safety
Company
lntormatlon.
and Phone
Number
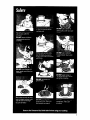
Your responsibilities.. .
Installation
and proper, safe use are your personal responsibilities.
Read this “Use and Care Gulde” and the “Cooking
Guide” carefully
for Important
use and safety Informatlon.
Tou must be awe your cooktop
Is...
l
installed and leveled In a countertop
and cabinet that will hold
the weight;
a installed in a well-ventllated
area protected
from the weather;
l
properly
connected
to the correct electric supply and
groundlng.
(See “Installation
Instructions.“)
i-- -
Propeuse
Yew must be sure your cooktop
Is...
l
used only for jobs expected
of home cooktops;
l
used only by people who can operate it
properly:
l
properly
maintained.
i !
-Jilt
.-.-- -
Contents
Responsibilities
Installation
Proper Use
.I : I. : :.
Safety
Using Your Cooktop
SurfaceUnitControls
.,::.::1:
Cooktop Module Controls
Changing
Cooktop Modules
Surface Unit Modules
Grill Module.
Optronal Griddle Module
:: :::
Optional Black Smoothtop
Module
Using the Cooktop Modules
Optional Griddle
Grill Module
Optional
Rotisserie’ : 1: : 1, : : 1 : :
Optional Smoothtop
Module
Cleaning
and Caring for Your Cooktop
Control Panel and Knobs
Surface Units and Reflector Bowls
Cleaning
Chart
If You Need Service or Assistance
1. Before Calling for Assistance
2. If You Need Assistance
3. If You Need Service
1, :
4. If You Have A Problem
.,
‘Tmk
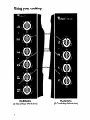
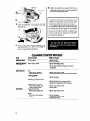
Using your cooktop
lnlt C
nit/C
Indlc
It Slg
RC88OOXL
(3 Cooktop Modules)
4
RC83OOXL
(2 Cooktop Modules)
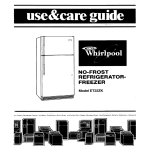
SURFACE UNIT CONTROLS
Control knobs must
be pushed In before
turnlng them to a setting. They can be set
anywhere
between
HI
to OFF.
One ot the slgnal
lights will glow when
a surtaoe unlt is on.
Be sure all lights
are off when you are
not cooklng.
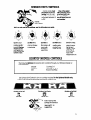
ting.
Unt HI you get used to the settings,
Use HI to start
foods cooktng
or
to brlng llquids
to a boll. Surface
unlt will not turn
red If good tontact Is made wtth
use the followlng
Use MED-HI to
as a gulde.
Use MED for
gravy, puddings
and icings or to
cook large
amounts of
vegetables.
hold a rapid boil
or to try chicken
or pancakes.
Use MED-LO to
keep food
cooking
alter
starting it on a
higher setting.
bottom oi pan.
Use LO to keep
toad warm until
ready to serve.
Set the heat
higher or lower
within the LO
band to keep
food at the
temperature
you
want.
COOKTOP MODULE CONTROLS
The following Optlonal
Accessories
Parts Distributor:
Griddle
Rotisserie
Grill
are available
on the Left
Left Front
your Whirlpool
Dealer
or
Cooktop 2-6”
Cooktop l-6” & l-8”
Black Smoothtop
Use Surface Unit Controls to turn on cooktop
surface unit indicators
with boxes show which
Grlddle
through
Grlddle
modules. For the Optlonal
control to use:
in the Center
Center
Front
Push In and turn the
Surface Unlt Control to
the setting you want
(see page
5 tor
suggestlons).
Grlddle
Grlddle
only,
on the Rlght
00
00II
Right Front
For the Grlll Module, use front or back controls as you would for surface
controls if you want both the front and back halves of the grill to heat.
Grill on Left
units. Use both
Grill in the Center
The Optlonal
Black
Smoothtop
Center
Rear
: g :
Center
Front
:I:
Module
Grill on the Right
Right Rear
works the same as Surface
Unit Modules,
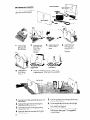
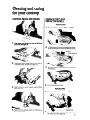
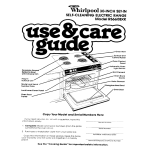
CHANGING COOKTOP MODULES
The Cooktop Modules will work on either side or the center of the cooktop. (Model
RCBBOOXL: The grill and griddle modules will fit only on the left side or center of the
cooktop.)
Make sure all controls are OFF and modules are cool before removlng
them.
SURFACE UNIT MODULES
1.
To remove,
the handle.
1.
To replace,
use both
hands to line up the terminal with the receptacle.
GRlLL
lifi slightly
MODULE
Frame
Grease
and
Well
by
2.
With both hands, pull
module toward you to
unplug it.
3.
Lift out and set aside.
2.
Push terminal into
receptacle
place until
it’s plugged
in.
3.
Lower the front with the
handle.
(Model RCBBOOXL: The grill module will 111only on the lelt slde
or center ol the cooktop.)
Terminal
\
Basket
Ceramic
with
Rocks
Heatlng
Element
Grllls
: g
1.
To remove,
off grill.
1.
To replace,
lower grease
well into
opening
lift
2.
Lift front end of
heating
element and
pull toward you.
2.
Put i.n basket
with ceramic
rot ks.
All parts
OPTIONAL
GRIDDLE
1.
To remove, lift
and remove
griddle cover.
3.
Lift out basket
of ceramic
rocks.
Plug heating
element
terminal into
receptacle.
must be cleaned
after each use to avold
spollage
and odors. See page 14.
(Model
center
MODULE
3.
RC8800XL: The griddle
ot the cooktop.)
module
4.
Lift slightly at
the back and
remove the
grease well,
being careful
not to sbill
4.
Place grills
over heating
element.
fat
will fit only on the left side or
2.
Lift front slightly
by the handle.
3.
both
hands, pull
griddle toward
you to unplug it.
4.
Lift out and set
aside.
2.
Push griddle
into place until
it’s plugged
in.
3.
Slide so tabs on
the griddle fit
into the notches
on each side.
4.
Replace cover
only over clean,
cool griddle.
Terminal
1.
To replace,
use
both hands to
line up the
terminal with
the receptacle.
OPTIONAL
1.
BLACK SMOOTH-
To remove, lift
slightly by the
handle.
2.
With both
hands, pull
module toward
you to unplug it
3.
Lift out and set
aside.
2.
Push smoothtop
into place until
it’s plugged
in.
3.
Lower smoothtop into place.
ReCeDtaCle
1.
To replace,
use
both hands to
line up the terminal with the
receptacle.
USING THE COOKTOP MODULES
OPTIONAL
GRIDDLE
Before using the griddle for the first time:
Wash, rinse and dry griddle.
l
Use warm sudsv water.
l
DO NOT immerse griddle.
l
DO NOT use metal scouring pads or abrasive
cleaners. They will damage
griddle.
2. Lightly wipe with cooking oil to season. You
don’t have to grease the griddle every time
you use it. However, oil or butter adds flavoring
and aids browning.
1.
1.
Lift and remove
griddle cover.
DO NOT
replace
until
griddle is cool.
2.
Preheat for a
few minutes
(until butter
melts or beads
of water dance
on the griddle).
Approxlmate
3.
Grlddle
Add food. Use
only nylon or
plastic utensils.
Metal can
scratch the nonstick finish.
Module
Bacon ...............................................................
Grilled Sandwiches
..................................................
Pancakes
..........................................................
Hamburgers
....................................................
Eggs ...............................................................
B
4.
TURN OFF the
griddle when
cooking
is finished. Leaving ii
ON can damage the griddle.
Settings
HI
HI
HI
MEO-HI
MED
GRILL MODULE
A range hood should be used to help get rid of smoke while using the Grill
Module (Whirlpool
Model No’s RGH8330 or RGH8336 recommended
for RC8300XL
Cooktop;
Model RGH8348 for the RC8800XL Cooktop).
Approximate
Preheat
Grill Module
grill for five minutes
GRILL
Cooklng
limes
at suggested
setting.
Wel htor
Thlc p: ness
Internal
Temperature
Control
Setting(r)
Approxlmate
Cooklng
Tlmo
Slde 1 Slde 2
1 ” (2.5cm)
I” (2 5cm)
1 ” (2Scm)
1403F(60’C)
16O’F(71 ‘C)
17O’F(76”C)
Hi
Hi
Hi
To test steak for
8 Min.
9 Min. doneness, cut
11 Min. 12 Min. near center
12 Min. 13 Min. with sharp
knife
1 ’ 2” (3.8cm)
1 12” (3.8cm)
1 12” (3.8cm)
14O’F(60-C)
16O”F( 71 -C)
17O”F(76”C)
Hi
Hi
Hi
10 Min.
7 Min.
13 Min. 13 Min.
16 Min. 16 Min.
1 ” (2Scm)
1 ” (2.5cm)
I” (2.5cm)
14O,F(6O’C)
16O’F(71-C)
17O’F(76”C)
Hi
Hi
Hi
8 Min. 10 Min.
9 Min. 12 Min.
10 Min. 13 Min.
2’?‘lbs. (1 kg)120 (44 C)
1 lb. [,5 kg)
120-(44’C)
2 Ibs. (1 kg)
120”(44’C]
Hi
Hi
Hi
15 Min.
4 Min.
5 Min.
2’ z Ibs. (? kg) 19O-F(88YZ)
Hi
z4’(1.9 cm)
170 F( 76-C)
2’ 2 tbs. [I kg) 17O’F(76’C)
Hi
Hi
15 Min.
10 Min.
1 lb. (.5 kg)
150 F(59-C]
Hi
6 Min.
12” (1.3cm)
10 oz. (,3 kg]
17O’F(76’C)
15O”F(59’C)
Hi
Med Hi
8 Min. 12 Min.
6 Min. Total
8 Franks
6 Sandwithes
4 potatoes
150-(59-C)
Hi
Hi
15 Min. When fish
4 Min. flakes easily it
5 Min. is done, Cook
all fish on
aluminum foil.
55 Min. Total
Turn every
12 Min. few minutes
10 Min.
7 Min.
8 Min. Total
Turn frequently
18 Min. Total
Hi
45 Min. Total
4 ears
Comments
150 F(59C)
Wrap tightly
Hi
30 Min. Total
2 loaves
Hints
and
130 F(54’C)
Hi
10 Min. Total
Tlps:
1. Foods cooked on the grill can spatter. It is
important
to clean all parts after each use.
See page 14.
2. The ceramic
rocks will darken with use.
3. The heating element for the grill cleans
itself. Do not immerse.
4. Take grill apart to clean and to remove
and store.
5. Most utensils safe for use on an outdoor
grill can be used with your Grill Module.
9
OPTIONAL
Rotlsserle
ROTISSERIE
Parts
The Rotisserie has 4 parts. It is
used with the Grill Module.
Tabs
1.
Remove the
grill from the
Grill Module
2.
Insert rear support tabs into
slots at rear
of the Grill
Module.
Ht$7’Posttlon
6.
Slide back to
lock Tilt top
to level.
1.
Put one fork on the spit pointing away from
the handle.
Push spit through meat so the weight IS
balanced
around the center
Put the second fork on the spit pointing
toward the meat.
Push both forks into the meat and tighten
the thumbscrews.
3.
4.
10
Slide forward to
lock. Tilt top to
level.
4.
Insert front support tabs into
slots at front of
the Grill
Module.
LowePosItion
Put motor socket and pins through holes
in Rear Support at the high or low position
5.
2.
3.
5.
6.
7.
Push the pointed end of the spit all the way
into the motor socket.
Put the handle end of the spit into the high
or low slot (to match the motor socket position] of the Front Support.
Plug in the Rotisserie motor and turn on the
Grill Module. See page 11 for suggested
cooking times.
Approximate
Food
rotlsserle
cooklng
tlmes:
Internal
Temperature
Weight
Control
Setting(s)
140-F
[ 60’C)
140-F
(60-C)
3’2Ibs.
Hi
(I.5 kg)
3”4 Ibs. Hi
(I.5 kg1
High
5Ibs.
HI
High
11~4”lbs. Hi
High
Y IL?!
(1 kg1
Hi
High
1 hr.
10 min.
5 Ibs
Hi
High
2 hr.
30 min.
Hi
High
Hi
High
Hi
High
Hi
High
1 hr.
45 min.
2 hr.
45 min.
2 hrs.
15 min.
2 hrs.
Spit
Posltlon
Tlme
Comments
1 hr.
55 min.
2 hr.
Meat with an
outer layer of fat
may take longer
to cook.
Beet
Rolled rib
(rare]
Rolled rump
High
Pork
Rolled
loin roast
Spareribs
Canadian
bacon
170 F
(76 C)
17O’F
(76’C)
160-F
(71’C)
(2 kg)
3 hrs.
15 min.
50 min.
lamb
Rolled
leg
175 F
(79 Cl
(2 kg1
Poultry
Chicken
Turkey
21qIbs.
(88 Cl
(1 kg1
190-F
(88C]
190-F
Duck
Cornish
190 F
hen
61J4Ibs.
(2.5 w
3% Ibs.
(I.5 kg)
!g’F’
2-l lb.
(88°C)
(1 kg1
hens
Truss poultry
tightly. Run spit in
at the base of the
tail and
diagonally
through the
cavity to the fork
of the wishbone.
If
wing tips brown
too rapidly, cover
them with foil.
NOTE:
l
l
THE OPTIONAL
Use the high spit position for anything
over two inches (5 cm) in diameter,
Turkeys bigger than 8 to 10 pounds should not be put on the rotisserie. Roast
them in the oven.
SMOOTHTOP
MODULE
Cooking on the optional
black smoothtop
is
o/most the same as cooking on surface elements.
There are three differences
you should know about:
1. The cookware
you use.
2. What to expect.
3. The care and cleaning.
Cookware...
For best results, proper
l
cookware
must be used.
Bottoms must be perfectly
flat, with NO
ridges, rims, patterns, dents, roughness or
scratches.
- Pans with uneven bottoms cause poor
cooking results and may damage
the
smoothtop.
-Nicks
and scratches on a pan can damage the smoothtop.
l
l
Bottoms must be clean. Heating a soiled pan
can leave a stain on the smoothtop.
Sliding aluminum
pans or foil, and copper
pans, on the smoothtopcan
leave a mark. The
marks made by aluminum
can be removed
It
they are not heated. See page 15 for cleaning and care suggestions.
11
0 Wipe up any spill when the unit is cool
enough not to steam when a wet cloth
touches it. The longer you cook wlth a splllover on the unit, the harder It will be to
remove that spill.
0 Clean off metal marks [from copper or
aluminum]
right away. If heated, they may
never come off.
CookIng..
The glass tilil take longerto
heat up than a
reglJk3r
surtace unit. It Will alS0 take longer
1c7cool down Turn off the unit a few minutes
before yolj are finished cooking.
The Core and Cleaning...
Always clean the smoothtop
after cooking.
Use a special srnoothtop
cleaner/conditioner
availnble
from your appliance
dealer,
glocery,
!;ofdware
or variety stores.
Avoidtng
stains
0 Use a special smoothtop
cleanei,‘condltioner every time you use the Smoothtop
Module. Follow the package
directions
careLIly
o Wipe the smoothtop
with a clean, damp
paper towel before you use the smoothtop. [Do not use a sponge or cloth. A little
leftover soup or soil can stain the smoothtop when heated ]
* Use only clean cookware
* Avo~a spillovers
Use pans with tall sides
9 Don’t iet covers drip on the smoothtop.
Avolding
Damage
Rough cookware,
jewelry, salt, sand,
knives, etc....can
scratch the surface. Use
only smooth cookware;
wipe the surface
before using. DO NOT use the smoothtop
as
a cutting board.
l Sugary
spills can cause pitting on the surface. Wipe a spill when the surface is cool.
l
Pans that aren’t flat can cause hot spots
that can crack the surface.
l
Spilling ice-cold
water on a hot surface
may crack it.
l
Dropping
heavy or hard objects on the
cooktop can crack it. Be careful with heavy
skillets. Don’t store jars or cans above the
smoothtop.
See the special
“Smoothtop
Cleaning
Chart”
on page 15.
l
Cleaning and caring
for your cooktop
CONTROL PANEL AND KNOBS
SURFACE UNITS AND
REFLECTOR BOWLS
REMOVING
1.
2.
First make sure knobs
pull knob straight off.
1.
Be sure surface
2.
Lift the edge of the unit opposite the recep
tacle just enough to clearthe
reflector bowl.
3.
Pull the surface
recebtacle.
are set on OFF then
Use warm soapy water and a soft cloth to
wipe the panel. Rinse and wipe dry.
4.
3.
Wash knobs in warm
well and dry.
soapy
water.
Push the knobs straight
they point to OFF.
unit straight
Lift out the reflector
away
from the
bowl
Rinse
REPLACING
1.
4.
units are OFF and COOL.
back
Be sure surface
unit controls
are OFF.
on. Make sure
2. Line up opening
the surface
in the reflector
unit receptacle.
bowl
with
13
5.
Receptacle
3.
Hold the surface unit as level as possible
with the terminal
just started
into the
receptacle.
4.
While pushing the surface unit terminal into
the receptacle,
lift a little on the edge of
the unit nearest the receptacle.
When the terminal
is pushed into the receptacle
as far as it will go, the surface unit
will fit into the reflector bowl.
Reflector bowls reflect heat back to the
utensils on the surface units. They also help
catch spills. When they are kept clean, they
reflect heat better and look new longer.
If a reflector bowl gets discolored,
some
of the utensils used may not be flat enough.
Or some may be too large for the surface
unit. In either case, some of the heat that is
meant to go into or around a utensil goes
down and heats the reflector bowl. This extra heat can discolor it.
CLEANING COOKTOP MODULES
_-__..CART
-___-
WHAT TO USE
HOW TO CLEAN
W&FACE
UNITS
Do not clean
l
l
l RIDDLE MODULE -~---Warm soapy
water
l
l
l
__-__
____.-
ORILL MODULE
--..--.
-
Grill
Warm soapy water or
soapy steel wool pad
Heating Element
Do not clean
l
l
Wash, rinse and dry well.
Use soapy steel wool pads
l
Soil burns off.
l
l
Basket with Ceramic
Ilot soapy water
l
l
Grease Well and Frame
Warm soapy water and
plastic scouring
pad
Warm soapy water and
plastic scouring
pad
Motor
v;;ec!oth;
warm soapy
or harsh
if needed.
__~
for stubborn
Do not immerse
Clean often.
Soak and swish In hot, soapy
Replace
as needed
(contact
l Wash, rinse and
dry well.
0 Clean often.
l
l
l
l
14
pads
Rocks
l
.___~
Sol1 burns otf.
Do not Immerse.
Do not Immerse griddle.
Wash, rinse and ary well.
Do not use metal scouring
cleansers
Use plastic scouring
pad
l
Wash, rinse and dry well.
Clean after each use.
Do not immerse.
Unplug before cleaning.
Wipe clean often.
water.
dealer).
areas
SMOOTHTOP
l
l
MODULE
Avoid Staining l See page 11
Use cleaner,
conditioner
often
package
directions
carefully.
l
Follow
If you do get a stain
1. A mildlv abrasive
cleanser like Bar
Keepers Friend’ with a plastic scouring
pad will help remove stains that aren’tburned on. Use cleaner/conditioner
afterwards
2. A soapy steel wool pad will help with stubborn spots Make sure the pad is very
soapy. Use cleaner/conditioner
afterwards
3. A moist sponge and automatic
dishwasher
detergent
can help. (Wear rubber gloves.)
Rinse and dry carefully. Use cleaneri
conditioner afterwards.
4. Spread a paste of powdered
cleanser
and water over the stain. Keep the paste
damp with a damp paper towel for 30
to 45 minutes. This can soften the soil so a
cleanser or steel wool pad can remove It
Use the cleaner/conditioner
afterwards
5. Soak stain with a mixture of household
ammonia
and water [ 1 part ammonia
to 4
parts water) for 30 to 60 minutes. Use a
damp papertowel
to cover. Use cleanser
and plastic, nylon or soapy steel wool
pad. Use the cleanser/
conditioner
afterwards.
razor
6. For thick soil buildups, a single-edge
blade in a holder can be used. Carefully
scrape off most of the soil as you would
scrape paint off a window. Then use one of
the cleaning
methods mentioned
above.
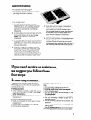
If you need service or assistance,
we suggest you follow these
four steps: -
1 Before
l
calling for assistance.. .
Performance
problems often result from
little things you can find and fix yourself without tools of any kind.
If surface unlt control knob or knobs will not
turn:
l
Did you push in before trying to turn?
If nothlng operates:
Is the cooktop
correctly
wired into a live
circuit with the proper voltage?
(See Installatlon Instructions.)
l
Have you checked
the main fuse or circuitbreaker box?
If cooklng results aren’t what YOU exDect:
Is the cooktop level?
.
Are you using pans recommended
in the
Cooklng Gulde?
Are the pans the size called for in the recipe?
Are you following
a tested recipe from a
reliable source?
Do the cooking
utensils have smooth, flat
bottoms?
Do the cooking
utensils fit the surface unit
being used?
See the Cooklng Guide for more information
on cooking problems and how to solve them.
l
If surface units will not operate:
Have you checked
the main fuse or circuitbreaker box?
l
Are surface units plugged
in all the way?
l
Do the control knobs turn?
l
15
2
l
APPLIANCES-HOUSEHOLDMAJOR-SERYICE
& REPAIR
Ifyou need assistance”‘. . .
WHIRLPOOLAPPLIANCES
FRANCHISEDTECHGARE
Call the Whlrlpool
COOL-LINE a‘ service assistance telephone
number. Dial tree from:
Continental
U.S. . . . . . . . . (600) 253- 1301
Michigan
. . . . . . . . . . . . . . . (800) 632-2243
Alaska 81Hawall..
. . . . . . (800) 253-1121
and talk with one of our trained Consultants.
The Consultant
can instruct you in how to obtain satisfactory
operation
from your appliance or, if service is necessary,
recommend
a
qualified
service company
in your area.
3
l
Whirlpool
nationwide
has a
net-
I
i TECH-CARE service
i technicians
are
’ 7&!w+.%RF
FRANCHISED
SERVICE
? trarned to fulfill the
.._~~
~~~ ~-~~~~
product
warranty
and provide
afterwarranty
service,
anywhere
in the United
States, To locate
TECH-CARE service
in your
area, call our COOL-LINE service
assistance
telephone
number [see Step 2) or look in your
telephone
directory
Yellow Pages under’
0
FSP IS a regrstered
339 3933
OR
ELECTRICAL
APPLIANCESMAJOR--REPAIRING
8 PARTS
~~HIRLP00tAPPLlANCEY
FRANCHISEDTECY-CARE
s,FHi’,r
XYZSERVICE CO
123 Maple
StHilCE
‘F r 0 1,,‘4 \‘/b.‘.S
999.9993
OR
WASHING MACHINES,
8 IRONERS-SERVICING
If you need service”’ . . .
SERVlCt
.SEH 1',( ‘Z ('0 IbPA.VIES
xv1 SEWCE co
123 Maple
DRYERS
NHIRLPOOLAPPLIANCES
FRANCHISEDTFCH CARiSLRvlCE
.,'F‘H\~/~
XYZSERVICCCO
123 Map,?
4
l
6 ('0 LJ1'4 Y/k::<
399 9999
Ifyou have a problem”‘. . .
Call our COOL-LINE service assistance
telephone number (see Step 2) and talk with one
of our Consultants, or if you prefer, write to:
Mr. Guy Turner, Vice President
Whirlpool Corporation
Administrative
Center
2000 US-33 North
Benton Harbor, Ml 49022
If you must call or write, please provide: model
number, serial number, date of purchase,
and
a complete
description
of the problem.
This
information
is needed
in order to better respond to your request for assistance.
trademark
of WhIrlpool
CorporalIon
for
quollty ports look tar this
FSP
symbol of quollty whenever
you need o replacement
part
’ for your WhIrlpool
oppllonce
FSP repiacement
parts
wll fit right and work right, because
they ore
mode to the some exocllng
specltlcollons
used to build every new WhIrlpool
oppllonce
Benlon Harbor, Mlchlgan. Aulomallc Washers. Clothes Dryers
Ice Makers. DIshwashers.
Freezers,
Relrlgeralor-Freezers.
Built-in
Ovens and Surlace
ltn~ls.
Ranges.
Compaclors. Room Afr Condrtloners.
Healing
and Air CondO~oning Systems
Microwave
Dehumrdrflers.
Ovens.
Central
w
Part No
1324622i877515Rev
A
Printed
In U.S.A