1
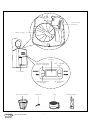
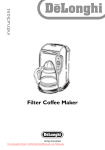
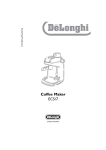
instr uctions
Filter Coffee Maker
ICM60
Water level
indicator
Filter holder
Display
ON/AUTO/OFF
button with light
SET - TIMER
button
AROMA button
with light
SET CLOCK
button
Hot plate
Permanent filter
Filter Coffee Maker
Measure
Jug
2
Chlorine filter
Thank you for choosing this coffee machine.To get the best
result out of your new coffee machine it is advisable to read
these instructions before using the appliance. This is the only
way to ensure optimum results and maximum safety.
Safety Warnings
• This appliance is designed to make coffee.Take care during use
to avoid burns caused by the water or steam jets or improper
use of the appliance itself.
• When the appliance is in use, do not touch any of the machine’s
hot surfaces.
• After unpacking, make sure that the machine is complete and
undamaged. In case of doubt, do not use the appliance and seek
the advice of a qualified service professional.
• Packaging materials (plastic bags, foam polystyrene, etc.) should
not be left within the reach of children as this could be a
potential source of danger.
• This appliance is to be used for domestic use only. Any other
use is to be considered improper and therefore, dangerous.
• The manufacturer takes no responsibility for damage derived
from improper use.
• Never touch the appliance with wet or damp hands.
• Never immerse the appliance in water.
• The appliance is not intended for use by persons (including children) with reduced physical, sensory or mental capabilities, or
lack of experience and knowledge, unless they have been given
supervision or instruction concerning use of the appliance by a
person responsible for their safety. Children should be supervised to ensure that they do not play with the appliance.
• In the event of breakdown or malfunctioning, turn the appliance
off immediately and do not touch. For repairs, please contact a
Service Centre authorised by the manufacturer. Failure to
observe the above points may affect the safe use of the appliance.
• If the supply cord is damaged, it must be replaced by the manufacturer, its service agent in order to avoid a hazard.
• When the appliance is not in use, turn off and disconnect the
plug from the socket.
• As with any electrical appliance, whilst the instructions aim to
cover as many eventualities as possible, caution and common
sense should be applied when operating your appliance, particularly in the vicinity of young children.
• Materials and accessories coming into contact with food conform to EC regulation 1935/2004.
3
Filter Coffee Maker
Green and Yellow to Earth
13 amp
Fuse
Brown
to Live
Blue to
Neutral
Cord Clamp
Electrical requirements
Before using this appliance ensure that the voltage indicated
on the product corresponds with the main voltage in your
home, if you are in any doubt about your supply contact your
local electricity company.
The flexible mains lead is supplied connected to a B.S. 1363 fused plug
having a fuse of 13 amp capacity. Should this plug not fit the socket outlets in your home, it should be cut off and replaced with a suitable plug,
following the procedure outlined below.
Note: Such a plug cannot be used for any other appliance and should
therefore be properly disposed of and not left where children might find
it and plug it into a supply socket - with the obvious consequent danger.
N.B. We recommend the use of good quality plugs and wall sockets that
can be switched off when the machine is not in use.
Important: the wires in the mains lead fitted to this appliance are
coloured in accordance with the following code:
GREEN ANDYELLOW EARTH
BLUE
NEUTRAL
BROWN
LIVE
As the colours of the wires in the mains lead of this appliance may not
correspond with the coloured markings identifying the terminals in your
plug, proceed as follows:
The wire which is coloured green and yellow must be connected to the
terminal in the plug which is marked with the letter E or by the earth
symbol
or coloured green or green and yellow.
The wire which is coloured blue must be connected to the terminal
which is marked with the letter N or coloured black.
The wire which is coloured brown must be connected to the terminal
which is marked with the letter L or coloured red.
When wiring the plug, ensure that all strands of wire are securely
retained in each terminal. Do not forget to tighten the mains lead clamp
on the plug. If your electricity supply point has only two pin socket outlets, or if you are in doubt, consult a qualified electrician.
Should the mains lead ever require replacement, it is essential that this
operation be carried out by a qualified electrician and should only be
replaced with a flexible cord of the same size.
After replacement of a fuse in the plug, the fuse cover must be refitted.
If the fuse cover is lost, the plug must not be used until a replacement
cover is obtained. The colour of the correct replacement fuse cover is
that of the coloured insert in the base of the fuse recess or elsewhere
on the plug. Always state this colour when ordering a replacement fuse
cover.
Only 13amp replacement fuses which are asta approved to B.S. 1362
should be fitted.
This appliance conforms to the Norms EN 55014 regarding the suppression of radio interference.
Warning - this appliance must be earthed
Filter Coffee Maker
4
Using for the first time
Before using the machine for the first time, wash all the accessories in warm soapy water and rinse. For the best tasting coffee
the internal circuits mut be flushed through at least twice.To do
this, follow the instructions in the paragraph “How to prepare the
filter coffee” without using ground coffee.
Installation
• After removing the packaging, make sure the product is complete.
• If in doubt, do not use the appliance and contact a qualified professional.
• The packing elements (plastic bags, polystyrene foam, etc.)
should be kept out of reach of children as they are a safety hazard.
• Place the appliance on a work surface far away from water taps,
basins and sources of heat.
• After positioning the appliance on the work top, leave a space
of at least 5 cm between the surfaces of the appliance and the
side and rear walls and at least 20 cm above the coffee maker.
• Never install the appliance in environments where the temperature may reach 0°C or lower (the appliance may be damaged if
the water freezes).
• Make sure the mains voltage corresponds to the voltage indicated on the appliance rating plate.
Connect the appliance to an efficiently earthed socket with a
minimum current rating of 10A only.
The manufacturer may not be considered liable for possible
incidents caused by the failure to adequately earth the mains.
• If the power socket does not match the plug on the appliance,
have the socket replaced with a suitable type by a qualified professional.
• The power cable on this appliance must not be replaced by the
user as this operation requires the use of special tools.
If the cable is damaged or requires replacing, contact an authorised service centre only to avoid all risks.
Programming the clock (fig. 1)
Plug the appliance into the mains socket.The first time it comes
on, "AM 0:00" appears on the display.
To set the precise time, press the "SET CLOCK" button repeatedly. This can be done rapidly by simply holding the button down.
The time can be set at any moment.
fig. 1
5
Filter Coffee Maker
Chlorine filter (if fitted)
fig. 2
The filter eliminates the taste of chlorine from the water. To install
the filter, proceed as follows :
• Remove the chlorine filter from the plastic bag and rinse it in
tap water.
• Lift the water tank lid and remove the chlorine filter holder
from its housing by lifting it upwards (fig. 2).
• Open the chlorine filter holder and carefully place the filter in
the holder as shown in fig. 3.
• Close the filter holder and replace it in its housing pushing it
fully down.
• The chlorine filter must be replaced every 80 uses, and alzays
after six months of operation.
How to prepare the filter coffee
fig. 3
fig. 4
fig. 5
fig. 6
• Lift the lid and fill the tank with fresh, clean water up to the
level corresponding to the number of cups of coffee required
using the coffee jug marked with the level indicators (fig. 4).
• Place the permanent filter in the filter holder (fig. 5).
• Place the ground coffee in the filter, using the measuring spoon
supplied, and level evenly (Fig. 6). As a general rule, use a level
measuring spoon of ground coffee (around 7 grams) for each
cup (for example, 8 spoons to make 8 cups). Never use more
than 14 level spoons.The quantity of ground coffee used will
vary according to personal taste. Use good quality, medium
ground coffee, packaged for filter coffee makers.
• Close the lid and place the jug on the plate with the lid on (fig.
7).
• Your appliance has an AROMA button.When this is pressed,
percolation of the coffee is slowed down to extract more of
the aroma.To activate the function, press the AROMA button.
The light on the button comes on. You are recommended to use
the AROMA button when you do not want to make a full jug of coffee.
• Press the "ON/AUTO/OFF" switch (Fig. 8).The light on the button comes on to indicate that the drip coffee maker is operating and "BREW" appears on the display.
fig. 7
Filter Coffee Maker
fig. 8
6
• The coffee will start to come out after a few seconds. It is
completely normal for the appliance to release a little
steam while the coffee is filtering.
• A beep indicates when the coffee is ready. If you leave the
ON/OFF button pressed after percolation has finished, the
plate will keep the coffee at the ideal temperature.
Attention: removing the jug before all the coffee is made does
not interrupt production of the coffee, but merely blocks flow
into the jug. If you want to pour out a little coffee immediately, you are recommended to do so as rapidly as possible in
order to avoid the coffee overflowing in the filter holder.
PROGRAMMING START-UP (AUTO)
Check that the time of day is set correctly.
To programme when you want the coffee to be made:
• Press the "SET TIMER" button and hold it down until the startup time is reached.
• Then release the "SET TIMER" button.The time flashes briefly.
ACTIVATING THE TIMER FUNCTION
After:
- setting the time you want the appliance to come on and go off
as described in the above paragraph;
- preparing the appliance to make coffee. Press the
"ON/AUTO/OFF" button (fig. 9) rapidly twice.The light on the
button shows that the appliance is operating and AUTO appears
on the display.
Coffee starts to run off several minutes later than the set time to
allow for preheating of the machine, thus optimising the temperature of the coffee.
Cleaning and maintenance
Before performing any cleaning or maintenance operations, turn
the machine off, unplug it from the power socket and allow it to
cool down.
1. When cleaning the coffee maker, do not use solvents or abrasive detergents. A soft, damp cloth is sufficient.
2. Never immerse the coffee maker in water: it is an electrical
appliance.
7
Filter Coffee Maker
fig. 9
Descaling
If the water in your local area is hard, lime scale will form over
time.These deposits may affect the correct operation of the appliance.
When the "ON/AUTO/OFF" button flashes, proceed with descaling.The descaling process may be performed using special commercially-available scale removers for filter coffee makers.
Alternatively, white wine vinegar can be used as follows:
1. Remove the chlorine filter.
2. Pour 2 cups of white wine vinegar and 3 cups of water into the
tank. Place the tank in the coffee maker;
3. Place the jug on the warming plate, do not put any ground coffee in the filter holder;
4. Press the filter coffee ON/OFF switch, filter the equivalent of
one cup and then switch off the appliance;
5. Leave the vinegar to act for one hour;
6. Switch the coffee maker back on and filter the rest of the solution;
7. To rinse the machine, operate it with water and without ground
coffee at least 3 times (3 complete tanks of water).
You are recommended to descale the coffee machine about every
300 coffees.
Problem solving
Problem
Possible causes
Solution
The filter coffee takes a
long time to filter through.
•
The filter coffee maker
needs to be descaled
•
Descale as described in
the paragraph
"Descaling"
The coffee has an acid
flavour
•
The coffee maker has not
been rinsed sufficiently
•
Rinse the appliance as
described in the chapter
"Descaling"
Important information for correct disposal of the product in
accordance with EC Directive 2002/96/EC.
At the end of its working life, the product must not be disposed of as urban
waste.
It must be taken to a special local authority differentiated waste collection centre or to a dealer providing this service.
Disposing of a household appliance separately avoids possible negative consequences for the environment and health deriving from inappropriate disposal and enables the constituent materials to be recovered to obtain significant savings in energy and resources. As a reminder of the need to dispose of household appliances separately, the product is marked with a
crossed-out wheeled dustbin.
Filter Coffee Maker
8
1321004IDL/10.07
De’Longhi Appliance - Via L. Seitz, 47 - 31100 Treviso Italia