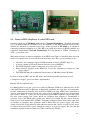
1
Linux-Call-Router
Software based ISDN Private Branch Exchange for Linux
By Andreas Eversberg (Jolly)
(http://www.linux-call-router.de)
Documentation for Version 1.0
This page is left blank.
2
Index
1. Introduction
2. Hardware Requirements
3. Download & Installation
4. Configuration
5. Using outer
6. Tuning
7 Debugging
8 Architecture
9 Support
10 References & Relates Projects
Appendix
3
1
Introduction
1.1 What is Linux-Call Router and PBX4Linux?
PBX4Linux started as a pure software based ISDN PBX, that connects external lines, internal
telephones, and optionally voice over IP. It is designed to run with Linux only because it uses
the kernel’s mISDN passive driver by Karsten Keil1. It worked together with OpenH3232, that
is a voice over IP implementation complied to the H.323 ITU-T standard. The primary goal is
a working ISDN PBX that connects BRI and PRI lines using call routing. Basic applications,
like voice box and conferences are implemented. The hardest part was a stable and conform
ISDN solution. Allot of work was also done on mISDN3 driver. Beside protocol
improvements and card implementation, I wrote a special audio processor called DSP to make
real-time audio processing.
At the same time, Asterisk4 PBX became popular, due to VoIP switching capability. I found
out that ISDN call processing and VoIP call processing is both complex and very different.
Since Asterisk lacks in ISDN connectivity and features, I decided to make an Interface
between PBX4Linux and Asterisk. Also I removed all VoIP code and simplified code
structure and audio processing and concentrate on good TDM call routing and features. I met
a company called Beronet5.
1.2 Philosophy behind
At the end of 2001, I found out, that my ISDN card has a chipset capable of connecting
telephones to it. This is called the NT-Mode. So my card can be used to transfer information
1
Karsten Keil is programmer of the famous HiSax kernel driver. It provides ISDN stacks to kernel, mainly for
PPPoE connectivity. He is working for SuSe and supports ISDN implementation for SuSe distribution. Later he
developed mISDN kernel driver. (www.mISDN.org)
2
OpenH323 is an open source telefonie stack for VoIP applications using H323 standard. (www.openh323.org)
3
mISDN is a software ISDN driver for Linux Kernel. It consists of Kernel space drivers and user space stacks.
(www.mISDN.org)
4
Asterisk is a software PBX that is strong in using VoIP protocols. It also supports ISDN and POTS interfaces
using Zaptel driver. The core programmer is Digium. (www.asterisk.org)
5
Beronet provides software solutions and support for Asterisk and mISDN based PBX systems. Also Beronet
developes for mISDN. (www.beronet.com)
4
between telephones and my Linux box. Normally ISDN cards transfer information between a
computer and the public telephone system. But at this time there was no protocol for Linux
kernel that could talk to ISDN telephones.
My first idea was to use a telephone to make voice over IP calls. Instead of messing with
headsets, I wanted to just pick up the phone, get a dial tone, and dial the IP number. On the
other side, I wanted to have another phone, that rings and shows me the IP number of the
caller. I know, that there are IP phone already but they are more expensive than ISDN phones.
So I started to expand the Linux kernel to be able to handle telephones connected to my ISDN
card. The patch was written for the old ‘HiSax’ driver. I hated that patch because it was
another dirty addition. I was glad that Karsten Keil wrote the new modular ISDN driver that
gave me a well defined API and real multipoint NT-mode. I added some features to the new
driver, so real time cross connections, conferences, DTMF decoding and tone generation is
possible.
While writing the expansion of the kernel driver, I designed the PBX4Linux, that is now also
capable of connecting calls between connected telephones and external ISDN lines connected
to the public telephone system, as well as voice over IP using OpenH323 library.
I wanted to have a PBX, that provides features I am missing in standard products, like letting
a call ring on my telephone at home and at the same time on my mobile via external call. The
called phone, that picks up first, gets connected, the other gets released. Another idea was
callback, which helps me to reduce the costs of mobile calls.
Many features followed: Deletion of digits while dialing after pick-up, an answering machine
that records during the announcement to trick the caller, and conferences with no member
limit but the resources of available channels.
During this book, you will learn about the features it has, how it works and, how to set up
your own software based ISDN PBX.
1.3 Who wrote it?
My name is Andreas Eversberg and I live in the northern part of Germany, called ‘SchleswigHolstein’. I currently work for a telephone company, called Versatel6, which is a full service
provider for telephone lines, internet and leased lines in Schleswig-Holstein and other parts of
Germany. I do administration of the network elements like subscriber line cards and ADSL
routers. I started writing the PBX and the kernel driver, six months before I got the job at
Versatel. I see this job as a start of managing life and getting used to “work” and of course to
learn and earn money.
My email address is ‘[email protected]’. My homepage is ‘www.eversberg.eu’. The
PBX4Linux page is ‘www.linux-call-router.de’.
1.4 How much does it cost?
It costs nothing at all. It is GPL! As long as you use it for non commercial purpose, I will not
charge you. Using this software in your company to handle the daily business is not a
commercial purpose in this context. See the appendix for copyright information.
6
Versatel Nord GmbH and Versatel Holding (www.versatel.de)
5
1.5 Some definitions of terms in this document
PBX
Private Branch Exchange (PBX), also called PABX, is a small private telephone system. It
features internal calls without getting changed, because calls are routed internally. It has
connectivity to the telephone network in most cases. It provides more features than the
telephone network provides.
exchange / public exchange / local exchange / remote exchange / international
exchange / transit exchange
The “exchange” or “public exchange” is the great “PBX” of your telephone company. It can
be something like a very large type of “PBX” with thousands of ISDN and analog ports in
several racks, or it can be one of these old mechanical types with relays that fill up a complete
building. There are different types of exchanges:
• Local exchange means the public exchange connected to the local PBX or party. We
talk about the exchange connected to the local user. Local exchanges are equipped
with many interfaces to serve many customers.
• Remote exchange means the public exchange connected to the remote PBX . We talk
about the exchange connected the remote user.
• International exchange is used to route calls between countries. They are equipped
with many interface trunks and use fiber or satellite links to other countries.
• Transit exchange is used to interconnect local and international exchanges together.
They have trunks to local exchanges as well as to other transit exchanges. Today there
is no need for a dedicated transit exchange, because local exchanges are also capable
of routing national and international calls.
H.323
H.323 is a standard for making calls via packet switched IP networks. It specifies, how voice
(and call control) is transferred over IP. H.323 is defined by the International
Telecommunication Union (ITU). To be able to interconnect two persons using H.323, both
must have an IP connection. If one party is reachable via public telephone network, an H.323
gateway is required.
SIP
SIP is not only a standard for making calls via packet switched IP networks, but it is mainly
used for it. There are many other protocols required for making calls over the internet. Since
H.323 is complex, heavy and limited to classic voice services, SIP becomes more and more
popular. SIP is defined in many RFCs.
6
Extension
Extensions are teephones connected to a PBX. Linux-Call-Router supports individual
configuration of extension. Calls from non-extensions are just routed, extensions have special
applications, like individual voice boxes and call logs. Many telephones can have the same
extension’s number. Extensions may also ring on external phones. The extension is identified
by the outgoing caller ID of the telephone and/or by interface it is connected to. On incoming
calls, the internal interface(s) is/are defined by the extension’s configuration, to what internal
interface to route the call to.
Internal port / interface
An interface with one or more ports can have an ‘extension’ flag set, so incoming calls are
treated as calls from an extension. Normally telephones connected directly via ISDN card to
the PBX will have an extension flag set.
External port / interface
An external telephone line (from a local telecommunication provider) is connected to the
PBX. Multiple external lines may be used for more channels. Since ‘extension’ flag is not set,
calls are treated as external calls.
Interface
One or a group of one or may internal/external port(s) with a given name. Multiple ports may
be grouped to a multi link PBX line. Each port must be assigned to an interface.
a-law / mu-law
Audio samples are not directly transmitted via B-channel. First a 12 bit sample is sampled
from the audio input and then converted into 8 bits. This is done by reducing the dynamics for
high amplitude samples, to increase the number of samples available for low amplitude. There
are two different ‘laws’, describing the amplitude ranges. The conversion can easily be done
by a table of 256 entries (to decode) and 65536 samples (to encode from a 16 bit sample). In
Europe, we use “a-law”. In America they use “mu-law”. The mu-law also allows to drop the
lowest significant bit. This is used in America for telephone exchanges that provides only 56
bits. To read more about the coding, refer to any “how-ISDN-works” manual.
PRI / BRI / G.703 / s2m / S/T / S0 / PMX / up0 / u2m / uk0 / HDSL / SDSL
There are two different types of ISDN interfaces:
•
•
Primary Rate Interfaces
Basic Rate Interfaces
The Primary Rate Interface has one 64 bit D-channel and 30 B-channel (channel 0 is used for
synchronization). The electric interface is also called “s2m” or “PRI” and is defined in the
ITU-Standard “G.703”. The bit rate is 2048Kbits/s. The electrical version of a “G.703”
7
interface is limited to several meters of cable length, so a modem must be used. “HDSL” and
“SDSL” provide transmission via none insulated twisted pair copper wires over some
kilometers. An older standard is called “u2m”. PRI interfaces are also called PMX (Primary
Multiplex).
The Basic Rate Interface has one 16 bit D-channel and two B-channel. The electrical interface
is also called “S/T” or “S0”. It supports point to multipoint connectivity. Also this interface
has only a limited range of cable length, so “uk0” or “up0” is used to transfer the signal over
several kilometers using two wires.
B-channel / D-channel
An ISDN interface has several types of channels. The D-channel is used to transfer signaling
information (data channel). The audio data in transferred vi B-channel (binary channel). Also
any data transmission like fax or internet is transferred via B-channel. Some interfaces have
overhead, monitor and echo channels. These are only relevant between interfaces and do not
transfer information between subscribers.
8
2
Hardware Requirements
2.1 ISDN cards
The first thing needed for the PBX, is of cause at least one ISDN card. At least two cards are
required to interconnect internal telephones with external telephone lines. Any card can be
used that is supported by the kernel’s mISDN driver:
•
•
•
•
•
•
•
•
HFC-S PCI based cards (tested)
Fritzcard PCI (tested)
Sedlbaur FAX
Winbond
HFC-4s / HFC-8s based cards (tested)
HFC-E1 based cards (tested)
HFC-USB
…
Please mail your experience with untested cards, when using the kernel’s mISDN driver.
In order to connect telephones directly to an ISDN card, it must support NT-Mode. Then it is
possible to use it as internal ISDN port. There currently there are these type of chip sets, that
support NT-Mode hardware layer:
•
•
•
•
HFC-S PCI based cards
HFC-4s / HFC-8s chip sets
HFC-E1 chip set
HFC-USB based adapters
9
All of these chips have a small ‘Dom’ of Cologne on the top:
The following cards do have the required chip set capable of NT-Mode:
•
•
•
•
•
•
•
•
•
•
•
•
•
•
•
•
•
•
•
•
•
•
•
•
•
Creatix ISDN-S0/PCI
Trust PCI-Modem
Acer ISDN 128 Surf PCI
D-Link DMI-128I+
Billion/Asuscom (Asuscom/Askey) (Beware of "BIPAC PCI SE", it has a
W6692 chip that DOESN'T WORK)
HFC cards from .Conrad Elektronik. (Bestellnummer 95 50 78)
Neolec FREEWAY ISDNPCI (available at Reichelt.de)
ISDN 128Kbs TA Card (TAS106H)
HFC-4S / 8S / E1 OEM
Junghanns Asterisk boards (HFC-4S / 8S / E1) www.junghanns.net
Beronet Asterisk boards (HFC-4S / 8S / E1) www.beronet.com
PBX4Linux boards (HFC-4S / 8S / E1)
Typhoon ISDN Quick Com 128 PCI
Arowana ISDN 128k
Conceptronic C128i(R) (snogard.de)
Conceptronic B128P Bulk ISDN
Telekom Teledat 220 PCI
Arowana 128PBS PCI
mps Software ISLINEuni/ISLINEpro/ISLINEnote
Micronet 128K ISDN TA Card
Sitecom DC-105 - PCI ISDN Card
Microcom ISDN Porte Internal (Czech site, I think)
E-Tech PCTA128 PCI ISDN board (sold in Holland)
Dynalink 128P PCI ISDN
Longshine LCS-8051A (Reichelt)
More cards are listed at www.mISDN.org. Please mail me other cards you know, that have an
NT-Mode capable chip sets. The card will look like:
10
(Figure: Cards with HFC-PCI, thanx to Ulrich for the pics)
2.2 Connect ISDN telephones to your ISDN card.
Normally, cards run in TE-Mode, which means ‘Terminal Equipment’. Terminal equipment
is e.g. an ISDN telephone, an ISDN card, a fax machine, or any other terminal to places calls,
dial into the internet, or send and receive faxes. If the card runs in NT-Mode, it is capable of
connecting terminal equipment to it. The NT is the small box where all ISDN terminals are
connected, which means ‘Network Termination’. It is also known as ‘NTBA’ (Germany) or
‘NT1’ (everywhere else).
What must be done, to connect telephones to an ISDN card? Don’t be shocked when you read
the list. It is much easier, as you will find out later in the text. Here is a list of things to do:
•
•
•
•
•
Of course, the card must support NT-Mode hardware layer. (all HFC chips do.)
A driver capable of NT-mode must be installed. (part of mISDN)
The ISDN telephone must be connected cross-over to the card.
Power must be supplied to the ISDN bus, in case the telephone(s) has/have no own
power supply.
The ISDN bus must be terminated with resistors of 100 Ohm. (better 50 Ohm)
In order to bring an HFC card into NT-mode, the following module parameter is used:
$ modprobe hfcpci protocol=0x12 layermask=3
But this will be explained later…
It is not possible to use just a cross-over cable for Ethernet. ISDN uses different wires in the
cable than Ethernet and Fast Ethernet. Additionally, terminals and cards have no termination,
because termination is normally done by NT1 or ISDN wall plug. ISDN cross connection is
done by connecting the inner twisted wires (pin 4 and 5) with the twisted wires around them
(pin 3 and 6). Pins 1, 2, 7 and 8 are not used. Some special PBX telephones can use these pins
for extra power supply, but I don’t know any telephone that supports it. Termination is
essential, even if the ISDN cable would have almost zero length. All this can be done by
using an old (even broken) NT1 (NTBA). Telephone companies throw them away when they
are broken or customers have problems with it. Most times the power supply still works
(about 9 out of 10). If you measure about 40 volts between pin 3 and 4, as well as pin 5 and 6,
you know that your NT1 is good enough for using it as a power supply. Be sure that the
terminator switches inside are turned on. (This is the factory default.)
11
An NT1 (NTBA) has three types of connectors. The first connects to the underground wire
that is connected to the telephone network.7 The second connects to the ISDN telephone(s).
The third is connected to the power line. Follow the steps to get an NT1 connected to an
ISDN card instead of the telephone network:
The VERY SIMPLE way:
Take an ISDN or Ethernet cable and cut it in the middle. Reconnect the inner pins (4 and 5) of
one end with the pins around them (3 and 6) of the other end. Do it vice versa. (Connect 3
with 4, 4 with 3, 5 with 6, 6 with 5) Now you have an ISDN cross over cable, that is different
to an Ethernet cable. Just connect the ISDN card with the cross over to one plug of your NT1,
and a telephone with a normal cable (not crossed) to the other plug. Connect the power line of
your NT1 or telephone and you are done. You will be able to connect only one telephone,
because both plugs are used. Don’t use the cross-over cable to directly connect your card to
your telephone, unless your card or your cable has termination and your telephone has own
power supply.
The COMFORTABLE way:
Step 1: Open the small door to get access to the wire clips. If it has no door, just take a screw
driver and open the case. Be aware of high voltage at the switched power supply, even if it is
not connected to the power line. Capacitors may hold high voltage for a long time. Inside are
4 clips to connect an ISDN cable directly to it, rather than connecting it to one of the RJ45
plugs. Each NT on the picture has six yellow clips: One pair (to the left) are used to connect
the U-Bus (underground wire), the two pairs (to the right) connect to the S-Bus (telephone).
The S-Bus is directly connected in parallel to the two rj45 plugs.
7
On the other end of the phone line, the telephone company uses something called LT (Line Termination). It
works almost like the NT1, but it is connected together with many other LTs to one or more 2-mbit-interfaces.
This is called the ‘Access Network’. This network is connected to the public exchange.
12
(Figure: NT1 with door open)
Step 2: Find out which clip inside the NT1 is connected to which pin on the rj45 plug.
Therefore connect an ISDN cable to one of the two ISDN jacks. Take an Ohm-Meter and find
out which clip is connected to which pin of the ISDN cable. Use a small peace of wire, to help
the meter’s probe get into the hole of the clip. Pin 4 and 5 as well as 3 and 6 of the ISDN
cable, is connected through the coil inside the NT1. The coil has low resistance, so your OhmMeter will show that they are connected (almost 0 Ohms). So you cannot determine between
pin 4 and 5 as well as between pin 3 and 6. There are two clips connected to pin 4 and 5, and
another two connected to 3 and 6. It doesn’t matter which clip is connected to pin 4 and which
is connected to pin 5, since the polarity doesn’t matter. (pin 3 and 6 respectively)
Most NT1 in Europe name the 4 pins: A1 and B1, A2 and B28. Do the following connections
for crossing send and receive pair:
-
A1 -> pin 3
B1 -> pin 6
A2 -> pin 4
B2 -> pin 5
8
German Telekom (former German state-owned telephone company) counted their twisted pairs in their cables.
A1 mens, the wire A of twisted pair 1. The white or the cable with less black rings is wire A, the other is wire B.
13
(Figure: Find clips)
Step 3: Take another ISDN cable or Ethernet cable and cut off one end. Take the inner pair of
the cable (pin 4 and 5) and connect them to the clips, that are connected to the outer pins of
the ISDN jacks (pin 3 and 6). Do this with the inner pins of the cable respectively. Again,
polarity of a cable pair doesn’t matter for the ISDN bus.
9
(Figure: cable connected to the clips)
Step 4: Use the Ohm-Meter again and verify the connection between the cable, that is
connected to the clips, and the cable connected to one of the jacks. Pin 4 and 5 should now
connect to pin 3 and 6 and vice versa.
(Figure: Verify cross connection)
Step 5: Connect the cable, which is connected to the clips, to the ISDN card, that should run
in NT-Mode. Be sure that termination is switched on. Inside the NT1 are two switches, that
must be ON. This is the default.
14
(Figure: cable connected to the ISDN card)
Step 6: Connect an ISDN telephone to the ISDN cable, that is connected to the ISDN jack.
Also connect the power cable.
(Figure: complete setup with one phone)
Since there is nothing connected to the U-Bus (underground wire), the internal electronics is
disabled9, because it gets its power from the U-Bus (not from the power line). Only the power
supply is connected to the coils (transformer) inside the NT1 providing power for telephones,
as well as termination. This is why the NT1 can be broken. Only power supply must work.
9
Some new NT1 will also run their electronics with the integrated power supply, so no power feeding is
required. (I found this on Sphairon’s NT1 + Split boxes.) In this case, I would suggest to disconnect the internal
coil from the NT1 controller. If you are not into electronics like that, just use an old NT1, it will work.
15
NOTE: If you like to connect more than one telephone, you might experience clicks and other
audio problems. Use 50 ohm instead of 100 ohm termination. This can be done by adding
another 100 ohm resistors in parallel with the ones in the NT1. Two 100 ohm resistors in
parallel become 50 ohm! One resistor must be connected between pin 3 and 6, and the other
between 4 and 5. You must figure out yourself how to connect the cable plus the resistors.
Maybe you use a soldering iron or stick both into the holes of the clips.
Alternatively you may get an ISDN termination plug. Use the plug between one jack of the
NT1 and the isdn phone or between NT1 and ISDN card. It will also lower the ISDN
termination down to 50 ohm.
2.3 Interrupt problems
One serious problem of installing HFC cards are interrupts. Some PCI slots share the same
IRQ. Be sure that every HFC card has its individual IRQ. When booting the PC, the IRQ is
shown of each PCI card installed. If two cards share the same IRQ the HFC-PCI driver may
fail. I experienced this as I installed three cards in one PC. This problem may be obsolete due
to Kernel improvements.
Another problem might occur with PC main boards using IDE controllers. The IDE controller
blocks CPU during transfer. Since IDE drives require time to calibrate and find sectors, they
can block IDE bus even multiple seconds. This causes loss of frames coming from the ISDN
cards. This results in gaps of the audio during hard drive operation. I used an ISA Fritz-Card,
which causes losses of interrupts during IDE hard driver access. The HFC-PCI card worked
better. This problem doesn’t occur with my PCI Adaptec SCSI controller in the same
machine. With serial ATA, this problem should be no matter.
The audio processing of mISDN and LCR is designed to handle these problems. This should
not lead to an increasing delay.
2.4 Hard disk
The size of a hard drive doesn’t matter, as long as no audio recording is done. Since the LCR
has a call recording feature (and answering machine), smaller hard drives get filled quickly
during long calls. A recoding with 8 bit mono causes a recorded file of 8 kilobytes per second
or 8000 bytes. The best quality of recoding is 16 bit stereo. This causes 32 kilobytes to be
written down during one second. If the call lasts one hour, LCR would record a file of 115.2
megabytes or 115200000 bytes. Even with 8 bits mono (or law codec) is used, the recording
would have still a size of 28.8 megabytes or 28800000 bytes. If the LCR would support the
LPC-10 codec to record audio, the size would be 1.44 megabytes for recording one hour. A
year of audio data could be compressed down to about 12.6 gigabytes. In this case, don’t
worry about size of your hard drive anymore. Any volunteers are welcome to implement the
LPC-10 codec… Note that the call recording is just a feature that is not turned on by default.
There are no requirements for hard drive’s speed, since the load will be 800-1600 kilobytes
per seconds for 100 recording calls at a time. Hard drives are much faster these days.
16
2.5 Memory
Almost every Linux box uses swap memory. LCR disables swapping of it’s code and data
memory. Other programs still use swap. If the LCR allocates new memory, that is not
available, the memory of other processes must be written to disk first. This may cause a high
delay of call processing, which also causes audio gaps and jitter. Also if other programs on
the Linux box are swapped (like the telnet daemon), the LCR will stop for a short period of
time, caused by hard disk traffic. If execution stops for several seconds, it may also cause
ISDN protocol to fail. To reduce the risk, you may turn off swap memory when running the
LCR. If LCR runs out of memory, it will terminate, because if a call that runs out of
resources, LCR requires memory to process releasing of that call, but memory is not available
anymore. Swap can be a good idea to prevent this, even if it causes gaps and jitter. Telephone
calls are a real-time task, that don’t like delays of any undefined time. Therefore increase
physical memory, so the Linux box would run without swapping memory.
It depends on what’s running on the Linux box. Just boot your Linux, and after starting LCR
look how much of memory is left. Turn off swap, and check what’s left:
$ swapoff -a
$ free
total
Mem:
52376
-/+ buffers/cache:
Swap:
0
used
50364
43432
0
free
2012
8944
0
shared
0
buffers
868
cached
6064
In this example from my Linux box, there is about 2 megabytes of free memory. Note that the
cached memory of about 6 megabytes will be available any time. The cached memory holds
recent data from hard drive, that will be accessed faster when accessed again. In this case
there are 8944 kilobytes (almost 9 megabytes) of memory still available without swapping.
After a while, the machine without swap may run out of memory. I experienced this
sometimes, because I had many other processes running, like web server, PPPoE and proxy.
Conclusion: It is much better to leave swap turned on, have much memory, and no other
heavy programs running (except for normal server tools, like Samba, FTP, telnet and SSH
daemons).
2.6 CPU
I have no experience with CPU usage. Making an external call, the CPU usage (AMD K6200) is between 0.5% and 3.5%. If anyone has more experiences, please let me know. I
recommend at least 200 megahertz for the LCR without using asterisk.
2.6 PCM
Almost all ISDN controllers support PCM bus to interconnect them. The HFC-4S / HFC-8S /
HFC-E1 support a PCM bus of 128 timeslots with two banks. Also these controllers have an
integrated timeslot assigner. This is useful to directly connect two controllers without a
switching matrix10. It is possible to connect up to 128 callers on one bus. This makes large
10
A switching matrix is used when interfaces are statically connected to timeslots on a PCM bus. Since all
channels of all controllers are connected to an individual timeslot, a switch controller is required to forward data
17
PBXs possible, where 128 calls can be made without CPU load for audio transfer. The driver
automatically detects these cards and does hardware cross-connections and conferencing.
Also PCM is possible with the HFC-PCI A chip. A special connector must be added to the
board in order to interconnect them. I tried this and it worked, but I found it too complicated.
If only a few ISDN ports are realized with HFC-PCI cards, software bridging is quite enough.
from one timeslot to another. If controllers have timeslot assigners, they can connect to any timeslot they want,
no switching is required.
18
3
Download & Installation
3.1. Install mISDN driver
Why mISDN driver and not HiSax driver:
The first ISDN driver of the Linux Kernel (HiSax) is not able to handle the ISDN
protocol for connecting telephones to it (NT-mode). mISDN provides a user space
library which supports NT-mode stack. The library “i4lnet” is part of the
“mISDNuser” package, but not included in the kernel source. (yet)
The ISDN4Linux is not able to link certain ISDN layers with user space programs.
mISDN provides direct access to any layer. Each protocol layer is implemented in
modules and can be loaded as required. Access to ISDN layer 311 is essential for
running a PBX.
Also b-channels have individual stacks with layers, that can be accessed from user
space.
Linux is not a real-time operating system. A PBX application in user space will have a
delay or interruptions, when cross-connecting audio streams. If, for example, a call is
made from an internal port to an external ISDN line, the b-channels must be crossconnected. To keep the delay as low as possible, a module called mISDN_dsp is
included in the mISDN kernel source. It was programmed for the PBX4Linux but is
also used in other applications, like a standallone Asterisk channel driver or this LCR.
It will not only cross-connect, it is also capable of making conferences with an
unlimited number of b-channels (if available), dejittering of audio source, volume
control for incoming and outgoing audio data, real time tone generation, DTMF
decoding, echo cancellation, even real time encryption, and it will do it in hardware if
supported.
•
•
•
•
In order to run LCR, the kernel with mISDN is require, as well as the “mISDNuser”
package. Download the latest sources from ‘www.mISDN.org’, the following packages are
required:
•
mISDN_xxxx.tar.gz
11
Layer 3 is the protocol layer of ISDN. This layer controls call setup, call modification (e.g. call forwarding)
and call release.
19
•
mISDNuser_xxxx.tar.gz
NOTE: In earlier versions of PBX4Linux, I suggested not to use the CVS version. This was
because the official version of mISDN did not work with the PBX4Linux code. One reason
was, that the API changed during development. Now you may download the latest release
from mISDN.org. Also the latest master branch (default branch) should work.
mISDN can be installed to Kernel source or compiled directly. When compiling directly, just
untar the mISDN package, make and make install:
$ tar xvzf mISDN_xxxx.tar.gz
$ cd mISDN
($ make menuconfig)
$ make
$ make install
The modules will be installed in “/lib/modules/<kernel version>/extra/”. In this case, be sure
that no mISDN is in the Kernel tree, because the kernel modules have higher priority than
extra installed ones.
If you like all mISDN to your Kernel: Here is a short instruction on how to add mISDN to
your Kernel source. If you like to use a newer Kernel, be sure to save the Kernel config of
your current system:
$ cd /usr/src/linux
$ cp .config ../current_config
Unpack the source of your new Kernel. Do this only if you don't already have a source
installed:
$ cd /usr/src/
$ tar -xvzf linux-x.x.xx.tar.gz
$ ln -s linux-xx.xx.xx linux
$ cd linux
Now you can add the mISDN driver to your kernel. Install as shown:
$ cd /usr/src
$ tar xvzf mISDN_xxxxxx.tar.gz
$ cd mISDN
$ ./std2kern [-h]
This script will copy the mISDN source from the current directory to the kernel source. Give
“h” option to get a list of options. By default the driver will be installed in “/usr/src/linux/”.
Don't worry about warning messages, that some versions of Makefile or Kconfig don't exist.
20
Then configure your Kernel:
$ cd /usr/src/linux
$ make menuconfig
Enable the following kernel features, using “make menuconfig”:
•
•
•
•
•
•
•
•
Enter Device drivers --->
Enter ISDN subsystem --->
ISDN Support (say 'm')
CAPI2.0 support (say 'm')
Modular ISDN driver --->
Enable memory leak debug for mISDN (say 'n')
Support modular ISDN driver (MUST say 'm')
Support for AVM Fritz!Cards (say 'y')
Support for HFC PCI cards (say 'y')
<other cards…> (say 'y')
Support for digital audio processor (say 'y')
A card, that supports NT-Mode, you may want to use. Otherwise you will not be able to
connect telephones. If your card is an HFC-S PCI, say yes to the following:
•
HFC-S PCI cards
Also say yes to any card you may want to use for external line.
Save and exit Kernel configuration, and continue to build the Kernel source:
$ make bzImage
$ cp arch/i386/boot/bzImage <location of bootloader>/vmlinuz
$ make modules
$ make modules_install
If everything compiles without errors, Reboot! Warnings about unused variables and wrong
prototypes can be ignored of course. After reboot, run “depmod”, in order to create
dependencies, so the ISDN modules will be found. In newer kernels the “depmod” is done
automatically when installing the modules.
To be able to use the “/dev/mISDN” device, it must be created:
$ mknod /dev/mISDN c 46 0
It is a character device with major number 46 and minor 0. Don’t worry if you forgot, LCR
will tell you when the device is missing. But before the device exists, the modules must be
loaded. Read on, on how to create an rc-script12 to load and unload the modules.
12
RC Scripts are Unix scripts, that are called during boot and shutdown, to start and stop services and software.
21
3.2. mISDNuser
In order to access mISDN device driver and use the NT-mode, install mISDNuser package:
$ tar -xvzf mISDNuser-x.xx.tar.gz
$ cd mISDNuser
$ make
$ make install
Two libraries will be created:
•
•
libmISDN.so
libisdnnet.so
Also some other utils will be part of the package. Just ignore them. Be sure to uncompress
mISDNuser the same source directory where you will uncompress LCR. The paths to the
libraries are relative in the Makefile of LCR. If you choose different locations, you must edit
the Makefile.
The libmISDN.so provides direct access to the mISDN device. It will be used to
communicated directly with the protocol stacks of mISDN.
The libisdnnet.so provides NT-mode protocol. The TE-mode is part of the Kernel modules.
3.3. Linux-Call-Router
Download LCR at ‘www.linux-call-router.de’. Uncompress it:
$ tar -xvzf lcr_xxxx.tar.gz
$ cd lcr
If you have trouble with OpenSSL includes, edit the “Makefile”. At the line "WITHCRYPTO", write “#” in front of it to comment it out. You will only need it, to support some
kind of propriety encryption and handshaking
Compile and install the PBX:
$ make
$ make install
Configuration files, documents and data files will be installed by default at: “/usr/local/lcr”.
Edit the “Makefile” in order to choose a different location. Don't worry about your old
configuration files, you might already have from older version. They will only be copied, if
they don't exist already. If they don’t exist, default configuration files will be installed. The
binaries are installed at “/usr/local/bin” by default.
To see a list of start options of LCR, just enter:
$ lcr
22
To run PBX4Linux as background task, enter:
$ pbx fork
A daemon fork will be done, so closing the shell will not interrupt the PBX. Also use this for
startup, if the PBX should be started at boot time.
Note: In order to run PBX4Linux, the mISDN driver must be loaded. Follow the next chapter
on how to configure the driver, and creating a start and stop script.
3.4 Asterisk channel interface
To be done….
23
4
Configuration
4.1. Start and stop mISDN
The following example will assume that your have a HFC-PCI card and a Fritz-Card installed.
The Fritz-Card is connected to a normal multipoint ISDN line. Multipoint lines are used in
most places. It is possible to connect up to eight telephones to it; the LCR may be connected
parallel with other telephones. The HFC-PCI card is connected to a telephone, as described
above. With this setup, LCR will be able to forward calls between external lines and internal
telephones.
Many things must be done to setup ISDN4Linux. Therefore I wrote a small tool, that creates a
shell scrip to start and stop kernel’s mISDN driver. It comes with the LCR package and will
be installed with it. Run it with:
$ genrc
This program generates a script, which is used to start/stop/restart mISDN
driver. All configuration of cards is done for using with the PBX.
Enter mode of your ISDN card #1. Should it run in NT-mode (for internal
phones), or in TE-mode (for external lines)? If you do not like to add more
cards, say 'done'.
[nt | te | done]: te
The ‘te’ keyword tells ‘genrc’, that the first card (Fritz-Card) should run in TE-Mode. It will
be connected to an ISDN line. Therefore the card must be configured as a “terminal
endpoint”.
Is your card #1 connected to point-to-multipoint line, which supports
multiple telephones on one line (Mehrgeräteanschluss) OR is it a point-topoint line which is used for PBX and supports extension dialing
(Anlagenanschluss)?
[ptp | ptm]: ptm
The type of line we will use, is multipoint. This is the standard type of ISDN lines all over the
world.
Select driver of ISDN card #1.
24
(1)
(2)
(3)
(4)
(5)
(6)
(7)
(8)
HFC PCI (Cologne Chip)
HFC-S USB (Cologne Chip)
AVM Fritz PCI
Seldbaur FAX
Winbond 6692 PCI
HFC-4S 4 S/T Ports (Cologne Chip)
HFC-8S 8 S/T Ports (Cologne Chip)
HFC-E1 1 E1 Port (Cologne Chip)
Select card number[1-n]: 2
Enter ‘2’ to select Fritz-Card. If your card is not in that list, there is no driver for it or ‘genrc’
may be out of date.
Summary: Card #1 of type AVM Fritz PCI will run in TE-mode and point-tomultipoint-mode.
Enter mode of your ISDN card #2. Should it run in NT-mode (for internal
phones), or in TE-mode (for external lines)? If you do not like to add more
cards, say 'done'.
[nt | te | done]: nt
The next card we use is the HFC-PCI running in NT-Mode. We want to connect a telephone
to it. NT means “network terminator”. In this case our Linux box is the network where the
telephone is connected to.
Select driver of ISDN card #2.
(1)
(2)
(6)
(7)
(8)
HFC PCI (Cologne Chip)
HFC-S USB (Cologne Chip)
HFC-4S 4 S/T Ports (Cologne Chip)
HFC-8S 8 S/T Ports (Cologne Chip)
HFC-E1 1 E1 Port (Cologne Chip)
Your card will run in NT-mode. The shown cards are capable of providing
hardware layer for NT-mode.
Select card number[1-n]: 1
We are not asked for multipoint, because only multipoint mode is supported for NT-mode.
The selected card is HFC-PCI.
Summary: Card #2 of type HFC PCI (Cologne Chip) will run in NT-mode and
point-to-multipoint-mode.
Enter mode of your ISDN card #3. Should it run in NT-mode (for internal
phones), or in TE-mode (for external lines)? If you do not like to add more
cards, say 'done'.
[nt | te | done]: done
There is no third card, so we use the keyword ‘done’. Now we are asked to enter dspmodule’s options and debugging values. Just enter ‘0’ for every value.
Enter options of mISDN_dsp module. For a-LAW, just enter 0.
For u-LAW enter 1.
[0..n | 0xn]: 0
Enter debugging flags mISDN core. For no debug, just enter 0.
[0..n | 0xn]: 0
Enter debugging flags mISDN core. For no debug, just enter 0.
25
[0..n | 0xn]: 0
Enter debugging flags of cards. For no debug, just enter 0.
[0..n | 0xn]: 0
Enter l1 debugging flags of driver. For no debug, just enter 0.
[0..n | 0xn]: 0
Enter l2 debugging flags of driver. For no debug, just enter 0.
[0..n | 0xn]: 0
Enter l3 debugging flags of driver. For no debug, just enter 0.
[0..n | 0xn]: 0
Enter dsp debugging flags of driver. For no debug, just enter 0.
[0..n | 0xn]: 0
Debugging is explained later in this book. Just enter ‘0’ for the first time. If you experience
crashes, read on, on how to use these values.
Enter location of the mISDN modules. Enter '0' for kernel's default
location.
Enter
'1'
for
binary
distribution's
location
'/usr/local/pbx/modules' or enter full path to the modules dir.
[0 | 1 | <path>]: 0
Depending on the location of the modules, give '0' or '1' here. '0' for default location (source
distribution) or '1' for location of the binary distribution.
File 'mISDN' is written to the current directory.
$
Now the following shell script is written in the current directory with the name “mISDN”:
# rc script for mISDN driver
case "$1" in
start|--start)
modprobe
modprobe
modprobe
modprobe
modprobe
modprobe
modprobe
mISDN_core debug=0x0
mISDN_dsp debug=0x0
mISDN_l1 debug=0x0
mISDN_l2 debug=0x0
l3udss1 debug=0x0
hfcpci protocol=0x12 layermask=0x3 debug=0x0
fritzpci protocol=0x2 layermask=0xf debug=0x0
sleep 1
;;
stop|--stop)
rmmod
rmmod
rmmod
rmmod
rmmod
rmmod
rmmod
;;
hfcpci
fritzpci
mISDN_isar
l3udss1
mISDN_l2
mISDN_l1
mISDN_core
restart|--restart)
sh $0 stop
sleep 2 # some phones will release tei when layer 1 is down
26
sh $0 start
;;
help|--help)
echo "Usage: $0 {start|stop|restart|help}"
exit 0
;;
*)
echo "Usage: $0 {start|stop|restart|help}"
exit 2
;;
esac
To load ISDN4Linux, just enter:
$ sh mISDN start
To unload the modules just enter:
$ sh mISDN stop
I will now explain what the script does, if the start option is given:
“modprobe mISDN_core debug=0x0”
“modprobe mISDN_dsp debug=0x0”
will load the kernel mISDN driver core.
will load the real time audio processor.
“modprobe mISDN_l1 debug=0x0”
will load the layer-1 protocol for TE-mode.
“modprobe mISDN_l2 debug=0x0”
will load the layer-2 protocol for TE-mode.
“modprobe l3udss1 debug=0x0”
will load the layer-3 protocol for TE-mode.
will load the card driver
for all HFC cards. Protocol type of 0x12 means NT-mode (0x10) and DSS1 (0x02).
Layermask of 0x3 means layer-0 (bit 0, card) and layer-1 (bit 1). Layer-2 and layer-3 are
realized via libisdnnet library.
“modprobe hfcpci protocol=0x12 layermask=0x3 debug=0x0”
will load the card
driver for all Fritz cards. Protocol type of 0x2 means TE-mode (0x00) and DSS1 (0x02).
Layermask of 0x7 means layer-0 (bit 0, card), layer-1 (bit 1), layer-2 (bit 2) and layer-3 (bit
3).
“modprobe fritzpci protocol=0x2 layermask=0xf debug=0x0”
“sleep 1”
will wait some time until all cards are registered.
Look into the system log. You will see some information while loading the modules. Also
errors will show up there. In order to see the current configuration, start the PBX with the
query option:
$ pbx query
** PBX4Linux **
Port
Version X.x (XXX 200x)
1: NT-mode BRI S/T interface port (for phones)
27
Port
2: TE-mode BRI S/T interface line (for phone lines)
$
Connect an ISDN telephone as described above, and pick up the phone. You will not get a
dial tone from the kernel. In order to get a dial tone, the application LCR must be running.
But before running LCR, you must configure interfaces and “extensions”.
4.2 PBX lines
A PBX line, also known as point-to-point line, is only capable to connect one PBX (or one
telephone in point-to-point mode) to it. Also it features direct dialing in of extensions13. The
PBX, connected to this type of ISDN line, is able receive incoming calls, after the first digit
behind the main number is dialed. It is controlled by the PBX, when the number is complete.
It depends on the provider, how much digits can be dialed after the main number. The
international convention of the maximum length of a phone number is 13 digits. If the county
code has two digits (49 in Germany) and the area code has three digits (212 for the city
Solingen), and the main number has six digits, then there are two more digits that will be
routed to the PBX line. Of course the PBX can define by itself when the number is complete.
Inside Germany, more digits are allowed. The ‘German Telekom’ for example forwards up to
17 digits. The company, I work for, forwards up to 24 digits after the area code. The PBX will
signal, when the number is complete. This is supported by LCR.
Another advantage of a PBX line is the ability to have more than one ISDN line for the same
main number or prefix. One BRI ISDN line can handle two calls only at a time. The number
of simultaneous calls can be increased by heaving more than one line. LCR also supports this.
There is no know limit, except for the number of cards, that fit into your Linux box.
Note that PBX lines might get fault monitored by the telephone company, because they are
more expensive and more important than normal ISDN lines. In this case, talk to your
telephone company to ignore alarms because every reboot, crash or ever restarting of the LCR
or mISDN driver will cause alarms.
To tell mISDN to use a PBX line, you must set the card into point-to-point mode. This will
automatically done when using “genrc”. The protocol for the card driver would be 0x22.
(0x20 for PTP-mode, 0x02 for DSS1)
$ modproble fritzpci protocol=0x22 layermask=0xf debug=0x0
This will be included in the “mISDN” shell script, if the option “ptp” is selected when
running the “genrc” tool.
PBX lines may also be multipoint. You will be able to connect normal telephones to it. In
case of LCR it makes no difference. If telephones would be connected parallel to the PBX
line, dialing of extension digits will work until one phone on the bus is ringing.
Another type of PBX line is the PRI line or “primary rate multiplex” line. This type of line
provides 30 B-channels in Europe and 22 B-channels in the USA. It is used for really big
13
DDI is a feature for incoming calls to dial an extension after the main prefix. The PBX will check the number
and signal, if it is complete.
28
PBXs. It is also possible to group multiple PRI lines to one big PBX interface. I already
implemented a driver, to support the European PRI chipset “HFC-E1”.
4.3 CLIP No Screening
“CLIP No Screening” or “No Screening CLIP” is a special agreement with your telephone
company. Normally caller Ids, that are sent on outgoing calls, are checked against the
numbers that are assigned to your ISDN line. If you send a caller ID, for which you have a
number assigned, the telephone company will forward it to the called user. If the caller ID you
specify doesn’t match with any of your assigned numbers, the main number assigned to you,
is used. So it is not possible to fake caller IDs, and pretend that you are your ex-girlfriends
new boyfriend, or the boss of your neighbor. But sometimes you may want to pretend that you
are the boss of your neighbor, especially when she calls your PBX, and it forwards the call to
your mobile telephone using a second line. On the second line to your mobile, the caller ID of
the caller of the first line (the boss) is used. When your mobile telephone rings, you will see
that the boss calls and not just your default number of your telephone line.
Another way to use this, is when you connect two PBXs. Lets assume you make a VoIP call
to another PBX, that transfers the call for you to the public telephone system. In this case you
want to send the caller ID of the PBX, you are calling from, and not of the other PBX, that
transfers the call.
There are lots of things to use it for. Some of them are not very nice, but most of them are
quite funny. I have this feature on my PBX line, for the reasons described above. Ask your
local telephone company for the agreement. Note, that this feature is part of the basic ISDN
standard ITU-T Q.931, so it is conform to make this feature available to you. If your
telephone company tells you, that this feature is not legal, tell them about the standard.
The caller ID, sent on a normal ISDN line, is normally the local telephone number of type
“unknown”. The telephone company screens the ID and adds the national and international
prefix in front. When using “CLIP No Screening”, the caller ID must be sent by the PBX
including all prefixes. There are three common types of caller IDs that can be sent: Type
“subscriber” will just send the caller ID without any prefix. The called party that receives this
caller ID will just see that number, as you specified, everywhere in the world. Type “national”
must be sent with area code and number. The called party’s Telephone will automatically add
the national long distance prefix in front, so it must be omitted. Type “international” must be
sent with country code, area code and number. The called party’s Telephone will
automatically add the international access code in front, so it must be omitted. Because the
PBX doesn’t know what access code the called party must dial, it just sends the type
“international”, and the prefix is added by the called party’s telephone.
It the connected ID is transmitted without checking, it is called “COLP No Screening”.
When this feature is enabled, two caller IDs are transmitted by you telephone company: the
user provided and the network provided caller ID. The is required for billing the right number.
Note: There are also special handling of caller IDs, so you caller ID will be forwarded as it
would be network provided. In this case, be very carefull on what you send, because this
number might get billed. But don’t worry, normal citizens will not get this feature, but your
telephone company might do a wrong configuration of your local exchange. You can test it,
because user provided calls will show as ‘user provided’ in the trace. (The trace feature is
explaned later.) Just call yourself and see what is coming in.
29
4.4 CLIR Ignore
The most wonderful feature that an ISDN line can ever have is “CLIR Ignore”. CLIR stands
for “Caller Line Identification Restriction”. The caller is able to hide the caller ID. If a call
with an restricted ID is received, the exchange will delete the number. Only the information,
that the ID is restricted, is transferred. In Germany most telephone lines restrict caller IDs. It
is regulated by the “Regulierungsbehörde RegTP”, that a call which is made anonymously,
should not presented to the called party. But the law says, that the called party has a right to
know who is calling. This is quite strange.
If “CLIR Ignore” is set on your ISDN line, the caller ID is transmitted even if the caller
doesn’t want it. You could see every caller’s ID in your log file. You could always reply a call
if you were absent. This feature is used by the police and emergency lines in order to call
back, if the caller hangs up or is unable to tell her location. The number will be transmitted
with the information, that it should not be displayed.
The LCR also supports suppression of the restricted caller IDs, if your have the “CLIR
Ignore”-feature on your ISDN line. Of course LCR also has the “CLIR Ignore” feature, that is
called “anon-ignore”. It displays anonymous external calls (if the “CLIR Ignore” feature is
provided on your ISDN line) as well as suppressed internal calls.
4.5 Previous through-connect
Whenever you make a call, you get tones and patterns from your external line: You hear the
dial tone of the local exchange, the ringing of the remote exchange and sometimes
announcements. All this happens before and after the called party answers. Also you don’t get
charged for it.14 But if you get called, the local exchange will not connect audio until you
answer the call. The local exchange generates tones, because your telephone doesn’t.
It is possible to send own tones during ringing or any stage of call setup, instead of the
standard tones of your local exchange. This is useful if you forward calls, so announcements
also get forwarded. A caller may also hear your ‘music’ or whatever you send him. There are
three things required to send own tones before you answer a call:
1.
2.
3.
You must have a PBX line (point-to-point), because during incoming call only one
endpoint (the PBX) can send tones. A PBX line only talks to one PBX and so an audio
channel can be assigned before answering of a call.
You must have the special feature enabled on your local exchange.15 You may ask your
telephone company to enable it for your, but don’t expect them to do it in Germany.
Tell me if you are successful.
You need to enable tones for the port at ‘interface.conf’. This will be explained later.
This options will indicate that tones are available at any state of the call.
The procedure of sending own tones is supported by the PBX, and is specified in the ISDN
standard Q.931 Annex K. Note that only the audio path to the caller may be connected
through, not the path from the caller to the PBX, so this is no ticket to make free calls.
14
Some countries do charge for calls that are not completed.
On Siemens exchanges (EWSD), the feature is called “PTRUCON” and is available since Version 15 of the
APS (firmware). (Since Version 16 it is bug free.)
15
30
The feature is mainly used for call forwarding through the PBX. If a forwarded call gets
answered, it will take a while until the connect message is received from the exchange and
forwarded to the PBX. It the called party answers and the connect comes to late, the audio
path would also be opened too late, without this feature. This can cause the first second of the
answered call to be lost. In case of previous through-connect, the audio path is connected to
the forwarded party prior answer, and so the caller will hear as soon as the party answers.
What do you think about an answering machine that makes you charge only after the beep? ☺
This nice feature as well as playing announcements free of charge are implemented in LCR
4.6 Leased lines
There are three types of ISDN basic access leased lines:
• 64Kb
• 128Kb
• 144Kb
one B-channel
two B-channels
two B-channels + D-channel
Both ends of a leased line are terminated by an NT1 (NTBA). On each side, one ISDN card
may be connected, both running in TE-Mode. Since leased lines are statically connected, no
call setup must be done. The data can be just transferred between both ISDN cards.
It is possible to connect a card, running in TE-Mode (hardware layer), to one end of the leased
line, where the NT-Mode protocol (software layer) is used. On the other end, telephones can
be connected. A 144Kb leased line is required, because the D-channel must also be
transmitted. It is then possible to use the leased line to connect telephones far, far away from
the PBX. I have never tested this setup with a real leased line, but it should work. Any card
can be used of course, since the hardware layer of this card is running in TE-Mode. Please
contact me if you require this setup.
An alternative to the leased line is the “layer-1-over-IP” (l1oip) driver for mISDN. It is a
virtual cal with a virtual leased line over IP. It is not compatible with any other VoIP
standard, but since it just tunnels ISDN, it also tunnels all features of ISDN. These virtual
cards can be used for LCR. Also the virtual cards can be connected directly to a real ISDN
card.
4.7
General options
When the LCR is started, it loads the file “options.conf” first. You may skip that section if
you are new to LCR, because all defaults are fine for most setups. The default location of the
options file is “/usr/local/lcr/options.conf”, if the default installation path is used. The file
contains many of keywords and comments. Comments start with “#”. Here is a description for
every keyword used in this file:
debug [<flags>]
Use this keyword to specify the debug flags. This can be:
• 0
= debugging off
31
• >=1 = debugging on
The flags can be given decimal or hexadecimal using the “0x” prefix. Possible flags are
defined in “main.h” header file. Also they are shown in options.conf. The definitions begin
with “DEBUG_*”. If debugging is turned on, a file called “/usr/local/lcr/debug.log” is created
and an filled with the debug output. It will also contain trace as brief output.
Note that debugging is for a programmer, not a user feature. To see what’s going, use traces.
Tracing is explained below.
Default: Debugging is tuned off by default.
Example: “debug 0x0004” does mISDN stack debugging output.
schedule [<priority>]
A PBX transfers signaling information as well as audio data. For the audio data it is essential
that LCR responds as fast as possible. Therefore the Linux OS provides a scheduling
algorithm to provide real time processing. “SCHED_RR” (round robin) is used which allows
one task with the highest priority to be processed until it waits for an action. Be sure to have
the highest priority, so no other program will use CPU if LCR needs to. The priority must be
between 0 and 99. If no priority is given, the scheduler is not changed, real time processing is
disabled. This is useful for debugging, because software faults, causing endless loops would
cause locking of all processes, the shells, the telnet daemon, even the console.
Default: By default the scheduler has priority 0.
Example: “schedule 99” set PBX4Linux process in SCHED_RR with priority 99.
alaw | ulaw
Specify the coding of samples, which are used in your country. It affects the internal
processing of LCR. Note that all tones and announcements are encoded “alaw”. If ulaw is
used, mISDN must also be set into ulaw mode. Also tones and announcements must be
converted or provided as wave audio files.
Default: By default “alaw” is used.
tones_dir <directory>
Tones and announcements are used to tell the telephone user when to dial, when the call is
ringing, why did this call disconnects… All tones are a-law encoded samples. There are two
default sets of tones, located at “/usr/local/lcr”, if the LCR is installed in the default location:
•
•
tones_american
tones_german
Both are located at “/usr/local/lcr/,” if the default installation directory was used. This
directory can be overridden for each extension’s settings file.
Default: American tones are used: “tones_american”
32
Example: “tones_dir tones_german” uses German tones.
fetch_tones <directory>[,<directory>[, …]]
Tones and announcements can be loaded into memory, rather than streamed when they are
played. This will prevent jitter, caused by hard disk access. Only the given directories will be
loaded. Other tones will still be streamed, such as recordings of the answering machine. Give
all tone sets here, separated by a comma. Don’t put spaces between the directory names. Note
that this needs about as much memory as all tones together. If tones are wave files, which are
not 16 bit mono, they are converted, so total memory usage may change. The total memory
usage will be printed when starting LCR.
Default: No tones are loaded, so they are directly streamed from hard disk.
Example: “fetch_tones tones_german,tones_english” will cause the German
and English tone sets to be fetched at startup time. Other tone sets like answering machine
announcements will still be streamed from hard disk.
extensions_dir <directory>
Each extension has its own directory. Settings, for example, are stored inside the individual
extension’s directory. All extensions are stored inside the default installation directory
“/usr/local/lcr”. Note that each extension is a sub directory that may have files and directories
inside.
Default: “extensions” The full path would be (in case of the default installation directory):
“/usr/local/lcr/extensions/”.
national [<prefix>]
Depending on your local exchange, long distance calls within your country, may require a
prefix. Germany and most countries in the world require “0” to call outside local area.
Denmark, for example, doesn’t have a national prefix. In this case this prefix must be omitted.
This is essential, to convert from national numbers without prefix to numbers with prefix and
vice versa. Caller IDs, for example, are always transferred without prefixes, but with a type
indicator, indicating the type of number. To convert a caller ID to a human dial able number,
LCR must know, what prefixes national type numbers have.
Default: “0”
Examples: “national 1” specifies the prefix to dial long distance within the USA.
“national” uses no prefix that must be used in Denmark.
international [<prefix>]
Depending on your local telephone system, international calls require a prefix, the
“international access code”. Germany and many countries in the world require “00” to call
international. This is essential to convert from international numbers without access code to
33
numbers with access code and vice versa. Caller IDs, for example, are always given without
access code, but with a type indicator, indicating the type of number. To convert a caller ID to
a human dial able number, LCR must know, what access code international type numbers
have.
Default: “00”
Examples: “international 011” specifies the access code to dial international from the
USA.
te_if [interface1,interface2,…]
nt_if [interface1,interface2,…]
port <number>[ptp]
These options are obsolete. Configuration of ports and interfaces are done in “interface.conf”.
nodtmf
The mISDN driver features DTMF detection, in conjunction with the mISDN_dsp.o module.
DTMF tones are used to control LCR during a connected call. Each ISDN call will use DTMF
detection, if this keyword is not given. DTMF detection needs CPU cycles to decode DTMF
tones. The ‘Goertzel’ algorithm is used, which is fast. By default, DTMF detection is enabled.
Example: “nodtmf” will disable the DTMF feature.
Default: DTMF detection is enabled.
dummyid [<id>]
If external calls are forwarded via LCR to external lines, the caller ID may not be available
due to restriction of the caller. In this case, no ID is used, causing not to present any ID to the
forwarded party. If your telephone line has the “CLIP No Screening” feature, you may specify
a number that will override your default telephone number of your ISDN line.
Anyway, unavailable numbers are send suppressed, so even if you set an ID here, it will not
be presented to the remote party.
Default: No caller ID is sent if not available. Your telephone company will use your default
number instead. (In Deutschland wird die Kopfnummer verwendet.)
Example: “0” will send a ‘0’ on forwarded calls, whenever the caller ID is not available.
inbandpattern [yes|no]
This option is obsolete, since tones can be configured for each individual interface in
“interface.conf”.
34
dsptones [none|amrican|german|oldgerman]
Tones/announcements are streamed from user space. It is possible to use the module "dsp.o"
instead. This module is required for LCR anyway. It provides simple tones with much less
CPU usage, because it is streamed in kernel space. Tones are much simpler and
announcements are not supported. This make LCR much faster when only used for ISDN
telephony. If supported by special hardware, tones are loops that require no bus/CPU load at
all, except when the tone changes. It can be overridden by extension's tone set.
Default: Tones are provided from user space. The sample sets are defined via keyword
“tones_dir”.
Note: The configuration is loaded and parsed during startup. Whenever this file changes, LCR
must be restarted.
email [email]
Source email address of the LCR. E.g. it is used when sending a mail from the voice box. It is
not the address the mails are sent to. Most mail servers require an existing domain in order to
accept mails.
Note: The configuration is loaded and parsed during startup ONLY. Whenever this file
changes, the PBX must be restarted for the changes to take effect.
4.8 Interface configuration
The “interface.conf” file is loaded first after starting LCR. Also it can be reloaded during
runtime, so changing interfaces does not require to terminate active calls. By default it is
locate at “/usr/local/lcr/interface.conf”. It will configure all ports of mISDN driver to use
with LCR.
Sometimes interfaces shall have multiple links (ports) to increase number of channels. A
multi link interface is an interface that uses multiple ports. All incoming calls are treated as
they would come from one ‘interface’. Outgoing calls are distributed on any free channel of
any port of the ‘interface’. This is useful to expand external and even internal interfaces to
more than two channels (BRI) or 30 channels (PRI). It also offers redundancy if one or more
links fail.
For internal interfaces any extension may be allowed. It is detected by caller ID (MSN
number on the phone). Most times only a given set of allowed extensions shall be allowed on
one interface. For each interface it is possible to define a default MSN number, as well as
additional MSN numbers that are accepted on this interface. If the MSN number of a phone is
not found in the list of allowed extensions, the first (default) extension is used.
The interface’s configuration is placed at “/usr/local/lcr/interface.conf” by default. Each
interface is defined in multiple line, starting with the interface’s name:
#This is a comment.
[telco]
port 2
35
[office]
extension
msn 202,203,204,205
port 5
This is about everything you need to set up a PBX. The first interface will get the name
“telco”. Port 2 is assigned to this interface. This interface is used for external calls, since the
keyword “extension” is not used. The second interface will get the name “office”. Port 5 is
assigned to this interface. This interface is an internal interface, because the “extension”
keyword is used. Also this extension is limited to four MSN numbers. If calls with different
MSN number are incoming, the first MSN is used.16
To get a brief list of all keywords, use “lcr interface”. Here is a list of keywords that can
be used to specify an interface:
extension
Specified whether this interface is just treated as an external interface, or if it has extensions.
This keyword has only effect on incoming calls. If an outgoing call is made, the extension’s
configuration file will specify the interface to use.
Example: “extension”
Default: The interface does not have extensions.
msn [<default MSN>[,<another MSN>[, …]]]
In case of extensions, only the given MSN are allowed. The caller ID of a phone is checked
against the list of MSN. If the caller ID is not found, the first MSN is used. This makes only
sense on internal ports, that are connected to phones.
The list of MSN can also be defined on external port. In this case, only caller IDs that are
found in the list, are accepted, others are replaced by the first MSN. There is no general use
for it.
Example: “MSN 5,6” only allows extension 5 and 6. If other caller ID is received from a
phone, the extension 5 will be used.
Default: The interface accepts any caller ID as MSN number.
is_tone yes | no
Some interfaces send tones and announcements, and others don’t. Your local exchange, for
example, will send tones, as you pick up the receiver. But your telephone will not do any tone
or announcement, if it is busy. If a phone is busy, the tone is generated by the local exchange
and transferred to the remote user.
16
This process is called „screening”. The caller ID of the phone is checked against the list of MSN numbers. If
the caller ID is not found, the first MSN is used. The caller ID of the phone is then replaced by the extension’s
caller ID. The local exchange will also do “screening” and adds area code and country code, if required. If “no
screening “ is done by the local exchange, the extension’s caller ID must include area code and country code.
36
LCR will be able to send tones and announcements on internal, as well as on external ports.
Sending tones on external ports make only sense, if local exchange will not do it, or if a
connected PBX doesn’t provide own tones. If tones are not available, they are generated by
LCR.
Also signaling of the tones are done, by sending progress indicator 8 “Inband tones”. If a
phone or exchange receives progress indicator 8, it will open the B-channel, to receive the
tones. If local exchange has the “previous through connect“-feature enabled, it may also allow
tones from LCR.
By default, tones are transmitted on NT-mode ports only, since telephones are not expected to
generate tones and announcements to the user.
Example: “is_tone yes” will send tones and announcements to all ports of the interface.
Default: Tones are only transmitted on NT-mode ports.
is_earlyb yes | no
As interfaces send tones and announcements, the interfaces connected to them will connect
and receive these tones. Imagine you are connected to the local exchange, that sends tones
during call setup or after disconnect, you may want to get these tones. In this case you may
need to say “yes” to this option. If you connect a phone, that normally doesn’t send any tones,
you may say “no” and LCR will make own tones.
By default, tones are received on TE-mode ports only, since telephones are not expected to
generate tones and announcements to the PBX.
Example: “is_earyb yes” will receive tones and announcements from all ports of the
interface.
Default: Tones are only transmitted on NT-mode ports.
hunt linear | roundrobin
An interface may have one or more ports. If multiple ports are given, the interface has more
channels available. When an outgoing call is made on an interface, a channel is required. By
default, the first available channel on the first free port is used. If all channels of one port are
busy, the next port is searched, until free channel is found. If all channels are free, the first
port is always used for outgoing call.
To balance load to all ports of an interface, the “roundrobin” value may be used. The channel
depends on port of the last call. If a call was made on port 1, the next call is made on port 2
and so on. A port is skipped, if no channel is available. If the last port was used or is busy, the
search begins again on the first port.
This feature is quite useful on point-to-multipoint ports. If one of two ports fail, every second
call will fail and the next will go through. In case of liner hunting, if port 1 fails, no outgoing
call possible, because always port 1 is used first. In case of point-to-point ports, if one port
fails, it will be ignored when hunting a free channel.
37
Example: “hunt roundrobin” will cycle to the next free port on every outgoing call.
Default: The free port is searched beginning with the first port on every outgoing call.
screen_in [options] <old caller ID>[%] [options] <new caller ID>[%]
screen_out [options] <old caller ID>[%] [options] <new caller ID>[%]
As you have read above, the “msn” parameter is used to check and change caller ID for
incoming calls for an internal phone. If the caller ID sent by the phone doesn’t exist in the list
of MSN numbers, the first MSN is used.
For more complex change of caller IDs, “screen_in” is used. This parameter can be given
multiple times. When an incoming call is received (from external line or internal port), the
caller ID is checked against the list of “screen_in” parameters. If it is found, it is replaced by
the “new caller ID”. If the rule matches, the search stops. If no rule matches, no change is
performed.
For outgoing calls (to external line or internal port), the caller ID can be changed by using
“screen_out”. The same operation is performed, as with “screen_in”.
Sometimes it is useful to compare a prefix of a caller ID. Add ‘%’ to the end of the caller ID
to compare only the part in front of ‘%’. When the caller ID matches and is replaced by the
new caller ID, the suffix may also be added to the “new caller ID” by adding ‘%’ to the new
caller ID.
Caller IDs may have different types or may be suppressed, presented or not available. If
options are given in front of the “old caller ID”, they must also match in order to match the
rule. If options are given in front of the “new caller ID”, the caller ID’s type and presentation
is also replaced, if the rule matches.
•
•
•
•
•
•
unknown
subscriber
national
international
present
restrict
will define a caller ID of type “unknown”.
“subscriber” type
“national” type
“international” type
caller ID is presented
caller ID is restricted
Changing caller IDs can be useful to convert any type of caller ID to the number that are
assigned to the local exchange. In case of “no screening CLIP” feature, screening is required
by LCR. Local caller IDs must be extended with national area code.
Example: “screen_out national 21250993 unknown 50993” Will change
outgoing caller IDs that exactly match national caller ID 21250994. The caller ID will be
replaced by type “unknown” with ID 50993.
Example: “screen_out unknown 5% national 2125%” Will change outgoing
caller IDs that begin with “5” to national caller ID with area code 212.
Default: By default, both screen lists are empty, so no change is performed.
38
filter <chain>
Filters are used to add one or more filters to audio processing. This can be single volume
change, echo cancellation or even encryption.
To be done…
port <number>
Each interface consists of one ore more ports. The given port number is added and bound to
the interface. If more than one port parameter is given, the interface is a multilink interface.
Multiple links are used to increase number of B-channels, as well as adding redundancy to the
interface. Multiple links are generally used to increase number of possible calls from or to the
local exchange.
Ports can be PRI or BRI interfaces. Also ports can run in TE-mode (to local exchange) or NTmode (to phones or other PBX).
The port number specifies the mISDN port number, starting with 1. Multiple ports can be
specified by giving multiple port parameters below the interface name.
Example: “port 5” Will bind port 5 to the current interface.
There is no default for that. If no port is specified, the interface doesn’t have any port. No
incoming or outgoing call is possible in this case.
ptp
ptmp
This parameter is followed by a “port” parameter. It alters port defaults.
“ptp” forces the port to be a point-to-point interface. It overrides the default mode given by
mISDN. For BRI NT-mode interfaces, the default is “ptmp”, so it can be altered. For PRI NTmode interfaces, the default is “ptp”.
“ptp” is useful, if port connects to another PBX.
For the socket based mISDN, there is no default given by driver. By default, LCR will always
set PRI ports into point-to-point and BRI into port-to-multipoint.
Example: “ptp” Will force to run the port in point-to-multipoint.
nodtmf
This parameter is followed by a “port” parameter. It alters port defaults.
39
Disables DTMF detection. For most external lines, DTMF is required for voice menus or
dialing extensions after answering the call. For performance reason, DTMF can be turned off
for the port.
In my opinion, machines are fast enough today to handle DTMF, since the filter quite fast. It
may be used on embedded solutions.
Example: “nodtmf” Will disabled DTMF detection.
Default: DTMF detection is turned on by default.
channel_out [force,][<number>][,...][,free][,any][,no]
channel_in [<number>][,free]
This parameter is followed by a “port” parameter. It alters port defaults.
Channel assignment is simple by default: The user (PBX) asks for “any channel”, and the
network (local exchange) will answer with a free channel, if available. It the network initiates
a call to the user, the channel number is forced. Channel assignment is done by the network
only in this case.
In case we are the user (PBX), we request “any channel” for outgoing calls and accept any
free channel for incoming calls. We would have the following defaults:
channel_out any
channel_in free
In case we are the network (PBX connected to a phone or another PBX), we force a free
channel for outgoing calls (calls to the user) and accept any free channel (from the user):
channel_out force,free
channel_in free
In case of a multipoint link to a phone, we also support call waiting. If no channels is
available, no channel is used until the phone releases or parks another:
channel_out force,free,no
Sometimes, it can be quite useful to alter the channel assignment. In case of “directed”
channels, a primary rate interface (PRI) may have some channels for incoming calls only,
some for outgoing calls only, and some for both way. An example is a hotline. Hotlines may
be busy due to high amount of calls. By default, all channels would be used, so no call agent
could make outgoing calls, not even in an emergency case.
The local exchange may use 20 channels incoming calls only. 8 channels may be used for
incoming calls and outgoing (both way) calls for the call agents. The other two are outgoing
only and can be used in an emergency. The LCR will use the following parameter:
channel_out force,22,23,24,25,26,27,28,29,30,31
40
This forces to local exchange to use channels 22-29 first, if not free, then it forces channels 30
and 31. For incoming calls we accept all channels, but reject channel 30 and 31.
channel_in 1,2,3,4,5,6,7,8,9,10,11,12,13,14,15,17,18,19,20,21,
22,23,24,25,26,27,28,29
All values given in the list are checked in order of appearance. If the first given channel is not
free, the next channel is checked. If no channel is found at all, the call is rejected.
force – This keyword is a special value. It will force all channels given, by signaling
“channel as given, no alternative accepted”. If not given, the remote may select a different
channel than we selected. This must be the very first value in the list. This keyword is only
allowed for outgoing channel selection.
1…15, 17...31 – These numbers give the channels to select in the given order.
free – Instead of typing in a list of all channels of the link, the LCR selects a free channel
from 1…31 (PRI) or 1..2 (BRI). The lower channel is selected first.
any – This doesn’t select any channel, it will signal “any channel accepted”. The remote
must select the channel in this case. This keyword is only allowed for outgoing channel
selection.
no – If this keyword is reached, the LCR signals “no channel available”. This is only allowed
on NT-mode point-to-multipoint links. If a phone is busy and no channel is available, it will
get a call with no channel. After clearing a previous, it will receive a channel. This is called
“call waiting”. This keyword is only allowed for outgoing channel selection.
Default: The defaults are different and explained above.
4.9 Routing
Introduction
Whenever an internal telephone is picked up without a number dialed, a dial tone is given,
inviting to dial a number. (This is the normal case, that may be modified.) The configuration
file “/usr/local/lcr/routing.conf” will specify, what action will be performed under what
conditions. One condition can be the dialed number. Also an action may have parameters to
change the default behavior. This is quite similar to an access list like “iptables”17. There are
three elements:
-
conditions
action
parameters
(In which case the action shall be performed)
(What action shall be performed if all conditions are true.)
(Will alter the default behavior of the action.)
All three elements form a “rule”. The “action” is mandatory, the conditions and parameters
are optional. Example:
dialing=5 time=900-1700 : intern extension=15
17
iptables is used by the Linux Kernel’s firewall to filter IP traffic.
41
This rule will match if the dialed digits start with “5” AND the time is between 9 AM and 5
PM. If all of the given conditions are true, the action “intern” is performed. The internal
extension is not the dialed digits “5”, but it is “15”, so we use the parameter “extension” to
override the default behavior.
Multiple rules for a rule set. Here is an example of a simple rule set:
[main]
extern
dialing=0
dialing=15
: intern extension=15
: extern
: intern
Each call will start with the rule set “main”. The first rule that matches will perform the
action. If the call is an external call, the first rule will match, because all conditions are true. If
the call is not an external call, the first rule will not match, so the conditions below are
checked. Depending on the dialed digit “0” or “15” the second or third rule will match. If
nothing is dialed, the rules will not match until something is dialed. Also if something else,
beginning with “9” is dialed, the rules will not match and nothing happens.
Sometimes it is usefull to get disconnected if digits are dialed that would never match. In this
case a special condition “default” can be used. A rule with the condition “default” matches if
the rules above would not match, if more digits are dialed:
[main]
extern
dialing=0
dialing=15
default
:
:
:
:
intern extension=15
extern
intern
disconnect cause=1 display=“Unbekannte Nummer“
If something else than “0” or “15” is dialed, the rule above would not match, even if more
digits are dialed, so the fourth rule will match. The action “disconnect” is performed. The
cause for disconnect is “1” (Unallocated number) and the message on the telephone’s display
is “Unbekannte Nummer”.
Syntax description
“routing.conf” is an ASCII file with rule sets. A rule set starts with the following syntax in a
separate line:
[peter]
Between braces is the name of the rule set, in this case the name is “peter”. The rule set ends
with end of file or if another rule set is defined.
Each rule set has an undefined number of rules:
<condition>=<value> [<moreconditions>=<value>] : action [parameter=value …]
Each rule is written in a separate line. All given conditions must match in order to process the
action. If no condition is given, the rule always matches. Some conditions have no value, like
“extern” or “anonymous”. Most conditions have string or number values, in this case “=” is
used to separate condition and value. No spaces are allowed. Multiple values may be given
using “,” to separate values. Also ranges for values are allowed: “-“ is used in this case. If a
42
value includes spaces, it must be quoted. Multiple conditions are separated with white spaces.
Here are some examples for conditions:
anonymous
callerid=”021250993”
callerid=0212,0202,0231
dialing=1,40-79
If multiple values or ranges are given, only on value must match, in order to match the
condition. If multiple conditions are given, all conditions must match. The first condition
given above matches if the caller is anonymous. The second matches if the caller ID is
“021250993” or begins with it. The third condition matches if the caller id begins with “0212”
or “0202” or “0231” or is equal to one of them. The fourth condition is true if at lease “1” or
something between “40” and “79” is dialed.
Strings may be quoted:
-
“012345”-“012399”
“Quote \”inside\” string”
Spaces\ without\ using\ quotes
The same rules apply to the parameters. In this case it makes no sense to define multiple
values. Some parameters expect a string of a comma separated list of values. The action is
separated from the conditions using “:”:
[main]
extern
intern
: goto ruleset=”extern”
: goto ruleset=“intern“
: disconnect
In this case the call checked to be an external call in the first rule. If it matches, the rule set
pointer jumps to the rule set “extern”. If the call is a call from an internal extension, the
second rule matches. If the call is neither external or internal ISDN, it will match in the third
rule, because no condition is given. The caller will be disconnected.
To add a comment, use “#” to start. Quote strings to use “#” as value for a string. Follow this
example:
dialing=*
dialing=”#”
: goto ruleset=”service” # all service codes
: goto ruleset=”service” # disable services
Available ‘conditions’:
To get a list of available conditions, use the following start option:
$ lcr rules
The output shows all available conditions first. Also check the default configuration
“/usr/local/lcr/interface.conf” for example. All conditions are explained in detail:
43
extern
This condition is true if call is from an external interface. It is defined by “interfaces.conf”
whether the port is connected external or internal (extension). Actually the call is extern, if the
caller is not associated with an internal extension.
intern
This condition is true if call is from internal interface (extension). It is defined by
“interfaces.conf” whether the port is connected external or internal. Actually the call is intern,
if the caller is associated with an internal extension.
port=<number>[-<number>][,…]
This condition is true if call is received from given port(s), not interface. A port number is
defined by mISDN and equals the number of mISDN stack. It is the same port that is defined
at “interface.conf”. Changing mISDN configuration, may cause port numbers to change, so it
is not wise to use this condition. Use “interface” condition in stead. It will check the name that
is associated with the port.
interface=<interface>[,…]
This condition is true if call is received from given interface(s), not port. An interface name is
defined at “interface.conf”.
callerid=<digits>[-<digits>][,...]
This condition is true if the caller ID is equal to one of the given string of digits, or begins
with one of the given string of digits. Also ranges of strings may be given. This condition is
used mainly for external calls
extension=<digits>[-<digits>][,...]
This condition is true if caller calls from given (range(s) of) extension(s). This condition only
applies to internal callers. Each internal caller is associated to an ‘extension’. Extensions are
explained later. In most cases, the extension number equals the internal caller ID. Also a
range of extensions may be given.
dialing=<digits>[-<digits>][,...]
Dialing is the most important condition. It will let the caller define what to do. This condition
will be true if one of the given digits or range of digits have been dialed. Also it is true if more
digits have been dialed, but if they begin with the digits given. Also a range of digits may be
given. It should be used in conjunction with “intern” or “extern” condition.
44
enblock
Whenever a call matches after call setup (incoming call without dialing afterwards), this
condition is true. If the condition is checked after dialing additional digits after setup, the
condition is not true.
overlap
This is the opposite of “enblock”. The condition is true only if additional digits are dialed
after setup.
anonymous
If a caller ID is sent restricted, this condition is true.
visible
If a caller ID is sent unrestricted, this condition is true.
unkown
If no caller ID is available, this condition is true. Sometimes it is possible that a caller ID is
available even if it is restricted. (Restricted calls from internal phone may have a caller ID, so
this condition is not true.)
available
If a caller ID is available, this condition is true, even if the caller ID might be restricted.
fake
If the caller ID has been given by user and not by network, this condition is true. A special
agreement with the phone company allows to send user generated caller IDs that may be of
someone else or even don’t exist. In this case the screening indicator show that this caller ID
may not really be of the caller. Also a second caller ID is sent, but LCR always uses the first
(unreal) caller ID.
real
This is the opposite of “fake”. This condition matches if the caller ID was not unscreened but
network provided (approved).
redirected
This condition is true if the call has been redirected. (forwarded)
45
direct
This condition is true if the call has not been redirected.
redirid=<digits>[-<digits>][,...]
This condition is true if the call has been redirected by the given number or the first digits of
the redirecting number matches. It can be used filter calls that have been accidentally
redirected to LCR.
time=<minutes>[-<minutes>][,...]
This condition is true if the given time in minutes is the current local time. The format must
be “hmm”, where 9 o’clock AM equals “900” and 8 o’clock PM equals “2000”. Also ranges
may be given. It is also possible to make negative ranges like “2000-900” (from 8 o’clock PM
until 9 o’clock AM).
mday=<day>[-<day>][,...]
This condition is true if the given day is the current day of the month. Also ranges and
negative ranges are possible.
month=<month>[-<month>][,...]
This condition is true if the given month is the current month. Also ranges and negative
ranges are possible.
year=<year>[-<year>][,...]
This condition is true if the given year is the current year. Also ranges are possible. The year
must be between 1970 and 2106.
wday=<day>[-<day>][,...]
This condition is true if the given weekday is the current day of week. Also ranges and
negative ranges are possible. Note that Monday equals “1” and Sunday “7”.
service=speech|audio|video|digital-restricted|digital-unrestricted|
digital-unrestricted-tones[,...]
This condition is true if the call has the given type of service. Note that an ordinary telephone
call can be speech or sometimes audio.
46
infolayer1=<value>[,...]
This condition is true if the call has the given layer 1 info. The value 2 indicates voice coded
aLaw, a value of 3 indicates uLaw.
hlc=<value>[,…]
This condition is true if the call has the given high layer capability. Use it only if you know
what you are doing.
file=<path>[,...]
This condition is true if the give file exists and if the first character of that file is ‘1’. Please
note that accessing this file may stall the PBX, so please don’t use network file systems or
slow devices like CD-Roms or floppy disks.
execute=<command>[,...]
This condition matches if the given command or shell script returns a value greater than 0.
Please note that LCR will halt for the time the script is running, so please use scripts that will
take not more than a 100th of a second. Audio may get interrupted and delayed.
default
This is a special condition that makes a rule only match if all rules above will never match,
even is more digits are dialed. This can be used for a fallback if no number given in any rule
above would match.
timeout=<seconds>
This is a special condition that will set a timeout if the rule would match. If no digits are
dialed for the given number of seconds, the rule matches.
free=<interface>:<channel>
This condition is true if the given more or equal the given number of channels are available
and free.
notfree=<interface>:<channel>
This condition is true if at least the given number of channels are available and free.
47
blocked=<interface>[,…]
This condition is true if one of the given interfaces are blocked. (not available for some
reason)
idle=<interface>[,…]
This condition is true if one of the given interfaces are idle.
busy=<extension>[,…]
This condition is true if one of the given extensions is busy.
notbusy=<extension>[,…]
This condition is true if one of the given extension is not busy.
remote=<application name>
This condition is true if the given remote application is running. One application can be
“asterisk” channel driver. This is useful to route calls in case the application is running or not.
notremote=<application name>
This condition is true if the remote application is not running.
Available ‘actions’
If all given conditions of a rule are true, the given action will be executed. To get a list of
available actions, use the following start option:
$ pbx rules
intern [connect] [extension=<digits>[,…]]
[capability=speech|audio|video|digital-restricted|digital-unrestricted|digitalunrestricted-tones] [capability=transparent|hdlc] [infolayer1=<value>]
[hlc=<value>] [exthlc=<value>] [present=yes|no]
[type=unknown|subscriber|national|international] [timeout=<seconds>]
This action will forward the call to an internal extension. It most cases it is desirable to give
an extension number, rather than using the dialed digits. Especially for mapping external
numbers to different internal extensions, it is required to give ‘extension’ parameter. If
multiple extensions are given, the call is forwarded to multiple extensions simultaneously.
48
extern|outdial [connect] [prefix=<digits>]
[capability=speech|audio|video|digital-restricted|digital-unrestricted|digitalunrestricted-tones] [capability=transparent|hdlc] [infolayer1=<value>]
[hlc=<value>] [exthlc=<value>] [present=yes|no]
[interfaces=<interface>[,<interface>[,...]]]
[type=unknown|subscriber|national|international] [complete]
[callerid=<digits>] [calleridtype=[unknown|subscriber|national|international]]
[timeout=<seconds>]
This action will forward the call to an external interface. The dialed external number matches
the digits that are dialed after the rule matches. Let’s assume the rule defines a condition
“dialing=0” to match this rule, then the dialed external number will be every digit dialed after
“0”. The dialed number can be overridden by “prefix” parameter. Any interface that is not an
extension, will be used. To specify one or more individual interfaces, use the “interfaces”
parameter.
Example: “dialing=0 : extern prefix=01013” This rule matches if at least 0 is
dialed. The caller will be forwarded to an external available channel. The prefix is put in front
of whatever dialed behind “0”. If the caller dials “0021250993”, the external number will be
“01013021250993”.
remote [connect] [timeout=<seconds>] <application>
This action will forward the call to the given remote application. This application must run in
order to complete the call.
Example: “dialing=4 : remote application=asterisk” This rule will match
if “4” was dialed at the beginning. If “4021250993” is dialed, the call will be forwarded to the
Asterisk channel driver. Asterisk will receive “021250993” as dialed number.
vbox-record [connect] [extension=<digits>] [announcement=<file prefix>]
[timeout=<seconds>]
Calls can be directly transferred to the answering machine of the given extension. Instead of
forwarding the calls with an extension’s forward option, this action may be used. The caller
can directly call the answering machine. It is essential to give “extension” option in order to
make this work. The announcement can be replaced by a different audio file. This allows
different announcements for different conditions.
Example: “dialing=1234 : vbox-record extension=201” If a caller dials 1234
(let’s assume it is an external caller), the voice box of extension answers.
partyline [room=<digits>]
This is a special feature to make large conferences by just calling a number. A “room” must
be given by digits. If multiple party lines shall exist, multiple rules with different rooms may
be specified. Any call to a party line gets connected. The first member will receive hold
music. If more than one active member is in the party line, they will hear each other. If one
member suspends or holds the call, the audio is muted, so the party line is not disturbed by
hold music from that member.
49
Example: “dialing=1234 : partyline room=42” If a caller dials 1234, he or she
enters the party line number 42.
login [connect] [extension=<digits>] [nopassword]
The login feature is used to log into a (different) extension. Especially external callers may
log into the given extensions from external phones. The caller will be asked to enter a
password, if the extension is already specified. If the extension is not specified, the caller
must dial the extension’s number, and then dial the password. The password is specified
within the extension’s setting file. By default, no password is used, so no password will work.
The number of digits, to be dialed for the password, is defined by the length of the extension’s
password. If the length has been reached, the call is disconnected, if the password is wrong. If
the password is correct, the dial tone invites to dial a number. If the “nopassword” parameter
is given, no password must be entered. Be sure that the conditions will only allow selected
callers to match that rule. Note: For external calls, the “connect” parameter is required in
order to connect the audio path and allow DTMF dialing. All dialing is now done using
DTMF or keypad information, if available.
Example: “dialing=98765 : login connect extension=200”. If the caller
dials 98765, she will get connected and asked to dial the password of extension 200. After
entering the correct password, a dial tone indicates the correctness. Otherwise the caller gets
disconnected.
callerid [connect] [present=yes|no] [callerid=<digits>]
[calleridtype=[unknown|subscriber|national|international]]
This action will change the extension’s caller ID. After the rule matches, the caller must dial
the new caller ID. After the caller ID, the caller must finish with “#”. The caller ID’s type is
defined by the digits entered. If the national prefix is dialed in front of the caller ID, the ID is
of type ‘national’, and sent without the national prefix of course. The same rule applies to
‘international’ and 'subscriber' caller ID type. To make current caller ID anonymous, the
caller just dials “#” right after the code. The allow the presentation again, a new caller ID
must be specified. If the caller ID is of type ‘unknown’, the new caller ID will always be of
type ‘unknown’. This is the normal case, if not “No Screening Clip” feature is available to the
external line. It is also possible to give the 'callerid' parameter instead of dialing it. This is
useful, if a fixed caller ID shall be selected by that rule.
Example: “91 callerid” will specify the prefix “91” to be dialed to change the caller ID.
If the caller wants to change her caller ID to “1234”, she must dial “911234#”.
calleridnext [connect] [present=yes|no] [callerid=<digits>]
[calleridtype=[unknown|subscriber|national|international]]
This is similar to “callerid” except for specifying a caller ID, which is only used for the next
call. After the next call is made, the regular caller ID is used again. Again, the dialing must be
completed with “#” at the end of the caller ID, if no 'callerid' parameter is given. To make the
caller ID for the next call anonymous, the caller must dial “#” without a caller ID.
50
forward [connect] [diversion=cfu|cfnr|cfb|cfp] [dest=<string>]
[delay=<seconds>]
This action changes the current call forwarding for the caller's extension. After the rule
matches, the caller must dial the new destination and finish with “#”. If no destination is
given, but finished with “#”, the call forwarding is deactivated.
To forward a call to the voice box, “dest=vbox” must be given.
It is essential to give the diversion type:
“diversion=cfu” means: “Call Forwarding Unconditional”. Every call to the given
extension is directly forwarded; the internal phones on the specified ports will not ring.
“diversion=cfb” means: “Call Forwarding when Busy”. If the extension is currently
calling, every call to the given extension is directly forwarded; the internal phones on the
specified ports will not ring. This will be performed if at least one caller uses the extension.
“diversion=cfnr” means: “Call Forwarding when No Response”. Every call to the given
extension is forwarded after some time of no response; the internal phones on the specified
ports will stop ringing.
“diversion=cfp” means: “Call Forwarding Parallel”. Every call to the given extension
will be forwarded to the given number. The internal phone and the forwarded destination will
ring, until someone answered on an internal phone, or on the forwarded destination.
redial [connect] [select]
This action just redials the last call. It doesn't redo the last action that was performed, just the
last call. If the 'select' parameter is given, the history of all stored calls can be selected. In
order to do this, the caller must be internal so the display feature is available. After the rule
matches, the last call is displayed. By dialing '#' via keypad or DTMF, the next older call is
show. To scroll back, dial '*'. Alternatively '1' and '3' can be used to scroll through the history.
To call the selected number, dial '0'. This feature only works for internal callers.
reply [connect] [select]
This action equals to the 'redial' action, but it refers to the incoming calls. In the list of
incoming calls, all answered and unansered calls are stored.
powerdial [connect] [delay=<seconds>] [limit=<retries>]
[timeout=<seconds>]
This action redials the last number again and again, until the call will be connected. To
prevent timeout of the telephone, use 'connect' parameter. The delay between calls can be
selected. If no delay is given, the delay must be dialed and finished with '#'. On every retry. a
beep will indicate that the call failed and that it is redialed. The delay may also be given here,
so no delay must be entered by the caller. Also the number of retries may be limited, as well
as the total time to try.
51
Warning: This feature may cause high signalling load the PBX as well as telephone
equipment connected to it. (local exchange) Also it may cause blocking of telephone line and
even failure. Your phone company may be very angry .
Example: “dialing=67 : powerdial” will cause dialing “67” to redial the last
number using power dial feature. The caller must dial “67#”, in order to start power dialing
with a almost no retry delay. If the caller dials “6760#”, the call will be redialed every minute
until it connects successfully.
callback [proceeding] [alerting] [connect] [extension=<digits>]
[delay=<seconds>] [callto=<digits>]
This action will do a callback. It can be used to start call back. The specified extension will
perform a callback if the rule matches. The number to call back is specified by the caller ID of
the caller. Alternatively a different call back destination can be given. This makes it possible
to trigger a call back from a different phone than the one that is called back. Callback is only
done to external destinations. Read “Callback” section for detailed information before using
this and authentication. The 'delay' parameter may be used to delay the call back.
If the call has been triggered via external PBX line, all further dialing is stored until the caller
hangs up. After calling back, the stored digits are dialed. Entering the digits after callback is
not required then. In most cases, only a few digits can be dialed behind the external number
prefix, because the total length of a suffix number is limited by the local exchange. I use
abbreviated dialing to handle the four digits that I can dial behind my external prefix.
If the caller ID is not known to LCR, the “callto” parameter must be given.
If the caller ID is received for the first time, the password must be entered, as it must be done
when using the login feature. Note that this done after calling back. The caller ID is stored in
the extension's directory for allowing further callbacks without authentication.
I also would suggest to use the “real” condition, so calls with fake caller ID will not be
allowed to do a callback.
Example: “dialing=8765 real : callback 200” will perform a callback from
extension 200, if the external number (MSN) “8765” is dialed and the caller does not have the
“No Screening Clip” feature.
abbrev [connect]
Every extension may dial abbreviations, which are specified in the extension’s phonebook:
“/usr/local/lcr/extensions/<extension>/phonebook”. A phonebook entry is a single line, which
looks like this:
<abbreviation> <dialing> [<name>]
The abbreviation may be any string of digits. If the abbreviation is dialed, the “dialing” is
performed. “dialing” may be any string of digits that may be dialed from the extension.
Beware of redialing the rule itself, to prevent recursions.
Abbreviations can be useful, especially to dial digits, that cannot be dialed from a telephone.
52
Example: “dialing=7 : abbrev” will cause dialing “7”, to dial an abbreviation. Let's
assume that the following line is stored in the phonebook:
“123 05551212 Directory Assistance”
The caller must dial “7123”. This will cause the dialing of “05551212” to be performed. In
this example the “0” in front of “5551212” is used to make an external call.
Note: It is required to put external prefix in front of the number. The dialing is performed as
it would have been done from the extension.
test [connect] [prefix=<digits>] [timeout=<seconds>]
This action runs the test mode. Read the “Test Mode” section for suffixes and their functions.
It is possible to specify the test by the ‘prefix’ parameter. If it is not specified, the caller must
dial the ‘test code’. On external lines, it requites the dial in feature, that is only available on
PBX lines. If a complete ‘prefix’ is given, no extension dialing is required.
Example: “dialing=99 : test” will specify the prefix “99” to be dialed to dial test
mode. If the caller would dial “995”, she would hear the hold music. “99 test
prefix=5” would directly play the hold music, if “99” is dialed.
play [proceeding] [alerting] [connect] [sample=<file prefix>]
[timeout=<seconds>]
This action plays the given audio file. The 'sample' parameter must be given. It may be
encoded as wave (16bit mono, stereo or 8bit mono) or “law”. The type of “law” codec is
specified in “options.conf”. The file may be specified with relative path or with absolute path.
If the path is relative, the specified “tones_dir” (in “settings” or “options.conf”) is used. The
suffix “.isdn” or “.wav” will be appended to the file, according to what exist. If the file
doesn’t exist or if the playing has finished, the suffix “_loop.isdn” or “_loop.wav” will be
played afterwards. If this also doesn’t exist, nothing is played.
Example: “dialing=93 : play /root/alle_meine_entchen” will play the file
“/root/alle_meine_entchen.isdn” or “/root/alle_meine_entchen.wav”, if exist. If the file has
been played or if it doesn’t exist, the file “/root/alle_meine_entchen_loop.isdn” or
“/root/alle_meine_entchen_loop.wav” is played, if exists, until the caller hangs up or the
action times out.
vbox-play [extension=<digits>]
This actions starts the interactive menu of the extension's answering machine. It is only
possible for internal calls. (or calls from extern that logged in) A spoken and displayed menu
will be available. Read “Using LCR” for more information on answering machine.
calculator [connect]
This action starts the built in calculator. This is just a small funny tool. This only works for
internal ISDN phones, since they only get the required display information. The calculator is
processed by dialing the formula via DTMF or dialed number. The optional “connect”
53
parameter is used to send a connect message to the phone, since ISDN phones may stop
dialing after a certain number of digits. In this case keypad or DTMF dialing is used.
The formula is only a simple term. It must have two values and one operand. The values may
only be entered as positive float values. After dialing the code, the first value is dialed, then
the operand and then the second value. To dial the operand, the ‘*’ key is used. If it is pressed
once, the multiplication is used. If it is pressed again, the division is used. If it is pressed
again, the addition is used. If it is pressed again, the subtraction is used. Depending on the
first value, if it is pressed again, the decimal point “.” is added. If the second value is entered,
the ‘*’ key will directly add the decimal point. After entering the formula, the ‘#’ is used to
get the result. If the result is displayed, it may be used for another formula. If ‘#’ is pressed
again, the formula is cleared. Here are examples of formulas and how to enter them:
Term:
5*8
5.5*8
5.5*8.8
4/8
4+8
4-8
Result:
40
44
48.4
0.5
12
-4
Dial:
5*8#
5*****5*8#
5*****5*8*8#
4**8#
4***8#
4****8#
The term is always displayed during dialing, not the keys that are actually entered.
goto [connect] [sample=<file prefix>] [ruleset=<name>] [strip]
This action jumps to given ruleset and optionally play sample. Dialed digits are not flushed.
After entering the new ruleset, all dialed digits are still available. Alternatively a sample may
be played to announce the ruleset. If the ruleset doesn't exist, the call gets disconnected. The
existance of the ruleset is checked only at call time.
In order to remove the digits required for this rule to match, use “strip”. After entering the
ruleset, the digits are removed, so further conditions (“dialing=xxx”) will only require the
digits dialed after the digits that were required to match the rule.
Example: “dialing=555 : goto ruleset=”servicemenu” strip” will cause to
jump into the ruleset “servicemenu”, if 555 is dialed. Because “strip” parameter is given, the
dialed digits “555” are removed from the dialed number when entering the new ruleset. If
“555666” would have been dialed, the new ruleset is entered with the dialed number “666”.
menu [connect] [sample=<file prefix>] [ruleset=<name>]
Same as 'goto', but flushes all digits dialed so far. The new ruleset is entered with no digits,
even if more digits are dialed than required to match this rule. This is very useful to make
interactive voice menus. Here is an example for a simple interactive voice menu:
...
time=1700-0900 dialing=123456 : menu connect sample=/usr/local/pbx/agent/intro ruleset=agent
...
[agent]
dialing=1 : play sample=/usr/local/pbx/agent/officehours
dialing=2 : vbox-record extension=200
dialing=9 : extern prefix=021250993
timeout=20 : vbox-record extension=200
54
The „intro.wav“ file would have the following ancouncement: „Hello - Our office is closed.
Tho hear our opening hours press 1, to leave a message press 2, and in case of an emergency
press 9, or wait to leave a message.“.
If the caller dials 1, the first rule of ruleset “agent” matches, the sample “officehours” is
played. “.wav” or “.wave” is appended to the file name.
If the caller dials 2, the voice box of extension 200 is called.
If the caller dials 9, the external call is made, the prefix “021250993” is dialed.
If the caller waits 20 seconds (enough time to hear the announcement and dial a digit), the call
is automatically forwarded to the voice box of extension 200.
disconnect [connect] [sample=<file prefix>] [cause=<cause value>]
[location=<location value>] [display=<text>]
This action disconnects the call. Optionally the 'cause', the 'location', a sample and a display
text may be given. The 'cause' is the ISDN specific code for disconnect cause. For example,
cause=1 would be the code for an unallocated number, as cause=17 would be the code for a
busy phone. The 'location ' is the ISDN specific code for the point that generates the cause.
Because the causes are generated by LCR, it automatically selects the correct location, so
don't give a different location, unless you know what you are doing.
Here is a list of the causes:
1
2
3
4
5
6
8
9
16
17
18
19
20
21
22
26
27
28
29
31
34
41
42
43
44
46
47
49
50
53
Unallocated number
No route to transit network
No route to destination
<Listen to announcement...>
Misdialed trunk prefix.
Channel unacceptable
Preemption
Preemption - circuit reserved
Normal call clearing
User busy
No user responding
No answer from user
Subscriber absent
Call rejected
Number changed
Non-selected user clearing
Destination out of order
Invalid number (incomplete)
Facility rejected
Normal, unspecified
No circuit/channel available
Temporary failure
Switchting equipment congestion
Access informationen discarded
No requested circuit/channel
Precedence call blocked
Resource unavailable, unspecified
Quality of service not available
Requested facility not subscribed
Outgoing calls barred within CUG
55
55
57
58
63
65
66
69
70
79
81
82
83
84
85
86
87
88
90
91
95
96
97
98
99
100
101
102
103
111
127
Incoming calls barred within CUG
Bearer capability not authorized
Bearer capability not present
Service or option not available
Bearer capability not implement.
Channel type not implemented
Requested facility not implement.
restricted digital informat. only
Service or option not implemented
Invalid call reference value
Identified channel does not exist
No suspended call with this id
Call identity in use
No call suspended
Suspended call has been cleared
User not member of CUG
Incompatibel destination
Non-existent CUG
Invalid transit network selection
Invalid message, unspecified
Information element missing
Message type non-existent
Message not compatible with state
Information element not impl.
Invalid info element contents
Message not compatible with state
Recovery on timer expiry
Parameter non-existent
Protocol error, unspecified
Interworking, unspecified
Here is a list of locations:
0
1
2
3
4
5
7
10
User
Private (Local)
Public (Local)
Transit
Public (Remote)
Private (Remote)
International
Beyond Interworking
For a detailed description read the ITU Q.850.
execute [connect] [execute=<full path>] [param=<string>]
Whenever this rule matches, the given command is executed after the caller hangs up. If digits
are dialed after the number, the digits are included in the parameter.
The first parameter of the executed command will be the given optional param string. The
next will be the dialed digits. If no optional param string is given, the first parameter will be
the dialed digits. The next parameters will be the caller ID followed by the caller’s extension,
followed by the extension’s name, followed by the port number.
Note: Use this only for commands that exit quickly, and do not cause high CPU load, because
this will slow down LCR and cause delays. I have not tested it well. It will do a daemon fork
and keep all current file descriptions open. Don’t use it to start programs. Use it to run a tool,
which immediately exits, like “echo”, “reboot” or any shell scripts, which may turn on your
coffee machine.
56
Example: “dialing=92 : execute execute=”echo $1 >> /tmp/log” will
execute the “echo” command, which will, in this case, append the dialed digits after the prefix
“92” to the file “/tmp/log” after the caller hangs up.
Please don’t use this, unless you know what you are doing.
file [connect] [file=<full path>] [content=<string>] [append]
This action writes the given content to given file. If content is not given, the dialed digits are
written.
pick [extensions=<extension>[,<extension>[,...]]]
This action picks up a ringing call. By default any internally ringing call is picked up. Also
calls that are already transfered to the answering machine (VBox) are picked. A list of
extensions may be specified with the 'externsions' parameter. Ony given extensions may be
picked.
Example: “dialing=3 : pick” will connect to ringing or knocking call, when the caller
dials “3”.
nothing [proceeding] [alerting] [connect] [timeout=<seconds>]
Does nothing. It is useful to wait for calls to be released completely, by giving timeout value.
Very useful for hunting groups.
efi [proceeding] [alerting] [connect]
This is a special feature for announcing the caller ID of the caller. I use this for my company
so technicians can check from what phone line they are calling.
Available ‘parameters’
Actions have parameters to give additional information as well as overriding default value. To
get a list of available parameters for an action, use the following start option:
$ pbx rules <action>
Here is a list of all parameters that are available:
proceeding
Will set the call into 'proceeding' state to prevent dial timeout.The caller will not be able to
dial additional digits.
57
alerting
Will set the call into 'altering' state. The caller will get the alerting signal that may cause an
alerting sound. The caller will not be able to dial additional digits.
connect
Will complete the call before processing the action. Audio path for external calls will be
established. DTMF dialing will be possible due to connected audio path.
extension=<digits>
Give extension name (digits) to relate this action to.
extensions=<extension>[,<extension>[,...]]
One or more extensions may be given. If multiple extensions are given, the call will ring on
multiple extensions simultaneously.
prefix=<digits>
Add prefix in front of the dialed number. Also a complete number may be given.
service=speech|audio|video|digital-restricted|digital-unrestricted|digitalunrestricted-tones
Alter the service type of the call. This will override the service given by the caller. It may be
usefull to announce data calls as voice calls, because some provider charge voice calls
differntly.
bmode=transparent|hdlc
infolayer1=<value>
hlc=<value>
exthlc=<value>
Alter mode, layer 1 info and high layer capability of the outgoing call. Use it only, if you
know what you are doing.
present=yes|no
Allow or restrict caller ID regardless what the caller wants.
diversion=cfu|cfnr|cfb|cfp
Set diversion type:
58
cfu
cfnr
cfb
cfp
call forward unconditional
call forward no response
call forward busy
call forward parallel
dest=<string>
Destination number to divert to. Use 'vbox' to divert to vbox. (cfu,cfnr,cfb only)
select
Lets the caller select the history of calls using keys '1'/'3' or '*'/'#'. This is only possible if the
caller calls from internal, because display feature is required.
delay=<seconds>
Number of seconds to delay.
limit=<retries>
Number of maximum retries.
host=<string>
Name of remote VoIP host.
port=<value>
Alternate port to use if 'host' is given.
interfaces=<interface>[,<interface>[,...]]
Give one or a list of Interfaces to select a free channel from.
address=<string>
Complete VoIP address. ( [user@]host[:port] )
sample=<file prefix>
Filename of sample (current tone's dir) or full path to sample. ('.wav'/'.wave'/'.isdn' is added
automatically.
59
announcement=<file prefix>
Filename of announcement (inside vbox recording dir) or full path to sample.
('.wav'/'.wave'/'.isdn' is added automatically.
ruleset=<name>
Ruleset to go to.
cause=<cause value>
Cause value when disconnecting. (21=reject 1=unassigned 63=service not available)
location=<location value>
Location of cause value when disconnecting. (0=user 1=private network sering local user)
display=<text>
Message to display on the caller's telephone. (internal only)
ports=<port>[,<port>[,...]]
ISDN port[s] to use.
tpreset=<seconds>
Preset of countdown timer.
file=<full path>
Full path to file name.
content=<string>
Content to write into file.
append
Will append to given file, rather than overwriting it.
60
execute=<full path>
Full path to script/command name. (Dialed digits are the argument 1.)
param=<string>
Optionally this parameter can be inserted as argument 1, others are shifted.
type=unknown|subscriber|national|international
Type of number to dial, default is 'unknown'.
complete
Indicates complete number as given by prefix. Proceeding of long distance calls may be
faster.
callerid=<digits>
Given caller ID will be used instead of dialing it.
callto=<digits>
Where to call back. By default the caller ID is used.
room=<digits>
Conference room number, must be greater 0, as in real life.
timeout=<seconds>
Timeout before continue with next action.
nopassword
Set “no password required” for the rule.
strip
Removes all digits dialed so far.
61
application=<name>
Selects remote application to forward the call to.
If “routing.conf” has been altered, use “lcradmin route” to reload routing at runtime.
4.10 Extensions
An extension is defined by a number. It is less confusing, if this number equals to the number
that must be dialed internally or externally. Extensions have all individual files and settings:
/usr/local/lcr/extensions/<extension>/settings
Settings are used to describe features of the extension.
/usr/local/lcr/extensions/<extension>/logs
All calls from and to the extension will be logged with date, time, duration, source and
destination.
/usr/local/lcr/extensions/<extension>/phonebook
The phonebook is used to store abbreviated numbers and their names. It is also possible to
store any dialing function of LCR. (The only thing that cannot be stored, is the recall of an
abbreviated number. This avoids recursions.)
/usr/local/lcr/extensions/<extension>/callbackauth
Everyone in the world can use the callback feature, as long as she sends her caller ID. After
callback, the extension’s password must be entered. If the password is correct, the caller ID is
stored in the file “callbackauth”. This is useful, to prevent unauthorized callers from using
callback. Next time a callback is done with the same caller ID, the callback is done without
authentification.
/usr/local/lcr/extensions/<extension>/recordings
Because we have a computer, and not just a dirty box hanging on the wall with CPU speed of
Commodore 64 computers, we are able to record calls also. Hard drives became large these
days. If call recording is enabled for an extension, all incoming and outgoing calls are stored
as wave or “law” files. The filename consists of the date, time, source and destination of this
call.
/usr/local/lcr/extensions/<extension>/vbox
The integrated answering machine stores all incoming calls in the “vbox” directory. Also the
“announcement” file is store here. Additionally, there will be an “index” file of all currently
stored messages.
Extensions can be easily created by using the “genextension” command:
$ genextension <extension> <interface> <caller ID>
62
The first parameter is the extension number, for example: “200”. The second parameter
specifies the extension’s interface to be used for calls to the extension. “Int” would send a call
to the internal interface as defined in “interface.conf”. If calls should ring on more then one
port, they must be separated by commas without spaces. “1,3,4” would send a call to the
internal port 1, 3 and 4. In this case, at least four internal ports must be defined in
“options.conf”. The third parameter defines the caller ID to be used, whenever the extension
makes a call (to external line). The type of caller ID is “undefined”, that is the standard type
for normal external ISDN lines. If the external ISDN line has the “CLIP No Screening”
feature, it must be given with type “subscriber”, “national” or “international”. The “settings”
file must then be altered with an editor. After executing the command the extension will be
created at “/usr/local/lcr/extensions/200/”.
Also you must make an entry in “routing.conf” at internal ruleset in order to receive calls:
dialing=200 : internal
or
dialing=300 : internal extension=200
For external calls, the extension may also be specified as the “default extension”:
dialing=0 : internal extension=200
If you use a normal (multipoint) telephone LINE with an MSN number “50993”, specify this
in your external ruleset:
dialing=50993 : internal extension=200
Here is a description of all keywords defined in the “/usr/local/lcr/extensions/200/settings”
file:
name [<string>]
Each extension can have a name. The name will be processed internally with the caller/called
ID. To actually see the name on a telephone, the ‘display_name’ feature must be enabled. In
this case the display shows the name with the number. Also the ‘cnip’ feature can be used. In
this case it must be enabled for the other party’s extension and it must be supported by her
telephone.
prefix [<prefix>]
This prefix will be dialed, whenever the extension picks up the phone. Instead of hearing a
dial tone, the caller will have the given prefix already dialed. This can be useful, if for
example, the caller should be able to directly dial an external number, without dialing the
code for external dialing first. If the code is “0”, the prefix of “0” would cause directly call
external after pickup. If the prefix would be “0<number>”, the number would be dialed just
after pick up. This can be useful for emergency calls of handicapped persons or little children,
if they are unable to dial a number.
Note: The given prefix will not override the dialing rights.
63
cfu [<number> | vbox]
Whenever this number is given, any incoming call to the extension will cause the call to be
forwarded to the given number. The call forward is done through LCR, since there is no
implementation of deflecting a call. The benefit of it is, that the party forwarded to, may
control LCR, answer knocking calls, and even record. To forward to the answering machine,
the keyword “vbox” must be used.
cfb [<number> | vbox]
This call forwarding is performed, only if the called extension is busy. That is, if a phone of
the extension is picked up, is connected during a call, receives announcements during
disconnect, or even makes multiple calls. The person, using the extension, is currently doing
something. That’s why she is busy. To forward to the answering machine, the keyword
“vbox” must be used.
cfnr [<number> | vbox]
cfnr_delay [seconds]
This call forwarding is made if the called person does not answer within a given time. If, by
default, the call is not answered after 20 seconds, it is forwarded to the given number. The
number of seconds can be changed. To forward to the answering machine, the keyword
“vbox” must be used.
cfp [<number>]
This call forwarding will not actually forward the call. Calls will not only ring on internal
ports, they will also ring on an external line at the same time. It is possible to pick up the call
at any ringing phone. If the called party picks up the phone, all other phones will stop ringing.
The benefits are: No more running to the ringing phone, before the call gets forwarded. And
no more callers, who will hang up before “the call is forwarded, the mobile rings, the mobile
take out of the bag, because the caller doesn’t wait that long, because she knows that you have
an one-room-30m²-apartment”.
change_forward (yes | no)
Allows or disallows the user, to change the forwarding for her extension. This is useful, if the
extension’s user should not be able to change the forwarding.
callerid (none | [s | n | i]<caller ID> [anonymous])
This will specify the caller ID for this extension. Whenever the extension makes a call or
receives a call, the caller ID is used. The caller ID is of type “unknown”. This is useful for
any ISDN line without the “No Screening CLIP” feature. If the caller ID starts with a small
“s”, it will be of type “subscriber”. If the caller ID starts with “n”, it will be of type “national”.
If the caller ID starts with “i”, it will be of type “international”. Because the types are used, it
64
is not allowed to put national or international prefix in front of the caller ID’s number. For
example: A caller ID for the number “1-212-555-1212”, which is a national number, would be
“n2125551212”. The international number would be “i12125551212”, because the “i” will
indicate international type, the “1” will be the country code, and the rest will indicate area
code and number.
Caller ID’s may also be sent with the information that it should not be displayed to the called
party. The called party will not receive the caller ID, unless she has the “CLIR ignore” feature
on her line, that is used by the police, for example. In case of an emergency, the caller ID can
be important, even if the call is anonymous.
If no caller ID is given, and if the caller ID should be sent anonymously (not to be displayed),
just the keyword “none” is used. In this case, no caller ID is transmitted. The telephone
company may use the default number instead.
id_next_call [[s | n | i]<caller ID> [anonymous]]
If this caller ID is given, it will be used for the call made by the extension. After the call, it
will be erased from the configuration file.
change_callerid (yes | no)
Allows or disallows the extension’s caller to change the caller ID. This is useful, if the
extension should not be able to change her caller ID, not even for the next call.
clip (asis | hide)
Calls, that are forwarded, use the originating caller ID. An internal telephone will always
show the real caller ID. If a caller makes a call to an extension that is forwarded to a mobile,
the mobile will receive the caller ID that is given here:
•
•
asis
= The original ID of the caller, that is forwarded,
will be used. (Only works with “CLIP No Screening” feature)
hide
= The extension’s caller ID “callerid” will be used.
colp (asis | hide | force)
If an extension is called; and if the called party answers, the caller ID of the extension is
presented to the caller, showing her, who she is connected with. On forwarded calls, the
given “connected to ID” may be used:
• asis = The ID of the party “forwarded to”, will be presented to the calling party, if
available, showing here, that she is connected to a different number. (Only works
with “COLP No Screening” feature)
• Hide
= Always the extension’s caller ID “callerid” will
be presented to the calling party, even for forwarded calls. No one would notice, if
the call has been forwarded.
• Force
= The ID of the party “forwarded to” is used. If the
party “forwarded to” will not present any “connected to ID”, the dialed number of
65
the party “forwarded to” will be used instead. (Only works with “COLP No
Screening” feature)
clip_prefix [<prefix>]
When a caller ID is shown on an internal phone, it is show without the out-dial prefix. Most
telephones have a feature to add the out-dial prefix in front, so unanswered calls can be dialed
out of the list of caller IDs. But some phones don't have this feature. In this case the out-dial
prefix can be specified here. This/These is/are the digit(s) that have to be dialed to get an
external line.
If no prefix is given, the caller ID is forwarded as is. The type of caller ID is processed by the
telephone. If a prefix is given, the caller ID is converted by LCR and sent as „unknown“ type
to the telephone. In this case the prefix + access codes are prefixed, as it will be done by the
telephone.
Example: A caller ID +1-809-563-0000 of „international“ type „1809563000“ and a given
prefix of „9“ and an international prefix of „00“ (see options.conf) will result in an
„unknown“ caller ID on the phone: „90018095630000“
centrex (yes | no)
Note: Centex might not work in the current version.
“Called Name Identification Presentation” (CNIP) can be used if supported by the telephone
or even by the external line. This feature is user -> network only, which means that it can not
be transmitted to the external line, only received from it. This special feature must be
supported by the telephone. Some telephones get confused by the CNIP feature, so their
operation fail. It is also possible to use display information. CNIP might also store the name
in the caller’s list of the telephone. Display information may disappear after a few seconds.
CNIP can be presented with the ‘centrex’ feature when
•
•
•
an internal call is made, and the caller has specified a name for the extension.
a call is received/answered from external, and the external line also features CNIP /
CONP.
the name is found in the phonebook.
The ‘centrex’ option also features “COnnected Name identification Presentation” (CONP).
The name of the party that answered the call can be presented.
interfaces [<interface 1>[,<interface 2>[, …]]]
This is one of the most important setting. If nothing is specified here, the extension cannot be
called. Of course the call forwarding is still possible. The interface or interfaces that should be
used must be specified here. Multiple interface must be separated by comma and without
spaces. See the following examples:
•
•
“interfaces”
This causes no internal phone to ring, when the extension is called.
“interfaces Int2”
66
•
The interface “Int2” is used.
“interfaces Int1,Int3”
Interfaces “Int1” and “Int3” will ring on incoming calls simultaneously. Remember
not to use spaces around the comma.
rights (none | internal | local | national | international)
Each extension has dialing rights. Use only one of the keywords. By default, international
calls are allowed. If the rights are set national, any international call attempt will cause the
call to be disconnected. If the rights are local, any national or international call attempt will be
forbidden. If the rights are internal, no external call is allowed at all. If the rights are none,
not even internal calls are allowed. The reception of any call will not be restricted by this
option.
Example: If you have children, they may not be allowed to make calls outside your local
area. You would give local rights only to your kids.
Example: If you have a customer phone in the supermarket, you would give only internal
rights to your customers.
Example: If the phone should only receive internal calls, try “none”.
delete_ext (yes | no)
Delete-function when dialing external numbers. '*' will delete the last digit, '#' will delete the
complete external number. After pressing ‘#’ the dial tone will be heard again. Also enable
'display_dialing' to see on the display what is actually dialed.
noknocking (yes | no)
Knocking may be used to receive a call, even if the phone is busy. Knocking must be
provided by the ISDN telephone. This is the normal case. If you say “yes” and if the extension
is busy, any call to this extension is rejected as being busy. By default, the extension can
receive multiple calls, even if busy.
txvol <volume –8…0…8>
This will adjust the volume of the extension by the power of 2. It only affects internal phones.
If the volume is 0, it means that it is not changed. A value of ‘-1’ would cause the audio to be
transmitted from the extension to the remote party at half volume. A value of ‘1’ would cause
the audio to be transmitted at double volume. Values of ‘2’ would cause the quadruple
volume, and a value of ‘8’ would cause 256 times the volume (very loud). Please note, that
the sound wave may be clipped when the volume is increased due to limited range.
Increase this value, if the mouth peace of your telephone is too weak, or you speak with very
low volume. Decrease this if, you have the telephone in a loud environment.
You may also use this feature to amplify the mouth peace, so it becomes a hand-free
microphone.
67
rxvol <volume>
This will do the same as “txvol”, but for the audio received by the extension. Increase this
value, if the ear peace of your telephone is too weak, if you have an ear disease, or if you have
the telephone in a loud environment.
tout_setup (off | <seconds>)
tout_dialing (off | <seconds>)
tout_proceeding (off | <seconds>)
tout_alerting (off | <seconds>)
tout_disconnect (off | <seconds>)
By default there are timeouts during a call. The timeouts can be turned off. All timeouts are
only relevant for internal ISDN telephones. Some phones have own timeouts, that cannot be
altered. Here is the explanation of all timeouts:
•
•
•
•
•
tout_setup: after picking up the phone, before dialing anything
tout_dialing: after dialing the last digit(s)
tout_proceeding: after received the proceeding message
tout_altering: during ringing
tout_disconnect: after the call has been disconnected or failed
Note: The timeouts are equal for outgoing and incoming calls. The ringing tone that can be
heard when making a call will timeout, as well as ringing of the phone on incoming calls. If
both parties have timeouts, the party with the smaller value will timeout first.
own_setup (yes | no)
own_proceeding (yes | no)
own_alerting (yes | no)
own_cause (yes | no)
There are some announcements in the public network, that tells the caller the reason, why a
call cannot be completed, or why it has been disconnected. Also the dial tone or busy tone is
coming from the network to inform the current call state. The ISDN network supports up to
127 possible causes, but only some of them are specified or assigned with tones. Most causes
3result in a busy tone. LCR can give you more detailed announcements, than the public
network would do. Read the section “Understanding Causes” for more details about this. If a
call gets disconnected, the original announcement, that is coming from the external line can
be presented to by the option “own_cause no”. If the LCR announcement should be used
instead, the keyword “own_cause yes” must be used.
Tones during setup, proceeding and alerting can also be replaced. It can be useful to make a
dialtone or ringing tone sound different.
facility (yes | no)
Facility information are country specific information during call. Germany for example
transfers advice of charge information during a call. The facility is encoded using ASN.1
68
notation, that is just transparently forwarded to the terminal. To enable the feature, ‘yes’ must
be given here. If supported by the telephone, it will display the charge info and even keep
track of it, using a counter. The telephone company does not send any money amount, they
send ‘Units’. Ask you company about the price of one unit. Also note that the charge for a call
depends on the length of a call or even the total calls at the end of a month, so the displayed
information may differ from the actual charge on the phone bill. Also some services will not
be charged by units, like value added service numbers. This option is required if a payphone
should be connected to LCR.
display_cause (none | english | german | english-location | german-location
| number )
Whenever a call cannot be established, or if the call is disconnected, a number from 1-127 is
transmitted. This number gives information about why the call cannot be established, or has
been released. The number can be displayed to the ISDN phone that is connected to an
internal port. If “none” is defined, nothing is displayed. If “number” is defined, only the
value, that causes the disconnect, will be displayed. If “english” or “german” is defined, the
value, causing the ‘disconnect’, will be shown on the display of the phone as English or
German text. In front of the text, the number is shown. If “english-location” or “germanlocation” is defined, the value, causing the ‘disconnect’, will be shown on the display with the
location text.
Examle: If an unassigned number has been called, the ‘cause’ value “1” will be transmitted.
The display message in English would be “1 – Unallocated number”. The display message in
German would be “1 – Nummer nicht vergeben”. The message with location (“germanlocation”) could be “1 – Vermittlung (Lokal)”.
Displaying ‘causes’ will give more detailed information, then the telephone would give.
display_ext (yes | no)
If you say “yes,” the caller ID will be indicated to the telephone’s display (using display
information). Also IDs, that have been sent using “CLIP No Screening”, will be discovered.
In this case the word “fake” is appended to the caller ID, indicating that this number is made
up by the caller and, may not be the real caller ID.
display_int (yes | no)
If you say “yes,” the caller ID from internal extensions will be indicated to the telephone’s
display (using display information), and also the internal extension’s number.
display_anon (yes | no)
If you say “yes”, the display shows if the caller ID is suppressed.
69
display_fake (yes | no)
If you say “yes”, the display shows if the caller ID is sent with the “No Screening CLIP”
feature.
display_name (yes | no)
If you say “yes”, the extension’s name is displayed.
display_menu (yes | no)
It is hard to remember all dialing codes, which are defined in “routing.conf”. If you say “yes”
here, the keys “*” and “#” can be used to select all rules that have been defined within a
ruleset. If, after pick up of the telephone, the key “*” or “#” is pressed, the first code is
displayed on the telephone. If “#” is pressed, the next code is displayed. If “*” is pressed, the
previous code is displayed. Additionally the code on the display is followed with the function
description for this code. Only rules that are defined by a “dialing” condition are displayed.
After selecting the rule, press “0” to dial the rule.
Example: If the first code, defined for a ruleset is “dialing=0 : external”, the display would
show after pressing “#” or “*”: “0=External”. If the next code, defined in the ruleset is
“dialing=2 : internal extension=200”, the display would show after pressing “#”: “2=Internal
extension=200”. After pressing “#”, if the end of the codes is reached, the display will
continue to display the first code. After pressing “*”, if the first of the rules are reached, the
display continue to display the last rule.
display_dialing (yes | no)
During dialing, the dialed number may alter. If you say “yes” here, the display would show,
what’s actually dialed, instead of what has been entered on the phone. This works for all
codes, like internal, external and other dialing functions.
tones_dir [<directory>]
If this directory is given, the default tones directory, which has been specified in
“options.conf”, will be overridden for this extension. This option makes it possible, to define
an individual set of tones for each extension.
Example: An extension may use German tones (“tones_german”) while others use the default
tones (“tones_american”).
9
record (<type> | off)
Each call can be recorded. If recording is turned on, the calls will be recorded as wave
encoded
files.
The
files
will
be
store
at
“/usr/local/lcr/extension/<extension>/recordings/<file>”. The file name is specified by the
date and time, it has been recorded, and by the duration. The following file types can be
generated while recording:
70
•
•
•
•
a-law/u-law: (8 Kbytes/s) (depending on the global mode defined in “options.conf”)
wave 16 bit mono: (16 Kbytes/s)
wave 16 bit stereo: (32 Kbytes/s)
wave 8 bit mono: (8 Kbytes/s)
When using stereo recording, one party will be heard on one channel, and the other party on
the other.
password [<pass phrase>]
The password is needed, to gain access to an extension. When an internal telephone is picked
up, no password is needed to make phone calls. For example, if callback is used, this
password must be entered after PBX4Linux calls back, in case the phone (identified with the
caller ID), from where the callback is done, is not known yet. If the login function is dialed,
the password must be entered in order to have access to the extension. In this case the
password is used to authenticate external or H.323 calls. Read the section “Internal
numbering” and “Callback” for more information.
The following options control the answering machine (voice box). It has nothing to do with
the ISDN4Linux “VBox".
vbox_mode
(normal | parallel | announcement)
By default, the normal mode is used. If someone gets connected to the answering machine,
the announcement is played. After playing the announcement, the call is recorded. When the
caller hangs up or the time limit exceeds, the recording is stopped. If the parallel mode is
used, the call is recorded during play of the announcement. This is useful to get the name of
the caller, if you record an announcement, where you pretend that you answer the phone. The
caller will tell his name before she recognizes that he talks to an answering machine. Many
people I know don’t talk to answering machines. If the caller should not be able to talk to the
answering machine, the announcement mode is used. After the announcement is played, the
call is disconnected.
vbox_codec (mono | stereo | 8bit | law)
See “record” for codec descriptions. This codec is used to record calls. If the stereo parameter
is used in conjunction with the parallel mode, the caller and the announcement are recorded
on different channels. Using stereo for ‘normal’ mode makes no sense.
vbox_time (infinite | <seconds>)
This specifies the limit of recorded calls in seconds. If “infinite” is given, then there is no
limit.
71
vbox_display (brief | detailed | off)
The display on the ISDN telephone will show the current menu and state, when the playback
function of the answering machine is called. The current counter of the message is displayed
also. For small displays, use “brief”, for larger displays, use “detailed”. If your telephone gets
confused, turn it “off”.
vbox_language (english | german)
When the playback function of the answering machine is called, all menu information are
spoken by a voice. The voice is available in English or in German. Specify the desired
language for the voice.
vbox_email [<email>]
vbox_email_file (yes | no)
To send an email whenever a message is received, give the email address using the
“vbox_email” keyword. It is also possible to attach the recorded audio file to that email by
saying “yes” to the file option. The source email address is specified in “options.conf”, it must
be a valid address, so most servers will only accept valid source and destination addresses.
vbox_free (yes | no)
If this flag is set, the voice box will only answer the call after playing the announcement. This
makes sense if the audio path is connected through prior answering the call. The caller may
not get charged during this time.
Note: This only works with a special feature of your external telephone line. To make this
feature work, you need to enable “tones” at “interface.conf”. This feature requires connecting
the B-channel during call setup, and must be enabled by the local exchange.
datacall (yes | no)
Data calls will not be answered by a telephone. Sometimes it may be useful to answer a data
call. In order to answer a data call but tell the telephone it is a voice call, say “yes” here. This
is useful to answer calls that should be encrypted. Your telephone company may use
compression and conversion for audio and speech calls, so you may need data calls instead or
encryption is not possible. It is also possible to change data calls to voice calls, by defining a
special rule in “routing.conf”.
seconds (yes | no)
According to the ITU Q.931 standard, the connect message may include date and time. The
information element consists of year, month, day, hour and minute. To also include seconds,
say yes. Most telephones should support it.
72
last_out <number>
last_in <number>
These keywords may appear multiple times in the configuration file. “last_out” stores the 50
last external, internal or remote application’s numbers that has been dialed, including the
dialing code. It is used when the redial or power dial function is dialed. “last_in” stores the 50
last incoming calls. It is used when the reply dial function is dialed. The actual number of
entries are defined in “main.h” using “MAX_REMEMBER” definition.
If “interface.conf” has been altered, use “lcradmin interface” to reload interfaces.
4.11 Directory
In the default installation directory there is a file:
/usr/local/lcr/directory.list
It contains numbers and their names. For every incoming caller ID (CLIP) and outgoing
connected ID (COLP) this directory is parsed. If a number is found, the name can will be
presented with the number. Of course the ‘display_name’ or ‘centrex’ feature must be enabled
to be able to present a name.
Format: <phone number> <name>
The number must be given as received:
•
National number
The national prefix must be included or 'n' must be used.
E.g.: n9036681733 or 19036681733 (in case '1' is the national prefix)
E.g.: n21250993 or 021250993 (in case '0' is the national prefix)
•
International number
The international prefix must be included or 'i'.
E.g.: i4921256483 or 0114921256493 (in case '011' is the intl. prefix)
E.g.: i19036681733 or 0019036681733 (in case '00' is the intl. prefix)
•
Subscriber number
No prefix must be included or 's' must be used.
E.g.: s50993 or 1733
Note: National numbers always require the area code. International numbers always require
the country code + area code.
73
5
Using Linux-Call-Router
5.1 Running
To see a list of commands, just enter:
$ lcr
This will show a list of available options.
$ lcr query
Will show all available ISDN ports/cards, and if they are configured right to be used with
LCR.
$ lcr start
The LCR will start and may exit in cause of an error. If no error occurred, LCR will continue
to run, until CTRL+C has been pressed. LCR will then exit by freeing all resources.
It is also possible to run LCR as a daemon:
$ lcr fork
In this case LCR will still do debug output to the current TTY, but will not exit, if the shell is
closed. LCR will do a daemon fork, use “kill” or “killall” to terminate. Use this to start
LCR during system boot. Be sure that mISDN and its drivers are started first.
If LCR is running twice, the second process will recognize the first lock, and exit immediately
with a message. The lock is located at “/var/run/lcr.lock”.
To get an overview of the current call states, run lcradmin with the 'state' option:
$ lcradmin state
The screen will look like this:
74
(Figure: state of a call)
On the this example screen a call is made from an internal phone to an external line by dialing
“0”. The upper block show all ISDN interfaces wit ports and their B-channels. The middle
block show the state of each call entity. The ‘JOIN’ connects two ‘ENDPOINT’s. The
‘endpoints’ have a ‘PORT’ entity each, that connects the ‘endpoints’ them to the telephone or
the phone line. The structure of LCR is explained later in this documentation. The lower block
will show the log as found in “/usr/local/lcr/log”.
Press enter once and then enter “help”, press enter gain. You get a list of commands.
To reload “routing.conf”, enter “route” or run:
$ lcradmin route
To reload “interface.conf”, enter “interface” or run:
$ lcradmin interface
To block a port for further incoming and outgoing calls, just enter “block <port number>” or
run:
$ lcradmin block <port number>
To unblock the port again, enter “unblock <port number>” or run:
$ lcradmin unblock <port number>
To unload the mISDN driver, all ports of the driver must be unloaded. An unloaded port can
the be used for a different application. Also it is useful before removing hot-plug devices.
Enter “unload <port number>” or run:
75
$ lcradmin unload <port number>
To load the port again, use “unblock” as described above, or use “interface” to reload all
interfaces.
To release a pending call, look at the endpoint’s serial ID. It is shown in the status screen, as
well as in the log, starting with “EP(<ID>)”. This can be useful, if two members are joined in
a conference, but they don’t or even can’t hang up for some reason. Also lost parked calls can
be released. Enter “release <endpoint’s ID>” or run:
$ lcradmin release <endpont’s ID>
WARNING: Don’t try to release the call by restarting LCR, since active calls will not be
terminated in some cases.
5.2 Internal phone (extension)
A phone, that is connected to any internal interface of LCR will be identified by its caller ID.
See the “Interface configuration” sections on how to make an interface “internal”. In order to
use a phone, the caller ID must be programmed at the phone, that is called MSN number.
(Multiple Subscriber Number) Whenever a caller picks up this phone to make a call, the
extension, that equals the caller ID, is searched. If the extensions should be “200”, the MSN
number must also be 200. If a list of MSN numbers is given for the interface, the first MSN is
used if the given caller ID is not in the list. Also the extension must exist. Create an extension
first, as described in chapter “Configuration”.
If a call is made to the extension, the call is forwarded to all extensions, that have been
configured in the extension’s configuration file. If a phone on the internal extension should
ring, it must have the extension number configured as MSN number.
Whenever a call is made from the extension, the caller ID is “screened” to whatever
configured in the extension’s settings. The MSN is replaces by the caller ID configured.
Normally, the local exchange requires the local number as caller ID.
If the internal phone makes an anonymous call, the call is forwarded also anonymous by
LCR, regardless what is configured in the extension’s setting.
5.3 Calling intern
If the call is made from internal or external to internal, the caller must dial the code, that is
specified in “routing.conf” for the extension to be dialed. Also the directory tree of the given
extension must exist in “/usr/local/lcr/extansions/”. All phone on all interfaces of the
extension will ring, as specified in “/usr/local/pbx/extensions/<extension>/settings”.
Example: If “dialing=200 : intern” is specified in “routing.conf”, the caller must
dial “200” to reach extension 200. If “dialing=0 : intern extension=200” is
specified, the caller must dial “0” in order to reach extension 200.
76
5.4 Calling extern
If a call is made from internal to external, the caller must dial the code, that is specified in
“route.conf”. It is standard for most PBXs in the world, to use the “0” for external calls. After
dialing the “0”, or whatever code is specified, the audio of the external line is cross-connected
with the phone. The dial tone, and even announcements can be heard now.
Example: If “dialing=0 : extern” is specified in “routing.conf”, the caller must dial
“0” to make an external call.
During dialing, it is not possible to delete the last number, because it is already sent to the
telephone network. LCR supports deleting, by terminating the call and making a new one.
The delete function must be enabled for this extension. When disabled the digits are dialed as
received. Whenever a “*” is received, the last digit is removed from the dial string, and the
call is terminated and reestablished by a new one. By dialing “#”, the complete number is
removed from the external call, an external dial tone is given. Example: “555124*12” will
dial the number “5551212”, because the “4” is removed by the “*”.
Info: In good old Germany, dialing of the digit ‘0’ was called “Amt”, which is the short form
for “Postamt” (post office). This term is used, because the old telephone system was
controlled by the German “Post”, and all the switching systems were located in the buildings
of post offices. Earlier, the calls were made by operators. The operator was sitting in the post
office “Amt”.
5.5 Calling remote application (Asterisk)
LCR offer connectivity to remote applications like Asterisk channel driver. Instead of routing
calls directly using “intern” or “extern” action, the call can be route to a connected
application. This is done by the “remote” rule:
dialing=1234 : remote application=asterisk
will forward the call to the asterisk, if “1234” is dialed in the current ruleset.
TBD…
5.6 Caller/Connected ID (CLIP/COLP)
The caller ID is transmitted from the caller to the called party. (CLIP) When the called party
answers the call, the connected ID is transmitted from the called party to the caller. (COLP)
So why is the connected ID transmitted? The called party number is known, because it has
been dialed! The called party may have call forwarding enabled or may answer the call on a
different telephone than that one that has been called. The caller will see who actually
answers.
The ID for internal calls may be specified in the extension’s settings. If the caller uses
anonymous caller ID, it will be forwarded anonymous. (suppressed) Only the police or any
other party with special rights may see even anonymous IDs to call back in an emergency.
77
5.7 Conference
LCR also supports conferences with an unlimited number of parties. Actually, LCR always
use conferences for all calls. If a normal call is made, a conference with two parties is set up.
The call/conference can be put on hold, to answer another incoming call, or to set up a new
one. The ISDN telephone must be used to put the call on hold. The LCR can join a call on
hold with the current active call. This may be done by using DTMF tones. Read the “Keypad”
section for information on how to join calls. If calls are joined, the members of the
call/conference increase.
Whenever a conference is put on hold, all parties connected in a conference may continue to
talk. Inactive parties are also muted, so the conference is not disturbed. If there is only one
party in the conference, who is active, she will hear the hold-music and get a notification, that
the call is currently inactive, until someone else retrieves the call.
If any party in a conference hangs up, the party is removed from the conference. If only one
party is left, the party will also be disconnected.
5.8 Keypad
Keypad dialing is used to control the call, after it has been connected. The keypad may be
dialed using DTMF tones, but also using the ISDN keypad facility. The keypad facility is not
supported by all ISDN telephones, so DTMF may be used in most cases. DTMF may be
recognized even if no DTMF tone is sent. This may happen during analyzing of voice.
Sometimes small parts of the human voice equal to very brilliant DTMF tones. Therefore a
sequence is used, whenever a call is connected. The sequence must be dialed quickly. If
pauses of more than 2-3 seconds is made between the digits, the sequence is not detected. The
sequence begins with “*” and ends with “#”. In case of keypad facility, “*” and “#” must not
be dialed.
Keypad
0
3
7
8
9
DTMF
*0#
*3#
*7#
*8#
*9#
Function
Disconnect the current call and give a dial tone
Join the current call with the call on hold.
Enable encryption using manual keying. (explained later)
Enable encryption using automatic keying. (explained later)
Disable or abort encryption.
When a call is put on hold, or the call has been disconnected using keypad, the caller may dial
using DTMF or ISDN keypad facility. If a call has been disconnected, or if the caller wishes
to get back to the dial tone because of wrong dialing, the caller must enter “#” twice, within
two seconds.
5.9 Callback
The callback makes only sense, if dialed from external telephones. The caller must dial the
code for callback, as specified in “numbering_ext.conf”. If the caller doesn’t transmit a caller
ID, callback is not possible at all. If the feature “CLIR Ignore” is available to the ISDN line,
that may only available to police or emergency phones, callback is possible, because the caller
ID is available, even though it is restricted. If the ID is not available, the call will be
78
disconnected with an error, indicating that the service is not available. After dialing the
callback code, the caller may continue dialing the number, that will be dialed after callback.
This feature is only available with PBX lines. The number of digits that may be dialed after
the code for callback depends on the maximum number that will be transmitted by the
telephone network. It may be enough to dial an abbreviation from the phonebook. If nothing
is dialed after the code for callback, the dial tone will be presented after callback.
As soon as the caller hangs up while processing the callback rule, LCR will wait 2-3 seconds,
and start calling back. The caller ID of the calling party will be used to indicate the callback.
This only works if the external line has the “CLIP No Screening” feature. On normal lines,
the default caller ID is given by the local exchange. After the caller answered the call, she
must enter the extension’s password, in order to use the callback. If the password is correct, it
will
be
stored
in
the
extension’s
password
list
“/usr/local/lcr/extensions/<extension>/callbackauth”. If the password is already specified,
LCR will directly dial, what has been dialed after the callback coded. If nothing has been
dialed, the dial tone is presented.
After callback, the DTMF feature is used to input digits. The caller must dial the same
number as she would dial when she picks up an internal phone.
If a call gets disconnected, the caller may dial “#” twice, to get a dial tone again, without
doing another callback. During a call, the caller must disconnect using “*0#” sequence. To
end the callback, the caller must hang up.
Callback gets rejected during trigger call, if
•
•
•
the caller ID is not available.
the extension does not exist.
the password is not given.
The call gets disconnected after callback if
•
•
•
the password input timed out.
any digit is wrong after entering the number of digits equal to the password.
the caller hangs up.
5.10 Test mode
The test mode is used to make certain tests for internal and external telephones. The rule for
test mode may be specified in “routing.conf”. For external calls using the test mode, the
external line must be a PBX line, to support the dialing of more digits after the test mode
code. Alternatively the test may be given as parameter “prefix=<code>”.If the code is given,
the test mode can be used with multipoint lines also, but only one test can be executed. Here
is a list of tests that can be made:
1
The call is proceeding. A ‘proceeding’ signal is sent to the calling ISDN telephone.
79
2
The call is alerting. An ‘alerting’ signal is sent to the calling ISDN telephone.
3
The call will be connected. The caller ID of the caller is sent back as connected ID. The audio
is echoed (looped). This is useful to test the audio roundtrip delay. You can compare hardware
bridging with software bridging delay, by just holding your mouth peace to the hand-free
speaker of you phone. If you hear a “ringing” echo, you have a delay that you can recognize.
If you hear just a smooth “whistle” tone, than your echo is too fast to recognize.
4
The call will be connected with a continuous test tone. This is good for testing if LCR runs
without gaps. High interrupt load may cause buffers in the kernel to underrun. Also hearing
some gaps are ok, because they result in de-jittering, because cards may have different clock
source and audio delay has to be keep low.
5
The call will be connected with the hold music.
6<cause>
After dialing 6 and three more digits, the call will be connected, and the announcement, that
will be specified by the ‘cause’ value. The ‘cause’ value is a number between 1 and 127. If
the ‘cause’ value has less than three digits, it must be filled with zeros in front. This is useful
to test announcement’s audio files.
7<cause>
This is the same as the previous function, except that the call gets really disconnected. The
‘cause’ value is sent with a disconnect message. This is useful to see how the telephone reacts
on different ‘causes’ or how the local exchange interprets and forwards the ‘cause’ value. On
external calls the call will be disconnected, and the announcement of the telephone system is
used.
8
Sends back a ‘disconnect’ message with normal call clearing cause (16).
9
Connects the call and sends back the text “Welcome to Linux” and “12345678” as connected
ID. This is useful to test COLP and display facility.
5.11 Understanding Causes
A “cause” value is a number between 1 and 127. It is used to explain why a call cannot be
completet. ISDN telephones use them to give text messages on its display. The public
telephone system uses them to send announcements, which explain the ‘cause’ value. All
80
cause values are defined in Q.850 of ITU-T standard. In the source file “cause.c” is a list of all
causes.
Example: If the LCR’s routing finds, that a dialed number doesn’t exist, it sends a
‘disconnect’ message with the cause value “1”, that means that the number is not allocated.
Someone in the USA would then get the announcement: “The number, you have dialed, is not
assigned.” In Germany the announcement would be: “Kein Anschluß unter dieser Nummer.”
Also the disconnect message has a “location” value. The location is used to indicate where the
cause in generated. If the cause is generated by the local exchange, the location is “public
local”. If the served user (the phone that receives the disconnect) is connected to a different
exchange, it will receive the location “public remote”, because for her it is the remote
exchange.
5.12 Answering machine (voice box)
The answering machine is divided into two parts. The first part answers a call, plays an
announcement and records a message. The second part offers a voice menu to plays the
recorded messages and to record the announcement. There are two ways to record messages.
The easiest way is to define a rule in “routing.conf”:
dialing=<digits> : vbox-record extension=<extension>
When the given digits are dialed, the answering macine (voice box) of the given extension is
called. The other way is to forward the call to the voice box. This can be done in the
extension’s “settings” file. Instead of entering an external telephone number at cfu, cfb or
cfnr, the key word “vbox” will forward the call to the voice box instead. To forward to the
voice box after 30 seconds of ringing without answer, use the following parameters in the
settings of the extension:
cfnr
cfnr-delay
vbox
30
When a call is received on the voice box, it will play the announcement, which is stored in
“/usr/loca/lcr/extensions/<extension>/vbox/announcement.isdn”. After that, it will record
until the maximum recording time is reached, as specified with “vbox_timeout”, or if the
caller hangs up. It is also possible to record during the announcement. This is useful to
pretend, that the call is not answered by an answering machine. In this case, the caller might
begin to talk during the announcement. Then it is useful to have her voice recorded. To use
the feature use the following parameter in the settings:
vbox_mode
parallel
To just play the announcement without recording, the following parameter is used:
vbox_mode
announcement
After the announcement is played, the call is disconnected.
81
To play the recordings of the answering machine, a special rule must be used in
“routing.conf”:
dialing=<digits> : vbox-play
Because each extension has its own answering machine, it is required to call from that
extension. In order to play back messages from extern, the ‘login’ code or the callback must
be used. It is also possible to just play back the recording of someone else’s voice box:
dialing=<digits> : vbox-play extension=<someone else’s extension>
After dialing the digits for playing back, a voice will speak the menu. If no recording is stored
in the answering machine, the voice will tell this first. During the speech, the following digits
may be dialed using DTMF or keypad dialing:
“1” Play previous message.
“2” Play current message. The date, time and caller ID is spoken and written to the display.
Then the display shows the total recording time and the current time playing. Pressing
“2” during intro will directly playback. Pressing “2” during playback, will stop.
Pressing “2” after stop, will continue the playback.
“3” Play the next message.
“4” Rewind the current playback. Pressing “4” again, will double the rewind speed
whenever it is pressed. If the beginning is reached, the playback will continue to play
forward. Pressing “2” during rewind, cause continue to play at normal speed.
“5” Stop the current playback. The menu is spoken afterwards.
“6” Wind the current playback in forward direction. Pressing “6” again, will double the
wind speed whenever it is pressed. Pressing “2” during rewind, cause continue to play at
normal speed.
“7” Use to record the announcement. After pressing 7, the announcement can be recorded by
pressing “1”, played by pressing “2”, and aborted by pressing “3”.
“8” Use to store the current message in the recordings directory. After pressing “1”, the
message is stored, and aborted by pressing “3”.
“9” Use to delete the current message. After pressing “1”, the message is deleted, and
aborted by pressing “3”. When recording, almost the first second is cut off, to avoid
recording the sound of the keypad. After recording, a beep tone is added to inform the
caller that the recording will start.
“0” Use to call the caller of the current message. This is only possible, if the caller ID is
available and not restricted.
It is also possible, to select one of the functions above, by using “*” (for previous item) and
“#” (for next item). On the display, the current function is displayed. To execute, press “0”.
The display will only be shown on an internal phone, since external lines cannot receive
display information.
82
To send an email whenever a message is received, give the email address using the
“vbox_email” keyword within the extension’s config file:
vbox_email
[email protected]
It is also possible to attach the recorded audio file:
vbox_email_file yes
This will only work if “sendmail” package is installed. Also it must be configured correctly.
Some mail accounts may recognize your dial-in-IP-address as a spammer’s address, so mail
should be forwarded by your “sendmail” to your provider’s email server. I cannot explain
here how to setup “sendmail”. Please visit www.sendmail.org for further info.
5.13 Encryption
Encrypted Calls
Just pick up the phone and call somebody who uses also LCR, press a key and the call will be
encrypted. - It's easy isn't it?
There are two types of encryption, that can be selected:
•
•
pre-shared keying
automatic key exchange
Both have advantages and disadvantages. Pre-shared keying requires a key to be shared. It is
essential that nobody can eavesdrop the key when it is exchanged. The best way to exchange a
key is to meet the other party. Always note that if the key gets stolen before and even after the
call, the call can easily be decrypted in the future. If you use automatic key exchange, the key
will be erased whenever the call has been disconnected. Also you don't need to share the key
before you make a call. The key exchange procedure does this for you. To be sure, that no
man-in-the-middle modifies the keys, the telephone’s display facility is required. To exchange
an encrypted session key, RSA is used, but this may take some seconds up to calculate the
keys.
Preshared keying
Preshared keying requires some security about handling of the keys:
•
•
•
•
•
The key must be good random.
The key should not be given to other parties (group of people)
The key must be stored secure.
The key can be used in the future to decrypt encrypted calls.
The key must be exchanged in a secure way.
Both parties must be identified by the caller ID or dialed number. In order to select the correct
key, the caller must transmit her caller ID or the called party will not know what key to select.
The
keys
are
stored
in
the
extension's
directory
83
“/usr/local/lcr/extensions/<extension>/secrets". The first keyword is the number of the remote
party. The number must be given as dialed (without the external prefix). For incoming calls
the number must be given as shown (without the external prefix). If the dialed number doesn't
match the caller ID of the same party, make two entries with the same key, but different
numbers. The second keyword is the authentication method. Only "manual" keying is
supported at this time. The third keyword is the encryption method. Only "blowfish"
encryption is supported at this time. The last keyword is a string that represents the key. The
string is converted from ASCII into binary. If the string is given with "0x" prefix, it is
converted from HEX into binary. For blowfish use the maximum key length of 448 bits (56
bytes or 112 HEX digits). To enable encryption, both parties will have to press digits '7'. If the
telephone sends DTMF tones instead of keypad information, both parties must press '*7#'.
The display will show if the key is found or if an error occurred. A special inband audio signal
is given for successfull encryption (two bells) or failure (marine horn). This method is very
fast, because no calcualtion process is required. If you here noise, the keys or algorithm
mismatch.
To turn of encryption, use keypad digit '9' or DTMF sequence '*9#'. A “marine horn” will
indicate the deactivation of encryption.
Automatic key exchange
It is very simple to enable this type of key exchange. It works if "crypto" library is enabled
during compilation time. Press digit '8' on your keypad. If your telephone sends DTMF tones
instead of keypad information press '*8#'. You should now notice the message "Key
Exchange" on the display of your telephone. This only works if your telephone supports
display messages. Display messages are essential to avoid man in the middle. The called party
should now hear some clicks in his telephone. This is data transmission of the identification
procedure. Messages are exchanges via audio channel, so you will hear click whenever some
message is transmitted.
The automatic key exchange procedure:
Both parties have to press digit '8' or DTMF '*8#' to enable automatic key exchange. This
must happen within 10 seconds. Both will send a random number and the CPU power to each
other. The first party that selects the automatic key exchange, will get the information about
the remote party. The CPU power is used to determine the fastest computer. If both parties
have equal speed, the random number is used.
(In case of equal random number, the b-channel seems to be looped.) The party with the faster
CPU or the bigger random number is master and will receive "Master" on her display. The
other party will get "Slave" on the display. The master calculates and RSA key pair. One of
the keys, the public key is sent to the slave. The slave generates a random session key,
encrypts it with the public key and sends it back to the master. Only the master is able to
decrypt the session key using the private key. The session key is just a random number that is
calculated from noise of all active B-channels during key exchange. It can be expected to be
"good random".
To avoid man-in-the-middle attack, both parites will see some values of their public key on
the display. If they are equal, there is no man in the middle. One party can tell the other about
parts of the public key. The voice of the party 'signs the public key'.
Both parties will use the session key to encrypt and decrypt the audio data using "Blowfish"
algorithm.
84
Man-in-the-middle attack is shown now: Imagine a device (the man in the middle) is attached
to your phone line. It intercepts the call to the other party. The device pretends to be the other
party and will use the automatic key exchange procedure. On the other side it pretends being
you and also does the automatic key exchange procedure with the other party. Now the device
can listen to the decrypted transmission, because the transmission is only secure between the
device and the parties. If the device is master of both connections, both public and private
keys may be equal, so you and the other party will receive the same public keys. In this case
both parties are slave, so this is an incident of a man in the middle. If one party would be
master, the device must generate a key pair for the other party. It is not possible to generate a
key pair with a given public key. Both parties would see different public keys in their display.
Again, to avoid man-in-the-middle attacks:
•
•
During negotiation, one party must see "Slave" and the other "Master" in their
displays.
Both parties must see the same public key digits in their display. It is not required to
see the complete key.
About the key on the display: Each bit of the key will halve the coincidence of not
discovering a man-in-the-middle-attack. If you compare the first block (4 hex digits), you will
end up with a chance of 1:65536 not discovering a man-in-the-middle-attack. If your compare
all four blocks (16 hex digits), the chance will be 1:18446744073709551616.
"My display shows a display message three seconds, then it is gone"
Don't worry about your display, just press keypad '8' or enter DTMF '*8#' again and you will
see the key message again.
Now the blowfish works:
The Blowfish encryption and decryption is done by the kernel module "mISDN_dsp.o", that is
also used for real time audio processing. A special command is used to enable and disble the
audio transmission.
The audio is processed in the file "dsp_blowfish.h". A block of 9 samples is converted into a
seven-bit-sample. The resulting 63 bits plus another random bit is used to encode a block of
64 bits using blowfish. The block is then converted into 8 bytes of seven bits plus one byte of
8 bits. The upper bit of the first 8 bytes are used for sync information. Decoding is done by
reversing the process.
Encryption in a conference:
It is not possible to encrypt a conference with three or more parties. But it can be done before
the parties are joined within a conference. Let's say you like to have a secure conversation
with two persons, both have also LCR. Call the first person and start encryption. Put the
person on hold and call the seconds person. Start encryption on the second call. Join the calls
as usual (keypad '3' or DTMF '*3#'). Check the public keys with each party before you join,
because in a conference it is not possible to redisplay them.
85
5.14 Other tools
$ gentones
This tool generates tones. When it is called without parameters, it will show the following
help:
Usage:
gentones wave2alaw <wav file> <alaw file>
gentones wave2ulaw <wav file> <ulaw file>
gentones tone2alaw <frq1> <frq2> <length> <fade in> <fade out> <alaw file>
gentones tone2ulaw <frq1> <frq2> <length> <fade in> <fade out> <ulaw file>
Length and fade lengths must be given in samples (8000 samples are one
second).
Tones will append to existing files, wav files don't.
It can be used, to generate law encoded tones with one or two frequencies. This is mainly used
to create patterns, like dial tones, busy tone and other audio patterns. Depending on your
telephone system, you need to use “tones2alaw” or “tones2ulaw”. There are two frequencies
to specify “frq1” and “frq2”. If only one frequency should be used, enter 0 for “frq2”. The
“length” specifies the total length of the tone in samples. 8000 samples are one second. 2000
samples are ¼ of a second. “fade in” and “fade out” is used to make the start and stop of the
tone soft. If “fade in” is 800, the sound will fade in within 1/10 of a second. This makes tones
very smooth and avoids the ‘click’ sound at the beginning. “fade out” respectively. Whatever
specified for “fade in” and “fade out”, the tone will be as long as given at “length”. If you
don’t want to use fades, set “frq1” and “frq2” to “0”. I suggest at least 50 sample for fade to
silence.
The given file will be appended to “alaw file” or “ulaw file”. If you like to create a new one,
but the name still exist, delete the file and then start creating it. This is useful to create a
sample with more than one tone. Example: A busy tone normally is made out of ½ second of
a tone, and one ½ second of silence. To add silence, just enter 0 for “frq1” and “frq2”.
It is also possible to convert a wave file to a-law or mu-law. The wave file must have a
sampling rate of 8000. It doesn’t matte what bit-resolution or how many channels it has
(stereo or mono). The sampling rate will not be converted, so it must be 8000 samples/second.
The resolution should be 16 bits for best quality. a-law and mu-law have better resolution than
8 bits. The data of a-law and mu-law is 8 bits sample, but since it is quantised, the quality will
be 12 bits. 12 bits sounds almost as good as 16 bits. Wave files are only available with 8 or 16
bits resolution.
The use of a-law or mu-law files, result in a faster processing, since the samples must not be
converted into a-law or mu-law for ISDN use. ISDN uses only a-law or mu-law samples.
$ genwave
To convert an a-law or mu-law file into a wave file, “genwave” is used. If it is called without
parameters, the following help is given:
Usage:
genwave ulaw2wave <alaw file> <wav file>
genwave alaw2wave <alaw file> <wav file>
86
Use “ulaw2wave” or “alaw2wave”, whatever your law-samples are encoded in. The output
file must be given with “.wav” extension. The sample is converted into 16 bits, mono, 8000
samples/s. “alaw” or “ulaw” files are always mono with 8000 samples/s.
Use this tool to convert recordings of calls or answering machine, if they are stored as a-law
or mu-law samples.
5.15 Parking a call
Using the HOLD feature
A call can be parked by using the “hold” feature of the ISDN telephone. This should be
supported by any telephone. The call will not be released, but only the B-channel. The hold
feature is useful to answer or setup a new call while holding the other. If a waiting call
without a B-channel should be received, the hold feature must be used in order to answer the
call. LCR supports this feature. There is no limit for the number of calls that can be placed on
hold. Most telephones only support one call to be on hold. If a B-channel is available, a call
on hold can be retrieved. If no channel is available, the active call must be put on hold first.
All this is done by the telephone, so you just need to switch between the calls.
During a call on hold, the remote party will get a notification, that the call is on hold, and
receive the hold-music. If the call is a conference, the call gets removed until retrieved.
Using the SUSPEND feature
A call can be suspended (parked) also. This feature should be supported by all ISDN
telephones, but is not used by many people, for some reason. An active call can be parked by
using a code. This can have up to 8 digits. Some telephones support only two digits, some use
fixed digits and some support no digits at all. The digits are used to identify the call. The call
can then be resumed on a different phone. It is even possible to resume a call on any other
interface (NT-mode) of the LCR. This allows to transfer a call or to move a telephone to a
different port.
Also during suspend, the remote party will get a notification, as described above for the ‘hold’
feature.
Please refer to the telephone’s manual.
NOTE: These features are only supported for NT-mode and do not apply to external lines. It
is not possible to hold/suspend an external call. This is also not possible for most PBX-lines.
87
6
Tuning
6.1
Load tones into memory
To reduce jitter, caused by hard disk access, edit the file “options.conf” and enable the
“fetch_tones” option. Specify all tone set that should be loaded into memory. Read the
“Configuration” section for option description. This requires more memory, but needs no
more hard disk load, when playing tones and announcements.
6.2
Set scheduler to high priority
If may processes run on your server, you may experience high CPU load. Since LCR is a realtime-process that requires steady execution, but not much CPU, it should run on a high
priority.
To run LCR with high priority, alter the “schedule” option in “options.conf” Use a value of 0
for normal scheduling, this is the default. The highest value is “99”. If a process has a higher
value than others, it will get CPU, if it requires the CPU. Note that even a value of 1 may
cause to lock up your machine, if LCR failed due to an endless loop bug.
6.2
Get rid of IDE
LCR may run on old and slow systems. This is quite ok, since handling some ISDN calls
don’t require much CPU power. If you experience voice gaps due to hard disc traffic, you
might have an IDE drive. If you can use SCSI or serial IDE, you will be lucky. But don’t
worry of some gaps, they will be recovered by mISDN’s DSP code. They will not lead into
increase of audio delay.
88
7
Debugging
7.1
Logging
Logging is enabled by default, because the log file is given at “/usr/local/lcr/log”. It will show
what’s going on inside the deep LCR code. If you pick up the phone and you hear a busy
tone, you don’t know what happens until you view the log file. Especially when using routing
rules, this may help to see if a rule matches and how it’s action is processed.
You will see something like this if you pick up the phone:
05.08.07 16:55:22.129 CH: DL_ESTABLISH INDICATION N<-U tei 66
05.08.07 16:55:22.175 CH(5): NEW_CR INDICATION callref new=0x10042
05.08.07 16:55:22.175 CH(5): SETUP INDICATION N<-U calling_pn type=4 plan=1 present=0
screen=0 number=201 called_pn type=0 plan=1 number=995 channel_id exclusive=0 channel=-3
hlc coding=0 interpreta=4 presentati=1 hlc=1 bearer coding=0 capability=0 mode=0 rate=16
multi=-1 user=3
05.08.07 16:55:22.175 CH(5): CHANNEL SELECTION (setup) channel request=any hunting
channel=free conclusion 'channel available' connect channel=1
05.08.07 16:55:22.175 CH(5): BCHANNEL create stack channel 1 stack id=0x10010200
address=0x50010202
05.08.07 16:55:22.175 CH(5): BCHANNEL activate channel 1
05.08.07 16:55:22.175 EP(5): SETUP from CH(5) caller id number=201 present=allowed dialing
995
05.08.07 16:55:22.175 EP(5): SCREEN (found in MSN list) msn 201
05.08.07 16:55:22.175 EP(5): TONE to CH(5) directory tones_american name dialing
05.08.07 16:55:22.175 EP(5): ACTION (match) action goto line 12
05.08.07 16:55:22.175 EP(5): ACTION goto/menu (change to) ruleset intern dialing 995
05.08.07 16:55:22.175 EP(5): ACTION (match) action test line 71
05.08.07 16:55:22.175 EP(5): ACTION test test 'hold music'
05.08.07 16:55:22.175 EP(5): CONNECT to CH(5) connect id number= present='not available'
05.08.07 16:55:22.175 EP(5): TONE to CH(5) directory tones_american name hold
05.08.07 16:55:22.175 CH(5): PROCEEDING REQUEST N->U channel_id exclusive=1 channel=1
05.08.07 16:55:22.175 CH(5): CONNECT REQUEST N->U date day=5.8.7 time=16:55:22
05.08.07 16:55:22.194 CH(5): BCHANNEL control DSP-RXOFF 1
05.08.07 16:55:22.194 CH(5): BCHANNEL control DSP-DTMF 1
05.08.07 16:55:24.356 CH(5): DISCONNECT INDICATION N<-U cause location=0 value=16
05.08.07 16:55:24.356 CH(5): RELEASE REQUEST N->U cause location=1 value=16 reason 'no
remote patterns'
05.08.07 16:55:24.356 EP(5): RELEASE from CH(5) cause value=16 location=0-User
05.08.07 16:55:24.405 CH(5): RELEASE_COMP INDICATION N<-U
05.08.07 16:55:24.405 CH(5): RELEASE_CR INDICATION callref 0x10042
05.08.07 16:55:24.405 CH(5): BCHANNEL deactivate channel 1
05.08.07 16:55:24.406 CH: BCHANNEL remove stack channel 1 stack id=0x10010200
address=0x50010202
05.08.07 16:57:04.389 CH: DL_RELEASE INDICATION N<-U tei 66
89
In this case, someone picks up the phone, here is what happens. First the layer 2 ISDN link is
established from phone with terminal ID 66, a new call is created. The dialed number “995” is
included in the setup message. The phone requests “any channel acceptable”, so LCR check
incoming channel selection list and find channel “1” is free. The b-channel is activated. The
ruleset “main” is parsed and rule “goto” matches, because it is a call from an extension. In the
ruleset “intern”, the rule “test” matches, because the first digit of the dialed number is “99”, as
requested. The test action is executed with the number “5”. This test plays the hold music.
The tone name “hold” is played and a connect message is sent to the telephone. First the
telephone receives a processing message with the selected channel ID, then it gets a connect
message with date and time. The B-channel is now configured for DTMF. After about two
seconds, the caller hangs up. A disconnect is received. Also a release is sent, because the
phone does not send any disconnect tone. Also the endpoint is released. The ISDN process is
removed and also the B-channel is closed. After about two minutes, the layer 2 ISDN lin k is
released.
7.2
Doing traces
To get a more detailed output you may want to trace. Also if you have may calls at a time,
you will be flooded with log information. You may want to select only special numbers or
interfaces. To get a list of possible trace option, use “lcradmin”:
$ lcradmin trace help
By default everything is traced in detail:
$ lcradmin trace
-----------------------------------------------------------------------------Port: 2 (BRI PTMP NT) Interface: 'N2' Caller: --Time: 05.08.07 17:14:49.628 Direction: IN Dialing: -------------------------------------------------------------------------------CH(6): SETUP INDICATION N<-U
calling_pn : type
= 4
: plan
= 1
: present
= 0
: screen
= 0
: number
= 201
channel_id : exclusive = 0
: channel
= -3
hlc
: coding
= 0
: interpreta = 4
: presentati = 1
: hlc
= 1
bearer
: coding
= 0
: capability = 0
: mode
= 0
: rate
= 16
: multi
= -1
: user
= 3
-----------------------------------------------------------------------------Port: 2 (BRI PTMP NT) Interface: 'N2' Caller: '201'
Time: 05.08.07 17:14:49.628 Direction: --- Dialing: -------------------------------------------------------------------------------CH(6): CHANNEL SELECTION (setup)
channel
: request
= any
hunting
: channel
= free
conclusion :
'channel available'
connect
: channel
= 1
90
8
Architecture
8.1
port, endpoint, join
(Figure: Structure of LCR)
This picture shows the main structure of LCR. There are three classes of objects involved:
Port
Whenever someone picks up a phone, or a call is received from external line, a port object
handles the incoming call. Also if someone is called, a port handles the outgoing call. All
ports only exist, if a call is made. An incoming ISDN call creates a port of type ISDN. After a
port receives an incoming call, it creates an endpoint, and sends messages to it. An endpoint
can have multiple ports, so it is possible to ring a call on multiple ISDN ports. The port class
is defined in “port.h”, and implemented in “port.cpp”, “mISDN.cpp”, “dss1.cpp”, …. The
base class “port.cpp” is incomplete and does not very much. It is used to provide functions,
which all classes of ports use. The is inherited by “mISDN.cpp”, “vbox.cpp”, ….
91
Endpoint
An endpoint is created, whenever a port receives a call. An endpoint acts as a call manager. It
controls the dial tone, does the processing of the dialling, and creates a join object, in case of
internal, external or remote application calls. An endpoint can have only one active join. The
endpoint class is defined in “endpoint.h”, and implemented in “endpoint.cpp”. Also each
endpoint has an application. It is defined in “endpointapp.h”, and implemented in
“endpointapp.cpp”. The application used for PBX functionality is called “apppbx”. Because
the endpoint that controls the PBX is large, it is split into other multiple files: “apppbx.cpp”,
“route.cpp”, “action.cpp”, “action_vbox.cpp”.
Join
A join is created by an endpoint, whenever an internal, external or remote call is made. By
default a join object is inherited by a JoinPBX object or a JoinRemote object. They are
defined and implemented in “join*”. A PBX join may have an unlimited number of endpoints.
A remote application join may have exactly one endpoint. A PBX join will normally have two
endpoints connected, but in case of may endpoints, the join will form a conference. If an
endpoint disconnects from the join, or if it sends any message, no other endpoint will get a
note of it, in case of three or more endpoints. If there are only two endpoints left in a join, the
messages from one endpoint are transferred to the other endpoint. If one endpoint releases, the
join gets released, and the release is transferred to the other endpoint. If a join is created, the
join creates another endpoint and transfers set-up information.
Messages
All entities communicated via messages. The messages are buffered, so that they are sent after
the entity is processed. The message contains a serial number, where the message was from,
and where it is sent to. If an entity is removed, but there is still a pending message, the
message is dropped. An entity will be created, and receives a set-up message afterwards. An
entity will be removed, when it receives a release message. If an entity is related to others, it
will send a release to the other entities before it is removed. Most messages are closely related
to ISDN messages with their information and functions, but expanded for more information
than ISDN offers. Messages are stored in a forward linked chain of structures. A message is
appended to the end of the chain, and removed from the beginning. All messages are defined
in “message.h” Functions to send and retrieve a message are implemented in “message.c”.
A simple call procedure
An ISDN telephone, which is connected to an internal ISDN port, is picked up. It sends a setup message to the ISDN port. A port entity receives that set-up message, and creates an
endpoint entity. This endpoint sends back a message, that it needs more digits, and another
message to the port, that the dial tone should be streamed. The caller may now enter digits.
These digits are sent to the endpoint entity via the port entity and are processed. Let's assume
that the caller dials the code for external calls. The endpoint received the digits for external
calls, creates a call entity and sends a set-up message to the call entity. The call entity receives
the set-up message and creates an endpoint entity, and sends the set-up message to it. The
endpoint entity receives the set-up messages, and selects a port, as specified by the type of
92
number that has to be dialled. In this case it is an external call, so a free port, which connects
to an external line is searched. If it is found, the set-up message is sent to that port. From now
on, all call-state messages are transferred via this port-endpoint-call-endpoint-port chain. The
call entity also interconnects the endpoints, by sending mixer information to the isdn ports,
receiving audio data from the endpoints, and sending audio data down to the endpoints.
8.2 Tones and announcements
For the LCR all tones must be defined as samples. These samples may be a-law or
u-law, or even wave encoded.
The formats are:
•
•
•
•
a-law/u-law: (8 Kbytes/s) (depending on the global mode defined in “options.conf”)
wave 16 bit mono: (16 Kbytes/s)
wave 16 bit stereo: (32 Kbytes/s)
wave 8 bit mono: (8 Kbytes/s)
Each tone can have two files. The first file has the extension ".isdn" or “.wav” and defines the
introduction of the tone pattern. The second file has the extension "_loop.isdn" or
“_loop.wav” and defines the endless loop of that tone.
If the first file does not exist, the second loop file is played right as the tone starts. If the
second loop file does not exist, the first file is played and silence is played afterwards. If no
file exist, silence is played.
Tone names and their occurrence:
NULL (null pointer) or “”
Silence
“busy”
The called user is busy.
“dialtone” / “dialpbx”
An internal dial tone is played and LCR is waiting for dialing information. “dialpbx” is used
for internal dial tone, “dialtone” if the external dial tone is overridden.
“dialing”
After receiving ‘dialing’ information, this tone is played.
“proceeding”
The dialed number is complete.
93
“ringing” / “ringpbx”
The called destination is ringing. “ringpbx” is used when an internal phone rings. “ringing” is
used if the external ring tone is overridden.
“error”
An unspecified error has occurred.
“release”
The call is disconnected and LCR waits for release of the call (hang-up of the phone).
“ring”
Sound of a ringing phone. This is used to indicate an incoming call during connected-mode.
“test”
A sine test tone with 1000 Hz.
“hold”
Hold music.
“redial”
This is an indication during power dialing. A short tone (should not be more than one second),
indicates, that the call failed after redialing. It is useful to indicate when the call failed and a
retry is done.
“cause_xx”
The call cannot be completed as dialed. The given ‘cause’ with the hex number “xx” is
played. If the file for the ‘cause’ doesn't exist, the error file is played. ISDN provides ‘cause’
1-127 which is "cause_01" - "cause_7f". Some ‘causes’ cannot be played; because they occur
when audio transfer is not possible.
“password”
When entering the password, this prompt is given.
“activated”
Function activated.
“deactivated”
Function deactivated.
“crypt_on”
Indicates that encryption is now enabled.
94
“crypt_off”
Indicates that encryption is now disabled or has failed.
“cause_80”
The given extension (MSN) is not registered. (The cause value “1” is actually sent to with the
disconnect message.)
“cause_81”
This indicates unauthorized call from extension. (The cause value “21” is actually sent to with
the disconnect message.)
“cause_82”
This indicates unauthorized external call from extension. (The cause value “21” is actually
sent to with the disconnect message.)
“cause_83”
This indicates unauthorized national call from extension. (The cause value “21” is actually
sent to with the disconnect message.)
“cause_84”
This indicates unauthorized international call from extension. (The cause value “21” is
actually sent to with the disconnect message.)
“cause_85”
This indicates unauthorized number or prefix. (The cause value “1” is actually sent to with the
disconnect message.)
“cause_86”
The dialed extension doesn't exist. (The cause value “1” is actually sent to with the disconnect
message.)
“cause_87”
This selected service is not authorized for the extension. (The cause value “21” is actually
sent to with the disconnect message.)
Additional tone sets can be downloaded from ‘http://www.linux-call-router.de/download’.
The answering machine (voice box) uses own samples sets. They are installed in
“/usr/local/pbx/vbox_english” and “/usr/local/pbx/vbox_german”. I will not describe the tones
here. They are self explaining. Note that some tones have short pauses, some have long
pauses, and some have no pause at the end.
95
9
Support
9.1 Mailing list
To be done…
9.2 Buying NT-Mode capable ISDN card
Check out what cards can be used. At http://www.linux-call-router.de you will find a list of
supported cards and brand names. Let me tell you that almost every budget card uses the
HFC-PCI controller that supports NT-mode.
9.3 Getting an NT1 / NTBA
Every phone company deals with ISDN NTs. Go to the service men of your local telephone
company and ask for the trash bin. Old NTs with expired warranty are thrown away. Service
men at telephone companies are very nice people. Almost every one might have an old NT for
you if you ask gently. They are broken, but 80-90% of them still have a working power
supply. Since the internal electronics is driven by the power from the underground wire, the
NT will not disturb the S/T interface. To be sure that the ISDN-coils works, take an volt meter
and check if you got about 40 volts between pin 3 and 4, as well as between 5 and 6. ISDNcoils almost never break.
Be carefull: NTs out of the trash might be wet. Also I know from our “million customers”,
that an NT1 can makenoise and even smoke.
Another place is ebay. Many sellers have old (still working) NTs. You may buy one there.
Always remember that most phone companies don’t sell them, so most offered NTs are still
owned by the phone company, even if they are not used anymore. NTs are cheap, so don’t
feel bad about buying one.
Of course an NT can be bought! Ask your local telephone company to sell one to you.
Pssst…. Or maybe just talk to you telephone’s company hotline and tell them “My NT1 makes clicks and noises, if I shake the U-line….” . Find out what happens then….
96
10
References & Relates Projects
10.1 Asterisk
Here is a description of the Asterisk project, as it is found at ‘http://www.asterisk.org’:
Asterisk is a complete PBX in software. It runs on Linux and provides all of the features you
would expect from a PBX and more. Asterisk does voice over IP in three protocols, and can
interoperate with almost all standards-based telephony equipment using comparatively
inexpensive hardware.
Asterisk provides Voicemail services with Directory, Call Conferencing, Interactive Voice
Response, Call Queuing. It has support for three-way calling, caller ID services, ADSI, SIP
and H.323 (as both client and gateway). Check the 'Features' section for a more complete list.
Asterisk needs no additional hardware for Voice over IP. For interconnection with digital and
analog telephony equipment, Asterisk supports a number of hardware devices, most notably
all of the hardware manufactured by Asterisk's sponsors, Digium. Digium has single and quad
span T1 and E1 interfaces for interconnection to PRI lines and channel banks. In addition, an
analog FXO card is available, and more analog interfaces are in the works.
Also supported are the Internet Line Jack and Internet Phone Jack products from Quicknet.
Asterisk supports a wide range of TDM protocols for the handling and transmission of voice
over traditional telephony interfaces. Asterisk supports US and European standard signaling
types used in standard business phone systems, allowing it to bridge between next generation
voice-data integrated networks and existing infrastructure. Asterisk not only supports
traditional phone equipment, it enhances them with additional capabilities.
Using the IAX Voice over IP protocol, Asterisk merges voice and data traffic seamlessly
across disparate networks. While using Packet Voice, it is possible to send data such as URL
information and images in-line with voice traffic, allowing advanced integration of
information.
97
Asterisk provides a central switching core, with four APIs for modular loading of telephony
applications, hardware interfaces, file format handling, and codecs. It allows for transparent
switching between all supported interfaces, allowing it to tie together a diverse mixture of
telephony systems into a single switching network.
Asterisk is primarily developed on GNU/Linux for x/86. It is known to compile and run on
GNU/Linux for PPC. Other platforms and standards based UNIX-like operating systems
should be reasonably easy to port for anyone with the time and requisite skill to do so.
Asterisk is available in the testing and unstable Debian archives, maintained thanks to Mark
Purcell.
A mailing list is available where developers and uses discuss bugs and problem.
10.2 OpenH323
Here is a description of OpenH323, as it is found at ‘http://www.openh323.org’:
„The OpenH323 project aims to create a full featured, interoperable, Open Source
implementation of the ITU H.323 teleconferencing protocol that can be used by personal
developers and commercial users without charge.
OpenH323 development is coordinated by an Australian company, Equivalence Pty Ltd, but
is open to any interested party. Commercial and private use of the OpenH323 code, including
use in commercial products and resale, is encouraged through use of the MPL (Mozilla Public
license).“
"The aim is to 'commoditize the protocol'. By giving the stack away, maybe we can stop everyone
obsessing over how to format the bits on the wire, and get them writing applications instead."
Craig Southeren,
co-founder of OpenH323
A mailing list is available where developers and uses discuss bugs and problem.
98
10.3 ISDN4Linux
The homepage of ISDN4Linux can be found at ‘http://www.isdn4linux.de’. This is the home
of the Kernel driver for ISDN support. Additionally the „isdn4k-utils“ can be downloaded
here, in order to configure and use ISDN4Linux. Note that ISDN4Linux is old, and LCR uses
the new mISDN driver. The mISDN driver now has it’s own page at ‘http://www.misdn.org/’.
This page has a FAQ and addresses to the mailing lists.
10.4 ITU
To be done…
10.5 Cologne Chip
To be done…
99
Appendix
Appendix A. Copyright + License
Copyright (C) 2003-2004
This program is
modify it under
as published by
of the License,
Andreas Eversberg ([email protected])
free software; you can redistribute it and/or
the terms of the GNU General Public License
the Free Software Foundation; either version 2
or (at your option) any later version.
This program is distributed in the hope that it will be useful,
but WITHOUT ANY WARRANTY; without even the implied warranty of
MERCHANTABILITY or FITNESS FOR A PARTICULAR PURPOSE. See the
GNU General Public License for more details.
You should have received a copy of the GNU General Public License
along with this program; if not, write to the Free Software
Foundation, Inc., 59 Temple Place - Suite 330, Boston, MA 02111-1307, USA.
Refer to http://www.gnu.org/licenses/gpl.html for complete license text.
100
Appendix B. Telephones
If someone like to do some portraits about telephones with benefits and problems, just mail.
TBD….
101