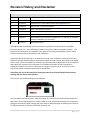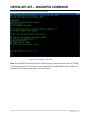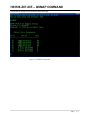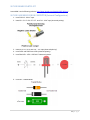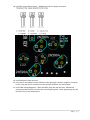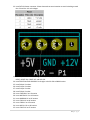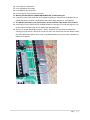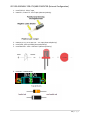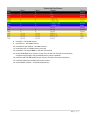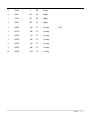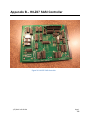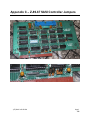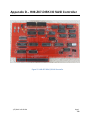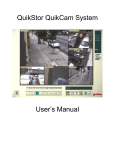
1
2011 H8/H89-Z67-IDE DISK CONTROLLER Norberto Collado [email protected] 8/15/2011 1|Page Revision History and Disclaimer Revision History Revision Date Comments 1.0 06/08/2010 Initial draft by Norberto Collado 1.1 10/31/2010 Added Kenneth L. Owen feedback (email: [email protected]) 1.2 12/05/2010 Added Kenneth L. Owen latest feedback 1.3 12/08/2010 Added 1.4 12/21/2010 Added minimum Cylinder size requirements. Updated assembly instructions. 1.5 01/03/2011 Added assembly instructions to support Internal/External Configurations 1.6 01/09/2011 Added H8 BUS key pin information. Highlighted Pin 1 on OSC picture. Added Ken feedback on NZCOM to get it operational. 1.7 08/15/2011 Added HDOS support Mark Garlanger feedback Although we have not obtained written permission to reproduce the information from Quikdata Computer Services, Inc., every effort will be made to ensure that credits are posted accurately. The purpose of this document is to “SUPPORT” those who still use these great Heathkit machines and to preserve the information of those who made a difference. Another purpose of this document is to allow the surviving classic computers to continue to function. Without the proper software support, the hardware cannot be seen in action, and a piece of our digital history is lost. I have not included any material in this document which I believe has current commercial value. Most of the material in this document is the intellectual property of other companies or individuals. However many of the companies are no longer in existence, and I do not have current contact information to obtained permission to include them. Please don't use any of this material for any purpose other than personal hobby/interest without checking with the owner of the material. Thank you for your understanding and consideration. Also I would like to thank Kenneth L. Owen for helping out in testing the Z67-IDE board to support the H89 system. A lot of FW changes were made in order to fix the issues that Ken found, plus some layout changes to improve the signal timing as well. Also thanks to Mark Garlanger for allowing me to borrow his Z-89-67 Controller to improve the Z67-IDE Controller FW. 2|Page Table of Contents Revision History and Disclaimer.................................................................................................................... 2 Table of Contents .......................................................................................................................................... 3 Table of Figures ............................................................................................................................................. 4 Introduction .................................................................................................................................................. 6 Z67-IDE DISK CONTROLLER ........................................................................................................................... 6 CONTROLLER CARD PORTS CONFIGURATION............................................................................................... 8 INSTALLING CP/M ON THE IDE, SATA HARD DRIVES OR CF CARDS .......................................................... 8 Configuration 1: .................................................................................................................................... 8 Configuration 2: .................................................................................................................................... 8 Configuration 3: .................................................................................................................................... 8 Configuration 4: .................................................................................................................................... 9 CP/M PARTITIONS LIMITATIONS ................................................................................................................... 9 MINIMUM CF STORAGE CAPACITY ............................................................................................................. 10 SASI/X UTILITY – “15” CP/M HARD DISK PARTITION SETUP FOR IDE DRIVE 0 ........................................ 11 SASI/X UTILITY – “15” CP/M HARD DISK PARTITION SETUP FOR IDE DRIVE 1 ........................................ 12 SASI/X UTILITY – CREATING “15” CP/M HARD DISK PARTITION FOR MASTER DRIVE ............................ 14 SASI/X UTILITY – CREATING “15” CP/M HARD DISK PARTITION FOR SLAVE DRIVE ................................ 16 H8/H89-Z67-IDE – BOOTING FROM IDE MASTER DRIVE ............................................................................ 23 H8/H89-Z67-IDE – BOOTING FROM IDE SLAVE DRIVE ................................................................................ 25 H8/H89-Z67-IDE – MAGNOLIA MICROSYSTEMS MONITOR EPROM (444-84B) USERS GUIDE ................... 26 MAGNOLIA 444-84C IDE MONITOR HEX LISTING ................................................................................... 26 H8/H89-Z67-IDE – QSCONFIG COMMAND ................................................................................................. 27 H8/H89-Z67-IDE – QSMAP COMMAND ...................................................................................................... 28 H8/H89-Z67-IDE – ASSIGNING LOGICAL DRIVE 1 ........................................................................................ 29 Z67-IDE DISK CONTROLLER ASSEMBLY ....................................................................................................... 30 Z67-IDE BOARD COMPONENTS ............................................................................................................... 30 Z67-IDE BOARD PARTS LIST ..................................................................................................................... 32 Z67-IDE ASSEMBLY FOR H8 COMPUTER (Internal Configuration) .......................................................... 32 WH-8-Z67-IDE JUMPER SETTING ................................................................................................................ 59 H8/H89-Z67-IDE FW PROGRAMMING STEPS .............................................................................................. 60 DS89C430 MTK2 APPLICATION ............................................................................................................... 60 PROGRAMMING THE DS89C430 MICROCONTROLLER ........................................................................... 60 3|Page CP/M VERSIONS SUPPORTED...................................................................................................................... 77 NZCOM UTILITY ISSUES ............................................................................................................................... 77 Quikdata Computer Services, Inc User Guide ............................................................................................. 78 Appendix A – IDE HD TTY LOGS................................................................................................................. 180 Appendix B – H8-Z67 SASI Controller........................................................................................................ 185 Appendix C – Z-89-67 SASI Controller Jumpers ........................................................................................ 186 Appendix D – H89-Z67-DISK I/O SASI Controller....................................................................................... 188 Appendix E – WH-8-Z37 Controller Jumpers ............................................................................................ 189 Appendix F – H8 Front Panel Keypad (PAM-37) ....................................................................................... 190 Table of Figures Figure 1: Master IDE Drive Hard Disk Partition Table ................................................................................. 11 Figure 2: Slave IDE Drive Hard Disk Partition Table .................................................................................... 13 Figure 3: Default Hard Disk Partition Table ................................................................................................ 14 Figure 4: Configuration for Master Drive (0)............................................................................................... 15 Figure 5: Configuration for Slave Drive (1) .................................................................................................. 16 Figure 6: QSASSIGN Command.................................................................................................................... 17 Figure 7: H8 CP/M boot from Master Drive (00:) ........................................................................................ 23 Figure 8: H89 CP/M boot, using the modified MMS boot ROM .................................................................. 24 Figure 9: H8 CP/M boot from Slave drive (01:) ........................................................................................... 25 Figure 10: QSCONFIG Command ................................................................................................................. 27 Figure 11: QSMAP Command ...................................................................................................................... 28 Figure 12: H8/H89 Z67-IDE Board ............................................................................................................... 30 Figure 13: H8/H89 Z67-IDE board components .......................................................................................... 31 Figure 14: Z67-IDE H8 Fully Assembled Board ............................................................................................ 47 Figure 15: Z67-IDE 10K Resistor Installation ............................................................................................... 48 Figure 16: Z67-IDE 220/330 resistors installation ....................................................................................... 49 Figure 17: Z67-IDE Angle the 40 pin right angle IDE connector to ensure that the CF card does not touch the board. .................................................................................................................................................... 50 Figure 18: Z67-IDE Proper 2N3904 transistor installation .......................................................................... 51 Figure 19: Z67-IDE H89/ATX Configuration................................................................................................. 52 Figure 20: Z67-IDE CF card adapter JP1 and JP2 Setup ............................................................................... 53 Figure 21: Z67-IDE CF card adapter power connections ............................................................................. 54 Figure 22: Z67-IDE board inside the H8 Chassis – Attached to the WH-8-37 Controller............................. 55 Figure 23: Z67-IDE board inside the H8 Chassis with tie-wrap to hold board in position ........................... 56 Figure 24: Z67-IDE board inside the ATX Enclosure with the HSFE controller ............................................. 57 Figure 25: Z67-IDE Controller with the HSFE to support Hard Sector Drives .............................................. 58 4|Page Figure 26: H8-Z67 SASI Controller ............................................................................................................. 185 Figure 27: H89-Z67 DISK I/O SASI Controller ............................................................................................. 188 5|Page Introduction This document provides an overview on the H8/H89 “Z67-IDE” controller board design by Norberto Collado for the Heathkit H8/H89 Computer. Z67-IDE DISK CONTROLLER The H8/H89 “Z67-IDE” DISK CONTROLLER supports the functionality of the QUIKSTOR Winchester sub-system from Quikdata Computer Services, Inc. Quikdata Computer Services, Inc. provided a compact 5" Winchester solution called the QUIKSTOR which included a drive, cabinet, power supply, fan, cables and the Xebec S1410 disk controller. Also Quikdata Computer Services provided high quality software drivers for CP/M and HDOS. The interface to the host system for the H8 was via the WH8-37, and for the H89 was via the Z-89-67 disk controller. This was the only board available to support any hard drive on the H8/H89. The WH-8-37 card contains both a 5" soft sector H37 compatible floppy controller interface, and a standard SASI interface bus. Since this card has both interfaces build in, and CP/M only supports two devices, the majority of the users will only have this card installed. The H8/H89 “Z67-IDE” DISK CONTROLLER presents itself to the QSBIOS (by Livingston Logic), as a XEBEC S-1410 Winchester disk controller, allowing use of any available IDE hard drives, CF cards (embedded IDE-CF adapter by Addonics), and SATA hard drives (IDE to SATA drive Motherboard adapter by StarTech.com). It supports “15” partitions of any size from 16 Kilobytes to 8 Megabytes, and any four partitions may be mounted at any time. QSBIOS supports booting from any of the “15” partitions, but only the first partition from Hard Drive 0 or 1 has been tested without any issues. Quikdata Computer Services detailed documentation is included at the end of this document for users who want to explore this capability. The H8/H89 “Z67-IDE” DISK CONTROLLER with QSBIOS is operable at any CPU speed up to 4 MHz, and it supports two bootable IDE hard drives via the H8 front panel or via the H89 Boot BIOS. The H8/H89 “Z67-IDE” only supports one Host Controller, so connecting two of these controllers to expand beyond 2 hard drives is not supported by the Z-89-67 and WH-8-37 card. According to Quikdata documentation, this configuration was never tested on the WH-8-37/Z-89-67 controller and was only tested on the H89 Magnolia Microsystems 77320 SASI/SERIAL card. The H8/H89 “Z67-IDE” SASI DISK CONTROLLER can be mounted inside the H8 computer cabinet when using CF cards or externally inside an ATX enclosure when using IDE or SATA hard drives. Also included are holes to mount the HSFE (Hard Sector Floppy Emulator by C. Elmquist) design to support external 1.44MB 3.5" floppies drives attached to the H17 or to the WH8-37 card. 6|Page The H8/H89 “Z67-IDE” DISK CONTROLLER is based on the DS89C430/450 compatible 8051 microcontroller operating at 20MHz. It has a serial port fixed at 9600 bps to download the firmware and for TTY logs for debugging issues. On power-on the controller searches for both IDE Master and Slave hard drives. If IDE’s drives are found it will turn-off the SASI error LED, indicating that it is ready to start communications with the WH-8-37/Z-89-67 card. If any failure is detected during the IDE scan, the controller will flash the SASI error LED along with the IDE “I/O” LED, and will stop all communications with the WH-8-37/Z-89-67 card. After the problem has been resolved, a hard reset via the reset switch or via an AC cycle will cause the controller to again search for the IDE hard drives. There is a watchdog timer that monitors the communication between the WH-8-37/Z-89-67 card and the H8/Z-89-67 -IDE controller, and will only reset the H8/H89-Z67-IDE controller when it detects that communication with the WH-8-37/Z-89-67 has been lost. In this situation it is recommended to reset the H8 computer via the front panel keyboard and on the H89 via the H89 keyboard, to boot again from the IDE hard drive. I tested the H8/H89-Z67-IDE Disk Controller continuously for over 2 months without any issues. The only time the watchdog timer kick-in was because the IDE power connection failed (bad connection) or due to a poor IDE cable connections. Refer to Appendix A to see examples of the TTY logs when using IDE, SATA and CF cards. Also I included TTY logs for a watchdog timeout and when an IDE scan failed. A nice feature of the H8/H89 “Z67-IDE” SASI TO IDE DISK CONTROLLER is that once it scans how many IDE’s drives are present, then it assigns the LUN id’s as follows; When both Master and Slave drives are present: IDE MASTER DRIVE LUN 0 IDE SLAVE DRIVE LUN 1 When only one drive is present (set as Master or Slave): N/A IDE SLAVE DRIVE LUN 0 AND LUN 1 IDE MASTER DRIVE LUN 0 AND LUN 1 N/A This feature allows the controller to re-assign the hard drives LUN’s when only one IDE drive is present. If a single drive is present (it doesn’t matter if it is a Master or Slave device), it will be bootable as a Master or Slave device. The user does not need to reconfigure the jumper on the IDE drive from Slave to Master or vice versa in order to boot the CP/M OS. 7|Page CONTROLLER CARD PORTS CONFIGURATION The following is a table summary of the controller ports configuration supported by the QSBIOS. Please refer to the PAM-37 ROM documentation for switch definition for proper port settings. Documentation can be obtained at the following website; http://www.lesbird.com/sebhc/index.html CONTROLLER CARD PORT WH-8-Z67 PORT H17 7CH (174Q) 78H (170Q) WH8-37 78H (170Q) 7CH (174Q) H47 78H (170Q) 7CH (174Q) INSTALLING CP/M ON THE IDE, SATA HARD DRIVES OR CF CARDS Now that you have a H8/H89-Z67-IDE DISK CONTROLLER, all you need is a WH8-37 or a Z-89-67 controller with the SASI bus and a bootable (QSBIOS system disk) floppy disk with all the files. Instructions on how to download the QS Utilities are at the following website; http://koyado.com/Heathkit/Z67-IDE.html Note: For those H8 users who do not have a WH8-37 controller, a SASI H8-Z67 controller interface is being design to work with this controller and Les’s Z80 card. Also in the works is the H89-Z67 SASI controller as well. Please send email to: [email protected] to check on the controller availability. I encourage using two IDE's, SATA's or CF's cards in order to use the second disk as a backup device. I will walk through the process on how to boot from either hard drive, but first I will like to discuss what IDE configurations have been tested. Configuration 1: - Two IDE hard drives. Any Manufacturer IDE hard drive passed the tests. Configuration 2: - Two CF cards using the Dual Embedded IDE-CF adapter from Addonics Technologies. - Cards tested: SanDisk Ultra II Type I, 8GB, 4GB, 512MB (Hitachi XXM2.3.0), and 2GB. Kingston 2GB Type I elite pro cards. 2G - TRANS CF TS2GCF133 - Card that failed: CF Type II card adapter for SDHC/MMC. This is a wireless adapter. Configuration 3: - Two SATA SSD hard drives using the IDE to SATA drive Motherboard adapter by StarTech.com. - SATA SSD hard drive tested: Dell 50GB Model: SAMSUNG MCCOE50G5MPQ-0VAD3 8|Page Configuration 4: - Two CF cards using the Dual Embedded IDE-CF adapter from ebay; Item# 300324891826 - Compact Flash Dual CF to 3.5 IDE HDD Converter Adapter CP/M PARTITIONS LIMITATIONS The partition utility under CP/M SASIX (by UltiMeth Corporation), divides the physical IDE disk into up to “15” user partitions or "logical drives". Besides these "logical drives", you can further have up to “15” USERS NUMBERS or User areas under CP/M (or up to 31 user areas with ZCPR) to further sub -divide the CP/M partitions. User Numbers are very helpful to use with the IDE drives, and it is highly recommended that you make use of them for maximum ease of use. Consult your CP/M manual for additional information on user numbers. CP/M has a limitation of a maximum number of directory entries which depends on the size of the partition, which allows up to 8MB per partition. Under CP/M, to view the maximum directory entries and all pertinent disk data, use the STATUS command as follows; 64K LLL/HEATH/ZENITH QUIKSTOR (C) CP/M 2.2.03 FOR H37 SASI DISKS WITH OPTION(S) IBE3 05/15/85 A>STAT DSK: A: Drive Characteristics 63936: 128 Byte Record Capacity 7992: Kilobyte Drive Capacity 512: 32 Byte Directory Entries 0: Checked Directory Entries 256: Records/ Extent 32: Records/ Block 64: Sectors/ Track 1: Reserved Tracks 9|Page MINIMUM CF STORAGE CAPACITY The Z67-IDE card supports 15 partitions and CP/M max storage capacity is 8MB per partition, then in order to support all 15 partition a minimum of 1825 cylinders is required. Based on empirical data the calculations are as follows; 1 cylinder = 8 tracks 1 track = 8KB of storage 1 cylinder will hold 64KB of storage (8 tracks x 8KB) 8MB of storage / 64KB = 125 cylinders 125 cylinders x 15 partitions = 1875 cylinders Minimum recommended CF card cylinder size is as follows; 1875 cylinders + 127 spare cylinders = 2002 cylinders For a 128MB CF card, the cylinder size available is 980 cylinders as shown below. This will only support 7 partitions of 8MB each. Model: SanDisk SDCFB-128 S/N: X0804 20060519120337 Rev: Rev 0.00 Cylinders: 980, Heads: 8, Sectors: 32 In summary the minimum CF card storage cylinder size is 1875 cylinders in order to support fifteen users with 8MB partitions each. I encourage getting the following CF card from Newegg; 20-208-338 FLASH 2G|TRANS CF TS2GCF133 10 | P a g e SASI/X UTILITY – “15” CP/M HARD DISK PARTITION SETUP FOR IDE DRIVE 0 Note: Using the WH8-37 or the Z-89-67 controller. Selecting 8 heads and a size of 125 cylinders per partition = 8000K Function: 0 (default) Port: 7CH (when using the WH8-37/ Z-89-67 controller) Drive: 0 (IDE Master Drive) Controller: 0 (default) Error-len: 2 (default) Heads: 8 Cylinders: 2002 Seek-type: 4 (default) Wcomp: 2002 Wreduc: 2002 Partition Name Cat WP Origin Size DRIVE0 1 2 0 2 125 DRIVE0 2 2 0 127 125 DRIVE0 3 2 0 252 125 DRIVE0 4 2 0 377 125 DRIVE0 5 2 0 502 125 DRIVE0 6 2 0 627 125 DRIVE0 7 2 0 752 125 DRIVE0 8 2 0 877 125 DRIVE0 9 2 0 1002 125 DRIVE0 10 2 0 1127 125 DRIVE0 11 2 0 1252 125 DRIVE0 12 2 0 1377 125 DRIVE0 13 2 0 1502 125 DRIVE0 14 2 0 1627 125 DRIVE0 15 2 0 1752 125 Figure 1: Master IDE Drive Hard Disk Partition Table 11 | P a g e SASI/X UTILITY – “15” CP/M HARD DISK PARTITION SETUP FOR IDE DRIVE 1 Note: Using the WH8-37 or the Z-89-67 controller. Selecting 8 heads and a size of 125 cylinders per partition = 8000K Function: 0 (default) Port: 7CH (when using the WH8-37/ Z-89-67 controller) Drive: 1 (IDE Slave Drive) Controller: 0 (default) Error-len: 2 (default) Heads: 8 Cylinders: 2002 Seek-type: 4 (default) Wcomp: 2002 Wreduc: 2002 Partition Name Cat WP Origin Size DRIVE1 1 2 0 2 125 DRIVE1 2 2 0 127 125 DRIVE1 3 2 0 252 125 DRIVE1 4 2 0 377 125 DRIVE1 5 2 0 502 125 DRIVE1 6 2 0 627 125 DRIVE1 7 2 0 752 125 DRIVE1 8 2 0 877 125 DRIVE1 9 2 0 1002 125 DRIVE1 10 2 0 1127 125 DRIVE1 11 2 0 1252 125 DRIVE1 12 2 0 1377 125 DRIVE1 13 2 0 1502 125 DRIVE1 14 2 0 1627 125 DRIVE1 15 2 0 1752 125 12 | P a g e Figure 2: Slave IDE Drive Hard Disk Partition Table In order to view the partition size, please use the QSASSIGN command as follows; A>QSASSIGN QSASSIGN CP/M Partition Assign Utility Version 1.1 08/12/84 Copyright (c) 1984 by Livingston Logic Current Partition Assignments Drive Unit/Name Size ------------------------------A: 00:DRIVE0 1 8000K B: Unassigned C: Unassigned D: Unassigned The Unit definition is as follows; 00: Controller 0 IDE Master Drive (0) 01: IDE Slave Drive (1) Controller 0 When executing the SASIX partition utility on a “NEW” IDE/CF/SATA drive, it will always display the default partition table. Please ignore the “Invalid boot track format” error message, because we need to write a “NEW” partition table into the boot track, by using the F1 key. Please refer to Quikdata Users Guide for command usage. 13 | P a g e Figure 3: Default Hard Disk Partition Table SASI/X UTILITY – CREATING “15” CP/M HARD DISK PARTITION FOR MASTER DRIVE In order to create the CP/M partitions, please use the SASIX command as follows; A>SASIX Please refer to Quikdata Users Guide for command usage. 14 | P a g e Figure 4: Configuration for Master Drive (0) 15 | P a g e SASI/X UTILITY – CREATING “15” CP/M HARD DISK PARTITION FOR SLAVE DRIVE Please refer to Quikdata Users Guide for command usage. Figure 5: Configuration for Slave Drive (1) 16 | P a g e Run the QSASSIGN command to view QUIKSTOR Partitions Assignments Please refer to Quikdata Users Guide for command usage. Figure 6: QSASSIGN Command Note: AS.COM is a shortcut for the QSASSIGN.COM command To view the Master IDE partitions, type the following command; A> QSASSIGN 00: To view the Slave IDE partitions, type the following command; A> QSASSIGN 01: Now let’s assign the partition to a logical drive letter to format them. A> QSASSIGN 00:DRIVE0 1 TO D: QSASSIGN CP/M Partition Assign Utility Version 1.1 08/12/84 Copyright (c) 1984 by Livingston Logic Current Partition Assignments 17 | P a g e Drive Unit/Name ------------------------------D: 00:DRIVE0 1 E: Unassigned F: Unassigned G: Unassigned Size 8000K A> QSASSIGN 01:DRIVE1 1 TO E: QSASSIGN CP/M Partition Assign Utility Version 1.1 08/12/84 Copyright (c) 1984 by Livingston Logic Current Partition Assignments Drive Unit/Name ------------------------------D: 00:DRIVE0 1 E: 01:DRIVE1 1 F: Unassigned G: Unassigned Size 8000K 8000K A> QSASSIGN 00:DRIVE0 2 TO F: QSASSIGN CP/M Partition Assign Utility Version 1.1 08/12/84 Copyright (c) 1984 by Livingston Logic Current Partition Assignments Drive Unit/Name ------------------------------D: 00:DRIVE0 1 E: 01:DRIVE1 1 F: 00:DRIVE0 2 G: Unassigned Size 8000K 8000K 8000K 18 | P a g e A> QSASSIGN 01:DRIVE1 2 TO G: QSASSIGN CP/M Partition Assign Utility Version 1.1 08/12/84 Copyright (c) 1984 by Livingston Logic Current Partition Assignments Drive Unit/Name ------------------------------D: 00:DRIVE0 1 E: 01:DRIVE1 1 F: 00:DRIVE0 2 G: 01:DRIVE1 2 Size 8000K 8000K 8000K 8000K A>QSFORMAT QSFORMAT CP/M Disk Formatting Utility Version 1.2 05/21/85 Copyright (c) 1984 by Livingston Logic Enter Command: FORMAT D: Place The Disk To Be Formatted In Drive D: Hit RETURN When READY, Or CTL-C To ABORT Formatting Operation Completed Successfully Do You Want A Media Check And Bad Block Lockout? <y/n> N Do You Have Another Diskette To FORMAT? <y/n> Y Enter Command: FORMAT E: Place The Disk To Be Formatted In Drive E: Hit RETURN When READY, Or CTL-C To ABORT Formatting Operation Completed Successfully Do You Want A Media Check And Bad Block Lockout? <y/n> N 19 | P a g e Do You Have Another Diskette To FORMAT? <y/n> Y Enter Command: FORMAT F: Place The Disk To Be Formatted In Drive F: Hit RETURN When READY, Or CTL-C To ABORT Formatting Operation Completed Successfully Do You Want A Media Check And Bad Block Lockout? <y/n> N Do You Have Another Diskette To FORMAT? <y/n> Y Enter Command: FORMAT G: Place The Disk To Be Formatted In Drive G: Hit RETURN When READY, Or CTL-C To ABORT Formatting Operation Completed Successfully Do You Want A Media Check And Bad Block Lockout? <y/n> N Do You Have Another Diskette To FORMAT? <y/n> N A>XDIR D: 0 File(s), occupying 0K of 7960K total capacity 512 directory entries and 7960K bytes remain on D: A>XDIR E: 0 File(s), occupying 0K of 7960K total capacity 512 directory entries and 7960K bytes remain on E: A>XDIR F: 0 File(s), occupying 0K of 7960K total capacity 512 directory entries and 7960K bytes remain on F: A>XDIR G: 0 File(s), occupying 0K of 7960K total capacity 512 directory entries and 7960K bytes remain on G: 20 | P a g e A>QSPUTSYS QSPUTSYS CP/M System Generation Utility Version 1.2 02/28/85 Copyright (c) 1984 by Livingston Logic Do You Wish to Copy BIOS.SYS? (Y/N): Y Enter Source Drive for BIOS.SYS: A Place BIOS.SYS SOURCE Disk in Drive A:. Type RETURN When Ready: Reading BIOS.SYS From Drive A: BIOS.SYS Successfully Read From Drive A: Enter DESTINATION Drive Name or RETURN to Quit: D Place DESTINATION Disk in Drive D: Type RETURN When Ready: Writing System To Drive D: System Successfully Written To Drive D: Writing BIOS.SYS To Drive D: BIOS.SYS Successfully Written To Drive D: Enter DESTINATION Drive Name or RETURN to Quit: E Place DESTINATION Disk in Drive E: Type RETURN When Ready: Writing System To Drive E: System Successfully Written To Drive E: Writing BIOS.SYS To Drive E: BIOS.SYS Successfully Written To Drive E: Enter DESTINATION Drive Name or RETURN to Quit: F Place DESTINATION Disk in Drive F: Type RETURN When Ready: 21 | P a g e Writing System To Drive F: System Successfully Written To Drive F: Writing BIOS.SYS To Drive F: BIOS.SYS Successfully Written To Drive F: Enter DESTINATION Drive Name or RETURN to Quit: G Place DESTINATION Disk in Drive G: Type RETURN When Ready: Writing System To Drive G: System Successfully Written To Drive G: Writing BIOS.SYS To Drive G: BIOS.SYS Successfully Written To Drive G: Enter DESTINATION Drive Name or RETURN to Quit: A>PIP D:=A:*.*[V] COPYING FBAD.COM ..etc. A>PIP E:=D:*.*[V] ; See note Note: Always use the [V] flag when copying files. This will cause all files, except system files to be transferred from the A: floppy to the D: Winchester partition, and verify them. 22 | P a g e H8/H89-Z67-IDE – BOOTING FROM IDE MASTER DRIVE If the WH-8-37 controller is the primary controller, then press the “1” key on the H8 front panel to boot from the Master IDE drive. If the WH-8-37 is the secondary controller, then press the “2” key on the H8 front panel to boot from the Master IDE drive. If the Z-89-67 controller is present on the H89 Computer, then by pressing the S and the 0 key will cause to boot from the Master drive (IDE: SS-0). Also by just typing “B” (for BOOT) at the H89 command prompt will also cause to boot from the Master IDE drive. Figure 7: H8 CP/M boot from Master Drive (00:) 23 | P a g e Figure 8: H89 CP/M boot, using the modified MMS boot ROM 24 | P a g e H8/H89-Z67-IDE – BOOTING FROM IDE SLAVE DRIVE If the WH-8-37 controller is the primary controller, then press the following key sequence on the H8 front panel to boot from the Slave drive; H8 Key H8 LED Display 0 dEu 2 H67 Por 1 H67 174 Uni 1 Uni H67 If the Z-89-67 controller is present on the H89 Computer, then by pressing the S and the 1 key will cause to boot from the Slave drive. (IDE: SS-1) Figure 9: H8 CP/M boot from Slave drive (01:) 25 | P a g e H8/H89-Z67-IDE – MAGNOLIA MICROSYSTEMS MONITOR EPROM (444-84B) USERS GUIDE Refer to Magnolia Users Guide on how to use the Monitor EPROM at the following website; http://www.lesbird.com/sebhc/documentation/hardware/Magnolia/Magnolia.zip Also attached is the hex file with IDE support modifications. Please burn a 2732A-20 200ns EPROM from Jameco.com (Part no. 40109). MAGNOLIA 444-84C IDE MONITOR HEX LISTING Latest version is at the following website; http://www.koyado.com/Heathkit/Z67-IDE_files/2732a_444_84c_ide_mms_v1.hex.zip 26 | P a g e H8/H89-Z67-IDE – QSCONFIG COMMAND Please refer to Quikdata Users Guide for command usage. Figure 10: QSCONFIG Command Note: If the QSCONFIG.COM utility fails to execute properly, please make sure that U7 (74LS74) IC is inserted properly. This 74LS74 IC is used specifically by the QSCONFIG utility to detect the presence of the “Quikstor Winchester” as shown above. 27 | P a g e H8/H89-Z67-IDE – QSMAP COMMAND Please refer to Quikdata Users Guide for command usage. Figure 11: QSMAP Command 28 | P a g e H8/H89-Z67-IDE – ASSIGNING LOGICAL DRIVE 1 Please refer to Quikdata Users Guide for command usage. Note: The AS command is a shortcut for QSASSIGN.COM utility. 29 | P a g e Z67-IDE DISK CONTROLLER ASSEMBLY Z67-IDE BOARD COMPONENTS Figure 12: H8/H89 Z67-IDE Board 30 | P a g e Figure 13: H8/H89 Z67-IDE board components 31 | P a g e Z67-IDE BOARD PARTS LIST Latest BOM is at the following website; http://www.koyado.com/Heathkit/Z67-IDE.html Z67-IDE ASSEMBLY FOR H8 COMPUTER (Internal Configuration) 1. Install C6-C12 - 0.01uF caps. 2. Install C1, C2, C3, C4, C5, C17, and C18 - 2.2uF caps (observed polarity). 3. Install C13, C14, C15, and C16 – 1uF caps (observed polarity). 4. Install LED1 and LED3 Green LEDs (observed polarity). 5. Install Red LED – LED2 – IDE FAULT (observed polarity). 6. Install D1 – 1N4004 diode. 32 | P a g e 7. 8. 9. 10. 11. 12. 13. 14. Install R2, R5, and R7 – 330 OHMS resistors. Install R1, R3 – 10K OHMS resistors Install R6, R8, R9, and R10 – 2K OHMS resistors. Install bare wire or 0 OHMS resistor across R4. Install bare wire or 0 OHMS resistor across R12. Install R15, and R16 – 1K resistors. Install R18 – 1K resistor ONLY on side two of the board. Install 10K BUSSED 10 pin resistor. Pin one is on the left side. If install incorrectly, data corruption might happen. See attached photo for proper installation. 15. Install the two 220/330 BUSSED 10 pin resistors. See photo for proper orientation. 16. Install R13 (220 ohms) and R14 (330 ohms) resistors. 17. Install 20 MHz oscillator – X1 (observed power pin) 33 | P a g e 34 | P a g e 35 | P a g e 18. Install Q1, Q2 and Q3 transistors – 2N3904. See photo for proper orientation. 19. Install SASI 40 pin male connector. 20. Insert the CF card adapter into the IDE 40 pin male right angle connector. Angle this connector in such a way that the CF card does not touch the Z67-IDE board. See picture below. 21. Install 7805 Voltage Regulators – REG1 and REG2, along with the heat-sinks. Add thermal compound under the heat-sink and under each voltage regulator. These regulators get hot, but they work fine at such temperatures. 36 | P a g e 22. Install ATX-P1 Power connector. Please observed correct orientation to avoid switching around the +5V and the +12 volt voltages. 23. Install 2 pin header at the following locations; PSEN, -EA, OFF-DD/ON-SD, PARITY ENABLED, ATX RESET, +RESET ON, +RESET OFF and ATX LED. 24. Install FRICTION LOCK HEADER 3 Pin Straight at the RS-232 to DB9K location. 25. Install 40 pin IC sockets 26. Install 14 pin IC sockets 27. Install 16 pin IC socket 28. Install 20 pin IC socket 29. Insert 74HCC04 IC at U1 location 30. Insert 82C55AC-2 IC at U2 location 31. Insert DS89C430 IC at U3 location 32. Insert 74LS14 IC at U4 location 33. Insert 74F04 IC at U5 location 34. Insert 8155H-2 IC at U6 location 35. Insert 74LS74 IC at U7 location 37 | P a g e 36. 37. 38. 39. 40. 41. Insert 7416 IC at U8 location Insert 74LS640 at U9 location Insert MAX232 at U10 location Insert P1 and P2 25 pin female connectors. Warning: DO NOT INSTALL A BARE WIRE ACROSS THE +5VEXT power pins. Connect CF power cable to the IDE to CF Adapter POWER pins. Some IDE to CF adapters do not include the power connector. The BOM lists the proper power adapter for such adapters. 42. TTL DEBUG 3 pin header is not used anymore. Do not install the 3 pin header at this location. 43. Install jumper across +RESET OFF to disabled H8 internal reset signal. The H8 reset signal is only used on Microcontrollers that do not support the Watchdog timer. 44. Glue a 2 pin jumper SHORT BLK (Jameco – 19141 – BOM Line 37) to protect the board from shorting the -18V and the +18V to the +8 Volt rail and to the Ground rail as shown below. Please use Gorilla Glue that expands 3 to 4 times; from RADIO SHACK. Please use proper orientation as shown on the picture. 38 | P a g e 39 | P a g e Z67-IDE ASSEMBLY FOR ATX/H89 COMPUTER (External Configuration) 1. Install C6-C12 - 0.01uF caps. 2. Install C1, C4 and C5 - 2.2uF caps (observed polarity). 3. Install C13, C14, C15, and C16 – 1uF caps (observed polarity). 4. Install LED1, LED3 and LED4 (observed polarity). 5. Install Red LED – LED2 – IDE FAULT (observed polarity). 6. Install D1 – 1N4004 diode. 40 | P a g e 7. 8. 9. 10. 11. 12. 13. Install R2, R5, R7, and R11 – 330 OHMS resistors. Install R17 - 2.2K OHMS resistor. Install R1, R3 – 10K OHMS resistors Install R6, R8, R9, and R10 – 2K OHMS resistors. Install bare wire or 0 OHMS resistor across R4. Install R18 – 1K resistor ONLY on side two of the board. Install 10K BUSSED 10 pin resistor. Pin one is on the left side. If install incorrectly, data corruption might happen. See attached photo for proper installation. 14. Install the two 220/330 BUSSED 10 pin resistors. See photo for proper orientation. 15. Install R13 (220 ohms) and R14 (330 ohms) resistors. 16. Install 20 MHz oscillator – X1 (observed power pin) 41 | P a g e 42 | P a g e 43 | P a g e 17. Install Q3 transistor – 2N3904. 18. Install SASI 40 pin male connector. 19. Insert the CF card adapter into the IDE 40 pin male right angle connector. Angle this connector in such a way that the CF card does not touch the Z67-IDE board. See picture below. 44 | P a g e 20. Install ATX-P1 Power connector (observed +5V location) 21. Install 2 pin header at the following locations; PSEN, -EA, OFF-DD/ON-SD, PARITY ENABLED, ATX RESET AND ATX LED. 22. Install 3 pin headers at the ATX POWER LED location. 23. Install FRICTION LOCK HEADER 3 Pin Straight at the RS-232 to DB9K location. 24. Install 40 pin IC sockets 25. Install 14 pin IC sockets 26. Install 16 pin IC socket 27. Install 20 pin IC socket 28. Insert 74HCC04 IC at U1 location 29. Insert 82C55AC-2 IC at U2 location 30. Insert DS89C430 IC at U3 location 31. Insert 74LS14 IC at U4 location 32. Insert 74F04 IC at U5 location 33. Insert 8155H-2 IC at U6 location 34. Insert 74LS74 IC at U7 location 45 | P a g e 35. 36. 37. 38. 39. Insert 7416 IC at U8 location Insert 74LS640 at U9 location Insert MAX232 at U10 location Install a bare wire across +5VEXT power pins. Due to the size of the board there are only two ATX holes to install the board inside the ATX enclosure. Please add rubber feet under the board to prevent the board from making contact with the ATX chassis when pressing on the board if power is being applied. Use the following part from jameco.com. Also Radio Shack sells such part. SJ-5027 SERIES BUMPON PROTECTIVE PRODUCTS Part no. 1644895 Manufacturer 3M COMPANY Manufacturer no. SJ-5027-BLACK 40. Connect CF power cable to the IDE to CF Adapter POWER pins. Some IDE to CF adapters do not include the power connector. The BOM lists the proper power adapter for such adapters. 41. TTL DEBUG 3 pin header is not used anymore. Do not install the 3 pin header at this location. 46 | P a g e Figure 14: Z67-IDE H8 Fully Assembled Board Dual Embedded IDE-CF adapter from Addonics Technologies. 47 | P a g e Figure 15: Z67-IDE 10K Resistor Installation 48 | P a g e Figure 16: Z67-IDE 220/330 resistors installation 49 | P a g e Figure 17: Z67-IDE Angle the 40 pin right angle IDE connector to ensure that the CF card does not touch the board. 50 | P a g e Figure 18: Z67-IDE Proper 2N3904 transistor installation 51 | P a g e Figure 19: Z67-IDE H89/ATX Configuration 52 | P a g e Figure 20: Z67-IDE CF card adapter JP1 and JP2 Setup eBay: Item# 300324891826 - Compact Flash Dual CF to 3.5 IDE HDD Converter Adapter 53 | P a g e Figure 21: Z67-IDE CF card adapter power connections 54 | P a g e Figure 22: Z67-IDE board inside the H8 Chassis – Attached to the WH-8-37 Controller 55 | P a g e Figure 23: Z67-IDE board inside the H8 Chassis with tie-wrap to hold board in position 56 | P a g e Figure 24: Z67-IDE board inside the ATX Enclosure with the HSFE controller 57 | P a g e Figure 25: Z67-IDE Controller with the HSFE to support Hard Sector Drives Note: The HSFE board can be obtained at the following website; http://www.lesbird.com/sebhc/storage/storage.html The HSFE was designed by Chris Elmquist specifically for the Heathkit computers. The HSFE is a device that "emulates" the hard sector index pulses so that you can use commonly available 3.5" soft sector media and 3.5" floppy drives. The hard sector controller card in your Heathkit computer thinks it is reading and writing to a hard sector floppy drive. 58 | P a g e WH-8-Z67-IDE JUMPER SETTING ATX LED – Two pin header for the IDE activity LED. Please connect to front panel drive activity LED. If using the ATX enclosure, then connect it to the HDD LED connector. ATX RESET – Two pin headers to reset the Z67-IDE controller. If using the ATX enclosure, then it connects to the RESET connector. Also this header is used to Program the FW on the DS89C430 Microcontroller. +RESET ON – Two pin header to enabled the reset signal from the H8 bus (-RESET) which resets the Microcontroller. Not required when using the Z67-IDE externally. +RESET OFF – Two pin header to disabled the reset signal from the H8 bus (-RESET) which resets the Microcontroller. Not required when using the Z67-IDE externally. ATX POWER LED – Three pin header for the ATX enclosure POWER LED. TTL DEBUG – Three pin header for the Microcontroller Serial Port. This is a TTL input/output and not to be confused with the RS-232 serial port. Not used anymore after installing the MAX232 circuitry. Only supported when the MAX232 IC is not present, and by using the USB to TTL converter by; http://www.ftdichip.com/Products/Cables/USBTTLSerial.htm. Pin 1 = Ground (Black cable), Pin 2 = Transmit (Yellow Cable) and Pin 3 = Receive (Orange cable). RS-232 TO DB9K – Three pin header for the Microcontroller Serial Port. This is an RS-232 serial port. This port is used to capture configuration data when the Z67-IDE is power-on for the first time. Also it is used to update the FW on the DS89C430 Microcontroller. http://www.aggsoft.com/rs232-pinout-cable/serial-port-db9.htm Pin 1 = Ground -> Connects to DB9 pin 5 (GND) Pin 2 = Transmit Data -> Connects to DB9 pin 2 (RXD) Pin 3 = Receive Data -> Connects to DB9 pin 3 (TXD) PSEN – Two pin header to Program the FW on the DS89C430 Microcontroller. -EA – Two pin header to Program the FW on the DS89C430 Microcontroller. AT89S52 – Resistor jumper (R19) to enable the 256 bytes of memory available within the 8155H-2 PPIO. This feature is not supported at this time. Send email to [email protected] for AT89S52 code support. DS89C430 – Resistor jumper (R4) to disable the 256 bytes of memory available within the 8155H-2 PPIO. Default supported configuration with the DS89C430 Microcontroller. PARITY ENABLED – Two pin header reserved to connect to the SCSI controllers. Default is OFF, due to the fact that Parity was not available on the XEBEC S-1410 Winchester disk controller. However the WH-8-37 and the Z-89-67 controller does supports Parity and the this jumper must be inserted in order to be able to boot HDOS. ON-SD/OFF-DD - Two pin header to enable or disable scanning the Slave IDE drive. When the jumper is not inserted, the FW will scan both IDE drives; Master and Slave. When the jumper is inserted, the FW will only scan the IDE Master Drive. The only time this jumper is used is when the user has only one IDE drive, which should be set as “Master”. SD = Single Drive Configuration (Single IDE drive configured ONLY as Master) 59 | P a g e DD = Double Drive Configuration (Two IDE drives configured as Master and Slave) H8/H89-Z67-IDE FW PROGRAMMING STEPS DS89C430 MTK2 APPLICATION The DS89C430 is an ultra-high-speed 8051-compatible microcontroller from Maxim Integrated Products. One unique feature of DS89C430 microcontroller is that it has a ROM loader mode which can be used to program the microcontroller itself. According to the user’s guide, UART0 (pin 10 and pin 11) is invoked in ROM loader mode when RST is set to High and both EA and PSEN are set to LOW simultaneously. After the ROM loader mode is enabled, serial communication can be handled between a PC’s RS-232 port and the microcontroller using a RS-232 transmitter/receiver such as MAX232. In order to program the DS89C430 Microcontroller the following software must be installed on your Windows XP computer. Please download the application from the following website; http://files.dalsemi.com/microcontroller/dev_tool_software/mtk/MTK2_Install-2.4.14.exe The latest version of the MTK2 application can be found at the following website; http://www.koyado.com/Heathkit/Z67-IDE.html PROGRAMMING THE DS89C430 MICROCONTROLLER After launching the MTK2 application, the Select Device Window is presented to the user. Please select the DS89C430 Microcontroller as shown below. 60 | P a g e Select the “Options” tab to Configured the Serial Port as shown below. 61 | P a g e 62 | P a g e Select COM1 with a baud rate of 9600 as shown below. Then click on the “OK” button. 63 | P a g e Open COM1 with a baud rate of 9600 as shown below. 64 | P a g e Power-off the Z67-IDE Controller board. Insert jumper on the –EA two pin header as shown below. 65 | P a g e 66 | P a g e Insert jumper on the PSEN two pin header as shown below. 67 | P a g e Connect the serial cable from the Z67-IDE controller to the PC COM 1 port as shown below; Pin 1 = Ground (Black Cable) -> Connects to DB9 pin 5 (GND) Pin 2 = Transmit Data (Red Cable) -> Connects to DB9 pin 2 (RXD) Pin 3 = Receive Data (Green cable) -> Connects to DB9 pin 3 (TXD) http://www.aggsoft.com/rs232-pinout-cable/serial-port-db9.htm 68 | P a g e Power-on the Z67-IDE board. Then insert a jumper on the two pin header labeled “ATX RESET” as shown below. 69 | P a g e Connect to loader as shown below. 70 | P a g e FW loader connects without any issues as shown below. If the FW loader fails to connect, then remove the “ATX RESET “jumper, then re-insert the “ATX RESET” jumper, and try again. Please verify that the – EA and the PSEN jumpers are properly installed. In this example I’m using COM8 at a baud rate of 9600 BPs. 71 | P a g e Select the “File” tab and then click on “Load Flash” as shown below. 72 | P a g e Select the latest Z67-IDE FW. As this writing the latest code is Z67-IDE10.hex which supports HDOS. The latest FW version can be found at the following website; http://www.koyado.com/Heathkit/Z67-IDE.html For this example, I will be using the Z67_DBG.hex FW version to demonstrate the concept. 73 | P a g e FW loads without any issues as shown below. 74 | P a g e Select the Target tab and select “Disconnect from Loader” as shown below. 75 | P a g e First remove the” –EA” and the” PSEN” jumpers. Then remove the “ATX RESET” jumper and the Z67-IDE FW should load as shown below. The IDE information will vary depending on the Vendor ID information. Please make sure that the information matches the manufacturer IDE drive label. Done! 76 | P a g e CP/M VERSIONS SUPPORTED Heathkit CP/M OS’s: CP/M 2.2.03 CP/M 2.2.04 NZCOM UTILITY ISSUES With CP/M 2.2.03 the NZCOM utility works fine. With CP/M 2.2.04 the NZCOM utility fails to work properly (NZCPM command hangs). Issue resolved. See Updates for further information. Please follow-up with Ken on this issue if using the NZCOM utility. His email is as follows; [email protected] Updates: ANY TIME the CP/M w/ZCPR2 system changes (bios modification, replacing CCP or BDOS or resizing of the system, NZCPM.COM needs to be deleted and MKZCM rerun. NZCPM.COM will be regenerated on the next boot of NZCOM. 77 | P a g e Quikdata Computer Services, Inc User Guide Heath/Zenith Computer Support H-SCOOP Newsletter Computer Control & Interfacing Word Processing He nry E . F a le (414) 452-4172 • Zenith Business Systems • Computer Consulting • Computer Programming • Sales, Service, Support April 9, 1985 TO ALL QUIKSTOR CUSTOMERS This is the latest version of our QUIKSTOR software. My apologies for the delay in shipping out the product. Many unexpected delays were encountered in the design and completion of this product. It's also hard to coordinate a project when three different people are working on it separated by great distances, when the software developers don't even own an H8. To make matters worse, Dean Gibson, the HDOS and PARTITION developer doesn't even have any H/Z computers anymore! The project started out as a minor revision of our first release software. We were going to just add multiple Winchester support and support for 2.2.04 CP/M. The project continued to snowball until it ended up being a complete re-write of all the code! Support of multiple Winchesters and multiple sizes Support of HDOS 2.0 2/4 MHz support CP/M 2.2.03 and 2.2.04 with and without ZCPR for all standard H/Z drives New improved partition and test utilities Up to four active CP/M partitions on line at one time Support for TLB ROMS without ANSI code Improved documentation MUCH MORE - worth the wait 78 | P a g e If receiving this as an update you will not be receiving a new binder or index tabs, just the new documentation and cover inserts for your binder. If you were a early purchaser of the first version and did not receive a binder, let us know and we'll send you one. If this is an update, please destroy all copies of the original software and documentation and return the original distribution disks to Quikdata. NOTE: You will have to unload your Winchester, install all the new software, and then load it up again! All data will be lost when running the new partition program! POSSIBLE PROBLEM FOR H8 USERS: All partition code and boot tables utilize automatic baud sensing and ANSI/HEATH ROM detection and setting as designed for the H19/H89 terminals. Heath/Zenith said the H29 was compatible with the H19 - THIS IS NOT TRUE!! The automatic baud sensing does not presently work with the H/Z29, and perhaps now with the H/Z49, H/Z22, etc. We are trying to solve this problem, but thus far have been unable to do this. If you have a non-H19 terminal, this software will not work for you. Return it at once for credit. If and when a version is released to compensate for the lies of Heath and Zenith in regard to the other terminals, you will be notified if you request that. Henry E. Fale President 79 | P a g e L. INTRODUCTION 1- Warranty & General Information 2- License Agreement 4- Purchase Registration 5- System Specifications 7- Features 8- Price Sheet/ Order Blank 9- Preview (YELLOW) 1 0 - General System Considerations 12- 2. 3. Quick Check - Booting Quikstor HARDWARE INSTALLATION 1- H89 Hardware Installation 2- Port Definitions and Configurations 3- Any SASI Interface Card 4- H/ Z Z67, Magnolia 77320 SASI Card 4- Final Check and Assembly 6- H8 Hardware Installation SET-UP & PARTITION: AN INTRODUCTION 1- Winchester Concepts 2- Partitions 2- Cluster Size 3- SASIXUxx - The Partition Program 5- SASIXUxx.COM – Partition Installation with Sample Screens 6- Program Entry Screen (BLUE) (RED) 80 | P a g e 8- 4. Main Screen 10- Format Option Screen 11- Boot Screen SOFTWARE INSTALLATION: HDOS SOFTWARE 1- Preparation of System Disk 2- DVDDKGEN - Optimize the winchester 3- SASIXUxx.ABS 4- DKSASXV3.DVD HDOS Driver 5. CP/M SOFTWARE INSTALLATION: QSBIOS 1- Product description, Introduction 2 - Installation - Making Floppy QSBIOS System Disk 4- Supplied Utility Programs 6- QSFORMAT; media FORMATting utility 8- QSPUTSYS; BIOS LOADER (sysgen) utility 9- QSASSIGN 11- QSMAP 12 - EX-14 batch processor 14- MINOR UTILITIES (GREEN) (ORANGE) CONFIG-80 XDIR FBAD 15- ZCPR 16 - ZCPR Command Searches 17 - Notes on 4MHz Operation 81 | P a g e 6. 17 - In Case of Difficulty 20 - Putting CP/M on Quikstor MULTIPLE WINCHESTERS (BLUE) 1- A. Multiple Quikstor Operation APPENDIX (RED) 1- Q & A on Quikstor Winchester Systems 4- Precautions 5- Problem Log 82 | P a g e QUIKSTOR OPERATORS MANUAL MODELS QS-15/33 83 | P a g e Copyright (c) 1983, 1984, 1985 Quikdata Computer Services, Inc. All Rights Reserved S/N QS-6601-2022 Rev 4 - 3/85 84 | P a g e Heath/Zenith Computer Support H-SCOOP Newsletter Computer Control & Interfacing Word Processing He nry E . F a le (414) 452-4172 • Zenith Business Systems • Computer Consulting • Computer Programming • Sales, Service, Support WARRANTY & GENERAL INFORMATION Dear Customer: Thank you for your purchase of our QUIKSTOR Winchester unit. We value your business and look forward to serving you again. We back all our products all the way, and we will not leave you stranded when looking for support or advice. Our reputation has grown mainly by word of mouth. We do very little advertising - we don't have to. We have a reputation to protect and live up to, and will continue to give you all needed support to get you going and to keep you going. Any questions, feel free to write or call during our normal business hours: 10 AM to 5 PM, M-Thu, 10 AM to 3PM Friday. Nights and Sundays as we are available. Upon receiving this order, inspect the shipping container and the contents. If any damage is noted to the contents, or any rough handling is noted with the package, report it at once to the carrier, and save the package and contents with all packing materials. This may be necessary for return and/or to settle insurance claims. To minimize shipping damage we try to ship the Quikstor units when possible, by Federal Express. Federal costs a little more, but they handle the packages much better than UPS. They also have a 2 day delivery. If you have a problem upon receipt, call us immediately and we'll let you know if you should contact the carrier, if you have not already done so. If problems develop later and you must return an item be sure to call us for advice and authorization. Then be sure it is properly packaged and send it insured for its value via Federal if possible, otherwise UPS or First Class mail. WARRANTY: All our hardware products carry a full 90 day parts and labor warranty minimum. The Rodime 33 Meg drive carries a full one year warranty. If you have a problem during this time period we will either replace the merchandise upon receipt of returned merchandise, or repair it and ship out within 48 hours. In most cases, emergency shipping can be scheduled for 24 hour receipt from your call. After the warranty we continue to offer full service, support and reasonable repair rates when needed. 85 | P a g e All software is covered by our one year warranty. Any defects in software will be updated free during the first year period from purchase. Additional future updates will be made available at nominal charges. Our software warranty offers additional coverage which may not be covered in our subcontractor’s warranties. We will be limited to coverage only for replacement or updated software. See License agreement for more information. No warranty, service or support will be offered without registration being properly filled out and returned. If you experience any problems or require technical assistance, please feel free to write or call (call especially if there are warranty related problems) our TECH HOT LINE a t (414) 452-6854. If you cannot get through or receive no answer, then call our normal line at (414) 452 -4172. 86 | P a g e Heath/Zenith Computer Support H-SCOOP Newsletter Computer Control & Interfacing Word Processing He nry E . F a le (414) 452-4172 • Zenith Business Systems • Computer Consulting • Computer Programming • Sales, Service, Support Serial No. QS-6601-2022 LICENSE AGREEMENT Thank you for selecting the QUIKSTOR QS-15/33, 15 or 33 megabyte hard disk unit for your H/Z H8/H89 computer. We believe that the QS-series is an outstanding product that will give you years of trouble free service. We appreciate your confidence in Quikdat a and our products. This sheet contains the QUIKSTOR limited use Software and Document license agreement and describes our warranty and update policy. When you have read this license agreement and have agreed to its terms, please complete and sign the license acknowledgement sheet and return at once. When this agreement is signed and returned to QUIKDATA, INC., this will be the agreement between us governing the use of the HDOS and CP/M software utilities and drivers for the 15 and 33 megabyte hard disk dr ive unit. Grant of License. QUIKDATA, INC., hereby grants to you and you accept a license to use the provided software, documentation and any supplied related materials delivered with this license agreement, for a single individual user only. A company or corporation, for instance, does not constitute a single user, as does not an individual with multiple systems (special software rates are available for these cases). You agree that you will not transfer or sub-license your rights under this agreement, and Quikdata, Inc., reserves the right to sell or give licenses to use the QUIKSTOR software and documentation to other persons and firms. Term. This license agreement is effective from the day you re ceive the software and documentation, and continues until you return to Quikdata, Inc., the original magnetic medium, all copies of the program, and all documentation and copies thereof. Quikdata's Rights. You acknowledge that the Materials are the sole and exclusive property of Quikdata Computer Services, Inc. By accepting this license, you do not become the owner of the Materials, but you do have the right to use the Materials as outlined and limited in th is agreement. You further agree not to transfer the Materials in any form to any person without the prior written consent of Quikdata, Inc. You will use your best efforts and take all 87 | P a g e responsible steps to protect the Materials for unauthorized reproduction , publication, disclosure or distribution. Your Agreement. You agree not to copy the Materials received from Quikdata, Inc., in whole or in part, except for backup or archive purposes. No more than five (5) copies may be in existence under this license agreement at any time. Limited Warranty. Quikdata, Inc. warrants the magnetic diskette on which the QUIKSTOR files are recorded, as well as related printed materials, to be free from defects in materials or faulty workmanship, in normal use and service for a period of ninety (90) days from the effective day of this agreement. If, during this period, a defect in the diskette should appear, the diskette may be returned to Quikdata, Inc., for replacement without charge, provided that you have returned your limited use acknowledgement sheet. 88 | P a g e EXCEPT FOR THE WARRANTY DESCRIBED IN THIS PARAGRAPH, THERE ARE NO WARRANTIES EXPRESSED OR IMPLIED, INCLUDING BUT NOT LIMITED TO IMPLIED WARRANTIES OF MERCHANTABILITY OR FITNESS FOR A PARTICULAR PURPOSE, AND ALL SUCH WARRANTIES ARE EXPRESSLY AND SPECIFICALLY DISCLAIMED. Liability. You agree that regardless of the form of any claim, Quikdata's liability for any damages to you or to any other parts shall not exceed the license fee paid for the materials. IN NO EVENT SHALL QUIKDATA, INC., BE RESPONSIBLE FOR ANY INDIRECT OR CONSEQUENTIAL DAMAGES OR LOST PROFITS, EVEN IF QUIKDATA HAS BEEN ADVISED OF THE POSSIBILITY OF SUCH DAMAGE. SOME STATES DO NOT ALLOW THE LIMITATION OR EXCLUSION OF LIABILITY FOE INCIDENTAL OR CONSEQUENTIAL DAMAGES, SO THE ABOVE LIMITATION OR EXCLUSION MAY NOT APPLY TO YOU. Updates. If the version of QUIKSTOR software that you have received contains any 'bugs' we will work on them and include repair any known 'bugs' in the next release of the software, which you will receive free of charge during the first year period. After this time, you will be notified of any software updates, which will be made available to you at a modest charge. All updates which are provided to you shall become part of the Materials and be governed by the terms of this license agreement. Governing Law. This License Agreement is to be governed by and interpreted in accordance with the laws of the State of Wisconsin. If any provision of this license agreement in any way contravenes the Laws of the State or jurisdiction in which this license agreement is to be performed, such provisions shall be deemed to be deleted and, if any term of this license agreement shall be declared by final adjudication to be legal or contra ry to public policy, it shall not affect the validity of any other term or provision of this license agreement. Attorney's Fees. Failure to uphold the terms of this agreement will result in Quikdata Computer Services, Inc., to take any and all legal action necessary. In addition, the software authors, Dean Gibson of UltiMeth Corporation, and Ray Livingston of Livingston Logic Labs, have claims on the software they produced and have full rights to purs ue any copyright violations with Quikdata, Inc., or individually. If any legal action is brought by either party to this license agreement against the other party regarding the subject matter of this license agreement, the prevailing party shall be entitle d to recover, in addition to any other relief, reasonable attorney's fees and expenses. Whole Agreement. This license agreement constitutes the entire software, document and Materials license agreement between you and Quikdata, Inc. 89 | P a g e Heath/Zenith Computer Support H-SCOOP Newsletter Computer Control & Interfacing Word Processing He nry E . F a le (414) 452-4172 • Zenith Business Systems • Computer Consulting • Computer Programming • Sales, Service, Support PURCHASE REGISTRATION Thank you for purchasing QUIKSTOR, the Winchester sub-system from Quikdata Computes Services, Inc. Please read the agreement enclosed and fill in the information on this sheet. Then return it to Quikdata at the above address. Product: QUIKSTOR Model QS-J Serial Number: QS1 Purchase Date: Purchased by: 5– 01 – 85_ Name Address City, State, Zip Phone ( ) - I have read and agree to abide by Quikdata's End User License Agreement. Signature: 90 | P a g e Heath/Zenith Computer Support H-SCOOP Newsletter Computer Control & Interfacing Word Processing He nry E . F a le (414) 452-4172 • Zenith Business Systems • Computer Consulting • Computer Programming • Sales, Service, Support QUIKSTOR 15-MEG SUBSYSTEM SPECIFICATIONS Our 15 megabyte (formatted) hard disk subsystems are adaptable to either the Heath/Zenith H8 or H89 computer systems via our QUIKSTOR subsystem. This same Winchester unit is also used for our internal QUIKSTOR system for the Z100 and Z150 series of computers. Please note that any Winchester hard drive unit is very delicate. The drive technology uses a "flying" head which never makes contact with the disk surface, but floats slightly above the surface. Never subject this unit to any type of shock or rough handling. When the unit is in operation, it must be level and on a hard rigid surface. It must not be subject to any vibrations, i.e. don't knock the unit while in operation, or you could damage the hard disk surface. Drive unit comes complete with cabinet, fan, switching power supply, cable, drive controller and all else needed for host computer interface - software and computer host adapter card extra. HARD DRIVE UNIT: Tandon TM503 5 1/4" rigid disk drive or equivalent ROTATION SPEED: 3600 RPM HEAD POSITIONING: Split band open loop rotary positioning system TRACK TO TRACK STEP TIME: 2 milliseconds plus 15 ms head settling time Heads positioned to track 000 at power up START/STOP: 15 seconds maximum to reach operating speed from power on 15 seconds for disk to stop rotating after power down Solenoid operated mechanical brake provided for rapid spindle deceleration and to preclude possibility of head or disk damage during shipping CAPACITY: 19.14 MB unformatted (15 MB formatted) per drive, 3.19 MB unformatted per surface, 10.4 KB per track PLATTERS: 3 ACTIVE DATA SURFACES: 6 TRACK DENSITY: 345 TPI CYLINDERS: 306 TRACKS: 1836 91 | P a g e READ/WRITE HEADS: 6 MEDIA: 3 lubricated 5 1/4" platters providing 6 recording surfaces SECTOR SIZE: 256/512 bytes - setup for 256 bytes RELIABILITY: 11000 power-on hours COMPONENT LIFE: 5 Years No Preventative maintenance required POWER REQUIREMENTS: 5V 1.2A max; 12V 5A motor start (12 seconds), 2A max running CONTROLLER INTERFACE CARD: S1410 Xebec controller for H8 and H89 HOST ADAPTER CARD: H89 - MMS 77320 SASI, H67 Heath card; H8 - H37/67 Heath card OPERATING CPU'S: H89 Z80, 2 or 4MHZ; H8 Z80 Required, 2 or 4 MHz OPERATING SYSTEMS SUPPORTED: Heath HDOS 2.0, Heath CP/M 2.2.03/2.2.0 PARTITIONS: User selectable and definable - supports both CP/M and HDOS simultaneously with up to fifteen user definable partitions (all of which can be bootable) WARRANTY 90 days minimum all parts and labor 92 | P a g e QUIKSTOR 33-MEG SUBSYSTEM SPECIFICATIONS Our 33 megabyte (formatted) hard disk subsystems are adaptable to either the Heath/Zenith H8 or H89 computer systems via our QUIKSTOR subsystem. This same drive is also used for our Quikstor internal systems for the Z100 and Z150 series of computers. . Please note that any Winchester hard drive unit is very delicate. The drive technology uses a "flying" head which never makes contact with the disk surface, but floats slightly above the surface. Never subject this unit to any type of shock or rough handling. When the unit is in operation, it must be level and on a hard rigid surface. It must not be subject to any vibrations, i.e. don't knock the unit while in operation, or you could damage the hard disk surface. Drive unit comes complete with cabinet, fan, switching power supply, cable, drive controller and all else needed for host computer interface - software and computer host adapter card extra. HARD DRIVE UNIT: Rodime 203E (206) 5 1/4" rigid disk drive or equivalent ROTATION SPEED: 3600 RPM HEAD POSITIONING: Steel band low inertia two phase stepper system TRACK TO TRACK STEP TIME: 8ms including head settling. 5us to 5ms pulse Heads positioned to track 000 at power up START/STOP: 10 seconds maximum to reach operating speed from power on 5 seconds for disk to stop rotating after power down Solenoid operated mechanical brake provided for rapid spindle deceleration and to preclude possibility of head or disk damage during shipping CAPACITY: 40 MB unformatted (33 MB formatted) per drive 6.66 MB unformatted per surface PLATTERS: 3 ACTIVE DATA SURFACES: 6 TRACK DENSITY: 600 TPI CYLINDERS: 640 TRACKS: 3840 READ/WRITE HEADS: 6 93 | P a g e MEDIA: 3 lubricated 5 1/4" platters providing 6 recording surfaces SECTOR SIZE: 256/512 bytes - setup for 256 bytes RELIABILITY: 11000 power-on hours COMPONENTLIFE: 5 Years No Preventative maintenance required POWER REQUIREMENTS: 5V 0.6A typ; 12V 4A motor start (12 seconds), 2A typ running CONTROLLER INTERFACE CARD: S1410 Xebec controller for H8/H89 systems HOST ADAPTER CARD: H89 - MMS 77320 SASI, H67 Heath card; H8 - H37/67 Heath card OPERATING CPU'S: H89 Z80, 2 or 4MHZ; H8 Z80 Required, 2 or 4 MHz OPERATING SYSTEMS SUPPORTED: Heath HDOS 2.0, Heath CP/M 2.2.03/2.2.04 PARTITIONS: User selectable and definable - supports both CP/M and HDOS simultaneously with up to fifteen user definable partitions (all of which can be bootable) HEAD LOCK SOLENOID upon power down WARRANTY one full year parts and labor 94 | P a g e Heath/Zenith Computer Support H-SCOOP Newsletter Computer Control & Interfacing Word Processing He nry E . F a le (414) 452-4172 • Zenith Business Systems • Computer Consulting • Computer Programming • Sales, Service, Support QUIKSTOR - 15 and 33 MEG WINNIE FEATURES Our QUIKSTOR subsystem supports the following features: QS15: Over 15 Megabyte total formatted storage, 19 megabyte unformatted QS33: 33 Megabyte total formatted storage, 4U megabyte unformatted Heath/Zenith H8 and H89 computers supported (Z100 and Z150 supported with different controllers and standard H/Z software) Version available to support Magnolia Microsystems CP/M and controller User defined partitions for both Heath CP/M and HDOS residing simultaneously Any standard Heath (or Magnolia drive, in the case of MMS CP/M systems) system drive can be used to load/unload and backup the hard disk Both Heath HDOS v2.0 and Heath CP/M v2.2.03/04 software drivers available for H8 and H89 Operates with any Z80 CPU and supports both 2 and 4 MHz (MMS version 2 MHz only) HDOS control port for both the H8 and H89 can be set at 270/274Q (in addition to the standard 170/174Q) to allow more system controllers Full support offered by Quikdata, Inc. Compact 5" Winchester unit operating with minimum power requirements and heat dissipation 95 | P a g e Subsystem includes drive, cabinet with switching power supply, fan, cable, Xebec S1410 controller Software drivers designed for very fast and efficient operation Interface to host system via several host adapter cards readily available: H8 - use Heath H37/67 card - can be addressed at 170 or 270 H89 - use Heath H67 card, or MMS 77320 SASI card which also has 3 serial ports Lowest cost/megabyte highly reliable 96 | P a g e Heath/Zenith Computer Support H-SCOOP Newsletter Computer Control & Interfacing Word Processing He nry E . F a le (414) 452-4172 • Zenith Business Systems • Computer Consulting • Computer Programming • Sales, Service, Support QUIKSTOR Price sheet/ Order blank Both the 15 and 33 meg QUIKSTOR master and slave units are usually shipping from stock, ready to plug in and go. Use this order blank (or copy) to indicate your desires. Check appropriate spaces. ABOUT YOUR SYSTEM COMPUTER SYSTEM: ( ) H8 ( ) H89 note: H8 requires Z80 CPU card OPERATING SYSTEMS USED: ( ) HDOS ( ) CP/M ( ) MMS CP/M CPU SPEED: ( ) 2 MHz ( ) 4 MHz CPU BOARD: ( ) Heath ( ) Trionyx ( ) DG ( ) TMSI ( ) Other SYSTEM CONTROLLER(S): ( ) H17 100K ( ) H17 400K ( ) H37 ( )H47 () MMS PRESENT ( ) H37/67 ( ) H67 () Other NOTE: The MTR90 monitor ROM or equivalent is required for operation in the H89; this includes the Magnolia 444-84B, the UltiMeth MTR4K, the Kres Monitor ROM, or the Heath MTR90. The Magnolia 444-84B ROM set is included if you purchase the MMS 77320 SASI interface card with three serial ports. For the H8 Heath's PAM37 ROM is required, which is supplied with the WH8-37 controller board (which supports the hard disk SASI interface, plus H37 floppy). ABOUT YOUR ORDER ( ) $1095 15 Meg Winchester hard disk subsystem - no software or host adapter ( ) $1795 33 Meg Winchester hard disk subsystem - no software or host adapter ( ) $ 895 15 Meg Winchester slave ( ) $1495 33 Meg Winchester slave ( ) $ 149 HDOS and CP/M Hard disk driver software with utilities (with purchase) ( ) $ 195 HDOS & CP/M software and documentation only ( ) $ 225 MMS 77320 SASI host adapter for H89 with 3 serial ports (includes monit or) 97 | P a g e ( ) $ 249 Heath H37/67 controller/ SASI host adapter for H8 (if available) ( ) $ 95 CP/M backup utility (optional) BACKREST ( ) $ 25 Shipping & Handling - required for all hard drive orders $ Total (note: add WI 5% sales tax for orders in the state of Wisconsin NOTE: Please supply FEDERAL serviceable address where possible. Add $25 extra for AIR MAIL shipping via US Postal Service. Whenever possible we will ship 2nd day Federal. NAME ADDRESS CITY PHONE( STATE ) ZIP HOURS: 98 | P a g e Time to read through this manual (at least once before you even do anything - please!) and follow the documentation step by step, you should have your system up and running in a relatively short time. This unit was designed from state of the art technology, and is made available complete with software and host adapter boards for both the H89 and H8 Heath/Zenith computers. Insta llation is simple and straight forward. This unit when installed per documentation will provide the end user with up to fifteen various user definable partitions, including both CP/M and HDOS on a Winchester drive; with up to four active CP/M partitions and 15 HDOS partitions supported. You are able to boot from any SYSGENed partition (either HDOS and/or CP/M), or access the hard drive partitions from any properly set up system floppy drive. NOTE: THE HARD DISK UNIT USES WINCHESTER TECHNOLOGY. THE 6 HEADS NEVER CONTACT THE SURFACE OF THE 3 PLATTERS, BUT ACTUALLY "FLY" ABOVE THE SURFACE. THE UNIT MUST BE RESTING ON A FIRM HARD SURFACE WHICH IS NOT SUBJECT TO VIBRATIONS OF ANY KIND! IF THE HARD DISK UNIT IS BUMPED OR JARRED DURING OPERATION CAUSING THE HEADS TO BANG OR "CRASH", FATAL RESULTS MAY OCCUR! Keep in mind that the disk is rotating at -3600 RPM. Even when not in use, the unit must not be subject to any undue shock or vibrations. Now that you have decided where to set the unit up, the next step is to connect the 40 pin SASI cable to the host adapter card (incorrectly called a controller card by some) in your computer. Installation of both hardware and software is covered in separat e sections of this manual. If you have any questions during installation or testing, feel free to call or write. We've made the process of installation as easy as possible, and have tried to detail every step. It is possible we may have missed something. If you find something confusing, please call it to our attention so we may investigate it and possibly update our future manual revisions. Please note that both this documentation and both HDOS and CP/M software are protected by copyright laws of the United States of America. A great deal of time and money has gone into the development of this package. You have purchased this package for a single end user system. With this in mind, please keep the software and documentation to you rself and do not allow either software or documentation to be copied or distributed in any form. Any violation of this will be considered willful infringements of U.S. copyright laws which will result in prosecution to the full extent of the law. We keep accurate records of all sales made - any software or documentation in the hands of unauthorized personnel will be able to be traced back to the original purchasers! Happy Storage! 99 | P a g e GENERAL SYSTEM CONSIDERATIONS This new release of software incorporates several new features not available in previous releases of the QUIKSTOR software. New features have been added to support other H19/89 TLB ROM's than the standard Heath TLB ROM, although they will not be supported by Quikdata. Previous releases of this software depended on the ANSI code in the H/Z19/89 TLB ROM. Other vendor's ROMs such as the UltraROM and the SUPER19 ROM would not work, since they stripped out the ANSI code. Both the PARTITION and BOOT tables in previous software releases used the ANSI code exclusively and would not work with modified TLB ROM's that stripped or modified the ANSI code. This new software supports both the ANSI and Heath codes and will automatically switch to the code that the terminal can handle by polling the terminal upon activation and sensing it's needs. This does not, however change our support. We still cannot and will not support auxiliary vendor's hardware and software. Other features in this version which many previous custome rs never knew about are the PARTITION and BOOT table code features. Upon booting to bring up the partition table, the software automatically senses terminal BAUD rate an adjusts itself to the baud automatically! In the previous software this worked with the H19 and H89's, but not with the H29's. This has now been fixed to also work on the H29 terminal (and I hope the H49 terminal - not tested yet). Since the primary purchaser and user of this product is the H89er, we are satisfied that it performs well on the H89 and went to special efforts to ensure its successful operations on the only 'other' terminal for the H8 as of software development - the H8 with H29. You have to stop somewhere, and this was the -where. Quikdata's QUIKSTOR hard disk system is sold to work on a standard Heath/Zenith H8 or H89 computer system. By standard, we mean the way it comes from the factory either assembled or in kit form. It may work on modified systems (e.g., it works with the Trionyx H8 boards and the D-G H8 boards, and D-G Super '89 boards), but all we are able to guarantee is that it will work on a standard Heath/Zenith H8 and/or H89, running standard H/Z software. We would like to be able to cover everything, but obviously from the man-hour support view, this is impossible. SOFTWARE CONFIGURATION Make certain that your 2.2.03 or 2.2.04 CP/M is properly configured for both upper and lower case characters. Also be certain that your 2.0 HDOS is configured for both upper and lower case characters. Additionally, under HDOS, your terminal width must be set to a value greater than 80. It's best to set this and leave it at 255. This can easily be accomplished from the HDOS prompt as follows: SET TT: WIDTH 255 If this is not done and you have the width set for 80 characters or less, the partition table will not come up properly, as some lines will attempt to 'wrap around', messing up the entire screen. 100 | P a g e 101 | P a g e CABLE ORIENTATION The ribbon cable used for the disk drives and our hard disk unit must be plugged into the controller card in the proper direction. For the H89 systems, pin 1 is always up. For the H8 pin 1 is always to the left. The pin 1 position of the drive cables can b e identified by a stripe along the ribbon cable edge and/or a dot or mark on the connector. 4MHZ OPERATION The Trionyx H8 CPU board supports both 2 and 4 MHz operation with a simple jumper change or via software. If you use the jumper method, you will boo t at either 2 or 4 MHz depending on the jumper. I placed a switch on my H8's left side which is connected to the Trionyx CPU speed selector whereby throwing the switch up will cause the H8 to boot at 2 MHz, and throwing the switch down will cause the H8 to boot at 4 MHz. The software provided with your hard disk system will operate and boot at both 2 and 4 MHz with the proper systems. For the H89, if you wish to BOOT at 4 MHz, you will require a monitor ROM such as the UltiMeth MTR-4K or the Kres equivalent. In addition, the CPU board must have been modified to support 4MHz operation. The easiest 4MHz modification to use is booting at 2MHz and switching to 4MHz after boot. This can easily be accomplished by the Kres 2/4 MHz H89 modification. Prese ntly, the only technically sound modification on the market as of this writing is the Kres 2/4 MHz board. 102 | P a g e QUICK CHECK All QUIKSTOR QS-15 Winchester units shipped have the CP/M QSBIOS files already PIPped onto the first CP/M partition. As the unit arrives it will already be partitioned either according to our 'standard' which is 10 megabytes on 2 CP/M partitions and 5 megabytes on 4 HDOS partitions, or according to what you indicated when placing your order. All QUIKSTOR QS-33 Winchester units shipped have the CP/M QSBIOS files already PIPped onto the first CP/M partition. As the unit arrives it will already be partitioned either according to our 'standard' which is 24 megabytes on 4 CP/M partitions and 9 megabytes on 8 HDOS partitions, or according to what you indicated when placing your order. ALL UNITS: The HDOS partitions (if desired) will all have been INITialized and the first HDOS partition SYSGENed, so you can install the host adapter card in your computer, plug in the system, configure your CPU DIP switch if necessary, install new monitor ROM if required, and BOOT directly off of HDOS. Like the CP/M partition, the first HDOS partition will have all distribution files already PIPped onto it. Before shipping, the entire Winchester surface is tested and any bad sectors are locked out if needed. If the bad sectors are excessive (more than 5) the unit is rejected and returned to the factory. The following shows the default partition assignment unless otherwise specified: PARTITION START SIZE SIZE # CYL CYL MEGS 100 5 Megs 5 Megs NAME 0 CP/M 0 1 1 CP/M 1 101 100 2 HDOS 0 201 25 1.2 Megs 3 HDOS 1 226 25 1.2 Megs 4 HDOS 2 251 25 1.2 Megs 5 HDOS 3 276 25 1.2 Megs QS15 103 | P a g e 0 CPM0 1 160 8 Megs 1 CPM1 161 160 8 Megs 2 CPM2 321 80 4 Megs 3 CPM3 401 80 4 Megs 4 HDOS0 481 25 1.2 Megs 5 HDOS1 506 25 1.2 Megs 6 HDOS2 531 25 1.2 Megs 7 HDOS3 556 25 1.2 Megs 8 HDOS4 581 25 1.2 Megs 9 HDOS5 606 25 1.2 Megs 10 HDOS6 631 25 1.2 Megs QS33 104 | P a g e BOOTING QUIKSTOR Whether you repartition the drive or not, BOOTing is the same. If your computer SASI host adapter card has its switch set for binary 15 (all l's), booting off the H67 device will cause the partition/boot table to be read in from the Winchester boot track and appear on the console. Simply enter the partition number you want to BOOT from, and hit the 'BLUE' key. The system will now boot the desired partition. If the computer SASI host adapter card has its switch for any valid boot partition number (again, in binary), that partition will automatically boot upon selection of the '67 device, bypassing the table. Remember, under HDOS you must type SPACES the first time through after SYSGENing the partition. Under CP/M you may also have to type SPACES if you are set for auto CONFIGUR the first time through and on an H8 computer. These conveniences have been provided to allow you to quickly bring up your unit and see it operate. You may at any time change any or all of the partitions, INIT or FORMAT, and SYSGEN or PUTSYS those you want BOOTable and you'll be all set to go. 105 | P a g e H8 HARDWARE INSTALLATION The only board presently available to support any hard disk on the H8 is the Heath WH8 -37 card. This card contains both a 5" soft sector H37 compatible floppy controller interface, and a standard SASI interface bus. Since this card has both interfaces built in, and CP/M only supports two devices, I assume the majority of users will only have this card installed - not the H47 or H17. To use this interface card with the H8 computer, a Z80 CPU must be used. Any Z80 should work - since I have used the Trionyx Z80 card and the Heath Z80 card, and my H8 systems are up and running with these cards, I am in the position to support the Heath and Trionyx Z80 CPU cards. We know from past experience that the DG system also works, and I have some information on this if needed. I will try to support all configurations, but since I do not have them, it may be difficult. The only difference should be because of different monitor ROMs used. With the WH837 card you also get the PAM-37 PAnel Monitor ROM set, which should be installed on the CPU you are using. Disregard the CPU board manufacturer’s instructions for CPU status switch settings and follow the PAM-37 documentation instead. NOTE: The Trionyx CPU card status switch SW3 is equivalent to the Heath CPU port status switch with a few exceptions. 1) Heath labels their switch 0 through 7, while Trionyx labels theirs 1 through 8. Thus Heath's 0 position correspond to Trionyx's 1 position, etc. Also Heath's switch ON (1) and OFF (0) is opposite Trionyx switch labeling. Therefore if the PAM-37 documentation says set the Heath CPU positions 0 and 1 to 00, you would set Trionyx 1 and 2 to 11, etc. Follow all preparation and installation instructions in the Heath instruction manual for the Z-67 interface, WH-8-37. For the H8 you must set all dip switch positions on the WH -8-37 card to the left position in order to get the BOOT partition table when BOOTing your system. Follow the included PAM-37 documentation for setting your switch settings for default ports and port assignments. Also, if a Z80 CPU other than the Heath Z80 CPU is being used, check that it is properly set up and configured according to the Z80 vendor's settings (except for the PAM -37 monitor ROM). If in doubt, call the vendor. Since the H8 is capable of universal boot without worrying about the switch settings on the CPU, you may want to use the universal boot routine to boot off the Winchester or any floppy drives you are using. Refer to the ROM manual on how to accomplish this. For those interested in having multiple controller cards in the H8 at one time (I have the H17, H37, H67 installed and can switch them in and out without having to ever take the H8 cover off), refer to my article in H-SCOOP issue #56 (November '84). It is possible, for example, to have one CP/M and/or HDOS partition set up for H37/winnie and another for H17/winnie. All sorts of neat tricks are then possible for file transfer and conversion. Please note that if the H17 card is being used, it must be set to port 7C (174Q), and the SASI (Z67) must be set to 78C (170Q). If you have the H37 card only, the Z67 interface (SW3 on the CPU card) must be set at "1 0" on the CPU switch (port 174Q, 7CH), and the Z37 interface portion must be set at "0 0" on the CPU switch (port 170Q, 78H), as outlined in the PAM -37 manual. You will also need to set the default BOOT device per PAM -37 instructions (SW3 on CPU 106 | P a g e board). Be sure to refer to your PAM-37 ROM documentation for switch definition and proper settings. Following is a table summary of the ports. CONTROLLER CARD PORT(S) REMAINING PORT FOR HARD DISK H17 7CH (174Q) 78H (170Q) WH8-37 '37 part 78H (170Q) 7CH (174Q) H47 78H (170Q) 7CH (174Q) Make a note of the controllers and port assignments as you will need these later. DISK CONTROLLER Z67 SASI CONTROLLER PORT WH8-37 PORT This is basically all you need to do, as the Quikstor unit plugs directly in, just as the Z67 would have done. Please proceed to software installation for your system. 107 | P a g e SET-UP & PARTITION: AN INTRODUCTION This package is the result of considerable effort expended in various phases for an easy to use Winchester hardware package for the H8 and H89 H/Z computer system, including hardware interfacing, software interfacing and documentation. The unit can be set up with the Heath HDOS operating system, the Heath CP/M operating system, or both. Both 2 and 4 MHz CPU's are supported by this package. The units are all tested, initialized, and set up at our labs for standard partitions (explained elsewhere) prior to shipping. Ports are set up and all else, so getting your hard disk up the first time should be painless. This will help in you getting up a 'standard' system in a short period of time, and with little effort. You can at any time change the partitions. WINCHESTERCONCEPTS Like a floppy, a Winchester disk consists of a round surface(s) coated with a magnetic oxide material which can be magnetized. While a floppy drive allows you to insert and remove the media, the Winchester is a sealed unit enclosed in a chamber within your hard drive cabinet. The Winchester’s storage capacity greatly exceeds that of any floppy disks. Most micro-computer operating systems were not designed to access a large amount of disk storage such as that found on a hard disk drive, directly and conveniently. Therefore, it is useful to conceptually divide a large amount of disk storage into smaller portions called 'partitions'. Such partitions are then treated by the operating system as separate disk drives. It is also useful to place more than one operating system and its -associated data on a single hard disk; this may be done by partitioning the hard disk and assigning different partitions to different operating systems. The SASIXUxx partition utility is used to partition a ST -506compatible hard disk which has been connected to the H/Z H8 or H89 computer via one of several available SASI interface boards, and a Xebec S1410 (or other compatible) hard disk controller. Thus, the software and data on a 'partition' can be accessed similarly to that stored on a floppy. For most practical purposes, a single Winchester partition can be thought of as a floppy disk as far as software storage is concerned. There are, however, a few differences between the Winchester and the floppy. The Winchester’s rigid platter cannot be removed like a floppy disk can. The Winchester is also much faster and more reliable than a floppy. Where the floppy disk is a fixed size (per diskette and controller), the Winchester’s partitions can be set by the user during the PARTitioning. 108 | P a g e You can BOOT off a floppy; you can also BOOT off of any SYSGENed partition on the Winchester. When your system is properly set up, you will be able to continue to BOOT off any of your floppy drives, and also any of the Winchester partitions - the default device specified by the CPU switch setting. You can assign your SASI HOST ADAPTER card switch setting to boot a 'default' partition, or by setting the switch setting to '15', the BOOT PARTITION menu will always come up (since there is no partition 15, only 0-14) and give you the choice of BOOT partition. 109 | P a g e PARTITIONS To expand on partitions a bit, the most common question asked is exactly what is a partition? Don't let the term scare you. To help clarify this, consider the floppy. When you work with floppy drives, you have 100K, 500K, or perhaps a maximum size of about 1 megabyte. With relatively small sizes such as this, you don't have to worry about size management of file s, or too many files to fit on the directory. When you have a Winchester of 15 megabytes or so, it's very large compared to a floppy. If you had only one 15 Meg Winchester partition you could not have more than one operating system. When your directory would become "full" you may still have 13 Megs left on the disk, but too bad - as far as the directory is concerned, the disk is full. Want to think about backing up one 15 Meg surface? The partition utility SASIXUxx (HDOS and CP/M versions included), divides the physical Winchester disk into up to 15 user partitions or "logical drives" for the selected ope rating system(s) you have chosen under SASIXUxx. The 15 Meg unit, for example, is already set up as follows unless another scheme was specified upon ordering the unit: PARTITION # OPERATING SYSTEM SIZE 0 CP/M-A: 4.8 Megs 1 CP/M-B: 4.8 Megs 2 HDOS-SYO: 1.2 Megs 3 HDOS-SY1: 1.2 Megs 4 HDOS-SY2: 1.2 Megs 5 HDOS-SY3: 1.2 Megs Besides these logical "drives", you can further have up to 15 USER NUMBERS or User areas under CP/M to further sub-divide the CP/M partitions. User Numbers are very useful to use with a Winchester, and it is highly recommended that you make use of them for maximum ease of use. Consult your CP/M manual for additional information on user numbers. 110 | P a g e CLUSTER SIZE Depending on the size of the partitions, there is always a 'minimum size' for a file to occupy, known as a cluster under HDOS. A cluster is a group of sectors which is the smallest size available for a file. This value varies depending on the 'disk' size. For instance, on a SS SD 100H disk, the cluster size would be two sectors. On a very large partition, the cluster size may be more than 20 sectors. This means, if you have a one sector file, although it will only occupy one physical sector on the hard drive, the directory logs it off as twenty sectors for instance. If you do, for instance, a CAT SY1:/ALL, you will see the actual disk sectors taken by each file. A CAT SY1:, for instance, will show you the same files, but with their actual file size. When HDOS is assigned to over 50 cylinders for a partition, the CAT command may show an incomplete space remaining. This is because only 4 digits were allocated when HDOS was designed and 5 digits are needed to show the free sectors on a large partition. It's no big deal, but you should be aware of this. Once there are a few files on the disk, the number will drop down below 9999, which will then accurately be displayed. When checking the size on an empty partition, you may see something like 8734, which is really 18734. Some examples of HDOS cluster sizes are listed: CYLINDER SIZE APPROX MEGABYTES CLUSTER SIZE 100 5 76 75 3¾ 58 50 2½ 38 25 1¼ 20 20 1 16 CP/M also has a limitation of a maximum number of directory entries which depends on the size of the partition, and allows up to 8 megabytes per partition (not true for CP/M+). The HDOS directory depends on the size selected, but at 1.2 Megabytes, the clus ter size is 20 sectors. Listed below are cluster sizes and directory sizes for CP/M: 0 to 255K = 1K minimum per file 256K to 2 megabytes = 2K minimum per file 2 megabytes to 8 megabytes = 4K minimum per file 0 to 255K partition = 64 maximum directory en tries 111 | P a g e 256K to 512K partition = 128 maximum directory entries 512K to 2 Megabyte partition = 256 maximum directory entries 2 Megabyte to 8 Megabyte partition = 512 maximum directory entries To calculate the partition size from the number of allocated cylin ders, note the following: 1 cylinder = 6 tracks. Each track holds 8K storage. Therefore, each cylinder will hold 48K storage. Thus, for the default CP/M partitions of 100 cylinders, you get 48000K storage, or 4.8 megabytes. For the default HDOS partitions of 25 cylinders, you get 1200K storage, or 1.2 megabytes. For a rough estimate, simply assume 20 cylinders is equal to one Megabyte. To calculate the sector/cluster size of your HDOS partitions, use the following formula: ((# CYLINDERS) * (# HEADS))/8 will give you a value. Take this value, round it up to the next highest even integer value, and that is the number of sectors taken by each cluster, which is the minimum sector size for any file. For example, this unit has 6 heads. The standard HDOS partiti ons are set up with a size of 25 cylinders. Therefore: ((25) * (6))/8 = 150/8 = 18.75, rounded up to 20 Thus as set up, your minimum sectors/HDOS cluster is 20. Under CP/M, you can easily see your pertinent data as to maximum directory entries and the entire pertinent disk STATUS by using the CP/M command: STAT DSK: 112 | P a g e THE PARTITION UTILITY: SASIXUxx AN INTRODUCTION The QUIKSTOR partitioning utility, SASIXUxx, where xx is 15 or 33 depending on the Winchester unit you have (named SASIXUxx.COM under CP/M and SASIXUxx.ABS under HDOS) was written by Dean Gibson of UltiMeth Corp. It is a very clever menu driven utility which makes partitioning very easy and user friendly. You are allowed to set up a maximum of 15 partitions and define these in any combinations you desire. Special features were taken into consideration in the programming efforts to make this a very powerful, yet easy to use utility. Some of the special features of SASIXUxx include: User friendly menu-driven utility. Set "standard" partitions for CP/M and HDOS to help the beginner get his system up without much hassle. User definable partitions supporting any combination of up to 15 partitions, each BOOTable if properly set up and SYSGENed. User settable options such as host adapter port. Ability to check controller and drive from the partition utility. Ability to assign an alternate boot track in the event track 0 becomes unreadable. Support of multiple Winchesters either by chaining off the Xebec controller or daisy chaining off the computer host adapter. This utility initializes the BOOT CODE on the hard disk, and writes out the partition table on the hard disk. This information is stored in a 'partition table', along with the hard disk master boot program on the boot track (normally track zero). The partition table contains 15 partition entries numbered 0 to 14; the partition number is only used during booting. Each partition table entry may be either unused (assigned a category code of zero), or used by a particular operating system. After the boot code is written out, you can access the hard disk from any other system drive both under HDOS and CP/M. Before you use any partition, that partition must be INITialized for HDOS or FORMATted for CP/M. If you further desire to BOOT off the hard disk, you must also SYSGEN the hard disk partitions you will want to boot from - more on this latter. Once the partitions are set up, BOOTing the hard disk will cause a menu to come up, allowing you to select which partition, 0 to 15, that you want to BOOT from (Note: the default switches must be set for 15 on the SASI host adapter card in order for the menu to come up and allow you to choose your partition upon each BOOT - refer to the hardware installation section for your system within this manual). When you BOOT the hard disk, the drive selects for a very short time and 113 | P a g e the BOOT CODE is read into the computer memory. After this point, the system "knows" where each partition is, and what operating system it c ontains. Please note, that whenever running the partition utility SASIXUxx, BE SURE YOU HAVE BACKED UP ANYTHING ON THE HARD DISK YOU MAY WANT TO HAVE SAVED, as repartitioning may cause you to loose any and all data on the hard disk unit. This is especially true if you are changing partition sizes. When the software is properly set up, you can use any system disk to load or backup the hard disk. Although the hard disk units are very reliable it is important to back up all data on the disk at frequent intervals so if something goes wrong you can load it back in. Ever lose the data on a 100K disk? Just think of losing 15 or 33 Megs! It's rare indeed, but could happen. We will now take a look at the partition program, SASIXtJxx.COM, which runs under CP/M, and explain how to use it. Please note the unit is already set up for the default conditions and partitions as shown on the screen examples. If you leave the drive as shipped to you, you will be all set up and ready to run with the default partitions and parameters. Partitions are already FORMATted under CP/M and INITialized under HDOS. If you want to use the 'standard' partitions and use the unit as shipped, you can skip the partition program and skip the INIT and FORMATting. Simply set up the system, SYSGEN, and go. 114 | P a g e SASIXUxx.COM PARTITION INSTALLATION including sample SCREENS Please note that this discussion applies to both the CP/M and HDOS versions of SASIXUxx. PARTITION PROGRAM SASIXUxx PROLOGUE As mentioned earlier, the partition program SASIXUxx is the program used to set up and test and partition the QUIKSTOR Winchester subsystem and slaves, if they are used. In order to run, the SASIXUxx program requires (in addition to the ST-506-compatible hard disk, XEBEC S1410compatible hard disk controller, and compatible SASI interface board) a CRT terminal for operation. The proper hard disk with Xebec controller is provided with your Quikstor subsystem. The CRT terminal must recognize either Heath or ANSI-standard "escape sequences". Suitable CRT terminals include the Heath/Zenith H/Z-19 and H/Z-29, and the DEC VT-100. The Heath H-9, the DEC VT-52, and the Lear-Siegler ADM-3A are NOT suitable. The SASIXUxx program is an interactive program which allows the user to specify how the hard disk is to be partitioned. For a bit of terminology, the information, or data, that the user must specify is grouped into fields; the fields are displayed on the CRT. -The user uses the cursor control keys on the keyboard to position the cursor at the field into which data is to be entered, and then keys the data directly into the field. Because not all of the fields can be displayed on the CRT at one time, the fields are grouped into amounts that can conveniently be displayed at a time; these groups are called screens. There are several screens that can be accessed with SASIXUxx. The following documentation describes, for each screen: 1. How that screen is accessed. 2. The format of that screen. 3. The fields on that screen. 4. How to access other screens. Information common to several screens is presented with the documentation for the first screen for which the information is applicable. 115 | P a g e FIRST SCREEN - SASIXUxx PROGRAM ENTRY When you first boot your system CP/M disk (to which you have copied from the CP/M QUIKSTOR installation disk the file SASIXUxx.COM to partition your drive), simple invoke the main partition screen by typing: SASIXUxx (where xx=15 or 33, depending on your drive) 116 | P a g e SCREEN #1 (Program entry screen): The first screen will come up and look similar to this: XEBEC Hard Disk Partitioning Utility - Copyright 1983 UltiMeth Corporation Function: 0 V$$$$.$$$$/$$[$:$$] Port.78 H Drive: 0 Controller: 0 Sense/ECC data: @@ @@@@@@ @@ .............................. --- Cursor/Editing Key Functions: Cursor keys: Unshifted: [Shifted:] Prev char(BS) [Prey field] Next char [Next field(CR)] Up same field [Prev line] Down same field [Next line(LF)] HOME First field [Last field] TAB Alternate begin/end field Editing keys: ERASE (to field end) IC Insert char DEL Clear prey char DC Delete char 5Check 6Read 7Exit Cntlr table prog This screen is initially accessed when the program SASIXUxx is started. If an exact copy of the above screen is not displayed on the CRT when SASIXUxx is started, then there may be a hardware problem (the CRT terminal may not be ANSI-escape-sequence-compatible). Note that, on the screen documentation for all screens: 1 . Dollar-signs ($) shown in the screen documentation will appear on the CRT screen as numbers 117 | P a g e and letters; such numbers and letters identify the particular version of the SASIXUxx program being used. 2. A string of periods (.) shown in the screen documentation will appear on the CRT screen either as blanks or as an informational, warning, or error message. 3. At-signs (@) shown in the screen documentation will appear on the CRT screen as various character values; such character values identify status information. 4. Underscores ( _ ) shown in the screen documentation are used to show user input fields, which appear on the CRT screen as various character values in "reverse video" (black characters on a bright background). All other text on the screen (except for numbers on the next -to-last line) appears as bright characters on a black background. Each user input field contains either a default value or the last valid value entered for that field. The contents of any user input field may be either accepted or modified. Various keys may be used to move the cursor between and within user input fields; these keys are listed on the lower right-hand side of the screen. Data may then be entered in any user input field. The keys that may be used to insert and delete characters within a user input field are also listed on the lower right-hand side of the screen. Let's describe the editing key functions. As shown on the right hand side of both screen displays, the keypad in the normal (unshifted) mode has the following effect on the screen: To move the cursor to the previous character hit the left arrow or BACK SPACE key ; right arrow moves you to the next character; up arrow moves you to the previous protected field, while the down arrow moves you to the next field, as will also the RETURN key. Hitting the HOME key will take you back to the first line of the screen. The DELete key will delete the character at the cursor and cause the cursor to back up one position. The IC key when depressed will allow you to insert a character at the cursor position in the field, while the DC key will allow you to delete a character at the cursor position in the field. This is as simple to use as any editor like PIE. Likewise, the keys when the SHIFT key is held down have different functions. The shifted left arrow will take position the cursor to the beginning of the field the cursor is i n, while the shifted right arrow key will take you to the end of that particular field. The shifted up arrow will take you to the previous line, while the shifted down arrow will take you to the next line (so will the LINE FEED key). The shifted HOME key will take you to the last line. This is a lot harder to write up and explain than it is to actually use it. Experiment and play around with the function keys to get a feel for what they do. 118 | P a g e After entering the last character in a user input field, or when a n attempt is made to move the cursor to another field, the value in the field in checked for validity (e.g., a numeric field must contain a numeric value). If the value is not valid, the cursor remains in the field along with the last valid value, an error message is displayed, and the terminal "bell" is sounded. The bell is also sounded if an attempt is made to move the cursor in a manner that is not allowed. The function keys labeled at the bottom of the screen may be used to perform the indicated function. The function key number is included with each label; the label is approximately positioned over the corresponding key on an H/Z-19 terminal. The Function: user input field occurs on all screens and has a special meaning. If a numeric value other than zero is entered in this field and the cursor is then moved to another field, the action taken is the same as if the function key with the same number as the field value had been keyed. This feature is useful for CRT terminals without function keys. The Sense/EOC data: status field appears on all screens. It contains information from the XEBEC controller regarding any error conditions detected during the last command sent to the controller. If an error occurs, the sense and ECC burst error length data is decoded and an appropriate error message is displayed. The Exit prog function key (#7) is provided on this screen and screen #2 (the main screen); it returns control to the operating system. The Port:, Drive: and Controller: user input fields must be correct for the installed SASI interface board, XEBEC controller, and hard disk drive before using either of the following function keys. For single Winchester systems both the drive and controller number will be zero (0). The Check cntlr function key (#5) is provided on all screens; it verifies proper operation of the XEBEC controller by sending diagnostic commands to the controller. The disk drive is not accessed. This should be chosen when first setting up the system to be certa in connections to Xebec from Host adapter and all operations are correct. It should also be chosen when the s ystem develops any problems to help isolate the trouble. The Read table function key (#6) is provided on this screen and screen #2 (the main screen); it attempts to read initialization data and the partition table from the boot track on the hard disk, and then accesses screen #2 (the main screen). 119 | P a g e SECOND SCREEN - MAIN SCREEN XEBEC Hard Disk Partitioning Utility - Copyright 1983 UltiMeth Corporation Function: V$$$$.$$$$/$$[$:$$] Port: @@H Drive: @ Controller: @ Sense/ECC data: @@ Error-len: _ Heads: @ Cylinders: @@@@ ............................... .............................. Name Cat WP Origin Size Category codes: 0 = Unused 1 = Spare 0 __________ _ _ ____ ____ 1 __________ _ _ ____ ____ 2 __________ _ _ ____ ____ 3 __________ _ _ ____ ____ 4 __________ _ _ ____ ____ 5 __________ _ _ ____ ____ <- Prev char(BS) [Prey field] 6 _ _ ____ ____ -> Next char [Next field(CR)] 7 _________ _ _ ____ ____ ^ Up same field [Prev line] 8 _________ _ _ ____ ____ v Down same field [Next line(LF)] 9 _________ _ _ ____ ____ HOME First field [Last field] 10 _________ _ _ ____ ____ TAB Alternate begin/end field 11 _ _ ____ ____ 12 _________ _ _ ____ ____ ERASE (to field end) 13 _________ _ _ ____ ____ DEL 14 _________ _ _ ____ ____ 2 = Heath CP/M MMS drive 4+ = HDOS WP codes: 0 = Read/Write 1 = Read only Cursor/Editing Key Functions: -Cursor keys: Unshifted: [Shifted:] Editing keys: 1Write 2Format 3Gen 4Check 5Check track options 3 = MMS CP/M cntlr IC Insert char Clear prey char DC Delete char 6Read 7Exit 8Start table prog over 120 | P a g e This screen is accessed by keying the Read table function key in the previous screen, screen #1 (the program entry screen), or by keying the "Exit screen" function key in screen #3 (the formatting screen). The Error-len: user input field may have a value from "1" to "11"; it is used by the controller when a data error is detected during a read. If the number of data bits in error is greater than the Error-len field value, then the controller will report the error as a hard error; otherwise, the controller will attempt to determine the proper value for the data bits in error. It is recommended that this field be set to a low value (such as "1", "2", or "3"). If hard errors are subsequently detected, increase the value slightly. If the field is set to a value much greater than 5, the likelihood greatly increases that the controller will incorrectly determine the proper value for any data bits detected in error. This procedure allows media failures of the disk drive to be detected early, while still allowing for the recovery of data from the disk drive. The user may partition the hard disk drive into up to 15 partitions. The information about partitions is stored in a partition table, along with the hard disk master boot program, on the boot track (normally track zero). The partition table contains 15 partition entries, numbered 0 to 14 the partition number is only used during booting. Each partition table entry may be either unused (assigned a category code of zero), or used by a particular operating system: Heath CP/M (assigned a category code of 2), Magnolia Microsystems CP/M (assigned a category code of 3, but not supported at this time), or HDOS (assigned a category code of 4, 5, 6, or 7). A partition table entry may also be used to reserve disk space for future use (assigned a category code of 1). The size and position of each partition on the hard disk are specified in cylinders. A cylinder consists of all of the tracks that can be read without moving, or seeking, the read/write heads in the disk unit. For example, on a hard disk drive with six heads, a cylinder contains six tracks. A track contains 32 256-byte sectors or 8K of data - thus, on a hard disk drive with six heads, a cylinder contains 48K of data. The Heads and Cylinders status fields display the number of heads and cylinders on the hard disk drive being used. These value s are fixed for each of the two systems presently being offered by Quikdata, and for this reason another Winchester cannot be used. Each partition may have: A 10-character name, assigned by the user; A category code, which specifies the operating system which will use the partition; A write-protect flag; An origin, or starting cylinder position for the partition; and a size of the partition in cylinders. The order of partition table entries is only significant within a category code. When each operating sy stem reads the partition table, it ignores all entries that do not have the category code that it is searching for. The Check drive function key (#4) is provided on all screens except screen #1 (the program entry screen). It quickly verifies that the disk drive is functioning by reading one sector on each track on the disk drive. The entire disk drive must be formatted for this function to complete without error. This should be performed when setting up a new system to check for proper drive and 121 | P a g e system operation. The Start over function key (#8) is provided on this screen and screen #3 (the formatting screen). It causes screen #1 (the program entry screen), to be displayed on the console again. The Gen MMS function key (#3) regenerates the Magnolia Microsystems partition table from the UltiMeth partition table and is advised not to be used since it is not supported at this time (although it may work). The Magnolia Microsystems partition table has a different format and is also recorded on the boot track. If Magnolia Microsystems CP/M is being used on the hard disk, this function should normally be activated before the boot track is written (function key #1), whenever: 1. The origin or size of any category 3 partition is changed; 2. The order or number of category 3 entries are changed; or 3. The value for the Error-len: field is changed. The Write track function key (#1) checks the partition table for correct values (no overlapping or out-of-bounds partition boundaries). If the values are valid, the partition table and the hard disk master boot program are written onto the boot track, and the program then returns control to the operating system. The Format options function key (#2) accesses screen #3 (the formatting screen). This screen will be discussed next. 122 | P a g e SCREEN THREE – FORMAT OPTIONS XEBEC Hard Disk Formatting Utility - Copyright 1983 UltiMeth Corporation Function: V$$$$.$$$$/$$[$:$$] Port•. @@H Drive: @ Controller: @ Error-len: @@ Heads: @ Sense/ECC data: @@ @@@@@@ @@ Cylinders: @@@@ .............................. Action code: _ 1 = Format cylinder zero 2 = Format alternate boot track: 4Check 5Check drive cntlr 6Perform Exit 8Start action screen over The alternate boot track: user input field specifies the alternate track to be used (only 1, 2, or 3 may be specified) when track zero is defective. This normally will not be used. It is a valuable safety feature built in. Normally a Winchester cannot have any defects on track 0, since that is always where the boot information and/or system information is stored. If this track goes bad, that's the end of the Winchester. With this scheme, if track 0 goes bad on one of our Winchesters, you can specify an alternate track to be used, resulting in not having to junk an otherwise good Winchester drive. The Perform action function key (#6) causes the action specified in the Action code: user input field to be performed. Please note the following condit ions for formatting the boot track: 123 | P a g e 1. Formatting cylinder zero should only be done when a new disk drive is installed, or when repeated problems are encountered in reading tracks 0, 1, 2, or 3. Formatting cylinder zero erases and resets any alternate boot track specified. The partition table must subsequently be rewritten. 2. Formatting an alternate boot track should only be done when repeated problems are encountered in reading track zero, and when reformatting cylinde r zero does not solve the problem. The partition table must subsequently be rewritten. The Exit screen function key (#7) accesses screen #2 (the main screen). 124 | P a g e BOOTING OFF QUIKSTOR - BOOT SCREEN When all the partitions have been set up and the Winchester has been properly INIT'd and SYSGEN'D under HDOS, or FORMATted and PUTSYS'd in CP/M, you are ready to boot off the QUIKSTOR. When you boot off the H8 or H89 and specify the H67 boot device and port, the BOOT SCREEN will appear on your terminal. XEBEC Hard Disk Partition Master Boot - Copyright 1983 UltiMeth Corporation V$$$$.$$$$/$$[$:$$] # Name 0 @@ @@ @ @@ @@ @ Cat WP Origin @ @ Size @ @ @@ @ @ @@ 1 @@@@@@@@@@ @ @ @@@@ @@@@ 2 @@@@@@@@@@ @ @ Sense/ECC data: @@ @@@@@@ @@ Port: @@H Drive: @ Controller: @ Heads: @ Cylinders: @@@@ @@@@@@@@ 3 @@@@@@@@@@ @ @ @@@@@@@@ 4 @@@@@@@@@@ @ @ @@@@ @@@@ 5 @@@@@@@@@@ @ @ @@@@@@@@ Error-len: @@ 6 @@@@@@@@@@ @ @ @@@@ @@@@ 7 @@@@@@@@@@ @ @ @@@@ @@@@ Category codes: 0 = Unused 8 @@@@@@@@@@ @ @ @@@@ @@@@ 1 = Spare 9 @@@@@@@@@@ @ @ @@@@ @@@@ 2 = Heath CP/M 10 @@@@@@@@@@ @ @ @@@@ @@@@ 3 = MMS CP/M 11 @@@@@@@@@@ @ @ @@@@ @@@@ 4+ = HDOS 12 @@@@@@@@@@ @ @ @@@@ @@@@ 13 @@@@@@@@@@ @ @ @@@@ @@@@ 14 @@@@@@@@@@ @ @ @@@@ @@@@ "M" provides this menu WP codes: 0 = Read/Write 1 = Read only Enter partition to boot: _ Function: _ ............................................................ ..................................................... 4Check 5Check 6Perform 8Return 125 | P a g e drive cntlr boot to ROM This screen is accessed when the hard disk master boot program is unable boot a valid boot partition, because: ' 1. A boot command string was keyed whose value was either an M, an m, or an invalid partition number, or a valid partition number whose category code is not appropriate for booting; or 2. The boot partition number was defaulted to the switches on the SASI interface board, which contained either 15, or a partition number whose category code is not appropriate for booting, which is the usual reason for it to appear. The Perform boot function key (#6) causes the partition specified in the partition to boot: user input field to be booted if that partition contains a bootable operating system. Lastly, the Return to ROM function key (#8) returns control to the computer's boot ROM. 126 | P a g e SOFTWARE INSTALLATION You have been supplied with all needed software to bring your hard disk up and use it, assuming you have the proper operating system you wish to use. You will have received the proper disk format for your distribution media, depending on the system you specified when placing your order. For any supplied format, all files will be present on all disk formats distributed. As development continues on this project, some of this software may be revised and updated. In that event, if you have filled in your software registration cards and returned them, you will receive a free software update along with the necessary documentation changes automatically within a years’ time for any major problems discovered. After that, you will have to pay a modest charge for any updates. HDOS SOFTWARE The HDOS software supplied consists of three files: DKSASXV3.DVD is the actual hard disk device driver; DVDDKGEN.ABS is the utility for specifying the maximum number of HDOS partitions; and SASIXUxx.ABS (where xx = 15 or 33) is an HDOS partition utility, which is identical to its CP/M counterpart - except it is used under HDOS. It is assumed that you are familiar with the HDOS utilities and commands required to carry out the needed steps. If not, please review and/or study your HDOS manual to become familiar at the very minimum with the following commands and utilities: INIT SYSGEN SET FLAGS PIP MOUNT DISMOUNT RENAME PREPARATION OF SYSTEM DISK There are several ways you can INIT and SYSGEN your QUIKSTOR Winchester drive under HDOS. The below procedure is one way. You may follow this, or use another method if you are confident you know what you are doing. If you are not familiar with HDOS its utilities and operations, you would be wise to follow this presented procedure. 127 | P a g e (1) INITialize an HDOS floppy disk with your present SY floppy driver. As this disk is being built, it should as much as possible contain the SYSTEM files from the original Heath distribution disks, and will be hereinafter be referred to as the SYSTEM FLOPPY DISK. Although various SYSCMD type modifications and other user installed patches and mods may work, they will not be supported. It is strongly suggested that the first time through you use the standard Heath files wherever possible to avoid any possible conflicts. After this, when everything is verified to be working properly and you are familiar with the unit setup, you may want to go back and do this again, only with your patched or SYSCMD files. (2) Run SYSGEN/MIN to create an operating system environment on your SYSTEM FLOPPY DISK. When running SYSGEN, be sure your destination disk is your SYSTEM FLOPPY DISK. Again, use the Heath distribution files (with exception of the SY: driver perhaps - if you are already using an UltiMeth driver - if not, you MUST use the Heath driver: no others will be supported). (3) Copy the following files (using PIP for multi-drive systems, or ONECOPY for single drive systems) onto the SYSTEM disk from the Heath distribution HDOS disks: INIT.ABS SYSGEN.ABS ERRORMSG.SYS SET.ABS FLAGS.ABS (4) Now BOOT your SYSTEM FLOPPY DISK in your SYO: floppy drive. Remember you will have to type spaces the first time through to get your system to recognize the console baud rate. Until this is done, the system will have appeared to have died. Subsequent BOOTs will not require this. If you do not want to use the DATE, and have the DATE presented at every b oot, you can SET HDOS NODATE. Be certain that the terminal width is set to 255 (SET TT: WIDTH 255). Refer to your HDOS 2.0 manual page 2.45 for more SET options. (5) The QUIKSTOR distribution disks you received have been distributed to you in the requested format for the drives and controller you are using on your system. Using either PIP (multiple drives) or ONECOPY (single drive system) copy the three files present (SASIXUxx.ABS, DVDDKGEN.ABS and DKSASXV3.DVD) from the QUIKSTOR distribution disk to your SYSTEMFLOPPY DISK. (6) If you do a CAT (or DIR) on your SYSTEM FLOPPY DISK, you will see the file DKSASXV3.DVD present. RENAME this file to DK.DVD, since a valid device driver must have only two letters before the delimiter (period): RENAME DK.DVD=DKSASXV3.DVD (7) RESET the computer, and again BOOT off your SYSTEM FLOPPY DISK. This time the DK.DVD hard 128 | P a g e disk device driver will be recognized as a legal driver - all ready to use. This disk now contains all the needed files to INIT and SYSGEN the hard disk , copy files to and from it, and access it. DVDDKGEN.ABS This is the utility used to set the maximum number of partitions (logical drives) you will be using with your DK.DVD device driver. You can have more partitions than that number, but you won't be able to access them. For instance, you might have 8 HDOS partitions, but never need to access more than two at a time. In this case you would DV DDKGEN DK1. You could then boot off the winnie and do a MOUNT SY1:, but could not mount SY2: thru SY7:. If you run DV DDKGEN (you don't have to, but will then use the full 2K memory for buffering as explained below, since it will default to the maximum number of 7, being eight partitions, or 'logical drives'), it should be run before you INITialize the Winchester with the new DK: driver. The maximum value is 7 (which is how it is set when shipped to you), since you are allowed up to eight devices per driver (example: DKO: to DK7:). Please keep in mind that each unit number requires an additional 256 bytes of RAM, since HDOS allocates 256 bytes of memory for each possible disk drive, up the maximum specified in the device driver. Thus, if you set this value to 3, you will use up an additional 1K RAM beside the space for the device driver itself. If you set this value to the maximum value of 7, you use up 2K RAM. Therefore, if you choose to use four HDOS partitions as provided on this default, you should set the number to 3. If you only want to end up with only a SYO: and SY1: (from DKO: and DK1:), you should specify 1. The way to use this utility is as follows: When you have the driver copied on your HDOS SYSTEM FLOPPYDISKrenamed DK.DVD, (explained in the next section under DKSASXV3.DVD), be sure you also have a copy of DVDDKGEN.ABS on the disk. Now simply type the maximum drive number as follows: DVDDKGEN DKn: where 'n' is the maximum number you will want. For our default having SYO: through SY3: (on hard disk, but starts out on your SYSTEM FLOPPY DISK as DKO: through DK3: ), the maximum number would be 3, thus DVDDKGEN DK3: will take care of it. INIT the HDOS partitions with the DK driver (INIT DKO:, INIT DK1:, etc.). That's all there's to it. 129 | P a g e Note to advanced users: Keep in mind that with HDOS you can have up to seven active device drivers, each which may reference a maximum of eight units. Suppose you want to have all HDOS on the Winchester and no CP/M. You could have, say, 10 HDOS partitions on the hard disk Set up two SY.DVD device drivers. Give one a category number of 4, for instance (see SASIXUxx documentation), and the other a category number of, say 5 for an example. Now you could run DVDDKGEN for each driver. This will give you two hard device drivers (assuming you have copied two copies and given them the two above names) each being able to access 5 "drives". (Please note that you must never access a particular partition with two different drivers as the results could be fatal. You cannot predict where you will end up and what will happen. You could very easily damage your files on a partition). Use some logic to do this, keeping in mind you are simply treating the partitions as 'individual floppy drives'. You could reduce your cylinder size to 20 for just under 1 Meg storage per drive, which would give you a sector cluster size of 16 instead of 20. I will not go into all the details here, I just wanted to show you that it can be done. SASIXUxx.ABS SASIXUxx.ABS is a partition program identical to its CP/M counterpart. It allows you to change any and all partitions and parameters under HDOS just like the SASIXUxx.COM did under CP/M. It does not matter whether you use the CP/M or HDOS version, both will achieve the same end result. Again, be certain you back up your unit before using any partiti oning utility, this one included. Now we'll look at the last of the HDOS software, the actual device driver DKSASXV3.DVD. 130 | P a g e HDOS SOFTWARE - DKSASXV3.DVD DRIVER The HDOS software driver you received on your HDOS distribution disk is called DKSASXV3.DVD. This is the driver for under HDOS which will allow you to access the Winchester drive from your system drive, or allow you to SYSGEN and BOOT the Winchester. The driver has been designed to be very fast, compact and efficient. This driver supports several features, including operation at both 2 and 4 MHz CPU speeds and switchable 2/4 MHz CPU's, and support for multiple Winchester systems. Your floppy driver, however, may not work at 4MHz. Thus if you want to use 4MHz for all, you'll have to either use a SPEED utility (Trionyx and Kres both provide these) or use DKH17.DVD for the H17/400K drives. The DKSASXV3 driver is used just like any other standard HDOS independent device driver. If you are not familiar with HDOS device drivers and their operation, please take the time now to read your HDOS manual and become familiar with them. It is assumed that you already have your hard disk unit partitioned. If not, you must partition it, or you will not be able to INITialize or SYSGEN it. The first thing you must do is copy the supplied DKSASXV3.DVD driver to your main system disk and rename it to DK.DVD. Depending on your drive configuration, this will have to be done using either PIP (for multiple drive systems) or ONECOPY (for a single drive system). Again, if you are not familiar with these utilities, please take the time now to read your HDOS manual and acquaint yourself with their operation. As an example, suppose you have mounted your QUIKSTOR HDOS distribution disk on SY1:. Using PIP do the following: PIP SYO:DK.DVD=SY1:DKSASXV3.DVD Now type BYE and re-BOOT the system to get the DK.DVD recognized. Use the SET command to check the settable options for the hard disk driver as follows: SET DK: HELP You will see the following options: Port nnnQ = 170Q/78H Port Address Drive n =0 Drive Number Controller n =0 Controller Number Category n =4 Partition Category In most cases you will not need to alter these settings. If you are using port 78H (170Q) for your floppy controller, you will have to change the hard disk controller port to 7CH (174Q). 131 | P a g e The drive number sets the driver for the Winchester drives on the same controller. If you only have one Winchester, this should be 0. If you have a second drive connected to the same Xebec controller, this should be set to a 1. The controller number sets the driver for the Winchester drives on a separate Xebec controller; i.e., daisy chained from the host adapter card. If you only have one Winchester, this will always be a 0. If you have two complete Winchesters with each having its own Xebec, then the second Xebec must be programmed for the second unit, and the driver must be set to a 1. The category partition code can be any value from 4 to 7 for supporting multiple driver copies to reference more than one DK: driver (with different names) for those wishing more than the maximum of 8 HDOS partitions. To change the port, for instance, the standard HDOS SET command is used as follows: SET DK: PORT 174Q That's all that is involved in the SET options. The drive number and controller number should be 0 for a single Winchester system, or set for the appropriate second Winchester if that is being accessed. The category number must be left as is for this system if one SY: HDOS driver is used for up to 7 HDOS partitions. Now that the driver is properly set up, you can INITialize the HDOS hard drive partitions. If you left the partitions as shipped or use the default partitions as supplied, you will have HDOS on four partitions, being 2, 3, 4 and 5, for logical HDOS partitions of SYO:, SY1:, SY2:, and SY3:. Keep in mind, that the driver on your SYSTEM FLOPPY DISK is DK.DVD, but will be SY.DVD: on the hard disk when SYSGENed, since SYSGEN switches the names when SYSGENING a drive (or partition) on the non-SY: disk. Thus, you must INITialize all these partitions as in this example: INIT DKO: As you INITialize the surfaces you should see the hard disk drive select light come on for a period of time during each INIT. If this does not occur, you have some problems and better check over all your work. In addition you can do a media check while in INIT - this is strongly advised. Once you have INITialized your partitions, you may now SYSGEN one or more of the partitions. Assuming you have all the needed files on your SYSTEM disk, type in the following: SYSGEN/MIN Respond DKO: (or DK1:, or DK2:, or DK3:) for destination drive and the default of SYO: for the source drive. While SYSGENing is taking place, you should see the hard drive select as the files are being copied over. When the SYSGEN takes place, the DK.DVD (previously DKSASXV3.DVD) hard driver is transferred and renamed as SY.DVD on the hard disk, while your present system SY.DVD driver is copied over and renamed DK.DVD. Thus your floppies will now be accessed from the hard drive as DK.DVD and the hard drive will be accessed as SY:. This is because the system BOOTable drive must always be SY:. Now all you must do is BOOT your hard disk system. The method of doing this will be different depending on how your default CPU switches are set and the monitor ROM you are using. Consult the monitor ROM documentation to find how to select and BOOT the Winchester drive. When you BOOT the Winchester drive the first time (BOOT for Z67 to bring up partition table, enter HDOS partition 132 | P a g e number you wish to BOOT, hit 'BLUE' key), the select light will come on for an instant and the system will appear to have died because it is waiting for "Type Spaces to determine Baud Rate". Simply hit the space bar several times, and the system should BOOT up. Once BOOTed, you can treat it as any HDOS drive - the only difference is it will be much faster and hold more data. You can now copy (PIP) files from your Winchester drive to your floppies and vice versa. Just reference your drives properly as SY: and DK:. That's all there is to installing and using the DKSASXV3.DVD HDOS devic e driver. 133 | P a g e QSBIOS (c) Copyright(c) 1983, 1984 by Livingston Logic (and Quikdata, Inc.) Post Office Box 5334 Pasadena, California 91107 PRODUCT DESCRIPTION QSBIOS(c) is a replacement for the standard Heath/Zenith CP/M 2.2X03 or 2.2.04 BIOS which provides complete support for the Xebec S-1410 Winchester disk controller, allowing use of any Seagate ST-506 compatible Winchester drive with up to 33 Megabytes capacity, as well as the standard H-17, H-37, and H-47 disk systems. Disk partitioning is totally user configurable, allowing up to 15 partitions of any size from 16 Kilobytes to 8 Megabytes. Any partition may be BOOTed, and any four partitions may be accessed at any given time. QSBIOS leaves completely intact all features of the standard Heath/Zenith CP/M 2.2.03 and 2.2.04 system and also adds several significant enhancements. COPYRIGHT NOTICE All Software and documentation provided with QSBIOS is protected under the copyright laws of the United States. It is provided for the exclusive use of the original purchaser on a single computer at a time. Copies of both printed and magnetic media may only be made for the purpose of backup or for normal operating procedures on a single computer. Copies MAY NOT be made for any other purpose or parties, whether for compensation or not, nor may they be made for use on multiple computers at one time. WARRANTY INFORMATION This product is provided strictly on an "as is" basis. No warranty is made or implied -a s to merchantability, or its fitness for any particular application. Any such determination is the sole responsibility of the purchaser. This warranty is in lieu of all other warranties either expressed or implied, including, but not limited to any implied warranty of merchantability or fitness for any particular application. LLL will, under no circumstances, be liable for any consequential or incidental damages resulting from the use, or inability to use, this or any other product. This product has been thoroughly tested and is known to be reliable. Support and questions should be 134 | P a g e directed to Quikdata, Inc. INTRODUCTION QSBIOS(c) is a replacement for the standard Heath/Zenith CP/M 2.2X03 and 2.2.04 BIOS -which provides complete support for the Xebec S-1410 Winchester disk controller provided in the QUIKSTOR package, allowing use of any Seagate ST-506 compatible Winchester drive with up to 33 Megabytes capacity, as well as the standard H-17, H-37, and H-47 disk systems. The Tandon TM503 15 Meg and the Rodime 203E 33 Meg drives are supported as individual units or as multiple units on the same Xebec controller or the same host adapter. Disk partitioning is totally user configurable, allowing up to 15 partitions of any size from 16 Kilobytes to 8 Megabytes. Any partition may be booted, and any four partitions may be accessed at any given time as the software is distributed. It may be modified for allowing a maximum of 8 partitions, but this will be the user's responsibility and will not be supported by Quikdata. QSBIOS leaves completely intact all features of the standard H/Z CP/M system and also adds several significant enhancements. The significant features of QSBIOS are: The BIOS.SYS file supplied with QSBIOS is operable at any CPU clock speed up to 4 MHz with 135 | P a g e NO PATCHING! Since CPU speed is measured and all pertinent timing constants calculated on each call to the disk drivers, QSBIOS will even work with the new software switchable 4 MHz conversions now being offered by several suppliers (Please read the disclaimer on 4 MHz operation at the end of this document.) • QSBIOS also contains the famous LLL "BIOS-80" drivers for the H-17 disk system, allowing use of any combination of 40 track and 80 track single and double sided 5" drives with the standard H-17 controller, providing up to 400K per disk while maintaining 100% compatibility with the standard 100K format. Also supports reading of 40 track disks in 80 track drives. • QSBIOSsupports ALL Heath/Zenith disk formats for the H-17, H-37, and H-47, including "extended" density for up to 1.25 megabytes per disk! • QSPUTSYS is supplied to allow generation of additional CP/M systems via a boot loader to any match any device. • In addition, the famous CP/MUG "ZCPR" Z-80 CCP is provided for those who want to have it automatically installed in the BIOS during the install procedure. The CP/M UG XDIR program is also supplied to provide detailed directory listings showing file sizes, and free space remaining on disk. • Includes QSFORMAT and QSASSIGN formatting and partition assignment utilities for formatting partitions, and assigning a partition to a particular logical drive. • Supports multiple Winchesters both via daisy chaining to the -computer host adapter or chaining off the master Xebec controller. Up to four active CP/M partitions at one time. • Expanded error messages have been provided for disk error messages and utility messages. 136 | P a g e 137 | P a g e INSTALLATION Installation of QSBIOS is very simple, but does require that the user be familiar with the CP/M operating system and its utilities, and that all directions be followed EXACTLY. Decide if you are using CP/M 2.2.03 o 2.2.04 and then note this in order that the proper files are used. ALL CP/M files MUST be copied from your CP/M 2.2.03 or 2.2.04 distribution disks, and you must not mix files between the two versions! ALL QSBIOS files MUST be copied from your QSBIOS distribution disk(s). In the following instructions, when a reference is made to a Heath/Zenith or C P/M utility, refer to the Heath documentation if you are not ABSOLUTELY CERTAIN how to operate that utility. Neither Livingston Logic nor Quikdata, Inc., CANNOT and WILL NOT take responsibility for educating the user in how to operate his computer or its operating system and related programs. The following instructions are VERY easy to follow provided you have READ and UNDERSTOOD all of the Heath documentation, and you follow these instructions TO THE LETTER. If you have trouble, refer to the section entitled "IN CASE OF DIFFICULTY" near the end of this document. NOTE - QSBIOS may, from time to time, be revised or updated. In order to avoid having to frequently update this printed documentation, any minor changes or revisions will be documented on the diskette itself. Before proceeding, check the diskette, for any files having the ".DOC" extension. If such a file is present (it may not be) please take a few minutes to read it before proceeding with the installation. 1 - Before proceeding, be sure that you have the following items o n hand: a - H/Z CP/M 2.2.03 or 2.2.04 Distribution Disks I, II & III b - QSBIOS Distribution Disks c - One blank diskette Also ensure the following conditions are met: a - Console BAUD rate MUST be 9600 b - CPU clock MUST be 2 MHz It is assumed that the ENTIRE QSBIOS setup procedure will be carried out using a 2 MHz CPU clock speed. If this is NOT the case, and you experience problems, DO NOT call for help. Due to the large number of 4 MHz conversions, BIOS modifications, and other possible incompatible hardware and software products on the market, Quikdata, Inc., and LLL CANNOT AND WILL NOT PROVIDE ASSISTANCE IN BRINGING UP A SYSTEM WHICH CONTAINS ANY NONHEATH HARDWARE OR SOFTWARE PRODUCTS. If you have ANY problems, refer to the "IN CASE OF DIFFICULTY" section near the end of this document. 138 | P a g e 2 - Create a bootable CP/M diskette by first FORMATting the blank diskette, and then SYSGEN it, being certain that the BIOS.SYS is on the disk. You can simply run MOVCPMxx from the distribution disk, and then run SYSGEN, hitting RETURN for the source drive name. If in doubt, refer to your Heath/Zenith CP/M documentation for details on the use of FORMAT, MOVCPM, and SYSGEN. This disk will be referred to as the "QSBIOS system disk" throughout the remainder of this document. You may want to put PIP.COM on the disk until all files are PIPped over. Then in the case of an H17 disk, ERAse PIP.COM to get enough space to carry out the procedures. Now BOOT off the QSBIOS SYSTEM DISK. NOTE: Depending on the version of CP/M you are using, you will use the appropriate INSTLxx.SUB file. Be sure to use the proper file or the end results will be disastrous! IF YOU ARE USING CP/M 2.2.03: INSTL03.SUB must be used in the following step. IF YOU ARE USING C P/M 2.2.04: INSTL04.SUB must be used in the following step. 3 - Using PIP, copy the following files from your QSBIOS Distribution Disk(s) onto your QSBIOS system disk: QSPUTSYS.GEN EX14.COM INSTLOx.SUB CFGPATCH.COM In addition, IF YOU WANT ZCPR to be automatically installed, include the following two files. If not, do not copy them on the disk. ZCPR.COD ZCPR.REL 4 - Using PIP, or any other suitable means, copy the following files from your Heath/Zenith CP/M Distribution Disk(s) onto your QSBIOS system disk: DDT.COM MOVCPM17.COM CONFIGUR.COM 5 - Run the installation program on your QSBIOS system disk by typing: EX14 INSTLOx, where x is 3 or 4, depending on your CP/M version. When completed, QSPUTSYS.GEN, MOVCPM17.COM, CFGPATCH.COM, CONFIGUR.COM, 139 | P a g e ZCPR.COD and ZCPR.REL should be gone. QSPUTSYS.COM and QSCONFIG.COM should be present. 6 - Depending on which floppy system you are using and which CP/M version you are using, copy the appropriate BIOS.SYS files from your QSBIOS Distribution Disk(s) onto your QSBIOS system disk and rename it to BIOS.SYS, deleting the existing BIOS.SYS file (may be STATed to SYS and will not show up in a DIR): BIOS0317.SYS - for Winchester and H-17 disks with CP/M 2.2.03 BIOS0337.SYS - for Winchester and H-37 disks with CP/M 2.2.03 BIOS0347.SYS - for Winchester and H-47 disks with CP/M 2.2.03 BIOS0417.SYS - for Winchester and H-17 disks with CP/M 2.2.04 BIOS0437.SYS - for Winchester and H-37 disks with CP/M 2.2.04 BIOS0447.SYS - for Winchester and H-47 disks with CP/M 2.2.04 For example, for the Z37 version using CP/M 2.2.04, you would PIP BIOS0437.SYS to your QSBIOS system disk. Then REN BIOS.SYS=BIOS0437.SYS) 7 - Run QSPUTSYS by typing QSPUTSYS A:BIOS.SYS. Do not use any specifiers and DO NOT COPY BIOS.SYS. Specify the A: drive (this should be the drive you booted from and the drive containing the QSBIOS SYSTEM DISK). When finished, the QSBIOS SYSTEM DISK in the A: drive should be a bootable QUIKSTOR CP/M disk. 8 - RESET the computer and reBOOT. The system should come up and sign on with the QSBIOS message. If it did, all is well, continue. If not, go back to step 1 and start over again. 9 - It is now time to configure QSBIOS to the h ardware in your system. Do this by running QSCONFIG, and make the proper changes to represent your system floppies, printers, terminals, etc. Remember, for the H8 computer you'll have to type 'spaces' for QSCONFIG to continue, just like with the H/Z CONFIGUR. 10- If you are using any double sided or 96 tpi drives on your H -17 controller, run CONFIG80 tc configure the BIOS for these drives. 11 - RESET the computer and re-boot. If all went well, the disk will boot and you can proceed with the utilities. Note that further bootable disks are generated by using QSFORMAT.COM followed by QSPUTSYS.COM; but you MUST be booted from a QUIKSTOR CP/M disk in order for QSPUTSYS and QSFORMAT to properly function! At this point you may want to PIP the needed files on your QSBIOS system disk. Files may include PIP.COM, STAT.COM, QSASSIGN.COM, QSFORMAT.COM, FBAD, etc. This completes the floppy disk SETUP portion of the QSBIOS installation procedure. Refer tc the section PUTTING GP/M[ ON QUIKSTOR located at the end of this section, for instructions of getting CP/M files and the SYSTEM on the Winchester. But first, please read the following sections on the utility programs before attempting this, since you must be familiar with the QSASSIGN, QSPUTSYS, QSFORMAT, and SASIXUxx utilities before you can successfully place the BIOS on the Winchester. 140 | P a g e 141 | P a g e QSBIOS UTILITY PROGRAMS A BRIEF DESCRIPTION OF INCLUDED PROGRAMS The following utilities are provided with QSBIOS: QSASSIGN - A partition assignment utility for assigning Winchester partitions to logical CP/M drives. QSCONFIG - A modified Heath/Zenith CONFIGUR for QSBIOS. QSFORMAT - A disk formatting utility for the H-17 system which allows formatting of double sided and 8U track disks. CONFIG80 - A system configuration utility similar to CONFIGUR and used to specify the type of drive at each physical drive address in the H -17 system. The following items are public domain software provided through the CP/MUG library. These programs are provided at no charge, and no support will be provided, except the documentation given below. XDIR.COM - An enhanced directory listing program which displays an alphabetically sorted directory listing complete with the size of each file. FBAD.COM - A non-destructive disk test and bad block lockout utility. ZCPR - A CCP (console command processor) replacement which provides several new and useful system commands, as well as enhancing the user interface. EX14.COM - Replacement for DR SUBMIT and XSUB batch processors, which provide many useful enhancements. 142 | P a g e BIOS UTILITIES AND NOTES QSBIOS.ASM NOTES QSBIOSV2.ASM can be assembled for either CP/M 2.2.03 OR CP/M 2.2.04. Which way it assembles is determined by two equates near the beginning of the file. If BIOS03 is set to TRUE, then a 2.2.03 BIOS is assembled. If BIOSO4 is set to TRUE, then a 2.2.04 BIOS is assembled. One or the other MUST be set to TRUE, BUT NOT BOTH. The Heath MAKEBIOS utility can be used to reassemble the BIOS. DISK ERROR MESSAGES When "Extended Disk Error Messages" are enabled via QSCONFIG, any disk errors will generate a message specifying the drive, track, and sector where the error occurred, and also a status message, as defined by Heath documentation. In addition, several recovery paths are now available. The four options for recovery are: Abort - will cause an immediate warm boot. Retry - will retry the operation. If the drive door was left open, or some such thing, this will allow complete recovery. Defer - will simply return an error to the calling program, and let it handle the error. In most cases, this will result in a BDOS Bad Sector Error message. Ignore - will simply ignore the error and continue as though nothing happened. This is useful for copying all good sectors from a file with one or more bad sectors. This option SHOULD NOT be used when an error occurs during loading a COM file. 143 | P a g e QSFORMAT Disk Formatting Utility QSFORMAT allows formatting disks to all of the "native" formats understood by Quikstor CP/M. The following formats are supported by FORMAT: 5" Hard Sector Formats (H-17 Only): 48 or 96 TPI Single or Double Sided Single Density 5" Soft Sector Formats: 48 or 96 TPI Single or Double Sided Single, Double, Extended and Z-100 Double Density 8" Formats: 48 TPI Only Single or Double Sided Single, Double, and Extended Density Winchester Formats: LLL/Ultimeth Format for Quikstor Partitions ' The command syntax for QSFORMAT is: 144 | P a g e QSFORMAT (?) (drive:) (TO format descriptor) where drive: is the CP/M drive in which to format the disk, and the format descriptor is any valid combination of the following: SS - Single Sided DS - Double Sided SD - Single Density DD - Double Density ED - Extended Density Z-100 - Z-100 Double Density If no format descriptors are given, the format will default to SS, SD. QSFORMAT will print an error message if the DS descriptor is given for a drive which has been configured as single sided. The Z-100 descriptor applies only to 5" drives connected to the H-37 controller. No format descriptors are allowed for the Quikstor. The only descriptors allowed for H-17 disks are SS, DS, and SD. If multiple descriptors are given, they must be separated by either spaces or comas. If no parameters are given on the FORMAT command line, FORMAT will print it's sign -on, and then prompt for the drive and format. For example, typing: QSFORMAT?(cr) Will cause a display of the proper command syntax for FORMAT QSFORMAT(cr) Will cause FORMAT to print the sign on followed by the prompt: Enter Command: FORMAT The format descriptor should now be entered exactly as it would be if entered on the command line. QSFORMAT B:(cr) Will cause the disk in drive B: to be formatted to SS,SD 145 | P a g e QSFORMAT C: TO DS,Z-100 Will cause the 5" disk in drive C: to to be formatted as double sided Z-100 double density. During formatting of disks on the H-17 and H-37, the current cylinder being formatted (which is the same as the track on a floppy) will be displayed on the console. When formatting has been completed, a message will be displayed stating that the formatting was successful, and the user will be asked whether he wishes a media check performed. The media check will read ALL sectors from the disk, and any unreadable sectors will be assigned to the file "BADBLOCK.BAD" so that they will not be accessed by 'other programs. This allows continued use of disks which contain one or more bad sectors. However, any disks which show more than a few bad sectors should be discarded. FORMAT Error Messages ** ERROR ** Diskette Is Write Protected This indicates that the diskette you are attempting to format is write protected. In the case of 5" disks, REMOVE the write protect tab. In the case of 8" disks, INSTALL a write enable tab. If this error occurs on formatting a Winchester partition, it will be necessary to exit the format program, and run the partitioning program to change the write protect status for the partition before it can be formatted. ** ERROR ** Diskette Is Incorrect Type Or Improperly Inserted This indicates that an invalid disk was placed in the drive, or it was not correctly inserted in the drive. This error will occur if a hard sector disk is inserted in a soft sector drive, or vice versa, or if the disk is inserted upside down, backwards, etc. This can also indicate that the drive speed is out of spec. ** ERROR ** Unable To Select This Disk The BIOS will not return the parameters for the requested disk. This usually indicates that the requested drive simply does not exist. Check your entry and try again. ** ERROR ** Unable To Read Directory Sectors This indicates that an unreadable sector was found in the disk directory during the media test. Diskettes with bad directory sectors cannot be used, as directory sectors cannot be locked out. The proper action is to try again to format and media test the diskette. If the error re-occurs, the diskette should be discarded. If this error occurs frequently, the drives probably require servicing. ** ERROR ** Illegal Drive Specification The specified drive is not a valid CP/M drive (A: - P:), or 146 | P a g e exceeds the number of physical drives supported by your BIOS. If the drive is a Winchester partition, it indicates that no partition has been assigned to the drive. Enter a different drive specification. ** ERROR ** Unable To Write Disk Label After formatting the diskette, an attempt was made to write the disk label, but the attempt failed. The proper action is to try again to format and media test the diskette. If. the error re-occurs, the diskette should be discarded. If this error occurs frequently, the drives probably require servicing. ** ERROR ** Unable To Find Track 0 This indicates that the driver was unable to get a track 00 signal from the requested drive. This indicates either a hardware fault, or possibly the disk is not properly inserted. Remove and replace the diskette, and try again. ** ERROR ** Drive Not Ready This indicates that the driver was unable to get a ready status from the drive. This most likely indicates the wrong type of disk was inserted in the drive, or the disk was inserted incorrectly, or the drive door was not, closed completely. Remove and replace the diskette, and try again. ** ERROR ** Partition Is Too Large To Format An attempt was made to format a Winchester partition which is larger than the CP/M maximum of 8 Megabytes. It will be necessary to exit the format program, and run the partitioning program to reduce the partition size to 8 Mbytes or less before it can be formatted. ** ERROR** Unable To Read Partition Table This indicates that the driver was unable to read the partition table from the Winchester drive. This probably indicates a hardware failure. **ERROR** Unable To Write Partition Directory After formatting the specified partition, an attempt was made to clear the partition directory to CP/M format, but the attempt failed. This probably indicates a hardware failure. ** ERROR ** Unable To Format This Diskette This indicates that the driver was unable to format the specified disk, and was unable to determine the exact problem. Check to be sure that a valid drive was specified, and that the disk was properly inserted in the drive, the door closed, and that the disk is not write protected. 147 | P a g e QSPUTSYS CP/M System Generation Utility QSPUTSYS provides the combined facilities of the standard CP/M MOVCPM and SYSGEN, and supports all available disk devices under Quikstor CP/M. QSPUTSYS can be used to generate a new maximum sized (64K in most cases) CP/M system, complete with the proper boot loader and BIOS loader, and place the system onto the system tracks of any floppy disk or Winchester partition. The BIOS.SYS file may also be copied if desired. The proper command syntax for QSPUTSYS is: QSPUTSYS (?) (sourcedrive:)(biosfile) (TO destinationdrive:) where sourcedrive: is the drive from which the BIOS.SYS file is to be taken, biosfile is the name of the BIOS.SYS file, if other than BIOS.SYS, and destinationdrive: is the drive to which the new system is to be written. When either a source drive or biosfile is given, the BIOS file will be taken from the specified drive. If neither the source drive nor biosfile is given then A:BIOS.SYS will be used. If a destination drive is specified, then the new system and BIOS will be written to that drive. For example: QSPUTSYS ? (cr) Will cause a display of the proper command format. QSPUTSYS(cr ) Will cause QSPUTSYS to enter the command mode, and you will be prompted for the BIOS file, and destination drive to which the system and BIOS are to be written. QSPUTSYS B:(cr) Will cause the file B:BIOS.SYS to be loaded, and you will then be prompted for the destination drive to which the system and BIOS are to be written. QSPUTSYS C:NEWBIOS.TST(cr) Will cause the file C:NEWBIOS.TST to be loaded, and you will then be prompted for the destination drive to which the system and BIOS are to be written. 148 | P a g e 149 | P a g e QSPUTSYS A: TO B:(cr) Will cause the file A:BIOS.SYS to be loaded, and the system and BIOS will then be written to the disk in drive B:. Note that this format is equivalent to "QSPUTSYS TO B:(cr)" QSPUTSYS B:NEWBIOS.TST TO C:(cr) Will cause the file B:NEWBIOS.TST to be loaded, and the system and BIOS will then be written to the disk in drive C:. QSPUTSYS Error Messages ** ERROR ** Invalid Drive, Please Try Another Drive exist. This indicates that the specified drive does not ** ERROR ** Unable To SELECT That Drive This indicates that the specified drive could not be selected. Either the drive does not exist, or the disk inserted in the drive is not properly formatted. ** ERROR ** No BIOS.SYS on That Disk This indicates that the BIOS.SYS file could not be found on the specified drive. ** ERROR ** Error Writing BIOS.SYS. Copy Aborted This indicates that a hard disk error occurred during the writing of the BIOS.SYS file. Either a bad sector was encountered, or the disk or directory is full. I 150 | P a g e QSASSIGN Partition Assignment Utility QSASSIGN provides a convenient means of assigning hard disk partitions to CP/M logical drives. The command syntax for QSASSIGN is: QSASSIGN (T) (unit:) (partname TO )(drive:), (unit:) (partname TO ) where unit: specifies the controller and physical drive number, partname is a valid partition name, and drive: is the CP/M drive to which partition unit:partname is to be assigned. The unit: specification is given as a one or two digit number, the first digit of which indicates the controller number (0-7), the second digit indicates the drive number (0-1). If a controller number is given, a drive number MUST be given also. If the controller number is not given, controller 0 will be used. If no drive number is given, drive 0 will be u sed. For example: QSASSIGN ? (cr) Will cause a display of the proper command syntax for QSASSIGN QSASSIGN (cr) Will cause all current assignments to be displayed. QSASSIGN 1: (cr) Will cause all available partitions on controller 0, drive 1 to be displayed. QSASSIGN 20: (cr) Will cause all available partitions on controller 2, drive 0 to be displayed. QSASSIGN B: (cr) Will cause the partition assigned to CP/M drive B: to be unassigned . QSASSIGN CPM PART1 TO B: (cr) 151 | P a g e Will cause the partition "CPM PART1" on controller 0, drive 0 to be assigned to CP/M drive B:. QSASSIGN 11:WORK TO C: (cr) Will cause the partition "WORK" on controller 1, drive 1 to be assigned to CP/M drive C:. QSASSIGN 1:SOURCE TO B:,11:DATA TO C: (cr) Will cause the partition "SOURCE" on controller 0, drive 1 to be assigned to CP/M drive B:, and the partition "DATA" on controller 1, drive 1 to be assigned to CP/M drive C:. After all assignments on the command line have been made, all current assignments will be displayed. QSASSIGN Error Messages ** ERROR ** Invalid Controller/Unit Specification The controller/unit specification was improperly formatted, or contained illegal characters. This field must be either a 1 or 2 digit number, followed by a colon. If a 2 digit number is given, the first must be the controller number (0-3), and the second the drive number (0-1). If only a single digit is given, it must be a drive number (0-1). ** ERROR ** Invalid Controller Specification The controller specification is not in the range 0to3. ** ERROR ** Invalid Drive Unit Specification The drive unit specification is not in the range 0 to 1. ** ERROR ** Missing or Invalid CP/M Drive Specification No CP/M drive was specified to assign the Partition to. or the drive specified is not a XEBEC device. ** ERROR ** Invalid Partition Name Specification The partition name specified was improperly formatted, contained illegal characters, or was too long. A valid partition name car be up to 10 characters long, and may contain any printing ASCII characters, with the exception of multiple consecutive spaces. 152 | P a g e ** ERROR ** Unable To Read Partition Table The partition table could not be read from the specified unit. This indicates either an invalid unit was specified, or there is a hardware failure ** ERROR ** Unable To Select Specified CP/M Drive The specified CP/M drive is invalid, and cannot be selected. ** ERROR ** Unable To Locate Specified Partition The specified partition name could not be located in the partition table on the specified device. ** ERROR ** Specified Partition Is Already Assigned The specified partition is already assigned to the same or a different CP/M drive. The partition must be unassigned before it can be reassigned to a different CP/M drive. ** ERROR ** Partition Table Is Incorrect Version The partition table form number does not match, so the partition table cannot be used. This indicates that the partitioning program and assign program came from different version of Quikstor CP/M. ** ERROR ** Attempt To Unassign Drive A: Anattempt was made to unassigned the partition from CP/M drive A:. This would result in a system crash, and cannot be allowed. ** ERROR ** Specified Partition Is Not A CP/M Partition The specified partitions category code indicates that the partition has been assigned to a different operating system. QSMAP Logical to Physical Drive Mapping Utility QSMAP provides a convenient way of temporarily reassigning or "remapping" the logical CP/N drives (A: - P:) to the physical devices in the system. This can be useful for changing the logical A: drive from one physical device to another, and even allows mapping the RAM disk to the A; drive. Any physical device may be mapped to any logical drive with the only restriction being that the A: drive MAY NOT be mapped to an undefined device. The command syntax for QSMAP is: QSMAP (?) (drive: TO drive:) (, drive: TO drive:) ................... 153 | P a g e If no arguments are given, then QSMAP simply displays the current drive mapping. Otherwise; QSMAP will interchange the physical devices assigned to the two logical drives given in the command line. For example: QSMAP ? (cr) Will cause a display of the proper command syntax for QSMAP QSMAP (cr) Will cause the current drive mapping to be displayed QSMAP A: TO C: (cr) Will cause drives A: and C: to be "swapped", so that the drive that was A~ will now become C:, and the drive that was C: will now become A:. Multiple MAPs may be done on a single command line by simply entering more than one argument string separated by comas. For example: QSMAP A: TO B:, C: TO D:, F: TO J: (cr) Will have the same effect as entering the following three commands: QSMAP A: TO B: (cr) QSMAP C: TO D: (cr) QSMAP F: TO J: (cr) QSMAP will always display the current mapping in effect after it has made any requested changes. It will also notify the user if an invalid mapping has been requested. 154 | P a g e QSMAP Error Messages ** ERROR ** Illegal Drive Assignment This indicates that the requested mapping would have placed an undefined drive in the A: position, generating a system which would not operate. EX14 - Enhanced Batch Command Processor EX14 is a public domain replacement for the DR SUBMIT and XSUB batch processors, which provides many useful enhancements. For the most part EX14 works in the same manner as SUBMIT and XSUB, and can be used as a substitute for them. However, EX14 also allows the following character sequences to be used: ^ followed by any character will give the corresponding control character. cause a Control-C to be substituted when the command is executed. For example, " C" will | will cause a carriage return to be substituted when the command is executed. This is useful if you are auto-executing a program which requires RETURNs entered to accept default values, e t c. ^| will cause a carriage return/line feed to be substituted when the command is executed. ^: will cause the entire SUB file to be re-executed from the beginning. I don't know why you'd want to do this, but you can. ^? will cause EX14 to pause until a RETURN is entered. A control-C at this point will abort EX14. This is handy if you want to go away for part of the execution, but don't want to miss another part. ^$ will cause the remainder of the line to be treated as a set of default parameters to be used in the case where the user did not enter any parameters on the command line. N ote that these are used in the order in which they are required. If three parameters are required, and only two are given on the command line, the third will be supplied from the FIRST default, NOT the third. ^ # will toggle the EX14 messages ("EX14 Active", etc.) on and off. These messages can be 155 | P a g e annoying. ^. will toggle ALL console output on and off, allowing SUB files to execute without outputting anything to the console. ; will indicate that the line is a comment, and it will be printed on the console, but not executed. ;; will indicate that all characters following until the next line feed are comments, and will not be displayed. $ followed by a digit 1-9 will cause the corresponding command line parameter (or default) to be substituted when the command is executed. This works exactly as for SUBMIT. $$ will give a $. This is required if your SUB file must contain a $ character, so EX14 does not confuse it with a command line parameter. The Digital Research MAC assembler is an example of when this is required, since all assembly parameters must be preceded by a $. This works exactly as for SUBMIT. $^ will give ^. $| will give |. A control-C from the console at any time will cause EX14 to abort. In addition to executing SUB files, EX14 may be run by simply typing EX14, in which case it will prompt the user for the sequence of commands to be executed. This allows a string of commands to be executed a single time without generating a SUB file. 156 | P a g e DETAILED INSTRUCTIONS - MINOR UTILITIES CONFIG80 works in much the same way as CONFIGUR. It is used for specifying the type of drive located at each physical drive address on the H-17 controller. The parameters which may be entered are: Track Density - May be either 48 for 40 track drives, or 96 for 80 track drives. Note that only the first digit needs to be entered (either 4 or 9). Number of Sides - May be either "1" for single sided drives, or "2" for double sided drives. Step Rate - May be any value from 4 mSec to 40 ms in increments of 2 ms. Enter a carriage return after inputting the step rate. Once all desired changes are entered, enter either "X", "Y", or "Z" to write the new BIOS back to the disk and re-enter CP/M. The "X", "Y", and "Z" commands work in exactly the same way as under CONFIGUR. XDIR is a utility which provides a greatly enhanced disk directory display. It uses the same command syntax as the standard CP/M DIR command, except that it also allows viewing $SYS files by giving a file specification followed by the letter "S". It will display all files on a disk, sorted in alphabetical order, with the size in Kbytes of each file, as well as a count of the number of files on the disk, number of directory entries used, number of directory entries left, total disk size in Kbytes, total space occupied by files, and total remaining space. XDIR is run with a command line of the same format as the standard CP/M D -IR command: XDIR *.COM will give a listing of all COM files with the $DIR attribute. XDIR *.COM S will give a listing of all COM files whether flagged as $DIR or $SYS. XDIR will give a display of ALL files on the currently selected drive. XDIR C: will give a display of ALL files on drive C:. XDIR B:*.COM will give a display of all COM files on drive B:. XDIR E: A*.* will give a display of all files on drive E: with names which start with "A". FBAD is a non-destructive disk test and bad sector lockout program. FBAD can be run on ANY disk, at ANY time. It WILL NOT alter ANY data or files on the disk. FBAD reads the ENTIRE disk, including system and directory areas, to locate any unreadable sectors. If a bad sector is found, the following actions will be taken: 157 | P a g e 1 - If the bad sector is in the system or directory area of the disk, an error message will be displayed on the console warning the user of a bad system or directory sector. 2 - If the bad sector is in the file area of the disk, an error message will be displayed giving the number of the CP/M allocation block containing the bad sector. That block will then be allocated to the file (UNUSED).BAD so that it cannot be used by any other file operations. If the bad sector is already allocated to a file, it is NOT UN-allocated from the file, so that all remaining sectors of the file can still be read. It is a good idea to run FBAD on a regular basis to keep track of the integrity of your disks. Should FBAD locate a bad sector on a system track, that disk will not be bootable, and cann ot be SYSGENed, but should be otherwise usable. Should FBAD locate a bad directory sector, ALL files should be IMMEDIATELY copied to another disk, and the bad disk (in the case of a floppy) should be discarded. Bad sectors in the file area of the disk can be left allocated to the file (UNUSED).BAD, with no ill effects. However, any disk which shows a large number of bad sectors should be discarded. It is very strongly recommended that FBAD be run on the CP/M Winchester partitions right after FORMATting the first time (this has already been done by us before shipping - do it again if you change partitions or re-FORMAT) to lock out any bad sectors that may be present. This will prevent many future headaches. It is very improbable that any Winchester will have no bad sectors, because of the large number of sectors on a Winchester. A few bad sectors are no cause for alarm. If the number is considerable, however, contact Quikdata for advice. Note that the QSFORMAT utility also has a "media check" incorporated into it. When first run, choose the media check option, and don't worry about FBAD. FBAD is mainly for media already formatted, to be checked sometime after the FORMAT has been done. ZCPR is the Z-80 Console Command Processor prepared by members of the CP/M Users Group. It is a greatly enhanced CCP containing all of the features of the Digital Research CCP, as well as several new ones. The commands available are: Familiar Commands: New Commands: DIR GO ERA GET REN USER JUMP DFU TYPE SAVE LIST The "Familiar Commands" operate in exactly the same manner as with the standard CCP, with the following exceptions: 158 | P a g e ERA - Will display the names of all files ERAsed. REN- If the new file already exists, you will be asked if it should be deleted bef ore performing the REName. TYPE - The file will be displayed on the console a screen (24 lines) at a time, and wait for a character from the console before scrolling to the next screen. This makes searching for something in a file much easier, since you needn't use CTL-S to stop the scrolling. SAVE - The size of the area to be SAVEd can be optionally specified in CP/M sectors (128 bytes) rather than in pages (256 bytes). In addition, if the specified file already exists, you will be asked if it should be deleted before performing the SAVE. USER - The current user number is always displayed in the system prompt following the drive identifier. Examples: ERA B:•.BAK - will cause ALL files with the BAK extension on drive B: to be erased. The name of each file will be displayed on the console in DIR format as it is ERAsed. REN C:OLDFILE.NEW=C:NEWFILE.OLD - will cause the file NEWFILE.OLD on drive C: to be renamed to OLDFILE.NEW. If the file OLDFILE.NEW already exists on drive C:, you will see the message: Delete File? If you respond with a "Y", then the existing OLDFILE.NEW will be deleted before renaming NEWFILE.OLD to OLDFILE.NEW. TYPE TXTFILE.TXT - will cause the file TXTFILE.TXT to be display a page at a time on the console. It will wait for a character from the console before going to the next page. TYPE TXTFILE.TXT P - will cause the file TXTFILE.TXT to be displayed on the console WITHOUT pausing between pages. This is the same effect given by the standard CCP. SAVE 4 JUNK.COM - will cause 4 PAGES (1024 bytes) of memory starting at address O100H to be saved to the file JUNK.COM. SAVE 4 JUNK.COM S - will cause 4 SECTORS (512 bytes) of memory starting at 0100H to be save to the file JUNK.COM. USER 5 - will cause the system prompt to change from "A7' to "A5>". The "New Commands" operate as follows: ' LIST - works exactly like the standard TYPE command, except that the specified file is sent to the system LST: device. DFU - specifies the default user number to be used in command searches discussed below. default user is normally 0. The GET - allows a file to be loaded into any location in memory. This can be very useful it certain assembly language debugging operations. 159 | P a g e GO - causes a direct CALL to any location in memory. This command, along with the GET command, allows execution of programs which operate at some address other than 0100H. Any program entered in this way can simply execute a RET instruction to return control directly to the CCP without doing a warm boot, providing the CCP is not overwritten, and the CCP stack is preserved. JUMP - same as the GO command, except this command causes a direct JUMP to 8 memory location rather than a CALL. Return from any program entered with this command MUST be by a warm boot. Examples: LIST TXTFILE.TXT - will cause the file TXTFILE.TXT to be printed on the system LST: device. DFU 3 - sets the current default user to 3. See the section below on command searches for details. GET 4000 B:ALPHA.BET - causes the file ALPHA.BET from drive B: to be loaded into memory starting at address 4000H. GO 4000 - causes a CALL to location 4000, beginning execution of whatever program is located there. JUMP 4000 - causes a JUMP to location 4000, beginning execution of whatever program is located there. ***** ZCPR COMMAND SEARCHES One of the most useful features of ZCPR is its "hierarchical search" capability. Suppose you are logged onto drive B:, under user 5 and you enter the following: B5> MBASIC If MBASIC.COM is located on your A: drive, or on drive B: under a different user, you will get the message: MBASIC? Which is the CCP's way of saying it couldn't find MBASIC.COM on your B: drive. ZCPR, however, would have found MBASIC.COM, even though it is NOT on the currently logged drive. ZCPR will search several places for a COM file before giving up, while the standard CCP will search the current drive under the current user number only. ZCPR will search in the following order: 160 | P a g e First: On the current drive, under the current user number Second: On the current drive, under the default user number Third: On drive A:, under the default user number The default user number can be set with the "DFU" command described above. Suppose we go back to the above example. You are logged onto drive B:, under u ser 5. The file you wish to load is on drive A: under user 3. With ZCPR you could enter the following: B5> DFU 3 B5> MBASIC And MBASIC.COM would be loaded from drive A: user 3. The search would take place as follows: First: Search drive B: under user 5 - can't find it Second: Search drive B: under user 3 - can't find it Third: Search drive A: under user 3 - found it With the standard CCP, you would have to first select drive A:, then switch to user 3, then enter the command. When MBASIC finally loaded, drive A: would be the default drive. In most cases, all operations take place under user 0, so there is no need to use the DFU command, as 0 is already the default user. This means that you need not worry about what drive you're logged onto when you try to load a program from drive A:, ZCPR will find it. You will find this to be a very convenient feature. NOTES ON 4 MHZ OPERATIONS A number of 4 MHz conversions have become available in the past several months for the H-89 computer. Unfortunately, they vary widely in their completeness and technical correctness. For the most part, these are poorly executed "quick and dirty" conversions, and little or no consideration has been given to any compatibility problems which might arise with existing hardware and software. Because of this, Livingston Logic, as well as many other vendors, has been 161 | P a g e experiencing a large increase in the number of complaints from cust omers who have installed these conversions. To date, NOT ONE of these complaints has proved valid. Tracking down such problems has begun taking up a great deal of our time, when, in fact, the problem is NOT ours! With the wide variety of different conversions and clock switching schemes available at the present time, it is simply not possible to provide software which will work in all cases. For this reason, we are forced to take the following position: 1 - LLL CANNOT and WILL NOT provide ANY assistance, either hardware or software, to anyone converting ANY system to 4 MHz operation. 2 - LLL CANNOT and WILL NOT provide ANY support for any customer experiencing any problems with our products when operated in any system with any 4 MHz conversion installed, whether the problem also occurs at 2 MHz or not. For the benefit of those who STILL wish to convert their systems to 4 MHz, we would strongly recommend the KRES Engineering conversion as the most complete, professional and technically competent conversion. All LLL products have been verified as working with the KRES conversion. However, the above policies STILL apply. IN CASE OF DIFFICULTY If you experience any difficulties in setting up and running QSBIOS and it's utilities, PLEASE do the following BEFORE requesting assistance: 1 - READ and RE-READ ALL DOCUMENTATION, including the Heath/Zenith CP/M documentation. Be sure you understand EVERYTHING you are doing. 2 - Start the procedure over again FROM THE BEGINNING. Be VERY SURE that you follow all directions TO THE LETTER!! DON'T SKIP STEPS!! DON'T ASSUME THAT YOU KNOW ENOUGH TO LEAVE OUT OR MODIFY ANY STEPS!! 3 - If you are still experiencing trouble, have someone else try the procedure, preferably someone with more CP/M experience and knowledge. 4 - If, at this point you're STILL having trouble, GO BACK TO STEP 1 AND DO IT ALL ONE MORE TIME!! 5 - If you've made it this far and you're STILL having trouble, then write down, in as much detail as possible, EXACTLY what the problem is, any symptoms or problems, EXACTLY WHEN and HOW the problem manifests itself, and EXACTLY what the configuration of your system is, including both HARDWARE and SOFTWARE. Mail this letter, and, if possible, a bootable disk exhibiting the problem, to Quikdata, or give us a call. 162 | P a g e Our experience with customer complaints/problems has been: 1 - Over 60% simply did not take the time to read and understand the documentation, and made little or no effort to isolate or verify the problem before calling for help. In many cases, we have been called upon to provide VERY BASIC information about the operation of the computer or the operating system. This is NOT our responsibility! 2 - Roughly 30% have problems with hardware, other software, or simply have not properly configured the hardware of software correctly. 3 - In the last year, an increasing number of problems have centered around 4 Mhz operation. In EVERY case, the problem has been found to be either a hardware caused malfunction due to an improperly executed conversion violating one or more hardware timing requirement, or some feature of the conversion which by it's very nature makes it incompatible with ANY standard disk driver. 4 - Far less than 1% has legitimate problems with "bugs", defective distribution media, or other manufacturing problems. Because of the recent increase in the number of calls falling into the first three categories above, we have been forced to adopt the following policy regarding alleged "bugs": 1 - Reports of suspected "bugs" MUST be made in writing, stating the exact nature of the bug, ALL hardware and software in use at the time of the problem, and all pertinent system configuration information (step rates, drive makes and models, etc.) 2 - The original distribution disk MUST BE RETURNED for inspection, along with the selling dealers name and purchase date. 3 - If possible, a bootable disk which exhibits the problem should also be returned with the report. 4 - Should we determine that a bug or problem does exist, we may or may not provide a correction, as we see fit. We may or may not incorporate any such fixes in future releases of the software. Any such updates may or may not be available at a reduced rate. Any such updates may or may not be announced in such publications as H -SCOOP, BUSS, and local club newsletters. LLL has always tried very hard to maintain compatibility with other existing products, both hardware and software, and we have often updated our products to take advantage of some new products features, or enhance compatibility. Unfortunately, this attitude is not shared by most 163 | P a g e sellers, and, as a result incompatibilities may arise, particularly with products developed AFTER the release of ours. For this reason, we DO NOT provide ANY products on a trial basis, and we further make NO warranties as to compatibility or suitability of any of our products for any purpose whatsoever. All products are sold strictly on an "as is" basis. When incompatibilities are found, we may or may not update our product to provide compatibility, and w e may or may not offer any such updates at a reduced rate. LLL CANNOT and WILL NOT provide ANY of the following services, except on a prepaid hourly basis at our current consulting rate: 1 - Assistance in the installation, configuration debugging, or operation of ANY other companies’ products. 2 - Assistance in the location and identification of general system hardware or software problems. 3 - Assistance in the modification of any of our products for any purpose. 4 - General advice, technical information, or any other information not directly related to the operation of one of our products. Further, any correspondence relating to the following subjects will not be acknowledged: 1 - Conversion of any system to 4 MHz operation. 2 - Hardware or software problems which occur with 4 MHz operation. 3 - Operation of ANY 80 track drive within the H-89 enclosure. 164 | P a g e PUTTING CP/M ON QUIKSTOR You now have a floppy disk (QSBIOS system disk) with all needed files on it. If you h ave not copied the needed files such as STAT, QSPUTSYS, QSASSIGN, QSCONFIG, FBAD, PIP, SASIXUxx, etc., do it now. Once you have this disk ready, boot off of it and be sure the Winchester is plugged in, connected, turned on and ready to go. When and if in doubt on any of the following procedures, be sure to take time to read the appropriate documentation in preceding sections so you know what you are doing. 1) Be certain the Winchester has already been PARTITIONED with SASIXUxx, and it has at least one CP/M partition. If not, take the time to read the partition documentation and partition the Winchester. 2) ASSIGN the partitions using QSASSIGN. For example, suppose your floppy drives are A:, B: and C:, and the Winchester CP/M partitions are D: and E:. Using QSASSIGN, you would assign D: and E: as follows, assuming your CP/M partitions are labeled as they leave our labs as CPM 0 and CPM 1. QSASSIGN CPM 0 TO D: QSASSIGN CPM 1 TO E: HINT: When working off the SYSTEM FLOPPY, it is easiest to set COMMAND LINE for cold boot on the CONFIGUR.COM program to any name, say START.SUB. Then create a SUBMIT file (see CP/M DR documentation if necessary) named START.SUB to execute and assign all Winchester partitions upon boot. 3) FORMATall CP/M partitions on the QUIKSTOR Winchester using QSFORMAT. You should now be able to access your Winchester. For example, if D: has been assigned to the CP/M 0 partition, doing a DIR D: should cause the Winchester to be accessed and a message "NO FILE" (or prompt comes back) to be displayed. 4) If you did not choose the "media check" with QSFORMAT, then run FBAD to test and lock out any bad sectors on the Winchester partition. Although all units purchased through Quikdata have already checked this, it may be wise to do it again to detect any possible shipping damage. In the future you will want to run this utility when you begin getting BAD SECTOR (or similar) messages). You would do this as follows: FBAD D: to test the first partition, and 165 | P a g e FBAD E: to test the second partition, etc. 5) It is now time to create a (P/M system on the Winchester. To do this, be sure you can still access the Winchester partition you wish to be able to boot from. Do a DIR or something, and if you can't access it, use QSASSIGN again. Now run QSPUTSYS (be sure you read and understand the documentation first!) which will place your BIOS and SYSTEM on the Winchester. This will cause the BIOS and system for the Winchester to be created and placed on the hard disk unit. For destination drive, specify your Winchester partition, D: in this example. You may now want to PIP all needed files onto the Winchester disk. If you want an entire disk to be transferred, for instance, use the command: PIP D:=A:*.*[V).This will cause all files, e xcept system files to be transferred from the A: floppy to the D: Winchester partition, and verify them. Note again that we are here assuming "D:" to be the assigned Winchester partition we are concerned with. 6) NowRESET the system and BOOT to bring up the Winchester boot table (assuming your status switch on the computer's Winchester host adapter is set to 15 - if it set to any other, that numbered partition will come up and attempt to boot and the boot table will not com e up.). 166 | P a g e Select the CP/M partition number from the menu and push the 'BLUE' key under the displayed message "perform boot" (or F6 if using an H29 or H49) on the bottom center of the boot table. The CP/M partition should now boot from the Winchester. If you did not obtain the above results and cannot boot from the Winchester, be sure to go over all hardware and software installation and try everything again. If this again fails, call or write. If you call, be sure to have your computer ready to go and by your telephone if at all possible. 167 | P a g e MULTIPLE QUIKSTOR OPERATION Besides supporting 15 and 33 Meg Winchester drives, this version of software supports multiple Winchesters on the H8 and H89 computers under both HDOS and CP/M operating systems. The second Winchester can be connected to the system in either of two ways; daisy chained from the computer's host adapter card or chained off the Xebec controller in the primary QUIKSTOR Winchester subsystem. Although the software can handle either (drive # off the same Xebec controller or Controller # when daisy chaining off the host adapter), there are advantages and disadvantages of each method. NOTE: For either method, as viewing the unit from the top front all pin "l's", or cable stripes, go toward the right. For the Tandon drive, U22 is the resistor pack. This must be removed from the master unit when configuring for connection to slave drive. The slave must have the resistor and the master drive must have it removed. W9 jumper on the Tandon drives is the Winchester select socket. The first drive on a Xebec controller must be set for "1", whole the second, or slave, must be set for "2". DIASY CHAIN OFF COMPUTER HOST ADAPTER NOTE: This method will only work with the H89 using the Magnolia 77320 SASI host adapter card! This is the only host adapter that has control lines for handling two Xebec controllers. The Heath H/Z67 card for the H89 and the Heath WH8-37 card for the H8 will only handle one controller! This method of connection is similar to floppy drive connections, in that the user can connect a second complete QUIKSTOR assembly to the first unit simply by daisy chaining the 40 conductor ribbon cable and jumping the Xebec for the second drive (of course removing the resistor pack from the second Xebec controller card). Disadvantage is an entire second unit must be purchased complete with Xebec, which adds about $200 to the slave's price. Advantage is an entire backup unit, Xebec controller and all. If the first unit goes dead, and perhaps the Xebec went dead, you still have an entire other unit to work with! CONNECTION AS DAISYCHAINED UNIT WITH dual Xebec cards NOTE: This method cannot be used with the Z67 H89 card, and possibly for the WH8 -37 H8 card since they appear not to support multiple Winchester chaining. It has not been tested yet and we 168 | P a g e cannot say. We do know that it works with the H89 Magnolia Microsystems 77320 SASI/SERIAL card. In the abovementioned configuration, both units may have different sized Winchesters, but the internals of the cabinet are identical, i.e., they each have a Xebec controller card. Thus for this method, you simply remove the cabinet of the second, or slave unit, and remove the "0" jumper block from J5 and set it to "1". This will select that unit as the second unit. The main cabinet already has this set for "U" for the first unit. In addition, the second unit should have the resistor pack installed at 6F (Note: location may differ on different Xebec revisions, however, the item you are looking for is the only 14 pin type of IC (it is actually a resistor pack) in an Integrated Circuit socket). This must be removed from the master unit and installed in the slave unit. If you purchased the unit from QUIKDATA, the second unit will already be properly configured. You still must remove the cover from the first drive unit, or master unit, and remove the 14 pin IC resistor pack. Store it away for future use, perhaps taped to the floor or wall of the unit's cabinet. 169 | P a g e When configuring the software such as using QSASSIGN, this is controller 1, and drive 0! For example, when using SASIXUxx, the fields for the drive being partitioned must be set for controller 1 and drive 0. When running QSASSIGN, the following command line may be used in this example: QSASSIGN 10:CPM 0 TO B: XEBEC SLAVE DRIVE NOTE: This method can be used with all cards, and must be used with the H89 H/Z67 card and the H8 WH8-37 card, as they do not support multiple controller cards! This method of connection has the first unit with the Xebec used as the master unit. The second, or slave unit, is connected directly from the first Xebec to the second unit's Winchester drive. It does not have its own Xebec controller. The advantage obviously, does not have to purchase complete second unit, which would require about an additional $200, more than the stripped slave (of Xebec controller card) would have required. The disadvantage is the Xebec redundancy i s missing; if the Xebec on the primary unit fails, the second unit is also down. The choice must be yours. The chances of this happening are remote, but it could happen. The failure rate of the Xebec 1410S controller is very rare; especially after the 90 d ay break-in period. In either of these cases, if you purchased the units from Quikdata and specified what they are to be used for, all the proper cabling and all the proper jumping on both the Xebec and/or the Winchester (in the case of the slave unit) will have already been done for you. All needed cables will have been supplied. It will simply be a matter of connecting it all up and properly configuring the software. CONNECTION TO SLAVE DRIVE via XEBEC SLAVE METHOD For the slave drive method, one Xebec controller is used, in the main subsystem cabinet, connected to the computer host adapter with one 40 conductor ribbon cable (P2). The main Winchester drive inside the cabinet with the Xebec is connected to the Xebec controller via a 34 pin connector on the Xebec (J1). The 20 pin cable on Winchester J2 is connected to the main Winchester drive in the master cabinet. That completes the connections for the main subsystem. There are many Xebec revisions out, and the board layout is different on each one, thus the plug 170 | P a g e designations may change. The master drive is always on the left most rear connector as viewing the unit from the front. The slave connector is more to the righ t. The slave drive is in an auxiliary cabinet which contains only the Quikstor Winchester and power supply (of course fan, cables, etc.) - no XEBEC controller card! The main difference between this method and the abovementioned alternate method is that this method uses only one Xebec card. In this case, the slave unit is connected via daisy chaining off the 34 pin ribbon cable in the master unit with a 'Y' cable or similar arrangement, just like with a floppy drive. The only other connection is a 20 pin cable which ties the main unit to the slave. For this connection, a 20 conductor ribbon cable connects the Winchester 20 pin card edge connector with plug J3 on the Xebec controller. That's all there's to it, except for taking care of the drives. Just like floppy drives, the Winchester drive has a resistor terminating pack on it. Same rules as for floppies apply. Keep the terminating resistor in the last drive on the physical chain and remove all others; i.e., the first Winchester’s in this case. Also like floppy drives the Winchester drive has a drive select plug. Be certain the first drive is setup for drive selects one, and the second, or slave, must be set for drive select two. Since this is different for each Winchester drive, just like for the floppies, I won't go into it here. Suffice it to say, if you order this from Quikdata it will have been done for you. If you have questions or problems with the particular drive you purchased, contact Quikdata for the proper jumper settings on the drive. When configuring the software, this is now controller 0, with drive 1! Thus, when running SASIXUxx, the controller field must be set to 0 and the drive must be set to 1 for the slave. When running QSASSIGN, the following example may apply: QSASSIGN 01: CPM 0 TO B: That's the simple facts for connecting dual Winchester drives. Be sure to re-read the software, especially SASIXUxx, the partitioning program and the drivers, since they must each be handled differently for multiple Winchester drives; the settings will be different, depending which method you have chosen. 171 | P a g e Heath/Zenith Computer Support H-SCOOP Newsletter Computer Control & Interfacing Word Processing He nry E . F a le (414) 452-4172 • Zenith Business Systems • Computer Consulting • Computer Programming • Sales, Service, Support Q & A ON QUIKSTOR WINCHESTER SYSTEMS We have been receiving a considerable number of questions on our QUIKSTOR 15 and 33 megabyte drive systems and slaves for the H8 and H89 computers, and have prepared this information for your convenience. What is the capacity of Quikstor, QS-15? The 5" Winchester drive is actually a 19 megabyte drive which formats down to a bit over 15 megabytes. What is the capacity of Quikstor, QS-33? The 5" Winchester drive is actually a 40 megabyte drive which formats down to over 33 megabytes. What is the physical size of the unit? The outside dimensions of the Quikstor cabinet is 5 1/2" high, 8 1/2" wide, and 15 1/2" long. Wiil the unit work on an H8 and an H89? The Quikstor unit was designed to work both on the H/Z H89 and Heath H8 computers. The H8 must have a Z80 CPU. An 8080 will not work since maskable interrupts are not available . See the following site to order the new and improve Z80 card for the H8 compu ter; http://www.lesbird.com/sebhc/pcbs/pcbs.html Are multiple Winchesters supported? Our new release of software, effective 4/85 has many new features over the previous release. One of these features is the support for multiple Winchester drives chained from the Xebec controller in the master unit, or daisy chained from the computer host adapter board. Both slave units and master subsystems are readily available from Quikdata. Refer to price sheet for additional information. 172 | P a g e Does the unit support both HDOS and CP/M, and are the partitions bootable? Quikstor will allow up to 15 user defined partitions, which can b e HDOS or CP/M or any combination of the two. In addition, each partition is bootable once it has been SYSGENed. As many as 8 HDOS partitions may be on line at one time with one driver, and as many as 4 CP/M partitions may be on line at one time. What versions of operating systems will the Quikstor software support? The CP/M BIOS provides support for either Quikstor and H17, Quikstor and H37 or Quikstor and H47. It requires CP/M 2.2.03 or 2.2.04. The HDOS driver is for use only under HDOS 2.0. I have an H17 and an H37. How do I transfer my files? Obviously, the H37 format is the most practical to have 'on line' with the Winchester, since it can hold more data. This is, of course, advantageous for both the loading and the unloading of the Winchester. Since you can't have more than one format used with the Winchester because of addressing problems, use the H37. Before you do that, however, using Heath's MAKEBIOS (see REMark issues 26 and 27 for an easier way on doing it), configure a BIOS for your H17 and H37. Then transfer all your H17 files to your H37 format. Remove the H17 card, and bring the Winchester/37 back on line. Now simply PIP all files over. 173 | P a g e What about support for Magnolia CP/M and Q'/M+? Our Quikstor units will work with Magnolia CP/M 2.2.xx and CP/M+, either or both running with the Magnolia 77316 double density card. The Magnolia SASI/Serial card, 77320 is required for the host adapter interface. The proper Magnolia Winchester software is already supplied at no additional cost with this card. If you are using this with CP/M only on the Magnolia, you will not require our QUIKSTOR software and documentation. The 77316 double density card, which supports 5 “and 8” drives, is used to load and unload the Winchester. Any support for CDR or other vendors boards? No. CDR may have their own software for Winchester operation, in which case our Winchester subsystem could be used. Our software and documentation do not apply to CDR, just like it does not apply to Magnolia. In addition to the Quikstor, what else is needed? In addition to the Winchester subsystem, the software and documentation package is required if using the standard H/Z computer and controllers. This is actually the user operator manual and contains complete instructions for hardware and software installation and use. It also contains, on the disk format you request, the CP/M and HDOS software that is required. The only additional item required is the computer host adapter card. For the H8 computer the WH8 -37 card is required. This card provides both H37 floppy support and SASI Winchester support. Unfortunately, this card is no longer made by Heath. The best place to obtain it is the 'used classifieds' market. - For the H89 one of two cards can be used. The H/Z-67 card from Heath is a SASI interface card and can be used. The Magnolia 77320 SASI card can also be used. The main difference is the Magnolia card also has three serial ports, identical to the standard He ath card. This allows you to remove the serial card and free a space. The host adapter does require one of the right hand bus slots of the H89. What modifications are needed to operate at 4MHz? None. Both the HDOS and the CP/M software have been designed to work at both 2 and 4 MHz, and with switchable CPU speeds. Because of the many different 4MHz mods on the market, most of which are not correct, we will not support 4 MHz You go 4MHz on your own. In addition to 2/4 MHz operation, the CP/M has built in ZCPR and in addition, BIOS-80 for H17 formats. The HDOS is used as a standard HDOS device driver. What about backup? Backup is accomplished with the standard floppy(s) on your system. The Quikstor Winchester unit can occupy address 170Q (78H) or 174Q (7CH). This leaves the alternate address available for a floppy system. That system can be either an H17, H37 or H47. The exception to this is when the Quikstor is used with the Magnolia CP/M and the Magnolia 77316 double density board. Then you 174 | P a g e can have the SASI with the Winchester, the H17 card, and the Magnolia DD controller supporting both 5" and 8" double density drive systems. Because of high costs of other backup means at this time, and the low order volume we would expect to receive we are not at this time planning tape backup or any other kind of backup. Obviously, besides backup the floppies are used to load the Winchester. Standard "PIP" type operations are used, and the Winchester partition(s) is treated just like a floppy - only very much faster! 175 | P a g e Is the unit hard to set up and use? No. Documentation is clear and straight forward. We also have the unit fully INITialized and FORMATted when shipped out, with the HDOS partitions ready to boot. If not specified, the partitions (for the 15 meg unit as an example) are set up as follows when shipped: CP/M partition A 5 megabytes CP/M partition B 5 megabytes HDOS partition 0 1.2 megabytes HDOS partition 1 1.2 megabytes HDOS partition 2 1.2 megabytes HDOS partition 3 1.2 megabytes If you want a different partition scheme, let us know so we can set it up before shipping. The user can at any time re-partition the Winchester. What about the Z100 series of computers? The H8 and H89 computers require only a 'host adapter' card. The Winchester Xebec controller card which connects via SASI bus to the computer's host adapter card is contained inside the Quikstor cabinet. The Z100, on the other hand, has the whole works inside the Z100 machine and does not require the Xebec controller. The Quikstor will work on the Z100 if the Xebec card is removed and cables are connected between the Z100 controller and Quikstor. In addition, the Z100 Winchester software from Zenith will handle up to 32 megabyte drives. We can supply all needed parts to use your present QUIKSTOR Winchester, either the 15 or 33 Meg drive internal or external for the Z100. What about the Z150 PC series of computers? About the same as above, the Z150 uses its own Xebec bus card which has both controller and host adapter on one card. The Quikstor Winchesters we use for the H8 and H89 QUIKSTOR units are identical to the ones we use in the Z100 and Z150, thus total compatibility is maintained. We have the Xebec cards and complete installation kits available for the Z150 line as wel l, and again, we can go internal or external. What about the warranty? Quikdata has always had an excellent warranty policy and the Winchester unit is no exception. Standard 90 days on parts and labor, and full service and support after the 90 days. Quick replacement of needed parts if necessary. The exception is the Rodime 33 Meg drive which has a 176 | P a g e full year warranty. What is the availability? Shipping is generally from stock. Most orders are shipped within 24 hours of receipt. 177 | P a g e PRECAUTIONS In order to get the most reliable operation from your QUIKSTOR Winchester unit, follow these precautions. Don't operate or store the unit in environments with temper atures below 60 degrees F or above 80 degrees F. Don't subject unit to any shock or vibrations at any time - especially during operation. Situate the unit where vibrations will be at a minimum. If you have room on the floor under the desk or table where the computer is situated, this will be best. Cable extensions of a few extra feet can be ordered if you cable is not long enough. The unit should not be placed on a table where a printer is located, as an operating printer causes vibration. Don't restrict air flow to the unit. This unit requires ample air circulation to keep itself from overheating. Line filters, spike suppressors and hash filters are recommended for use with this Quikstor unit, even though it contains its own spike suppression filter, and on all computer equipment. Use of line filtering units will prevent unwanted electrical 'noise' from entering the equipment, which could result in possible component damage. Beware of static electricity. Computer equipment is very susceptible to static electricity. The best prevention for static electricity is having ample humidity in the room. Every six months or so remove cover from the unit (turned off, of course) and blow out dust. Other than this, no preventative maintenance is required on this unit . Don't ever operate this or any other computer equipment when a lightning storm is in progress, or is eminent. In case of earthquakes, floods, fire, theft and the like, I hope you have good insurance on your equipment. PROBLEMS? It is our wish that you never have any problems with your Quikstor Winchester unit. It is, however, made of both electronic and mechanical parts, and they do tend to fail. In the event that you experience problems with your unit, or even if you want to add suggestions to the manual or to procedures, make your notes here. For problems, record all the information you can, such as: computer type, amount memory, operating system being used, exact partition table values, noted problem, exactly record any error messages received, etc. Then if you do require assistance and you must call us for help, we will be in a better position to help knowing all the answers. PROBLEM LOG NOTES 1/7/2012 2:05:35 PM Page | 179 Appendix A – IDE HD TTY LOGS IDE HD TTY LOG: WH-8-Z67 SASI TO IDE DISK EMULATOR Author: Norberto Collado - (C) Copyright, 2010 EMAIL: [email protected] Version - 2.0 HW/Settings: MicroController: DS89C450 @20MHz Baud Rate: 9600 8-N-1 IDE CONTROLLER: 82C55AC-2 SASI CONTROLLER: 8155H-2 SASI INITIATOR ID: 7 SASI TARGET ID: 0 PARITY: ENABLED -> ODD DATA TRANSFER: ASYNCHRONOUS TOTAL RAM: 1K BYTES PLEASE WAIT... SCANNING IDE INTERFACE FOR IDE HARD DRIVE (0). Model: HDS728080PLAT20 S/N: PFD215S7RLD0WN Rev: PF2OA21B Cylinders: 16383, Heads: 16, Sectors: 63 PLEASE WAIT... SCANNING IDE INTERFACE FOR IDE HARD DRIVE (1). Model: QUANTUM FIREBALL EX3.2A S/N: 673832051449 Rev: A0A.0400 Cylinders: 6256, Heads: 16, Sectors: 63 Target ID: 1 WH-8-Z67 SASI TO IDE DISK CONTROLLER Product revision level: V 2.0 Controller Ready to transfer data to/from IDE DRIVE 0 OR DRIVE 1. 1/7/2012 2:05:35 PM Page | 180 IDE SATA SSD TTY LOG: WH-8-Z67 SASI TO IDE DISK EMULATOR Author: Norberto Collado - (C) Copyright, 2010 EMAIL: [email protected] Version - 2.0 HW/Settings: MicroController: DS89C450 @20MHz Baud Rate: 9600 8-N-1 IDE CONTROLLER: 82C55AC-2 SASI CONTROLLER: 8155H-2 SASI INITIATOR ID: 7 SASI TARGET ID: 0 PARITY: ENABLED -> ODD DATA TRANSFER: ASYNCHRONOUS TOTAL RAM: 1K BYTES PLEASE WAIT... SCANNING IDE INTERFACE FOR IDE HARD DRIVE (0). Model: SAMSUNG MCCOE50G5MPQ-0VAD3 S/N: SPE870197ASE97AA0130 Rev: VAC23D3Q Cylinders: 16383, Heads: 16, Sectors: 63 PLEASE WAIT... SCANNING IDE INTERFACE FOR IDE HARD DRIVE (1). Model: SAMSUNG MCCOE50G5MPQ-0VAD3 S/N: DFFS70J839SE839C7498 Rev: VAC23D3Q Cylinders: 16383, Heads: 16, Sectors: 63 Target ID: 1 WH-8-Z67 SASI TO IDE DISK CONTROLLER Product revision level: V 2.0 Controller Ready to transfer data to/from IDE DRIVE 0 OR DRIVE 1. 1/7/2012 2:05:35 PM Page | 181 IDE CF CARDS TTY LOG: WH-8-Z67 SASI TO IDE DISK EMULATOR Author: Norberto Collado - (C) Copyright, 2010 EMAIL: [email protected] Version - 2.0 HW/Settings: MicroController: DS89C450 @20MHz Baud Rate: 9600 8-N-1 IDE CONTROLLER: 82C55AC-2 SASI CONTROLLER: 8155H-2 SASI INITIATOR ID: 7 SASI TARGET ID: 0 PARITY: ENABLED -> ODD DATA TRANSFER: ASYNCHRONOUS TOTAL RAM: 1K BYTES PLEASE WAIT... SCANNING IDE INTERFACE FOR IDE HARD DRIVE (0). Model: KINGSTON S/N: KINGSTON CF 000055F1 Rev: 20060713 Cylinders: 4029, Heads: 16, Sectors: 63 PLEASE WAIT... SCANNING IDE INTERFACE FOR IDE HARD DRIVE (1). Model: SanDisk SDCFH2-004G S/N: 012610I1908J1925 Rev: HDX 4.32 Cylinders: 7964, Heads: 16, Sectors: 63 Target ID: 1 WH-8-Z67 SASI TO IDE DISK CONTROLLER Product revision level: V 2.0 Controller Ready to transfer data to/from IDE DRIVE 0 OR DRIVE 1. 1/7/2012 2:05:35 PM Page | 182 NO IDE HD FOUND TTY LOG: WH-8-Z67 SASI TO IDE DISK EMULATOR Author: Norberto Collado - (C) Copyright, 2010 EMAIL: [email protected] Version - 2.0 HW/Settings: MicroController: DS89C450 @20MHz Baud Rate: 9600 8-N-1 IDE CONTROLLER: 82C55AC-2 SASI CONTROLLER: 8155H-2 SASI INITIATOR ID: 7 SASI TARGET ID: 0 PARITY: ENABLED -> ODD DATA TRANSFER: ASYNCHRONOUS TOTAL RAM: 1K BYTES PLEASE WAIT... SCANNING IDE INTERFACE FOR IDE HARD DRIVE (0). PLEASE WAIT... SCANNING IDE INTERFACE FOR IDE HARD DRIVE (1). ERROR - NO IDE HARD DRIVES FOUND. CHECK WIRES OR POWER SUPPLY CONNECTIONS. FLASHING IDE DRIVE ERROR LED.... H8 INTERFACE TO Z67 CONTROLLER HALTED.... 1/7/2012 2:05:35 PM Page | 183 WATCHDOG TIMER TTY LOG: WH-8-Z67 SASI TO IDE DISK EMULATOR Author: Norberto Collado - (C) Copyright, 2010 EMAIL: [email protected] Version - 2.0 HW/Settings: MicroController: DS89C450 @20MHz Baud Rate: 9600 8-N-1 IDE CONTROLLER: 82C55AC-2 SASI CONTROLLER: 8155H-2 SASI INITIATOR ID: 7 SASI TARGET ID: 0 PARITY: ENABLED -> ODD DATA TRANSFER: ASYNCHRONOUS TOTAL RAM: 1K BYTES PLEASE WAIT... SCANNING IDE INTERFACE FOR IDE HARD DRIVE (0). Model: SanDisk SDCFH2-008G S/N: 014222J3008N4649 Rev: HDX 4.32 Cylinders: 15880, Heads: 16, Sectors: 63 PLEASE WAIT... SCANNING IDE INTERFACE FOR IDE HARD DRIVE (1). Model: SanDisk SDCFH2-004G S/N: 012610I1908J1925 Rev: HDX 4.32 Cylinders: 7964, Heads: 16, Sectors: 63 Target ID: 1 WH-8-Z67 SASI TO IDE DISK CONTROLLER Product revision level: V 2.0 The system locked up and was rebooted by the watchdog Controller Ready to transfer data to/from IDE DRIVE 0 OR DRIVE 1. 1/7/2012 2:05:35 PM Page | 184 Appendix B – H8-Z67 SASI Controller Figure 26: H8-Z67 SASI Controller 1/7/2012 2:05:35 PM Page | 185 Appendix C – Z-89-67 SASI Controller Jumpers 1/7/2012 2:05:35 PM Page | 186 1/7/2012 2:05:35 PM Page | 187 Appendix D – H89-Z67-DISK I/O SASI Controller Figure 27: H89-Z67 DISK I/O SASI Controller 1/7/2012 2:05:35 PM Page | 188 Appendix E – WH-8-Z37 Controller Jumpers 1/7/2012 2:05:35 PM Page | 189 Appendix F – H8 Front Panel Keypad (PAM-37) 1/7/2012 2:05:35 PM Page | 190