1
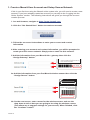
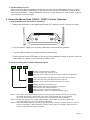
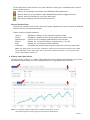
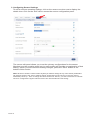
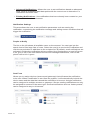
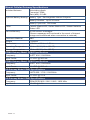
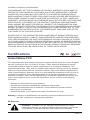
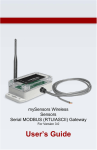
Monnit Wireless Sensors
and Cellular Gateway
User’s Guide
For Cellular Gateway Models CGW2 & CGW3
Use With iMonnit Online Software
MonnitLink™ Cellular Gateway Quick Start
• Create an iMonnit user account and assign wireless gateway and sensors.
• Plug the power supply into a power outlet then connect to the gateway.
• Turn the power switch on (battery backup models only).
• Once all three lights turn green, your network is ready to bring sensors online.
IMPORTANT!
DO NOT power up your Cellular Gateway until after you have created an account on
iMonnit.com and added your cellular gateway and wireless sensors to the account.
1. Create a Monnit User Account and Setup Sensor Network
If this is your first time using the iMonnit online system site, you will need to create a new
account. If you have already created an account you can skip to the “Logging into the
Online System” section. The following instructions will guide you through the account
creation process.
1. In a web browser, navigate to https://www.imonnit.com.
2. Click the “Get Started Here” button to create an account.
3. Follow the on-screen instructions to enter your account and contact
information.
4. After entering your account and contact information, you will be prompted to
Contains FCC ID: ZTL-RFSC1
create your first sensor network. Simply enter a name for this
and IC:network.
9794A-RFSC1
5. Add the information from your
“Assign Gateway” button.
MonnitLink™
This device complies with Part 15 of the
FCC Rules. Operation is subject to the
following two conditions:
gateway then click the
(1) this device may not cause harmful
interference and
(2) this device must accept any interference
received, including interference that may
cause undesired operation.
ID: ######
Code: XXXXXX
Pe
Back of
+
_
el
6a. Add the information from your first Monnit wireless sensor then click the
“Assign Sensor” button.
Sensor
Contains: FCC ID: ZTL-RFSC1
IC: 9794A-RFSC1
Sensor ID: ######
Sensor Code: XXXXXX
6b. On the next screen, enter a name for the wireless sensor and use the
drop down to tell us how you are going to be using the wireless sensor.
(This allows us to suggest settings for your sensor.) When finished, click
the “Continue” button.
PAGE 2
7. Confirmation Screen.
When you have finished adding the sensor, you will see a confirmation screen. At this
point you can assign notifications to the sensor (see Using The iMonnit™ Online Wireless Sensor System) , assign additional sensors to your account or click “Done” to go to
your sensors overview page.
2. Using the MonnitLink CGW2 / CGW3 Cellular Gateway
1. Using the MonnitLink Cellular Gateway
• Attach the Antenna’s to the gateway (Sensor RF antenna on left, Cellular on right).
Sensor RF
Cellular
• Plug the power supply into a power outlet then connect to the gateway.
• Turn the power switch on (battery backup models only)
• Check that the three LED lights on the front of the gateway change to green. Once all
three lights turn green, your network is ready to use.
2. Understanding the Cellular Gateway Lights
Sensor communication problem
Communication with sensors is ok
Blinking: active communication between sensors and gateway
Last communication with Monnit’s server was unsuccessful
Last communication with Monnit’s server was ok
Blinking: active communication with Monnit’s server
Cellular network connection error
Blinking Red: Network registration in progress
Connected to the cellular network
Blinking Green: Activating data session
Blinking Green / Red: Low cellular network signal
Note 1: The CGW resets itself after receiving new configuration from the server (ex. new HB),
the LEDs will change colors breifly, then each LED will flash red as the gateway
connects. When all LEDs have turned green, the reset cycle has completed.
Note 2: During SW upgrade, the middle LED will flash green. After successful upgrade all
LEDs will flash green, then the gateway will restart.
Note 3: Units with battery backup will turn off the LEDs when running on battery power to save on
power consumption. LEDs will flash to signify activity then go off again. When power is
restored, operation will return to normal.
PAGE 3
On Bootup: The cell light begins flashing red. The flashing switches to green and
finally lands on a solid green when the link to the cell network is established. Next, the
middle light flashes green and then lands on solid green when the link to the server is
established. The wireless sensor light turns green indicating the gateway is ready to
listen to sensor traffic.
During Operation: All lights are solid green. Activity from a sensor will cause the wireless sensor light to flash instantly. When the gateway is deliver messages to the server,
the cell light may illuminate and go through the sequence of acquiring a link to a tower if
it is not currently connected. The middle light flashes green on the gateway’s heartbeat,
or when an urgent message needs delivery.
2. Cellular Gateway Controls
Control Button
A short press of the control button while lights are all green, will force immediate
communication to server and exchange all sensor data currently stored in memory.
Press and hold to reset the gateway to factory settings (hold until all lights go red).
This resets the gateway heartbeat to 60 minutes. You will need to login to the online
system after resetting the gateway to reconfigure the gateway to your desired settings.
Note: If the gateway LEDs do not turn green, you may have a connectivity issue. Wait a few
minutes to see if the lights turn green. If they do not, power cycle the device by disconnecting then
reconnecting the power on standard gateways or toggling the power switch on gateways with battery backup. If it still does not connect, reset the device to factory settings. If there is still an issue,
contact Monnit customer support. If all three lights look amber, then there is an internal hardware
problem. If, left to right, the lights are red-green-green, there is a cell modem issue. If red-redgreen, there is a memory issue. For all of these cases, you will need to contact Monnit support.
3. Configuring The Cellular Gateway
The cellular gateway collects data from all sensors within range and is preconfigured
to batch deliver the sensor messages to the online system at the specified heartbeat
(every 60 minutes by default factory settings).
You can access gateway settings by clicking on “View Gateways” in the top bar of the
“Overview” page. Clicking on a gateway in the list, opens the detail view. Click on the
“Edit” tab to access the gateway’s settings.
PAGE 4
3. Using Your Monnit Wireless Sensors
Insert Batteries Into Wireless Sensors
Important: Make sure your sensors are at least 3ft. away from Ethernet Gateway.
Peel back the black sticker cover of the battery slot and slide the coin cell battery into
the sensor as shown in fig.1. It will power on within 10-20 seconds. Once online, your
sensor is ready to be deployed. If you wish to change a sensor configuration, change the
parameter in the software. The new parameters will be transmitted to the sensor on the
next heartbeat. If you need a more immediate response from the sensor, power cycle the
sensor by removing the battery, waiting 60 seconds, then re-insert the battery.
Battery
Insertion
fig.1
+
_
Notes:
- If the sensor status indicator does not change, reset
the sensor by removing the battery.
- Wait 60 seconds then re-insert the battery.
- When inserting the battery, make sure to push the
battery all the way back using a paper clip.
- Note the proper orientation of battery in fig.1
Warning: Your sensors ship with a 10 minute heartbeat.
It is recommended that unless you are using the AA battery
solution, you should set the heartbeat to no faster than one hour to preserve battery life. When
changing a sensor’s heartbeat, the new configuration information will be sent to the sensor on it’s next
heartbeat. If you want to update the sensors immediately you can reset them manually.
Manual Sensor Reset Process:
1 - Using the end of a paper clip, push the batteries out of the sensors through the small hole
in the top of the sensor
2 - Change the sensor heartbeat through the online system
3 - Re-insert the batteries into the sensors
PAGE 5
4. Using The iMonnit™ Online Wireless Sensor System
1. Understanding The Online Interface
When you log into the online system, the default view shows all of your sensors last
recorded data.
Menu System
View / Sort Features
Date Range Selector
Sensors Overview
Sensor Details View
Menu System
Overview
Notifications
Manage
Reports
Sensor Maps
Support
- Shows all sensors in the account and their last readings.
- Manage sensor notifications and show all sent notifications.
- Manage networks, sensors and gateways.
- Printable account and sensor network reports.
- Visual maps to help you track sensor placement.
- Support information for using sensors and software.
View / Sort Features
This section allows you to sort the sensors being viewed and search for sensors on
your account.
Sensor Overview
Displays sensors on your account with their last reading and status information.
Clicking on a sensor row expands the “Sensor Detail View” allowing you to view
detailed information for the selected sensor.
PAGE 6
To the left side of each sensor row is an indicator to help you understand the current
status of the sensor.
Sensor is checking in and within user defined safe parameters.
Sensor has met or exceeded a user defined threshold or triggered event.
Sensor has not checked in (inactivity alert sent).
No sensor readings will be recorded (Inactive)
Sensor Details View
Clicking on a sensor row on the “Overview” page expands the row to include a detailed
sensor view for the selected sensor.
Select a tab to change between:
History Chart
Notifications
Export
Edit
Calibrate
- Displays a history of the selected sensor’s data.
- Displays a graphical view of the selected sensor’s data.
- Allows you to manage notifications for the sensor.
- Allows you to archive data by exporting as a .csv file.
- Allows you to manage sensor settings.
- Available on certain sensor types to provide more accurate data.
Note: The data shown on the chart, notification, history and export tabs is based on the date
range indicated on the upper right side of the sensor detail information. To change the date
range, click inside the date box.
2. History and Chart Views.
Clicking on the “History” or “Chart” tabs within the sensor detail panel allows you to view
the sensor’s data history as time stamped data or in a graphical chart format.
Note: To change the date range of the viewable information, click on
the date range box at the top right of the sensor detail panel.
PAGE 7
3. Configuring Sensor Settings
To edit a sensors operation settings, click on the sensor overview row to display the
details view. Click on the “Edit” tab to access the sensor configuration panel.
The sensor edit panel allows you to set the primary configurations for the sensor.
Mousing over the question mark icon by each setting will provide an explanation of that
setting. When you have finished making changes, press the “Save” button at the
bottom of this section.
Note: Be sure to click the “Save” button anytime you make a change to any of the sensor parameters.
All changes made to the sensor settings will be downloaded to the sensor on the next sensor
heartbeat (check-in). Once a change has been made and “Saved,” you will not be able to edit that
sensor’s configurations again until the sensor has downloaded the new setting.
PAGE 8
4. Sensor and/or Gateway Notification(s).
Notifications for a single sensor can be created, deleted or edited by clicking the
“Notifications” tab in a sensor’s detail view.
Notifications can be created, deleted or edited for any sensor or group of sensors by
clicking on “Notifications” in the main menu.
Toggle On/Off
Click to Open Detail View
Send Test
Edit Delete
When creating a notification, you will need to select the type of notification to create.
• Sensor Reading Notification - Reading notifications are sensor specific (i.e. water
sensor = trigger alert when water present, temp sensor = trigger alert when temp
is above 70F, etc.). When creating a sensor reading notification, you will need to
choose the sensor type you are creating the alert for. The select box will only show
sensor types that are currently being used on your sensor network.
• Battery Notification - Allows users to define a battery power percentage level that
will trigger an alert from the system, warning them to replace batteries.
• Inactivity Notification - Set-up “Inactivity” notifications to alert you when your sensors have stopped communicating with the servers. Failure to set up an “Inactivity”
notification will result in no email/SMS text being sent should your sensors stop
communicating with the servers.
PAGE 9
• Advanced Notifications - Allows the user to set notifications based on advanced
rules, such as comparing past data points with the current one to determine if a
notification should be sent.
• Existing Notifications - Use notifications that have already been created on your
account with the selected sensor.
Notification Settings
This area allows the user to set notification parameters such as naming the
notification, customizing the notification message and setting sensor conditions that will
trigger the notification.
People to Notify
The list on the left shows all available users on the account. You can type into the
search box to filter large lists of users. Select the user(s) to receive the notification and
click the arrow button to add them to the recipient list. By default, email notifications are
activated. Clicking the notification delivery method icon toggles them on and off (green
is on, grey is off). If the user should receive text message notifications, click on the
phone icon to turn it green.
Sent From
Allows you to assign devices (sensors and gateways) that will cause the notification
to be sent. When a notification is sent from the system, it will automatically include the
device name and the data that caused the notification to be sent. A single notification
can be assigned to multiple sensors or gateways. Sensor reading notifications can only
be assigned to sensors of the same type. General notifications such as “battery status”,
can be assigned to any or all sensors.
PAGE 10
Devices to Notify
If you have a Monnit Control or Notifier A/V device on your network, you will also see
a “Devices to Notify” tab. This will allow the notification to interact with these types of
devices. Select a device from the list on the left and click the arrow button to add it to
the recipient list. Clicking the control icon toggles their setting.
Note: Control devices have two relays per device that are controlled separately. You can turn a
relay on, off or toggle the state. You can also set a duration by clicking on the timer icon. This will
perform the selected toggle (on/off/toggle) for a set duration, then change back.
5. Exporting Sensor Data
Clicking on the “Export” tab within the sensor data window allows you to export sensor data
to a comma separated value (.csv) file or send the sensor data to an external web source.
To export sensor data you must first select the date range for the data you want to export.
Once the date range is selected, determine whether you want sensor data from the
selected sensor only, from all sensors in the network or all sensors assigned to the account. When you are finished, click on “Export Data” at the bottom of this window. The
data will be exported to a comma separated value (.csv) file format. Note: Only the first 2,500
records within the selected date range will be exported.
You can alternately send your sensors’ incoming data to a 3rd party by clicking on the
“Configure data push” button at the bottom of the window. From this area you can pass
data from your wireless sensor network devices to another service in real time. This is done
by coding the data into a url query then sending the data via http get request at the time
data is received. There is an extensive list of parameters that can be passed, as listed in
the viewed window, that allow you to send detailed information about both the data and the
sensor.
PAGE 11
6. Calibrating Sensor Data
Certain wireless sensors can be calibrated for more accurate readings (ex. temperature
sensors). If calibration is possible for a sensor, the “Calibrate” tab will be visible in the detail
view. To calibrate a sensor, replace the last reading with the more accurate reading and click
“Calibrate”. All future readings from the sensor will be based off the new calibration setting.
7. Manage Sensor Networks
To view or edit information about your wireless sensor network(s), click on “Manage” in the
main navigation. This area allows you to edit network details, create new sensor networks,
and manage wireless gateways and sensors for your network(s).
Click to
Manage
Create a
new network
Select which
network to view
Edit network
information
Add a device
to the network
Remove device
from network
Clear sensor
history and data
Move device
to
PAGE 11
another network
Note: Some buttons and features are only visible if there is more than one sensor network setup on the
account, such as the network selection box in the upper right corner.
If more than one sensor network is setup on the account, you can easily move gateways and sensors from
one network to another by clicking on the “Move Device” button at the far right of the device’s “Status” section.
If you clear a sensor’s data, the data history is deleted from the entire system and can not be recovered. We
recommend exporting a sensor’s data history using the export function in the sensor details view
(“Overview” page) before clearing the sensor’s data if you want to have a record of the data.
PAGE 12
Antenna Orientation
In order to get the best performance out of your Monnit Wireless Sensors and Gateways, it is important to note proper antenna orientation and sensor positioning. Antennas should all be oriented in
the same direction, pointing vertically out of the sensor or gateway. If the device is mounted flat on a
horizontal surface, you should bend the antenna so that it is pointing vertical. You should also make
the sensor’s antenna wire as straight as possible, avoiding any kinks and curving of the wire.
For optimum signal strength determine the height at which the majority of your sensors will be mounted at and position the wireless gateway at the same height. The sensor signal strength will reduce if
the sensors are positioned higher than the wireless gateway. Also sensors should be at least 3 feet
away from each other and the wireless gateway to function properly.
Vertically Mounted
Vertically Mounted
Devices At Least 3 Feet Apart
Horizontally Mounted
Horizontal Surface
PAGE 13
Monnit Cellular Gateway Specifications
Included Antenna
Articulating dipole
Connector: SMA
Gain (dBi): 2.0 dBi
Optional Battery Backup Battery Type: Rechargeable Lithium Polymer
Battery Duration: Up to 24 hours
Battery Cycle Life: 500 times
LEDs
Cellular Status LED, Online Status LED, Sensor Network
Status LED
Device Memory:
50,000 sensor messages
(Sensor messages will be stored in the event of Internet
outage and transferred when connection is restored)
Enclosure Material
ABS
Weight
7 ounces
Dimensions
5.004 in. x 3.8 in. x 1.51 in.
Operating Temperature
-10 to +70 °C (14 to 158 °F)
Storage Temperature
-20 to +85 °C (-4 to 185 °F)
CDMA Gateway Model CGW2 Specifications
Frequency
1xRTT 800 / 1900 MHz
Input Power
5.5 VDC @ 900 mA
CDMA Gateway Model CGW3 Specifications
Frequency
1xRTT 800 / 1900 MHz
Input Power
5.5 VDC @ 900 mA
3G Gateway Model CGW3 Specifications
Frequency
UMTS 850 / 1700 / 1900 MHz
Input Power
5.5 VDC @ 2.5 A
2G Gateway Model CGW3 Specifications
Frequency
GSM/GPRS 850 / 900 / 1800 / 1900 MHz
Input Power
5.5 VDC @ 2.5 A
PAGE 14
Monnit Wireless Sensors Technical Specifications
Supply Voltage
2.0 - 3.6 VDC *
Current Consumption
0.7 µA (sleep mode)
2 mA (radio idle/off mode)
2 mA (measurement mode)
25 mA (radio RX mode)
35 mA (radio TX mode)
Operating Temperature Range
(Board Circuitry and Coin Cell)
-7°C to +60°C ( 20°F to +140°F )**
Optimal Battery Temperature
Range (Coin Cell)
+10°C to +50°C ( +50°F to +122°F )
Certifications
Industry
Canada
900 MHz product; FCC ID: ZTL- RFSC1 and IC:
9794A-RFSC1. 868 and 433 MHz product tested
and found to comply with: CISPR 22:2008-09 / EN
55022:2010 - Class B and ETSI EN 300 220-2 V2.4.1
(2012-05).
* Hardware can not withstand negative voltage. Please take care when connecting a power device.
** At temperatures above 100°C, it is possible for the board circuitry to lose programmed memory.
PAGE 15
Warranty Information
(a) Monnit warrants that Monnit-branded products will be free from defects in materials and
workmanship for a period of one (1) year from the date of delivery with respect to hardware
and will materially conform to their published specifications for a period of one (1) year
with respect to software. Monnit may resell sensors manufactured by other entities and are
subject to their individual warranties; Monnit will not enhance or extend those warranties.
Monnit does not warrant that the software or any portion thereof is error free. Monnit will
have no warranty obligation with respect to Products subjected to abuse, misuse, negligence or accident. If any software or firmware incorporated in any Product fails to conform
to the warranty set forth in this Section, Monnit shall provide a bug fix or software patch
correcting such non-conformance within a reasonable period after Monnit receives from
Customer (i) notice of such non-conformance, and (ii) sufficient information regarding such
non-conformance so as to permit Monnit to create such bug fix or software patch. If any
hardware component of any Product fails to conform to the warranty in this Section, Monnit
shall, at its option, refund the purchase price less any discounts, or repair or replace nonconforming Products with conforming Products or Products having substantially identical
form, fit, and function and deliver the repaired or replacement Product to a carrier for land
shipment to customer within a reasonable period after Monnit receives from Customer (i)
notice of such non-conformance, and (ii) the non-conforming Product provided; however,
if, in its opinion, Monnit cannot repair or replace on commercially reasonable terms it may
choose to refund the purchase price. Repair parts and replacement products may be
reconditioned or new. All replacement products and parts become the property of Monnit.
Repaired or replacement products shall be subject to the warranty, if any remains, originally
applicable to the product repaired or replaced. Customer must obtain from Monnit a Return
Material Authorization Number (RMA) prior to returning any Products to Monnit. Products
returned under this Warranty must be unmodified.
Customer may return all Products for repair or replacement due to defects in original materials and workmanship if Monnit is notified within ninety (90) days of customer’s receipt of
the product. Monnit reserves the right to repair or replace products at its own and complete
discretion. Customer must obtain from Monnit a Return Material Authorization Number
(RMA) prior to returning any products to Monnit. Products returned under this Warranty
must be unmodified and in original packaging. Monnit reserves the right to refuse warranty
repairs or replacements for any products that are damaged or not in original form. For
products outside the ninety-day warranty period repair services are available at Monnit at
standard labor rates for a period of one year from the Customer’s original date of receipt.
(b) As a condition to Monnit’s obligations under the immediately preceding paragraphs,
Customer shall return Products to be examined and replaced to Monnit’s facilities, in
shipping cartons which clearly display a valid RMA number provided by Monnit. Customer
acknowledges that replacement products may be repaired, refurbished or tested and found
to be complying. Customer shall bear the risk of loss for such return shipment and shall
bear all shipping costs. Monnit shall deliver replacements for Products determined by Monnit to be properly returned, shall bear the risk of loss and such costs of shipment of repaired
products or replacements, and shall credit Customer’s reasonable costs of shipping such
returned Products against future purchases.
(c) Monnit’s sole obligation under the warranty described or set forth here shall be to repair
or replace non-conforming products as set forth in the immediately preceding paragraph, or
to refund the documented purchase price for non-conforming Products to Customer. Monnit’s warranty obligations shall run solely to Customer, and Monnit shall have no obligation
to customers of Customer or other users of the Products.
PAGE 16
Limitation of Warranty and Remedies.
THE WARRANTY SET FORTH HEREIN IS THE ONLY WARRANTY APPLICABLE TO
PRODUCTS PURCHASED BY CUSTOMER. ALL OTHER WARRANTIES, EXPRESS
OR IMPLIED, INCLUDING BUT NOT LIMITED TO THE IMPLIED WARRANTIES OF
MERCHANTABILITY AND FITNESS FOR A PARTICULAR PURPOSE ARE EXPRESSLY
DISCLAIMED. MONNIT’S LIABIITY WHETHER IN CONTRACT, IN TORT, UNDER ANY
WARRANTY, IN NEGLIGENCE OR OTHERWISE SHALL NOT EXCEED THE PURCHASE
PRICE PAID BY CUSTOMER FOR THE PRODUCT. UNDER NO CIRCUMSTANCES
SHALL MONNIT BE LIABLE FOR SPECIAL, INDIRECT OR CONSEQUENTIAL DAMAGES. THE PRICE STATED FOR THE PRODUCTS IS A CONSIDERATION IN LIMITING
MONNIT’S LIABILITY. NO ACTION, REGARDLESS OF FORM, ARISING OUT OF THIS
AGREEMENT MAY BE BROUGHT BY CUSTOMER MORE THAN ONE YEAR AFTER
THE CAUSE OF ACTION HAS ACCRUED.
IN ADDITION TO THE WARRANTIES DISCLAIMED ABOVE, MONNIT SPECIFICALLY
DISCLAIMS ANY AND ALL LIABILITY AND WARRANTIES, IMPLIED OR EXPRESSED,
FOR USES REQUIRING FAIL-SAFE PERFORMANCE IN WHICH FAILURE OF A PRODUCT COULD LEAD TO DEATH, SERIOUS PERSONAL INJURY, OR SEVERE PHYSICAL
OR ENVIRONMENTAL DAMAGE SUCH AS, BUT NOT LIMITED TO, LIFE SUPPORT OR
MEDICAL DEVICES OR NUCLEAR APPLICATIONS. PRODUCTS ARE NOT DESIGNED
FOR AND SHOULD NOT BE USED IN ANY OF THESE APPLICATIONS.
Certifications
Industry
Canada
United States FCC
This equipment has been tested and found to comply with the limits for a Class B digital
devices, pursuant to Part 15 of the FCC Rules. These limits are designed to provide
reasonable protection against harmful interference in a residential installation. This
equipment generates, uses, and can radiate radio frequency energy and, if not installed
and used in accordance with the instruction manual, may cause harmful interference to
radio communications. However, there is no guarantee that interference will not occur in
a particular installation. If this equipment does cause harmful interference to radio or
television reception, which can be determined by turning the equipment off and on, the
user is encouraged to try to correct the interference by one of more of the following
measures:
• Reorient or relocate the receiving antenna
• Increase the separation between the equipment and receiver
• Connect the equipment into an outlet on a circuit different from that to which
the receiver is connected.
• Consult the dealer or an experienced radio/TV technician for help.
Warning: Changes or modifications not expressly approved by Monnit could void
the user’s authority to operate the equipment.
RF Exposure
WARNING: To satisfy FCC RF exposure requirements for mobile
transmitting devices, the antenna used for this transmitter must not be
co-located in conjunction with any other antenna or transmitter.
PAGE 17
United States FCC - Continued
To reduce potential radio interference to other users, the antenna type and its gain should be so chosen
that the equivalent isotropically radiated power (EIRP) is not more than that required for successful communication (listed below).
The system antenna(s) used for the following transmitters must be installed to provide a separation
distance of at least 20 cm from all the persons and must not be co-located or operating in conjunction
with any other antenna or transmitter.
All Monnit Wireless Sensors and Cellular Gateway Models CGW2 & CGW3 Contain:
FCC ID: ZTL-RFSC1
Approved Antennas
The following antennas are approved for use with Monnit devices (required antenna impedance is
50 ohms.)
•
•
•
•
Hyperlink HG905RD-RSP (5.1 dBi Rubber Duck)
Pulse W1063 (3.0 dBi Rubber Duck)
ChangHong GSM-09 (2.0 dBi Rubber Duck)
Specialized Manufacturing MC-ANT-20/4.0C (4” whip)
Monnit CGW2 - CDMA Gateway Also Contains CDMA Module:
FCC ID: MIVCNN0301
• The system antenna(s) used with the device must not exceed the following levels:
• Band Class 0: the maximum gain is 2.2dBi.
• Band Class 1: the maximum gain is 8dBi.
Monnit CGW3 - CDMA Gateway Also Contains CDMA Module:
FCC ID: RI7CE910-DUAL
• The system antenna(s) used with the device must not exceed the following levels:
• CDMA BC0: the maximum gain is 5.12dBi.
• CDMA BC1: the maximum gain is 6.12dBi .
Monnit CGW3 - 3G Cellular Gateway Also Contains Module:
FCC ID: RI7HE910NA
• The system antenna(s) used with the device must not exceed the following levels:
• GSM 850/FDD V: 5.29 dBi
• PCS 1900/FDD II: 4.02 dBi
• FDD IV: 6.32 dBi
Monnit CGW3 - 2G Cellular Gateway Also Contains Module:
FCC ID: RI7GE910
• The system antenna(s) used with the device must not exceed the following levels:
• GSM 850: 6.43 dBi
• PCS 1900: 2.75 dBi
PAGE 18
Canada (IC)
English
Under Industry Canada regulations, this radio transmitter may only operate using an
antenna of a type and maximum (or lesser) gain approved for the transmitter by Industry
Canada. To reduce potential radio interference to other users, the antenna type and its gain
should be so chosen that the equivalent isotropically radiated power (e.i.r.p.) is not more
than that necessary for successful communication.
The radio transmitters (IC: 9794A-RFSC1, IC: 4160a-CNN0301, IC: 5131A-CE910DUAL,
IC: 5131A-HE910NA IC: 5131A-GE910) have been approved by Industry Canada to operate with the antenna types listed on previous page with the maximum permissible gain and
required antenna impedance for each antenna type indicated. Antenna types not included
in this list, having a gain greater than the maximum gain indicated for that type, are strictly
prohibited for use with this device.
This device complies with Industry Canada licence-exempt RSS standard(s). Operation is
subject to the following two conditions: (1) this device may not cause interference, and (2)
this device must accept any interference, including interference that may cause undesired
operation of the device.
French
Conformément à la réglementation d’Industrie Canada, le présent émetteur radio peut
fonctionner avec une antenne d’un type et d’un gain maximal (ou inférieur) approuvé pour
l’émetteur par Industrie Canada. Dans le but de réduire les risques de brouillage radioélectrique à l’intention des autres utilisateurs, il faut choisir le type d’antenne et son gain de
sorte que la puissance isotrope rayonnée équivalente (p.i.r.e.) ne dépasse pas l’intensité
nécessaire à l’établissement d’une communication satisfaisante.
Le présent émetteurs radio (IC: 9794A-RFSC1, IC: 4160a-CNN0301, IC: 5131A-CE910DUAL, IC: 5131A-HE910NA et IC: 5131A-GE910) a été approuvé par Industrie Canada pour
fonctionner avec les types d’antenne figurant sur la page précédente et ayant un gain admissible maximal et l’impédance requise pour chaque type d’antenne. Les types d’antenne
non inclus dans cette liste, ou dont le gain est supérieur au gain maximal indiqué, sont
strictement interdits pour l’exploitation de l’émetteur.
Le présent appareil est conforme aux CNR d’Industrie Canada applicables aux appareils
radio exempts de licence. L’exploitation est autorisée aux deux conditions suivantes : (1)
l’appareil ne doit pas produire de brouillage, et (2) l’utilisateur de l’appareil doit accepter
tout brouillage radioélectrique subi, méme si le brouillage est susceptible d’en compromettre le fonctionnement.
PAGE 19
European Union - Directive 1999/5/EC
The Monnit CGW3 - 2G Cellular Gateway has been evaluated against the essential requirements of the 1999/5/EC Directive.
Hereby, Monnit Corp., declares that the Monnit CGW3 - 2G Cellular Gateway is in compliance with the essential requirements and other relevant provisions of Directive 1999/5/EC.
In order to satisfy the essential requirements of 1999/5/EC Directive, GE910 modules are
compliant with the following standards:
RF spectrum use (R&TTE art. 3.2)
EN 301 511 V9.0.2; EN 62311:2008
EMC (R&TTE art. 3.1b)
EN 301 489-1 V1.9.2
EN 301 489-7 V1.3.1
Health & Safety (R&TTE art. 3.1a)
EN 60950-1:2006 + A11:2009 + A1:2010 +
A12:2011 + AC:2011
The conformity assessment procedure referred to in Article 10 and detailed in Annex IV of
Directive 1999/5/EC has been followed with the involvement of the following Notified Body
Notified Body:
Monnit Corp.
7304 South Cottonwood
Suite 204
Midvale, UT 84047
Notified Body No: TBD
There is no restriction for the commercialisation of the Monnit CGW3 - 2G Cellular Gateway
in all the countries of the European Union.
Antennas
WARNING: ISM and GSM antennas are considered integral to the
Monnit CGW3 - 2G Cellular Gateway and should remain fixed within 3
meters of the device during operation.
PAGE 20
SAFETY RECOMMANDATIONS
READ CAREFULLY
Be sure the use of this product is allowed in the country and in the environment required.
The use of this product may be dangerous and has to be avoided in the following areas:
• Where it can interfere with other electronic devices in environments such as hospitals,
airports, aircrafts, etc
• Where there is risk of explosion such as gasoline stations, oil refineries, etc
It is responsibility of the user to enforce the country regulation and the specific environment
regulation.
Do not disassemble the product; any mark of tampering will compromise the warranty validity. We recommend following the instructions of this user guide for correct setup and use of
the product.
Please handle the product with care, avoiding any dropping and contact with the internal
circuit board as electrostatic discharges may damage the product itself. The same precautions should be taken if manually inserting a SIM card, checking carefully the instruction for
its use. Do not insert or remove the SIM when the product is in power saving mode.
Every device has to be equipped with a proper antenna with specific characteristics. The
antenna has to be installed with care in order to avoid any interference with other electronic
devices and has to guarantee a minimum distance from the body (20 cm). In case of this
requirement cannot be satisfied, the system integrator has to assess the final product
against the SAR regulation.
The European Community provides some Directives for the electronic equipments introduced on the market. All the relevant information’s are available on the European Community website: http://ec.europa.eu/enterprise/sectors/rtte/documents/
The text of the Directive 99/05 regarding telecommunication equipments is available, while
the applicable Directives (Low Voltage and EMC) are available at:
http://ec.europa.eu/enterprise/sectors/electrical
CAUTION: MONNIT CGW3 CONTAINS AN ENCLOSED CR2032
COIN CELL BATTERY. RISK OF EXPLOSION IF BATTERY IS
REPLACED BY AN INCORRECT TYPE. DISPOSE OF USED
BATTERIES ACCORDING TO THE INSTRUCTIONS.
PAGE 21
Error Reporting, Troubleshooting and Support
For technical support and troubleshooting tips please visit our support library online at
http://www.monnit.com/support/. If you are unable to solve your issue using our online
support, email Monnit support at [email protected] with your contact information and a
description of the problem, and a support representative will call you within one business
day. For error reporting, please email a full description of the error to [email protected].
Additional Information and Support
For additional information or more detailed instructions on how to use your Monnit Wireless
Sensors or the iMonnit Online System, please visit us on the web at
http://www.monnit.com/support/.
Monnit Corporation
7304 South Cottonwood
Suite #204
Midvale, Utah 84047
801-561-5555
www.monnit.com
All trademarks are property of Monnit. ©2009-2015 Monnit Corp. All Rights Reserved.
MUG-23-2C (02/15)