1
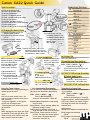
Canon XA10 Quick Guide
Media Pool Settings
Quick Instructions
[1] Charge the Battery Pack.
[2] Insert a SD card into slot B.
[3] Connect Headphones.
[4] Select The Operating Mode.
h.
[5] Check your Mic/Audio Input Switch.
[6] Turn on the Camera.
[7] Load/Set Your Menu Settings.
rding.
[8] Press START/STOP to Start Recording.
[9] Adjust Audio Levels.
se.
[10] Press START/STOP to Stop/Pause.
[1] Charging the Battery Pack
1] Connect the power cord to the
compact power adapter.
2] Plug the power cord into a power
out let.
3] Connect the power adapter to the
camcorder's DC IN terminal.
5] Charge battery with the
camcorder turned off. The
red ON/OFF (CHG) indicator
will stop blinking when the
battery
attery pack is
fully
ully charged.
4] Attach the battery pack. Press
the battery pack softly into the
battery
y attachment unit and slide
place.
it toward until it clicks in pla
[2] Insert S
SD
D Card into slo
slott B
Memory card must be in the
UNLOCK posit
position
tion to record new
w
files to the card.
ca
ard. 8GB (or
more) SD, SDHC
HC or SDXC
class 10 or UHS
HS class 1
memory cards
s prefered.
1] With camcorder
order off.
2] Open the slot cover.
3] Insert the memory car
card
ad
straight into
nto memory slot B.
4] Gently close
se the cover.
Removing a Memory Card
Push card in and it will eject.
>AF Mode:
Instant AF
Focus Assistance:
On
Built-in Mic Freq:
Normal
Built-in Mic Directionality:
Normal
XLR Rec Channel:
CH1
>Rec Media:
Memory Card B
Recording Mode:
MXP
Frame Rate:
24P
>AV/Headphones:
Headphones
Custom Key/Dial:
Exposure
Assign Button 1:
AF/MF
Assign Button 2:
WB
Set WB Priority:
Auto
Power Saving Mode:
Off
Date Format:
Y.M.D.
[3] Using Headphones
h
[6] Power On
Connect the
th 3.5mm minijack to the
AV OUT/ terminal to
verify your audio levels
while recording.
[7] Load/Set You Menu Settings
Set headphone
volume level to 8.
[4] Operati
Operating Mode
AUTO
M (full acces
access)
filters)
CINEMA (cinematic
(cine
rs)
[5] Mic/A
Mic/Audio Input
put
Set the sw
switch to
“INT”
INT to u
use the
Turn the camera on
Insert a SD card with settings into slot B.
OPEN: [FUNC.] > [MENU] >
>
(Backup Menu Settings B]
Select [load] and then touch [Yes] the
screen will restart.
[8] START/STOP to Begin Recording
[9] Adjust Audio Levels
[FUNC.] > [ Mic Level] > ....
[M Manual] - adjust using arrows
[A Automatic] - automatic levels
[10] START/STOP to Stop/Pause
Using the Touch Screen
Built-In Microphone
B
Micropho Directionality
Selecting the Frame Rate
Buttons and menus change depending on
operating mode
de and task.
Set the audio input switch in the handle to
[INT] adjust the direclionality
dire
direclionality.
Touch
Press on the touch screen firmly. You
may not be able
touch
b to perform
f
h operations correctly......
- Using your fingernails or hard-tipped
objects such as ballpoint pens.
- Operating the touch screen with wet Of
gloved hands.
>
>
OPEN: [FUNC.] > [MENU]
[M
[Built -in Mic Directionality]
Select the
desired
option & touch [X].
h d
i
Number of frames/fields per second that
will be recorded.
OPEN: [FUNC.] > [MENU] >
>
[Frame Rate]
Select the desired option & touch [X].
Drag
While applying pressure, swipe your finger
up and down or left and right across the
screen. Used to scroll menus, browse and
adjust controls button and sliders.
[Monaural] Mono. Emphasizes sound coming
from the front.
[Norm] Default - Stereo. Between [Wide] and
[Monaural] settings in reach.
[Wide] Stereo. For ambient sounds over a
large area-adds to the sense of presence.
[Zoom] Stereo. Sound linked to the zoom
position. The larger the subject appears
on the screen, the louder and more
focused the sound will be.
Progressive Option: - Recommended option
[24P] 24 fps (frames per second), Progressive. Using this frame rate will achieve a
cinematic look.
Other Options:
[60i] 60 fps. Standard interlaced field rate.
[PF30] progressive/interlaced
hybrid.
[PF24] progressive/interlaced
hybrid.
jtyler 2013.10.30
Canon XA10 Quick Guide
Location, Location, Location
Manual Focus
Use the focus ring to focus manuThe Video Files
ally. You can also use peaking to
Specs:
help you focus more accurately.
MXP, 1920x1080
1] Open the focus controls.
Frame Rate: 60i or 24p
[FUNC.] > [
Focus]
Audio:
To switch to autofocus without
compression: Dolby Digital 2ch
opening the focus controls,
encoding: Linear PCM
press [AF/MF]. In such case,
sampling: 48 kHz, 16 bits
Touch AF (step 3) will not be
File:
available.
AVCHD/MPEG-4 AVC/H.264
2] Touch [MF].
Saved on the memory card to:
3] Touch a subject that appears
\CANON\PRIVATE\AVCHD\BDMV\STREAM
inside the
frame. The Touch
the file is named ‘#####.MTS’
AF mark
will flash and the
focusing distance will be
The Image Files
adjusted automatically. You can
Specs:
further adjust the
1920x1080 pixels
focus manually if necessary.
4] Turn the focus ring to adjust
File:
the focus.
Baseline JPEG
The center of the screen will
Color sampling:
be magnified to hep you focus
4:2:2 or 4:2:0
more easily. Turn this setting
Saved on the memory card to:
on/off with the [Focus Assis\DCIM\101CANON
tance].
the file is named ‘IMG_####.JPG’
[FUNC.] > [MENU] >
> [Focus Assistance]
Using the Viewfinder
Other Focus Options:
With the camera on pull
[FUNC.] > [MENU] >
out the viewfinder. and
> [Distance Units]
adjust the viewfinder
> [Focus Ring Responce]
using the dioptric
> [Focus Ridn Direction]
Playback
Press the
button to switch the
between recording and playback modes.
Selecting SD Card for Recordings
To remove the
battery pack
1] Slide BATTERY RELEASE toward the lens
and hold down.
2] Slide the battery pack over the battery
release slider and pull it out.
Saving Menu Settings to slot B
Settings already on the card will be
overwritten.
With a memory card in slot B.
OPEN: [FUNC.] > [MENU] >
>
(Backup Menu Settings B]
1] Select [Save] and then select [Yes] will
save the current setting to the SD card
in slot B.
2] Select [OK] and then touch [X].
Profile Saving/Loading Notes: (It’s not 100% true.)
The manual states that the camcorder can load
settings from canon XA10 and VIXIA HF G10 that are
common to both types of camcorders. Settings that
are not common to both types will be reset to
default values,”
Select to location to record your movies
and photos. The SD card slot [B] is the
default for Media Pool menu profile.
OPEN: [FUNC] > [MENU] >
>
[Rec Media for ....]
Touch the icon for
(built-in memory),
(slot A) or
(slot B)
and then touch [X].
Slot [A] must be slected before [Double
Slot Rec] or
[Relay Recording] can
be chosen.
[Double Slot Rec] records duplicate data
to bot card slots - this setting can be set
in the profile.
[Relay Recording] records on the
slot [A] card then the slot [B] card cannot be saved in the profile.
In this menu option you can also check the available
recording time/number of photos, based on
currently used settings and memory card capacity.
Initializing the Memory
The camera prefers memory cards to be
fromated as exFAT. You may need to initialize
memory cards when you use them with the
camcorder for the first time. Initializing
memory will permanently delete all the files
it contains.
Connect the AC Adapter and power the
camcocder. Do not disconnect the power
source until the initialization is completed.
Open the initialization screen for the desired
memory.
OPEN: [FUNC.] > [MENU] >
>
[Initialize
]>
(built-in memory),
(slot A) or
(slot B)
and then press [Initialize]
In the initialization screen, touch [Complete
lnitialization] to physically erase all the data.
Press [OK] and then touch [X].
Factory Reset:
Remove the battery pack and disconnect all
power sources. Then, press the RESET button
with a pointed object to reset all the
camcorder's settings to default values.
Condensation
Moving the camcorder rapidly between hot
and cold temperatures may cause condensation (water dropletts) to form on its internal
surfaces. Stop usng the camcorder if condensation is detected. Continued use may
damage the camcorder.
Condensation may form:
• When the camcorder is moved quickly from
cold to warm places
• When the camcorder is left in a humid room
• When a cold room is heated rapidly
To avoid condensation:
• Do not expose the camcorder to sudden or
extreme changes in temperature.
• Remove the SD card(s) and battery pack.
Then, place the camcorder in an airtight
plastic bag and let it adjust gradually to
temperature changes before removing it
from the bag.
When condensation is detected:
The camcorder automatically shuts off. The
precise time required for water droplets to
evaporate will vary depending
on the location and weather
conditions. As a general rule,
wait 2 hours before resuming.