1
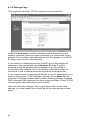
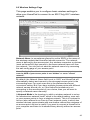
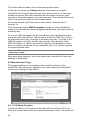
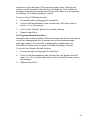
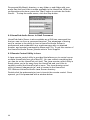
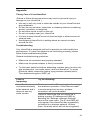
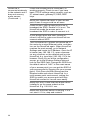
HomePod
User Manual
User Manual
MP-100
HomePod — Wireless Network Digital Audio Player with FM Tuner
Copyright
Copyright © 2003-4 by Xsense Connectivity, Inc. (dba Macsense Connectivity). All rights
reserved. No part of this documentation may be reproduced in any form or by any means or
used to make any directive work (such as translation or transformation) without permission
from Xsense Connectivity, Inc. Xsense Connectivity, Inc. reserves the right to revise this
documentation and to make changes in content without obligation among Xsense
Connectivity, Inc. to provide notification of such revision or change. All products and their
associated features are subject to change or upgrade at the time of the shipment or of the
sales.
Trademarks
All products, company, brand names are trademarks or registered trademarks of their
respective companies. They are used for identification purpose only. Specifications are
subject to be changed without prior notice.
FCC Interference Statement
This equipment has been tested and found to comply with the limits for a Class B digital
device pursuant to Part 15 of the FCC Rules. These limits are designed to provide
reasonable protection against radio interference in a commercial environment. This
equipment can generate, use and radiate radio frequency energy and, if not installed and
used in accordance with the instructions in this manual, may cause harmful interference to
radio communications. Operation of this equipment in a residential area is likely to cause
interference, in which case the user, at his own expense, will be required to take whatever
measures are necessary to correct the interference.
Safety Precautions
Follow all warnings and instructions marked on the product.
•
•
•
•
•
•
•
•
•
•
•
Slots and openings on the device are provided for ventilation. To protect it from
overheating, these openings must not be blocked or covered.
Do not use or store HomePod in the environment that exceeds temperature and humidity
specifications. Do not place HomePod near a radiator or heat register or in a built-in
installation unless adequate ventilation is provided.
Before cleaning, unplug HomePod from wall outlet. Do not use liquid cleansers or aerosol
cleansers. Use a damp cloth for cleaning.
Do not place cords or cables where they may be walked on or tripped over.
Be sure to comply with any applicable local safety standards or regulations.
General-purpose cables are provided with HomePod. The use of any other cables or
requirements mandated by local authority is user’s responsibility.
Cables attached to devices in different locations with different power sources and
grounding may cause hazardous voltage. Consult a qualified electronic consultant before
installing the product to check if this phenomenon exists and, if necessary, take
corrective action.
Never touch un-insulated telephone wires or terminals unless the line has been
disconnected.
Avoid using telephone equipment or installing the product during an electrical storm.
Never install HomePod, or any kind of telephone jacks, lines, network cables, or power
connections in wet locations.
Never spill liquid of any kind on HomePod.
TABLE OF CONTENTS
1.0 Welcome...................................................................................... 1
2.0 Before You Start.......................................................................... 3
2.1 Package Contents..................................................................... 3
2.2 System and Other Requirements .............................................. 3
3.0 Getting to Know Your HomePod ............................................... 5
3.1 Setting up Your HomePod......................................................... 5
3.2 Front Panel ............................................................................... 6
3.3 Side Connectors ....................................................................... 6
4.0 Server Software Installation....................................................... 9
4.1 Windows Installation ................................................................. 9
4.2 Macintosh Installation.............................................................. 10
5.0 Audio Server Control and Configuration ................................ 13
5.1 Server Control......................................................................... 14
5.2 Configuring Audio Folders....................................................... 14
5.3 Configuring iTunes Audio Library ............................................ 15
6.0 HomePod Setup........................................................................ 17
6.1 Wired Setup ............................................................................ 17
6.2 Wireless Setup........................................................................ 17
7.0 HomePod Basic Operation ...................................................... 19
7.1 Turning HomePod On and Off................................................. 19
7.2 Resetting HomePod ................................................................ 19
7.3 HomePod Display Menus........................................................ 19
7.4 HomePod Controls.................................................................. 21
7.4.1 Content Navigational Buttons ....................................... 21
7.4.2 Functional Buttons ........................................................ 22
7.4.3 Shuffle/Loop Mode Buttons........................................... 22
7.4.4 FM Radio Buttons: ........................................................ 22
8.0 Web Configuration.................................................................... 23
8.1 IP Settings Page ..................................................................... 24
8.2 Wireless Settings Page ........................................................... 25
8.3 Miscellaneous Page ................................................................ 26
8.3.1 LCD Sleep Function...................................................... 26
8.3.2 System Shutoff Function ............................................... 27
8.4 Radio Stations Page................................................................ 28
8.5 Firmware Upgrade Page ......................................................... 29
9.0 Extras Programs and Utilities.................................................. 31
9.1 HomePod Audio Server in Java .............................................. 31
9.2 HomePod Audio Server in Shell Command ............................ 32
9.3 Remote Control Utility in Java................................................. 32
Appendix ......................................................................................... 35
Taking Care of Your HomePod...................................................... 35
Troubleshooting ............................................................................ 35
Contacting Macsense.................................................................... 40
Technical Specifications ................................................................ 40
Limited Consumer Warranty ......................................................... 42
Getting Service ............................................................................. 43
1.0 Welcome
Thank you for purchasing a Macsense HomePod. Your HomePod gives
you access to digital audio files stored on your computer from anywhere
in the house or office.
1
2
2.0 Before You Start
2.1 Package Contents
Prior to setting up your HomePod, make sure your HomePod package
includes the following items:
• HomePod Unit
• Stereo Audio Cable
• Power Adapter
• HomePod CD
• Remote Control
• Quick Start Guide
• Ethernet Cable
• User Manual
2.2 System and Other Requirements
• Wi-Fi (802.11b or g) Access Point or Wireless Router
• Macintosh G3 or Pentium III PC
• Mac OS 9 and X or Windows 98/Me/2000/XP
3
4
3.0 Getting to Know Your HomePod
3.1 Setting up Your HomePod
HomePod streams digital audio files stored on your computer, over the
local network (either by wired Ethernet or over a wireless Wi-Fi
network).
Most of the time, HomePod will be used in a wireless environment. A
typical wireless network setup involves a computer connected to a
wireless router (or an access point) to form a wireless network.
HomePod would then connect wirelessly to this same network.
Note: The terms “wireless router”, “access point”, and “base station” are
sometimes used interchangeably in this manual. Wireless router is a device
that combines the functions of an access point plus a switching hub. Base
station is a common term used in the Mac community to refer to an access
point.
Headphone
Access Point
HomePod
Built-in Speakers
Computer
(Mac/PC)
Music Files
Store Here
USB Drive
Home Stereo
Digital Surround
System
HomePod System Diagram
Your HomePod can be placed anywhere in the house or office where
the wireless network has coverage. The audio files stored on your
computer can then be played through HomePod’s built-in stereo
speakers, attached headphones, home stereo system, or a high-end
digital surround sound system.
Note: An audio file, such as an MP3 file, is a file that may include music,
speech, narrative, or audio book content. The term “audio server” is used
to describe a computer on your network that contains audio files that will
be served to the HomePod.
The audio collection stored on your computer is recognized by the
HomePod as an “Audio Server”. Each computer with audio content
requires that the HomePod Audio Server Software be installed and
running to make the audio collection available to the HomePod.
One HomePod can access audio content from multiple computers
around the home or office. Conversely, multiple HomePods can
simultaneously access content from the same computer.
5
3.2 Front Panel
Power Button
Infra-red Receiver
irDA Receiver
Display Screen
Jog-shuttle Dial and Enter Button
Navigational and Action Buttons
Built-in Stereo Speakers
Volume Control Buttons
HomePod Front Panel
3.3 Side Connectors
HomePod is equipped with a rich set of input and output ports for
interfacing with other audio systems and devices.
Wi-Fi Antenna
FM Radio Antenna
Reset Button
Headphones Jack
USB Port
Ethernet Port
Power
RCA Jack, Right
RCA Jack, Left
Coaxial Output
SPDIF Output
HomePod Side Connectors
Wi-Fi Antenna
For connecting to the Wi-Fi 802.11b wireless network.
Raise the antenna for better reception.
Reset Button
For resetting the HomePod unit during an unexpected
crash. To reset, use a paper clip pin to poke into the
hole once. Same affect as unplugging and re-plugging
the power cord.
USB Port
For connecting to Flash Memory Stick or USB Hard
Drive. (Optional function.)
Ethernet Port
This 10/100Mbps Fast Ethernet Port is for establishing
a wired connection with your network. If you don’t have
a wireless network in place, you can also connect
HomePod to a wired network.
Power
For plugging in the power cord.
FM Radio Antenna
The FM Radio Antenna is a wire extending from within
the unit. Elongate the wire to get the best radio
reception.
Headphones Jack
For connecting to a standard portable stereo
headphone.
Audio RCA Jacks
For connecting to a home stereo system. Left and
6
Right jacks need to used at the same time.
Coaxial Output
SPDIF Output
For connecting to high-end digital surround sound
system. Only one of the other is used.
7
8
4.0 Server Software Installation
A small server program, called HomePod Audio Server, must be
installed on each computer that contains audio files that you want to
play through the HomePod. Use the HomePod CD and follow
instructions below to complete the software installation.
4.1 Windows Installation
On the PC, insert the HomePod CD and run the HomePod Audio
Server->Setup.exe.
HomePod CD Content for PC
HomePod Audio Server is based on Java. For Windows PC’s
(98/Me/2000/XP), the installer will alert you to install or upgrade Java
(JRE) if you haven’t already.
Message alerting JRE installation
Click Yes to install Java Runtime Environment (JRE) into your PC. The
process may take a few moments. Let it run to completion without
interrupting the process. If your PC already has Java installed and you
don’t want to upgrade to the latest version, then click No.
When the installation is complete, you will see a new C:\Program
Files\HomePod\Audio Server\ directory as shown below and a new
entry in Start Menu->Programs->HomePod->Audio Server->HomePod
Audio Server.
9
Contents of the Windows HomePod Audio Server folder
4.2 Macintosh Installation
On the Mac, insert the HomePod CD and run the HomePod Audio
Server.pkg installer.
Contents of the HomePod CD
You will need to have the administrator password in order to proceed
with the installation. Follow the instructions on screen to complete the
installation.
HomePod Installer for Mac
10
When the installation is complete, you should see a new “HomePod”
folder in the Applications folder.
HomePod Audio Server folder content for Mac
11
12
5.0 Audio Server Control and Configuration
To launch the Windows HomePod Audio Server configuration program,
double-click on the HomePod Audio Server icon or select
Start->Programs-> HomePod->Audio Server->HomePod Audio Server.
HomePod Audio Server configuration for Windows
To start the HomePod Audio Server program on the Mac, go to the
Applications menu and double-click on the HomePod Audio Server icon.
HomePod Audio Server configuration for Mac
Note: The HomePod Audio Server program for PC and Mac are identical in
function and user interface, so screen shots will be used interchangeably
in this manual.
The HomePod Audio Server Configuration application allows you to set
up and control your audio collection. From this application, you can
define the audio content to be shared, name your audio collection, and
start or stop the server. Once your audio server is configured and
started, your library will recognized by the HomePod.
The window is divided into three frames. The icons in the left side frame
can be selected to view different configuration settings in the right side
frame. The bottom frame contains help information for each
configuration option. Closing the application will minimize the window to
the task tray. You can double-click on the tray icon to open the
configuration window again.
13
5.1 Server Control
Click on the HomePod icon in the left side frame to bring up the main
server controls. This window allows you to monitor and configure the
server settings. The “Audio Server Name” field defines a specific name
for your audio collection that will be displayed on the HomePod.
Examples of some good names are, “John’s Audio Collection”,
“Bedroom Collection”, or “Living Room Audio Library”.
Once you have named you audio collection, you need to define the
contents of your collection. There are two ways to define which audio
files you want included in your collection: by Audio Folders or by
iTunes Audio Library. Other methods will be added to HomePod Audio
Server in the future. If you are using iTunes to manage your audio
collection, proceed to the Configuring iTunes Audio Library section.
5.2 Configuring Audio Folders
An Audio Folder is any directory that contains audio files (such as MP3
files). This is the most generic way of configuring the Audio Server to
locate your audio files. By specifying an Audio Folder, all the audio files
in that directory (including any subdirectories) will become part of your
collection. You can specify more than one Audio Folder, and all the
contents will be combined into one collected and recognized by the
HomePod.
When you click on the Audio Folders icon on the left, you will be
presented with two “Add” options on the right:
Configuring Audio Folders
To add an Audio Folder, click on the “Add Audio Folder…” icon and
locate the folder that contains your audio files. This may be your C:\My
Documents\My Audio\ directory, or any folder with your audio files that
you'd like to include in your collection. The path to the folder you just
added will be listed on the right frame. You can also configure the Audio
Server to recognize your existing playlists. To add your playlists, click
on the “Add Playlist Folder…” and select the top level folder that
contains your playlist files (.M3U).
After the configuration is complete, click the HomePod icon on the left
frame to return to the server control frame. Press the “Start” button to
14
activate the Audio Server.
Starting the Audio Server
5.3 Configuring iTunes Audio Library
If you are using Apple’s iTunes software to manage your audio files,
then you should select this method as the preferred way of configuring
your audio collection so that the HomePod shares the iTunes song and
playlist information.
When you click on the iTunes Audio Library icon on the left side frame,
you will see a “Select…” icon on the right:
Configuring iTunes Music Library
Click on the “Select…” icon to locate and open the “iTunes Music
Library.xml” file in the iTunes folder. The .xml file contains the complete
index to the iTunes Music Library songs and playlists.
15
Locating the iTunes .xml file
To share an iTunes Music Library with the HomePod, the iTunes
program need not be running.
After the configuration is complete, click the HomePod icon on the left
side frame to return to the main server control frame. Press the “Start”
button to activate the Audio Server.
Starting the Audio Server
16
6.0 HomePod Setup
There are two ways to connect the HomePod to your network, wired
(with an Ethernet cable) or wirelessly (through Wi-Fi). The two methods
are mutually exclusive at startup time, i.e. when one is enabled the
other will become disabled. When HomePod is first powered up, it will
try to detect if an Ethernet cable is attached. If it is, the Ethernet
connectivity will have priority over wireless connectivity. If an Ethernet
cable is not connected to the HomePod at startup, the HomePod’s
wireless connection will be activated. For most users, HomePod will be
used in a wireless environment so the Ethernet port need not be used.
Follow the instruction below for each connection setup.
6.1 Wired Setup
Before turning on the HomePod, connect it to your network with the
enclosed Ethernet cable. HomePod can be connected to a wireless
router or a switching hub. Next, plug in HomePod and turn it on. The
boot up process will take about 20 seconds, after which HomePod
should discover any Audio Servers that have been activated.
6.2 Wireless Setup
Make sure that you have already set up a wireless router or access
point (base station) to form your wireless 802.11 b/g network. Your
computers and HomePod must be in the same domain as the router
(e.g. all must be in 192.168.1.x). Confirm that the DHCP server on the
access point is running so that your computers and HomePod can
automatically obtain IP addresses automatically (this is usually on by
default). If you have WEP encryption enabled in the access point, turn it
off for now; you can turn it back on later after the HomePod is running
smoothly. Next, plug in the power adapter and turn on the HomePod.
The boot up process will take about 20 seconds, after which HomePod
should discover any Audio Servers that have been activated.
If the HomePod is unable to find any Audio Servers even though they
are running, try the following: Turn off HomePod. Connect the HomePod
to the router by a wired Ethernet cable, and then turn on the HomePod
again. When HomePod reaches the main screen, go to Network
Settings and locate its IP Address. Once the IP is known (say
192.168.1.3), open a browser on any computer on the network and log
into HomePod, e.g. type http://192.168.1.3/ in the browser. Once you
are at the configuration screen, go to the Wireless Settings tab and look
for the SSID field. Change the SSID from the default value of “ANY” to
the exact name of your access point (you can get the SSID of your
access point by logging into your access point). Click Save and then
disconnect the Ethernet cable and reboot HomePod. In a multi-access
point environment, setting the SSID to match your access point will help
HomePod connect to it much more easily.
If you still have trouble finding an Audio Server, refer to the
Troubleshooting section in the Appendix section of this manual. Also
17
review the Wireless Settings Page details in the Web Configuration
section of this manual.
18
7.0 HomePod Basic Operation
7.1 Turning HomePod On and Off
To turn on the HomePod, press and release the
Power button. You
should be prompted with a startup screen that displays “HomePod
Wireless Audio Services”.
To turn off the HomePod, press and hold the
seconds.
Power button for two
7.2 Resetting HomePod
In the rare event that HomePod is hung and does not respond to button
presses, you can reset the unit by poking on the reset button on the left
back side of HomePod using a paper clip, or you can temporarily unplug
the power cord to cycle the power.
7.3 HomePod Display Menus
HomePod menu system is a tree structure. You start at the Main Menu,
and every item on the menu either enters another sub-menu, or it
terminates in a screen in that branch.
The following is a tree structure of the HomePod menu system.
[Audio Server Name]
+ All Songs
+ Artists
+ Albums
+ Artist/Albums
+ Genres
+ Playlists
+ FM Radio
+ Settings
+ Network Settings
+ Network Information
+ IP Address Configuration
+ Dynamic IP Address
+ Set Static IP Address
+ Signal Strength
+ Speakers
+ Contrast
The Main Menu will automatically detect and list any Audio Servers
found on the network, listing one line for each audio library. If no
libraries are detected, then the first line will display “Searching for Audio
Servers”. Click the
button to refresh the list of Audio Servers.
Main Menu
19
Each audio collection can be navigated by categories based on their
ID3 tags. The category menus are designed to facilitate easy location of
songs, artists, or albums form a large audio library. A typical audio
collection can contain hundred or thousands of songs. By using the
category menus, you can find what you want in a few quick steps. The
categories include: song title, artists, albums, artists/albums, genres,
and playlists. These categories are the same as those used by most
popular audio managers, such as iTunes, AudioMatch, MediaPlayer, or
WinAmp.
Category Menu
Press
to select any category. The HomePod will allow you to
navigate your audio content based on that category. The first item within
each category is Play All; press
again to start playing all the song in
the current list. You can also scroll to the items below and select a
specific song, album, artists or playlist, depending on the category.
Listing Menu
The Play Screen is displayed when a song is being played by
HomePod. This screen gives additional information about the song that
is being played. In the top left corner, it displayed the Genre. The
second line aligned left displays the Name of the song. The third line
aligned right is the Artist of the song. The forth line aligned left is the
Album of the song, and alight right is the Track Number of the song in
the album.
The Playing Screen
From the main menu, you can also select FM Radio to listen to local
radio stations. The FM Radio screen allows you to tune to your local FM
radio stations when you’re not listening to your network audio collection.
Your can define up to 20-preset radio stations so you can jump to them
easily using the navigational keys (see the Web Configuration section
for details). To turn the frequency up and down, turn the rotating dial
clockwise or counter-clockwise. To jump to the next or previous preset
or
buttons.
stations, use the
20
FM Radio Screen
Settings Menu lists the settings that you can either check or set from the
HomePod. The Network Settings menu displays important settings that
are crucial to network connection. The Speakers item controls the sound
coming out of HomePod’s build-in speakers. The menu item toggles On
and Off with each press of the
key. The Contrast item controls the
brightness of the LCD. Rotate the center dial to turn the contrast value
up or down.
Settings Menu
The Network Settings Menu opens up screens that facilitate monitoring
of network settings on HomePod. In the Network Info sub-menu, you
can check the current IP, subnet mask, gateway IP address of the
HomePod. Use this information to troubleshoot when your HomePod is
having trouble connecting to your network. The Set IP Address menu
item is used when you want to defined a fixed IP for your HomePod. You
can also modify these basic setting and more from HomePod’s web
config pages. The Signal Strength sub-menu shows the SSID and signal
strength of the connected wireless router or access point. If HomePod is
connected to the network by Ethernet cable, then this information is not
applicable.
Network Settings Menu
7.4 HomePod Controls
Use the following buttons on the HomePod to control and navigate the
content on the HomePod.
7.4.1 Content Navigational Buttons
The audio library is organized as a tree structure. Use the following
buttons to easily traverse the list.
+ HomePod Audio Library
+ All Songs
- As Good As It Gets
- All You Need Is Love
- Midnight Blues
21
+
+
+
+
+
- The Way You Were
Artists
Albums
Artists/Albums
Genres
Playlist
Use the rotating dial to navigate up and down any list.
button to select an item in the list, or press the
Press the
to come out of a list.
button
7.4.2 Functional Buttons
To play a song, press the
highlighted on the list.
button or the
To pause a playing song, press the
resume play.
button when the song is
button. Press
again to
If you are playing a collection of songs (such as an album or random
play mode) press the
button to skip to the next.
To jump to the beginning of a song while it is playing, press the
button.
If you’re using the built-in speaker or the headphones port, to increase
the volume, press the
button; to decrease the volume, press the
button.
7.4.3 Shuffle/Loop Mode Buttons
To shuffle a list of songs, while a list of songs is playing in the play
mode, press the
button. Press
again to exit shuffle mode.
button while a song is
To repeat a song or list of songs, press the
playing. If an individual song was selected, the Loop function will repeat
that one song over and over. If the playing song is part of playing list,
then the whole list of songs will repeat once completed.
7.4.4 FM Radio Buttons:
To start FM Radio, at the main menu, scroll to "FM Radio" and press the
button.
To jump to the next preset station, click the
To jump to the previous preset station, click the
button.
button.
To adjust the frequency of the tuner, rotate the dial right and left.
22
8.0 Web Configuration
HomePod includes a built-in web configuration page that you can
access from any browser (Internet Explorer, Apple Safari, AOL
Netscape, etc.) on a computer connected to the network. You can set
many of the advanced functions using this configuration.
To access the web configuration page:
Launch your browser and type in the IP address of the HomePod; e.g. if
your HomePod's IP address is 192.168.1.3, then type
"http://192.168.1.3" in your browser (to obtain HomePod’s IP address,
navigate to Settings:Network Settings:Network Info).
When prompted for a username and password, leave username blank
and type "admin" as the password. "admin" is the default password and
can be changed after the first time you log into the device. Make sure to
note your new password if you change it.
23
8.1 IP Settings Page
This page sets the basic TCP/IP settings for your HomePod.
HomePod Hostname is useful in identifying your HomePod on the
network, especially when you have more than one HomePods on the
network. The hostname you defined here will also appear in the DHCP
IP table of your router or access point.
If your router or network server has a DHCP server that assigns IP
addresses, then you should select Dynamic IP so an IP will be
assigned to HomePod automatically whenever the HomePod is
connected to the network. This is the default and preferred way for
HomePod to join a network because everything is plug-and-play.
If you network doesn’t automatically assign you an IP address then you
need to define basic TCP/IP settings manually. Select Static IP and
enter the IP Address, Subnet Mask, Default Gateway/Router, Preferred
DNS, Alternate DNS (optional) into their respective fields. These TCP/IP
values register your HomePod on the network.
After you make the changes, click on the Save button to save the
settings. You must restart your HomePod for the new settings to take
effect.
24
8.2 Wireless Settings Page
This page enables you to configure basic wireless settings to
allow your HomePod to connect to an 802.11b/g Wi-Fi wireless
network.
Network Name (or sometimes referred to as the SSID) is the name of
the wireless network that HomePod should connect to. The network
name is defined by the access point. Any wireless computers or devices
(such as HomePod) that connect to the same network name will form
one network. You can find out what the network name is by accessing
the web config page of your access point.
Note: For Apple Base Station users and other advance access points, make
sure the SSID of your access point is not “hidden” or set to "closed
network".
By default, the Network Name field is set to “ANY” and HomePod will
automatically detect and connect to the strongest access point in the
surrounding area. For most users this is the preferred and most
convenient setting. But if you have multiple access points with different
network names around you, or if the HomePod somehow is not
connecting to the access point of your choice, then you will want to
specify a network name manually.
A Network Mode is the topology in which a wireless network is set up.
An Infrastructure network mode, which is the default setting, uses one
or more access points to form a wireless network. This is in contrast to
Ad-hoc (also referred to as Peer-to-Peer) network mode, in which two
wireless devices communicate with one another without the existence of
an access point. Ad-hoc is useful if you want to connect a HomePod to
your computer and listen to its shared library directly without an access
point.
25
To set the network mode, click on the appropriate button.
In the ad-hoc mode, the Channel defines the frequency at which
HomePod will communicate with the other ad-hoc device, in this case
another computer. Both the HomePod and the other computer must
operate in the same network name and channel. The channel field is not
used if the network mode is set at infrastructure.
To set the channel, pull down the list and select a channel from 1
through 14.
If the access point has WEP Encryption turned on, then HomePods
needs to be set with the same encryption parameters, and also have the
matching key.
To turn on WEP encryption on the HomePod, select the Enable button
and click either the 64-bit or 128-bit option. Enter the WEP key in hex in
its respective field, Key 1 through 4; normally only Key 1 is used. If the
WEP Encryption is 64 bit, the hex key requires 10 characters. If the
WEP Encryption is 128 bit, the Hex key requires 26 characters. A hex
key is a continuous stream of hex characters (0-9, A-F) without hyphen
or space between them.
Note: For WEP encryption, set the base station or access point to use the
“Share Key” mode.
After saving the changes, you must restart your HomePod for the new
settings to take effect.
8.3 Miscellaneous Page
This page enables you to configure other useful functions of the
HomePod. After saving the changes, you must restart your HomePod
for the new settings to take effect.
8.3.1 LCD Sleep Function
HomePod offers a LCD sleep function that will turn off the LCD if you
have not access the buttons for a specified period of time. The audio will
26
continue to play while the LCD goes into sleep mode. Pushing any
buttons on the HomePod will turn the LCD back on. This function is
designed to protect and extend the life the LCD when it is not needed
for viewing. The default setting is "Never".
To turn on the LCD Sleep function:
1.
Access the web-config page of HomePod.
2.
Click on the Miscellaneous tab, and set the LCD Sleep time to
either 1, 5, or 15 minutes.
3.
Click on the "Submit" button to save the settings.
4.
Reboot HomePod.
8.3.2 System Shutoff Function
HomePod also offers a System Shutoff function that will turn the whole
unit off at a designated time to protect the unit from unnecessary
prolonged usage. This function is designed for people who use
HomePod to sooth them to sleep. The default setting is "Never".
To turn on the System Shutoff function,
1.
Access the web-config page of HomePod.
2.
Click on the Miscellaneous tab, and set the unit System Shutoff
time to 15, 30, or 60 minutes Click on the "Submit" button to save
the settings.
3.
Reboot HomePod.
27
8.4 Radio Stations Page
This page allows you to preset twenty FM radio stations. The stations
you define here will appear in the FM Radio list on the HomePod.
You can define up to 20 FM radio stations. The stations you defined
here will allow you to jump to these stations quickly with the press of the
and
buttons on the HomePod.
Twenty local FM radio stations in San Francisco have been set up in the
Radio Stations page as default. You can change the stations for your
location.
If you are not getting good reception, unwind and extend the antenna
wire on the back of HomePod.
To preset FM radio stations:
1.
Access the web-config page of HomePod.
2.
Click on the Radio Stations tab.
3.
Enter the name of the station in the Name field (maximum 20
characters); you can enter the call letter of a radio station (e.g.
"KFRC") or a short description for the type of audio that this station
plays (e.g. "80's Easy Listening").
4.
Enter the frequency in the Frequency field (e.g. "101.3").
5.
Click on the "Submit" button to save the settings.
Reboot is not necessary. The settings will be available the next time you
use the FM Radio.
28
8.5 Firmware Upgrade Page
This page displays the current version of your Firmware and Boot ROM,
and enables you to upgrade your HomePod firmware to new versions
as they become available.
For tech support service, it is often needed to know which versions of
Firmware and Boot ROM you have installed in the HomePod. The
versions info is displayed in the format of a version number followed by
a date time, as below:
Current Versions:
Firmware version: v.1.0.5, 01/28/04
BootROM version: v.2.7, #317 Tue Jan 27 12:00:32 CST 2004
From time to time, Macsense offers upgrades to HomePod firmware to
add new features and fix bugs. The HomePod firmware will be
distributed as a compressed encrypted file named "homepod.tar.zip".
New updates will be posted on Macsense website when available
(http://www.macsense.com/homepod).
To upgrade HomePod firmware:
1.
Download "homepod.tar.zip" to the desktop of your computer.
2.
Log into the HomePod’s web-config page.
3.
Click on the Firmware Upgrade tab.
4.
Click the "Browse..." button.
5.
Locate the "homepod.tar.zip" file on your desktop.
6.
Press the "Upgrade" button and wait 3 minutes. If upgrade is
successful, you will be prompted with a successful message.
7.
Reboot HomePod.
29
30
9.0 Extras Programs and Utilities
HomePods provides extra programs and utilities that you can use on
your Mac, PC, or Linux computers that provide additional functions.
9.1 HomePod Audio Server in Java
Another pure-Java version of the HomePod Audio Server is included on
the HomePod CD. If you are using Mac OS 9 or a Linux computer
where the native version of the HomePod Audio Server is not available,
you can use the Java-version of the server. The Java version of the
HomePod Audio Server is universally compatible, and can also work
under Mac OS X and Windows 98/Me/2000/XP as well. The Java
version is functionally identical to the native servers with the exception
of user interface differences.
The Java version of the HomePod Audio Servers is located in the Extras
folder on the HomePod CD. Copy the "HomePod Audio Java Server”
folder to the desktop. You can move the "HomePod Audio Server" folder
to anywhere in your hard drive, as long as you move it as a whole.
Note: HomePod Audio Java Server is Java-based and requires that Java
already be installed before you initiate the Audio Server installation. For
Windows, go to Sun's Official Java site to download and install the latest
Java runtime Environment (JRE) release,
http://www.java.com/en/download/. For Macintosh, Java VM is built-in into
the Mac OS X and therefore need not be installed separately. For Mac OS 9
users, use the installer “MRJ 2.2.5 Install.smi”also available on the
HomePod CD.
If you are using Apple iTunes to manage your music files, use
"ituneslibrary.jar" as the server program. A window with three fields
would appear. In the first field, name your audio collection, e.g.
"HomePod Music Library" or "Bedroom Collection". In the second field,
use the "Browse..." button to locate the "iTunes Music Library.xml" file in
the iTunes folder, and press the "Open" button. (Note, you’re selecting
the location of the .xml file and not the iTunes Music folder itself.) When
all configurations are done, press the "Start" button to activate the Audio
Server. The songs will first be indexed as indicated by the progress bar.
To stop the audio server, click the "Stop" button.
If you are not using Apple iTunes, run the "filesystemlibrary.jar" as the
server. A window with three fields would appear. In the first field, name
your audio collection, e.g. "Ryan's Music Library" or "Bedroom
Collection". In the second field, use the "Browse..." button to locate the
directory where you store all your audio files. This may be your C:\My
31
Documents\My Music\ directory, or any folder or sub-folder with your
audio files that you'd like to make available to the HomePod. When all
configurations are done, press the "Start" button to activate the Audio
Server. To stop the audio server, click the Stop button.
9.2 HomePod Audio Server in Shell Command
HomePod Audio Server is also available as a GUI-less command line
that you can run from a command terminal. The advantage of having
such a version is the ability to host a HomePod Audio Server in
professional and residential Linux media servers with no attached
monitor, and remotely managed by Macs and PCs. To get this version of
the HomePod Audio Server, please write to Tech Support.
9.3 Remote Control Utility in Java
A Java remote control utility is provided that allows you to control one or
multiple HomePods from your Mac/PC. You can control everything that
you can do on the HomePod unit itself. The Java remote control utility is
handy when you’re far away from the HomePod and you’d like to
centrally control the HomePod all at once. The Java remote control
utility is named “pdaremote.jar” and is located in the HomePod
CD->Extras->HomePod Audio Java Server directory.
Double click the pdaremote.jar icon to launch the remote control. Once
opened, you’ll be presented with a window below.
32
The “Players” field in the bottom half of the window lists all the
HomePods located on the network. Select one from the list that you
wish to control. The “Libraries” field on top of the window is a pull-down
menu listing the available Audio Server on the network. Use the buttons
to navigate the list or play and stop songs as you would control the
HomePod using the physical HomePod unit.
33
34
Appendix
Taking Care of Your HomePod
(Failure to follow these instructions may result in personal injury or
damage to your HomePod.)
• Use only a soft, dry cloth to clean the outside of your HomePod and
any peripherals.
• Do not use any solvents, chemicals, or cleaning solutions containing
alcohol, ammonia, or abrasives.
• Do not allow liquids to spill on the unit.
• Do not use sprays near your HomePod.
• It is best to keep HomePod out of direct sunlight or other sources of
extreme heat.
• Avoid placing HomePod in a setting where air cannot circulate
around the unit.
Troubleshooting
Your HomePod is designed and built to provide you with trouble-free
performance. If it does not appear to be functioning correctly, please
follow these troubleshooting steps.
General troubleshooting guidelines:
• Make sure all connectors are properly attached.
• Make sure the power adaptor is firmly connected.
• Try the basic setup first before attempting complex ones. Involve only
one access point, one audio server, and one HomePod. Try wired
(Ethernet cable) connection before trying wireless (access point).
Turn wireless encryption (WEP) off.
If this is
happening:
Try the following:
HomePod is
connected wirelessly
to the network and it
does not see any
audio servers.
Do not connect the Ethernet cable when using
the wireless connection. If the Ethernet cable
is connected at boot-up time, wireless
connection will not be enabled.
Check to make sure that the HomePod is
getting a proper IP Address and SSID by
selecting the “Settings->Network Settings”
item on the main menu. The IP and SSID will
only appear if the HomePod has successfully
connected to a wireless network. Without
them, the audio server will not be recognized.
35
HomePod is
connected wirelessly
to the network and it
does not see any
audio servers.
(Continued…)
Check the access point to make that it is
working properly. Check to see if you have
basic TCP/IP settings setup correctly, such as
IP, subnet mask, gateway IP, SSID, WEP
keys.
Move your HomePod closer to your access
point to see if range could be an issue.
Check to see if your access point is set to
broadcast the SSID. Enable it if it is not. The
HomePod needs the access point to
broadcast the SSID in order to connect to it.
If your access point has WEP turned on,
turned it off first to make sure HomePod can
connect without WEP.
Turn off HomePod. Connect the HomePod to
the router by a wired Ethernet cable, and then
turn on the HomePod again. When HomePod
reaches the main screen, go to Network
Settings and locate its IP Address. Once the IP
is known (say 192.168.1.3), open a browser
on any computer on the network and log into
HomePod, e.g. type http://192.168.1.3/ in the
browser. Once you are at the configuration
screen, go to the Wireless Settings tab and
look for the SSID field. Change the SSID from
the default value of “ANY” to the exact name
of your access point (you can get the SSID of
your access point by logging into your access
point). Click Save and then disconnect the
Ethernet cable and reboot HomePod. In a
multi-access point environment, setting the
SSID to match your access point will help
HomePod connect to it much more easily.
Make sure the PC/Mac that has audio server
installed is on the same subnet as the
HomePod. E.g. 192.168.1.xxx.
Make sure the audio server is running. If it is
not, start it. If it is, stop and restart it.
36
HomePod is
connected via
Ethernet to the
network and it does
not see any of audio
servers.
Connect the Ethernet cable before turning on
the HomePod. If the Ethernet cable is not
connected at boot-up time, wireless
connection will be enabled instead.
Check to make sure that you have a green
light on the HomePod’s Ethernet port.
Check to make sure that the HomePod is
getting a proper IP Address by selecting the
“Settings->Network Settings” item on the main
menu. The IP will only appear if the HomePod
has successfully connected to a wireless
network. Without it, the audio server will not be
recognized.
Make sure that your network has a DHCP
server available.
Make sure the PC/Mac that has audio server
installed is on the same subnet as the
HomePod. E.g. 192.168.1.xxx.
Make sure the audio server is running. If it is
not, start it. If it is, stop and restart it.
HomePod is getting
an IP address but it
still can not find any
audio servers.
Make sure the audio server is running. If it is
not, start it. If it is, stop and restart it.
Wireless is not
working so I inserted
an Ethernet cable
but it still doesn’t
work.
The Ethernet cable needs to be inserted at the
time the HomePod is turned on. If there is no
cable inserted at the start-up time then the
Ethernet port becomes disabled and wireless
becomes active. So even if a cable is inserted
after start-up the Ethernet port is already
disabled and will not function.
Make sure that all software firewalls are
disabled. This includes firewalls that are part
of the operating system.
For Windows XP: Open Start->Settings->
Control Panel->Network Connections. The
Network Connections window will open.
Right-click on the network adapter that is in
use and select Properties. Click the Advanced
tab. Uncheck the Internet Connection Firewall
checkbox and save settings.
For Mac OS X 10.3: Open System
Preferences and click Sharing. Click Firewall
and click the Stop button.
37
WEP does not work.
64-bit and 128-bit WEP Encryptions are
supported. Make sure that your access point is
set to accept "Shared Key" and the hex key is
typed in the HomePod web config page in the
Key #1 field.
Only hex keys are accepted. Turn ASCII key to
hex before using.
Make sure the hex key is entered correctly as
a continuous stream without spaces or
hyphens.
Buttons are slow to
respond under
wireless mode.
A degradation of the signal strength or sudden
signal interference on the wireless network
can cause this type of behavior. Wait a little
longer for the buttons to respond. Do not keep
on pushing the buttons repeatedly.
Look for the interference sources, such as
your cordless phone, microwave oven, TV
antenna, and monitors. Remove the sources
or place the access point and HomePod away
from these sources.
There is no sound or
sound volume is low
when played.
Check the volume control on the HomePod
and make sure that the volume is turned up.
Audio sound is
distorted.
Confirm if the same song sounds any better
when played on the computer. Perhaps the
song was just encoded badly from the source.
Audio sound is
distorted when
output to external
speakers.
Check the volume control on the HomePod
and make sure that the volume is not turned
all the way up. When outputting to external
speakers, set the volume on the HomePod to
about one third only and let the amplifier of the
external speakers/receivers do the
amplification.
Pressing the
button does not jump
to the previous song
but repeats the
same song.
The
button works in the same way a CD
player does. While a song is playing, push it
once and it will go back to the beginning of the
playing song. Pushing it twice will go to the
previous song.
AAC songs do not
play.
AAC support is still currently under
development. We will offer free upgrades to
current HomePod owners when it is available.
38
Maker sure mute button on the remote control
unit is not activated. Press the mute button
again to deactivate mute.
Songs purchased
from Apple Audio
Store do not play.
Songs purchased from Apple Audio Store are
protected in a special AAC-DRM format and
are not playable on HomePod. Apple does not
allow third party products aside from iPod and
iTunes to decode and play these songs.
Unless Apple changes this policy, AAC-DRM
playback on non-Apple players such as
HomePod will not be legally possible.
Remote control does
not work.
Make sure the plastic protective slip insulating
the battery compartment is pulled out.
Make sure that you are pointing the remote at
the small circular hole located on the top left
corner of the front of the HomePod. Make sure
no physical obstruction is there between the
Remote and HomePod.
Make sure the emitter on the remote control
unit is pointing towards the HomePod.
HomePod hangs
while booting up.
Shut off the HomePod by holding down the
power button for two seconds, insert a paper
clip in the reset hole on the side of the
HomePod, or unplug and re-plug the power
cord. Hold a few seconds and restart the unit
again.
Power off button
does not turn the
unit off.
The Power button has a prolonged timing
mechanism to prevent accidental shut off.
Press and hold the Power button down for two
seconds to turn the unit off.
If the unit indeed hung and does not respond
to the Power button, unplug and re-plug the
power cord and try again.
Audio is playing, but
the LCD is dark.
The LCD Sleep function in the web config
page is turned on.
The contrast is set too low. Go to Settings->
Contrast on HomePod’s main screen to
increase the contrast value.
The FM reception is
bad.
Make sure the antenna wire is extended
outward. Be careful not to pull out the antenna
from inside the unit.
HomePod unit
topples or slides
easily.
Check to see if the four pads are in place on
the base of the unit. If these pads are present,
email us to get free replacement
39
Contacting Macsense
For additional information in solving problems with your HomePod,
contact Macsense Tech Support.
Technical Support Hours: 9am – 4:30pm PST
Phone: 1-800-642-8860 x100 (Free Support)
Email: [email protected]
Web: http://www.macsense.com/knowledgebase
Register your product online to be informed of the latest product
upgrades and promotions.
http://www.macsense.com/registration/
We upgrade firmware periodically to include support on new functions
and bug fixes. Remember to check website for the latest updates.
http://www.macsense.com/homepod/
Technical Specifications
•
•
•
•
•
•
•
•
•
•
•
•
•
•
Toshiba TX4926 200MHz CPU
16MB Flash RAM, 32MB SDRAM
124x64 pixel graphical back-lit blue LCD display
Jog-shuttle rotating dial
802.11b 11Mbps mini-PCI Card with external antenna
RJ-45 10/100Base-T Ethernet Port
Left, right and headphone audio outputs
Built-in stereo speakers
Digital coaxial and optical SPDIF ports
FM tuner with wire antenna
USB 1.1 port, host-powered
Web-configurable and upgradeable firmware
IR and IrDA ports
18-key remote control
Physical Dimensions and Weight
• Body thickness 3/4" (1.9cm)
• 7" W x 5" H x 2" D (17.8 x 12.7 x 5cm)
• 15.3 oz (434g)
OS Support
• Mac OS 9 and OS X
• Windows 98/Me/2000/XP
Supported Media Manager
• Apple iTunes, Microsoft MediaPlayer, Audio Match Jukebox, Nullsoft
WinAmp
Supported Audio Formats
• MP3 and Internet Radio currently and upgradeable to AAC, WMA,
WAV and more.
40
Software
• Firmware and desktop software. Powered by GLOOTM open media
platform. GLOO is an open, Java-based media platform that handles
the discovery, request, transfer, and control of audio content on
HomePod.
• FM radio tuner with 20 preset stations. Station name and frequency
can be defined by user through web interface.
• Unicode. Support for English, Spanish, French, Italian, German,
Hebrew, Arabic, Chinese, Japanese, Korean, and other languages.
Specifications subject to change without notice.
41
Limited Consumer Warranty
Macsense Connectivity (“Macsense”) warrants all HomePod products sold
(“Products”) to be free of defects in material and workmanship, subject to the
following conditions.
The duration of Macsense’s warranty with respect to Macsense HomePod
product is limited to one (1) year from the date of sale to the original consumer
purchaser.
No other express warranties are made with respect to any Product. All implied
warranties, including warranties of merchantability and fitness for a particular
purpose are limited to the warranty period set forth above. The warranty is not
transferable and applies only to the original consumer purchaser of the Product.
Macsense will, as its sole obligation under this warranty, replace or repair, at its
option any Product that does not conform to this warranty. Under no
circumstances will Macsense be liable for any incidental or consequential
damages under this warranty or any implied warranties.
Macsense will not be responsible for damage resulting from any (i) deviation from
Macsense’s operating instructions as printing in Macsense’s catalog or on any
packaging, labels or other literature provided with a Product, (ii) installation of a
product in a manner which is inconsistent with Macsense’s written instructions,
(iii) alteration or modification of a Product, (iv) misuse, (v) neglect, (vi) abuse, (vii)
accident, (viii) normal wear and tear, (ix) commercial use, (x) service by anyone
other than a Macsense authorized repair facility, or (xi) other improper
application, installation or operation of the Product.
42
Getting Service
To obtain warranty service during the first thirty (30) days after the date
of purchase, you must return the defective Product with the original
receipt to the original place of purchase. To obtain warranty service
during the remainder of the warranty period, you must contact
Macsense by phone at (650)552-9110 or by fax at (650)552-9250.
When contacting Macsense by fax, please include a letter detailing your
complaint and provide a daytime phone number where you can be
reached. If further clarification or additional information is required from
Macsense, you may call us.
If warranty service is needed at any time during the warranty period, the
purchaser will be required to furnish a sales receipt/proof of purchase
indicating the date of purchase; amount paid and place of purchase.
Customers who fail to provide such proof of purchase will be charged
for the repair of any Product.
How state law relates to the warranty:
Some states do not allow limitations on how long implied warranties last,
or the exclusion or the limitation of incidental or consequential damages.
So the above limitations or exclusions may not apply to you. This
warranty gives you specific legal rights. You may also have other rights
that may vary from state to state.
NO PERSON IS AUTHORIZED BY MACSENSE TO MODIFY OR ADD
TO THIS LIMITED WARRANTY.
Macsense Connectivity
857 Hinckley Road
Burlingame, CA 94010
U.S.A.
www.macsense.com
The Macsense logo and HomePod name are trademarks of Macsense Connectivity.
GLOO is a trademark of Gloolabs, LLC.
©2004 Macsense Connectivity. All rights reserved.
HC-020304
43