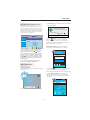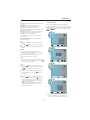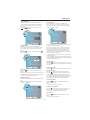
1
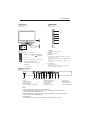
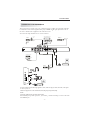
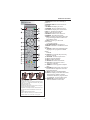
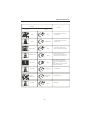
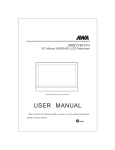
MSDV3203-F4
32"(81cm)HD READY LCD Television
USER MANUAL
Please read this User Manual carefully to ensure use of this product and keep this
manual for future reference
N294
CONTENTS
SAFETY INSTRUCTIONS.................................................................................................2
INSTALLATION......................................................................... ......................................3
WALL MOUNTING INSTALLATION GUIDLINES.............................................................3
ACCESSORIES.................................................................................................................4
FRONT PANEL.................................................................................................................4
KEY BOARD(RIGHT SIDE)..............................................................................................4
REAR PANEL...................................................................................................................4
ANTENNA CONNECTION................................................................................................5
CONNECTING TO PC.......................................................................................................5
PC PRESET.......................................................................................................................6
CONNECTING TO AV EQUIPMENT..................................................................................7
REMOTE CONTROL................................................................ ........................................8
BATTERY INSTALLATION...............................................................................................8
KEYS FUNCTION.............................................................................................................8
OPERATION..................................................................................................................... 9
BASIC OPERATION..........................................................................................................9
TELETEXT.......................................................................................................................9
EPG..................................................................................................................................11
MENU OPERATION..........................................................................................................11
TROUBLESHOOTINGS....................................................................................................14
TECHNICAL SPECIFICATION.........................................................................................15
-1-
SAFETY INSTRUCTIONS
IMPORTANT SAFETY INSTRUCTION
WARNING:
1.Read these safety instructions.
2.Keep these safety instructions.
3.Heed all warnings.
4.Follow all safety instructions.
5.Do not use this apparatus near water.
6.Clean only with dry cloth.
7.Do not block any ventilation openings. Install in
accordance with the manufacturers instructions.
8.Do not install near any heat sources such as radiators ,
stoves, or other apparatus (including amplifiers)that
produce heat.
9.Protect the power cord from being walked on or
pinched particularly at power outlets, and the point
where they exit from the apparatus.
10.Only use attachments/accessories specified by the
manufacturer.
11.Unplug this apparatus during lightning storms or
when unused for long periods of time.
12.Refer all servicing to qualified service personnel.
Servicing is required when the apparatus has been
damaged in any way, such as the power-supply cord
or plug is damaged, liquid has been spilled or objects
have fallen into the apparatus, the apparatus has been
exposed to rain or moisture , does not operate normally,
or has been dropped.
13.Apparatus must not be exposed to dripping or
splashing and no objects filled with liquids, such as
vases, should be placed on the apparatus.
To prevent fire or shock hazard, do not expose this
appliance to rain or moisture.
Thank you very much for purchasing this TV. To enjoy
your product from the very beginning, read this manual
carefully and keep it handy for easy reference.
INSTALLATION
Locate the TV in the room where light does not strike
the screen directly.
Total darkness or a reflection on the picture screen can
cause eyestrain. Soft and indirect lighting is recommended
for comfortable viewing.
Allow enough space between the TV and the wall to
permit ventilation.
Avoid extremely warm locations to prevent possible
damage to the cabinet or premature component failure.
This TV can be connected to AC 100-240 Volts. 50/60 Hz.
Never connect to a DC supply or any other power supply.
Do not cover the ventilation openings when using the TV.
CAUTION
Never tamper with any components inside the TV, or any
other adjustment controls not mentioned in this manual.
All LCD-TVs are high voltage instruments. When you
clean up dust or water drops on the LCD PANEL or
CABINET, the power cord should be pulled out from the
receptacle, then wipe the TV with a dry soft cloth. During
thunder and lighting, unplug the power cord and antenna
cord to prevent damage to your TV. All repairs to this TV
should only be performed by qualified TV service personnel.
Warning: Change or modifications to this unit not expressly
by the part responsible for compliance could void the user 's
authority to operate the Equipment.
CAUTION
a. Do not expose to dripping or splashing.
b. No objects filled with liquids, such as vases, shall be
placed on the apparatus.
c. The mains plug of this device is used as the disconnect
device and shall remain readily accessible and operable.
d. No naked flame sources, such as lighted candles, should
be placed on the apparatus.
e. Allow suitable distances around the apparatus for sufficient
ventilation. Ventilation should not be impeded by covering
ventilation openings with items such as newspapers, table
cloths, curtains and such like.
RISK OF ELECTRIC SHOCK
DO NOT OPEN!
CAUTION
TO REDUCE THE RISK OF ELECTRIC SHOCK, DO
NOT REMOVE COVER (OR BACK).NO USER
SERVICEABLE PARTS INSIDE. REFER SERVICING
TO QUALIFIED SERVICE PERSONNEL.
The symbol indicates that dangerous voltages
constituting a risk of electric shock are present
within this unit.
This symbol indicates that this productincorporates
double insulation between hazardous mains voltage
and user accessible parts. When servicing use only
identical replacement parts.
WARNING: To reduce the risk of fire or electric shock,
do not expose this apparatus to rain or cords.
The symbol indicates that there are important
operating and maintenance instructions in the
literature accompanying this unit.
-2-
INSTALLATION
High voltages are used in the operation of this television
receiver. Do not remove the cabinet back from your set.
Refer servicing to qualified service personnel.
Never stand on, lean on, or suddenly push the television or
its stand. You should pay special attention to children.
Serious injury may result if it falls.
To prevent fire or electrical shock hazard, do not expose
the television receiver to rain or moisture.
Do not place your television on an unstable cart, stand,
shelf or table. Serious injury to an individual , and damage
to the television, may result if it falls.
Do not drop or push objects into the television cabinet
slots or openings. Never spill any kind of liquid on the
television receiver.
When the television receiver is not used for an
extended period of time, it is advisable to disconnect
the AC power cord from the AC outlet.
Avoid exposing the television receiver to direct sunlight
and other sources of heat. Do not stand the television
receiver directly on other products which give off heat,
e.g. video cassette players and audio amplifiers. Do not
place naked flame sources, such as lighted candles on
the television.
Do not block the ventilation holes in the back cover.
Adequate ventilation is essential to prevent failure of
electrical components.
Dim:515*320mm(
If the television is to be built into a compartment or similar
enclosure, the minimum distances must be maintained. Heat
build-up can reduce the service life of your television, and
can also be dangerous.
Do not trap the power supply cord under the television
receiver.
-3-
INSTALLATION
Front panel
KEYBOARD
SOURCE
MENU
CH+
CH-
3
5
VOL+
VOL-
4
2
1
30
1
2
3
4
5
6
7
8
9
1
SOURCE
Display the input source menu.
2 MENU
Display main MENU.
3 CH+/CHIn TV mode press CH+ or CH- to change
the channel up and down.
In MENU mode, press CH+ or CH- to select
items .
In standby mode, press CH+ or CH- to turn
on the TV.
4 VOL+/VOLAdjust sound level.
In MENU mode, press VOL+ or VOL- to
adjust the item that you selected.
30
1:
Remote control sensor.
2:
Indicator LED: GREEN
POWER ON.
0
RED
+
+
VOL
CH
_
_
3:
4:
STANDBY.
Key board
Power: Press this button to turn the unit
ON from STANDBY mode.
Press it again to turn the set back to
STANDBY.
5:
AC power switch.
REAR AV Connection
14
1
2
1. ANT
2. AUDIO OUTPUT
3. SPDIF OUTPUT
4. VIDEO OUTPUT
5. AV1/S-VIDEO1 AUDIO INPUT
3 4
5
6
7
8
9 10
11
6. YPbPr AUDIO INPUT
7. PC AUDIO INPUT
8. YPbPr INPUT
9. AV1 INPUT
10. S-VIDEO1 INPUT
12
13
11. VGA INPUT
12. HDMI2 INPUT
13. HDMI1 INPUT
14. AC POWER INPUT
NOTE:
1.AV1 and S-VIDEO1 share one audio channel.
2.When HDMI1 port get DVI signal, the PC Audio channel will change to
receive the audio from HDMI1 port
3.When HDMI2 port get DVI signal, the YPbPr Audio channel will change to
receive the audio from HDMI2 port.
4.AV OUTPUT
It works only at input sources: TV,DTV,S-Video1,S-Video2,AV1,AV2.
-4-
INSTALLATION
ANTENNA CONNECTION
Note:
Aerial connections:IEC(female).
Input impendance:75 unbalanced.
-5-
INSTALLATION
CONNECTING TO PC
STEPS:
Be sure both the TV and computer are set to Power off.
1.Connect VGA and audio cable.
2.Connect the power cord.
3.Power on the TV, switch the input source to VGA mode.
4.Power on the PC.
This sequence is very important.
8
2
1
VGA cable
PC Audio
Power cord
-6-
INSTALLATION
CONNECTING TO AV EQUIPMENTS
This TV provides two groups of AV ,two S-Video,one group of YPbPr for convenient connection
to VCR,DVD or other video equipment,three group of HDMI for HD signal input Please refer to
the owner s manual of the equipment to be connected as well.
You can use the input terminals on TV set rear as follows.
R
VIDEO EQUIPMENT with YPbPr
To au dio
outputs
with SPDIF Input
term inal
R Pr
VIDEO EQUIPMENT
To s-video
output
From Coaxial SPDIF
output
Y
W
with S-video
Terminal
G
G Y
B
R
W
R
VIDEO RECORDER
B Pb
Y Black (s-video)
W White(audol L)
R Red(audio R)
Y
W
R
W
R
R
B
G
2
W
R
Y
W
R
1
Y
With VIDEO Input Terminal
W
R
Y
TO VIDEO
Iutput
To audio Input
VIDEO EQUIPMENT
Y
With VIDEO
terminal
To audio
Output
W
R
HDMI
To video
output
HEADPHONE
S-VIDEO2
VIDEO
AV2
L
R
HDMI3
HDMI
It can be connected to the following appliances: VCR, multi disc player, DVD, camcorder, video game
or stereo system, etc.....
YPbPr can support these video fomats:480i,576i,480p,576p,720p,1080i,1080p.
NOTE:
AV2 and S-VIDEO2 share the audio input channel.
When HDMI3 port get DVI signal, the AV2 Audio
from HDMI3 port
-7-
channel will change to receive the audio
REMOTE CONTROL
KEYS FUNCTION
MUTE
POWER
1
13
AUDIO
1
2
3
14
2
RECALL
4
5
6
7
8
9
15
0
TV MENU
SOURCE
16
3
17
OK
4
18
5
CH.LIST
SOUND
EXIT
19
+
20
PIC
CH
+
6
VOL
_
_
7
SLEEP
ASPECT
21
8
FREEZE
TV/RADIO
22
TEXT
9
23
EPG
FAV
INFO
10
24
11
12
REVEAL
HOLD
LIST
INDEX
SUBPAGE
SIZE
MIX
SUBTITLE
25
Insert Batteries Into the Remote Control
1
2
3
1. Remove the battery cover.
2. Inserting the 2 AAA 1.5V batteries making sure the
polarity (+ or -) of the batteries matches the polarity
marks inside the unit.
3. Mount the battery cover.
Replace with new batteries when the TV set begins
to show the following symptoms:
Operation is unsteady or erratic. Sometimes the TV
set does not function with Remote Control Unit.
Remark:
1) Alkaline Battery Recommended.
2) Remove batteries when they are exhausted or if the
remote control is not to be used for long time.
1: POWER :To set the TV to standby or
power on.
2: NUMERIC KEY : For direct access to
channels.
3: TV MENU :To display TV menu.
4: CURSOR :To move within the menu.
5: CH.LIST :To display the channels list.
6: VOL+/- :To adjust sound level.
7: PIC :To switch picture mode.
8: SLEEP :S et timer to turn off the TV.
9: FREEZE : To freeze the picture.
10: EPG :To display information about the
program being viewed and what's on
Next inDTV mode.
11: FAV :To access your favourite
channels list
in TV or DTV mode.
12: TELETEXT KEYS : See page 14.
13: MUTE :To disable or enable the sound
output.
14: AUDIO :To select the available audio
language of TV programs or select
sound
channel.
15: RECALL : To access the previously
viewed channel.
16: SOURCE : To select input source.
17: OK :To confirm selection.
18: EXIT : To exit the menu.
19: SOUND :To switch sound mode.
20: CH+/CH- :To access the next or
previous channels.
21: ASPECT : To change picture aspect
ratio.
22: TV/RADIO :In DTV mode, it is u sed to
switch between digital TV channels
and radio stations.
23: TEXT :To enter or exit TELETEXT.
24: INFO :To display information about the
channel being viewed or further
information about the program when
in small EPG screen in DTV mode.
25: SUBTITLE :To switch betweend
ifferent subtitles in DTV mode.
-8-
OPERATION
BASIC OPERATION
TURN ON THE UINT
Press the POWER button on the remote control to switch on the power. The power indicator will light up in
green colour, press the POWER button again to switch off the power, and the indicator will change to red.
CHANNEL SEARCH
Press the SOURCE button on the remote control to select the TV or DTV input mode, and press the OK button
to confirm.If you are using the unit for the first time, an Installation Guide menu will be displayed to guide you
through the channel scan,Use the remote control to finish channel scan (you can also refer to CHANNEL MENU
(page 11) in this manual for the channel scan operation).
NEW INSTALLATION
Menu Language
English
Auto Tuning
EXIT
MENU
OK
WATCH TV PROGRAM
Press the CH- or CH+ button to select the previous or next channels or press the 0-9 buttons to enter a channel
number directly.Press CH.LIST button to view the channels list and press the
buttons to select the desired
TV programmes.
CHANGE VOLUME
Press the VOL - or VOL + button to adjust the volume level. Press the VOL - button repeatedly to decrease the
volume; press the VOL + button repeatedly to increase the volume from 0 to 100.
CHANGE PICTURE MODE
Press the PIC button repeatedly to cycle through the available video picture modes.
CHANGE SOUND MODE
Press the SOUND button repeatedly to cycle through the available sound modes.
VIEW CHANNEL INFORMATION
Press the INFO button to display the preset channel information.
MUTE
Press the MUTE button to cut off the sound output, press this button again to resume sound output.
CHANGE INPUT SOURCE
Press the SOURCE button then press the
confirm.
buttons to select the input source and press the OK button to
-9-
OPERATION
TELETEXT
Teletext is an information system broadcast by certain channels which can be consulted like a newspaper.
It also offers access to subtitles for viewers with hearing problems or who are not familiar with the
transmission language (cable networks, satellite channels, etc.)
Press :
You Will obtain:
T EXT
This is used to enter or exit teletext mode. The summary appears with a list of
items that can be accessed. Each item has a corresponding 3 digit page number.
If the channel selected does not broadcast teletext, the indication 100 will be
displayed and the screen will remain blank (in this case, exit teletext and select
another channel).
Enter the number of the page required using the 0 to 9 up/down. Example: page
SELECTING A PAGE 120, enter 120. The number is displayed top left, the counter turns and then the
page is displayed. Repeat this operation to view another page. If the counter
continues to search, this means that the page is not transmitted. Select another
number.
DIRECT ACCESS
TO THE ITEMS
INDEX
SUB PAGE
Coloured icons are displayed at the bottom of the screen. The 4 coloured buttons
on the remote control are used to access the items or corresponding pages. The
coloured icons flash when the item or the page is not yet available.
This returns to the contents page (usually page 100).
Certain pages contain subpages which are automatically displayed successively.
This key is used to stop or resume sub-page acquisition. The indication appears
top left.
HOLD
To freeze the page.
REVEAL
To display or hide the concealed information (games solutions).
SIZE
To zoom the page.
LIST
To save and display your favourite pages.
MIX
To mix teletext with video pictures.
-10-
OPERATION
1).Auto Tuning: Search all the channels automatically
(ATV, DTV & Radio)
EPG (Electronic Programme Guide)
The EPG (Electronic Programme Guide) menu is
used to look at what is being broadcast on a DTV
or Radio channel at a later point in time. Press the
EPG button to access the EPG menu, t he detailed
programme information of the channel currently
being viewed will be displayed.
PROGRAMME GUIDE
20 Feb 2006 16:07
800
801
802
803
804
805
DTV
France 2
France 4
France 5
ARTE
LCP
France 3
EXIT
Please select country first
then select Start to update info
Country selection
Start
DTV 801 France 4
1555.1625 Last Exit
20 Feb
17:00
Information
Movie 1
Programme 2
Programme 3
Programme 4
Programme 5
16:00
Last Exit
INFO
Schedule
DATE
Reminder
Australia
Cancel
Press the
buttons to select country then
press the
buttons to select start or cancel.
Press the OK button to start or exit auto tuning .
NOTE: All the channels including ATV, DTV and
Radio can be tuned at the one time .
2).DTV Manual Tuning: You can select a DTV
channel then find the program in this channel
OK
To see what is going to be broadcast after the
current programme, press the
button to view
future programmes and press the
button to
return towards the programmes televised at the
current time. To view a different channel, press
the or button. To book a wanted programme
for later watching, press the blue button to enter
Reminder menu. Press the green button to enter
the schedule list.
To exit the EPG menu and watch the selected
channel, press the EPG or EXIT button.
DTV Manual Tuning
UHF CH
30
Please select channel then
press OK to search
Bad
MENU OPERATION
EXIT
1.CHANNEL MENU
The first item of the menu is CHANNEL menu( for
TV source only).
Nomal
OK
Good
MENU
Pls press the
buttons to select the channel , then
press the OK button to search the programs .
NOTE: Bad Normal Good refers to the signal intensity.
3). ATV Manual Tuning :You can change the
sound system to search the analog TV channels
and fine tune the channels, then store the channels
you selected.
CHANNEL
Auto Tuning
DTV Manual Tuning
ATV Manual Tuning
ATV Manual Tuning
Programme Edit
Storage To
EXIT
MENU
System
BG
Current CH
1
Search
Fine-Tune
Skip
Yes
Frequency 255.25MHz
OK
You can search channels and edit programs here.
EXIT
-11-
SAVE
OPERATION
2. PICTURE MENU
Storage To: To select the channel number you want
to save to.
System: To select the TV sound system.
Current CH: To select the current channel.
Search: To search backward/forward.
Fine-Tune: To fine tuning when the signal level of
current channel is weak.
Skip: When it set to Yes, the current channel will
be skipped while you are changing channels by
pressing the CH+ or CH- buttons.
The second item of the menu is PICTURE menu.
You can adjust picture effect here, including contrast,
brightness and colour as well as other picture functions.
Press the
buttons to select items and press the
buttons to adjust.
PICTURE
Press the red button to store the channel after
manual tuning .
4). Programme Edit: You can edit programs in
the following items.
Picture Mode
Delete
Press the red button, it will shows a red delete
cursor.
Press the
buttons to choose the program.
Press the red button again, the program will be
deleted.
Dynamic
Contrast
70
Brightness
70
Colour
70
Sharpness
70
Tint
0
MENU
EXIT
OK
(1)
Rename
You can only rename ATV programs.
Move the cursor to the program, press the green
button to rename the program.
Press the TV MENU button to exit edit , Press
the EXIT button to exit the menu.
Move
Move the cursor to the program, press the yellow
button, it will show a yellow cursor, Press the
buttons to move the program.
PICTURE
Colour Temp
Normal
Red
Aspect Ratio
70
70
70
16:9
Noise Reduction
ON
Green
Blue
MENU
EXIT
OK
(2)
Skip
Press the
buttons to choose the program,
then press the blue button to skip this program,
SKIP
the
icon will show on the right side of the
program.
PICTURE
PC Setup
Choose the skipped program and press the blue
button again to cancel skip, the SKIP icon will
disappear.
FAV
Press the
buttons to choose the program,
press the FAV button, it will show on the right
side of the program.Choose the FAV program
and press the FAV button again to cancel FAV,
the icon will disappear .
Once your favourite group is created,you can
press the FAV button to quickly access your
favourite channel list.
EXIT
MENU
OK
(3)
PICTURE
Auto Adjust
H-Position
Clock
70
70
70
Phase
70
V-Position
EXIT
MENU
(4)
OK
NOTE:
1).Tint is available in NTSC system only.
2).PC Setup is available in VGA mode only.
-12-
OPERATION
3.SOUND MENU
6.LOCK MENU
The sixth item of the menu is the LOCK menu.
You can lock system, set password, block program,
set parental guidance, restore factory default and set
maximum volume control.
The third item of the menu is the SOUND menu.
You can adjust the sound effect here, including
treble, bass and balance as well as other sound
functions.
Press the
buttons to select and press the
buttons to adjust.
LOCK
SOUND
Sound Mode
Lock System
Treble
Block Programme
50
50
0
Bass
Balance
Surround Sound
Parental Guidance
Max Volume
EXIT
Clock
Off Time
Off
On Time
Off
Sleep Timer
Off
Auto Sleep
Off
Time Zone:
Press the
Change Password:
Press the or OK button and enter the new password.
OK
buttons to adjust the Time Zone.
Block Programme:
Press the or OK button to enter the program list.
Press the
buttons to select the channel you want
to lock then press the green button to lock, the lock
icon will appear behind the locked channel. To unlock
the channel, select the locked channel and press the
green button again,the lock icon will disappear.
NOTE:
When the Auto Sleep is set to ON, the unit will turn
to standby mode automatically if there is no signal
input for a period of about 15 minutes.
5.DEFAULT MENU
The fifth item of the MENU is the DEFAULT menu.
Parental Guidance:
Press the
buttons to set the program rating to
block some programs.
Note:
1). Parental Guidance is optional.
Note:
1). Menu Language, Audio Language, Subtitle
Language are optional.
Restore Factory Default:
Press the or OK button to restore, this operation
will reset the unit to factory default and all the
settings and stored channels will be cleared.
DEFAULT
Menu Language
English
Audio Language
English
Subtitle Language
English
Hearing impaired
Country
EXIT
Off
Max Volume:
Press the
buttons to set the maximum volume.
Note:
1). Max Volume is optional.
Australia
MENU
OK
LOCK System:
Press the
buttons to turn ON or OFF. If it is set to
ON, you will be asked to enter password when searching
the channels .
New South Wales GMT +10
MENU
MENU
To enter the LOCK menu, password will be requested,
the default password is 6666.
The master password is 9527 and may be entered if
the user set password is lost or forgotten (in order to
program a new password). Please note this master
over-ride password does not change and therefore
should not be given to people you do not wish to allow
access to your locked settings.
1. The super password cannot be erased, it will always
remain operational
2. If you forget the password, enter the super password.
And then modify your password, enter the new password
twice to confirm that success.
TIME
EXIT
100
OK
4.TIME MENU
The forth item of the menu is the TIME menu.
You can adjust the clock, power on/off time, sleep
timer and time zone as well as other time clock
functions.
Press the
buttons to select and press the
buttons to adjust.
Time Zone
Off
Restore Factory Default
Off
MENU
EXIT
Off
Change Password
Standard
OK
-13-
TROUBLESHOOTING
Problem
Check
Picture
Audio
Snow
Noise
antenna position, direction
or connection
Ghost
Normal audio
antenna position, direction
or connection
Interference
Noise
electronic equipment,car/
motorcycle,fluorescent light
Normal Picture
Mute
Volume(check if mute is
activated or if the audio system
connections are not correct)
Mute
Power cord is not inserted
Power switch is not opened
Contrast and brightness/volume
setup
Press standby key on the remote
control for inspecting
No picture
No colour
Normal audio
Colour control
Picture
breaking up
Normal audio
or weak
Retune channel
No colour
Noise
-14-
TV system
TECHNICAL SPECIFICATIONS
LCD :
Viewing Picture Size(diagonal)
31.5 (80cm)
Resolution
1366x768
Aspect Ratio
16:9
Display colours
16.7M
Brightness
500 CD/M
Contrast ratio
1500:1
Response time
6.5 ms
Viewing angle
176(H)/176(V)
2
TV:
TV system
DVB-T decode
DVB-T de-modulation
Digital TV: DVB-T
Analog TV: PAL/SECAM
Audio: MPEG2 Audio Layer I&II
Video: MPEG2 Transport MP@HL
Demodulator : COFDM
OFDM Mod.: 2K, 8K FFT, SFN and MFN
Packed Carries: 2K/8K
Guard Interval: 1/4, 1/8, 1/16, 1/32
Terminals:
Analog RGB(VGA) Input
Rear HDMI Input
1
Side HDMI Input
2
1
Rear Composite Video Input
1
Rear S-Video Input
1
Rear Audio Input
3
Y Cb(Pb) Cr(Pr) Input
Side Composite Video Input
1
Side S-Video Input
1
1
Side HEAD PHONE Output
Rear Composite Video Output
Analog Audio Output
1
Coaxial SPDIF Output
1
1
1
Others:
Input Power Voltage
100V-240V~ 50/60Hz
Power consumption
170W
2x8W
Audio Output Power THD 7% )
-15-