1
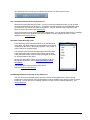
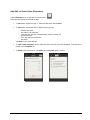
GO!NotifyLink ActiveSync Solution for iOS Devices User Guide GO!NotifyLink ActiveSync Solution for iOS Devices: iPhone, iPod touch, iPad, iPad mini What’s in this document This document: Lists software requirements Gives an overview of iPhone, iPod touch, iPad, and iPad mini functionality using the GO!NotifyLink ActiveSync solution Provides instructions for creating the required Microsoft Exchange® mail account on the device Provides some information for getting started using your iOS device with GO!NotifyLink Unless otherwise noted, the phrase “iOS device” used throughout this document will refer to the iPhone, iPod touch, iPad, iPad mini, and iPad Air devices inclusively. GO!NotifyLink iOS Device Solution Requirements 1 Table of Contents Requirements 3 iOS Device Functionality Overview 4 FAQs 5 Account Setup Instructions 8 Account Maintenance 11 Settings 12 Push Settings .............................................................................................................. 12 Settings on the GO!NotifyLink Client Web .................................................................. 13 Email and PIM Settings ............................................................................................... 14 Security Settings ......................................................................................................... 16 Using Your Device 20 Mail .............................................................................................................................. 20 Sending Email ................................................................................................ 21 Reading Email ................................................................................................ 23 Attachments ................................................................................................... 24 Calendar ...................................................................................................................... 26 Managing the Calendar.................................................................................. 26 Meeting Requests .......................................................................................... 28 Contacts ...................................................................................................................... 31 Managing Contacts ........................................................................................ 31 Address Books ............................................................................................... 32 Using Remote Lookup ................................................................................... 33 Tasks (Reminders) ...................................................................................................... 34 Managing Tasks (Reminders) ........................................................................ 34 Battery Conservation Tips GO!NotifyLink iOS Device Solution 36 Requirements 2 Requirements Server / Device Verify with your IT Administrator, that you have been added to the server with an ActiveSync license key. Use iTunes on your Mac or PC to update iOS software. Upgrade Instructions The following devices and operating system versions are supported with GO!NotifyLink 4.7 Patch 3 or greater: iPad Air 2 OS 8.1 – 8.1.3, 8.2.0, 8.3.0 iPad Air OS 7.1 - 7.1.2, 8.0, 8.0.2, 8.1 - 8.1.3, 8.2.0, 8.3.0 iPad mini 3 OS 8.1 – 8.1.3, 8.2.0, 8.3.0 iPad mini iPhone 6 and 6 plus OS 6.0.1, 6.1, 6.1.2, 6.1.3, 7.0 - 7.0.6, 7.1 - 7.1.2, 8.0, 8.0.2, 8.1 8.1.3, 8.2.0, 8.3.0 OS 6.0, 6.0.1, 6.1, 6.1.2, 6.1.3, 7.0 - 7.0.6, 7.1 - 7.1.2, 8.0, 8.0.2, 8.1 8.1.3, 8.2.0, 8.3.0 OS 6.0, 6.1, 6.1.2, 6.1.3, 7.0 - 7.0.6, 7.1 - 7.1.2, 8.0, 8.0.2, 8.1 - 8.1.3, 8.2.0, 8.3.0 OS 6.0, 6.1, 6.1.2, 6.1.3, 7.0 - 7.0.6, 7.1 - 7.1.2, 8.0, 8.0.2, 8.1 - 8.1.3, 8.2.0, 8.3.0 OS 8.0, 8.0.2, 8.1 - 8.1.3, 8.2.0, 8.3.0 iPhone 5s and 5c OS 7.0 - 7.0.6, 7.1 - 7.1.2, 8.0, 8.0.2, 8.1 - 8.1.3, 8.2.0, 8.3.0 iPhone 5 iPhone 4 OS 6.0, 6.1, 6.1.2, 6.1.3, 7.0 - 7.0.6, 7.1 - 7.1.2, 8.0, 8.0.2, 8.1 - 8.1.3, 8.2.0, 8.3.0 OS 6.0, 6.1, 6.1.1, 6.1.2, 6.1.3, 7.0 - 7.0.6, 7.1 - 7.1.2, 8.0, 8.0.2, 8.1 8.1.3, 8.2.0, 8.3.0 OS 6.0, 6.1, 6.1.2, 6.1.3, 7.0 - 7.0.6, 7.1 - 7.1.2 iPhone 3GS OS 6.0, 6.1, 6.1.2, 6.1.3 iPod Touch 5th Gen OS 6.0, 6.1, 6.1.2, 6.1.3, 7.0 - 7.0.6, 7.1 - 7.1.2, 8.0, 8.0.2, 8.1 - 8.1.3, 8.2.0, 8.3.0 OS 6.0, 6.1, 6.1.2, 6.1.3 iPad 4 iPad 3 iPad 2 iPhone 4S iPod Touch 4th Gen GO!NotifyLink iOS Device Solution Requirements 3 iOS Device Functionality Overview GO!NotifyLink Enterprise Server allows iPhone, iPod touch, iPad, and iPad mini to synchronize email, calendar, contacts, and tasks using the native software contained on the device. There is no application software to install. This section overviews GO!NotifyLink functionality based on the parameters of the native iOS software. Email Uses the native iOS device app to send, receive, reply to and forward emails Folder Mirroring allows email folders from your mail account to be synchronized to the device Email Filters, set on the GO!NotifyLink server, filter mail sent to the device Attachment viewing is supported using device’s native viewers. Emails with attachments can be forwarded. With the exception of picture files in the device’s Camera Roll album and contact (.vcf) files in the Contacts application attaching a file residing on the device to an email is not currently supported. You cannot save a document file attachment on the device. PIM (Calendar, Contacts and Tasks) Interfaces to the native iOS Calendar, Contacts, and Reminders(Tasks) applications Synchronize calendar events in a configurable Look-Back/Look-Ahead range Choose Address Books (on groupware servers that support this) Remote Lookup (Global Address List) retrieves contact information from an LDAP directory using the iOS Contacts application Receive and respond to meeting invitations Create and send meeting invitations from the device Task synchronization is supported on iOS 5 or greater devices synchronizing with GO!NotifyLink Enterprise Server v4.8.0 or greater. Push Types Direct Push (Push) and Scheduled Push (Fetch) options Security SSL encryption protocol for data-in-motion between the device and GO!NotifyLink server GO!NotifyLink iOS Device Solution iOS Device Functionality Overview 4 Ability to remotely clear devices that have been lost or stolen Require password access on the device (Enabled via the GO!NotifyLink Admin Web) Inactivity Timeout (Enabled via the GO!NotifyLink Admin Web) Minimum password length requires passwords to be at least 8 characters. Maximum number of failed password unlock attempts resets device settings to their defaults and removes all information and media stored on the device. Require an alphanumeric value for the password. The character pattern must include one letter, one number and one special character when Password Strength is set to “Strong.” Device IT Policy Comparison Chart Link to this chart to learn which GO!NotifyLink IT policies are supported and which are not supported when using the GO!NotifyLink iOS Device solution. FAQs After I register my device w/ GO!NotifyLink, when will email, calendar, contacts, and tasks sync to my device? The device operates in Direct Push mode. Thus, once registration is completed, the device automatically establishes a connection with the GO!NotifyLink server and checks for available email, contacts, calendar events, and task items. Did your device have contact or calendar data on it prior to registration? Then you will have to turn Contacts and Calendars synchronization ON in the device’s Settings application if you want contact and calendar information to synchronize. You may choose to have existing data kept on the device or deleted and replaced with what syncs from the server. See step 5 in the Account Setup Instructions. Does the reload option work with GO!NotifyLink? Yes. Reload may be used to manually initiate a synchronization at any time. It allows you to retrieve messages in between set intervals if you are operating your device in the “Fetch” synchronization mode. Reload is one way to retrieve messages in email folders that do not automatically synchronize. iOS devices do not synchronize mail automatically in any folder but the Inbox. The user must initiate synchronization by opening these other folders. If one of these folders is already open, the user must tap the reload icon to continue retrieving. Other folders (excluding Trash) can be selected to automatically synchronize like the Inbox. See Email and PIM Settings. GO!NotifyLink iOS Device Solution FAQs 5 The reload icon is the circular arrow located at the left end of a folder screen’s footer. Can I send attachments from the my iOS device? Attachment functionality has some limits. You can receive/view attachments and you can forward emails with attachments from the device. Though document file attachments are downloaded when you open them, you cannot save them on the device. You can, however, save image files to the device’s Camera Roll album (see Attachments). There are currently only two options for sending attachments. You can attach image files to a message using the device’s Photo application and you can attach a contact using the device’s Contacts application (see Sending Email). How does Folder Mirroring work? Folder Mirroring is automatically enabled on the GO!NotifyLink Client Web. Any folder tagged for synchronization to the device is mirrored on the device. Users may tag Sent, Trash, Drafts, or custom folders for synchronization. This example of the device’s mirrored folders shows the native email Inbox folder and includes a custom folder and the Sent, Trash and Drafts folders, each of which was tagged on the web for synchronization to the device. All setup for this feature is done on the GO!NotifyLink server through the Client Web. See the Enterprise Server Client User Guide. You cannot add or rename folders on the device. See also Email and PIM Settings. Are Meeting Invitations supported on my iOS device? Yes, you can accept invitations via the device’s Calendar or Mail applications. Since meeting invitations are sent as emails, mail synchronization must be enabled on the device in order to receive invitations. You can also send a meeting invitation from the device’s Calendar application. See Meeting Requests. GO!NotifyLink iOS Device Solution FAQs 6 How does Remote Lookup work on my iOS device? An LDAP server must first be defined on the GO!NotifyLink server. This will give you access to enterprise directories. Then, in the device’s Contacts application, tap Groups and type a name into the search field. The iOS device shows you matching names from the enterprise directory. See Using Remote Lookup. What if I have other email accounts on my iOS device? Set the account that synchronizes via GO!NotifyLink as the default account. Tap Settings > Mail, Contacts, Calendars Scroll down to the Mail section and tap Default Account. Select the Exchange account. Scroll down to the Contacts section and tap Default Account. Select the Exchange account. Scroll down to the Calendars section and tap Default Calendar. Select the Exchange account. For tasks, scroll down to the Reminders section and tap Default List. Select the Exchange account. Where can I find the Username and Authentication Password used to register my device? In the Username field, enter the email address of your mail account on the groupware server. Find your Authentication Password on the GO!NotifyLink Client Web. Select General > Device GO!NotifyLink iOS Device Solution FAQs 7 Account Setup Instructions Since the GO!NotifyLink server has the ability to communicate via the Microsoft ActiveSync protocol, you use the Exchange ActiveSync account setup procedure on the device to create your GO!NotifyLink account. Though field descriptions may be labeled “Exchange,” keep in mind that you will always enter credentials associated with your GO!NotifyLink account. Please note that the account setup process may vary depending on the iOS version you are using. 1. Select the Settings icon from the device’s Home Screen. 2. Select Mail, Contacts, Calendars > Add Account… > Microsoft Exchange. GO!NotifyLink iOS Device Solution Account Setup Instructions 8 3. Enter the registration credentials. Email – Email address of your mail account on the groupware server Password – Authentication Password as it appears on the GO!NotifyLink server Tap Next. If you see the error message, “Cannot Verify Server Identity,” tap Continue to bypass the error and proceed. 4. In the Server field, enter the external address (IP or domain name) of the GO!NotifyLink server and tap Next. GO!NotifyLink On Demand users enter the server address noted in your welcome letter, tap Next, then proceed to step 5. At this point the device may: Connect and begin to load your mail and PIM items. Note: If you had contact and calendar items on your device prior to registration, proceed to step 5. Display one or more of the error messages in the table below. See instructions on how to proceed. Error Messages If the device displays: Unable to Verify Certificate This displays when the server could not verify the SSL certificate on the GO!NotifyLink server. Tap Accept to bypass the error. The registration will complete and the device will connect and begin to load mail and PIM items. If you accidently tap Cancel at this prompt, the device will fail to make a connection and you will not be prompted again. See Knowledge Base article for reconnection instructions. If the device displays: Exchange account verification failed This displays at the top of the screen when an SSL certificate is not being used on the GO!NotifyLink server. Tap Next, then Save. Then go to the device Settings and turn off SSL. See SSL Encryption for instructions. The registration will complete and the device will connect and begin to load mail and PIM items. GO!NotifyLink iOS Device Solution Account Setup Instructions 9 If the device displays: Unable to verify account information Tap OK to bypass the error. If the device displays: This account may not be able to send or receive emails. Are you sure you want to continue? Tap Save to bypass the error. The registration will complete and the device will connect and begin to load mail and PIM items. 5. If your device had contact and calendar data on it prior to registration, Contact and Calendar synchronizations will default to OFF. You can turn on contact and calendar synchronization at the prompt. Note: You can also change the synchronization settings at any time from the device settings. From the Home screen, tap Settings > Mail, Contacts, Calendars. Then tap your account. If contacts and/or calendar events exist in the device’s local files when you create your Exchange account, you will have the option to either keep existing/local items on the iPhone/iPod touch/iPad or delete them. Local items are stored in a separate address book/calendar labeled, On My iPhone (iPod/ iPad), and are not synchronized to the server. If you want to synchronize contacts and calendar events from the server, but keep existing (local) items on the device, turn Contacts and/or Calendars ON and tap Keep On My iPhone (iPod/ iPad). If you want to synchronize PIM items, but prefer that existing (local) items be removed from the device, turn Contacts and/or Calendars ON and tap Delete. Tap Done to continue. Hint: Make sure you set the Exchange ActiveSync account as the default for Calendar, Contacts, and Reminders (Tasks). If it is not the default, items added from alternate applications on the device will not synchronize. See Email and PIM Settings: Set Default Account. 6. Once you connect to the server, you may be prompted to create or change your passcode to match the policies set on the server. See Security Settings: Required Password and Inactivity Timeout. GO!NotifyLink iOS Device Solution Account Setup Instructions 10 Account Maintenance If you are moving your GO!NotifyLink account to a different device, you will need to. Clear Registration on the GO!NotifyLink Client Web Remove your GO!NotifyLink account form the old device and recreate it on the new device Clear Registration Before Reregistering Your Account on a New Device If you are reregistering your account because you changed devices, you must Clear Registration via the GO!NotifyLink Client Web. See instructions for accessing the GO!NotifyLink Client Web. 1. Login to the GO!NotifyLink Client Web and select General > Device. 2. Click the Clear Registration button. 3. Proceed with reregistering your account. Removing Your Account from the Device When you remove an account from the device, the account and all mail and PIM items (calendar events, contacts and tasks) associated with it, are deleted from the device. 1. From the device Home screen, tap Settings > Mail, Contacts, Calendars, then select your account. 2. Tap Delete Account. GO!NotifyLink iOS Device Solution Account Maintenance 11 Settings Push Settings Push Your mail account, synchronizing via GO!NotifyLink, is a “push” account. When new messages, contacts, calendar events, or tasks are available, the information is automatically delivered (pushed) to your iPhone/ iPod touch/ iPad. This is the equivalent of the GO!NotifyLink “Direct Push” mode. Push Synchronization with Wi-Fi Connections. If you do not have a cellular connection, the device can receive pushed data over a Wi-Fi connection when the device is awake (screen is on or device is connected to your computer or a power adapter). Fetch In contrast, with “fetch” service, the device must periodically check the server to see if new messages have arrived and then request a delivery. Fetch is used if Push is turn off and the user may define the frequency of the fetch sessions. “Fetch” is the equivalent of the GO!NotifyLink “Scheduled Push” mode. Mail, contacts, calendar events and tasks sent from the device will process immediately, independent of the scheduled fetch sessions. GO!NotifyLink iOS Device Solution Settings 12 Change Your Push Setting Push mode is the default setting on your device. You may, however, wish to temporarily suspend Push service if you are outside a service area or wish to conserve battery life. When Push is turned OFF, data can still be fetched at periodic intervals or manually. Battery Life. Though Push mode offers more up-to-the-minute message delivery, for some users, increased battery consumption may be the tradeoff. If your battery is not lasting as long as you would like, try using the Fetch mode. 1. From the Home screen tap Settings > Mail, Contacts, Calendars. 2. Tap Fetch New Data 3. Turn Push OFF 4. Choose the interval at which the device should “fetch” data or tap Manually. Every 15 Minutes Every 30 Minutes Hourly Manually (use the “reload” icon screen to fetch) on the Mailbox or Inbox Settings on the GO!NotifyLink Client Web There are several settings, configurable on the GO!NotifyLink Client Web, that control what synchronizes to your device. What follows are instructions for accessing the Client Web online. When instructions in this guide direct you to change a setting from the Client Web: On Premise Users: In your web browser, enter the server address of the web server running the Http/Web component of GO!NotifyLink, followed by /client/ On Demand Users: In your web browser, enter the server address of the On Demand web server: https://hosted<#>.notifylink.com/client/clientlogin.php Where # is indicated, insert the server number you have been assigned to (without brackets <>). Login In the Username and Password fields of the Login screen, enter the email address and password of your mail account. (You can change the password assigned to you in the Client Web from the Accounts page.) Consult the Enterprise Server Client Web Guide for more information on the Client Web. ** GO!NotifyLink iOS Device Solution Settings 13 Email and PIM Settings This chart summarizes the settings that control how the email and PIM (calendar events, contacts, and tasks) are synchronized to the device. Some settings are configurable on the device. Others are configurable through the GO!NotifyLink Client Web. Instructions for accessing the Client Web Below is a list of the settings and where they can be configured. Configuration Settings Description Configurable via: Device Settings > Mail, Contacts, Calendars > (Mail) > Default Account (Contacts) > Default Account (Calendars) > Default Calendar (Reminders) > Default List Set Default Account: For Mail, Calendar, Contact Group and Reminders (Tasks) If you have multiple Mail/PIM accounts on your device, you will need to set a default account. Make the Exchange Filters Filters messages sent from the server GO!NotifyLink Client Web: Mailbox > Filters Folder Mirroring On the web Folder Mirroring is automatically enabled. Select email folders to be synchronized to the device. Users may choose Sent, Trash, Drafts, or custom folders. GO!NotifyLink Client Web: Mail Folders to Push account associated with your GO!NotifyLink user account the default for the Mail account, the Calendar, the Contact Group and Reminders (Tasks). Mail and calendar/contact items that originate from alternate applications on the device will then synchronize to the server. (Example: Using the Contacts application to attach a contact to an email.) If defaults are set to other accounts, such data will not synchronize to the server associated with your Exchange account. Other folders (excluding Trash) can be selected to automatically synchronize like the Inbox. Older operating systems do not have this option and require that you open any folder other than Inbox in order to initiate synchronization. To select folders: Mailbox > Folders Device Settings > Mail, Contacts, Calendars > (account) > Mail Folders to Push Notification ON/OFF Enables/Disables GO!NotifyLink message notification. Restarts/Suspends retrieval of Email from the server. GO!NotifyLink Client Web: General > Control Options Mail Days to Sync Number of days a message is available on the device. Use as a cleanup setting to manage message quantity. Cleanup will take effect within 24 hours of the scheduled delete. Choose 1 or 3 days, 1 or 2 weeks, or 1 month. “No limit” is not supported, but if chosen, will default to 180 days. Device Settings > Mail, Contacts, Calendars > (account) > Mail Days to Sync Show number of messages The number of items sent to the device in each Sync request. If more than the selected number of items exist, multiple Sync requests are used until all items are retrieved. Choose from 25, 50, 75, 100, 200 recent messages. Device Settings > Mail, Contacts, Calendars > Show GO!NotifyLink iOS Device Solution Settings 14 Calendar Sync Set the calendar synchronization range how far back and ahead to sync your calendar events on the device. Look-back is set from the device. Default is 1 month. Choose from 2 weeks, 1, 3, 6 months or All Events. (If All Events is chosen, Look-back is set to 52 weeks.) Look-ahead is set from the client web. Default is 26 weeks. Choose from 1 to 52 weeks. Device Settings > Mail, Contacts, Calendars > Sync GO!NotifyLink Client Web: PIM > Calendar > Synchronization Range Filter Meeting Response Emails When enabled, this option filters out meeting response emails sent directly from the iOS device to the meeting organizer. The organizer may still receive response email from the attendee’s PIM server. In cases where the PIM server is configured to send response email, this filter serves to eliminate duplicate notifications. GO!NotifyLink Client Web: PIM > Calendar Choose Address Books If the groupware server supports multiple address books, choose which will synchronize to the device. Contacts from the chosen address books will synchronize to the device’s “All Contacts.” GO!NotifyLink Client Web: PIM > Contacts > Choose Address Books GO!NotifyLink iOS Device Solution Settings 15 Security Settings Please note that iOS 4 supports multiple Exchange ActiveSync accounts on a single device. This introduces the possibility of a device dealing with conflicting sets of IT/Security policies issued from multiple Exchange ActiveSync servers. In these cases, the device will always enforce the highest security requirements of all conflicting policies. SSL Encryption SSL is an encryption protocol for data-in-motion between the device and GO!NotifyLink server. An SSL certificate must be installed on the web server in order for you to use SSL. Check with your IT administrator to determine if this feature is available to you. (SSL is available to GO!NotifyLink On Demand users, as all On Demand servers are equipped with SSL certificates.) If the server is NOT using SSL (check with your IT administrator to verify), turn the Use SSL setting off. This will allow the device to make connections to the GO!NotifyLink server over http instead of https. Tap Settings from the device’s Home screen. Tap Mail, Contacts, Calendars Tap your account and then tap Account Info Tap the Use SSL ON/OFF box to display OFF Required Password and Inactivity Timeout If your organization’s mobile security policy requires that your device be password protected, you will be prompted to define your lock password on the device. Note: If your organization does not enforce the password policy, but you wish to password protect your device, you can: Request that your IT Administrator turn on the enforcement for your account through the GO!NotifyLink Administrative Web. Then follow the instructions below. Use the device’s native Passcode Lock option (Settings > General > Passcode Lock) to set a 4 digit numeric passcode. 1. The “New Passcode Required” message will appear. Tap Continue. Note: If you tap Close here, the prompt will pop up each time the device wakes. GO!NotifyLink iOS Device Solution Settings 16 2. Enter a passcode, then re-enter it to confirm. Passcode Requirements: Although the entry instructions read, “Enter 1 or more numbers,” the keypad displays allowing you to enter letters, numbers, or non-alphanumeric characters. If server security rules are enforced, there may be a minimum password length requirement or you may be required to use a certain number of complex characters (non-alphanumeric) in the password. You will also want to set the Auto-Lock which determines the inactivity timeout interval on the device. This will turn off the device’s display and prevent unintended operation of your device. Note: iPhone users can still receive calls and text messages and can adjust volume for the headpiece while the device is locked. iPod touch/ iPad users can also adjust the volume while the device is in a locked state. 3. Tap Settings > General > Auto-Lock. 4. Select a 1, 2, 3, 4, or 5 minute interval. Choose ‘Never’ to disable the inactivity timeout. Note: If server security rules are enforced, you can only choose intervals less than or equal to the value of the server’s Inactivity Timeout setting (within the 1 to 5 minute range) and you will not be able to choose Never. GO!NotifyLink iOS Device Solution Settings 17 Changing Your Passcode If you want to change your passcode: 1. Tap Settings > General > Passcode Lock 2. Tap Change Passcode. 3. Enter your current passcode. 4. Enter your new passcode, then re-enter it to confirm. GO!NotifyLink iOS Device Solution Settings 18 Turning the Passcode Off If the passcode requirement is lifted* and you wish to operate without a passcode, you will have to disable the passcode on your device after the requirement is lifted. Note: Once the requirement has been disabled on the server, you may need to turn the device off, then on again before adjusting this setting. See Knowledge Base article for more information. 1. Tap Settings > General > Passcode Lock 2. Tap Turn Passcode Off. 3. Enter your current passcode. * From the GO!NotifyLink Administrative Web: Lock Rules, disable the Inactivity Timeout. Wipe on Failed Unlock Attempts This security feature can be enforced from the GO!NotifyLink Administrative Web. The purpose of Wipe on Failed Unlock Attempts is to limit the chances an unauthorized user has to guess a password. A failed unlock attempt wipe will remove account information and all data (messages, contacts, calendar events, tasks, media, etc.) from the device. The device returns to its original, factory settings. iPhone 3GS and 4G devices will complete the wipe rapidly, however, this can take up to 2 hours or more on older models. You will be unable to use the device while data is being overwritten. If this feature is not enforced from the server, the user can enable it locally. Select Settings > General > Passcode Lock and turn Erase Data ON. The default is 10 failed attempts. Remote Wipe In the event that your device is lost or stolen, contact your IT Administrator as soon as possible. The administrator has the ability to enforce a Remote Wipe security function on the device from the GO!NotifyLink Administration Web. A Remote Wipe will remove account information and all data (messages, contacts, calendar events, tasks, media, etc.) from the device. The device returns to its original, factory settings. iPhone 3GS and 4G devices will complete the wipe rapidly, however, this can take up to 2 hours or more on older models. You will be unable to use the device while data is being overwritten. Note: If your device is retrieved, your GO!NotifyLink account must be deleted from the GO!NotifyLink server and added again before you can restore the device through iTunes and re-registered your account. GO!NotifyLink iOS Device Solution Settings 19 Using Your Device iPhone/ iPod touch/ iPad/ iPad mini use the native email client to send, receive, reply to and forward emails via GO!NotifyLink. The native Calendar, Contacts, and Reminders (Tasks) applications are also used to synchronize contacts calendar events, and tasks via GO!NotifyLink. Mail Set the Default Mail Account Set the Exchange ActiveSync account associated with your GO!NotifyLink user account as the default. This account must be the default in order for messages created outside the Mail application to synchronize through the GO!NotifyLink ActiveSync component. For example, when you create an email from the Contacts application for the purpose of attaching a contact file, the contact is sent using the default mail account. If the default is not your Exchange account, the message will not synchronize. This is also important since iOS 4 supports multiple Exchange ActiveSync accounts. If you compose an email from the unified Inbox, by default it is sent from the address associated with the device’s default email account. Hint: You should also set the Exchange ActiveSync account as the default for calendar, contacts, and reminders (tasks). 1. Select Settings > Mail, Contacts, Calendars. 2. Scroll to the Mail section and tap Default Account. 3. Select the account associated with the Exchange account. GO!NotifyLink iOS Device Solution Using Your Device 20 Sending Email 1. Select the Mail icon from the Home screen, then tap 2. Type a name or email address in the To field or tap to add a name from your contacts. As you type, matching email addresses from your contacts appear. Tap to choose one. Tap return or access the contact list again to add more names. Note: If you have access to an enterprise directory, matching addresses from your contacts appear first, then matching enterprise directory addresses appear. 3. Tap Cc or Bcc if you want to copy or blind copy the email to others. 4. Enter a Subject and then you message. 5. Tap Send or to save a draft of the message, tap Cancel then tap Save. Send a photo in a message In the device’s Photos application, choose a photo and tap . Then tap Email Photo. The photo is sent using the default email account. GO!NotifyLink iOS Device Solution Using Your Device 21 Share a contact in a message In the device’s Contacts application, choose a contact and tap Share Contact at the bottom of the Info screen. The .vcf contact file is sent using the default email account. Reply to a Message 1. Open a message and tap . 2. Tap Reply or Reply All. 3. Type your message. 4. Tap Send. Forward a Message 1. Open a message and tap . 2. Tap Forward. 3. Add one or more email addresses and your message. 4. Tap Send. GO!NotifyLink iOS Device Solution Using Your Device 22 Reading Email The Mail icon on the Home screen shows the number of unread messages in your Inboxes. Note: If you have more than one mail account on the device this number includes unread messages from all Inboxes. Email Folders GO!NotifyLink can synchronize email from multiple folders on the mail server to the device Inbox and to multiple folders that mirror those on the server. If you have access to the GO!NotifyLink Client Web, you can select the folders you wish to synchronize to the device. From the GO!NotifyLink Client Web, select Mailbox Properties > Folders and select the folders you want GO!NotifyLink to monitor. In addition to the Inbox, you can select the Sent Items, Deleted Items, Drafts, or any custom folders. Mail Folders to Push The folders you select for synchronization appear in the Mailboxes list. The Inbox is the only folder that synchronizes automatically. Other folders must be opened to initiate synchronization. Folders other than Inbox will initiate synchronization only when they are opened or when using the reload icon (manually initiated sync). You can, however, select other folders (excluding Trash) to also synchronize automatically. On the device, tap Settings > Mail, Contacts, Calendars > (account) > Mail Folders to Push, then check the folders you wish to automatically synchronize. The Mailboxes List In the Mailboxes (folder) list, you will see the number of unread messages in each mailbox and folder. Tap a mailbox or folder to see its messages. Note: If you have chosen to mirror the Sent Items or Trash folder on your device, they will always be named “Sent” and “Trash” regardless of what they are named in your collaboration suite. GO!NotifyLink iOS Device Solution Using Your Device 23 The Message List Messages with a blue dot next to them are unread. Tap a message to read it. Within a message, tap ▲ or ▼ to see the previous or next message. Attachments iPhone/ iPod touch/ iPad/ iPad mini allow you to view picture and document attachments and can play many audio attachments using applications native to the device. You can forward a message with attachments. You can save a picture attachment you have received to the device’s Camera Roll album. You can create a message with a picture attachment from the device’s Photos application. See Sending Email. You can create a message with a contact file (.vcf) attachment from the device’s Contacts application. See Sending Email You cannot save a document file on the device. You cannot attach a document file to an email you are composing. Open an attached file Tap the attachment. It downloads and opens using native viewing applications. Save an attached photo or video to the Camera Roll album To save a photo, tap the photo, then tap Save Image. If the attachment has not yet been downloaded, tap the download notice first. To save a video, tap and hold the attachment, then tap Save Video. If the attachment has not yet been downloaded, tap the download notice first. GO!NotifyLink iOS Device Solution Using Your Device 24 Supported attachment formats for viewing If a file type is not supported by iPhone/ iPod touch/ iPad/ iPad mini, you will see the filename, but you won’t be able to open it. Document formats .doc Microsoft Word .docx Microsoft Word (XML) .htm webpage .html webpage .key Keynote .numbers Numbers .pages Pages .pdf Preview, Adobe Acrobat .ppt Microsoft PowerPoint .pptx Microsoft PowerPoint (XML) .rtf Rich Text Format .txt text .vcf contact information .xls Microsoft Excel .xlsx Microsoft Excel (XML) Image formats .jpeg JPEG/JIFF Image .gif Graphic Interchange Format .png Portable (Public) Network Graphic .bmp Bitmap graphics Audio formats .mp3 MP3 Audio File .aac MPEG-2 Advanced Audio Coding File .wav Waveform Audio .aiff Audio Interchange File GO!NotifyLink iOS Device Solution Using Your Device 25 Calendar Set the Default Calendar If you have multiple Mail/PIM accounts on your device, you will need to set the Default Calendar. Set the Exchange ActiveSync account associated with your GO!NotifyLink user account as the default. This calendar must be the default in order for events added while viewing All Calendars to synchronize through the GO!NotifyLink ActiveSync component. It is also necessary if you wish to create meeting requests on the device. Hint: You should also set the Exchange ActiveSync mail account, contact group, and task list (reminders) as defaults. 1. Select Settings > Mail, Contacts, Calendars. 2. Scroll to the Calendar section and tap Default Calendar. 3. Select the calendar associated with the Exchange account. It appears with (Exchange) beside it. Managing the Calendar Viewing All Calendars When you choose the All Calendars option, you are viewing all events from all calendars. Although merged into one view, the items may be stored in separate calendar files based on the application from which they originated. If you add events while viewing All Calendars, they are added to the default calendar file. Therefore, the default calendar must be the Exchange account calendar in order for events to synchronize through the GO!NotifyLink ActiveSync component. Events in the Exchange account calendar appear on the calendar with a distinct color assignment. For example, in the illustration below, Exchange account calendar items appear in an orange block (day view) or with an orange dot (month or list view). Choosing a Calendar View 1. Select the Calendar application. GO!NotifyLink iOS Device Solution Using Your Device 26 2. Tap Calendars in the Calendar title bar, then select a calendar to view or All Calendars. Add, Edit or Delete Calendar Events Tap the Calendar icon on the device’s Home screen. A number in the upper right corner of the icon indicates the number of new meeting invitations in your calendar. Tap List, Day, or Month to change the calendar view. To select a calendar file to view, tap Calendars in the title bar. To add an event: Tap + To edit an event: Tap the event, then tap Edit To delete and event: Tap the event, tap Edit , then scroll to the bottom and tap Delete Event GO!NotifyLink iOS Device Solution Using Your Device 27 Set the Calendar Time Zone The Calendar’s time zone can be set independently of the device’s general time zone setting. If the Calendar Time Zone Support setting is ON (default), the Calendar will always show event dates and times in the time zone selected for Calendars. If the setting is OFF, events display according to the time zone of your current location as determined by the network time, which changes automatically based on the user’s geographic location. However, some carriers do not support network time in all locations, so the device may not be able to automatically set the local time when you are traveling. 1. Choose Settings > Mail, Contacts, Calendars. 2. Scroll to the Calendar section, tap Time Zone Support. 3. Turn Time Zone Support ON and select a major city in the Time Zone of your choice. Note: The general time zone is located in the device’s General settings. Like the Calendar time zone, it can be set manually or for automatic updates via the cellular network. Tap General > Date & Time. Meeting Requests You can create, receive and respond to meeting requests on the device. Meeting requests, issued from a user on the same groupware server, appear in both the email Inbox and on the Calendar. In the Calendar, the invitation appears in the appointed time slot with a dotted line around it. You can respond to an invitation in the Calendar application or you can open the meeting’s Info screen from Mail and respond to it there. Note: Meeting requests sent to you from users on external groupware servers may appear as messages in your Inbox. You can reply to these messages, however, you will not be able to accept or decline the meeting, nor will the request initiate a change to your calendar. GO!NotifyLink iOS Device Solution Using Your Device 28 The icon in the lower-right corner of the Calendar screen indicates the number of new invitations you have, as does the Calendar icon on the Home screen. Things to know about Meeting Requests on iOS Devices Since meeting invitations are sent as emails, mail synchronization must be enabled in order to receive invitations. If disabled, the invitation will not appear in either the Mail or Calendar application. When you respond to a meeting invitation from your device, it issues an email and a calendar update to the meeting organizer. Depending on the groupware you are using, the PIM server may also send a response email, resulting in the organizer receiving two response emails from you. You can suppress the email sent directly from the device by enabling a filter on the GO!NotifyLink Client Web. From the GO!NotifyLink Client Web home page, select PIM > Calendar > Calendar Control Options, then enable the Filter Meeting Response option. It is necessary to set the Exchange ActiveSync account associated with your GO!NotifyLink user account as the default if you wish to create meeting requests on the device. Meeting invitations sent from the device are created in the Calendar application. You must be viewing your Exchange account calendar or All Calendars to create an invitation. Respond to an invitation in Calendar: 1. Tap a meeting invitation in the calendar or tap the meeting invitation icon to display the Event screen and tap an invitation. 2. In the Info screen: You can set an Alert to sound prior to the meeting or Add Comments to be included with the email response to the organizer. Tap Accept, Maybe, or Decline. A response email, including any comments you added, is sent to the organizer. Note: If you accept, or tentatively accept the meeting, you can change your response later. You can also change your comments by tapping Add Comments. GO!NotifyLink iOS Device Solution Using Your Device 29 Open and respond to a meeting invitation in an email message: Tap the invitation. You can manage and respond to the invitation here as well. Create and Send a Meeting Invitation 1. Select the Calendar application and make sure you are viewing All Calendars or the calendar file associated with your Exchange account. 2. Tap + to create an event with invitees. 3. Enter the event specifics, then tap Invitees and select contacts from your contact list or enter email addresses. 4. Tap Done to return to the Add Event screen. 5. Tap Done to send the invitation. The event will appear on your calendar. GO!NotifyLink iOS Device Solution Using Your Device 30 Contacts Set the Default Contact Account If you have multiple Mail/PIM accounts on your device, you will need to set the Default Contact Account. Set the Exchange ActiveSync account associated with your GO!NotifyLink user account as the default contact group. This contact group must be the default in order for contacts added while viewing All Contacts to synchronize through the GO!NotifyLink ActiveSync component. Hint: You should also set the Exchange ActiveSync mail account, calendar, and task list (reminders) as defaults. 1. Select Settings > Mail, Contacts, Calendars. 2. Scroll to the Contacts section and tap Default Account. 3. Select the account associated with the Exchange account. Managing Contacts Add, Edit, or Delete Contacts Tap the Contacts icon on the device’s Home screen. To choose a contact group to view, tap Groups in the title bar. To add a contact: Tap Contacts and tap + To edit contact information: Choose a contact, then tap Edit GO!NotifyLink iOS Device Solution Using Your Device 31 To delete a contact: Choose a contact, tap Edit, then scroll to the bottom and tap Delete Contact To search for a contact: Tap Contacts and tap the search box. As you type, matching names from the contact list appear. Address Books GO!NotifyLink can synchronize contacts from multiple address books or contact categories on the Mail/PIM server into different categories on the device. If you have access to the GO!NotifyLink Client Web, you can select the address books/categories you wish to synchronize to the device. From the GO!NotifyLink Client Web home page, select PIM > Contacts > Choose Address Books and check the address books/categories to be monitored. Note: FirstClass, Google, MDaemon, Meeting Maker, Mirapoint, Oracle, and Sun Java Enterprise System collaboration suites do not support multiple address books. GO!NotifyLink iOS Device Solution Using Your Device 32 Using Remote Lookup If an LDAP server is defined in GO!NotifyLink and your GO!NotifyLink user account is set up to access it, you can use the Contacts application to search your enterprise directory for contacts in your organization. Note: For devices running OS 2.x, Contacts must be set to ON in the device Settings in order to search for a contact in a remote directory. Tap Settings > Mail, Contacts, Calendars. Then tap your account and turn Contacts ON. You cannot edit contacts from an enterprise directory or save them to the device. 1. Tap Contacts > Groups 2. Select the Directory to search. 3. Enter a name, address or other information in the search field. You may also access enterprise directories from the To/Cc/Bcc fields while composing a message in Mail. Using Remote Lookup While Composing Email Turning on contact synchronization is not a prerequisite for using remote lookup while composing mail. As you begin to type an email address in the To/Cc/Bcc fields of the compose screen, the device will automatically perform a remote lookup based on the characters you enter. This will occur even if you are not synchronizing contacts (as is required when using remote lookup from the Contacts application) as long as your user account is set up to access the LDAP server. GO!NotifyLink iOS Device Solution Using Your Device 33 Tasks (Reminders) Tasks synchronization is supported on devices synchronizing with GO!NotifyLink Enterprise Server, version 4.8.0 or greater. Set the Default List If you have multiple Mail/PIM accounts on your device, you will need to select a default task list. Set the Exchange ActiveSync account associated with your GO!NotifyLink user account as the default list. Hint: You should also set the Exchange ActiveSync mail account, calendar, and contact group defaults. 1. Select Settings > Mail, Contacts, Calendars. 2. Scroll to the Reminders section and tap Default List. 3. Select the account associated with the Exchange Account. Managing Tasks (Reminders) Viewing Tasks (Reminders) Tap the Reminders icon on the device’s Home screen. At the top of the screen, tap List or Date. The List view allows you to see the tasks on a particular task list. Tap the list icon to choose your GO!NotifyLink Exchange account list, the Completed task list, or the device’s native Reminders list. The Date view allows you to see any task for which you have designated a reminder date and time. Tap the calendar icon to select a specific date. To Search for a task, using the Date view, tap the calendar icon, then tap Search Reminders. Using the List view, tap the List icon, then tap Search Reminders. Enter text in the search field. List View GO!NotifyLink iOS Device Solution Date View Search for a task Using Your Device 34 Add, Edit, or Delete Tasks (Reminders) Tap the Reminders icon on the device’s Home screen. Select the list to which you will add the task. To add a task, tap the plus sign. + Enter the task name and tap Done. To edit a task, tap the task. On the Details screen you can: o edit the task name o add a time to be reminded o make the task one that is repeated daily, weekly, monthly, etc. o prioritize the task o move the task to a different list o add notes Tap Done to save your changes. To mark a task completed, tap the check box next to the item you have completed. The task will be moved to the Completed list. To delete a task, tap the task. Tap Delete, then tap Delete again to confirm. Edit or Delete a Task GO!NotifyLink iOS Device Solution Tasks marked as completed Using Your Device 35 Battery Conservation Tips Two basic battery conservation tips that you should know: Keep your device out of the sun or a hot car, as heat will degrade your battery’s performance. Run the device through one charge cycle per month. Charge it to 100 percent, then let it completely run down. This will prolong the overall life of your battery. In addition, adjusting some of the Settings on the device can help you conserve day-to-day battery usage and maximize overall battery life. Adjust as many of the settings as possible. Tap the Settings icon on the Home screen to access all these features. ‡Turn 3G coverage off – 3G coverage is still limited, so turn it off if it is not absolutely necessary. Tap, General > Network > Enable 3G, then turn it OFF. Turn WiFi off – When WiFi is on, the device it constantly looking to join new networks, so turning it off saves power. If you are browsing frequently, however, WiFi uses less power than cellular networks. Tap, WiFi, then turn it OFF. Turn Location Services off – Unless you are using this feature and it is available in your location, turn it off. Tap, General > Location Services, then turn it OFF. Turn Push mode off and set Fetch at a less frequent interval – Unless you need email instantly, turn Push off. Tap, Fetch New Data, then turn Push OFF. Then set the Fetch interval for 30 minutes or 1 hour. ‡Turn Bluetooth off – Turn it on only when you are using it. Leaving it on all day uses power unnecessarily. Tap General > Bluetooth, then turn it OFF. ‡Turn Airplane Mode on – When you are in a low or no coverage area, turn this on so that the device is not actively searching for cellular networks it will likely not find. Tap Airplane Mode, then turn it ON. ‡Turn Vibrate off – Use only as needed. Tap, Sounds > Vibrate, then turn it OFF for both Silent and Ring modes. Turn Brightness down – Chances are you will not need brightness at 100 percent. Tap, Brightness, then slide the bar to decrease brightness. Turn Equalizer settings off – Apply equalizer settings only when listening to music. On iPhone: Tap iPod > EQ, then turn settings OFF. On iPod touch/ iPad: Tap Music > EQ, then turn settings OFF. GO!NotifyLink iOS Device Solution Battery Conservation Tips 36 Turn Auto-Lock on – Use Auto-Lock to sleep the device when you are not using it. The shorter the lock interval, the more power you save. Tap, General > Auto-Lock, then set lock interval to 1 minute. See the Apple documentation for further information on maximizing the lifespan and battery life of your device. http://www.apple.com/batteries/ ‡ Applies to iPhone only GO!NotifyLink iOS Device Solution Battery Conservation Tips 37