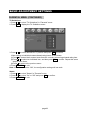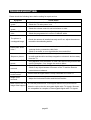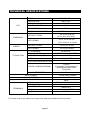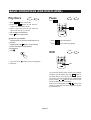
1
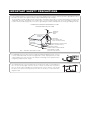
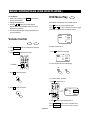
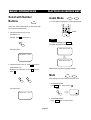
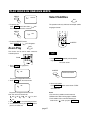
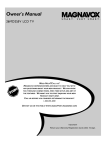
37" LCD HDTV
With Built-in DVD Player
DTV-373-D
OWNER'S MANUAL
IMPORTANT SAFETY PRECAUTIONS
• If an outside antenna is connected to the television equipment, be sure the antenna system is grounded so as to
provide some protection against voltage surges and built-up static charges.
Section 810 of the National Electrical Code provides information with respect to proper grounding of the mast and
supporting structure, grounding of the lead-in wire to an antenna discharge unit, size of grounding conductors,
Iocation of antenna-discharge unit, connection to grounding electrodes,and requirements for the grounding electrode.
EXAMPLE OF ANTENNA GROUNDING AS PER
NATIONAL ELECTRICAL CODE
ANTENNA
LEAD IN
WIRE
GROUND
CLAMP
ELECTRIC
SERVICE
EQUIPMENT
NEC —NATIONAL ELECTRICAL CODE
ANTENNA
DISCHARGE UNIT
(NEC SECTION 810-20)
GROUNDING CONDUCTORS
(NEC SECTION 810-21)
GROUND CLAMPS
POWER SERVICE GROUNDING
ELECTRODE SYSTEM
(NEC ART 250, PART H)
• For added protection for this television equipment during a lightning storm, or when
it is left unattended and unused for long periods of time, unplug it from the wall
outlet and disconnect the antenna. This will prevent damage to the equipment due
to lightning and power-line surges.
• An outside antenna system should not be located in the vicinity of overhead power
lines or other electric light or power circuits, or where it can fall into such power
lines or circuits. When installing an outside antenna system, extreme care should
be taken to keep from touching such power lines or circuits as contact with them
might be fatal.
TABLE OF CONTENTS (FOR TV TUNER)
IMPORTANT INFORMATION
IMPORTANT SAFETY PRECAUTIONS
SUPPLIED ACCESSORIES
PREPARATION
● INSERTING BATTERIES INTO THE REMOTE CONTROL
● USING THE REMOTE CONTROL UNIT
● CAUTIONS REGARDING REMOTE CONTROL UNIT
DISPLAY
● FRONT VIEW
● REAR VIEW
REMOTE CONTROL
CONNECTIONS
BASIC OPERATIONS
● TURNING ON THE POWER
● TURNING OFF THE POWER
● SIGNAL INPUT SELECTION
WATCHING TV
● TURNING ON THE POWER
● TURNING OFF THE POWER
● SIMPLE BUTTON OPERATIONS FOR CHANGING CHANNELS
● USING FLASHBACK ON THE REMOTE UNIT
● SIMPLE BUTTON OPERATION FOR CHANGING VOLUME/SOUND
● ELECTRONIC PROGRAM GUIDE
● SETTING MTS/SAP STEREO MODE
BASIC ADJUSTMENT SETTINGS
●
VIDEO MENU
● AUDIO MENU
● SCREEN MENU
● CHANNEL MENU
● SETUP MENU
● CLOSED CAPTION MENU
● PARENTAL MENU
TROUBLESHOOTING
TECHNICAL SPECIFICATIONS
1
2-3
4
5
5
5
5
6
6
7
8-9
10-11
12
12
12
12
13-16
13
13
13
14
15
15
16
17-28
17-18
19
20
21
23
24
26-28
29
30
TABLE OF CONTENTS (FOR DVD PLAYER)
BASIC OPERATIONS
● PLAY DISCS
● PAUSE
● OSD
● VOLUME CONTROL
● DVD MENU PLAY
● SELECT WITH NUMBER BUTTONS
PLAY DISCS IN VARIOUS WAYS
● AUDIO MODE
● MUTE
● FAST PLAY
● REPEAT PLAY
● ZOOM PLAY
● SELECT SUBTITLES
● PROGRAM PLAY
● SHUFFLE (RANDOM) PLAY
MENU SETTING
● GENERAL SETUP
● AUDIO SETUP
● PASSWORD SETUP
● PREFERENCES
DIGITAL CARD PLAY OPERATION
TROUBLESHOOTING
TECHNICAL SPECIFICATIONS
31-35
31
31
31-34
34
34
35
35-39
35
35
36
36
37
37
38
39
40-44
41-42
42-43
43
44
45
46
47
IMPORTANT INFORMATION
WARNING: TO REDUCE THE RISK OF FIRE OR ELECTRIC SHOCK, DO NOT EXPOSE
THIS PRODUCT TO RAIN OR MOISTURE.
CAUTION
RISK OF ELECTRIC SHOCK
DO NOT OPEN
The lightning flash with arrowhead symbol, within an equilateral triangle,
is intended to alert the user to the presence of uninsulated ''dangerous
voltage'' within the product's enclosure that may be of sufficient
magnitude to constitute a risk of electric shock to persons.
The exclamation point within a triangle is intended to alert the user to the
presence of important operation and maintenance (servicing) instructions
in the literature accompanying the product.
FCC RF INTERFERENCE STATEMENT
NOTE: This equipment has been tested and found to comply with the limit for a Class B digital
device, pursuant to Part 15 of the FCC Rules. These limits are designed to provide
reasonable protection against harmful interference in a residential installation.
This equipment generates, uses and can radiate radio frequency energy and, if not
installed and used in accordance with the instructions, may cause harmful interference to
radio communications. However, there is no guarantee that interference will not occur in a
particular installation.
If this equipment does not cause harmful interference to radio or television reception which
can be determined by turning the equipment off and on, the user is encourage to try to
correct the interference by one or more of the following measure.
● Reorient or relocate the receiving antenna.
● Increase the separation between the equipment and receiver.
● Correct the equipment into an outlet on a circuit different from that to which the receiver
is connected.
● Consult the dealer or an experienced radio, TV technical for help.
● Only shielded interface cable should be used.
page1
IMPORTANT SAFETY PRECAUTIONS
The present set has been designed and manufactured to assure personal safety. Improper use
can result in electric shock or fire hazard. The safeguards incorporated in the present unit will
protect you if you observe the following procedures in installing, using and servicing. The present
unit is fully transistorized and does not contain any element that can be repaired by the user.
1. Read these instructions - All operating instructions must be read and understood before the
product is operated.
2. Keep these instructions - These safely and operating instructions must be kept in a safe place
for future reference.
3. Heed all warnings - All warnings on the product and in the instructions must be observed closely.
4. Follow instructions - All operating instructions must be followed.
5. Attachment - Do not use attachments not recommended by the manufacturer. Use of inadequate
attachments can result in accidents.
6. Power source - This product must operate on a power source specified on the model label. If
you are not sure of the type of power supply used in your home, consult your dealer or local
power company.
7. AC cord protection - The AC cords must be routed properly to prevent people from stepping on
them or objects from resting on them. Check the cords at the plugs and product.
8. Overloading - Do not overload AC outlets or extension cords. Overloading can cause fire or
electric shock.
9. Entering of objects and liquids - Never insert an object into the product through vents or
openings. High voltage flows in the product, and inserting an object can cause electric shock
and/or short internal parts. For the same reason, do not spill water or liquid on the product.
10. Servicing - Do not attempt to service the product yourself. Removing covers can expose you
to high voltage and other dangerous conditions. Request a qualified service person to
perform servicing.
11. Repair - If any of the following conditions occurs, unplug the AC cord from the AC outlet, and
request a qualified service person to perform repairs.
a) When the AC cord or plug is damaged.
b) When a liquid was spilled on the product or when objects have fallen into the product.
c) When the product has been exposed to rain or water.
d) When the product does not operate properly as described in the operating instructions. Do
not touch the controls other than those described in the operating instructions. Improper
adjustment of controls not described in the instructions can cause damage, which often
requires extensive adjustment work by a qualified technician.
e) When the product has been dropped or damaged.
page2
IMPORTANT SAFETY PRECAUTIONS
f) When the product displays an abnormal condition. Any noticeable abnormality in the product
indicates that the product needs servicing.
12. Replacement parts - In case the product needs replacement parts, make sure that the service
person uses replacement parts specified by the manufacturer, or those with the same
characteristics and performance as the original parts. Use of unauthorized parts can result in
fire, electric shock and/or other danger.
13. Safety checks - Upon completion of service or repair work, request the service technician to
perform safety checks to ensure that the product is in proper operating condition.
14. Wall or ceiling mounting - When mounting the product on a wall or ceiling, be sure to install
the product according to the method recommended by the manufacturer.
15. Unplug the AC cord from the AC outlet before installing the speakers.
16. Cleaning - Unplug the AC cord from the AC outlet before cleaning the product. Use only with
a dry cloth to clean this apparatus. Do not use liquid or aerosol cleaners.
17. Water and moisture - Do not use this product near water such as bathtub, washbasin, kitchen
sink and laundry tub, swimming pool and in a wet basement. TV set shall not be exposed to
dripping or slashing and no objects filled with liquid, such as vases, shall be placed on the TV
set.
18. Stand - Do not place the product on an unstable cart, stand, tripod or table. Unstable installation
is likely to make the product fall resulting in serious injuries as well as material damage. Use
only the cart, stand, tripod, bracket, or table specified by the manufacturer, or sold with the
apparatus.
19. When a cart is used, use caution when moving the cart/apparatus combination to void injury
from tip-over.
20. Ventilation - The vents and other openings in the cabinet are designed for ventilation. Do not
cover or block them since insufficient ventilation can overheat and/or shorten the product’s
life span. Do not place the product on the bed, sofa, rug or other similar surfaces since they
can block ventilation openings. This product is not designed for built-in installation; do not
place the product in an enclosed place such as a bookcase or rack unless proper ventilation
is provided or the manufacturer's instructions are followed.
21. The LCD panel used in this product is made of glass. Therefore, it can be broken when the
product is dropped or gets shock. Be careful not to be injured by glass pieces in case the
panel is broken.
22. Heat sources - Do not install near any heat sources such as radiators, heat registers, stoves,
or other apparatus (including amplifiers) that produce heat.
23. The LCD panel is a product of very high technology with 2,949,120 thin film transistors, giving
you fine picture details. Occasionally, a few non-active pixels may appear on the screen as a
fixed blue, green or red point. Please note that this does not affect your product's performance.
page3
SUPPLIED ACCESSORIES
Make sure the following accessories are provided with the product.
Component Video Cable or
Y/Pb/Pr cable
AV cables
TV/DVD
EPG
TV
VIDEO
P.MODE
1
37" LCD HDTV
S.MODE
2
3
With Built-in DVD Player
10/0
+10
4
5
6
7
8
9
DTV-373-D
OWNER'S MANUAL
FAVORITE
VOL
CH
CC
MTS/SAP
MUTE
TV MENU
FLASHBACK
OK
DVD
TITLE
DVD
MENU
/USB/CARD
STOP
DVD
PREV
NEXT
ZOOM
SETUP
FR
FF
AUDIO
REPEAT
PLAY MODE SUBTITLE
OSD
EJECT
VIEW MODE
RC-600
Remote control
User guide
It also include:
①batteries (2)
②Warranty card
page4
PREPARATION
INSERTING BATTERIES INTO THE REMOTE CONTROL
Insert supplied batteries via the battery compartment on the back of the remote control.
Make sure polarity matches the (+) and (-) marks inside the compartment.
USING THE REMOTE CONTROL UNIT
●
●
●
TV/DVD
EPG
TV
VIDEO
P.MODE
S.MODE
1
2
3
4
5
6
Use the remote control by pointing it towards the remote
sensor on the TV. Objects between the remote control and
the sensor may disrupt operation.
Effective range is 20 feet but is dependant on what your
viewing angle is.
Range can also be affected by direct sunlight on the TV's
sensor.
100
/
+10
FAVORITE
7
8
9
VOL
CH
CC
MTS/SAP
MUTE
TV MENU
FLASHBACK
OK
DVD
TITLE
DVD
MENU
/USB/CARD
STOP
DVD
PREV
NEXT
ZOOM
FR
FF
AUDIO
PLAY MODE SUBTITLE
OSD
SETUP
REPEAT
EJECT
VIEW MODE
RC-600
CAUTIONS REGARDING REMOTE CONTROL UNIT
●
●
Do not expose remote to liquids, direct sunlight or shock.
The remote control unit may not work properly if the remote sensor window of the Display is
under direct sunlight or strong lighting. In such case, change the angle of the lighting or Display,
or operate the remote control unit closer to the remote sensor window.
page5
DISPLAY
FRONT VIEW
1
SD/MMC/MS
DVD/CARD
2
3
4
PREV
5
NEXT
DISC IN
6
STOP
7
8
PLAY/
PAUSE
REPEAT
9
EJECT
SOURCE
MENU
10
11
CH
CH
12
VOL
VOL
13
16 15
ON/OFF
14
1) MULTI MEDIA CARD/SD/MEMORY STICK CARD SLOT
2) DISC SLOT: Insert a DVD or CD disc to play under DVD status. In other status, insert a disc to
change to DVD status.
3) DVD/CARD: In DVD mode, use to shift between DVD and CARD. In other mode, press to
change to DVD mode directly.
4) PREV: Use to skip to the previous chapter.
5) NEXT: Use to skip to the next chapter.
6) STOP: Use to stop the DVD playback.
7) PLAY/PAUSE BUTTON: Use to begin or pause the DVD playback. Only 12cm discs can be
inserted.
8) REPEAT: Use to repeat the DVD playback.
9) EJECT BUTTON: Use to eject the disc being played in the disc slot.
10) SOURCE: Use to select the AV signal source among: Digital TV, Analog TV, Composite 1,
Composite 2, S-Video1, S-Video2, Component, DVD/CARD, HDMI1 and HDMI2.
11) MENU: Use to bring up the TV menu.
12) CH+/-: Use to skip to the next/previous channel.
13) VOL +/-: Use to adjust the volume.
14) POWER: Use to turn the unit on and off.
15) STANDBY/Power On Indicator
16) Remote Sensor
page6
DISPLAY
REAR VIEW
S-VIDEO2
L
R
AUDIO
VIDEO
AV2 INPUT
Y
CB / PB
R
L
C R / PR
AUDIO
VIDEO
L
ANT. IN
HDMI 1
HDMI 2
INPUT
INPUT
2
3
R
AUDIO
RS232
S-VIDEO1
AV 3 I N P U T
1
AUDIO
L
R
4
AUDIO
OUTPUT
5
AV 1 I N P U T
6
7
1) Antenna Input
2) HDMI 1 Input
3) HDMI 2 Input
4) Component Video (Y、PB/CB、PR/CR) and Audio Input
5) Audio Output
6) INPUT1(Composite Video, S-Video and Audio Input)
7) RS-232 Terminal
8) INPUT2 (Composite Video, S-Video and Audio Input)
page7
8
REMOTE CONTROL
1
2
3
TV/DVD
EPG
TV
VIDEO
P.MODE
S.MODE
1
2
3
4
5
6
7
8
9
35
34
33
32
10/0
+10
4
5
FAVORITE
VOL
CH
CC
31
MTS/SAP
30
6
MUTE
TV MENU
FLASHBACK
7
8
9
10
OK
DVD
TITLE
DVD
MENU
/USB/CARD
STOP
11
12
13
14
15
16
17
29
28
DVD
PREV
NEXT
ZOOM
SETUP
FR
FF
AUDIO
REPEAT
OSD
EJECT
PLAY MODE SUBTITLE
VIEW MODE
27
26
25
24
23
22
21
20
19
18
RC-600
1) POWER: Use to turn the unit on and off.
2) EPG: Use to bring up the EPG menu.
3) TV: Press to change to TV mode directly.
4) Number Buttons: Use to set the channel numbers.
Dot Button: In Digital TV mode, there can be several TV programs in a channel, use the
number buttons and the dot button to enter. Example: press the number button 5,
the dot button, and then the number button 2 to enter the TV program 5-2.
FAVORITE: Use to select between “Favorite Mode On” and “Favorite Mode Off”.
Favorite Mode On: press CH ∧/∨ to select your favorite channel in favorite channel list.
Favorite Mode Off: press CH ∧/∨ to select the all channel searched.
Note: Only in TV mode, Favorite button is available.
5) MTS/SAP: Use to select the MTS/SAP stereo mode.
6) VOL +/-: Use to adjust the volume.
7) TV MENU: Use to bring up the TV menu.
page8
REMOTE CONTROL
8) Cursor Buttons (
,
,
,
): Use to select a desired item on the setting screen. And move
the picture on the screen.
9) OK: Use to confirm your selections.
10) DVD TITLE: Use to bring up the DVD title menu.
11) STOP: Use to stop the DVD playback.
12)
: Press to skip to the previous chapter or track.
13)
: Press to skip to the next chapter or track.
14)
: Press to play in fast backward.
15)
:Press to play in fast forward.
16) PLAY MODE: Use to shift DVD play mode.
17) SUBTITLE: Use to shift DVD subtitle language.
18) VIEW MODE: Use to select a viewing mode.
19) OSD: Use to bring up the DVD on screen display.
20) EJECT BUTTON: Use to eject the disc being played in the disc slot.
21) AUDIO: Use to shift DVD audio language.
22) REPEAT: Use to repeat the DVD playback.
23) ZOOM: Use to zoom the DVD playback picture.
24) SETUP: Use to bring up the DVD setup menu.
25) DVD/USB/CARD: In DVD mode, use to shift between DVD and CARD. In other mode,
press to change to DVD mode directly.
26) / : Use to begin/pause the DVD playback.
27) DVD MENU: Use to bring up the DVD root menu.
28) FLASH BACK: Use to return to the previous channel.
29) MUTE: Use to mute the sound.
∧ /∨
∨ : Use to skip to the next/previous channe.
30) CH∧
31) CC: This is used to select closed caption.
32) S.MODE: Use to select a sound mode among: Normal, News, Music, Dance, Rock and User.
33) P.MODE: Use to select a picture mode among: Standard, Movie, Sport and User.
34) VIDEO: Use to select the input signal source among: Digital TV, Analog TV, Composite 1,
Composite 2, S-Video1, S-Video2, Component, DVD/CARD, HDMI1 and HDMI2.
35) TV/DVD: Set the remote control between TV and DVD mode.
If the red light flashes when pressed, the buttons for TV operations work. If the
green light flashes when pressed, the buttons for DVD operations work.
NOTE: If the remote control does not operate, press the “TV/DVD” button on the remote
control and try again.
page9
CONNECTIONS
S-VIDEO2
L
R
AUDIO
VIDEO
AV2 INPUT
Y
CB / PB
C R / PR
AUDIO
VIDEO
L
ANT. IN
HDMI 1
HDMI 2
INPUT
INPUT
R
L
AV 3 I N P U T
AUDIO
L
R
AUDIO
R
S-VIDEO1
AUDIO
OUTPUT
AV 1 I N P U T
h
DVI Audio Cable
d
e
c
f
b
g
page10
RS232
CONNECTIONS
SYSTEM CONNECTIONS
a. Using the antenna input: Connect the antenna terminal from an antenna or cable/satellite
receiver to the antenna input terminal on the DTV-373-D; use the VIDEO button and
the / buttons to set the DTV-373-D's signal source to "Digital TV" or “Analog TV”.
b. Using the RCA Video/Audio input on the back: Connect compatible AV equipment to the
DTV-373-D through the Composite Video and Audio input jacks on the back; use the VIDEO
button and the / buttons to set the DTV-373-D's signal source to "Composite 1".
c. Using the RCA Video/Audio input on the side: Connect compatible AV equipment to the
DTV-373-D through the Composite Video and Audio input jacks on the side; use the VIDEO
button and the / buttons to set the DTV-373-D's signal source to "Composite 2".
d. Using the S-Video1 and RCA Audio input on the back: Connect AV equipment to the DTV373-D through the S-Video and Audio input jacks on the back; use the VIDEO button and the
/ buttons to set the DTV-373-D’s signal source to “S-Video1”.
e. Using the S-Video2 and RCA Audio input on the side: Connect AV equipment to the DTV373-D through the S-Video and Audio input jacks on the side; use the VIDEO button and the
/ buttons to set the DTV-373-D’s signal source to “S-Video2”.
f. Using the Component input: The Component input may be used for Progressive scan or
HDTV inputs; use the VIDEO button and the / buttons to set the DTV-373-D's signal
source to "Component".
g. Using the HDMI1 connector: Connect a PC computer to the DTV-373-D through the HDMI
socket on DTV-373-D. Use the VIDEO button and the / buttons to set the DTV-373-D’s
signal source to “HDMI1” .
h. Using the HDMI2 connector: Connect a PC computer to the DTV-373-D through the HDMI
socket on DTV-373-D. Use the VIDEO button and the / buttons to set the DTV-373-D’s
signal source to “HDMI2” .
page11
BASIC OPERATIONS
POWER
VIDEO
TV/DVD
EPG
TV
SOURCE
SOURCE
P.MODE
VIDEO
S.MODE
MENU
CH
1
2
3
4
5
6
7
8
9
CH
+10
VOL
FAVORITE
VOL
ON/OFF
10/0
POWER
VOL
CC
CH
MTS/SAP
MUTE
TV MENU
FLASHBACK
TURN ON THE POWER
1. Press POWER button on the front panel to turn on the TV set. The POWER indicator lights up
green.
2. If the STANDBY indicator still lights up red, press POWER on the remote control to turn the TV
set on.
TURN OFF THE POWER
1. Press POWER on the remote control, the image on the screen disappears and the
STANDBY indicator lights up red.
NOTE: Small amounts of electric power is still consumed even when the power is turned off.
SIGNAL INPUT SELECTION
By pressing the VIDEO button on the remote control and confirming by the OK button, you can
change the mode as follows:
Digital TV
Analog TV
Composite 1
HDMI2
Composite 2
HDMI1
page12
S-Video1
DVD/CARD
S-Video2
Component
WATCHING TV
TURN ON THE POWER
1. Press POWER button on the front panel to turn on the TV set. The POWER indicator
lights up green.
2. If the STANDBY indicator still lights up red, press POWER on the remote control to turn
the TV set on.
TURN OFF THE POWER
1. Press POWER on the remote control, the image on the screen disappears and the
STANDBY indicator lights up red.
NOTE: Weak electric power is still consumed even when the power is turned off.
SIMPLE BUTTON OPERATIONS FOR CHANGING CHANNELS
You can change channels in several ways.
∧ /∨
∨ on the remote unit
Using CH∧
+10
4
5
6
FAVORITE
7
8
9
VOL
CH
CC
@@@@@@@@e?
@@@@@@@@e?@@@@@@@@?e@@@@@@@@e?@@@@@@@@?e
@@@@@@@@e?
@@@@@@@@e?@@@@@@@@?e@@@@@@@@e?@@@@@@@@?e@@@@@@@@
@@@@@@@@
@@h?
@@
@@h?
@@
@@h?
@@
@@h?
@@
@@h?
@@
@@h?
@@
SOURCE
MTS/SAP
MENU
MUTE
CH
CH
CH+/-
@@
@@
@@
@@
@@
@@
@@
@@
@@
@@
@@
@@
@@
@@
@@
@@
@@
@@
@@
@@
@@
@@
@@
@@
@@
@@
@@
@@
@@
@@
@@
@@
@@
@@
@@
@@
@@
@@
@@
@@
@@
@@
@@
@@
@@
@@
@@
@@
@@
@@
@@
@@
@@
@@
@@
@@
@@
@@
@@
@@
@@
@@
@@
@@
@@
@@
@@
@@
@@
@@
@@
@@
@@
@@
@@
@@
@@
@@
@@
@@
@@
@@
@@
@@
@@
@@
@@
@@
@@
@@
@@
@@
@@
@@
@@
@@
@@
@@
@@
@@
@@
@@
@@
@@
@@
@@
@@
@@
@@
@@
@@
@@
@@
@@
@@
@@
@@
@@
@@
@@
@@
@@
@@
@@
@@
@@
@@
@@
@@
@@
@@
@@
@@
@@
@@
@@
@@
@@
@@
@@
@@
@@
@@
@@
@@g
@@g
@@g
@@g
@@g
@@g
@@@@@@@@
@@@@@@@@
TV MENU
?@@
?@@
?@@
?@@
?@@
?@@
?@@@@@@@@?e@@@@@@@@e?@@@@@@@@?e@@@@@@@@
?@@@@@@@@
?@@@@@@@@?e@@@@@@@@e?@@@@@@@@?e@@@@@@@@ ?@@@@@@@@
FLASHBACK
VOL
VOL
ON/OFF
OK
DVD
TITLE
DVD
MENU
/USB/CARD
STOP
DVD
PREV
NEXT
ZOOM
SETUP
1. Press CH∧ to increase channel number.
2. Press CH∨ to decrease channel number.
NOTE: CH+/- on the TV set operates the same as CH∧/∨ on the remote unit.
page13
CH∧/∨
WATCHING TV
Using number buttons on the remote unit
P.MODE
S.MODE
1
2
3
4
5
6
7
8
9
10/0
+10
NUMBER BUTTONS
FAVORITE
VOL
CC
CH
MTS/SAP
MUTE
TV MENU
FLASHBACK
OK
Select the channels directly by pressing the number buttons.
EXAMPLE:
To select a 1-digit channel (e.g. channel 2):
Press 2 .
To select a 2-digit channel (e.g. channel 12):
● Press 1 ,followed by 2 .
●
USING FLASHBACK ON THE REMOTE UNIT
P.MODE
1
S.MODE
2
3
10/0
+10
4
5
6
7
8
9
FAVORITE
VOL
CC
CH
MTS/SAP
MUTE
TV MENU
FLASHBACK
FLASHBACK
OK
Press FLASHBACK to switch the currently tuned channel to the previous tuned channel.
Press FLASHBACK again to switch back to the currently tuned channel.
page14
WATCHING TV
SIMPLE BUTTON OPERATION FOR CHANGING VOLUME/SOUND
Changing the volume
You can change the volume by pressing VOL +/- button.
P.MODE
SOURCE
S.MODE
1
2
3
4
5
6
7
8
9
10/0
+10
MENU
CH
FAVORITE
CH
VOL
VOL
@@@@@@@@e?
@@@@@@@@e?@@@@@@@@?e@@@@@@@@e?
@@@@@@@@e?
@@@@@@@@e?@@@@@@@@?e@@@@@@@@e?@@@@@@@@
@@@@@@@@
@@h?
@@
@@h?
@@
@@h?
@@
@@h?
@@
@@h?
@@
@@h?
@@
VOL+/-
VOL
VOL+/-
ON/OFF
@@
@@
@@
@@
@@
@@
@@
@@
@@
@@
@@
@@
@@
@@
@@
@@
@@
@@
@@
@@
@@
@@
@@
@@
@@
@@
@@
@@
@@
@@
@@
@@
@@
@@
@@
@@
@@
@@
@@
@@
@@
@@
@@
@@
@@
@@
@@
@@
@@
@@
@@
@@
@@
@@
@@
@@
@@
@@
@@
@@
@@
@@
@@
@@
@@
@@
@@
@@
@@
@@
@@
@@
@@
@@
@@
@@
@@
@@
@@
@@
@@
@@
@@
@@
@@
@@
@@
@@
@@
@@
@@
@@
@@
@@
@@
@@
MTS/SAP
MUTE
@@
@@
@@
@@
@@
@@
@@
@@
@@
@@
@@
@@
@@
@@
@@
@@
MUTE
CH
CC
@@g
@@g
@@g
@@g
@@g
@@g
@@@@@@@@
@@@@@@@@ ?@@@@@@@@?e@@@@@@@@e?@@@@@@@@
?@@@@@@@@?e@@@@@@@@e?@@@@@@@@
?@@
?@@
?@@
?@@
?@@
?@@
?@@@@@@@@
?@@@@@@@@
TV MENU
FLASHBACK
1. Press VOL+ to increase the volume.
2. Press VOL- to decrease the volume.
Using MUTE on the remote control
Press MUTE to mute the current sound output.
1. Press MUTE to remove the sound.
2. Press MUTE again to cancel the mute.
Electronic Program Guide
It has an Electronic Program Guide to help you find the shows you want to watch.
A
E
B
D
C
A Displays titles about upcoming programs of the currently channel selected.
B Displays which channel is currently selected.
C Other details about the selected digital programs.
D Displays the content for the selected digital programs.
E Displays the start and end times of the selected digital programs.
Note: The availability of details depends on the broadcaster.
When the TV program being played was forbidden to play for parental control, the EPG
button is not available.
Using the EPG (Electronic Program Guide)
1. In Digital TV mode, select a channel you want to watch.
2. Press EPG button on the remote control, the screen will display the EPG menu.
3. Press / to preview the upcoming digital program.
4. Press EPG button repeatedly to exit from the EPG menu and return to the normal viewing mode.
page15
WATCHING TV
Setting MTS/SAP stereo mode
The System has a feature that allows reception of sound other than the main audio for the
program. This feature is called Multi-channel Television Sound (MTS). The System with MTS can
receive mono sound, stereo sound and Secondary Audio Programs (SAP). The SAP feature
allows a TV station to broadcast other information, which could be audio in another language or
something completely different like weather information.
You can enjoy Hi-Fi stereo sound or SAP broadcasts where available.
●
Stereo broadcasts
View programs like live sporting events, shows and concerts in dynamic stereo sound.
●
SAP broadcasts
Receive TV broadcasts in either MAIN or SAP sound.
MAIN sound: The normal program soundtrack (either in mono or stereo).
SAP sound: Listen to second language, supplementary commentary and other information. (SAP
is mono sound.)
If stereo sound is difficult to hear.
● Obtain a clearer sound by manually switching to fixed mono-sound mode.
Note
● Once “MONO” mode is selected, the sound remains mono even if the System receives a stereo
broadcast. You must switch the mode back to “STEREO” if you want to hear stereo sound
again.
● Selecting MTS while in the input mode does not change the type of sound. In this case, sound
is determined by the video source.
VOL
CH
CC
MTS/SAP
MTS/SAP
MUTE
TV MENU
FLASHBACK
Each time you press MTS/SAP , the screen
toggles as shown below.
OK
MONO mode
MONO
MONO + SAP mode
STEREO + SAP mode
STEREO mode
STEREO
MONO
STEREO
SAP
MONO
SAP
MONO
MONO
(The images display examples when receiving MTS and SAP.)
page16
MONO
BASIC ADJUSTMENT SETTINGS
VIDEO MENU
You can get the satisfied picture by adjusting the following Video menu.
Press the VIEDO button to select various signal modes.
Press the TV MENU button to enter LCD menu.
Press / to select "VIDEO MENU", and then press OK or to enter "Video" menu.
Brightness
1. Press / to select "Brightness" in "Video" menu.
2. Press OK to enter the Brightness menu.
3. Press / to adjust the brightness; press OK to return to the "Video" menu.
4. Press TV MENU to exit.
Contrast
1. Press / to select "Contrast" in "Video" menu.
2. Press OK to enter the Contrast menu.
3. Press / to adjust the contrast; press OK to return to the "Video" menu.
4. Press TV MENU to exit.
Saturation
1. Press / to select "Saturation" in "Video" menu.
2. Press OK to enter the Saturation menu.
3. Press / to adjust the saturation; press OK to return to the "Video" menu.
4. Press TV MENU to exit.
Hue
1. Press / to select "Hue" in "Video" menu.
2. Press OK to enter the Hue menu.
3. Press / to adjust the hue; press OK to return to the "Video" menu.
4. Press TV MENU to exit.
page17
BASIC ADJUSTMENT SETTINGS
VIDEO MENU(CONTINUED)
Temperature Mode
1. Press / to select "Temperature Mode" in "Video" menu.
2. Press / to select a Temperature Mode among: Cool, Normal, Warm, and User. When "User"
is selected, the screen shows:
3. Press / to select "Temperature (R)", "Temperature (G)", "Temperature (B)", and press
adjust.
4. Press TV MENU to exit.
page18
/
to
BASIC ADJUSTMENT SETTINGS
AUDIO MENU
Adjust the quality of the sound through the following Audio menu.
Press the VIDEO button to select various signal modes.
Press the TV MENU button to enter LCD menu.
Press / to select "AUDIO MENU", and then press OK or to enter "Audio" menu.
Treble
1. Press / to select "Treble" in "Audio" menu.
2. Press / to adjust the treble.
3. Press TV MENU to exit.
Bass
1. Press / to select "Bass" in "Audio" menu.
2. Press / to adjust the bass.
3. Press TV MENU to exit.
Balance
1. Press / to select "Balance" in "Audio" menu.
2. Press / to adjust the balance.
3. Press TV MENU to exit.
Multi Channel Sound (only in Analog TV mode)
1. Press / to select "Multi Channel Sound" in "Audio" menu.
2. Press / to select a Multi Channel Sound.
3. Press TV MENU to exit.
page19
BASIC ADJUSTMENT SETTINGS
SCREEN MENU
Use to adjust display mode of the playback picture.
Press the VIDEO button to select various signal modes.
Press the TV MENU button to enter LCD menu.
Press / to select "SCREEN MENU", and then press OK or
to enter "Screen" menu.
Horizontal Position
1. Press / to select "Horizontal Position" in "Screen" menu.
2. Press OK to enter the Horizontal Position menu.
3. Press / to adjust the horizontal position of the playback picture.
4. Press OK to return; press TV MENU to exit.
Vertical Position
1. Press / to select "Vertical Position" in "Screen" menu.
2. Press OK to enter the Vertical Position menu.
3. Press / to adjust the vertical position of the playback picture.
4. Press OK to return; press TV MENU to exit.
Position Reset
1. Press / to select "Position Reset" in "Screen" menu.
2. Press OK to activate the position reset, the value of horizontal position and vertical position
return to the default.
3. Press TV MENU to exit.
page20
BASIC ADJUSTMENT SETTINGS
CHANNEL MENU (ONLY DIGITAL TV & ANALOG TV MODE)
1. Press the TV MENU button to enter LCD menu.
2. Press / to select "CHANNEL MENU", and then press OK or
to enter "Channel" menu.
Favorite Channel
1. Press / to select "Favorite Channel" in "Channel" menu.
2. Press / to select the favorite channel number in ANALOG and DIGITAL.
3. Press OK to put the current channel into favorite list.
4. Press TV MENU to exit.
Example:
1. In analog TV mode, it is need to select Favorite Mode Off by pressing FAVORITE button and
then enter into the “channel menu” after searching all the TV program.
2. Press OK or to select “ANALOG” in “Favorite Channel”. And the “ANALOG” displays the
current channel, press / to select your favorite TV programs(i.e.A8).Then press OK to put
the current channel (i.e.A8) into the favorite list. It will appear a list mark.
3. Exit the TV menu. And press FAVORITE button to select “Favorite Mode On”.
4. Press CH∧/∨ to select your favorite TV programs in the favorite list.
5. Delete the favorite channel from the favorite list. Enter into the channel menu, select the
favorite channel(i.e.8) stored in the favorite list by pressing / in ANALOG. Press OK to
delete the favorite channel from the favorite list and the list mark will disappear.
Also you can press CH∧/∨ or number buttons to select the TV programs. Then enter into
the channel menu to put the current TV channel into the favorite list.
In digital TV mode, the method to put the current digital channel into the favorite list same as
that of in analog TV mode.
Channel Search
1. Press / to select "Channel Search" in "Channel" menu.
2. Press / to shift among: ANALOG, DIGITAL, and BOTH.
1) ANALOG: Auto search only setup analog TV channels.
2) DIGITAL: Auto search only setup digital TV channels.
3) BOTH: Auto search setup both analog and digital TV channels.
3. Press TV MENU to exit.
page21
BASIC ADJUSTMENT SETTINGS
CHANNEL MENU (CONTINUED)
Air/Cable
1. Press / to select "Air/Cable" in "Channel" menu.
2. Press / to shift between Air and Cable.
3. Press TV MENU to exit.
Auto Scan
1. Press / to select "Auto Scan" in "Channel" menu.
2. Press OK to activate auto scan.
3. This unit will search and memorize all channels viewable automatically in your area.
4. The unit will skip to the first channel to play when the auto search ends.
Fine Tune
When the auto search ends or is stopped, the screen shows:
1. Press / to select "Fine Tune" in "Channel" menu.
2. Press OK to enter the "Fine Tune" menu.
3. Press / to adjust the current channel clearer as your desired.
4. Press OK to return; press TV MENU to exit.
NOTE: "Fine Tune" only works on Analog TV channels.
page22
BASIC ADJUSTMENT SETTINGS
SETUP MENU
1. Press the TV MENU button to enter LCD menu.
2. Press / to select "SETUP MENU", and then press OK or
to enter "Setup" menu.
Language
1. Press / to select "Language" in "Setup" menu.
2. Press / to select a language.
3. Press TV MENU to exit.
Sleep
1. Press / to select "Sleep" in "Setup" menu.
2. Press / to set the sleep time among: Off, 15Mins, 30Mins, 45Mins, 60Mins, 90Mins, and
120Mins.
3. Press TV MENU to exit.
Menu Transparency
1. Press / to select "Menu Transparency" in "Setup" menu.
2. Press / to adjust the menu transparency.
3. Press TV MENU to exit.
Menu Timeout
1. Press / to select "Menu Timeout" in "Setup" menu.
2. Press / to set the menu timeout among: Off, 10Seconds, 20Seconds, 30Seconds,
40Seconds, 50 Seconds, and 60Seconds.
3. Press TV MENU to exit.
Time Zone
1.Press / to select ”Time Zone” in “Setup” menu.
2.Press / to select the time zone among: Central, Eastern, Atlantic, Hawaii, Alaska, Pacific,
Mountain.
3.Press TV MENU to exit.
Default Setting
1. Press / to select "Default Setting" in "Setup" menu.
2. Press OK to restore the default setting, the value of video menu and audio menu
return to the default.
3. Press TV MENU to exit.
page23
BASIC ADJUSTMENT SETTINGS
CLOSED CAPTION MENU
Your system is equipped with an internal closed caption decoder; closed caption is the system that
allows you to view conversations, narration, and sound effects in TV programs and home videos
as subtitles on your display.
Only in Digital TV, Analog TV, Composite and S-Video mode, there is Closed Caption menu.
1. Press the TV MENU button to enter LCD menu.
2. Press / to select "CLOSED CAPTION MENU", and then press OK or to enter "Closed
Caption" menu.
ANALOG CC
1. Press / to select "Analog CC" in "Closed Caption" menu.
2. Press / to select a closed caption among: OFF, CC1, CC2, TEXT1, and TEXT2.
3. Press TV MENU to exit.
DIGITAL CC
1. Press / to select "Digital CC" in "Closed Caption" menu.
2. Press / to select a closed caption among: OFF, CC1, CC2, CC3, CC4, CC5, and CC6.
3. Press TV MENU to exit.
Note: a. Only in Digital TV mode, digital CC is available.
b. In digital TV mode, the "Analog CC" is preferential. If you want to view "Digital CC", only
set "Analog CC" to "OFF" in CLOSED CAPTION MENU.
Caption
1. Press / to select "Caption" in "Closed Caption" menu.
2. Press / to select a closed caption mode among: Off, On, and On Mute.
3. Press TV MENU to exit.
Note: In ANALOG TV, Composite and S-Video mode, only Analog CC and Caption are available.
Caption Size
1. Press / to select "Caption Size" in "Closed Caption" menu.
2. Press / to select a closed caption size among: Standard, Large, and Small.
3. Press TV MENU to exit.
page24
BASIC ADJUSTMENT SETTINGS
CLOSED CAPTION MENU (CONTINUED)
Font Style
1. Press / to select "Font Style" in "Closed Caption" menu.
2. Press / to select a font style among: Default, Style1, Style2, Style3, Style4, Style5,
Style6 and Style7.
3. Press TV MENU to exit.
Foreground Color
1. Press / to select "Foreground Color" in "Closed Caption" menu.
2. Press / to select a foreground color among: Default, Black, Green, Blue, Red, Purple,
Orange, and Yellow.
3. Press TV MENU to exit.
Background Color
1. Press / to select "Background Color" in "Closed Caption" menu.
2. Press / to select a background color among: Default, White, Green, Blue, Red, Purple,
Orange, and Yellow.
3. Press TV MENU to exit.
Note: When Digital CC is off, Caption Size, Font Style, Foreground Color, Background Color is
not selected.
page25
BASIC ADJUSTMENT SETTINGS
PARENTAL MENU
Only in Digital TV, Analog TV, Composite and S-Video mode, there is Parental menu.
1. Press the TV MENU button to enter LCD menu.
2. Press / to select "PARENTAL MENU", and then press OK or to enter "Parental" menu.
The password menu displays.
3. Enter the password with number buttons, and press OK to confirm. (The factory password is
9999.)
After entering the password, the following screen will be displayed:
page26
BASIC ADJUSTMENT SETTINGS
PARENTAL MENU (CONTINUED)
Change Password
1. Press / to select "Change Password" in "Parental" menu.
2. Press OK to display the Change Password menu.
3. Enter your new password with numbers, then input it again and press OK to confirm.
4. Press TV MENU to exit.
MPAA (Movie Rating)
1. Press / to select "MPAA" in "Parental" menu.
2. Press OK to display the MPAA menu.
3. Press / to select desired MPAA position and press OK to confirm.
4. Press TV MENU to exit.
Note: If Status is not set to “ON”, the configuration settings will not work.
page27
BASIC ADJUSTMENT SETTINGS
PARENTAL MENU (CONTINUED)
TV Guidelines
1. Press / to select "TV Guidelines" in "Parental" menu.
2. Press OK to display the TV Guidelines menu.
3. Press / to select desired US-TV position and press OK to confirm.
When setting an individual content-based rating items, do as follows:
①Press to access block content items from the currently selected age-based rating item.
②Press / to select an individual item, and then press OK to confirm. Repeat the same
step for other items.
③Press to return to the previous menu.
4. Press TV MENU to exit.
Note: If Status is not set to “ON”, the configuration settings will not work.
Status
1. Press / to select "Status" in "Parental" menu.
2. Press / to select "On" or "Off" and press OK to confirm.
3. Press TV MENU to exit.
page28
TROUBLESHOOTING
Please check the following items before asking for repair service.
Symptom
Neither picture nor
sound.
Picture is OK, but no
sound.
Sound is OK, but no
color.
Check Items
- Check the contact of sockets is all right.
- Check the TV main power is on.
The picture is
overlapped image.
-Check the antenna is installed correctly and if not, adjust the antenna
toward the broadcasting station.
Picture has ''snow
noise ''.
- Check the antenna or its connection is correct and if not, correct the
antenna fault or connection cable fault.
- Check if car traffic or neon sign disturbs the sound effect.
Stripes on picture.
- Check the susceptible interference by other electronic devices such
as radio and television and keep magnetic or electronic devices away
from the TV.
Bad stereo or SAP
sound.
Remote control does
not work.
''No Signal'' appears
on the screen.
Image is not
centered.
Black screen with no
image often happen.
- Check the volume control is set to minimum or mute.
- Check the color control and adjust it properly.
- Check the programme is in color or in black & white.
- Long distance from the station or other radio waves can generate bad
sound. Reception. If so, change the mode to Mono.
- Check if the batteries in the Remote control die.
- Check if any object between IR sensor of the TV and the Remote
control does not obstruct.
-Ensure that the signal cable is firmly connected to PC and TV.
- Adjust the Horizontal Position and Vertical Position.
It is normal phenomenon. It will appear black screen phenomenon
when the unit receive the encrypted digital cable TV signals. Because
it is compatible for reception of unencrypted digital cable TV signals.
page29
TECHNICAL SPECIFICATIONS
37'' WIDE LCD
PANEL
RESOLUTION
1366 X 768
VIEWING ANGLE (H/V)
LCD
CONTRAST RATIO
BRIGHTNESS (cd/m2)
EFFECTIVE PIXEL RATE
DIMENSION
500
MORE THAN 99.99%
947 X 724 X 300 mm
WITH STAND
(37.3 X 28.5 X 11.8 inch)
WITHOUT STAND
24.2Kg (53.36 lbs)
WITH STAND
29.7Kg (65.49 lbs)
TV STANDARD
TV-FUNCTION
800:1
947 X 665 X 99 mm
(37.3 X 26.2 X 3.9 inch)
WITHOUT STAND
WEIGHT
176°/176°
TUNING SYSTEM
FREQUENCY RANGE
NTSC/ATSC
ELECTRIC TUNING SYSTEM
VHF/UHF
125 CHANNELS
CATV
DIGITAL TERRESTRIAL BROADCAST (8VSB)
DIGITAL CABLE(64/256QAM)
ANALOG TERRESTRIAL
INPUT POWER
2-69 CH
1-125CH
(Compatible For Reception Of
Unencrypted Digital Cable
TV Signals)
2-69 CH
AC100~240V, 50/60Hz
SOUND OUTPUT
8W + 8W
POWER CONSUMPTION
AV IN
COMPONENT
200W
VIDEO, S-VIDEO, AUDIO L&R
Y, Pb (Cb), Pr (Cr)
MONITOR OUT
AUDIO OUT
TERMINALS
HDMI IN
ANTENNA IN
HDMI CONNECT OR
F-TYPE
This manual is only for your reference, any change to the design and specifications will not be advised.
page30
BASIC OPERATIONS (FOR DVD PLAYER)
Play Discs
DVD
Pause
、 CD
DVD
、 CD
Press
1. Press POWER to turn on the unit.
2. P r e s s t h e D V D b u t t o n o n t h e r e m o t e
control to enter DVD status.
3. I n s e r t a d i s c i n t o t h e d i s c s l o t , w i t h t h e
label side facing to yourself.
4. The unit begins to read the disc.
5. Press (PLAY) to play the disc.
OK
DVD
TITLE
DVD
MENU
/USB/CARD
STOP
DVD
PREV
NEXT
ZOOM
SETUP
FR
FF
AUDIO
REPEAT
PLAY MODE SUBTITLE
OSD
EJECT
VIEW MODE
RC-600
AFTER STEP 4 IS FINISHED:
If playing a DVD, the TV screen shows DVD menu or
title menu.
If playing a CD, press (PLAY), and the unit plays
the disc according to the track numbers.
5. Stop playback.
Press ■ .
●
●
●
Press
to pause the playback.
●
Press
again to resume the playback.
OSD
DVD
DVD
TITLE
、 CD
DVD
MENU
/USB/CARD
STOP
DVD
You have to push "■" button twice to stop playback
of a DVD disc.
PREV
NEXT
ZOOM
SETUP
FR
FF
AUDIO
REPEAT
●
PLAY MODE SUBTITLE
OSD
EJECT
VIEW MODE
OSD
RC-600
The On-Screen Display (OSD) contains many playback
features.To see the Display, press the OSD button on
the remote while a disc is playing. The Display appears
across the top of the screen.Each feature is illustrated with
an icon. Use the or buttons on the remote to move
through the different icons in the Display.
When an icon is highlighted, use the or butons on the
remote to scroll through the choices displayed in the text
box under the icons.
page31
BASIC OPERATIONS (FOR DVD PLAYER)
Remember, you can only access the Display when you're
2. Press the
or
buttons to highlight the Chapter icon.
playing a disc. Also, the Display features are only
3. Press the
or
buttons to go to the previous or next
available if the disc was created with that particular
chapter.
feature (i.e., if you select the Subtitle icon, you won't be
Notes: The chapter feature won't work if the disc isn't
able to change the subtitle language unless the author of
formatted with separate chapters.
the disc created the disc with subtitles).
You can also advance to the next chapter by pressing
The invalid symbol "
on the remote and go to the preceding chapter by
" appears on the screen when you
pressing
press a button that doesn't have any function. If one of
on the remote.
■ Changing the Audio Language
the icons is "grayed out ",that Display feature isn't
If the disc was created with different language tracks
available for the disc you're playing. To make the Display
(recorded in different languages), you can use the Display
disappear from the screen, press OSD on the remote.
to temporarily change the DVD player's Audio Language
setting.
DVD
1. While the disc is playing, press OSD on the remote
DVD discs have the following playback features:Title,
to bring up the Display.
Chapter, Audio, Subtitle, Angle and Repeat.
2. Press the
■ Select a Title
or
buttons to highlight the Audio icon.
The current audio language appears in the text box
Some discs contain more than one title. For example,
below the row of icons.
there might be four movies on one disc (each movie might
3. Press the
or
buttons to scroll through the audio
be considered a title).
languages that are available on the disc until the audio
Each title is divided into chapters. To select a title:
language you want to use appears in the text box.
1. While the disc is playing, press OSD on the remote
Audio will be played in that language.
to bring up the Display.
4. To make the Display disappear, press the OSD button
2. If the Title icon on the Display isn't highlighted, use the
or
on the remote.
Note: The language feature only works if the disc was
buttons to highlight it.
created with multiple audio tracks. When you choose an
3. Press the or buttons to go to the previous or next
audio language from the Display, you only override the
title.
Note: Some discs only have one title.
audio language setting in the DVD player's main menu
■ Select a Chapter
temporarily.
Because DVD discs use digital technology, a title can be
The audio language can also the changed through the
divided into individual chapters (similar to tracks on a CD).
DVD player menu.
You can skip to a specific chapter by using the Chapter
■ Selecting the Subtitle Language
If the disc was created with subtitles, you can use the
feature in the Display.
Display to change the Subtitle language.
1. While the disc is playing, press OSD on the remote
to bring up the Display.
page32
BASIC OPERATIONS (FOR DVD PLAYER)
1. When the disc is playing, press OSD on the remote
to bring up the Display.
2. Press the
or
buttons to highlight the Subtitle icon.
3. Press the
or
buttons to scroll through the subtitle
●
All - repeats the disc that is playing
●
Title - repeats the title that is playing
Chapter - repeats the chapter that is playing
To Use Repeat:
1. While a disc is playing, press OSD on the remote to
bring up the Display.
2. Highlight the Repeat icon.
3. Press the or buttons to scroll through the Repeat
options until the Repeat option you want is displayed in
the text box.
4. The selected repeat option will loop repeatedly until
you turn Repeat off.
How to Cancel Repeat:
There are three ways to cancel Repeat:
●
languages that are available on the disc until the
subtitle language you want to use appears in the text
box. The subtitles will be shown in that language.
4. To make the Display disappear, press the OSD button
on the remote.
Notes: Changing the subtitle language with the Display
will only affect the disc currently being played. When the
disc is removed or the player is turned off, the subtitle
language will revert to the language setting specified
●
Press STOP twice.
through the DVD player main menu.
●
Go to Repeat icon in the Display and select Off.
The subtitle language can also be changed through the
●
DVD player menu.
CD
WHEN PLAYING CD
CD discs have the following playback features: Track,
L/R, and Repeat.
■ Select a Specific Track
1. While the disc is playing, press OSD on the remote
to bring up the Display.
2. Highlight the Track icon.
3. Press the or buttons to scroll through the track
numbers.
■ Changing the Audio Channel Output
If you are playing a Stereo CD, you can change the
channel output from the player.
1. Press OSD on the remote to bring up the Display.
2. Highlight the L/R icon on the Display.
3. The audio channel choices appear in the text box.
Press the or buttons to scroll through the choices:
LEFT MONO, RIGHT MONO, MIXED MONO or
STEREO. Whatever choice is displayed becomes the
active choice.
■ Using the Repeat Feature
The default mode for the Repeat feature is off. There are
two Repeat options for CDs:
■ Changing the Camera Angle
Some discs contain multiple angles of a particular scene
or sequence. If the disc only has one angle, this feature
won't work. When multiple angles are available, to
change the camera angle:
1. When a disc is playing, press OSD on the remote to
bring up the Display.
2. The Angle icon will display the number of angles
available. For example, if there are 3 different angles,
the icon will read 1 of 3, This means angle 1 is
currently being played.
3. Press the
or
Eject the disc.
buttons to scroll through the angle
choices. The angle number displayed in the text
window is automatically shown.
4. To make the Display disappear, press the OSD button
on the remote.
■ Using the Repeat Feature
The default mode for the Repeat feature is off. There are
three Repeat options:
page33
●
All - repeats the disc that is playing
●
Track - repeats the track that is playing
BASIC OPERATIONS (FOR DVD PLAYER)
DVD Menu Play
To Use Repeat:
1. While a disc is playing, press OSD on the remote
to bring up the Display.
2. Highlight the Repeat icon.
3. Press the or buttons to scroll through the
Repeat options until the Repeat option you want is
displayed in the text box.
4. The selected repeat option will loop repeatedly until
you turn Repeat off.
Some DVDs have title menus and chapter menus.
Press (PLAY), the screen shows the menu.
Press
or
to skip to the next or previous page.
Select with number buttons or direction buttons.
Volume Control
●
11.
、 CD
Example: select track 13.
Press VOLUME on the TV or amplifier to adjust the
volume.
●
1. Press
Press VOLUME on the remote control.
EPG
TV
P.MODE
to enter the next menu.
S.MODE
2
3
4
5
6
12.
13.
14.
15.
Root
Menu
VIDEO
1
1.
2.
Root
Menu
DVD
DVD
10/0
+10
FAVORITE
7
VOL
8
9
CH
CC
2. Press number buttons to select directly.
MTS/SAP
VOLUME+,-
MUTE
TV MENU
FLASHBACK
+10
+
3
1. Press + to raise the volume.
You can also select as follows:
1. Press to select track 13.
VOL
CH
CC
MTS/SAP
MUTE
2. Press - to lower the volume.
TV MENU
FLASHBACK
Root
Menu
OK
DVD
TITLE
DVD
MENU
/USB/CARD
STOP
DVD
PREV
NEXT
ZOOM
SETUP
FR
FF
AUDIO
REPEAT
PLAY MODE SUBTITLE
OSD
12.
13.
14.
15.
EJECT
VIEW MODE
2. Press
(PLAY) to start playing track 13.
Press DVD TITLE once to return to the title menu.
Press DVD MENU once to return to the root menu.
page34
BASIC OPERATIONS
Select with Number
Buttons
PLAY DISCS IN VARIOUS WAYS
Audio Mode
●
CD
DVD
、 CD
You may select a language from a multi-language DVD.
OK
DVD
TITLE
Load a disc. Press number buttons to select tracks after
the unit finishes reading the disc.
DVD
MENU
/USB/CARD
STOP
DVD
PREV
NEXT
ZOOM
SETUP
FR
FF
AUDIO
REPEAT
PLAY MODE SUBTITLE
1. If the track number isn't over 10, just
push buttons 1-10.
Example: push 8 to select track 8.
OSD
AUDIO
EJECT
VIEW MODE
RC-600
DVD
To select a language, press AUDIO .
The screen will show the following in order:
8
●
AUDIO 1/2:AC-3 5.1CH
The screen shows:
TRACK08/20
00:00
AUDIO 2/2:AC-3 5.1CH
2. If the track number is over 10, press + 10 once and a
button between 1-10.
Example: if you select track 12, press +10 once and
button 2 .
Different discs may differ in languages available.
Mute
+10
+
2
DVD
、 CD
When playing a disc, this function removes the sound.
1. TO REMOVE SOUND
Press MUTE , the screen shows "
The screen shows:
TRACK12/20
MUTE
00:00
2. TO RESUME SOUND
Press MUTE again, to resume sound.
page35
".
PLAY DISCS IN VARIOUS WAYS
Fast Play
DVD
Repeat Play
、 CD
DVD OR CD
OK
DVD
TITLE
DVD
MENU
/USB/CARD
STOP
to play in fast-forward
DVD
mode. Each time you press the button, the screen shows
PREV
NEXT
ZOOM
SETUP
FR
FF
AUDIO
REPEAT
PLAY MODE SUBTITLE
the following in order:
FF
、 CD
This function can be used to repeatedly play a title,
chapter, track, or a whole disc.
When playing a disc, you can play it in fast-forward or
fast-reverse mode to find what you want to view.
1. While disc is playing, press
DVD
OSD
REPEAT
EJECT
VIEW MODE
①
②
③
④
⑤
⑥
RC-600
2X
4X
8X
16X
32X
DVD
You can repeat a title or chapter.
1. To repeat a chapter:
Press REPEAT , the screen will show:
REPEAT
2. While disc is playing, press
CHAPTER
to play in fast-reverse
mode. Each time you press the button, the screen shows
the following in order:
FR
①
②
③
④
⑤
⑥
2. To repeat a title:
Press REPEAT twice, the screen will show:
2X
4X
8X
16X
32X
REPEAT
TITLE
3. To repeat all:
Press REPEAT third time, the screen shows
"
ALL".
4. To remove "REPEAT" function:
Press REPEAT until "
ALL" disappears.
3. Press
(PLAY) to switch to normal play while in fastforward or fast-reverse playing mode.
CD
You may repeat a track or an entire disc according to
the following steps.
1. To repeat a track:
Press REPEAT , the screen shows "
TRACK".
The unit plays the current track.
●
page36
PLAY DISCS IN VARIOUS WAYS
REPEAT
Select Subtitles
TRACK
DVD
2. To repeat a disc:
Press REPEAT , the screen shows "
The unit plays all the tracks on the disc.
This operation works only with discs with multiple subtitle
languages recorded.
ALL".
REPEAT
OK
ALL
DVD
TITLE
DVD
MENU
/USB/CARD
STOP
DVD
PREV
NEXT
ZOOM
SETUP
FR
FF
AUDIO
REPEAT
PLAY MODE SUBTITLE
OSD
3. To remove "REPEAT" function:
Press REPEAT till "
ALL" disappears.
EJECT
VIEW MODE
SUBTITLE
RC-600
Zoom Play
DVD
This function can be used to watch a motion or
motionless picture.
DVD
/USB/CARD
STOP
DVD
ZOOM
PREV
NEXT
ZOOM
SETUP
FR
FF
AUDIO
REPEAT
OSD
EJECT
PLAY MODE SUBTITLE
1. Press SUBTITLE repeatedly until the desired
language is selected.
The screen shows:
VIEW MODE
RC-600
1. Press ZOOM during playback,
the screen shows:
SUBTITLE
2X
SUBTITLE01/03:ENGLISH
The picture is enlarged twice the size.
2. Press ZOOM again, the screen shows:
2. Remove the subtitle.
Press SUBTITLE until the screen shows "TURN
OFF SUBTITLE".
3X
Notes:
For some discs, subtitles cannot be removed.
Different discs differ in the language of subtitles.
If the subtitles of discs cannot be selected, the
screen shows "
" when you press SUBTITLE .
The picture is enlarged three times the size.
Note: The unit has six zoom levels:
2X,
3X,
4X,
1/2 ,
●
1/3 , and
●
●
1/4 .
3. Press , , , to move the enlarged picture.
4. To resume the picture, press ZOOM until the
picture is in normal size.
page37
PLAY DISCS IN VARIOUS WAYS
Program Play
DVD
CD
CD
1. Press P.MODE until the screen shows:
/USB/CARD
STOP
DVD
PREV
NEXT
ZOOM
SETUP
FR
FF
AUDIO
REPEAT
OSD
EJECT
PLAY MODE SUBTITLE
PLAY MODE
PROGRAM: TRACK
01 _ _
02 _ _
03 _ _
04 _ _
05 _ _
EXIT
VIEW MODE
RC-600
To use the program playback feature, you must enter
the order in which you want the titles (and chapters) on
the DVD or the tracks on the CD to play by creating a
program.
2. Use the number buttons on the remote to enter the
track number you want to play first. The track number
DVD
entered appears in the box. The example: To program
track 8 of a CD to play first, enter 8, and the screen
1. Press PLAY MODE until the screen shows:
PROGRAM: TT(20)/CH (--)
01 TT:_ _ CH:_ _ 06 TT:_ _ CH:_
02 TT:_ _ CH:_ _ 07 TT:_ _ CH:_
03 TT:_ _ CH:_ _ 08 TT:_ _ CH:_
04 TT:_ _ CH:_ _ 09 TT:_ _ CH:_
05 TT:_ _ CH:_ _ 10 TT:_ _ CH:_
EXIT
NEXT
(01-20)
06 _ _
07 _ _
08 _ _
09 _ _
10 _ _
NEXT
shows:
_
_
_
_
_
PROGRAM: TRACK (01-20)
01 08
06 _ _
02 _ _
07 _ _
03 _ _
08 _ _
04 _ _
09 _ _
05 _ _
10 _ _
EXIT
START
NEXT
2. Use the number buttons on the remote to enter the title
(and chapter) you want to play first. The title (and
chapter) number you entered appears in the box. For
example: Enter Chapter 1 in Title 8, the screen shows:
3. The cursor jumps to the next spot in the program list
PROGRAM: TT(20)/CH (--)
01 TT:0 8 CH:0 1 06 TT:_ _ CH:_
02 TT:_ _ CH:_ _ 07 TT:_ _ CH:_
03 TT:_ _ CH:_ _ 08 TT:_ _ CH:_
04 TT:_ _ CH:_ _ 09 TT:_ _ CH:_
05 TT:_ _ CH:_ _ 10 TT:_ _ CH:_
EXIT
START
NEXT
section. Make sure the box is highlighted and enter
_
_
_
_
_
your next track.
4. Continue adding tracks until your program is
complete. You can play your program by highlighting
START and press PLAY .
Note: If you want to program more than 10 tracks,
3. The cursor jumps to the next spot in the program list
section. Make sure the box is highlighted and enter
your next track.
4.Continue adding title (and chapter) until your program
is complete. You can play your program by highlighting
START and press PLAY .
Note: If you want to program more than 10 titles (and
chapters), highlight NEXT and press PLAY to
go to the next page. Proceed to program 11-20 in
the same way titles 1-10 were programmed.
5. To remove program playback, press the STOP button
twice during the program play.
highlight NEXT and press PLAY to go to next
page. Program 11-20 in the same way 1-10 were
programmed.
5. To remove program playback, press the STOP button
during the program play.
page38
PLAY DISCS IN VARIOUS WAYS
Shuffle (Random) Play
DVD
CD
The unit can play DVD chapters or audio tracks in
random order.
The order is different each time.
1. Press PLAY MODE to select shuffle or random play
mode when a disc is playing.
PLAY MODE
The screen shows:
SHUFFLE
OR
RANDOM
2. Shuffle or random play will begin.
3. Remove shuffle or random play.
●
When playing a DVD disc, press ■ twice.
●
When playing a CD disc, press ■ twice.
page39
MENU SETTING
According to the recorded information and external
equipment, set the following functions for the player to
obtain the best playing status.
The screen shows:
-- Audio Setup Page -OK
DVD
TITLE
Speaker Setup
DVD
MENU
Dolby Digital Setup
/USB/CARD
STOP
DVD
PREV
NEXT
ZOOM
SETUP
FR
FF
AUDIO
REPEAT
PLAY MODE SUBTITLE
OSD
Channel Equalizer
SETUP
3D Processing
EJECT
Main Page
VIEW MODE
Go To Speaker Setup Page
RC-600
1.Press SETUP to set options in the main menu.
●
SETUP
Press direction buttons ( or ) to highlight "Dolby
Digital Setup", and press (PLAY) to enter "Dolby
Digital Setup" Page. The screen shows the submenu
for your selection.
The screen shows:
The main menu appears on the screen, with icons across
the top of the screen, illustrating General Setup, Audio
Setup, Preference, Password Setup, and Exit Setup.
The screen shows:
--Dolby Digital Setup-Dual Mono
STR
Stereo
Left Mono
Right Mono
Mixed Mono
D.R.C
--Setup Menu--Main page --
Audio Setup
General Setup
Audio Setup
Press direction buttons
The screen shows:
●
Preferences
,
to select "Left Mono".
Password Setup
Exit Setup
Go To General Setup Page
--Dolby Digital Setup-Dual Mono
2. Press direction buttons ( or ) to select and press
(PLAY) to confirm.
Example: Select "Audio Setup" and do some setup.
Press direction button to highlight "Audio Setup",
press (PLAY) to enter "Audio Setup Page".
STR
Stereo
Left Mono
Right Mono
Mixed Mono
●
D.R.C
Audio Setup
page40
MENU SETTING
Press
(PLAY) to confirm your selection. Set "Dual
Mono" in "Dolby Digital Setup" to "Left Mono".
The sereen shows:
●
-- General Setup Page -TV Display
Wide
Normal/PS
Normal/LB
Wide
OSD Lang
ENG
English
French
Spanish
Captions
On
On
Off
Screen Save On
On
Off
Last Memory On
On
Off
Main Page
--Dolby Digital Setup-Dual Mono
L
Stereo
Left Mono
Right Mono
Mixed Mono
D.R.C
Audio Setup
■ TV DISPLAY
1. NORMAL/PS
This is selected when the unit is connected
to a normal TV.
Wide-screen images are shown on the screen, but
with some parts cut automatically.
3. Exit setup menu.
Press the direction button to exit from "Dual
Mono".
Press the direction button to exit from "Dolby
Digital Setup".
Press the direction button to highlight "Main Page"
and press (PLAY). The screen shows:
●
●
●
Setup Page -- Main Page
2. NORMAL/LB
This is selected when the unit is connected
to a normal TV. Wide-screen images are
shown on the screen with black bars on the
top and bottom of the screen.
General Setup
Audio Setup
Preferences
Password Setup
Exit Setup
Go To Audio setup Page
Press the direction button to highlight "Exit Setup"
and press (PLAY) to exit setup menu completely.
NOTE:You can also keep pressing the direction button
until the cursor is moved to the last icon illustrating
Exit, then press the (PLAY) button to exit setup
menu completely.
●
3. WIDE
This is selected when the unit is connected to a
wide-screen TV.
General Setup
The setting structure is :
NOTE: You can use the WIDE button on the remote
control to set TV display mode.
page41
MENU SETTING
■ OSD LANGUAGE
●
●
●
Lt/Rt
A disc recorded multi channel soundtrack, the output
signal will be incorported to left and right channel.
STEREO
A disc recorded multi channel soundtrack, the output
signal will be incorported to stereo.
●
ENGLISH
The OSD is in English.
FRENCH
The OSD is in French.
SPANISH
The OSD is in Spanish.
●
■ DOLBY DIGITAL SETUP
■ CAPTIONS
The setting structure is:
ON
Subtitles are shown.
OFF
Subtitles are hidden.
●
- - Dolby Digital Setup - Dual Mono
STR
Stereo
Left Mono
Right Mono
Mixed Mono
FULL
3/4
D.R.C
2/4
1/4
Audio Setup
OFF
●
■ SCREEN SAVER
The screen saver image appears when the unit stops or
the image is frozen for a few minutes. The screen saver
prevents damage to the TV screen.
ON: Start the screen saver.
OFF: Remove the screen saver.
●
●
DUAL MONO
This is the output mode of the L and R signals of the
set audio output. If it is set to "MIXED MONO", the
function only works when the DVD being played is 5.1channel.
D.R.C
This is selected to adjust linear compression rate to
obtain the different compression results of the signals.
●
■ LAST MEMORY
The unit can memory the point of a disc where the
power is off and play from the point when you turn on
the unit again.
ON: This function is on and works.
OFF: This function is off and does not work.
●
●
●
Audio Setup
■ EQUALIZER
The setting structure is:
This will help you to select graphic equalizer patterns
according to the genre of the music being played,and
adjust the equalizer.
The setting structure is:
- - Audio Setup Page - Speaker Setup
Dolby Digital Setup
- - Channel Equalizer - None
None
Rock
Pop
Live
Dance
Techno
Classic
Soft
Audio Setup
Channel Equalizer
EQ Type
3D Processing
Main Page
■ SPEAKER SETUP
The setting structure is:
- - Speaker Setup Page - STR
Lt/Rt
Stereo
Audio Setup
Downmix
EQ TYPE
You can select music category by pressing the direction
buttons and confirm by pressing the PLAY button.
●
page42
MENU SETTING
Password Setup
■ 3D PROCESSING
The setting structure is:
The setting structure is :
- - 3D Processing Page - V SURR
Reverb Mode
- - Password Setup Page - PW Mode
Off
On
Off
Password
Change
Main Page
Off
On
Off
Off
Off
Concert
Living Room
Hall
Bathroom
Cave
Arena
Church
■ PASSWORD MODE
●
ON: The password function is on and "PARENTAL"
is dim and cannot be selected.
●
Audio Setup
OFF: The password is locked, "PARENTAL" can
be selected.
■ PASSWORD CHANGE
V SURR
Use to turn the above function off.
REVERB MODE
Use to select a Reverb Mode which you want.
●
Select this to adapt the code, the screen shows:
●
Old Password
New Password
Confirm PWD
OK
Enter a password according to the screen.
Note: The password is automatically factory set to
88888.
page43
MENU SETTING
Preferences
The setting structure is :
- - Preference Page - Audio
ENG
Subtitle
ENG
Disc Menu
Parental
Default
English
French
Spanish
Chinese
Japanese
English
French
Spanish
Chinese
Japanese
Off
ENG
08
English
French
Spanish
Chinese
Japanese
1
2
3
4
5
6
7
8
KID
G
PG
PG 13
PGR
R
NC17
ADULT
Reset
Main Page
■ LANGUAGE SELECTION
If a language mentioned above is recorded on the disc,
you can select sound, subtitles or disc menu languages. If
not, the language recorded on the disc is shown.
■ PARENTAL LOCK
When playing a disc with parental lock function, you may
select an age control grade according to the rating your
desire.
Example: If "PG" is selected, you cannot play DVD video
discs rated higher than the PG grade.
■ DEFAULT >> RESET
Each function setting returns to the initial status in the
factory if you select this option.
Note:
"PREFERENCES" can only be selected when password
is OFF when the unit is in stop mode.
●
page44
MEMORY CARD PLAY OPERATION
MEMORY CARD (MMC/SD /Memory Stick card ) can memory MP3 songs and digital pictures .
How to select MEMORY CARD to play
1. Turn on the power.
2. Insert MMC/SD/Memory Stick card to the "3 in 1 DIGITAL CARD" Slot.
NOTE: Insert the digital card with the label side downwards.
DIGITAL CARD
MMC/SD /Memory Stick card
SD/MMC/MS
DVD/CARD
PREV
NEXT
DISC IN
STOP
PLAY/
PAUSE
REPEAT
EJECT
3. Press VIDEO to select " DVD/Card" mode .
4. Press" DVD/CARD" button on the remote control to switch : DVD /CARD.
TV MENU
FLASHBACK
SD/MMC/MS
OK
DVD/CARD
DVD/CARD
DVD
TITLE
DVD
MENU
PREV
/USB/CARD
STOP
NEXT
DVD
DISC IN
PREV
NEXT
ZOOM
SETUP
FR
FF
AUDIO
REPEAT
DVD/CARD
STOP
PLAY/
PAUSE
REPEAT
PLAY MODE SUBTITLE
OSD
EJECT
EJECT
VIEW MODE
RC-600
How to play MEMORY CARD
1. In DVD mode , press "DVD/CARD" button on the remote control to switch. Example :
00:00
00:00
001/012 FOLDER
\
MP3
JPG
D SD
2. Press "DVD/CARD" button on the remote control to switch.
1) If insert " Memory Stick " card to the "3 in 1DIGITAL CARD" slot , the screen displays " MS"
when the unit was switched to " CARD " play .
2) If insert " MMC " card,the screen display “MMC” ; if insert "SD" card , the screen displays
" SD" when the unit was switched to "CARD " play .
3. The operation of MEMORY CARD are the same as " MP3" operation .
NOTE: According to the content of the MEMORY CARD the Display of the Image will way in
Load Time.
page45
TROUBLESHOOTING
If you experience the following problems while using the unit, this troubleshooting guide can help you.
No sound
●
●
●
Check if the unit is connected securely.
Make sure the TV or amplifier is working properly.
Make sure the amplifier is set to receive DVD signal
output.
Disc cannot be played
●
●
●
●
No image
●
●
●
Check if the unit is connected securely.
Make sure the TV is working properly.
Make sure the color system is set correctly.
●
Make sure the audio output mode is set correctly.
Make sure the audio connection between the unit and
amplifier is in place.
Clean the disc.
Moisture has condensed in the unit. Remove the
disc and leave the unit on for about an hour.
The unit doesn't operate normally
●
Disconnect the power plug and insert it into the wall
outlet again.
Bad sound quality
●
There is no disc in the unit.
Put the disc on the disc tray properly with the label
side up.
Remote control does not work
●
●
●
Remove barriers between the remote control and the
unit.
Point the remote control at the remote control sensor
of the unit.
Replace the batteries with new ones.
This product incorporates copyright protection technology that is protected by method claims of certain U.S. patents and other
intellectual property rights owned by Macrovision Corporation and other rights owners. Use of this copyright protection technology
must be authorized by Macrovision Corporation, and is intended for home and other limited viewing uses only unless otherwise
authorized by Macrovision Corporation. Reverse engineering or disassembly is prohibited.
page46
TECHNICAL SPECIFICATIONS
Laser
Video system
Frequency response
Signal/noise ratio
Wavelength 650nm
NTSC
20Hz ~ 20KHz±2.5dB
≥80dB
Audio distortion + noise
≤- 60dB (1KHz)
Channel separation
≥80dB ( 1KHz)
Dynamic range
≥80dB ( 1KHz)
Audio out
(analog audio)
Output
output level:
+0.2V
2V -0.5V
Load impedance: 10K Ω
output level:
1Vp-p±20%
Video out
Load impedance: 75 Ω, imbalance, negative polarity
Power supply
Power Consumption
AC100-240V, 50/60Hz
≤20W
This manual is only for your reference, any change to the design and specifications will not be advised.
page47