1
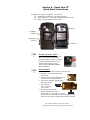
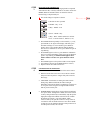
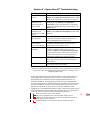
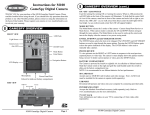
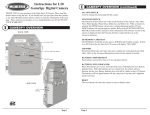
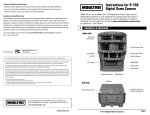
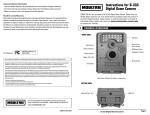
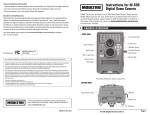
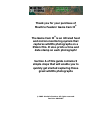
Thank you for your purchase of Moultrie Feeders’ Game Cam II® The Game Cam II® is an infrared heat and motion monitoring system that captures wildlife photographs on a 35mm film. It also prints a time and date stamp on each photograph! Section A of this guide contains 5 simple steps that will enable you to quickly get started capturing those great wildlife photographs © 2003. Moultrie Feeders. All rights reserved. Revision #012103 Section A - Game Cam II® Quick Start Instructions In addition to the supplied equipment, you will need: Rechargeable or alkaline 6-volt spring-top battery 35mm camera film – 800 speed recommended for best results Bungee cord for mounting Game Cam II Camera Low Battery Indicator Configuration Switches 6V Battery STEP 1 BATTERY INSTALLATION Open Game Cam II case as illustrated above. To install the 6-volt battery, attach black alligator clip to (-) terminal of battery and red alligator clip to (+) terminal. Place battery in case as shown. DO NOT PUT BATTERIES INTO CAMERA. STEP 2 FILM LOADING • Lift camera from Game Cam II case and turn over. • Slide back cover latch down to open camera back. • Turn the camera on by sliding the switch under the lens to the right as shown. • Insert film in chamber and pull film to film stop as shown. • Close the back cover. It will close with a “click”. • The film will automatically advance until display at top of camera reads “1”; if it flashes “0”, film is loaded incorrectly and must be reloaded according to same directions. Turn camera off until Game Cam II is mounted. For picture number to be read correctly, top display must be read when facing back of camera STEP 3 DATE OR TIME IMPRINTING Camera mode can be set so each photograph will be imprinted with either the date, or the day and time it was taken. Locate the MODE, SELECT and SET buttons on camera back. Press buttons using a soft pointed object. ⎫• The modes change in sequence as shown. a) No date or time is printed b) Month – Day – Year c) Day – Month – Year d) Year – Month – Day e) Day – Hour – Minute (Hour uses 24 hour clock – 12 noon is hour 12, 1PM is 13, etc.) • • • • • STEP 4 Press MODE button repeatedly to select mode b), c), or d); press SELECT; one figure in the display will flash; press SET until it changes to correct number; press SELECT again to move to next number. Repeat until all numbers have been set. When date is correct, press SELECT again to stop flashing. Press MODE again to select e); press SELECT and SET as above to set hour and minutes; when correct press SELECT again to stop flashing; a solid line should appear above minute number. If it does not, press SELECT until it does. Press MODE again to select preferred date or time imprint. If no imprint is desired, press MODE button to select a). Replace camera into Game Cam II case. CONFIGURATION SWITCHES Locate the three switches inside the door of the Game Cam II. • DELAY switch allows selection of 15 second or 6 minute delay time between pictures. Longer delay time conserves film usage. • AIM LIGHT switch assists in aiming the Game Cam II during setup. When turned ON, the amber aim light illuminates each time the Game Cam II detects a presence in its view path. After setup, the aim light should be turned OFF to preserve battery life. • POWER MODE switch allows selection between High and Low power mode. In High Power Mode, the camera’s flash is always charged and ready to immediately snap the perfect night photo. High Power Mode is ideal for areas in which the animals are moving. Low Power Mode, which conserves battery life, puts the camera to “sleep” until it is “awakened“ when an animal is detected. Low Power Mode is ideal for areas in which the animals remain present for an extended period of time, like a feeder. Form STEP 5 MOUNTING AND SETUP • Select a location for the Game Cam II. This might be facing a feeder, a trail through the woods, or another area frequented by animals to be photographed. Mount the Game Cam II on a tree or post at about 2-3 feet above the ground using a bungee cord through the metal eyelets at back of the case. • Turn on the AIM LIGHT (refer to STEP 4, above). • To test setup, a person can move into the Game Cam II operating range (refer to the Specifications section of this document for details) and note when AIM LIGHT illuminates. Adjust mounting of Game Cam II as necessary. • When camera is properly aimed, turn AIM LIGHT OFF for camera concealment and to preserve battery life. • Turn the camera on by sliding the switch under the lens to the right • Securely close and latch the door. • Game Cam II is now ready for operation. Section B - Game Cam II® Camera Details Mid-roll Rewinding The camera can rewind the film mid-roll for removal and processing. Using a soft pointed object, press the rewind button on the top of the camera as shown. To avoid damaging buttons, apply only light pressure and do not use a sharp object. Top Camera Buttons The two additional buttons on the top of the camera, Flash and Photo Delay, should not be used. If accidentally activated, pressing the button again will turn them OFF (as indicated on the top display). Section C - Game Cam II® Performance Optimization It is recommended that the following service be performed on the Game Cam II. The frequency in which this service is performed is based on the amount of wildlife activity, at least every two weeks. Item Film count Battery Final Check Instructions • Open the door on the Game Cam II • Check the number of photos taken on the top display of the camera. For picture number to be read correctly, top display must be read when facing back of camera. If all photos have been taken, which is indicated by a “0” on the top display, replace the film following STEP 2 of the Quick Start Instructions section of this document. Under typical operating conditions, it is recommended that the battery be replaced each time the film is replaced. However, if battery is replaced while a partially used film is loaded, the old battery must be swapped with new battery within 15 seconds to retain the picture/film count. Please refer to the Specifications Section for details regarding battery life. • Close and securely latch the door Section D - Game Cam II® Specifications 6V Battery 6V Battery life Low Battery Indicator Sensor Type Operating Range Film Size Film Speed Flash Focus Film Rewind Data Backup Security 6-Volt Alkaline Spring Top - (ex. Energizer No. 529) or Rechargeable. High Power Mode- Approximately 10 days with a 5Ah rechargeable battery or 20 days with an Energizer 529 battery. In Low Power Mode, the battery life will be about twice that of High Power Mode. The Low Battery Indicator is located just above the Configuration Switches on the inside panel of the front door. If the Low Battery Indicator light is ON for periods longer than 10 seconds, the battery is low and needs to be replaced. If the battery has not been checked or replaced for an extended period of time, it is possible that the battery is too low to illuminate the Low Battery Indicator. Infrared. Heat and motion detector 5 feet to 28 feet for best results 35mm ISO 100, 400, or 800 (800 is recommended for best results) Automatic Automatic Automatic – displays a “0” on top display when rewound Date and time via an internal Lithium battery CR2025 Place a lock through the plastic holes on the door tab. A cable may also be inserted through lock and around tree. Section E - Game Cam II® Troubleshooting Symptom “E” on top display of camera Aim light does not illuminate when moving in front of Game Cam II Aim light illuminates, but camera does not take picture Battery life is shorter than specified Camera stuck in the rewind mode – motor keeps running No time/date stamp on photos Photos are blurry Range too short Try This E indicates there is no film installed. Load film using STEP 2 in the Quick Start Instructions section of this document. Be careful not to confuse the “E” with a “3”. Verify that the 6V spring top battery is properly installed following STEP 1 in the Quick Start Instructions section of this document. Verify that the Aim Light configuration switch is turned ON (refer to STEP 4 above). Verify that the camera is turned ON as described in STEP 5 in the Quick Start Instructions section of this document. Verify that a Alkaline battery is being used. If the battery does not indicate “Alkaline” on the case, it is NOT recommended for the Game Cam II . Visually inspect the small rewind button on the top of the camera to determine if it is stuck in the down position. If it is, use a pencil to free it. Verify that the solid black line is over the top of the last two digits on the back display of the camera as described in STEP 3 of the Quick Start Instructions section of this document. If this does not resolve the problem, call Customer Service for instructions on replacing the CR2025 battery inside the camera. Confirm that the lens on the camera is clean. Assure that no leaves and/or brush are blocking the Game Cam II Extreme temperatures could have a diminishing effect on the Game Cam II’s performance. If you need additional assistance, our customer service representatives are here to help you at (205) 664-6700 during the hours of 8:00 a.m. to 5:00 p.m. CST Monday through Friday. NOTE: This equipment has been tested and found to comply with the limits for Class B digital device, pursuant to Part 15 of the FCC rules. These limits are designed to provide reasonable protection against harmful interference in a residential installation. This requirement generates, uses and can radiate radio frequency energy and, if not installed and used in accordance with the instructions, may cause harmful interference to radio communications. However, there is no guarantee that interference will no occur in a particular installation. If this equipment does cause harmful interference to radio or television reception, which can be determined by turning the equipment on and off, the user is encouraged to correct the interference by one of more of the following measures: θ• Reorient or relocate the receiving antenna θ• Increase the separation between the equipment and the receiver θ• Connect the equipment into an outlet on a circuit different from that to which the receiver is connected θ• Consult the dealer or an experience radio/TV technician for help Form